
Automate (repeatable) creation of Windows server within VMware Fusion images to make Vagrant boxes on macOS
![]()
![]()
![]()
![]()
![]()
![]()
![]()
![]()
![]()
![]()
![]()
![]()
![]()
Overview
This tutorial contains hands-on step-by-step instructions to create a Windows 2016 server within a Mac laptop (the host machine), using software from HashiCorp: Packer, Vagrant, Atlas. This is more of a deep dive than others, as it explains the intricacies for troubleshooting, with commentary flagged as “PROTIP” along the way.
NOTE: Content here are my personal opinions, and not intended to represent any employer (past or present). “PROTIP:” here highlight information I haven’t seen elsewhere on the internet because it is hard-won, little-know but significant facts based on my personal research and experience.
https://www.packer.io/
 Click to pop-up this image
Install Packer on macOS
Use one of several ways to install Packer on a macOS Terminal window:
A. The easiest way to install and use Packer on macOS is use my mac-setup.sh shell script.
./mac-setup.sh -v -packer
curl -O https://raw.githubusercontent.com/wilsonmar/mac-setup/master/mac-install.sh
B. To do a one-off install of Packer on your laptop using Homebrew</a>. VIDEO:
brew install packerThis approach lets you later use brew to update Packer to the latest version and even uninstall it:
brew uninstall packerBut brew installs the latest version of Packer, which may not be the version you want.
C. The most flexible way is to use the bash script (written by HashiCorp Engineer Robert Peteuil) which detects host architecture, searches for releases, downloads, verifies and installs binaries. Optional parameters allow finding latest patch releases, retrieving enterprise binaries, and functioning in special modes.
- At a folder where you want to add external repos:
git clone https://github.com/robertpeteuil/hashicorp-installer --depth 1
cd hashicorp-installer
chmod +x hcinstall.sh
./hcinstall.sh -p packer
Packer version 1.9.4 installed to /usr/local/bin
D. Use Rober Peteuil’s https://iac.sh to install Packer:
curl iac.sh/packer | shI don't use this because it does not let you update Packer to the latest version nor uninstall it.
Whichever way, verify the install:
packer --version
1.9.4 is the latest version as of this writing.
Docker Hello World
After Packer and Docker are installed, and Docker Engine is running:
This example build.pkr.hcl file makes use of Hashicorp’s Docker builder plugin to build a Docker image that prints “Hello, World!” to the console on Gruntwork’s Ubuntu image.
- In a folder named gruntwork
-
Create a file named build.pkr.hcl with this content (which is a HCL version of the JSON file):
packer { required_plugins { docker = { version = ">=v1.0.1" source = "github.com/hashicorp/docker" } } } source "docker" "ubuntu-docker" { changes = ["ENTRYPOINT [\"\"]"] commit = true image = "gruntwork/ubuntu-test:16.04" } build { sources = ["source.docker.ubuntu-docker"] provisioner "shell" { inline = ["echo 'Hello, World!' > /test.txt"] } post-processor "docker-tag" { repository = "gruntwork/packer-hello-world-example" tag = ["latest"] } } -
Run
packer init build.pkr.hcl
Installed plugin github.com/hashicorp/docker v1.0.8 in "/Users/wilsonmar/.packer.d/plugins/github.com/hashicorp/docker/packer-plugin-docker_v1.0.8_x5.0_darwin_amd64"
-
Run
packer build build.pkr.hcl
docker.ubuntu-docker: output will be in this color.
==> docker.ubuntu-docker: Creating a temporary directory for sharing data...
==> docker.ubuntu-docker: Pulling Docker image: gruntwork/ubuntu-test:16.04
 docker.ubuntu-docker: 16.04: Pulling from gruntwork/ubuntu-test
...
 docker.ubuntu-docker: 42e674202424: Pull complete
 docker.ubuntu-docker: 075070dca424: Pull complete
 docker.ubuntu-docker: 76fdf21dc491: Pull complete
 docker.ubuntu-docker: Digest: sha256:aed71132b5cf1facc84ed57c3206cc481156ec0ba6825750813d03e64e8819b6
 docker.ubuntu-docker: Status: Downloaded newer image for gruntwork/ubuntu-test:16.04
 docker.ubuntu-docker: docker.io/gruntwork/ubuntu-test:16.04
 docker.ubuntu-docker: What's Next?
 docker.ubuntu-docker: View a summary of image vulnerabilities and recommendations → docker scout quickview gruntwork/ubuntu-test:16.04
==> docker.ubuntu-docker: Starting docker container...
 docker.ubuntu-docker: Run command: docker run -v /Users/wilsonmar/.packer.d/tmp3825516417:/packer-files -d -i -t --entrypoint=/bin/sh -- gruntwork/ubuntu-test:16.04
 docker.ubuntu-docker: Container ID: 0a6ffdae00f9e4a4bbcc73092a9e922d972013767b790f2faa50cee83b8c1ad1
==> docker.ubuntu-docker: Using docker communicator to connect: 172.17.0.2
==> docker.ubuntu-docker: Provisioning with shell script: /var/folders/vv/ndwywgwj52j1t92_bqd_q7ym0000gn/T/packer-shell790104074
==> docker.ubuntu-docker: Committing the container
 docker.ubuntu-docker: Image ID: sha256:523ae577a7155c26e884f340d9f2a696ee725c6d30341132bef40e4f261b792d
==> docker.ubuntu-docker: Killing the container: 0a6ffdae00f9e4a4bbcc73092a9e922d972013767b790f2faa50cee83b8c1ad1
==> docker.ubuntu-docker: Running post-processor:  (type docker-tag)
==> docker.ubuntu-docker (docker-tag): Deprecation warning: "tag" option has been replaced with "tags". In future versions of Packer, this configuration may not work. Please call `packer fix` on your template to update.
 docker.ubuntu-docker (docker-tag): Tagging image: sha256:523ae577a7155c26e884f340d9f2a696ee725c6d30341132bef40e4f261b792d
 docker.ubuntu-docker (docker-tag): Repository: gruntwork/packer-hello-world-example:latest
Build 'docker.ubuntu-docker' finished after 31 seconds 837 milliseconds.
==> Wait completed after 31 seconds 838 milliseconds
==> Builds finished. The artifacts of successful builds are:
--> docker.ubuntu-docker: Imported Docker image: sha256:523ae577a7155c26e884f340d9f2a696ee725c6d30341132bef40e4f261b792d
--> docker.ubuntu-docker: Imported Docker image: gruntwork/packer-hello-world-example:latest with tags gruntwork/packer-hello-world-example:latest
-
Run Docker:
docker run -it --rm gruntwork/packer-hello-world-example cat /test.txt
Hello, World!
Packer template samples
- https://www.middlewareinventory.com/blog/packer-aws-terraform-example/ by Sarav Thangaraj
Packer template files are in JSON format and consist of three parts:
- Builders define what images are to be create and for which technology/platform (such as AWS, DOCKER, VirtualBox, OpenStack, etc.).
- provisioners list of built-in or external configuration on management tools like Shell script, Ansible playbook, Chef, PowerShell etc.
- Post-Processors optionally act after the image is built by the builder and provisioned by the provisioner(s).
Rather than hard-coded and exposed, variables in templates using the -var-file option so values can be passed into the template. Values for variables are defined in a separate file outside of GitHub repos.
Packer encourages the use of a framework such as Chef or Puppet to install and configure software within Packer-made images.
https://devopscube.com/packer-tutorial-for-beginners/
https://medium.com/techno101/packer-a-complete-guide-with-example-cf062b7495eb
https://github.com/SwampDragons/packer-examples are for Windows and Ubuntu
https://developer.hashicorp.com/packer/tutorials/docker-get-started/docker-get-started-build-image
https://github.com/vmware-samples/packer-examples-for-vsphere
https://docs.tritondatacenter.com/public-cloud/api/hashicorp/packer
Vagrant vs. Docker
You may think that orial is rather dated because many are migrating from Vagrant images to Docker and Kubernetes.
Individual Vagrant box images are Gigabytes (many times) larger than Docker “containers”, and thus take more RAM as well. This is because Vagrant box images contain the entire operating system whereas Docker separates out shared components. See my “Docker setup tutorial”.
But know that Vagrant has been around longer than Docker. So some consider it more “mature”, stable, “simpler to understand” than Docker.
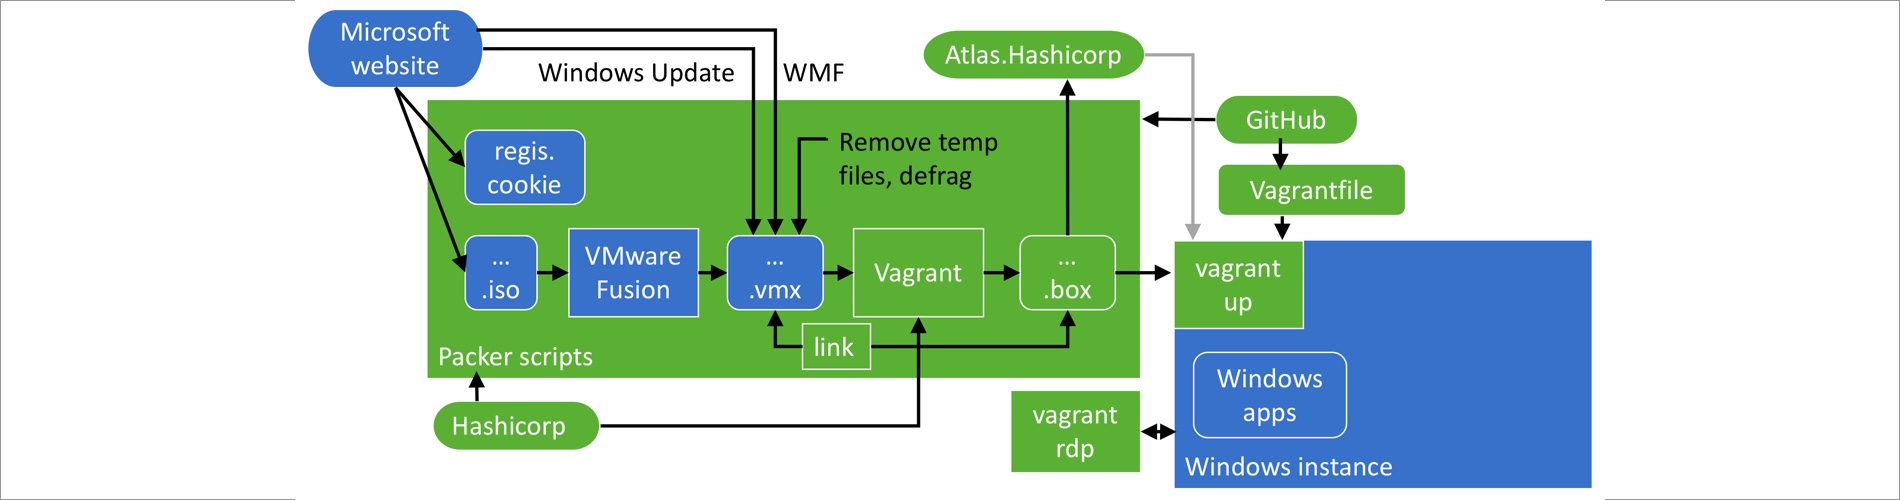
The workflow begins with manually registering with Microsoft for download of a large installer file (an ISO image) that’s like what is on a DVD. To automate this on macOS we download from GitHub a script processed by Packer from HashiCorp.
We need to automate this because Microsoft limits its free license to 180 days (6 months). This building from scatch is like buying a new computer. You’ll have the very latest versions of all software. This is important to keep up with changes without spending what usually takes days.
The script downloads the iso file to create a VMware Fusion server image. VMware is needed for nested virtualization of Windows HyperV containers. A Windows Update is applied to get the latest security patches. Agents for accessing the machine within Azure and other clouds is added, called WMF (Windows Management Framework).
We then keep the image small by removing unneeded files and defragmenting the disk.
The VMware image can then be converted to a box image in a format used by Vagrant (from HashiCorp) so that it can be made available for download from a repository of Vagrant box images called Atlas that HashiCorp has made available.
BTW, HashiCorp also has a licensed utility that dynamically updates the Vagrant file when changes are made in the VMWare image.
Having images in the cloud means that one line in a Vagrantfile obtained from GitHub is all that’s needed for Vagrant to bring up a Windows machine.
Hashicorp provides a Vagrant RDP program for GUI access the Windows instance. Custom Windows apps can be added inside this Windows server.
to create Dockerized images such as Windows Docker Containers. The images are pushed up to DockerHub so others can use it to run as isolated instances on Windows server machines in production.
Windows since 8.1, 10 Business editions came with Hyper-V installed. Small VM’s of Ubuntu using RTcamps EasyEngine. Simple to spin up a new instance of WordPress. Great for debugging and testing and the connecting of SFTP with PHPstorm makes everything sync easily.
- create a container running https://github.com/jwilder/nginx-proxy on port 80. Then specify a VIRTUAL_HOST environment variable when creating other containers to give them a domain name.
Steps
TODO:
-
Be inside a Terminal window, on any directory.
VMWare Fusion install on macOS
Install VMware Fusion for macOS (not the Pro edition) for its drivers.
CAUTION: Homebrew not an option;
brew search vmware
The response (at date of writing):
Error: Cask vmware-fusion-tech-preview exists in multiple taps:
  homebrew/cask-versions/vmware-fusion-tech-preview
  caskroom/versions/vmware-fusion-tech-preview
PROTIP: New brew versions lag behind what is available online for download.
-
To avoid “File not found” errors after install, if you have an existing version, in the macOS Dock at the edge of a screen, right-click on the VMWare Fusion app icon to see images have been installed:

QUESTION: Where are these files?
Vagrant install
-
Install Vagrant using Homebrew:
export HOMEBREW_CASK_OPTS="--appdir=/Applications"
brew install --cask vagrant
-
To avoid issues, delete the curl program from Vagrant so your Mac’s program is used:
sudo rm /opt/vagrant/embedded/bin/curl
All Vagrant commands
-
List Vagrant commands:
vagrant
Example:
Usage: vagrant [options] command> [args>]

 -v, --version                    Print the version and exit.
 -h, --help                       Print this help.

Common commands:
  box             manages boxes: installation, removal, etc.
  connect         connect to a remotely shared Vagrant environment
  destroy         stops and deletes all traces of the vagrant machine
  global-status   outputs status Vagrant environments for this user
  halt            stops the vagrant machine
  help            shows the help for a subcommand
  init            initializes a new Vagrant environment by creating a Vagrantfile
  login           log in to HashiCorp's Vagrant Cloud
  package         packages a running vagrant environment into a box
  plugin          manages plugins: install, uninstall, update, etc.
  port            displays information about guest port mappings
  powershell      connects to machine via powershell remoting
  provision       provisions the vagrant machine
  push            deploys code in this environment to a configured destination
  rdp             connects to machine via RDP
  reload          restarts vagrant machine, loads new Vagrantfile configuration
  resume          resume a suspended vagrant machine
  share           share your Vagrant environment with anyone in the world
  snapshot        manages snapshots: saving, restoring, etc.
  ssh             connects to machine via SSH
  ssh-config      outputs OpenSSH valid configuration to connect to the machine
  status          outputs status of the vagrant machine
  suspend         suspends the machine
  up              starts and provisions the vagrant environment
  validate        validates the Vagrantfile
  version         prints current and latest Vagrant version

For help on any individual command run `vagrant COMMAND -h`

Additional subcommands are available, but are either more advanced
or not commonly used. To see all subcommands, run the command
`vagrant list-commands`.
Vagrant VMware install
-
Install the Vagrant Fusion plugin from HashiCorp:
vagrant plugin install vagrant-vmware-fusion
The response at time of writing:
Installing the 'vagrant-vmware-fusion' plugin. This can take a few minutes...
Fetching: vagrant-vmware-fusion-5.0.4.gem (100%)
Building native extensions.  This could take a while...

Vagrant is installing the VMware plugin which requires
root access. You may be prompted for your password to
complete setup.

Installed the plugin 'vagrant-vmware-fusion (5.0.4)'!
-
Pay $79 for the license at https://www.vagrantup.com/vmware/index.html
Vagrant plugin usage documentation is at: https://docs.vagrantup.com/v2/plugins/usage.html
- Open the email from HashiCorp. Click the link. Click “click here” to download the
license.licfile. -
Construct the command with the name of the license file within the Downloads folder:
vagrant plugin license vagrant-vmware-fusion ~/Downloads/hashicorp-vagrant-license.lic
The response:
Installing license for 'vagrant-vmware-fusion'...
The license for 'vagrant-vmware-fusion' was successfully installed!
QUESTION: What is the name of the provider to use?
Packer from GitHub
Packer (at packer.io) is from HashiCorp who created Vagrant. It is a cross-vendor utility that builds images used by VMware and cloud providers: Amazon EC2, CloudStack, DigitalOcean, Docker, Google Compute Engine, Microsoft Azure, QEMU, VirtualBox.
-
Install Packer using Homebrew, which places commands in a public folder so you don’t have to add it to your PATH:
brew install packer
-
Create a folder to house various repositories from GitHub:
cd ~
mkdir gits
cd gits
Alternately, some prefer
dev. -
Create a folder to house repositories around a subject, such as virtual machines:
cd ~/gits
mkdir vms
cd vms
Alternately, use your own “subject” folder.
-
Get the Packer scripts (just the latest version):
git clone https://github.com/StefanScherer/packer-windows --depth=1
cd packer-windows
Sample response:
Cloning into 'packer-windows'...
remote: Counting objects: 178, done.
remote: Compressing objects: 100% (142/142), done.
remote: Total 178 (delta 47), reused 93 (delta 11), pack-reused 0
Receiving objects: 100% (178/178), 135.62 KiB | 0 bytes/s, done.
Resolving deltas: 100% (47/47), done.
-
Use a text editor to view file
windows_2016_docker.json.The sections are “builder”, “provisioners”, “Post-processors”, and “variables”.
The “iso_url” variable defines the URL to get the Windows 2016 disk image.
WARNING: The URL changes over time.
Register for Windows ISO file
-
Get to the page providing downloads of Windows Server 2016 Evaluation edition good for 180 days:
https://www.microsoft.com/en-us/evalcenter/evaluate-windows-server-2016/
We come to this page to get a cookie for a Packer script to download.
- Click Register, and provide your info.
- Select “ISO” (not Azure or Virtua Lab). Click Continue.
- Fill in your name, work email, country, etc. Click Continue.
- Select “English” language. Click Download.
-
Cancel the download of file:
14393.0.161119-1705.RS1_REFRESH_SERVER_EVAL_X64FRE_EN-US.iso
Leave it to the Packer to download the file, but we want to make sure that it downloads the most recent file Microsoft has.
PROTIP: The file at time of writing is a whopping 6.5 GB! So it may take hours to download, depending on how fast your internet connection is.
Packer pulls the installer and runs it
-
To have Packer download the big .iso file from Microsoft: It’s big so it will take a long time.
While in the packer-windows folder, use the Packer file windows_2016_docker.json in the repo from Stefan:
packer build --only=vmware-iso windows_2016_docker.json
Note one of the response lines from it:
==> vmware-iso: Downloading or copying: http://care.dlservice.microsoft.com/dl/download/1/4/9/149D5452-9B29-4274-B6B3-5361DBDA30BC/14393.0.161119-1705.RS1_REFRESH_SERVER_EVAL_X64FRE_EN-US.ISO
 vmware-iso: Download progress: 1%
 ==> vmware-iso: Creating floppy disk...
 vmware-iso: Copying files flatly from floppy_files
 vmware-iso: Copying file: ./answer_files/2016_core/Autounattend.xml
 vmware-iso: Copying file: ./scripts/disable-screensaver.ps1
 vmware-iso: Copying file: ./scripts/disable-winrm.ps1
 vmware-iso: Copying file: ./scripts/docker/enable-winrm.ps1
 vmware-iso: Copying file: ./scripts/docker/2016/install-containers-feature.ps1
 vmware-iso: Copying file: ./scripts/microsoft-updates.bat
 vmware-iso: Copying file: ./scripts/win-updates.ps1
 vmware-iso: Done copying files from floppy_files
 vmware-iso: Collecting paths from floppy_dirs
 vmware-iso: Resulting paths from floppy_dirs : []
 vmware-iso: Done copying paths from floppy_dirs
==> vmware-iso: Creating virtual machine disk
==> vmware-iso: Building and writing VMX file
==> vmware-iso: Starting virtual machine...
</pre>
Packer stores the installer into a folder named “packer_cache”. So to run using what has already been downloaded:
packer build --only=vmware-iso windows_2016_docker.json --var iso_url=~/gits/vms/packer-windows/packer_cache/49f719e23c56a779a991c4b4ad1680b8363918cd0bfd9ac6b52697d78a309855.iso
NOTE: This is also MSDN file en_windows_server_2016_x64_dvd_9718492.iso
PROTIP: The Packer command can be restarted and it restarts where it left off on partial downloads. Once downloaded, it knows to not download again.
The rest of the response:
    vmware-iso: Download progress: 100%
==> vmware-iso: Creating floppy disk...
    vmware-iso: Copying files flatly from floppy_files
    vmware-iso: Copying file: ./answer_files/2016/Autounattend.xml
    vmware-iso: Copying file: ./floppy/WindowsPowershell.lnk
    vmware-iso: Copying file: ./floppy/PinTo10.exe
    vmware-iso: Copying file: ./scripts/disable-screensaver.ps1
    vmware-iso: Copying file: ./scripts/disable-winrm.ps1
    vmware-iso: Copying file: ./scripts/docker/enable-winrm.ps1
    vmware-iso: Copying file: ./scripts/docker/2016/install-containers-feature.ps1
    vmware-iso: Copying file: ./scripts/microsoft-updates.bat
    vmware-iso: Copying file: ./scripts/win-updates.ps1
    vmware-iso: Done copying files from floppy_files
    vmware-iso: Collecting paths from floppy_dirs
    vmware-iso: Resulting paths from floppy_dirs : []
    vmware-iso: Done copying paths from floppy_dirs
==> vmware-iso: Creating virtual machine disk
==> vmware-iso: Building and writing VMX file
==> vmware-iso: Starting virtual machine...
### VMware Fusion Internal Error
On occassion, my VMware Fusion 8.5 displays “Internal error” upon starting an image.
==> vmware-iso: Error starting VM: VMware error: Error: Cannot connect to the virtual machine
==> vmware-iso: Deleting output directory...
Build 'vmware-iso' errored: Error starting VM: VMware error: Error: Cannot connect to the virtual machine

==> Some builds didn't complete successfully and had errors:
--> vmware-iso: Error starting VM: VMware error: Error: Cannot connect to the virtual machine

==> Builds finished but no artifacts were created.
PROTIP: The Packer command can be restarted and it restarts where it left off
### Windows Desktop Update
Packer shows this message while it constructs a Windows instance:
==> vmware-iso: Waiting for WinRM to become available...
A cmd.exe window appears to display messages about the Update process, which can take a while.
Checking for Windows Updates
Script: A:\win-updates.ps1
Script User: VAGRANT-2016\vagrant
Started: 9/18/2017 12:30:58 AM
We wait (with no countdown UI) while this appears:
Downloading updates...
WARNING: If Windows Update is interrupted, Packer will start again with a new instance of VMware Fusion image, and download again.
TODO: Contact them and see if we can avoid re-downloading.
-
PROTIP: Keep your laptop plugged into a power source and a (preferrably fast) network.
-
PROTIP: Keep the macOS screen from going to sleep: choose Apple menu > System Preferences, click Energy Saver. Drag the “Display sleep” to “Never”.
PROTIP: To move mouse beyond the Windows machine, press command+Tab until the process you want is highlighted.
The WindowsServer2016Docker.vmx file that VMware Fusion opens is created inside the output-vmware-iso folder. However, this folder is moved to:
~/.vagrant.d/boxes/windows_2016_docker/0/vmaware_desktop/WindowsServer2016Docker.vmxwhen you see:
Build 'vmware-iso' finished.
==> Build finished. The artifacts of successful builds are:
--> vmware-iso: 'vmware' provider box: windows_2016_docker_vmware.box
The .box file is created in the GitHub root level directory.
Custom applications are added within the Vagrant image, not in the .vmx image.
Add box
vagrant box add windows_2016_docker windows_2016_docker_vmware.box
The response:
 detected as metadata. Adding it directly...
==> box: Adding box 'windows_2016_docker' (v0) for provider:
 box: Unpacking necessary files from: file:///Users/wilsonmar/gits/vms/packer-windows/windows_2016_docker_vmware.box
==> box: Successfully added box 'windows_2016_docker' (v0) for 'vmware_desktop'!
PROTIP: The above command adds to folder
~/.vagrant.d/boxes/under your user home. -
List Vagrant boxes (to verify):
vagrant box list
The response should be:
windows_2016_docker (vmware_desktop, 0)
Vagrantfile
-
To create a bare-bones Vagrantfile:
vagrant init windows_2016_docker windows_2016_docker_vmware.box
CAUTION: This overwrites an existing Vagrantfile if one exists.
The response:
A `Vagrantfile` has been placed in this directory. You are now
ready to `vagrant up` your first virtual environment! Please read
the comments in the Vagrantfile as well as documentation on
`vagrantup.com` for more information on using Vagrant.
Alternately, copy
vagrantfile-windows_2016.templatefrom the GitHub repo ontoVagrantfilecp vagrantfile-windows_2016.template Vagrantfile
PROTIP: By default, macOS does not recognize “.template” as a file to be edited, so after right-clicking such a file, select Open With, then “Other” to select your favorite text editor (Sublime Text, Atom, etc.)
Enable Windows RDP
-
Edit the Vagrantfile to reference the name of the box file in the vagrant add above</a>:
 config.vm.define "windows_2016_docker"
 config.vm.box = "windows_2016_docker_vmware.box"
-
Notice the specification of the Windows user name and password:
 # Admin user name and password
 config.winrm.username = "vagrant"
 config.winrm.password = "vagrant"
-
Install WMF 5.0 (Windows Management Framework) PowerShell.
WARNING: Windows 10 / Server 2016 has WMF/PowerShell 5 pre-installed which is maintained by Windows Updates.
Vagrant Up
-
Bring up Vagrant .box in the folder:
vagrant up
QUESTION: Add
vagrant up \-\-provider vmware_fusion?The response:
Bringing machine 'default' up with 'vmware_fusion' provider...
==> default: VMware requires root privileges to make many of the changes
==> default: necessary for Vagrant to control it. In a moment, Vagrant will ask for
==> default: your administrator password in order to install a helper that will have
==> default: permissions to make these changes. Note that Vagrant itself continues
==> default: to run without administrative privileges.
==> default: Box 'windows_2016_docker' could not be found. Attempting to find and install...
 default: Box Provider: vmware_desktop, vmware_fusion, vmware_workstation
 default: Box Version: >= 0
==> default: Box file was not detected as metadata. Adding it directly...
==> default: Adding box 'windows_2016_docker' (v0) for provider: vmware_desktop, vmware_fusion, vmware_workstation
 default: Unpacking necessary files from: file:///Users/wilsonmar/gits/vms/packer-windows/windows_2016_docker_vmware.box
==> default: Successfully added box 'windows_2016_docker' (v0) for 'vmware_desktop'!
==> default: Cloning VMware VM: 'windows_2016_docker'. This can take some time...
==> default: Verifying vmnet devices are healthy...
==> default: Preparing network adapters...
WARNING: The VMX file for this box contains a setting that is automatically overwritten by Vagrant
WARNING: when started. Vagrant will stop overwriting this setting in an upcoming release which may
WARNING: prevent proper networking setup. Below is the detected VMX setting:
WARNING:
WARNING:   ethernet0.pcislotnumber = "33"
WARNING:
WARNING: If networking fails to properly configure, it may require this VMX setting. It can be manually
WARNING: applied via the Vagrantfile:
WARNING:
WARNING:   Vagrant.configure(2) do |config|
WARNING:     config.vm.provider :vmare_fusion do |vmware|
WARNING:       vmware.vmx["ethernet0.pcislotnumber"] = "33"
WARNING:     end
WARNING:   end
WARNING:
WARNING: For more information: https://www.vagrantup.com/docs/vmware/boxes.html#vmx-whitelisting
==> default: Starting the VMware VM...
==> default: Waiting for machine to boot. This may take a few minutes...
 default: WinRM address: 192.168.182.129:5985
 default: WinRM username: vagrant
 default: WinRM execution_time_limit: PT2H
 default: WinRM transport: negotiate
==> default: Machine booted and ready!
==> default: Forwarding ports...
 default: -- 3389 => 3389
 default: -- 22 => 2222
 default: -- 5985 => 55985
 default: -- 5986 => 55986
 default: WinRM address: 192.168.182.129:5985
 default: WinRM username: vagrant
 default: WinRM execution_time_limit: PT2H
 default: WinRM transport: negotiate
==> default: Configuring network adapters within the VM...
==> default: Configuring secondary network adapters through VMware
==> default: on Windows is not yet supported. You will need to manually
==> default: configure the network adapter.
==> default: Enabling and configuring shared folders...
 default: -- /Users/wilsonmar/gits/vms/packer-windows: /vagrant
The Windows Desktop should now appear.
-
Get the VMware Fusion menu by moving your mouse/trackpad cursor to the top of the screen. Select View > Single Window.
-
Select menu Window > Virtual Machine Library to see that the VMware instance is a “Linked clone” in directory
~/.vagrant.d/boxes/windows_2016_docker/0/vmaware_desktop/WindowsServer2016Docker.vmx
-
Click the entry within the VIRTUAL MACHINES list to return to the VMware Fusion instance.
-
Click the Windows icon and choose Shutdown.
-
In the VMWare Fusion Window > Virtual Machine Library, right-click on “packer-windows” to select “Create Full Clone”.
Boxster to add Windows apps
-
PROTIP: In the clone, add Windows apps using Terraform (or Ansible or PowerShell DSC) so that if something goes terribly wrong, you can begin anew with much less effort.
Within Windows, download the zip from boxstarter.org to install Chocolatey and its modules within PowerShell. Exit PowerShell when done.
For resiliancy of reboots, Boxstarter intercepts all Chocolatey install commands to check for pending reboots and reboots the machine automatically, then log the user back on and resume the installation. Boxstarter will even suspend Bitlocker, if enabled, to avoid prompts for the Bitlocker key upon reboot.
Vagrant Global Status
-
Get the id:
vagrant global-status
A sample response:
id       name    provider      state   directory
--------------------------------------------------------------------------------
16b921a  default vmware_fusion running /Users/wilsonmar/gits/vms/packer-windows

The above shows information about all known Vagrant environments
on this machine. This data is cached and may not be completely
up-to-date. To interact with any of the machines, you can go to
that directory and run Vagrant, or you can use the ID directly
with Vagrant commands from any directory. For example:
"vagrant destroy 1a2b3c4d"
RDP into Windows
-
Open another Terminal window to login to the new server via Microsoft’s Remote Desktop Protocol:
vagrant rdp
Alternately, open a Terminal window to login to the new server via SSH (Secure Shell) if port 22 was open.
Rockstars
Stefan Scherer.
- https://github.com/StefanScherer/docker-windows-box/
Matt Wrock (@mwrockx, hurryupandwait.io), Software Development Engineer at Chef Software
-
Lightweight Windows Vagrant Boxes with Packer [41:27] at HashiConf 19 Sep 2016. [4:08] shows file.
-
Creating windows base images using Packer and Boxstarter July 17, 2015
Matthew Hodgkins
- Best Practices with Packer and Windows with code at https://github.com/MattHodge/PackerTemplates/
Gaelcolas
- https://gaelcolas.com/2016/07/11/introduction-to-kitchen-dsc/
Others:
https://twitter.com/kikitux
-
unattended install of Visual Studio, SQL Server, IIS, Windows Updates and more from a chocolatey script stored as a gist using Boxstarter.org
Training
Sanjeev Thiyagarajan’s Automation with Hashicorp Packer:
- https://www.youtube.com/watch?v=tbv1lTF1wFU #1: Introduction mutable vs immutable infrastructure
- https://www.youtube.com/watch?v=M8nB46A9iVs #2: Windows Installation
- https://www.youtube.com/watch?v=vOlqThdX4C0 #3: Mac Installation
- https://www.youtube.com/watch?v=RSoir5KYNgY #4: Linux Installation
- https://www.youtube.com/watch?v=vOV74gevFgs #5: Building Your First AMI
- https://www.youtube.com/watch?v=TmMoTseT2Ow #6: Configuring Provisioners
For Grunwork’s Terratest:
- https://github.com/gruntwork-io/terratest/tree/master/examples/packer-docker-example
- https://gruntwork.io/repos/master/terratest/examples/terraform-packer-example#
- https://github.com/gruntwork-io/terratest/blob/master/examples/terraform-packer-example/main.tf
More on DevOps
This is one of a series on DevOps:
- DevOps_2.0
- ci-cd (Continuous Integration and Continuous Delivery)
- User Stories for DevOps
- Git and GitHub vs File Archival
- Git Commands and Statuses
- Git Commit, Tag, Push
- Git Utilities
- Data Security GitHub
- GitHub API
- Choices for DevOps Technologies
- Pulumi Infrastructure as Code (IaC)
- Java DevOps Workflow
- AWS DevOps (CodeCommit, CodePipeline, CodeDeploy)
- AWS server deployment options
- Cloud services comparisons (across vendors)
- Cloud regions (across vendors)
- Azure Cloud Onramp (Subscriptions, Portal GUI, CLI)
- Azure Certifications
- Azure Cloud Powershell
- Bash Windows using Microsoft’s WSL (Windows Subsystem for Linux)
- Azure Networking
- Azure Storage
- Azure Compute
- Digital Ocean
- Packer automation to build Vagrant images
- Terraform multi-cloud provisioning automation
-
Hashicorp Vault and Consul to generate and hold secrets
- Powershell Ecosystem
- Powershell on MacOS
- Jenkins Server Setup
- Jenkins Plug-ins
- Jenkins Freestyle jobs
- Docker (Glossary, Ecosystem, Certification)
- Make Makefile for Docker
- Docker Setup and run Bash shell script
- Bash coding
- Docker Setup
- Dockerize apps
- Ansible
- Kubernetes Operators
- Threat Modeling
- API Management Microsoft
- Scenarios for load
- Chaos Engineering