

Immutable declarative versioned Infrastructure as Code (IaC) and Policy as Code provisioning into AWS, Azure, GCP, and other clouds using Terragoat, Bridgecrew, and Atlantis team versioning GitOps
![]()
![]()
![]()
![]()
![]()
![]()
![]()
![]()
![]()
![]()
![]()
![]()
![]()
Overview
- Why Terraform?
- Secure Learning Tools and Ecosystem
- Terraform Usage Workflow Stages, Automated
- 1) Install base tools/utilities
- 2) Task Template to Install Utilities Locally
- 4) Obtain cloud credentials and network preferences
- 5) Get sample Terraform code
- AWS
- The calling shell script
- Add-on for Consul
- Azure
- 4) Terraform project conventions
- 6) Code cloud resources in HCL
- Links to Certification Exam Objectives
- Terraform vs. AWS Cloud Formation
- Installation options
- Configure Terraform logging
- Install Utilities
- Issues to look for
- Install Security Scanners
- Known-bad IaC for training
- Standard Files and Folders Structure
- variables.tf (vars.tf)
- main.tf
- Multi-cloud/service
- Credentials in tfvars
- .gitignore
- Upgrading Terraform version
- Reusable Modules
- Testing Terraform
- terraform init
- Terraform CLI Commands
- Terraform show
- Terraform apply
- Saving tfstate in S3 Backend
- Workspaces
- VPC Security Group
- Provisioners
- CDK for Terraform
- Create SSH key pair
- Atlantis on Terraform
- Social
- Rock Stars
- Tutorials
- References
- Configuration
- Identify versions
- Terraform tools
- References
- More on DevOps
This tutorial is a step-by-step hands-on deep yet succinct introduction to learn to use HashiCorp’s Terraform to build, change, and version resources running in multiple cloud platforms. The sequence of topics has been carefully arranged for quicker learning, based on various tutorials on this topic.
NOTE: Content here are my personal opinions, and not intended to represent any employer (past or present). “PROTIP:” here highlight information I haven’t seen elsewhere on the internet because it is hard-won, little-know but significant facts based on my personal research and experience.
Why Terraform?
terraform.io (HashiCorp’s marketing home page) says the product is a “tool for building, changing, and versioning infrastructure safely and efficiently”.
“Terraform makes infrastructure provisioning: Repeatable. Versioned. Documented. Automated. Testable. Shareable.”

Repeatable from versioning: Terraform provides a single consistent set of commands and workflow on all clouds. That is “future proofing” infastructure work.
Use of version-controlled configuration files in an elastic cloud means that the infrastructure Terraform creates can be treated as disposable. This is a powerful concept. Parallel production-like environments can now be created easily (without ordering hardware) temporarily for experimentation, testing, and redundancy for High Availability.
Secure Learning Tools and Ecosystem
Here is my proposal to ensure that cloud resources are secure when created, the first time and every time.
Although Terraform works on multiple clouds, to simplify the explanation here, we’ll focus on AWS for now.
Resources in AWS can be created and managed using several tools: manually using the AWS Management Console GUI or manually invoking on a Terminal running CLI (Command Line Interface) shell scripts or programs written to issue REST API calls. But many enterpise AWS users avoid using GUI and CLI and instead use an approach that provides versioning of Configuration as Code (IaC) in GitHub repositories, so you can go from dev to qa to stage to prod more quickly and securely.
Although AWS provides their own Cloud Formation language to describe what to provision in AWS, for various reasons, many prefer Terraform. Terraform files are commonly run within an automated CI/CD pipeline so that it is repeatable. Having configurations documented in GitHub enables drift detection which identifies differences between what is defined versus what is actually running.
The AWS Config service logs every change in configuration of resources. The AWS Security Hub service looks in logs for vulnerabilities to issue Findings based on its own “AWS Foundations” set of policies. AWS provides a webpage of recommendations for remediation, but only by using its own GUI or CloudFormation code, not Terraform coding.
More importantly, findings from AWS are raised for resource which have already been manifested on the internet, and thus vulnerable to public attack.
In today’s hostile internet, we can’t risk an incremental approach to achieving the security needed. We really need to achieve full “security maturity” in our Terraform code the first time we deploy it onto the internet.
PROTIP: We prevent vulnerabilities
Several vendors have created static scan programs. Checkov and TFSec have an interface to the popular VSCode text editor on laptops, which “shifts left” the work of security earlier in the development lifecycle.
The crucial skill needed today is expertise at manually editing Terraform files which are “bulletproof”.
One way to climb this steep learning curve is learning to learn known-good and fix known-bad sample Terraform code which are accompanied with policies used to detect violations. It’s even better to have each policy be associated with recommendations for remediating the Terraform code, along with tutorials about configuration options.
Because cloud services change all the time, a policy creator helps to keep up with all the polices needed. In the Terraform Cloud, policies are defined in the Sentinel language. Other vendors define policies in the Rego language processed by the OPA engine.
When a community of Terraform developers have policies which attest that Terraform code is known good, their templates can be Shareable and thus reduce both risk and much effort by others.
PROTIP: This approach is essentially TDD (Test Driven Development) applied to infrastructure code.
Atlantis provides a mechanism like GitHub Dependabot, which automatically creates Pull Requests containing remediations. Terraform Cloud provides a GUI to display them.
So here it is, our ecosystem your you to create secure Terraform, the first time and every time.
Recap

Terraform Usage Workflow Stages, Automated
PROTIP: Here is how to get started, from scratch, the quickest (and safest) way with the most automation:
- Install base tools/utilities locally on your mac.
- Use the GitHub Template to create your repo and use Task to install tools/utilities locally.
- Obtain sample Terraform code (from GitHub or Terraform.io module registry).
-
Obtain cloud credentials, network CIDR subnet definitions, and other preferences for your region(s) in AWS, Azure, GCP, etc., securely saved to and retrieved from a secure secrets vault.
- Define your Terraform project’s folders and files.
-
Code resources in HCL-formatted .tf files.
-
Use GitHub Actions to automatically kick off a CI/CD run instead of typing ad-hoc CLI commands to test Terraform.
- If defined, provisioners for remote-exec and local-exec (such as Ansible) are run on servers to configure their processes.
- Optionally, Generate a Dependency Graph for visualization.
- Identify security issues running in the cloud (using AWS Config, etc.).
- Perform tuning using Densify for Finops, etc.
Among Terraform usage workflow stages:
1) Install base tools/utilities
- In a Terminal, if you haven’t already, install Homebrew (see https://brew.sh).
-
Use Homebrew to install base tools/utilities:
brew install jq, tree, git
brew install go-task/tap/go-task  # https://taskfile.dev/
brew install --cask visual-studio-code
-
If you prefer using Python, there is a Python module to provide a wrapper of terraform command line tool at https://github.com/beelit94/python-terraform
CLI Keyboard aliases
-
To save time typing Ad hoc Terraform CLI commands, define keyboard aliases in a shell file such as my .aliases.zsh :
alias tf="terraform $1"  # provide a parameter
alias tfa="terraform apply -auto-approve"
alias tfd="terraform destroy"
alias tffd="terraform fmt -diff"
alias tfi="terraform init"
alias tfp="terraform plan"
alias tfr="terraform refresh"
alias tfs="terraform show"
alias tfsl="terraform state list"
alias tfsp="terraform state pull"
alias tfv="terraform validate"
Shell files to call
-
PROTIP: To save yourself typing (and typos), define a shell file to invoke each different pipeline:
chmod +x abc-dev-fe.sh
abc-dev-fe.sh
chmod +x abc-stage-fe.sh
abc-stage-fe.sh
tfvars & override precedence
Terraform provides different mechanisms for obtaining dynamic values.
When troubleshooting, REMEMBER: the order of precedence*
-
Environment variables defined in shell files are overridden by all other ways of specifying data:
export TFVAR_filename="/.../abc-stage.txt"
Alternately, specify a value for the variable “env” (abbreviation for environment) after prefix TF_VAR_:
TF_VAR_env=staging
CAUTION: It’s best to avoid using enviornment variables to store secrets because other programs can read snoop in memory. When using environment variables to set sensitive values, those values remain in your environment and command-line history.
-
Within terraform.tfvars
-
Within terraform.tfvars.json
-
Within *.auto.tfvars (in alphabetical order)
filename = "/root/something.txt"
-
Command-line flags -var or -var-file overrides all other techniques of providing values:
terraform apply -var "filename=/.../xxx-staging.txt"
Values for variables can be specified at run-time using variables names starting with “TF_VAR_”, such as:
But unlike other systems, environment variables have less precedence than -var-file and -var definitions, followed by automatic variable files.
Among Terraform usage workflow stages:
2) Task Template to Install Utilities Locally
PROTIP: Several utilities are needed to ensure the correctness and security of each type of file used. Using the latest version may not result in all of them working well together. So the multi-talented Kalen Arndt created a GitHub template that automatically installs versions of utilities your Mac needs which he has validated. His template makes use of Task (an improvement over Linux Make, but written in Go) and adsf.
-
In a browser go to:
- Click “Uses this template” and “Create a new repository”.
- Click “Select an owner” and one of your accounts (which I call your_acct below).
- Type a Repository name (which I call your_repo_name below)
-
Click the green “Create repository from template”.
In a Terminal app:
-
Construct a command to download the repo you created above:
clone git clone git@github.com:your_acct/your_repo_name.git
cd your_repo_name
PROTIP: Pick a name with the most important keywords first.
-
File .tool-versions specifies current versions of each tool/utility installed.
-
terraform-docs - Generate documentation from Terraform modules in various output formats
-
tfupdate - Update version constraints in your Terraform configurations
-
checkov - Prevent cloud misconfigurations and find vulnerabilities during build-time in infrastructure as code, container images and open source packages with Checkov by Bridgecrew (owned by Prisma Cloud).
-
tfsec - Security scanner for your Terraform code. TODO: Use other scanners as well?
-
pre-commit - A framework for managing and maintaining multi-language git pre-commit hooks (that automates actions).
-
python - The Python programming language [See my tutorial on Python]
-
shfmt - A shell parser, formatter, and interpreter with bash support; includes shfmt
-
shellcheck - ShellCheck, a static analysis tool for shell scripts
-
vault - A tool for secrets management, encryption as a service, and privileged access management
-
TODO: Install awscli, kubectl, etc. for Blueprints (below)
- But rather than occassionally checking manually, Kalen updates each version based on GitHub issue such as this created automatically by the Renovate dependency checker. The “renovate” utility automates update of 3rd-party dependencies (Multi-platform and multi-language) via pull requests. It is configured by preset “extends” (like ESLint).
References:
- https://docs.renovatebot.com/
- https://www.mend.io/free-developer-tools/renovate/
- https://www.augmentedmind.de/2021/07/25/renovate-bot-cheat-sheet/
- https://blog.logrocket.com/renovate-dependency-updates-on-steroids/
-
FYI: Whether settings define whether pre-commit and asdf are enabled is specified in the renovate.json file within folder .github.
-
Install the tools/utilities on your laptop as defined in the .tools-versions file described above:
task init
This command runs the Taskfile.yaml.
Notice that to add a utility, both the Taskfile.yaml and .tool-versions files need to be edited.
Note that Task invokes ASDF, which provides a single CLI tool and command interface to manage the install of multiple versions of each project runtime. [Intro doc]
asdf is used instead of switching among different versions of Terraform using tfenv or the little-known Homebrew pin and switch commands pointing to different git commits.
-
Get to know the .vscode/extensions.json file listing extensions Kalen likes to be installed in Visual Studio Code:
- pjmiravalle.terraform-advanced-syntax-highlighting
- editorconfig.editorconfig
- oderwat.indent-rainbow
- yzhang.markdown-all-in-one
- davidanson.vscode-markdownlint
- mohsen1.prettify-json
- run-at-scale.terraform-doc-snippets
- gruntfuggly.todo-tree
- redhat.vscode-yaml
- vscode-icons-team.vscode-icons
- shd101wyy.markdown-preview-enhanced
-
FYI: The .editorconfig file defines (for each type of file) the indents and other specifications Visual Studio Code should use to enforce consistent formatting.
-
View pre-commit actions defined in .pre-commit-config.yaml to verify the version numbers:
-
https://github.com/pre-commit/pre-commit-hooks/releases/
-
https://github.com/antonbabenko/pre-commit-terraform/releases/
-
https://github.com/syntaqx/git-hooks/releases/
-
-
QUESTION: Within the .github/workflows folder is the push-tf-registry.yml file which defines GitHub Actions to “Release to terraform public registry” specific SHA’s.
renovate chore(deps): pin dependencies
Among Terraform usage workflow stages:
4) Obtain cloud credentials and network preferences
Running my script to defined keyboard aliases enables you to issue on Terminal:
awscreds
That would invoke your favorite editor to edit ~/.aws/credentials.
Alternately, you can
aws configure
to specify:
AWS Access Key ID [****************MHQJ]:
AWS Secret Access Key [****************CXH7]:
Default region name [us-east-1]:
Default output format [json]:
Among Terraform usage workflow stages:
5) Get sample Terraform code
PROTIP: It’s too dangerous to start from scratch because misconfigurations can cost large cloud bills and leak valuable data. So we need to help each other on a collaborative mutual “known-secure” platform.
PROTIP: Begin with your cloud vendor selection. Going directly to a Kubernetes cloud service is the least time-consuming approach. But that costs more money.
| Cloud | VMs | Container | K8s |
|---|---|---|---|
| AWS: | EC2 | ECS | EKS |
| Azure: | AVM | ACS | AKS |
| GCP: | GCE | GCS | GKE |
Comparisons:
- https://learn.boltops.com/curriculums/aws-and-terraform/courses/aws-eks-kubernetes/lessons/aws-eks-vs-azure-aks-vs-google-gke
- https://github.com/boltops-learn (private repos by invitation)
Control Plane pricing: AKS is free. GKE is free for one zonal cluster, then $72/month. Pricing for EKS alone is $73/month for each cluster in us-west-2 (0.10 USD per hour x 730 hours per month).
Difficulty: click-button GUI makes AKS and GKE the easiest to setup.
There’s also NKS (Naver Kuernetes Service).
Terraform Kubernetes
PROTIP: Kubernetes has a lot of “knobs”. There is a lot to configure. So we would like to have a “starter set” of versioned Infrastructure and Code (IaC) in Terraform to create a Baseline environment containing various add-ons typically added to Kubernetes which, ideally, contain the security controls needed to be “production-worthy”, but be brought up quickly for further customization.
Use of Kubernetes accelerates time to market for platform initiatives through the Separation of Concerns - Platform Teams vs Application Teams:
Platform teams build the tools that provision, manage, and secure the underlying infrastructure while application teams are free to focus on building the applications that deliver business value to customers. It also gives operators more control in making sure production applications are secure, compliant, and highly available. Platform teams have full control to define standards on security, software delivery, monitoring, and networking that must be used across all applications deployed.
This allows developers to be more productive because they don’t have to configure and manage the underlying cloud resources themselves. Application teams need to focus on writing code and quickly shipping product, but there must be certain standards that are uniform across all production applications to make them secure, compliant, and highly available.
My blog on Kubernetes describes these advantages of using Kubernetes:
- Resiliency (auto-restart nodes that fail)
- Imposition of a shared operational workflow using common software development lifecycle (SDLC), common management API Deployment velocity that can be better supported by a central team of experts
- Achieve resource utilization density
Bear in mind that Kubernetes is not magic:
- Nodes can take 15 seconds to start, so overprivisioning is necessary
- Clusters run all time even when there is no traffic
Docs on Terraform Kubernetes:
- https://registry.terraform.io/providers/hashicorp/kubernetes/latest/docs
- https://registry.terraform.io/providers/hashicorp/kubernetes/latest/docs/guides/getting-started
- https://kubernetes.io/blog/2020/06/working-with-terraform-and-kubernetes/
- https://opensource.com/article/20/7/terraform-kubernetes
-
https://unofficial-kubernetes.readthedocs.io/en/latest/user-guide/kubectl-overview/
-
VIDEO: Terraforming the Kubernetes Land Oct 13, 2017 by Radek Simko (@RadekSimko)
- https://logz.io/blog/kubernetes-as-a-service-gke-aks-eks/
AWS
The AWS Partner Solutions website has “Quick Starts” of IaC code. A search of for “terraform” include:
- Terraform modules
- Amazon VPC for Terraform on AWS Provisions Amazon Virtual Private Cloud (Amazon VPC) resources managed by Terraform on the Amazon Web Services (AWS) Cloud.
- https://github.com/aws-quickstart/quickstart-eks-hashicorp-consul
- https://aws-quickstart.github.io/quickstart-hashicorp-consul/
EC2
- https://aws.amazon.com/ec2/
ECS
- https://aws.amazon.com/ecs/
- https://aws.amazon.com/eks/faqs/
- https://developer.hashicorp.com/consul/tutorials/cloud-production/consul-ecs-hcp
- https://logz.io/blog/aws-eks-features/
- https://github.com/Capgemini/terraform-amazon-ecs/ (not updated since 2016)
EKS
- https://aws.amazon.com/eks/
- https://aws.amazon.com/blogs/aws/amazon-elastic-container-service-for-kubernetes/ from 2015
- https://github.com/clowdhaus/eks-reference-architecture
- https://github.com/terraform-aws-modules/terraform-aws-eks
- https://appfleet.com/blog/amazon-elastic-container-service-for-kubernetes-eks/
- https://www.youtube.com/watch?v=Qy2A_yJH5-o
Some “best practices” followed include:
- “EKS Best Practices Guides” A best practices guide for day 2 operations, including operational excellence, security, reliability, performance efficiency, and cost optimization. From this repo.
- “Provisioning Kubernetes clusters on AWS with Terraform and EKS” (using eksctl)
EKS can be based on AWS Fargate which manages nodes for you so you don’t have to specify server instance types. Just tell EKS how much RAM and CPU you need. (Same with GKE AutoPilot).
List commands: aws eks help
- associate-encryption-config
- associate-identity-provider-config
- create-addon
- create-cluster
- create-fargate-profile
- create-nodegroup
- delete-addon
- delete-cluster
- delete-fargate-profile
- delete-nodegroup
- deregister-cluster
- describe-addon
- describe-addon-versions
- describe-cluster
- describe-fargate-profile
- describe-identity-provider-config
- describe-nodegroup
- describe-update
- disassociate-identity-provider-config
- get-token
- help
- list-addons
- list-clusters
- list-fargate-profiles
- list-identity-provider-configs
- list-nodegroups
- list-tags-for-resource
- list-updates
- register-cluster
- tag-resource
- untag-resource
- update-addon
- update-cluster-config
- update-cluster-version
- update-kubeconfig
- update-nodegroup-config
- update-nodegroup-version
- wait
EKS Blueprints for Terraform
So I created the shell script which enables you, with one command in Terminal, to install on a Mac utilities needed to create a base set of AWS resources and various utilities installed to support a production instance of EKS. It’s a simpler local alternative than using AWS Cloud9 IDE on a Linux machine, using during delivery of Workshop Studio sessions during AWS conferences.
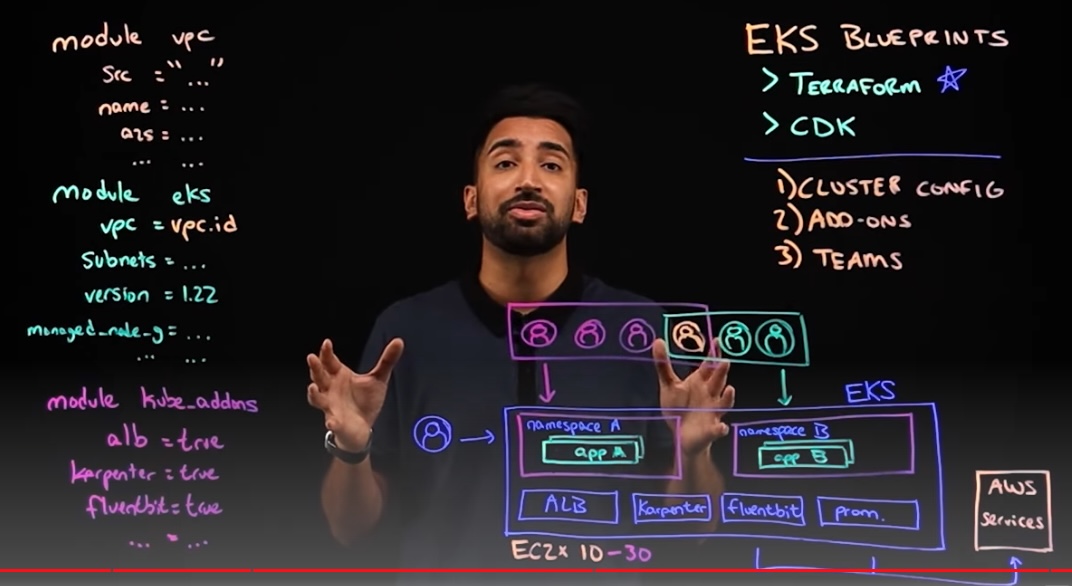
AWS EKS Blueprint (announced April 20, 2022) is a tool-chain platform” on top of Helm, Terraform, and ArgoCD, etc. that comes with “batteries included” a pre-configured base of Terraform IaC components to assemble the desired state of each team’s EKS environment, such as the control plane, worker nodes, and Kubernetes. Multiple teams to deploy EKS across any number of accounts and regions.
Its gh-pages branch is used to display this webpage.
PROTIP: My shell script makes use of The Blueprints repo created by the AWS IA (infrastructure and automation) team within AWS:
Blueprint add-ons
That webpage lists the dozens of add-on containers (services) that have already been integrated into the Blueprints for securing, scaling, monitoring, and operating containerized infrastructure.
Each add-on (feature) is defined as a module within this module folder.
All embedded with relevant security controls built-in.
VIDEO: “10 Must-Have Kubernetes Tools”
CLI tools:
- Local development - Rancher Desktop
- Manifests
- Operate - kubectl extensions
- https://github.com/ahmetb/kubectx to change context arn’s and k8s namespaces
- kubens
- 3rd-party apps - databases, etc. using Helm
- Observe with https://k9scli.io (Terminal + vim + k8s) https://www.youtube.com/watch?v=boaW9odvRCc
https://www.youtube.com/watch?v=wEQJi7_4V9Q
In cluster:
- Sychronize current state - ArgoCD or Flux
- Infrastructure - https://crossplane.io
- Applications definition - Instead of Helm, crossplane or KubeVela
- Metrics - Prometheus.io to collect for Grafana dashboards
- Log collection - grafana.com/oss/loki and Promtail to ship logs
- Policies (admission controllers) - Kyverno.io or open-policy-agent.github.io/gatekeeper
- Service Mesh sidecars
- TLS certificates - https://cert-manager.io use letsencrypt
https://www.youtube.com/watch?v=BII6ZY2Rnlc
Blueprint examples
Several “examples” (cluster use cases) have been defined. Each example references a particular set of modules.
From the AWS EKS Blueprints announcement:

example eks-cluster-with-new-vpc
This blog post demonstrates use of my shell script, which enables a lone individual developer/SRE/student to independently and quickly create an isolated full-featured production-candidate EKS environment, by typing a single command.
Most Kubernetes tutorials (KodeKloud, etc.) teach you about atomic kubectl and eksctl commands. You need that to pass KCAD exams. But here I describe a way to repeatedly create a production environment with all its complexities, which is the job of Kubernetes admins.
Specifically, my shell script currently automates several manual steps described at the AWS EKS Blueprints “Getting Started” page, to run Terraform in the eks-cluster-with-new-vpc folder to create a Kubernetes cluster (in one Terminal command):
- A VPC with 3 Private Subnets and 3 Public Subnets (or more if you choose)
- EKS Cluster Control plane with one managed node group
- Internet gateway for Public Subnets and NAT Gateway for Private Subnets
- Plus many possible add-ons
That is the starting point for a full-featured production-worthy environment.
PROTIP: It’s quicker and easier to run a script. Manually invoking one command at a time is time consuming and error prone. It’s too easy to skip a step, which causes errors and wasted time troubleshooting. A script ensures that steps are run in sequence. Checks can be added to make sure conditions for each command are met before, and after each command to ensure that each step achieves what was intended.
My shell script makes it quicker to test changes in Helm charts and addition of add-on for more capability in your Kubernetes environment (such as Observability, backup, etc.).
Once proven independently, changes to the IaC code base can then be confidently committed into the team GitHub repo for running within shared CI/CD infrastructure (using GitHub Actions, etc.). This enables you to say in your PR:
- Yes, I have tested the PR using my local account setup (Provide any test evidence report under Additional Notes)
Use my shell script while learning to use CI/CD SaaS operations (such as Argo CD), without begging for team access.
Let’s start by the end-product of a cluster.
k8s_nodes_pods created
To confirm what was created, run my shell script with the -v parameter:
./eks-start1.sh -v
That does the same as manually typing these Kubernetes status commands:
kubectl get nodes
should return a list such as this:
NAME                                        STATUS   ROLES    AGE     VERSION
ip-10-0-10-190.us-west-2.compute.internal   Ready    <none>   9m14s   v1.23.13-eks-fb459a0
ip-10-0-11-151.us-west-2.compute.internal   Ready    <none>   9m9s    v1.23.13-eks-fb459a0
ip-10-0-12-239.us-west-2.compute.internal   Ready    <none>   9m15s   v1.23.13-eks-fb459a0
kubectl get pods --all-namespaces
should return “Running” status for:
NAME                                                         READY
amazon-cloudwatch   aws-cloudwatch-metrics-8c4dl                                 1/1
amazon-cloudwatch   aws-cloudwatch-metrics-g67tv                                 1/1
amazon-cloudwatch   aws-cloudwatch-metrics-khz28                                 1/1
cert-manager        cert-manager-559c84c94f-jpdlv                                1/1
cert-manager        cert-manager-cainjector-69cfd4dbc9-wpftq                     1/1
cert-manager        cert-manager-webhook-5f454c484c-j8jvl                        1/1
gatekeeper-system   gatekeeper-audit-9b7795dcf-gzn49                             1/1
gatekeeper-system   gatekeeper-controller-manager-78b8774b7c-57tt5               1/1
gatekeeper-system   gatekeeper-controller-manager-78b8774b7c-b7hks               1/1
gatekeeper-system   gatekeeper-controller-manager-78b8774b7c-hl2vg               1/1
kube-system         aws-load-balancer-controller-854cb78798-ckcs6                1/1
kube-system         aws-load-balancer-controller-854cb78798-rpmwc                1/1
kube-system         aws-node-f4zxh                                               1/1
kube-system         aws-node-gl9vt                                               1/1
kube-system         aws-node-qg4nz                                               1/1
kube-system         cluster-autoscaler-aws-cluster-autoscaler-7ccbf68bc9-d6hc5   1/1
kube-system         cluster-proportional-autoscaler-coredns-6fcfcd685f-5spb8     1/1
kube-system         coredns-57ff979f67-4nnh2                                     1/1
kube-system         coredns-57ff979f67-q4jlj                                     1/1
kube-system         ebs-csi-controller-79998cddcc-8fttd                          6/6
kube-system         ebs-csi-controller-79998cddcc-wkssp                          6/6
kube-system         ebs-csi-node-6pccm                                           3/3
kube-system         ebs-csi-node-wv2jm                                           3/3
kube-system         ebs-csi-node-xqjpp                                           3/3
kube-system         kube-proxy-cgjsq                                             1/1
kube-system         kube-proxy-fwmv9                                             1/1
kube-system         kube-proxy-lt8cg                                             1/1
kube-system         metrics-server-7d76b744cd-ztg98                              1/1
kubecost            kubecost-cost-analyzer-7fc46777c4-5kdjw                      2/2
kubecost            kubecost-kube-state-metrics-59fd4555f4-tghnt                 1/1
kubecost            kubecost-prometheus-node-exporter-89vg6                      1/1
kubecost            kubecost-prometheus-node-exporter-fll24                      1/1
kubecost            kubecost-prometheus-node-exporter-pjhsz                      1/1
kubecost            kubecost-prometheus-server-58d5cf79df-jxtgq                  2/2
TODO: A diagram of resources above?
TODO: Description of what each node provides and how they communicate with each other.
The 18 nodes created under namespace “kube-system” are:
- 2 AWS Load Balancer Controllers
- 3 AWS nodes
- 1 Cluster Autoscaler
- 1 proportional autoscaler for CoreDNS
- 2 CoreDNS
- 2 EBS CSI (Container Storage Interface) controllers
- 2 EBS CSI nodes
- 3 kube-proxy nodes
- 1 Prometheus metrics server
- vpc-cni (Network Interface)
The calling shell script
PROTIP: Before running any script on your machine, a good security practice is to understand what it really does.
-
In a browser, view the script online in GitHub:
https://github.com/wilsonmar/mac-setup/blob/master/eks-start1.sh
PROTIP: A basic tenant of this script’s desig is that no action is taken unless the user specifies a parameter.
If a script is called with no parameters:
./eks-start1.sh
the script presents a menu of parameters and command examples:
=========================== 202?-??-15T15.05.50-0700 ./eks-start1.sh v0.19
PARAMETER OPTIONS:
-h          #  show this help menu by running without any parameters
-cont       #  continue (NOT stop) on error
-v          # -verbose (list rundetails to console)
-vv         # -very verbose (instance IDs, volumes, diagnostics, tracing)"
-x          #  set -x to display every console command
-q          # -quiet headings for each step

-vers       #  list versions released
-I          # -Install utilities brew, etc. (default is install)
-tf "1.3.6"            # version of Terraform to install
-gpg        #  Install gpg2 utility and generate key if needed
-email "johndoe@gmail.com"     # to generate GPG keys for

-DGB        # Delete GitHub at Beginning (download again)
-c          # -clone again from GitHub (default uses what exists)
-GFP "/Users/wilsonmar/githubs"   # Folder path to install repo from GitHub

-aws        # -AWS cloud awscli
-region "us-east-1"    # region in the cloud awscli

-KTD        # Kubernetes Terraform Deploy
-DTB        # Destroy Terraform-created resources at Beginning of run
-DTE        # Destroy Terraform-created resources at End of run
To run the script to establish Kubernetes cluster:
time ./eks-start1.sh -v -KTD
But before you do that, let’s look at the tools and utilities that need to be installed.
Utilities to run Blueprint
To install all the utilities needed (brew, jq, git, tree, awscli, kubectl, terraform, etc.):
./eks-start1.sh -I -v
-v displays additonal verbosity.
-q quiets the headings displayed by the h2 custom-defined command.
GitHub to load Blueprints
In STEP 9, the script clones: https://github.com/aws-ia/terraform-aws-eks-blueprints
–depth 1 excludes branches such as gh-pages referenced to display website “Amazon EKS Blueprints for Terraform”. This results in the du -h command showing 26MB of disk space usage (instead of 40MB with all branches).
Run
Upon failure, the script automatically runs Cleanup terraform destroy commands (unless the script’s override parameter was specified).
export AWS_REGION=us-west-2
aws ec2 describe-availability-zones --output text --query 'AvailabilityZones[0].[RegionName]'
aws configure list | grep region
aws configure get region --profile $PROFILE_NAME
terraform plan
PROTIP: Tfsec (and other scans of Terraform HCL) are run from the output of terraform plan.
terraform apply -target=”module.vpc” -auto
Apply complete! Resources: 23 added, 0 changed, 0 destroyed.
kubectl config view --minify -o jsonpath='{.clusters[].name}'arn:aws:eks:us-west-2:670394095681:cluster/eks-cluster-with-new-vpc%
set configure_kubectl = "aws eks --region us-west-2 update-kubeconfig --name eks-cluster-with-new-vpc"
aws eks --region "$AWS_REGION" update-kubeconfig --name eks-cluster-with-new-vpc
Updated context arn:aws:eks:us-west-2:670394095681:cluster/eks-cluster-with-new-vpc in /Users/wilsonmar/.kube/config
-
Configure AWS credentials. The account used should be granted a minimum set of IAM policies.
-
Download the script:
curl -s "https://raw.githubusercontent.com/wilsonmar/mac-setup/master/eks-start1.sh" --output eks-start1.sh
-
Set permissions (needed only one time):
chmod +x eks-start1.sh
-
Set your Mac to not sleep: Click the Apple logo on the top-left corner of your screen, and select System Preferences. In the upper-right, type on Battery. At the left menu, click Battery. Drag the slider to Never. Click “Power Adapter” and drag that slider to Never.
sudo systemsetup -setcomputersleep Never
-
Among Application Utilities, invoke Apple’s Activity Monitor to identify high CPU processes to close, then how much CPU and Memory is consumed by processes Terminal and “terraform”.
-
In Terminal: Run using a timer and script parameters:
time ./eks-start1.sh -v
Update your AWS credentials if you see messages like this:
│ Error: configuring Terraform AWS Provider: error validating provider credentials: error calling sts:GetCallerIdentity: operation error STS: GetCallerIdentity, https response error StatusCode: 403, RequestID: 9e49efe4-dd08-4b2c-a6df-22a754b8a04d, api error ExpiredToken: The security token included in the request is expired

time outputs three timings: real, user and sys, such as:

real    1m47.363s
user    2m41.318s
sys     0m4.013s
- QUESTION: What is the UI that can be seen?
- QUESTION: How to access services within EKS?
-
QUESTION: AWS Config. security alerts, if any.
- Reuse configured blueprints (in GitHub) to consistently “stamp out” instances across multiple AWS accounts and Regions using continuous deployment automation.
Add-on for Consul
https://developer.hashicorp.com/consul/docs/k8s/installation/install
Blueprints are defined/added in main.tf file in each example folder.
Add-on add-ons: There is growing list of add-ons to the Blueprints include Prometheus, Karpenter, Nginx, Traefik, AWS Load Balancer Controller, Fluent Bit, Keda, ArgoCD, and Consul.
Here we example extensibility for Consul.
Each add-on is a module defined in modules/kubernetes-addons/main.tf file. For example:
module "consul" {
  count             = var.enable_consul ? 1 : 0
  source            = "./consul"
  helm_config       = var.consul_helm_config
  manage_via_gitops = var.argocd_manage_add_ons
  addon_context     = local.addon_context
}
Each module has a folder, such as Consul’s modules/kubernetes-addons/consul.
Consul’s locals.tf file defines:
  default_helm_config = {
    name             = local.name
    chart            = local.name
    repository       = "https://helm.releases.hashicorp.com"
    version          = "1.0.1"
    namespace        = local.name
    create_namespace = true
    description      = "Consul helm Chart deployment configuration"
    values           = [templatefile("${path.module}/values.yaml", {})]
  }

  helm_config = merge(local.default_helm_config, var.helm_config)

  argocd_gitops_config = {
    enable = true
  }
Add-ons are enabled together by specification in the modules/kubernetes-addons/locals.tf file.
argocd_addon_config = {
   ...
   consul = var.enable_consul ? module.consul[0].argocd_gitops_config : null
The HashiCorp Consul add-on is described here in the docs [editable].
https://developer.hashicorp.com/consul/docs/k8s/installation/install
https://github.com/aws-ia/terraform-aws-eks-blueprints/blob/main/modules/kubernetes-addons/consul/README.md?plain=1 which references docs at https://developer.hashicorp.com/consul/tutorials/get-started-kubernetes/kubernetes-gs-deploy
added in modules/kubernetes-addons/main.tf:
module "consul" {
  count             = var.enable_consul ? 1 : 0
  source            = "./consul"
  helm_config       = var.consul_helm_config
  manage_via_gitops = var.argocd_manage_add_ons
  addon_context     = local.addon_context
}
values.yaml specifies a 3-replica server.
The “Inputs” section in the README are coded within variables.yaml which defines “addon_context” variables.
To use GitOps, edit and change variable “manage_via_gitops” setting default = false to true. QUESTION?
Additional customizations
TODO: Add a sample application (such as HashiCups).
https://developer.hashicorp.com/consul/docs/k8s/helm
https://helm.sh/docs/intro/using_helm/#customizing-the-chart-before-installing
Additional capabilities to add:
* Deployment platform
* Deployment topology
* TLS Certificates
* Connectivity for operator and clients
* Logging
* Host monitoring
* Application telemetry
* Backups
* Restores
* Upgrades
Other add-ons
https://aws-ia.github.io/terraform-aws-eks-blueprints/main/extensibility/
You may want to try implementing other use cases in the example deployment options (“constructs”) folder not demonstrated here:
- Karpenter auto-scaler for EKS
- Grafana Loki
- Observability Grafana
- IPV6 EKS clusters
- Analytics clusters with Spark or EMR on EKS
PROTIP: Add-ons can be both open-source or licensed.
Modules include:
- aws-eks-fargate-profiles
- aws-eks-managed-node-groups
- aws-eks-self-managed-node-groups
- aws-eks-teams
- aws-kms
- emr-on-eks
- irsa
- kubernetes-addons
- launch-templates
Process Helm charts to configure Kubernetes using CNCF GitOps tool ArgoCD:
https://catalog.workshops.aws/eks-blueprints-terraform/en-US
https://github.com/aws-ia/terraform-aws-eks-blueprints/tree/main/examples
https://developer.hashicorp.com/consul/docs/k8s/installation/install
https://github.com/hashicorp/terraform-aws-consul-ent-k8s
More
https://github.com/kalenarndt/terraform-vault-consul-k8s-integration from Kalen is a module that builds the Root CA, Server TLS Intermediate, Consul Connect Intermediate, Connect Inject Intermediate, Controller Intermediate, KV Secrets Engine, Bootstrap Tokens, Gossip Tokens, Consul Licenses, Vault Policies, Kubernetes Roles for authentication with the policies associated, and outputs a sample Helm values file.
Blueprints for Terraform is open-sourced two ways, in different repos and workshops:
- EKS Blueprints for Terraform (below)
-
EKS Blueprints for CDK workshop at https://catalog.workshops.aws/
- EKS Blueprints for CDK workshop at https://catalog.workshops.aws/eks-blueprints-for-cdk/en-US
- https://github.com/aws-quickstart/cdk-eks-blueprints
- https://www.npmjs.com/package/@aws-quickstart/eks-blueprints NPM module
- https://github.com/aws-samples/cdk-eks-blueprints-patterns
- https://github.com/aws-samples/eks-blueprints-workloads
Azure
AVM
https://azure.microsoft.com/en-us/products/virtual-machines/
https://learn.microsoft.com/en-us/azure/architecture/aws-professional/compute
ACS (Azure Container Service)
Retire on 31st Jan 2020.
A wrapper on top of Azure IAAS to deploy a production ready Kubernetes, DC/OS, or Docker Swarm cluster.
https://azure.microsoft.com/en-us/products/container-apps/
AKS
https://learn.microsoft.com/en-us/azure/aks/quotas-skus-regions
https://azure.microsoft.com/en-us/products/kubernetes-service/
https://github.com/hashicorp/terraform-azure-consul-ent-k8s
git clone https://github.com/lukeorellana/terraform-on-azure
cd terraform-on-azure
It contains these folders:
- 01-intro
- 02-init-plan-apply-destroy
- 03-terraform-state
- 04-variables
- 05-modules
- 06-advanced-hcl
https://github.com/KevinDMack/TerraformKubernetes to establish K8S using Packer within Azure
GCE
https://www.msp360.com/resources/blog/azure-vm-vs-amazon-ec2-vs-google-ce-cloud-computing-comparison/
GCS
GKE
https://github.com/hashicorp/terraform-gcp-consul-ent-k8s
- To obtain the name of cluster (stored in custom metadata of nodes) from inside a node:
curl http://metadata/computeMetadata/v1/instance/attributes/cluster-name -H "Metadata-Flavor: Google"
CI/CD
https://github.com/fedekau/terraform-with-circleci-example
VIDEO: “Create Preview Environments for Terraform” (using GitHub Actions)
Terraspace generates IaC code
VIDEO: Terraspace.cloud dynamically generates Terraform projects in a centralized manner (which eliminates duplication). So the whole stack can be brought up by a single command: VIDEO:
terraspace up STACK
Unlike Terragrunt, Terraspace automatically creates storage Buckets in the back-end. Terraspace intermixes its own features with those of Terraform (e.g. using ERB templates in backend configuration), needed because Terraform doesn’t allow expressions in the backend block.
Terraspace claims that their CLI hook syntax is “more concise and cleaner”.
Among Terraform usage workflow stages:
4) Terraform project conventions
PROTIP: Consistent definition of HCL folders and files in your Terraform projects would enhance efficiency and teamwork.
tfvars files by env
REMEMBER: Files named with the .tfvars file ending extension contains actual values used in each environment (dev, qa, stage, prod).
Each environment has different needs. For example, the number of instances:
- In dev, env_instance_count = 1
- In qa, env_instance_count = 2
- In stage, env_instance_count = 4
- In prod, env_instance_count = 4
PROTIP: Since there can be secret values, use a mechanism that guarantees the file is never uploaded into GitHub.
The terraform.auto.tfvars file should be specified in .gitignore.
In VIDEO: “Bootstrapping Terraform Secrets with 1Password CLI”, Jillian (Wilson) Morgan shows that plaintext secrets can be replaced with a reference to 1Password protocol “op://”.
-
Within 1Password, the “devs” vault, “gcp” item, “credentials” field:
GOOGLE_CREDENTIAL=op://devs/gcp/credential
-
To populate, run a keyboard alias command that executes:
op run --env-file=.env terraform apply
References:
- https://developer.1password.com/docs/cli
- https://1password.developers
- https://join.slack.com/t/1password-devs/shared_invite/zt-1halo11ps-609pEv96xZ3LtX_VEOfJQA
References:
- https://www.terraform.io/language/modules/develop/structure
- https://www.baeldung.com/ops/terraform-best-practices
What’s HCL?
Terraform defined HCL (HashiCorp Configuration Language) for both human and machine consumption. HCL is defined at https://github.com/hashicorp/hcl and described at https://www.terraform.io/docs/configuration/syntax.html.
Terraform supports JSON syntax to read output from programmatic creation of such files. The name suffix of files containing JSON “*.tf.json”.
HCL is less verbose than JSON and more concise than YML. *
Unlike JSON and YML, HCL allows annotations (comments). As in bash scripts: single line comments start with # (pound sign) or // (double forward slashes).
Multi-line comments are wrapped between /* and */.
\ back-slashes specify continuation of long lines (as in Bash).
Files in the root folder:
The root folder of the repo should contain these files:
-
.gitignore - files and folders to not add and push to GitHub
-
LICENSE - (no file extension) to define the legal aspects (whether it’s open source)
The root folder of each module should contain these files:
-
README.md describes to humans how the module works. REMEMBER: Don’t put a README file within internal module folders because its existance determines whether a module is considered usable by an external user.
-
main.tf is the entry point of the module.
-
providers.tf specfies how to process HCL code (aws, azure, etc.)
-
outputs.tf defines data values output by a terraform run.
-
versions.tf
-
variables.tf declares a description and optional default values for each variable in *.tf files
Folders in the project:
Within folder examples
Within folder test
Within folder modules
IAM (folder)
* README.md
* variables.tf
* main.tf
* outputs.tf
Network (folder)
* …
Vault
* install-vault
* install-vault.sh
* run-vault
* run-vault.sh
* vault-cluster
* vault-security-group-rules
* vault-elb
REMEMBER: Terraform processes all .tf files in a directory invoked in alphabetical order.
Among Terraform usage workflow stages:
6) Code cloud resources in HCL
Links to Certification Exam Objectives
Pluralsight has a 20-question assessment: Managing Infrastructure with Terraform Skill IQ” covering (Google):
- Add Terraform to a CI/CD Pipeline
- Automate infrastructure deployment
-
Create and import Modules
- Implement Terraform with AWS
- Implement Terraform with Google Cloud Platform
-
Implement Terraform with Microsoft Azure
- Import data from external sources
- Install and Run Terraform
- Manage State in Terraform
- Troubleshoot Terraform Issues
 This page houses both links and my notes to pass the HashiCorp Terraform Associate certification (at https://hashicorp.com/certification/terraform-associate). For only $70.50 (paid after picking a time on OSI Online, terrible) , correctly answer 70%+ of 57 multiple-choice/fill-in questions to give your employers some assurance that you have a practical knowledge of these topics:
- Understand infrastructure as code (IaC) concepts
a. Explain what IaC is
b. Describe advantages of IaC patterns - Understand Terraform’s purpose (vs other IaC)
a. Explain multi-cloud and provider-agnostic benefits
b. Explain the benefits of state management - Understand Terraform basics
a. Handle Terraform and provider installation and versioning
b. Describe plugin based architecture
c. Demonstrate using multiple providers
d. Describe how Terraform finds and fetches providers (from the Terraform Registry)
e. Explain when to use and not use provisioners and when to use local-exec or remote-exec - Use the Terraform CLI (outside of core workflow)
a. Given a scenario: choose when to use terraform fmt to format code
b. Given a scenario: choose when to use terraform taint to taint Terraform resources
c. Given a scenario: choose when to use terraform import to import existing infrastructure into your Terraform state
d. Given a scenario: choose when to use terraform workspace to create workspaces
e. Given a scenario: choose when to use terraform state to view Terraform state
f. Given a scenario: choose when to enable verbose logging and what the outcome/value is - Interact with Terraform modules
a. Contrast module source options
b. Interact with module inputs and outputs
c. Describe variable scope within modules/child modules
d. Discover modules from the public Terraform Module Registry
e. Defining module version - Navigate Terraform workflow
a. Describe Terraform workflow ( Write -> Plan -> Create )
b. Initialize a Terraform working directory (terraform init)
c. Validate a Terraform configuration (terraform validate)
d. Generate and review an execution plan for Terraform (terraform plan)
e. Execute changes to infrastructure with Terraform (terraform apply)
f. Destroy Terraform managed infrastructure (terraform destroy) - Implement and maintain state
a. Describe default local backend
b. Outline state locking
c. Handle backend authentication methods
d. Describe remote state storage mechanisms and supported standard backends
e. Describe effect of Terraform refresh on state
f. Describe backend block in configuration and best practices for partial configurations
g. Understand secret management in state files - Read, generate, and modify configuration
a. Demonstrate use of variables and outputs
b. Describe secure secret injection best practice
c. Understand the use of collection and structural types
d. Create and differentiate resource and data configuration
e. Use resource addressing and resource parameters to connect resources together
f. Use Terraform built-in functions to write configuration
g. Configure resource using a dynamic block
h. Describe built-in dependency management (order of execution based) - Understand Terraform Cloud and Enterprise capabilities
a. Describe the benefits of Sentinel, registry, and workspaces
b. Differentiate OSS and TFE workspaces
c. Summarize features of Terraform Cloud
VIDEO: Registering for the test takes several steps:
- Clicking on “Register Exam” takes you to the Zendesk Exam Portal.
- Read the Exam Handbook. Key points:
- 48 hour cancellation
- There is a Exam FAQ
- Click “Click here to go to the exam platform” for the “Continue with GitHub”.
- Authorize HashiCorp to use your GitHub credentials to register for exam at the PSI Exam website
- Click “Schedule” to the right of “HashiCorp Certified: Terraform Associate - Ready to Schedule”
- Select Country & Timezone. Click a day in green. Click a range of hours. Click a specific hour. Click Continue.
- In the pop-up, click Continue for “Booking created successfully”. Close.
-
Now you see the $70.50. Check “I acknowledge”… Pay Now.
-
FAQ: After passing the exam, share your badge at
-
In your resume, add a link to your certification as:
https://www.credly.com/earned/badge/[unique certification ID]
The exam expires in 2 years.
HashiCorp doesn’t have a deeper/more difficult “Professional level” cert at time of writing.
Infrastructure as Code (IaC) Provisioning Options
The objective is to accelerate work AND save money by automating the configuration of servers and other resources quicker and more consistently than manually clicking through the GUI. That’s called the “Infrastructure-Application Pattern (I-A)”.
| Since | Community | Type | Infra. | Lang. | Agent | Master | |
|---|---|---|---|---|---|---|---|
| CFN/CF | 2011 Medium | Small*1 | Immutable | Declarative | No | No | |
| Heat | 2012 Low | Small | Immutable | Declarative | No | No | |
| Terraform | 2014 Low | Huge | Immutable | Declarative | No | No | |
| Pulumi> | 2017 Low | New | Mutable | Procedural | Yes | Yes |
Terraform installs infrastructure in cloud and VM as workflows.
Kubernetes orchestrates (brings up and down) Docker containers.
Pulumi (see my notes on it)
dagger.io
Terraform vs. AWS Cloud Formation
| Feature | CloudFormation | Terraform |
|---|---|---|
| Multi-Cloud providers support | AWS only | AWS, GCE, Azure (20+) |
| Source code | closed-source | open source |
| Open Source contributions? | No | Yes (GitHub issues) |
| State management | by AWS | in Terraform & AWS S3 |
| GUI | Free Console | licen$ed* |
| Configuration format | JSON & Template | HCL JSON |
| Execution control* | No | Yes |
| Iterations | No | Yes |
| Manage already created resources | No (Change Set?) | Yes (hard) |
| Failure handling | Optional rollback | Fix & retry |
| Logical comparisons | No | Limited |
| Extensible Modules | No | Yes |
To get AWS certified, you’re going to need to know Cloud Formation.
Licensing open source for GUI
Although Terraform is “open source”, the Terraform GUI requires a license.
Paid Pro and Premium licenses of Terraform add version control integration, MFA security, HA, and other enterprise features.
References:
- https://www.stratoscale.com/blog/data-center/choosing-the-right-provisioning-tool-terraform-vs-aws-cloudformation/
CF to TF Tool
PROTIP: TOOL: cf2tf is a Python module that converts CloudFormation templates to Terraform configuration files so you use https://console.aws.amazon.com/cloudformation less. It’s by “shadycuz” Levi Blaney, author of the Hypermodern Cloudformation series.
- Beware of the CF code refactoring that another has needed to do: https://medium.com/trackit/aws-cloudformation-to-terraform-translation-dacfc96e3994
- Review issues that remain open for cf2tf: https://github.com/DontShaveTheYak/cf2tf/issues
- Install Python with Conda or virtualenv (see my
https://wilsonmar.github.io/python-install/) - Create a folder to clone into (such as $HOME/Projects).
- Create virtual Python enviornment:
conda activiate py310
python --version
- Clone the repo:
git clone https://github.com/DontShaveTheYak/cf2tf --depth 1
cd ct2tf
- Install Python module locally:
pip install cf2tf --upgrade
cf2tf my_template.yaml
- Download my_template.yaml CloudFormation files that creates an AWS resource stack:
- lambda_hello.yaml from https://leaherb.com/aws-lambda-tutorial-101/ describes creating a Lambda function using CF YAML.
- ec2_stack1.yaml from https://github.com/smoya/cloudformation-hello-world/blob/master/hello_world_demo.json creates a Docker in ECR (Elastic Container Registry), RDS MySQL database, EC2 with VPC, subnet, Route, Security Group, IG, ELB, AutoScaling, CloudWatch alarms
- https://reflectoring.io/getting-started-with-aws-cloudformation/ describes creating an ECS cluster running a Docker container using CF files from https://github.com/stratospheric-dev/stratospheric/tree/main/chapters/chapter-1/cloudformation
- https://www.youtube.com/watch?v=YXVCdGyHDSk shows how to create a table with DBQueryPolicy within a pre-defined DynamoDB from https://gist.github.com/awssimplified/f96437a5a3beed65bf4782eb7b69afa4
- Validate the template within AWS:
aws cloudformation validate-template --template-body file://lambda_hello.yaml
- Make sure it really creates the stack and resource within AWS:
aws cloudformation create-stack --stack-name hello-lambda-stack \
  --template-body file://lambda_hello.yml \
  --capabilities CAPABILITY_NAMED_IAM
- Run:
cd /;cd ~/Projects/cf2tf
cf2tf lambda_hello.yaml >main.tf
- Compare input and output I got:
| CloudFormation template.yaml | Terraform HCL |
Resources:
  HelloLambdaRole:
    Type: AWS::IAM::Role
    Properties:
      RoleName: HelloLambdaRole
      AssumeRolePolicyDocument:
        Statement:
          - Effect: Allow
            Principal:
              Service: lambda.amazonaws.com
            Action: sts:AssumeRole
  HelloLambdaFunction:
    Type: AWS::Lambda::Function
    Properties:
      FunctionName: HelloLambdaFunction
      Role: !GetAtt HelloLambdaRole.Arn
      Runtime: python3.7
      Handler: index.my_handler
      Code:
        ZipFile: |
          def my_handler(event, context):
            message = 'Hello Lambda World!'
            return message
| resource "aws_iam_role" "hello_lambda_role" {
name = "HelloLambdaRole"
assume_role_policy = {
Statement = [
{
Effect = "Allow"
Principal = {
Service = "lambda.amazonaws.com"
}
Action = "sts:AssumeRole"
}
]
}
}
resource "aws_lambda_function" "hello_lambda_function" {
function_name = "HelloLambdaFunction"
role = aws_iam_role.hello_lambda_role.arn
runtime = "python3.7"
handler = "index.my_handler"
code_signing_config_arn = {
ZipFile = "def my_handler(event, context):
message = 'Hello Lambda World!'
return message"
}
}
|
- Try one with more resources:
cf2tf ~/Projects/cf2tf/ec2_stack1.yaml >main.tf
- Make it work:
terraform init
terraform plan
terraform apply
- Verify the stack was created:
aws cloudformation describe-stacks --stack-name hello-lambda-stack
- Delete the resources so you don’t get charged:
terraform destroy
- Conform resource deletion using AWS GUI:
References:
- https://docs.aws.amazon.com/AWSCloudFormation/latest/UserGuide/GettingStarted.Walkthrough.html
- https://docs.aws.amazon.com/AWSCloudFormation/latest/UserGuide/aws-template-resource-type-ref.html
- https://dev.to/johntellsall/convert-cloudformation-to-terraform-in-two-seconds-6mm using CoPilot
- https://stackoverflow.com/questions/64048258/how-to-convert-cloudformation-template-to-terraform-code
- https://www.stratoscale.com/blog/data-center/choosing-the-right-provisioning-tool-terraform-vs-aws-cloudformation/
Installation options
A) Manually type commands in Terminal. This is tedius and time consuming because there are several utilities to install.
B) Use a GitHub Template to install utilities and create a Terraform template.
Manual install
There is a version manager to enable you to install several versions of Terraform: https://github.com/aaratn/terraenv
-
Terraform is open-sourced in GitHub. Metadata about each releases is at:
https://github.com/hashicorp/terraform/releases
PROTIP: Terraform is written in the Go language, so (unlike Java) there is no separate VM to download.
-
To download an install file for your operating system, click the list of Terraform versions at:
https://releases.hashicorp.com/terraform/
PROTIP: But instead of manually downloading, get the latest version automatically using an installer by following instructions below.
-
After installation, get the version number of Terraform:
terraform --version
The response I got (at time of writing) is the version and what operating system:
Terraform v1.1.16
on darwin_amd64
If you need to upgrade:
Your version of Terraform is out of date! The latest version
is 1.1.6. You can update by downloading from https://www.terraform.io/downloads.html
Install on MacOS using tfenv
-
A search through brew:
brew search terraform
==> Formulae
hashicorp/tap/consul-terraform-sync      terraform-provider-libvirt
hashicorp/tap/terraform ✔                terraform-rover
hashicorp/tap/terraform-ls               terraform@0.11
iam-policy-json-to-terraform             terraform@0.12
terraform ✔                              terraform@0.13
terraform-docs                           terraform_landscape
terraform-inventory                      terraformer ✔
terraform-ls                             terraforming
terraform-lsp

If you meant "terraform" specifically:
It was migrated from homebrew/cask to homebrew/core.
Note there are back versions of terraform (11, 12, 13, etc.).
Standard Homebrew install
-
Is there a brew for Terraform?
brew info terraform
Yes, but:
terraform: stable 1.1.6 (bottled), HEAD
Tool to build, change, and version infrastructure
https://www.terraform.io/
Conflicts with:
  tfenv (because tfenv symlinks terraform binaries)
/usr/local/Cellar/terraform/1.1.6 (6 files, 66.7MB) *
  Poured from bottle on 2022-02-19 at 10:43:46
From: https://github.com/Homebrew/homebrew-core/blob/HEAD/Formula/terraform.rb
License: MPL-2.0
==> Dependencies
Build: go ✘
==> Options
--HEAD
 Install HEAD version
==> Analytics
install: 47,985 (30 days), 134,541 (90 days), 525,730 (365 days)
install-on-request: 44,756 (30 days), 125,786 (90 days), 493,333 (365 days)
Its popularity has grown since:
terraform: stable 1.0.5 (bottled), HEAD
...
install: 41,443 (30 days), 125,757 (90 days), 480,344 (365 days)
install-on-request: 38,839 (30 days), 118,142 (90 days), 455,572 (365 days)
-
PROTIP: Although you can brew install terraform, don’t. So that you can easily switch among several versions installed of Terraform, install and use the Terraform version manager:
brew install tfenv
The response at time of writing:
==> Downloading https://github.com/tfutils/tfenv/archive/v2.2.0.tar.gz
Already downloaded: /Users/wilson_mar/Library/Caches/Homebrew/downloads/d5f3775943c8e090ebe2af640ea8a89f99f7f0c2c47314d76073410338ae02de--tfenv-2.2.0.tar.gz
🍺  /usr/local/Cellar/tfenv/2.2.0: 23 files, 79.8KB, built in 8 seconds
Source for this is has changed over time: from https://github.com/Zordrak/tfenv (previously from https://github.com/kamatama41/tfenv)
When tfenv is used, do not install from the website or using :
brew install terraform -
Install the latest version of terraform using tfenv:
tfenv install latest
The response:
Installing Terraform v1.0.5
Downloading release tarball from https://releases.hashicorp.com/terraform/1.0.5/terraform_1.0.5_darwin_amd64.zip
######################################################################### 100.0%
Downloading SHA hash file from https://releases.hashicorp.com/terraform/1.0.5/terraform_1.0.5_SHA256SUMS
==> Downloading https://ghcr.io/v2/homebrew/core/pcre/manifests/8.45
######################################################################## 100.0%
==> Downloading https://ghcr.io/v2/homebrew/core/pcre/blobs/sha256:a42b79956773d
==> Downloading from https://pkg-containers.githubusercontent.com/ghcr1/blobs/sh
######################################################################## 100.0%
==> Downloading https://ghcr.io/v2/homebrew/core/grep/manifests/3.7
######################################################################## 100.0%
==> Downloading https://ghcr.io/v2/homebrew/core/grep/blobs/sha256:180f055eeacb1
==> Downloading from https://pkg-containers.githubusercontent.com/ghcr1/blobs/sh
######################################################################## 100.0%
==> Installing dependencies for grep: pcre
==> Installing grep dependency: pcre
==> Pouring pcre--8.45.mojave.bottle.tar.gz
🍺  /usr/local/Cellar/pcre/8.45: 204 files, 5.5MB
==> Installing grep
==> Pouring grep--3.7.mojave.bottle.tar.gz
==> Caveats
All commands have been installed with the prefix "g".
If you need to use these commands with their normal names, you
can add a "gnubin" directory to your PATH from your bashrc like:
  PATH="/usr/local/opt/grep/libexec/gnubin:$PATH"
==> Summary
🍺  /usr/local/Cellar/grep/3.7: 21 files, 941.7KB
==> Upgrading 1 dependent:
zsh 5.7.1 -> 5.8_1
==> Upgrading zsh
  5.7.1 -> 5.8_1

==> Downloading https://ghcr.io/v2/homebrew/core/zsh/manifests/5.8_1
######################################################################## 100.0%
==> Downloading https://ghcr.io/v2/homebrew/core/zsh/blobs/sha256:a40a54e4b686eb
==> Downloading from https://pkg-containers.githubusercontent.com/ghcr1/blobs/sh
######################################################################## 100.0%
==> Pouring zsh--5.8_1.mojave.bottle.tar.gz
🍺  /usr/local/Cellar/zsh/5.8_1: 1,531 files, 13.5MB
Removing: /usr/local/Cellar/zsh/5.7.1... (1,515 files, 13.3MB)
==> Checking for dependents of upgraded formulae...
==> No broken dependents found!
==> Caveats
==> grep
All commands have been installed with the prefix "g".
If you need to use these commands with their normal names, you
can add a "gnubin" directory to your PATH from your bashrc like:
  PATH="/usr/local/opt/grep/libexec/gnubin:$PATH"
Unable to verify OpenPGP signature unless logged into keybase and following hashicorp
Archive:  tfenv_download.qXFIgg/terraform_1.0.5_darwin_amd64.zip
  inflating: /usr/local/Cellar/tfenv/2.2.2/versions/1.0.5/terraform
Installation of terraform v1.0.5 successful. To make this your default version, run 'tfenv use 1.0.5'
PROTIP: The above commands create folder .terraform.d on your $HOME folder, containing files
checkpoint_cacheandcheckpoint_signature.See HashiCorp’s blog about version announcements.
-
Make the latest the default:
tfenv use 1.0.5
Switching default version to v1.0.5
Switching completed
-
Proceed to Configuration below.
Install on Windows
- In a Run command window as Administrator.
- Install Chocolatey cmd:
-
Install Terraform using Chocolatey:
choco install terraform -y
The response at time of writing:
Chocolatey v0.10.8
Installing the following packages:
terraform
By installing you accept licenses for the packages.
Progress: Downloading terraform 0.10.6... 100%

terraform v0.10.6 [Approved]
terraform package files install completed. Performing other installation steps.
The package terraform wants to run 'chocolateyInstall.ps1'.
Note: If you don't run this script, the installation will fail.
Note: To confirm automatically next time, use '-y' or consider:
choco feature enable -n allowGlobalConfirmation
Do you want to run the script?([Y]es/[N]o/[P]rint): y

Removing old terraform plugins
Downloading terraform 64 bit
  from 'https://releases.hashicorp.com/terraform/0.10.6/terraform_0.10.6_windows_amd64.zip'
Progress: 100% - Completed download of C:\Users\vagrant\AppData\Local\Temp\chocolatey\terraform\0.10.6\terraform_0.10.6_windows_amd64.zip (12.89 MB).
Download of terraform_0.10.6_windows_amd64.zip (12.89 MB) completed.
Hashes match.
Extracting C:\Users\vagrant\AppData\Local\Temp\chocolatey\terraform\0.10.6\terraform_0.10.6_windows_amd64.zip to C:\ProgramData\chocolatey\lib\terraform\tools...
C:\ProgramData\chocolatey\lib\terraform\tools
 ShimGen has successfully created a shim for terraform.exe
 The install of terraform was successful.
  Software installed to 'C:\ProgramData\chocolatey\lib\terraform\tools'

Chocolatey installed 1/1 packages.
 See the log for details (C:\ProgramData\chocolatey\logs\chocolatey.log).
- Proceed to Configuration below.
Install on Linux
-
https://github.com/migibert/terraform-role Ansible role to install Terraform on Linux machines
-
https://github.com/hashicorp/docker-hub-images/tree/master/terraform builds Docker containers for using the terraform command line program.
To manually install on Ubuntu:
-
On a Console (after substituing the current version):
sudo curl -O https://releases.hashicorp.com/terraform/0.12.0/terraform_0.12.0_linux_amd64.zip
sudo apt-get install unzip
sudo mkdir /bin/terraform
sudo unzip terraform_0.11.5_linux_amd64.zip -d /usr/local/bin/
Install on Linux using Docker
-
To install Docker CE on Linux:
sudo apt-get update
sudo apt-get install \
 apt-transport-https \
 ca-certificates \
 curl \
 software-properties-common

curl -fsSL https://download.docker.com/linux/ubuntu/gpg | sudo apt-key add -

sudo add-apt-repository \
"deb [arch=amd64] https://download.docker.com/linux/ubuntu \
$(lsb_release -cs) \
stable"

sudo apt-get update
sudo apt-get install docker-ce
Configure Terraform logging
-
To set a level of logging (similar to Log4j’s INFO < WARNING < ERROR < DEBUG < TRACE to see Terraform’s internal logs):
export TF_LOG=TRACE
-
Define where logs are saved:
export TF_LOG_PATH=/tmp/terraform.log
-
Define the above settings in a shell file used to call Terraform.
Install Utilities
You’ll need a text editor with plugins to view HCL:
VSCode
-
Use VSCode (installed by default) to view blocks in Terraform HCL files:
cd ~/clouddrive/terraform-on-azure/02-init-plan-apply-destroy/01-intro
code main.tf
-
In VSCode, press shift+command+X or click the bottom-left menu icon and select “Extensions” to select the add-on from HashiCorp

-
If you use Azure, install the “Azure Terraform” extension from Microsoft.
CAUTION: Avoid installing anything from publishers you don’t know.
-
Define .gitignore for use with VSCode:
-
Review code:
NOTE: Each key-value pair is an argument containing an expression of a text value.
Each HCL file needs to specify the (cloud) provider being used is “azure”.
NOTE: Multiple providers can be specified in the same HCL file.
Each Provider is a plugin that enables Terraform to interface with the API layer of various cloud platforms and environments.
-
Search for “Resource Group” in Terraform’s Azure Provider docs:
https://registry.terraform.io/providers/hashicorp/azurerm/latest/docs
for “azurerm_resource_group”.
JetBrains add-ins
https://plugins.jetbrains.com/plugin/7808-terraform-and-hcl
Issues to look for
There are several industry standards which prescribe “controls” and configurations:
- AWS Foundations referenced by the AWS Security Hub service
-
CIS
- SOC2
- ISO
-
FedRAMP
- PCI
- HIPAA
- NIST
- Hightrust
- etc.
The trouble with written policies and standards is that they are in PDF and Excel files. So few read them.
Terraform Enterprise TFLint
An important distinction between Cloud Formmation and Terraform is that Terraform tracks the state of each resource.
Terraform Enterprise automatically stores the history of all state revisions. https://www.terraform.io/docs/state
VIDEO: Terraform Enterprise has producers (experts) and read-only consumers. Terraform Enterprise processes HCL with auditing policies like linter https://github.com/terraform-linters/tflint, installed on Windows using choco install tflint. See https://spin.atomicobject.com/2019/09/03/cloud-infrastructure-entr/
[8:25] Terraform Enterprise enforces “policy as code” which automates the application of what CIS (Center for Internet Security) calls (free) “benchmarks” – secure configuration settings for hardening operating systems, for AWS settings at (the 155 page) https://www.cisecurity.org/benchmark/amazon_web_services/.
- Set to public instead of private?
Terratest from Gruntwork.
https://itnext.io/automatic-terraform-linting-with-reviewdog-and-tflint-f4fb66034abb
Programs processing Policy as Code
PROTIP: To prevent vulnerabilities before they are manifested in resources on the internet, several groups have created programs which can automatically attest to whether a Terraform file actually meets or violates specific policies defined as code.
This enables a CI/CD pipeline to stop processing if a Terraform file fails a scan.
github.com/iacsecurity/tool-compare details each policy check and which tool performs them:
-
OSS Python-based Checkov by Bridgecrew.io (acquired by Palo Alto Networks)
-
Fremium Indeni Cloudrail
-
OSS Go-based Kics (Keeping Infrastructure as Code Secure) by Checkmarx
-
Freemium Snyk
-
OSS Terrascan by Accurics.
-
OSS Go-based Tfsec by Aqua Security has a VSCode extension (/usr/local/Cellar/tfsec/0.56.0: 5 files, 16.9MB)
-
https://github.com/accurics/terrascan uses Rego policies
-
SonarQube
-
Terraform FOSS with Atlantis
-
Terraform Enterprise Sentinel
STAR: Rob Schoening presents an evaluation of the above tools.
Post deployment, Pulumi finds unused resources daily and shut them down.
Install Security Scanners
https://github.com/iacsecurity/tool-compare lists specific tests (of vulnerability) and which products can detect each.
Checkov is an OSS static scanner of Terraform, AWS Cloud Formation, and Azure ARM templates.
Cloudrail from Indeni is a freemium scanner utility which audits Terraform IaC code for security concerns. It calls itself “context-aware” because (although Terratest requires that you deploy the infra and run tests against the live infra), Cloudrail takes a hybrid (SAST+DAST) approach - parsing static TF files into a database (of resources in a python object) and “continuously” comparing that against the live infrastructure in a separate python object fetched dynamically using their Dragoneye data collector (for AWS and Azure).
When run on local environments, security scanning achieves “shift left”.
Install Checkov scanner
- If you prefer using Conda, please install that up and setup an environment.
-
The Terraform files can be analyzed (before they become resources) using static scanners TFSec or Checkov (Twitter: #checkov</a>):
pip3 install -U checkov
checkov --help
- Expand your Terminal to full screen.
-
Let’s start by scanning a single tf file within terragoat/terraform/aws:
checkov -f db-app.tf > db-app.txt
It takes several minutes.
> db-app.txt above sends the output to a new file. If the file already exists, it overwrites the previous run.
Checkov is “freemium” to the licensed Bridgecrew platform, the program asks:
Would you like to “level up” your Checkov powers for free?  The upgrade includes:

• Command line docker Image scanning
• Free (forever) bridgecrew.cloud account with API access
• Auto-fix remediation suggestions
• Enabling of VS Code Plugin
• Dashboard visualisation of Checkov scans
• Integration with GitHub for:
 ◦ 	Automated Pull Request scanning
 ◦ 	Auto remediation PR generation
• Integration with up to 100 cloud resources for:
 ◦ 	Automated cloud resource checks
 ◦ 	Resource drift detection

and much more...

It's easy and only takes 2 minutes. We can do it right now!

To Level-up, press 'y'...

Level up? (y/n): _
-
Edit the output file.
       _               _
___| |__   ___  ___| | _______   __
  / __| '_ \ / _ \/ __| |/ / _ \ \ / /
 | (__| | | |  __/ (__|   < (_) \ V /
  \___|_| |_|\___|\___|_|\_\___/ \_/

By bridgecrew.io | version: 2.0.829
Update available 2.0.829 -> 2.0.873
Run pip3 install -U checkov to update

terraform scan results:

Passed checks: 12, Failed checks: 14, Skipped checks: 0

Check: CKV_AWS_211: "Ensure RDS uses a modern CaCert"
 PASSED for resource: aws_db_instance.default
 File: /db-app.tf:1-41
As of this writing, Checkov has 50 built-in checks. Each check has a Guide at https://docs.bridgecrew.io/docs/general-policies which defines recommended Terraform coding.
-
Remove the file to save disk space.
-
Scan a directory (folder), such as from Terragoat:
checkov -d aws
Install full-fast-fail scanner
This library is not yet in Homebrew, so:
git clone https://github.com/JamesWoolfenden/full-fast-fail --depth 1
cd full-fast-fail
./checker.sh
Terragoat for learning
(It’s in the same vein as RhinoLabs’ penetration testing training tool, CloudGoat.)
-
Get it on your laptop after navigating to a folder:
git clone https://github.com/bridgecrewio/terragoat --depth 1
cd terragoat/terraform
-
Vulnerabilities designed into Terragoat are for specific services in AWS, Azure, and GCP clouds. Let’s look at aws services:
ls aws
Response:
db-app.tf - database application
ec2.tf
ecr.tf - elastic Kubernetes service
eks.tf - elastic Kubernetes service
elb.tf - elastic load balancer
es.tf
iam.tf
kms.tf - key management service
lambda.tf
neptune.tf
rds.tf - relational database service
xs3.tf - key management service
PROTIP: BLAH: These are a few of the 200+ AWS services.
QUESTION: How will you know when new AWS services become available or deprecated?
Known-bad IaC for training
-
To use the Terraform to create resources, I created a setup.sh based on CLI code in this README.md file.
-
Edit my setup.sh file to override default values in file consts.tf:
- “acme” for company_name in TF_VAR_company_name
- “mydevsecops” for environment in TF_VAR_environment
- TF_VAR_region
-
Edit my setup.sh file to override default values in file providers.tf:
alias      = "plain_text_access_keys_provider"
  region     = "us-west-1"
  access_key = "AKIAIOSFODNN7EXAMPLE"
  secret_key = "wJalrXUtnFEMI/K7MDENG/bPxRfiCYEXAMPLEKEY"
SECURITY WARNING: Replace key values with a variable name.
https://github.com/bridgecrewio/terragoat#existing-vulnerabilities-auto-generated
-
Sign up for the #CodifiedSecurity Slack community (confirm by email).
, and #airiam,
https://medium.com/bridgecrew/terragoat-vulnerable-by-design-terraform-training-by-bridgecrew-524b50728887
Gruntwork’s sample
Gruntwork.io offers (for $795/month = $9,500/year), access to their 250,000-line Reference Architecture of (opinionated) starter code to create a production-worthy “defense in depth” setup on AWS:

An additional $500 a month gets you access to their Reference Architecture Walktrough video class. But previews of the class is free:
The Gruntwork Production Framework organizes app solutions for going to production on the public cloud:

For those who can’t subscribe, Yevegeniy (Jim) Brikman (ybrikman.com, co-founder of DevOps as a Service Gruntwork.io) has generously shared:
-
https://github.com/brikis98/infrastructure-as-code-talk/tree/master/terraform-configurations
-
https://github.com/brikis98/terraform-up-and-running-code provides bash scripts to run on Ubuntu server to install Apache, PHP, and a sample PHP app on an Ubuntu server. It also has automates tests written in Ruby script to make sure it returns “Hello, World”. The repo is referenced by the book Terraform Up & Running (OReilly book $11.99 on Amazon) and website:
terraformupandrunning.com
The sample scripts referenced by this tutorial contain moustache variable mark-up so that you can generate a set for your organization.
-
https://www.terraform.io/docs/providers/azurerm/r/virtual_machine_scale_set.html
-
https://training.gruntwork.io/courses/reference-architecture-walkthrough/lectures/4211191
Cloudposse
https://github.com/cloudposse has mostly AWS Terraform, such as https://github.com/cloudposse/load-testing
Standard Files and Folders Structure
VIDEO: In this 2 hour video mastercourse “The Gruntwork Infrastructure Module Cookbook” on Teachable, Yevgeniy (Jim) Brikman (of Gruntwork) demos the logic of how to structure (from 2017, before Workspaces) a Terraform project folder such as Gruntwork’s example: Gruntwork recommends separate folders:
- vpc (networking)
- frontend
- mysql (db)
variables.tf (vars.tf)
References:
- https://www.terraform.io/language/values/variables
- https://kodekloud.com/topic/understanding-the-variable-block/
- PROTIP: Specifying passwords in environment variables is more secure than typing passwords in tf files*.
PROTIP: For reusability, static values are replaced with variables resolved in a separate variables.tf file.
This file defines for each (and every) variable referenced within tf files its description, default.
For example, reference to environment variables:
variable "server_port" {
  description = "The port the server will use for HTTP requests"
  default = 8080
}
variable "aws_access_key" {}
variable "aws_secret_key" {}
variable "subnet_count" {
  default = 2
}
There are several types of variables:
variable "image_name" {
  type        = "string"
  description = "The name of the image for the deployment."
  default     = "happy_randomizer"
}
variable "service_networks" {
  type        = "list"
  description = "The name or ID of one or more networks the service will operate on."
  default     = ["Joyent-SDC-Public","Joyent-SDC-Private"]
}
variable "image_version" {
  type        = "string"
  description = "The version of the image for the deployment."
  default     = "1.0.0"
}
variable "image_type" {
  type        = "string"
  description = "The type of the image for the deployment."
  default     = "lx-dataset"
}
variable "package_name" {
  type        = "string"
  description = "The package to use when making a deployment."
  default     = "g4-highcpu-128M"
}
variable "service_name" {
  type        = "string"
  description = "The name of the service in CNS."
  default     = "happiness"
}
“Collection” variable types allow multiple values of one primitive type variable to be grouped together.
type = list(string) can be iterated from index 0 for the first item.
type = list(number) causes an error if entries are not numbers.
A “structural”
variable "someone" {
  type = object({
    name = string
    pant_size = number
    favorite_foods = list(string)
    is_available = bool
  })
  default = {
     name = "Joe"
     pant_size = 42
     favorite_foods = ["salmon", "chicken", "bananas"]
     is_available = true
  }
}
Boolean true/false and numbers are never between quotes.
type = set(string) cannot contain duplicates.
type = tuple([string, number, bool]) is used for mixed types in a list.
NOTE: A tuple cannot be converted into a string.
resource ... {
   ...
   for_each = toset(var.regio)
}
variable region {
   type = list
   default = ["us-east-1",
              "us-east-1",
              "ca-central-1"]
   description = "A list of AWS Regions"
}
variable "ami" {
      type = map
      default = {
         us-west-1 = "ami-...123",
         us-east-1 = "ami-...456",
         eu-east-1 = "ami-...789",
      }
}
To retrieve indirectly by key name to obtain value “HHD”:
ami = lookup( var.ami_map, "us-west-1")
The result is ami-…123
-
To select the appropriate storage size based on your server plan even using nested lookups like in the example below.
storage = lookup(var.storages,lookup(var.plans,var.config,"1xCPU-1GB"),"25")
variable storages {
type = map
default = {
   "1xCPU-1GB" = "25"
   "1xCPU-2GB" = "50"
   "2xCPU-4GB" = "100"
}
}
variable plans {
type = map
default = {
   "5USD"  = "1xCPU-1GB"
   "10USD" = "1xCPU-2GB"
   "20USD" = "2xCPU-4GB"
}
}
variable config {
default = "5USD"
}
If the key does not exist in the map, the interpolation will fail. To avoid issues, you should specify a third argument, a default string value that is returned if the key could not be found. Do note though that this function only works on flat maps and will return an error for maps that include nested lists or maps.
TODO: Obtain the latest ami.
Linters identify when they are not.
Interpolation & HCL2 syntax
Terraform 0.11 and earlier required all non-constant expressions to be provided via interpolation syntax with a format similar to shell scripts:
image = "${var.aws_region}"
PROTIP: Interpolation allows a single file to be specified for several environments (dev, qa, stage, prod), with a variable file to specify only values unique to each enviornment.
But this pattern is now deprecated.
var. above references values defined in file “variables.tf”, which provide the “Enter a value:” prompt when needed:
Values can be interpolated using syntax wrapped in ${}, called interpolation syntax, in the format of ${type.name.attribute}. For example, $\{aws.instance.base.id\} is interpolated to something like i-28978a2. Literal $ are coded by doubling up $$.
Interpolations can contain logic and mathematical operations, such as abs(), replace(string, search, replace).
HCL does not contain conditional if/else logic, which is why modules (described below) are necessary.
HCL2 is the new experimental version that combines the interpolation language HIL to produce a single configuration language that supports arbitrary expressions. It’s not backward compatible, with no direct migration path.
main.tf
References:
- https://www.terraform.io/language/values/variables#booleans
In this minimal sample file for AWS, HCL specifies the provider cloud, instance type used to house the AMI, which is specific to a region:
terraform {
  required_version = ">= 0.8, < 0.9"
}
provider "aws" {
  version = ">= 1.2, < 1.2"
  alias = "${var.aws_region_alias}"
  region = "${var.aws_region}"
  access_key = "${var.AWS_ACCESS_KEY}"
  secret_key = "${var.AWS_SECRET_KEY}"
}

resource "aws_instance" "web" {
  ami           = "ami-40d28157"
  instance_type = "t2.micro"
  subnet_id     = "subnet-c02a3628"
  vpc_security_group_ids = ["sg-a1fe66aa"]
  tags {
    Identity = "..."
    Name = "my_server"
  }
}
output "public_ip"  {
  value = aws.instance.my_server[*].public_ip
}
In this minimal sample file for Azure:
provider “azurerm” {
   version = “~> 2.1.0"
   subscription_id = var.subscription_id

   client_id = var.client_id
   client_secret = var.client_secret
   tenant_id = var.tenant_id

   features {}
}
terraform, the first block name, defines an argument (between curly braces) which defines the versions of terraform the file was tested for use.
Each block defined between curly braces is called a “stanza”.
REMEMBER: Key components of Terraform are: provider, resource, provision. “provider” and “resource” are each a configuration block.
In the resource block, “aws_instance” is the Resource Type. “web” is the Resource Name.
If the prefix block name begins with a known provider name such as “time_” or “random_”, a type =” is not needed because Terraform assumes that prefix as the type (type = time_static) referenced by ${time_static.time_update.id}
The ami (amazon machine image) identifier is obtained from Amazon’s catalog of public images.
“t1.micro” qualifies for the Amazon free tier available to first-year subscribers.
PROTIP: Vertically aligning values helps to make information easier to find.
subnet_id is for the VPC and vpc_security_group_ids array.
tags_identity is to scope permissions.
A data source is accessed through a data provider.
References:
- http://www.antonbabenko.com/2016/09/21/how-i-structure-terraform-configurations.html
- Another example is from the Terransible lab and course
- https://www.ahead.com/resources/how-to-create-custom-ec2-vpcs-in-aws-using-terraform/
Multi-cloud/service
Terraform is more accurately characterized as a “multi-service” tool rather than a “multi-cloud tool” because PROTIP: One would need to rewrite templates to move from, say, AWS to Azure. Terraform doesn’t abstract resources needed to do that. However, it does ease migration among clouds to avoid cloud vendor lock-in.
Terraform provides an alternative to each cloud vendor’s IaC solution:
- AWS - Cloud Formation & CDK
- Microsoft Azure Resource Manager Templates
- Google Cloud Platform Deployment Manager
- OpenStack Heat (on-premises)
Terraform can also provision on-premises servers running OpenStack, VMWare vSphere, and CloudStack as well as AWS, Azure, Google Cloud, Digitial Ocean, Fastly, and other cloud providers (responsible for understanding API interacitons and exposing resources).
In GCP, Terraform state is stored as an object in a configurable prefix in a given bucket on GCS (Google Cloud Storage), which supports state locking.
To set an IAM policy for a specified project and replace any existing policy that is already attached, the use a google_project_iam_policy authoritative resource.
References:
- https://oracle-base.com/articles/misc/terraform-variables
Terraform Providers
https://www.terraform.io/docs/language/providers/index.html
-
List providers from https://github.com/terraform-providers
terraform providers
Most commonly, Terraform Providers translate HCL into API calls defined in (at last count, 109) cloud provider repositories from Terraform, Inc. Note there is a local provider and also a “random” provider to generate random data:
Terraform Built-in Providers
https://github.com/hashicorp/terraform/tree/master/builtin/providers
US Majors: “aws”, “azurestack”, “google”, “google-beta”, “azurerm”, “azuread”,
“heroku”, Kubernetes, “gitlab”, DigitalOcean, Heroku, GitHub, “cloudscale”, “cloudstack”, “opentelekomcloud”, “oci” (Oracle Cloud Infrastructure), “opc” (Oracle Public Cloud), “oracclepass” (Oracle Platform Cloud), “flexibleengine”, “nsxt”, “rancher”, “rancher2”, (VMware NSX-T), “vcd” (VMware vCloud Director ), “openstack”, “scaleway”, “UCloud”, “JDcloud”, Joyent Triton, Circonus, NaverCloud, TelefonicaOpenCloud, oneandone, Skytap, etc.
Cloud operators in China: “alicloud”, “huaweicloud”, “tencentcloud”, etc.
Monitoring and other infrastructure services vendors: “datadog”, “grafana”, “newrelic”, “pagerduty”, “bigip” (F5 BigIP), “RabbitMQ”, “acme”, “yandex”, “ciscoasa” (ASA), etc.
CDN vendors: Dyn, “fastly”, “cloudflare”, “netlify”, “packet” (Terraform Packet), “consul” (Terraform Consul), “nutanix”, “ignition”, “dnsimple”, “fortis”, LogicMonitor, “profitbricks”, “statuscake”, etc.
Database and repositories: “influxdb”, “mysql”, “postgresql”, “vault” (Terraform), “bitbucket”, “github”, “archive”, etc.
Servers: “docker”, “dns”, UltraDNS, “helm” (Terraform), “http”, “vsphere” (VMware vSphere), etc.
chef, “spotinst”, “linode”, “hedvig”, “selectel”, “brightbox”, “OVH”, “nomad”, “local”, Panos, NS1, “rundeck”, VMWare vRA7, random, external, “null”, Icinga2, Arukas, runscope, etc.
The follow have been archived: Atlas (Terraform), “clc” (CenturyLinkCloud), OpsGenie, (IBM) SoftLayer, PowerDNS, DNSMadeEasy, Librato, Mailgun, LogEntries, Gridscale, CIDR, etc.
Custom Providers
Custom Terraform Providers are written in the Go language.
The steps below are based on https://www.terraform.io/intro/examples and implemented in the setup scripts at: https://github.com/wilsonmar/mac-setup which performs the following steps for you:
- Install a Git client if you haven’t already.
-
Use an internet browser (Chrome) to see the sample assets at:
https://github.com/terraform-providers/terraform-provider-aws.git
- If you are going to make changes, click the Fork button.
-
Create or navigate to a container folder where new repositories are added. For example:
~/gits/wilsonmar/tf-sample -
Get the repo onto your laptop (substituting “wilsonmar” with your own account name):
git clone https://github.com/terraform-providers/terraform-provider-aws.git --depth=1 && cd tf-sample
The above is one line, but may be word-wrapped on your screen.
The response at time of writing:
Cloning into 'tf-sample'...
remote: Counting objects: 12, done.
remote: Compressing objects: 100% (12/12), done.
remote: Total 12 (delta 1), reused 9 (delta 0), pack-reused 0
Unpacking objects: 100% (12/12), done.
-
PROTIP: Make sure that the AWS region is what you want.
https://www.terraform.io/docs/providers/aws/r/instance.html AWS provider
A template data store Template Provider exposes data sources which use templates to generate strings for other Terraform resources or outputs.
Credentials in tfvars
Actual values which replace each variable in tf files are defined in a *.tfvars file for each environment:
PROTIP: Separate Terraform configurations by a folder for each environment:
- base (template for making changes)
- dev
- loadtest (performance/stress testing)
- stage
- uat (User Acceptance Testing)
- prod
- demo (demostration used by salespeople)
- train (for training users)
Credentials in a sample terraform.tfvars file for AWS:
aws_access_key = "123456789abcdef123456789"
aws_secret_key = "Your AWS SecretKey"
aws_region = "us-east-1"
aws_accountId = "123456789123456"
private_key_path = "C:\\PathToYourPrivateKeys\PrivateKey.pem"
It’s not good security to store such information in a repo potentially shared, so tfvars files are specified in .gitignore, and retrieved from secret storage before running terraform commands. Also for security, the variables are then removed from memory shortly after usage.
-
Navigate into the base folder.
PROTIP: Terraform commands act only on the current directory, and does not recurse into sub directories.
A development.tfvars file may also contain:
environment_tag = "dev"
tenant_id = "223dev"
billing_code_tag = "DEV12345"
dns_site_name = "dev-web"
dns_zone_name = "mycorp.xyz"
dns_resource_group = "DNS"
instance_count = "1"
subnet_count = "1"
The production.tfvars file usually instead contain more instances and thus subnets that go through a load balancer for auto-scaling:
environment_tag = "prod"
tenant_id = "223prod"
billing_code_tag = "PROD12345"
dns_site_name = "marketing"
dns_zone_name = "mycorp.com"
dns_resource_group = "DNS"
instance_count = "6"
subnet_count = "3"
All these would use
main_config.tfandvariables.tffiles commonly used for all environments:Tag for cost tracking by codes identifying a particular budget, project, department, etc.
Defaults and lookup function
PROTIP: Variables can be assigned multiple default values selected by a lookup function:
# AWS_ACCESS_KEY_ID
# AWS_SECRET_ACCESS_KEY
# export AWS_DEFAULT_REGION=xx-yyyy-0

variable "server_port" {
  description = "The port the server will use for HTTP requests"
  default = 8080
}
variable "amis" {
  type = "map”"
  default = {
 us-east-1 = "ami-1234"
 us-west-1 = "ami-5678"
  }
}
ami = ${lookup(var.amis, "us-east-1")}
PROTIP: With AWS EC2, region “us-east-1” must be used as the basis for creating others.
NOTE: Amazon has an approval process for making AMIs available on the public Amazon Marketplace.
The “default” argument requires a literal value and cannot reference other objects in the configuration.
Count of items processed
VIDEO: To create several items (such as files) using a count that is indexed from 0:
-
In a .tf file:
resource "local_file" "my_data" { my_data_filename = var.my_data_filename[my_data_file_count.index] my_data_file_count = 3 } -
In a variables.tf file, my_data_filename[0] is the first default file name:
variable "my_data_filename" { default = [ "/root/file_a.txt", "/root/file_b.txt", "/root/file_c.txt", "/root/file_d.txt" ] } -
After terraform apply, a list of files would yield:
file_a.txt
file_b.txt
file_c.txt
The default directory_permission and file_permission is 0777.
VIDEO: To ensure that items are properly deleted, a for-each is used to create a map referenced by key values instead of a blind list referenced by an index.
.gitignore
-
In the .gitignore file are files generated during processing, so don’t need to persist in a repository:
.DS_Store
*.pem
*.tfvars
*.auto.tfvars
terraform.tfvars.json
*.tfplan
*.plan
*.tfstate
terraform.tfstate*
*.tfstate.backup
.terraform/
*.lock.info
*.iml
vpc
.DS_Storeis created internally within MacOS and so serves no purpose in GitHub..pemare private key files which should never be stored in GitHub.*.tfvarscontains secrets, so should not be saved in GitHub.*.tfplanis created each timeterraform planis run, so no need to save it in GitHub.terraform.tfstate*is a wildcard for folderterraform.tfstate.dand variants, which contain Terraform Workspaces.tfstate.backupis created from the most recent previous execution before the currenttfstatefile contents..terraform/specifies that the folder is ignored when pushing to GitHub.Terraform apply creates a dev.state.lock.info file as a way to signal to other processes to stay away while changes to the environment are underway.
PROTIP: CAUTION: tfstate files can contain secrets, so .gitignore and delete them before git add.
-
Define .gitignore for use with editors used by the team: VSCode, PyCharm, IntelliJ, etc.
https://www.toptal.com/developers/gitignore/api/terraform,intellij+all,visualstudiocode
https://intellij-support.jetbrains.com/hc/en-us/community/posts/360006390300-Terraform
https://community.opengroup.org/osdu/platform/deployment-and-operations/infra-azure-provisioning/-/blob/master/.gitignore
Upgrading Terraform version
When upgrading Terraform version, configurations may need syntax update.
-
To make updates automatically:
terraform versionupgrade
Terraform reversed from resources
Wisdom Hambolu analyzes use of a utility that attempts to convert Cloud Formation files to Terraform, with mixed results.
To generate from resources created under an AWS account/Azure Subscription Terraform HCL files, here are the options:
NOTE: No longer supported is the Ruby-based https://github.com/dtan4/terraforming. It also comes as a Docker container.
Created about the same time are:
- Google’s terraformer
- cloud diagram creator Cycloid’s terracognita https://blog.cycloid.io/what-is-terracognita
Both are installed onto MacOS using Homebrew.
brew info terracognita
brew install terracognita
terracognita aws resources | wc -l      # 119
terracognita azurerm resources | wc -l  # 119
terracognita google resources | wc -l   #  21
On GCP, customize based on video at https://asciinema.org/a/330055 :
terracognita google --project cycloid-sandbox --region us-central1 \
   --credentials "$HOME/cycloid/google/cycloid-iam-9789b351a19b.json \
   --tfstate resources.tfstate \
   --hcl resources.tf \
   -i google_compute_instance \
   -i google_compute_network
On Azure:
terracognita azurerm --tenant-id $TENANT_ID \
   --subscription-id $SUBSCRIPTION_ID \
   --resource-group-name $GROUP_NAME [format to import] \
   --client-id $CLIENT_ID --client-secret $CLIENT_SECRET
On AWS with profiles:
terracognita aws --aws-default-region "$AWS_REGION" \
     [format to import] --aws-profile $PROFILE_NAME
On AWS with credentials:
terracognita aws --aws-default-region '$AWS_REGION" \
     [format to import] --aws-access-key $AWS_ACCESS_KEY \
     --aws-secret-access-key $AWS_SECRET_ACCESS_KEY
On AWS with credentials file:
terracognita aws --aws-default-region $AWS_REGION \
      [format to import] --aws-shared-credentials-file $FILE_PATH
Additionally on AWS:
--hcl test.tf \
   --module module-name (as tf module) Optional with this format: \
   --module-variables file.json/yaml (to limit vars on the module) \
   --tfstate test.tfstate (as tfstate)
More info at https://github.com/cycloidio/terracognita#modules
brew info terraformer
brew install terraformer
-
Diagram generation tools:
Hava.io
The AWS network diagram generator from Hava.io visualizes security groups, connections, etc. on AWS, Azure, and GCP so that you can more easily spot anomalies, review cost forecasts, etc.

Selecting each resource reveals its attributes: security groups, connections, subnets, ingress/egress IPs.

For a 14-day trial on AWS, provide your Cross-Account ARN.

Export diagrams for on-boarding, management, audit and compliance purposes in 3D diagrams as well as output to Visio, draw.io or any VSDX. Diagrams can be embedded as iframes on webpages.
Cloudcraft
Cloudviz
https://cloudviz.io/ for AWS at $10/month
LucidChart?
-
Deploy your existing CFT instead of trying to convert it:
https://www.terraform.io/docs/providers/aws/r/cloudformation_stack.html
-
It may be possible for simple cases but perhaps very complex (almost impossible) to convert CFT intrinsic functions:
https://docs.aws.amazon.com/AWSCloudFormation/latest/UserGuide/intrinsic-function-reference.html
Azure AzTfy
From Azure: https://github.com/Azure/aztfy a tool to bring existing Azure resources under the management of Terraform, based on https://github.com/hashicorp/terraform-provider-azurerm
*1 - CF/CFN (CloudFormation) is used only within the AWS cloud while others operate on several clouds. CFN is the only closed-sourced solution on this list. Code for Terraform is open-sourced at https://github.com/hashicorp/terraform
Those who create AMI’s also provide CFN templates to customers.* (cloudnaut.io has free templates)
TOOL: Troposphere and Sceptre makes CFN easier to write with basic loops and logic that CFN lacks.
But in Sep 2018 CloudFormation got macros to do iteration and interpolation (find-and-replace). Caveat: it requires dependencies to be setup.
CF/CFN (Cloud Formation) limits the size of objects uploaded to S3.
Can’t really do that with CFN alone. Even though Cloud Formation has nested stack only for AWS.
AWS Cloud Formation and Terraform can both be used at the same time. Terraform is often used to handle security groups, IAM resources, VPCs, Subnets, and policy documents; while CFN is used for actual infrastructural components, now that cloud formation has released drift detection using Bridgecrew.
NOTE: “Combined with cfn-init and family, CloudFormation supports different forms of deployment patterns that can be more awkward to do in Terraform: ASGs with different replacement policies, automatic rollbacks based upon Cloudwatch alarms, etc. due to state being managed purely internally by AWS.
Terraform is not really an application level deployment tool. So you wind up rolling your own.
Working out an odd mix of null resources and shell commands to deploy an application while trying to roll back is not straightforward and seems like a lot of reinventing the wheel.”
References about CFN:
- Puppet, Chef, Ansible, Salt AWS API libraries Boto, Fog
- AWS CloudFormation Sample Templates at https://github.com/awslabs/aws-cloudformation-templates
- AWS CloudFormation Master Class by Stéphane Maarek from Packt May 2018
- Some CloudFormation templates are compatible with OpenStack Heat templates.
Dependency Graph for visualization

-
VIDEO: The above Resource Graph visual representation of dependencies can be created by this command:
terraform graph | dot -Tsvg > graph.svg
The terraform graph command creates graphs specified in the DOT language, with the file name extension .gv, so the dot program is needed to generate .svg format used to specify graphics in programs.
-
Copy the SVG code to Clipboard to paste into webgraphwiz.com
PROTIP: Save that URL among your browser bookmarks.

The above is from “Solving Infrastructure Challenges with Terraform” 5h videos on CloudAcademy by Rogan Rakai using GCP and VSCode on https://github.com/cloudacademy/managing-infrastructure-with-terraform to create a two-tier sample WordPress app with a MYSQL_5_7 database, both running under Kubernetes (GKE), with a replica in another region.
Alternately, several apps can display SVG files, including Sketch.app.
-
A more colorful format using Blast Radius [examples]:

Terragrunt from Gruntwork
VIDEO: A popular replacement of some standard terraform commands are terragrunt commands open-sourced at https://github.com/gruntwork-io/terragrunt by Gruntwork:
   terragrunt get
   terragrunt plan
   terragrunt apply
   terragrunt output
   terragrunt destroy
These wrapper commands provide a quick way to fill in gaps in Terraform:
-
provide dynamic values to a provider
-
provide extra tools for working with multiple Terraform modules
-
managing remote state, and keeping DRY (Don’t Repeat Yourself), so that you only have to define it once, no matter how many environments you have. This reduces boilerplate.
-
configure remote state, locking, extra arguments, etc.
WARNING: There are some concerns about Terragrunt’s use of invalid data structures. See https://github.com/gruntwork-io/terragrunt/issues/466
QUESTION: Terraform Enterprise cover features of Terragrunt?
References:
- https://blog.gruntwork.io/introducing-the-gruntwork-module-service-and-architecture-catalogs-eb3a21b99f70 August 26, 2020
- https://www.missioncloud.com/blog/aws-cloudformation-vs-terraform-which-one-should-you-choose
Install on MacOS:
-
To install Terragrunt on macOS:
brew unlink tfenv
brew install terragrunt
brew unlink terraform
brew link --overwrite tfenv
The unlink is to avoid error response:
Error: Cannot install terraform because conflicting formulae are installed.
  tfenv: because tfenv symlinks terraform binaries

Please `brew unlink tfenv` before continuing.

Unlinking removes a formula's symlinks from /usr/local. You can
link the formula again after the install finishes. You can --force this
install, but the build may fail or cause obscure side effects in the
resulting software.
Otherwise:
==> Installing dependencies for terragrunt: terraform
==> Installing terragrunt dependency: terraform
==> Downloading https://homebrew.bintray.com/bottles/terraform-0.12.24.catalina.
Already downloaded: /Users/wilson_mar/Library/Caches/Homebrew/downloads/041f7578654b5ef316b5a9a3a3af138b602684838e0754ae227b9494210f4017--terraform-0.12.24.catalina.bottle.tar.gz
==> Pouring terraform-0.12.24.catalina.bottle.tar.gz
🍺  /usr/local/Cellar/terraform/0.12.24: 6 files, 51.2MB
==> Installing terragrunt
==> Downloading https://homebrew.bintray.com/bottles/terragrunt-0.23.10.catalina
==> Downloading from https://akamai.bintray.com/d6/d6924802f5cdfd17feae2b561ab9d
######################################################################## 100.0%
==> Pouring terragrunt-0.23.10.catalina.bottle.tar.gz
🍺  /usr/local/Cellar/terragrunt/0.23.10: 5 files, 30.4MB
-
For the Terragrunt menu on macOS:
terragrunt
Expand the Terminal/console window edge for full screen to see all lines without wrapping:
DESCRIPTION:
terragrunt - Terragrunt is a thin wrapper for Terraform that provides extra tools for working with multiple
Terraform modules, remote state, and locking. For documentation, see https://github.com/gruntwork-io/terragrunt/.

USAGE:
terragrunt <COMMAND> [GLOBAL OPTIONS]

COMMANDS:
run-all               Run a terraform command against a 'stack' by running the specified command in each subfolder. E.g., to run 'terragrunt apply' in each subfolder, use 'terragrunt run-all apply'.
terragrunt-info       Emits limited terragrunt state on stdout and exits
validate-inputs       Checks if the terragrunt configured inputs align with the terraform defined variables.
graph-dependencies    Prints the terragrunt dependency graph to stdout
hclfmt                Recursively find hcl files and rewrite them into a canonical format.
aws-provider-patch    Overwrite settings on nested AWS providers to work around a Terraform bug (issue #13018)
*                     Terragrunt forwards all other commands directly to Terraform

GLOBAL OPTIONS:
terragrunt-config                            Path to the Terragrunt config file. Default is terragrunt.hcl.
terragrunt-tfpath                            Path to the Terraform binary. Default is terraform (on PATH).
terragrunt-no-auto-init                      Don't automatically run 'terraform init' during other terragrunt commands. You must run 'terragrunt init' manually.
terragrunt-no-auto-retry                     Don't automatically re-run command in case of transient errors.
terragrunt-non-interactive                   Assume "yes" for all prompts.
terragrunt-working-dir                       The path to the Terraform templates. Default is current directory.
terragrunt-download-dir                      The path where to download Terraform code. Default is .terragrunt-cache in the working directory.
terragrunt-source                            Download Terraform configurations from the specified source into a temporary folder, and run Terraform in that temporary folder.
terragrunt-source-update                     Delete the contents of the temporary folder to clear out any old, cached source code before downloading new source code into it.
terragrunt-iam-role                          Assume the specified IAM role before executing Terraform. Can also be set via the TERRAGRUNT_IAM_ROLE environment variable.
terragrunt-iam-assume-role-duration          Session duration for IAM Assume Role session. Can also be set via the TERRAGRUNT_IAM_ASSUME_ROLE_DURATION environment variable.
terragrunt-ignore-dependency-errors          *-all commands continue processing components even if a dependency fails.
terragrunt-ignore-dependency-order           *-all commands will be run disregarding the dependencies
terragrunt-ignore-external-dependencies      *-all commands will not attempt to include external dependencies
terragrunt-include-external-dependencies     *-all commands will include external dependencies
terragrunt-parallelism  N>                   *-all commands parallelism set to at most N modules
terragrunt-exclude-dir                       Unix-style glob of directories to exclude when running *-all commands
terragrunt-include-dir                       Unix-style glob of directories to include when running *-all commands
terragrunt-check                             Enable check mode in the hclfmt command.
terragrunt-hclfmt-file                       The path to a single hcl file that the hclfmt command should run on.
terragrunt-override-attr                     A key=value attribute to override in a provider block as part of the aws-provider-patch command. May be specified multiple times.
terragrunt-debug                             Write terragrunt-debug.tfvars to working folder to help root-cause issues.
terragrunt-log-level                         Sets the logging level for Terragrunt. Supported levels: panic, fatal, error, warn (default), info, debug, trace.
terragrunt-strict-validate                   Sets strict mode for the validate-inputs command. By default, strict mode is off. When this flag is passed, strict mode is turned on. When strict mode is turned off, the validate-inputs command will only return an error if required inputs are missing from all input sources (env vars, var files, etc). When strict mode is turned on, an error will be returned if required inputs are missing OR if unused variables are passed to Terragrunt.

VERSION:
v0.31.7

AUTHOR(S):
Gruntwork <www.gruntwork.io>
-
To define:
terragrunt = {
  # (put your Terragrunt configuration here)
}
The problem with Terragrunt
A terragrunt.hcl is needed in each folder where we want Terragrunt to generates a Terraform project in that folder. So people end up with a bunch of folders that represent all your modules, environments, regions permutations - one folder for each permutation of env+server+region+account.*
The problem with that is duplicated terragrunt.hcl configurations, which create the need to plan Terragrunt project structure carefully upfront. However, recent TF versions have:
-
partial backend configurations (so you can pass backend as CLI flags)
-
ability to set data directory tf_data_dir
-
Change to a directory with
-chdirparameter.
### Terraform Console
-
Open the Terraform Console (REPL) from a Terminal/command shell:
terraform console
The response is the prompt:
>
-
Commands can interpret numbers:
element(list("one","two","three"),0,2)The response is (because counting begins from zero):
1:3: element: expected 2 arguments, got 3 in:
-
Type exit or press (on a Mac) control+C to return to your Terminal window.
The program also expects an additional top level in all .tfvars files:
You should now be at your operating system console.
fmt HCL Coding Conventions
Terraform language style conventions include:
-
A block definition must have block content delimited by “{“ and “}” starting on the same line as the block header.
-
Indent using two spaces (not tabs).
-
A space before and after “=” assignment is not required, but makes for easier reading.
Reusable Modules
Modules are self-contained packages of Terraform configurations that are managed as a group.
In other words, a Terraform module is a container for multiple resources used together.
Putting Terraform code in modules enable their reuse, which speeds development by reducing testing and increasing the pace of change.
Terraform modules provide “blueprints” to deploy.
References:
- https://blog.gruntwork.io/how-to-create-reusable-infrastructure-with-terraform-modules-25526d65f73d
- How to Build Reusable, Composable, Battle tested Terraform Modules
- How to: Introduction to Terraform Modules
Custom modules
To add more logic to continue using declarative specifications (templates), administrators can write modules of their own.
Thus Terraform defines the “desired state configuration” (DSC).
-
To get (download and update) modules in the root module without initializing state or pull provider binaries like terraform init:
terraform get
Output from within a module
From within a module named “some_module”:
output "returned-variable" {
  value = "1"
}
Output in the main Terraform code invoking the module:
module.some_module.returned-variable
The module’s source can be on a local disk:
module "service_foo" {
  source = "/modules/microservice"
  image_id = "ami-12345"
  num_instances = 3
}
### Modules from GitHub
The source can be from a GitHub repo such as https://github.com/objectpartners/tf-modules
module "rancher" {
  source = "github.com/objectpartners/tf-modules//rancher/server-standalone-elb-db&ref=9b2e590"
}
- Notice “https://” are not part of the source string. It’s assumed.
- Double slashes in the URL above separate the repo from the subdirectory.
- PROTIP: The ref above is the first 7 hex digits of a commit SHA hash ID. Alternately, semantic version tag value (such as “v1.2.3”) can be specified. This is a key enabler for immutable strategy.
The ability to loop over modules with a single module call became available August 2020 with the release of Terraform 0.13.
### Terraform Registry
PROTIP: Learn from modules created by others in Terraform Modules Registry (marketplace) at https://registry.terraform.io/browse/modules which contains 9,000 modules shared globally by many.
For AWS in github.com/terraform-aws-modules: https://registry.terraform.io/modules/terraform-aws-modules/security-group/aws/latest
- ACM
- Appsync
- ALB
- Atlantis
- autoscaling
- Big Query
- Cloudwatch
- Cloud Front
- Eventbridge
- ebs-optimized
- ec2-instance
- ECS
- EKS
- ELB
- key-pair
- Lambda
- Load Balancer HTTP
- org-policy
- redshift
- rds-aurora
- S3-bucket VIDEO, AWS docs
- security-group
- step-functions
- vpn-gateway
- VPC
Vault
HashiCorp Vault can store long-lived credentials in a secure way and dynamically inject short-lived, temporary keys to Terraform at deployment. https://registry.terraform.io/modules/hashicorp/vault module installs HashiCorp’s own Vault and Consul on AWS EC2, Azure, GCP.
Video of demo by Yevgeniy Brikman:

Community modules
Terrafrom provides its own modules.
PROTIP: Don’t blindly include public assets in your code. First scan them. Then copy lines and test them.
Terraform Modules are how to add “smartness” to manage each DevOps component:

-
https://github.com/gruntwork-io/terratest is a Go library that makes it easier to write automated tests for your infrastructure code.
https://terratest.gruntwork.io/docs/testing-best-practices/unit-integration-end-to-end-test/ https://terratest.gruntwork.io/ https://terratest.gruntwork.io/docs/testing-best-practices/unit-integration-end-to-end-test/
-
https://www.ybrikman.com/writing/2017/10/13/reusable-composable-battle-tested-terraform-modules
-
https://github.com/terraform-aws-modules
CAUTION: In 2020, 44% of public registry modules did not meet CIS benchmarks. 56% of the modules that have ever been downloaded contain what is now considered a misconfiguration.
VIDEO: Terraform Provider Azure.gov for standardized templates across clouds at github.com/dod-iac (DOD Infrastructure as Code) with 36 examples of how the Pentagon uses Terraform within AWS IAM, S3, EBS, KMS, Kinesis api gateway, Lambda, MFA, GuardDuty, Route53, etc. Included is https://github.com/dod-iac/terraform-module-template for creating new terraform modules.
Terraform Cloud
TFE provides easy access to shared state and secret data.
Terraform Cloud workspaces store the Terraform configuration in a linked version control repository.
Terraform on AWS
VIDEO: Implementing Terraform with AWS by Ned Bellavance at https://github.com/ned1313/Implementing-Terraform-on-AWS
CLI List AWS instances
-
Tagged AWS resources with the environment
env_instance_tags = { "environment" = "prod" } -
List instances filtered for only those resources tagged:
export AWS_PAGER=""
export ENV="dev"  # or "qa" or "prod"
 aws ec2 describe-instances \
 --filters Name=tag:environment,Values=${ENV} \
 --query 'Reservations[*].Instances[*].{Instance:InstanceId,AZ:Placement.AvailabilityZone,Name:Tags[?Key==`Name`]|[0].Value,Environment:Tags[?Key==`environment`]|[0].Value}' \
 --output table
export AWS_PAGER=”” disables paging of output.
-
To list all instances:
-filters Name=tag-key,Values=Name \
VPC
For example, to create a simple AWS VPC (Virtual Private Cloud),
-
Allocate IPs outside the VPC module declaration.
resource "aws_eip" "nat" { count = 3 vpc = true } -
Set: https://github.com/terraform-aws-modules/terraform-aws-vpc/tree/master/examples
module "vpc" {
  source = "terraform-aws-modules/vpc/aws"

  name = "my-vpc"
  cidr = "10.0.0.0/16"

  azs             = ["eu-west-1a", "eu-west-1b", "eu-west-1c"]
  private_subnets = ["10.0.1.0/24", "10.0.2.0/24", "10.0.3.0/24"]
  public_subnets  = ["10.0.101.0/24", "10.0.102.0/24", "10.0.103.0/24"]

  enable_nat_gateway = true
  enable_vpn_gateway = true

  tags = {
 Terraform = "true"
 Environment = "dev"
  }
}
REMEMBER: “azs” designates Availability Zones.
PROTIP: Remember: a common mistake under each module is forgetting that providers are specified within a list:
module "vpc" {
source = "terraform-aws-modules/vpc/aws"
providers = {
   aws = aws.eu
}
name = "my-vpc"
cidr = "10.0.0.0/16"
azs = "["eu-west-1a", "eu-west-1b", "eu-west-1c"]
private_subnets = ["10.0.1.0/24", "10.0.2.0/24", "10.0.3.0/24"]

enable_nat_gateway = true
enable_vpn_gateway = true

tage = {
   Terraform = "true"
   Environment = "dev"
}
Terraform on Azure
https://medium.com/modern-stack/azure-management-using-hashicorp-terraform-e15744f7e612
https://www.oasys.net/posts/updating-azurerm-template-from-terraform/
VIDEO: Implementing Terraform on Microsoft Azure by Ned Bellavance
-
In a browser, go to straight to the Azure Cloud Shell:
https://shell.azure.com
-
PROTIP: Azure uses the subscription you last used (based on cookies saved from your previous session). So switch to another browser profile or switch to another Subscription.
az account list
“isDefault”: true, means you’re using the default Azure account.
Alternately, environment variables can also be specified for a Service Principal with a cert/secret hard coded in a file run:
export ARM_CLIENT_ID="..."
export ARM_CLIENT_SECRET="..."
export ARM_SUBSCRIPTION_ID="..."
export ARM_TENANT_ID="..."
Alternately, to use a container’s Managed Service Identity (MSI) instead of ARM_CLIENT_SECRET:
export ARM_USE_MSI=true
export ARM_SUBSCRIPTION_ID="..."
export ARM_TENANT_ID="..."
-
Terraform is pre-installed:
terraform --version
Terraform v0.14.10
Your version of Terraform is out of date! The latest version
is 0.15.0. You can update by downloading from https://www.terraform.io/downloads.html
See what is the latest version and details for each release.
Terraform on Azure documentation index by Microsoft:
- Terraform with Azure on Microsoft Docs summary
- Quickstart: Configure Terraform using Azure Cloud Shell
- Quickstart: Configure Terraform using Azure PowerShell
- https://docs.microsoft.com/en-us/azure/virtual-machines/extensions/custom-script-windows to pass in a ps to run, referenced in https://www.udemy.com/course/terraform-on-azure-2021/learn/lecture/25583448#overview
Videos:
- 1.5 hr Udemy video course: Terraform on Azure 2021 by Luke Orellana under Mike Pfiffer’s CloudSkills.io at https://github.com/CloudSkills/Terraform-Projects/tree/master/4-Build-Azure-Infrastructure
- Learning Terraform on Microsoft Azure - Terraform v12 / v13
Testing Terraform
As with Java and other programming code, Terraform coding should be tested too.
Gruntwork has an open-source library to setup and tear down conditions for verifying whether servers created by Terraform actually work.
https://github.com/gruntwork-io/terratest is a Go library that makes it easier to write automated tests for your infrastructure code. It’s written in Go that uses Packer, ssh, and other commands to automate experimentation and to collect results (impact of) various configuration changes.
BLOG:
terraform validate
-
Validate the folder (see https://www.terraform.io/docs/commands/validate.html)
terraform validate single-web-server
If no issues are identified, no message appears. (no news is good news)
-
Add a pre-commit hook to validate in your Git repository
Main.tf
PROTIP: There should be only one main.tf per folder.
Plug-in Initialization
Cloud providers are not included with the installer, so…
-
In your gits folder:
git clone https://github.com/terraform-providers/terraform-provider-aws.git --depth=1
-
Initialize Terraform working directory (like
git init) plug-ins:terraform init
Sample response:
Initializing provider plugins...
       - Checking for available provider plugins on https://releases.hashicorp.com...
       - Downloading plugin for provider "aws" (1.17.0)...

The following providers do not have any version constraints in configuration,
so the latest version was installed.

To prevent automatic upgrades to new major versions that may contain breaking
changes, it is recommended to add version = "..." constraints to the
corresponding provider blocks in configuration, with the constraint strings
suggested below.

       * provider.aws: version = "~> 1.17"

Terraform has been successfully initialized!

You may now begin working with Terraform. Try running "terraform plan" to see
any changes that are required for your infrastructure. All Terraform commands
should now work.

If you ever set or change modules or backend configuration for Terraform,
rerun this command to reinitialize your working directory. If you forget, other
commands will detect it and remind you to do so if necessary.
See https://www.terraform.io/docs/commands/init.html
This creates a hidden
.terraform\plugins" folder path containing a folder for your os -darwin_amd64` for MacOS.
terraform init
terraform init is run again if you modify or change dependencies.
The command causes a .terraform folder in the folder.
-
To Download and install binaries of providers and modules, initialize each new Terraform project folder:
terraform init hashicorp/vault/aws
The above makes use of https://github.com/hashicorp/terraform-aws-vault stored as sub-folder hashicorp/vault/aws
It’s got 33 resources. The sub-modules are:
- private-tls-cert (for all providers)
- vault-cluster (for all providers)
- vault-lb-fr (for Google only)
- vault-elb (for AWS only)
- vault-security-group-rules (for AWS only)
An example of initializing a backend in S3:
terraform init \
 -backend-config="bucket=red30-tfstate" \
 -backend-config="key=red30/ecommerceapp/app.state" \
 -backend-config="region=us-east-2" \
 -backend-config="dynamodb_table=red30-tfstatelock" \
 -backend-config="access_key={ACCESS_KEY}" \
 -backend-config="secret_key={SECRET_KEY}"
QUESTION: Are interpolations now allowed in backend .tf statements?
Alternately, to skip default installation of plugins:
terraform init hashicorp/vault/aws -get-plugins-false
Alternately, to install from a target folder path:
terraform init hashicorp/vault/aws -plugins-dir="$PLUGIN_PATH"
Sample response:
Initializing backends...

Initializing provider plugins...
       - Finding hashicorp/azurerm versions matching "2.40.0"...
       - Installing hashicorp/azurerm v2.40.0...
       - Installed hashicorp/azurerm v2.40.0 (signed by HashiCorp)

Terraform has created a lock file .terraform.lock.hcl to record the provider
selections it made above. Include this file in your version control repository
so that Terraform can guarantee to make the same selections by default when
you run "terraform init" in the future.

Terraform has been successfully initialized!

You may now begin working with Terraform. Try running "terraform plan" to see
any changes that are required for your infrastructure. All Terraform commands
should now work.

If you ever set or change modules or backend configuration for Terraform,
rerun this command to reinitialize your working directory. If you forget, other
commands will detect it and remind you to do so if necessary.
-
To confirm that command creates a (hidden) .terraform directory:
ls -al .terraform
-
To confirm that command creates a (hidden) dependency lock file to enforce versioning of plugins and Terraform itself:
ls .terraform.lock.hcl
-
Set a dependency lockfile mode:
terraform init -lockfile=MODE
-
To upgrade all plugins to the latest version (which compiles with the configuration’s version constraint):
terraform init -upgrade
-
What if Terraform
terraform apply
-
Respond to “Enter a Value:”
yes
-
Verify it worked:
az group list -o table
“Environment” = “terraexample”
-
Done with Terraform
terraform destroy -auto-approve
-
Respond to “Enter a Value:”
yes
-
Navigate to the next example:
cd ~/clouddrive/terraform-on-azure/02-init-plan-apply-destroy/02-interpolation
terraform init
code main.tf
-
Execute plan file “temp”
terraform apply temp -auto-approve
REMEMBER: Although terraform plan -out temp requires -out argument, terraform apply does not require an argument in front of the file name.
-
This example has output blocks to separate tfstate for the virtual network and each resource group (using interpolation):
code ~/clouddrive/terraform-on-azure/03-terraform-state/02-remote-state/main.tf
The output blocks can be moved to a separate output.tf file.
- data.
-
variables.tf for reusability. Define default values refered as “var.” in:
code ~/clouddrive/terraform-on-azure/04-variables/02-deployvariables/terraform.tfvars
Environment variables are referenced as “TF_VAR_XXX”
A map is a collection of variables, for use in conditional logic.
An object can contain lists, etc.
-
05-Modules passes NSG output
https://registry.terraform.io/browse/modules?provider=azurerm
-
Advanced location variable:
variable "location" {
    type = string
    description = "Azure location (region)"
    default = ""
 }
resource "azurerm_resource_group" "rg" { name = "rg-testcondition" location = var.location != "" ? var.location : "westus2" }
Docs:
- chapter 37 shows use of for_each to specify hub-and-spoke networking.
-
To limit the number of concurrent operations as Terraform walks the graph:
terraform apply … -parallelism=3
Handle secrets in *.tfvars securely
PROTIP: Since *.tfvars files typically containing secrets, handle them securely.
Within abc-dev-fe.sh For local development only on a laptop, unencrypt a local.tfvars file.
For other environments running in the cloud, retrieve a *.tfvars file from a trusted cloud vault storage (such as a HashiCorp Vault, Azure Key Vault, AWS Secrets Manager, etc.).
References:
- https://learn.hashicorp.com/tutorials/terraform/sensitive-variables?in=terraform/0-14
- Inject Secrets into Terraform Using the Vault Provider
- https://www.terraform.io/language/state/sensitive-data
- https://www.digitalocean.com/community/tutorials/how-to-securely-manage-secrets-with-hashicorp-vault-on-ubuntu-20-04
- https://www.linode.com/docs/guides/secrets-management-with-terraform/
Marking Variables as Sensitive
variable "database_password" {
    description = "Password of database administrator"
    type = string
    sensitive = true
}
variable "database_username" {
    description = "Username of database administrator"
    type = string
}
Terraform CLI Commands
Use them to perform the traditional core Terraform “happy path” workflow consists of these steps:
### Ad hoc Terraform CLI commands
- terraform init
- terraform validate
- terraform plan -out plan_file
- Scan Terraform files for violation of policies (running TFSec, etc.)
-
terraform apply plan_file
-
To validate whether HCL files are syntactically valid and internally consistent, regardless of any provided variables or existing state. Also, correctness of attribute names and value types:
terraform validate

This is automatically run when terraform plan or terraform apply is run.
-
To reformat HCL files according to rules.
terraform fmt -diff

This is a destructive command, so make sure to git commit before the command.
Terraform Plan command
A key differentiator of Terraform is its plan command, which provides more than just a “dry-run” before configurations are applied for real.
Terraform identifies dependencies among components requested, and creates them in the order needed.
-
A simple way
terraform plan -out=happy.plan
Alternate format (instead of an equal sign):
terraform plan -out happy.plan
Alternately, leave out the .plan file extension, as it’s assumed:
terraform plan -out happy
A sample response:
"<computered>" means Terraform figures it out.
Under the covers, terraform plan generates an executable, and uses it to apply configuration to create infrastructure. This guarantees that what appeared in plan is the same as when apply occurs.
The Terraform Plan file output is a binary file (machine code).
Parallel execution
When Terraform analyzes a configuration specification, it recognizes where parallel execution can occur, which means faster runs to create real infrastructure.
Terraform control, iterations, and (perhaps most of all) management of resources already created (desired state configuration) over several cloud providers (not just AWS).
- https://app.pluralsight.com/courses/49b66fa5-6bcd-469c-ad04-6135ff739bb6
A more sophisticated plan
Alternately, a more sophisticated way to have Terrform evaluate based on vars in a different (parent) folder:
terraform plan \
   -var 'site_name=demo.example.com' \
   -var-file='..\terraform.tfvars' \
   -var-file='.\Development\development.tfvars' \
   -state='.\Development\dev.state' \
   -out base-`date-+'%s'`.plan
The
-varparameter specifies a value for var.site_name variable.The two dots in the command specifies to look above the current folder.
The
-outparameter specifies the output file name. Since the output of terraform plan is fed into theterraform applycommand, a static file name is best. However, some prefer to avoid overwriting by automatically using a different date stamp in the file name.The “%s” yields a date stamp like 147772345 which is the numer of seconds since the 1/1/1970 epoch.
Pluses and minuses flag additions and deletions. This is a key differentiator for Terraform as a “”
Terraform creates a dependency graph (specfically, a Directed Acyclic Graph). This is so that nodes are built in the order they are needed.
Terraform show
-
View the plan created by terraform plan
terraform show "happy.plan"
This shows output variables defined by tf code such as:
output "instance-dns" {
  value = aws_instance.nodejs1.public_dns
}
output "private-dns" {
  value = aws_instance.nodejs1.private_dns
}
“(known after apply” is resolved by terraform apply.
Terraform apply
-
Process the plan created by terraform plan
terraform apply "happy.plan"
REMEMBER:
terraform applygenerates a terraform.tfstate file (containing JSON) to persist the state of runs by mapping resource IDs to their data. There is a one-to-one mapping of resource instances to remote objects in the cloud.Alternately, to specify the state file’s output name and attribute:
terraform apply -state=".\develop\dev.state"
   -var="environment_name=development"
Within the file, “version” defines the version of the tfstate JSON format. The “terraform_version” is the terraform program version. , the file contains a serial number to increment every time the file itself changes.
-
List resources in the state:
terraform state list
-
Pull current remote state and output to stdout:
terraform state pull
-
Push (update) remote state from a local state:
terraform state push
-
Show a specific resource in the state:
terraform state show
-
Move an item in the state (to change the reference) instead of renaming a module, which would result in a create and destroy action:
terraform state mv
-
Remove instances from the state:
terraform state rm
Alternative
Alternative specification of environment variable:
TF_VAR_first_name="John" terraform apply
Values to Terraform variables define inputs such as run-time DNS/IP addresses into Terraform modules.
What terraform apply does:
- Generate model from logical definition (the Desired State).
- Load current model (preliminary source data).
- Refresh current state model by querying remote provider (final source state).
- Calculate difference from source state to target state (plan).
- Apply plan.
NOTE: Built-in functions: https://terraform.io/docs/configuration/interpolation.html
In Terraform, you cannot create your own user-defined functions.
Primitive data types in Terraform are Number, String, Boolean.
Dynamic blocks CANNOT be used with lifecycle blocks, because Terraform must process lifecycle blocks before it can safely evaluate expressions.
Apply to create tfstate
References:
- https://kodekloud.com/topic/introduction-to-terraform-state/
- BLOG:
Yevgeniy Brikman (Gruntwork) “How to manage Terraform state”
-
While in the same folder where there is a “backend.tf” file (above), have Terraform read the above to establish an EC2 instance:
terraform apply -auto-approve
The console shows resources provisioned in the cloud.
-
To force the state file to be updated during a plan operation:
terraform plan --refresh=false
-
To force the state to be updated anytime:
terraform refresh
-
If “-auto-approve” was not specified, responde to the prompt by typing “yes”.
Apply creates a new file terraform.tfstate define the status/condition of cloud resources at a specific time.
NOTE: Subsequent to apply, any command that modify state results in a terraform.tfstate.backup created to store tfstate before it changes.
-
Manually verify on the AWS Management Console GUI webpage set to service S3.
Terraform State commands
Rather than editing the tfstate file:
-
List
terraform state list
-
State can be pulled from a remote state backend:
terraform state pull
-
VIDEO: Extract from response above the hash_key:
terraform state pull | jq '.resources[] | select(.name == "state-locking-db")|.instances[].attributes.hash_key'
Saving tfstate in S3 Backend
In a team environment, it helps to store state state files off a local disk and in a “backend” location central to all.
- Using AWS IAM, define a AWS user with Permissions in a Role.
-
Obtain and save credentials for user in an environment variable.
VIDEO: Terraform Remote State on Amazon S3 describes use of a file named
backend.tf, such as this AWS S3 specification, after substituting “YouOwn” with the (globally unique) S3 bucket name defined with the current AWS credentials:terraform { backend "s3" { bucket = "YouOwn-terraform" key = "terraform.tfstate" region = "us-east-1" } }Remote state
NOTE terraform.tfstate can be stored over the network in S3, etcd distributed key value store (used by Kubernetes), or a HashiCorp Atlas or Consul server. (HashiCorp Atlas is a licensed solution.)
-
State can be obtained using command:
terraform remote pull
-
Retrieve state data from a remote data store:
terraform_remote_state
Backends
Terraform can manage state through these backends which persists (stores) data:
- local (the default)
HashiCorp products:
- Terraform Enterprise (cloud)
- Consul (a distributed key-value store)
- Atlas
- etcd (distributed key value store used by Kubernetes)
Cloud vendors:
- s3 - in AWS VIDEO with DynamoDB
- gcs - Google Cloud
-
azurerm
- artifactory - by JFrog
- cos
- postgres
- manta
- swift
Some backends allows multiple named workspace instances to be associated with a single backend configuration (without configuring a new backend authentication).
- local (the default)
HashiCorp products:
-
When using remote state as a data source, use root-level outputs of Terraform configurations as input data for another configuration:
data "terraform_remote_state" "vpc" {
  backend = "remote"

  config = {
 organization = "hashicorp"
 workspaces = {
   name = "vpc-prod"
 }
  }
}
resource "aws_instance" "foo" {
  subnet_id = data.terraform_remote_state.vpc.outputs.subnet_id
}
Drift management
- https://www.youtube.com/watch?v=CsCdEvZ5la0
- VIDEO:
Drift occurs when the actual state of resources provisioned diverges from the expected state.
If an approved manual configuration has been changed or removed, such as when a VM is terminated using the AWS Console GUI, the state can be refreshed by an alias of the command terraform apply -refresh-only -auto-approve which doesn’t make changes:
terraform refresh
-
When you can’t create new resources (you’re not in control of resource creattion), and an existing resource needs to be added, import an existing resource (one at a time) into a placeholder definition:
resource "aws_instance" "example1" {
 # blank instance configuration
}
The resource address and its ID is required:
terraform import aws_instance.example1" i-abc1111
CAUTION: Importing the same resources is not recommended because that can cause weird behavior.
data instance_id import
-
To reference an existing instance from within a .tf file, first capture the instance_id of the instance not managed by Terraform.
-
Reference that instance_id in a .tf file:
data "aws_instance" "news_server" { instance_id = "i-234124897234" } output news_server { value = data.aws_instance.news_server.public_ip } -
REMEMBER: terrform import brings in the state of another resource, and cannot change that other instance. So define a shell resource:
resource "aws_instance" "other_server" {
# (resource arguments)
}
Once imported, resources are available for management.
Taint to -replace
-
Due to Terraform’s design for immutability, if an individual resource has been damaged or degraded such that it cannot be detected by Terraform, or to get Terraform to make a configuration change in real time, replace by resource address index in a plan or apply, for example:
terraform apply -replace="aws_instance.example[0]"
aws_instance is a module namespace or resource_type. “example” is its name.
CAUTION: Replacement of “tainted” resources may cause other resources to be modified, such as public IPs.
NOTE: terraform taint (to mark a resource for replacement) was deprecated as of version 0.152. VIDEO
terraform taint aws_instance.webserverThe above would cause the resource to be deleted and replaced with a resource with the new configuration.
The opposite command was:
terraform untaint aws_instance.webserver
### Destroy state
PROTIP: At time of this writing, Amazon charges for Windows instances by the hour while it charges for Linux by the minute, as other cloud providers do.
VIDEO: Destroy instances (so they don’t rack up charges unproductively):
- While in the same folder where there is a “backend.tf” file (above), have Terraform read the above to establish an EC2 instance when given the command:
33
3333300
terraform destroy
-
Confirm by typing “yes”.
-
Manually verify on the AWS Management Console GUI webpage set to service S3.
Processing flags
HCL can contain flags that affect processing. For example, within a resource specification,
force_destroy = trueforces the provider to delete the resource when done.
Crossplane
Crossplane.io provides more flexible ways to interact with Kubernetes than Terraform. Their github.com/crossplane has providers for AWS, Azure, and GCP.

Workspaces
NOTE: The Terragrunt wrapper for terraform plan/apply/destroy commands (and in file terraform.tfvars) provide an alternative to HashiCorp’s Workspaces feature (described at https://www.terraform.io/docs/state/workspaces.html).
VIDEO: Workspaces enable management of multiple “environments” in alternate state files (dev, qa, stage, prod).
VIDEO INTRO: Terraform now offers a Terraform Cloud provider to manage VCS provider GitHub in temporary test workspaces, to see the impact of incremental changes.
Workspaces work locally or via remote backends.
-
By default, when working locally, Terraform creates a workspace in your local backend called “default”.
terraform workspace list
*identifies the selected workspace -
Create a new workspace projectX to contain a separate state file:
terraform workspace new projectX
-
To change your current workspace to a workspace:
terraform workspace select projectX
-
Reference the ${terraform.workspace} named value in HCL:
resource "aws_instance" "example" { // Return 5 instead of 1 if the value is not "default" count = "${terraform.workspace == "default" ? 5 : 1 } # ... tags = { Name = "web - ${terraform.workspace}" } # ... } -
To output the current Workspace:
??? terraform.workspace
-
Terraform stores workspace states in a folder called terraform.tfstate.d
ls -al terraform.tfstate.d
PROTIP: Use a remote backend unless you’re working by yourself.
Terraform Cloud workspaces act like differen working directories (like GitHub branches)
VPC Security Group
-
VPC Security group
The example in Gruntwork’s intro-to-terraform also specifies the vpc security group:
resource "aws_instance" "example" {
  \# Ubuntu Server 14.04 LTS (HVM), SSD Volume Type in us-east-1
  ami = "ami-2d39803a"
  instance_type = "t2.micro"
  vpc_security_group_ids = ["${aws_security_group.instance.id}"]
  user_data = <<-EOF
           #!/bin/bash
           echo "Hello, World" > index.html
           nohup busybox httpd -f -p "${var.server_port}" &
           EOF
  tags {
 Name = "ubuntu.t2.hello.01"
  }
}
resource "aws_security_group" "instance" {
  name = "terraform-example-instance"
  \# Inbound HTTP from anywhere:
  ingress {
 from_port = "${var.server_port}"
 to_port = "${var.server_port}"
 protocol = "tcp"
 cidr_blocks = ["0.0.0.0/0"]
  }
}
The “var.server_port” is defined in variables file:
The tag value AWS uses to name the EC2 instance.
Execution control
Terraform automatically detects and enforces rule violations, such as use of rogue port numbers other than 80/443.
## outputs.tf
Sample contents of an outputs.tf file:
  output "public_ip" {
  value = "${aws_instance.example.public_ip}"
}
  output "url" {
  value = "http://${aws_instance.example.public_ip}:${var.port}"
}
Sample contents of an outputs.tf file for a cluster points to the Elastic Load Balancer:
output "aws_elb_public_dns" {
  value = "${aws_elb.web.dns_name}"
}
output "public_ip" {
  value = "${aws_instance.example.public_ip}"
}
output "azure_rm_dns_cname" {
  value = "${azurerm_dns_cname_record.elb.id}"
}
PROTIP: If the AMI is no longer available, you will get an error message.
-
Output Terraform variable:
output "loadbalancer_dns_name" {
  value = "${aws_elb.loadbalancer.dns_name}"
}
Provisioners
VIDEO: When a resource is initially created, provisioners can be executed to initialize that resource.
VIDEO: This defines a string (from a variable) inside the file:
resource "aws_instance" "web" {
  # ...
  provisioner "file" {
    content = "ami_used: ${self.ami}"
    destination = "/tmp/file.log"
}
-
VIDEO: To copy files or directories within a Linux machine, using the file provisioner:
resource "aws_instance" "web" {
  # ...
  provisioner "file" {
 source = "conf/myapp.conf"
 destination = "/etc/myapp.conf"

  connection {
 type     = "ssh"
 user     = "root"
 password = "${var.root_password}"
 host     = "${var.host}"
  }
}
A connection block is needed for the provisioner to pass authentication.
This examples copies a file through Windows Remote Management (winrm):
resource "aws_instance" "web" {
  # ...
  provisioner "file" {
    source = "conf/myapp.conf"
    destination = "C:/App/myapp.conf"

  connection {
    type     = "winrm"
    user     = "Administrator"
    password = "${var.admin_password}"
    host     = "${var.host}"
  }
}
QUESTION: How about a custom user name rather than generic root/admin account name?
CAUTION: What Cloud Provisioners do are not reflected in Terraform state, so better to use cloudinit scripts.
Cloud-init is an industry standard for cross-platform cloud instance initializations. When your VM is launched on a Cloud Service Provider (CSP) based on YAML or Bash script such as:
#!bin/bash
yum update -y
yum install -y httpd
sudo service httpd start
sudo service httpd enable
Packer (from HashiCorp) is an automated image-build service for multiple clouds.
Provisioner definitions define the properties of each resource, such as initialization commands.
remote-exec on target machines
VIDEO: After a VM is provisioned, this inline script makes uses of Puppet:
resource "aws_instance" "web" {
  # ...
  provisioner "remote-exec" {
    inline = [
      "puppet apply",
    "sudo service nginx start",
    "consul join ${aws_instance.web.private_ip}",
  ]
}
Observe that the last line is allowed to have a comma.
REMEMBER: A single “script” is the keyword for when a relative or absolute local script is copied to the remote resource for execution. The plural “scripts” is the keyword when executed in order:
provisioner "remote-exec" {
  # ...
  scripts = [
    "./setup-users.sh",
    "/home/anyuser/Desktop/bootstrap",
  ]
}
Another inline example installs an nginx web server and displays a minimal HTML page:
provisioner "remote-exec" {
  inline = [
    "sudo yum install nginx -y",
    "sudo service nginx start",
    "echo "<html><head><title>NGINX server</title></head><body style=\"background-color"></body></html>"
  ]
}
PROTIP: SECURITY CAUTION: Better to pull in installers and libraries from an internal Artifactory registry which allows for forensics in case something bad happens, since the external one could have been infected an hour before.
To trigger a map of values
resource "aws_instance" "web" {
  # ...
  triggers {
    cluster_instance_ids = "${join(",", aws_instance.cluster.*.id)}"
  }
  connection {
    host     = "${element(aws_instance.cluster.*.public_ip, 0)}"
  }
  provisioner "remote-exec" {
    inline = [
      "bootstrap-cluster.sh ${join(" ", aws_instance.cluster.*.private_ip)},
    ]
  }
}
local-exec provisioner Ansible
Provisioner configurations are also plugins for Ansible configuration management:
VIDEO: “Local” is where Terraform commands are run, which can be your laptop/workstation or on a build server (Jenkins, GitHub Actions, GCP Cloud Build, AWS Code Build, etc.). Another example is within HashiCorp’s “Terraform Cloud Run Environment” of single-use Linux virtual machine.
NOTE: Software can be specified for installation using Packer’s local-exec provisioner which executes commands on host machines. For example:
resource "null_resource" "local-software" {
  provisioner "local-exec" {
    command = "echo ${self.private_ip} >> private_ips.txt"
    command = <<EOH
sudo apt-get update
sudo apt-get install -y ansible
EOH
  }
}
NOTE: The apt-get installer is in-built within Ubuntu Linux distributions.
PROTIP: Use this to bootstrap automation such as assigning permissions and running Ansible or PowerShell DSC, then use DSC scripts for more flexibility and easier debugging.
On a Windows machine:
resource "null_resource" "windows-example" {
  provisioner "local-exec" {
    command = "Get-Date > completed.txt"
    interpreter = ["PowerShell", "-Command"]
  }
}
QUESTION: The interpreter is excuted first, then the command?
Ansible local-exec
See https://github.com/radekg/terraform-provisioner-ansible
As a general rule, use Ansible for repetitive on-going maintenance tasks such as:
- Backup table to Datawarehouse
- Truncate daily tables
To run Ansible playbook.yml:
provisioner "local-exec" {
   command = "ANSIBLE_HOST_KEY_CHECKING=False ansible-playbook \
   -u {var.user} -i '${self.ipv4_address},' \
   --private-key ${var.ssh_private_key} playbook.yml"}
The key component is ${self.ipv4_address} variable. After provisioning the machine, Terraform knows its IP address. And we need to pass an IP address for Ansible. Therefore, we are using the built-in Terraform variable as input for Ansible.
Another option is to run Terraform and Ansible separately but import the data from one to another. Terraform saves all the information about provisioned resources into a Terraform state file. We can find the IP addresses of Terraform-provisioned instances there and import them into the Ansible inventory file.
Terraform Inventory extract from the state file the IP addresses for use by ab Ansible playbook to configure nodes.
Ansible can use hash_vault to retrieve secrets from a HashiCorp Vault.
References:
- https://www.hashicorp.com/resources/ansible-terraform-better-together
- https://www.digitalocean.com/community/tutorials/how-to-use-ansible-with-terraform-for-configuration-management
NOTE: Ansible Tower cannot be used with Terraform.
Configuration Management
| Maturity | Community | Type | Infra. | Lang. | Agent | Master | |
|---|---|---|---|---|---|---|---|
| Puppet | 2005 High | Large | Config. Mgmt. | Mutable | Declarative | Yes | Yes |
| Chef | 2009 High | Large | Config. Mgmt. | Mutable | Procedural | Yes | Yes |
| SaltStack | 2011 Medium | Large | Config. Mgmt. | Mutable | Declarative | Yes | Yes |
| Ansible | 2012 Medium | Huge, fastest growing | Config. Mgmt. | Mutable | Procedural | No | No |
Terraform and Ansible can work in unison, complementing each other. Terraform bootstraps the underlying cloud infrastructure for Ansible to configure app settings and the user space. To test a service on a dedicated server, skip using Terraform and run the Ansible playbook on that machine. Derek Morgan has a “Deploy to AWS with Ansible and Terraform” video class at LinuxAcademy which shows how to do just that, with code and diagram.
“Procedural” means “programmatic” as in a Python or JavaScript program applies logic. This means procedures need to be written to check whether a desired resource is available before provisioning, then logic is needed to check whether the provisioning command was effective.
“Declarative” means a (yaml format) file defines what is desired, and the system makes it so. tf files are declarative, meaning that they define the desired end-state (outcomes). If 15 servers are declared, Terraform automatically adds or removes servers to end up with 15 servers rather than specifying procedures to add 5 servers. Terraform can do that because Terraform knows how many servers it has setup already.
IaC code is idempotent (repeated runs results in what is described, and does not create additional items with every run). Terraform takes action only when needed (called “convergence” principle).
Terraform manages explicit and implicit (assumed) dependencies automatically.
Terraform automatically takes care of performing in the correct sequence.
Immutable?
PROTIP: WARNING: Terraform does not support rollbacks of changes made.
“Immutable” means once instantiated, components cannot be changed. In DevOps, this strategy means individual servers are treated like “cattle” (removed from the herd) and not as “pets” (courageously kept alive as long as possible).
Immutable and idempotent means “when I make a mistake in a complicated setup, I can get going again quickly and easily with less troubleshooting because I can just re-run the script.”
Plugins into Terraform
All Terraform providers are plugins - multi-process RPC (Remote Procedure Calls).
https://github.com/hashicorp/terraform/plugin
https://terraform.io/docs/plugins/index.html
Terraform expect plugins to follow a very specific naming convention of terraform-TYPE-NAME. For example, terraform-provider-aws, which tells Terraform that the plugin is a provider that can be referenced as “aws”.
PROTIP: Establish a standard for where plugins are located:
For *nix systems, ~/.terraformrc
For Windows, %APPDATA%/terraform.rc
https://www.terraform.io/docs/internals/internal-plugins.html
PROTIP: When writing your own terraform plugin, create a new Go project in GitHub, then locally use a directory structure:
$GOPATH/src/github.com/USERNAME/terraform-NAME
where USERNAME is your GitHub username and NAME is the name of the plugin you’re developing. This structure is what Go expects and simplifies things down the road.
TODO:
- Grafana or Kibana monitoring
- PagerDuty alerts
- DataDog metrics
Plugin Registry
https://registry.terraform.io is public
hosts both providers and modules (a group of configuration files that provide common configuration).
https://www.youtube.com/watch?v=Qfp8Jv78yt8 Writing High Quality Terraform Modules for Exponential Organizations
CIDR Subnet function
variable network_info {
   default = “10.0.0.0/8” #type, default, description
}
cidr_block = ${cidrsubnet(var.network_info, 8, 1)} # returns 10.1.0.0/16
cidr_block = ${cidrsubnet(var.network_info, 8, 2)} # returns 10.2.0.0/16
Also:
variable network_info {
   default = “10.0.0.0/8” #type, default, description
}
cidr_block = ${cidrsubnet(var.network_info, 8, 1)} # returns 10.1.0.0/16
cidr_block = ${cidrsubnet(var.network_info, 8, 2)} # returns 10.2.0.0/16
In this example terraform.tfvars file are credentials for both AWS EC2 and Azure ARM providers:
bucket_name = "mycompany-sys1-v1"
arm_subscription_id = "???"
arm_principal = "???"
arm_passsord = "???"
tenant_id = "223d"
aws_access_key = "insert access key here>"
aws_secret_key = "insert secret key here"
private_key_path = "C:\\MyKeys1.pem"
The private_key_path should be a full path, containing \\ so that the single slash is not interpreted as a special character.
bucket_name must be globally unique within all of the AWS provider customers.
### Terraforming AWS Configuration
PROTIP: Install from https://github.com/dtan4/terraforming a Ruby script that enables a command such as:
terraforming s3 --profile dev
You can pass profile name by –profile option.
### Verify websites
-
The website accessible?
-
In the provider’s console (EC2), verify
Densify FinOps
densify.com dynamically self-optimizes configurations based on predictive analytics. This “FinOps” works by updating tags in AWS of recommendations for server type based on cost and performance analysis in real-time:
vm_size = "${module.densify.instance_type}"

It’s defined in a tf file:
module "densify" {
  source = "densify-dev/optimization-as-code/null"
  version = "1.0.0"

  densify_recommendations = "${var.densify_recommendations}"
  densify_fallback        = "${var.densify_fallback}"

  densify_unique_id       = "${var.name}"
}
CDK for Terraform
VIDEO: CDK for Terraform
Create SSH key pair
-
To create a SSH key pair using CLI using the AWS Test Framework:
aws ec2 create-key-pair --endpoint http://aws:4566
--key-name jade \
--query 'KeyMaterial' \
--output text > /root/terraform-projects/project-jade/jade.pem
aws ec2 describe-instances --endpoint http://aws:4566
To just get the id of the EC2 created with this AMI and Instance Type, use filters and jq to filter the data:
aws ec2 describe-instances --endpoint http://aws:4566 --filters "Name=image-id,Values=ami-082b3eca746b12a89" | jq -r '.Reservations[].Instances[].InstanceId'
Atlantis on Terraform
References:
- https://itnext.io/pains-in-terraform-collaboration-249a56b4534e
* ensure code reviews.
Atlantis was created in 2017 by Anubhav Mishra and Luke Kysow. Before they joined HashiCorp in 2018, they saw Hootsuite use their github.com/runatlantis/atlantis, a self-hosted golang application that listens for Terraform pull request events via webhooks. It can run as a Golang binary or Docker image deployed on VMs, Kubernetes, Fargate, etc.
Read the description and benefits at runatlantis.io:

Developers and Operations people type atlantis plan and atlantis apply in the GitHub GUI to trigger Atlantis invoking terraform plan and terraform apply in the CLI.
Atlantis-based workflow with Terraform Enterprise

-
In your GitHub account Developer settings, generate a Personal Access Token (named “Terraform Atlantis”) and check only repo scope (to run webhooks).
CAUTION: This is a static secret which should be updated occassionally.
Click the clipboard icon. On your MacOS Terminal, within a project folder, install Atlantis bootstrap locally and provide the GitHub PAT.
Atlantis creates a starter GitHub repo, then downloads the ngrok utility to fork an “atlantis-example” repo under your account. It sets up a server at ngrok.io.
-
Copy in base Terraform configuration files.
Within files are references to reusable modules used by other projects.
An atlantis.yaml file specifies projects to be automatically planned when a module is modified.
-
Manually run tf init to install cloud provider plug-ins.
-
In main.tf add a null resource as a test: from perhaps https://github.com/jnichols3/terraform-envs
resource "null_resource" "demo" {} -
Anyone can open up a pull request in the GitHub repo holding your Terraform configuration files.
This ensures that other team members are aware of changes pending. When plan is run, the directory and Terraform workspace are Locked until the pull request is merged or closed, or the plan is manually deleted. With locking, you can ensure that no other changes will be made until the pull request is merged. https://www.runatlantis.io/docs/locking.html#why
-
Instead of manually invoking terraform plan, Atlantis invokes them when atlantis planis typed in GitHub GUI which triggers the Atlantis server to run. Atlantis can be invoked automatically on any new pull request or new commit to an existing pull request.
and adds comments on the pull request in addition to creating an execution plan with dependencies.
atlantis plan can be for a specific directory or workspace
https://www.runatlantis.io/docs/autoplanning.html#example
Sentinal apply
-
Those licenced to use Terrform Cloud as a remote backend provisioner, sentinel apply is also invoked to create cost projections and policy alerts based on sentinel policy definitions.
-
Someone else on your team reviews the pull request, makes edits and rerun atlantis plan several times before clicking approve PR.
-
In a GitHub GUI comment, type atlantis apply to trigger Atlantis to run terraform apply and add comments about its provisioning of resources. Atlantis makes output from apply visible in GitHub.
Atlantis can be configured to automatically merge a pull request after all plans have been successfully applied.*
https://www.runatlantis.io/docs/security.html#mitigations
Note that apply creates tfstate files.
-
Optionally, a “local-exec” provisioner can invoke Ansible to configure programs inside each server.
Social
-
https://www.twitch.tv/hashicorplive 1st & 3rd PT Fridays every month
- Google Group terraform-tool
- StackOverflow
-
0.12-alpha4 Dec 20, 2018 on Mitchell Hashimoto (CEO) YouTube channel
- No IRC (Internet Relay Chat)?
Rock Stars
Here are people who have taken time to create tutorials for us about Terraform:
Ned Bellavance (@ned1313 MS MVP at nerdinthecloud.com) has several video classes on Pluralsight [subscription]:
-
Terraform - Getting Started (Beginner level) Sep 14 2017 [3h 11m]
-
Deep Dive - Terraform 6 Feb 2018 [3h 39m] shows how to export secret keys for back-end processes, use custom data sources, and incorporation into enterprise CI/CD frameworks.
-
Resource graphs of dependencies.
Derek Morgan in May 2018 released video courses on LinuxAcademy.com:
-
Managing Applications and Infrastructure with Terraform [4:35:35]
-
Deploying to AWS with Ansible and Terraform with hands-on lab.
Dave Cohen in April 2018 made a 5 hands-on videos using Digital Ocean Personal Access Token (PAT).
Seth Vargo, Director of Evangelism at HashiCorp, gave a deep-dive hands-on introduction to Terraform at the O’Reilly conference on June 20-23, 2016. If you have a SafaribooksOnline subscription, see the videos: Part 1 [48:17], Part 2 [37:53]
Saurav Sharma created a YouTube Playlist that references code at https://github.com/Cloud-Yeti/aws-labs as starters for website of videos and on Udemy.
Yevgeniy (Jim) Brikman (ybrikman.com), co-founder of DevOps as a Service Gruntwork.io
-
O’Reilly book “Hello Startup” about organizations.
zero-downtime deployment, are hard to express in purely declarative terms.
Comprehensive Guide to Terraform includes:
-
Infrastructure-as-code: running microservices on AWS with Docker, ECS, and Terraform
- $500 A Crash Course on Terraform
-
BOOK: Terraform: Up and Running from O’Reilly Media published: March 2017
- BLOG: Infrastructure as code: running microservices on AWS using Docker, Terraform, and ECS Mar 31, 2016
Anton Babenko (github.com/antonbabenko linkedin)
-
Manage AWS infrastructure as code using Terraform talk in Norway 14 Dec 2015
-
https://github.com/antonbabenko/terraform-best-practices-workshop
James Turnbull
- The Terraform Book ($8 on Kindle) is among the first books on this subject, based on Terraform v0.10.3. Files referenced are at https://github.com/turnbullpress/tfb-code [On SafariBooks]
Jason Asse
Nick Colyer (Skylines Academy)
- Automating AWS and vSphere with Terraform (Intermediate level) Jun 12 2017 [1:22]
Kirill Shirinkin
- Getting Started with Terraform - Second Edition from Packt July 2017 (1st edition Jan 2017)
James Nugent
- Engineer at HashiCorp
dtan4
Kyle Rockman (@Rocktavious, author of Jenkins Pipelines and github.com/rocktavious) presented at HashiConf17 (slides) a self-service app to use Terraform (powered by React+Redux using Jinga2 to Gunicorn + Djanjo back end running HA in AWS) that he hopes to open-source at github.com/underarmour
Tutorials
-
Official Getting Started docs at HashiCorp focus on individual elements (i.e. resources, input variables, output variables, etc).
At the top of the list is the in-depth videos and hands-on labs with quizzes of KodeKloud’s “HashiCorp Certified Terraform Associate”. It’s taught by Vijin Palazhi, who also created tutorials on Kubernetes, Jenkins, and other DevOps tools and certifications.
ACloud.Guru has a 11-hour Associate prep course by Moosa Khalid.
On Linked Learning: Advanced Terraform by David Swersky references https://github.com/LinkedInLearning/advanced-terraform-2823489
Videos free on YouTube but a better UI to view vidoes is provided by:
- Andrew Brown posted from his $24 Exampro to in one 13-hour on YouTube dated Oct 5, 2021, described here.
On Udemy.com:
-
“Terraform: Beginner to Advanced” by Zeal Vora has code at https://github.com/zealvora/terraform-beginner-to-advanced-resource
More than Certified in Terraform by Derek Morgan “will get you ready to start using Terraform in the real world! We cover Terraform from the very basics to more advanced usage while building deployments of Docker, AWS, Kubernetes, Github, Terraform Cloud, and more!” Find the course on Teachable at https://courses.morethancertified.com
Another FreeCodeCamp.org video on YouTube:
“Get started managing a simple application with Terraform” by Alexandra White (at Joyant) shows the deployment of the Happy Randomizer app
Other YouTube videos :
-
On Feb 2022 Sid Palas (of DevOps Directive) released his 2h 38m VIDEO “Complete Terraform Course - From BEGINNER to PRO! (Learn Infrastructure as Code)” with code at https://github.com/sidpalas/devops-directive-terraform-course and Discord channel for discussions.
-
Automating Infrastructure Management with Terraform at SF CloudOps Meetup
-
Evolving Your Infrastructure with Terraform Jun 26, 2017 by Nicki Watt, CTO at OpenCredo
-
Journey to the Cloud with Packer and Terraform Oct 12, 2017 by Nadeem Ahmad, Software Engineer at Box
References
PDF: HashiCorp’;’s Cloud Operating Model whitepaper
VIDEO: Learn Terraform in 10 Minutes Tutorial by Reval Govender
VIDEO: SignalWarrant’s videos on PowerShell by David Keith Hall includes:
- Automate Creating Lab Virtual Machines in Azure with PowerShell shows how to take input from a CSV file.
Terraform Basics mini-course on YouTube in 5-parts from “tutorialLinux”.
http://chevalpartners.com/devops-infrastructure-as-code-on-azure-platform-with-hashicorp-terraform-part-1/ quotes https://www.hashicorp.com/blog/azure-resource-manager-support-for-packer-and-terraform from 2016 about support for Azure Resource Manager.
Sajith Venkit explains Terraform file exampled in his “Building Docker Enterprise 2.1 Cluster Using Terraform” blog and repo for AliCloud and Azure.
AWS Cloudformation vs Terraform: Prepare for DevOps/ Cloud Engineer Interview
How to create a GitOps workflow with Terraform and Jenkins by Alex Podobnik
VIDEO: Manage SSH with HashiCorp Vault
https://medium.com/capital-one-tech/terraform-poka-yokes-writing-effective-scalable-dynamic-and-error-resistant-terraform-dcbd6a0ada6a
2 hr. VIDEO: Terraform for DevOps Beginners + Labs by Vijin Palazhi.
https://medium.com/codex/devops-iac-setup-using-terragrunt-and-terraform-5d8a54c97724
Like Sentinel, the env0 includes policy as code guardrails.
https://medium.com/4th-coffee/on-devops-30-9-extraordinary-terraform-best-practices-that-will-change-your-infra-world-278d98d209ee
https://medium.com/@ben.arundel/godaddy-and-terraform-a-brief-poc-f3afac56c402
VIDEO: “Learning Live with AWS & HashiCorp” multi-part series by Jenna Pederson from AWS (@jennapederson) and J. Cole Morrison from HashiCorp (@jcolemorrison):
- Laying the Foundations of a Microservices Architecture
- Creating Your First Containerized Microservice
- Extending Your Application with Private Microservices
- Introducing a Service Mesh with Consul
VIDEO: Microsoft’s Terrafy (pronounced “terrify” as in Holloween?) at https://github.com/Azure/aztfy generates *.tf (Terraform configuration files) and State based on resources based on what is in an AzureRM resource group. Those files can then be used in regular Terraform commands as if they were originally created using Terraform Plan and Apply.
https://open.spotify.com/episode/54xRbC6doIojY1edvB1QdT?si=8580a6cdebcd438a PagerDuty
https://aws-ia.github.io/standards-terraform/ THE AWS INTEGRATION & AUTOMATION TEAM’S BEST PRACTICES FOR TERRAFORM
https://www.youtube.com/watch?v=G7l6ggJit3Q HashiCorp - Terraform on AWS by Chris Dunlap
Configuration
### Command Alias list & help
-
Use the abbreviated alternate to the
terraformcommand:tf
Alternately, use the long form:
terraform
Either way, the response is a menu (at time of writing):
Usage: terraform [global options] <subcommand> [args]

The available commands for execution are listed below.
The primary workflow commands are given first, followed by
less common or more advanced commands.

Main commands:
  init          Prepare your working directory for other commands
  validate      Check whether the configuration is valid
  plan          Show changes required by the current configuration
  apply         Create or update infrastructure
  destroy       Destroy previously-created infrastructure

All other commands:
  console       Try Terraform expressions at an interactive command prompt
  fmt           Reformat your configuration in the standard style
  force-unlock  Release a stuck lock on the current workspace
  get           Install or upgrade remote Terraform modules
  graph         Generate a Graphviz graph of the steps in an operation
  import        Associate existing infrastructure with a Terraform resource
  login         Obtain and save credentials for a remote host
  logout        Remove locally-stored credentials for a remote host
  output        Show output values from your root module
  providers     Show the providers required for this configuration
  refresh       Update the state to match remote systems
  show          Show the current state or a saved plan
  state         Advanced state management
  taint         Mark a resource instance as not fully functional
  test          Experimental support for module integration testing
  untaint       Remove the 'tainted' state from a resource instance
  version       Show the current Terraform version
  workspace     Workspace management

Global options (use these before the subcommand, if any):
  -chdir=DIR    Switch to a different working directory before executing the
             given subcommand.
  -help         Show this help output, or the help for a specified subcommand.
  -version      An alias for the "version" subcommand.
NOTE: The
terraform remotecommand configures remote state storage.BLAH: Terraform doesn’t have an alias command (like Git) to add custom subcommands, so one has to remember which command is Terragrunt and which are standard Terraform?
-
Install Terragrunt wrapper:
https://github.com/gruntwork-io/terragrunt
-
Help on a specific command, for example:
terraform plan --help
Identify versions
https://github.com/minamijoyo/tfupdate to parse Terraform configurations and updates all version constraints. brew install minamijoyo/tfupdate/tfupdate It is a best practice to break your Terraform configuration and state into small pieces to minimize the impact of an accident. It is also recommended to lock versions of Terraform core, providers and modules to avoid unexpected breaking changes. If you decided to lock version constraints, you probably want to keep them up-to-date frequently to reduce the risk of version upgrade failures. It’s easy to update a single directory, but what if they are scattered across multiple directories?
Terraform tools
https://github.com/hieven/terraform-visual an interactive way of visualizing your Terraform plan by https://www.linkedin.com/in/hieven/
References
https://github.com/terraform-aws-modules/terraform-aws-eks in https://registry.terraform.io/modules/terraform-aws-modules/eks/aws/latest
grep '^resource' modules/fargate/*.tf
grep '^resource' modules/node_groups/*.tf
grep '^resource' *.tf
grep '^module "' *.tf
https://github.com/gruberdev/tf-free/issues Use Terraform to create cloud-native resources which are free-of-charge on major cloud providers (AWS, Azure, Google).
Robert Jordan, author of Developing Infrastructure as Code with Terraform LiveLessons discusses module design and unit testing (terratest) in his “Next-Level Terraform” live course on OReilly PDF references https://github.com/bananalab/Next-Level-Terraform and https://github.com/bananalab/terraform-live-template
In his Learn Infrastructure as Code with Terraform on Feb 13…
https://www.youtube.com/watch?v=V53AHWun17s Learn Terraform with Azure by Building a Dev Environment – Full Course for Beginners by freecodecamp
https://learning.oreilly.com/live-events/hashicorp-certified-terraform-associate-certification-crash-course/0636920072267/0636920091198/ Aug 8-9, 2023 by Benjamin Muschko
https://github.com/shuaibiyy/awesome-terraform A curated list of awesome Terraform tools, modules, resources and tutorials.
More on DevOps
This is one of a series on DevOps:
- DevOps_2.0
- ci-cd (Continuous Integration and Continuous Delivery)
- User Stories for DevOps
- Git and GitHub vs File Archival
- Git Commands and Statuses
- Git Commit, Tag, Push
- Git Utilities
- Data Security GitHub
- GitHub API
- Choices for DevOps Technologies
- Pulumi Infrastructure as Code (IaC)
- Java DevOps Workflow
- AWS DevOps (CodeCommit, CodePipeline, CodeDeploy)
- AWS server deployment options
- Cloud services comparisons (across vendors)
- Cloud regions (across vendors)
- Azure Cloud Onramp (Subscriptions, Portal GUI, CLI)
- Azure Certifications
- Azure Cloud Powershell
- Bash Windows using Microsoft’s WSL (Windows Subsystem for Linux)
- Azure Networking
- Azure Storage
- Azure Compute
- Digital Ocean
- Packer automation to build Vagrant images
- Terraform multi-cloud provisioning automation
-
Hashicorp Vault and Consul to generate and hold secrets
- Powershell Ecosystem
- Powershell on MacOS
- Jenkins Server Setup
- Jenkins Plug-ins
- Jenkins Freestyle jobs
- Docker (Glossary, Ecosystem, Certification)
- Make Makefile for Docker
- Docker Setup and run Bash shell script
- Bash coding
- Docker Setup
- Dockerize apps
- Ansible
- Kubernetes Operators
- Threat Modeling
- API Management Microsoft
- Scenarios for load
- Chaos Engineering