
Learn Python by using CodeSpace IDE, CodeAir drones with CodeX and CodeBot robots.
![]()
![]()
![]()
![]()
![]()
![]()
![]()
![]()
![]()
![]()
![]()
![]()
![]()
Overview
#teachersofyoutube #teacherlife #pythonlearning
Company & People
1038 Research Blvd Suite 240 Madison, AL 35758 (Huntsville, Alabama) info@firia.com (256) 434-1888
- https://www.linkedin.com/in/geri-ewing/ CEO responds to emails
- https://www.linkedin.com/in/davidbewing David Ewing President
- https://www.linkedin.com/in/sarah-ewing-438453344 (Caspian) Marketing & Media Specialist
- https://www.linkedin.com/in/kevin-banks CTO - components
- https://www.linkedin.com/in/arden-sindel-81132136a/ Video: Rheem Canon M50, studio lighting, Adobe Lightroom and Photoshop.
for #computerscienceeducation
Products
- Websites
- CodeSpace IDE
- CodeBot with wheels
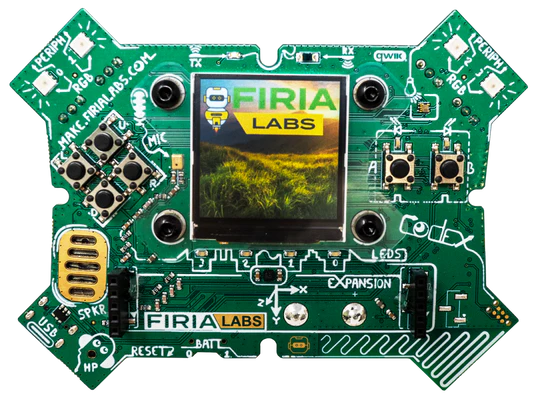
- CodeX (like Micro:Bit)
- CodeAir
Websites
https://learn.firialabs.com/ redirects to:
https://resources.firialabs.com/curricula
https://resources.firialabs.com/curricula/ap-csp/ap-csp-codex CodeX: AP CSP Teacher Resources https://www.linkedin.com/in/jill-jones-3a7119327 Jill Jones at Cleveland
https://resources.firialabs.com/curricula/cs-unplugged lists activities that do not require electronics.
Standards
- CSTA
- ISTE
- Common Core
- TEKS
Community
https://community.firialabs.com
https://resources.firialabs.com/curricula/firiambassadors
https://docs.firialabs.com/ Libraries for
Buy
https://firialabs.com/cart https://firialabs.com/collections/mission-packs
https://firialabs.com/collections/codex™ $199 https://firialabs.com/collections/codex™/products/introducing-python-with-codex™
https://resources.firialabs.com/curricula/codex-cross-curricular https://resources.firialabs.com/curricula/codex-cross-curricular/brain-decoded-with-codex to teach neuroscience
https://resources.firialabs.com/curricula/codex-cross-curricular/lift-off-with-codex $199 https://firialabs.com/collections/mission-packs/products/mission-pack-lift-off-peripherals-kit has 22 sonsors
CodeSpace IDE
-
Get license claim;’ code from email
https://resources.firialabs.com/curricula/code-space/getting-started
-
Getting Started
https://resources.firialabs.com/curricula/code-space/getting-started
-
login (with auto logout in another tab)
https://login.firialabs.com/?redirect=y&returnTo=license.firialabs.com
- Click “CLAIM ORDER” if that appears at the upper-left.
- Click “ACTIVATE” if that appears.
-
In the “Filters” menu on the right
-
Create a classroom at:
https://dashboard.firialabs.com/
-
Class Progress
https://dashboard.firialabs.com/
- Click Class Name
-
Click “OPEN LESSON ACCESS CONTROLLER”.
CodeX AP CSP Python Code List.pdf
https://apcentral.collegeboard.org/media/pdf/ap-computer-science-principles-exam-reference-sheet.pdf Effective Fall 2020
https://code.org/files/APCSP_Code_QuickReference.pdf
https://longbaonguyen.github.io/courses/apcsp/apprinciples.html
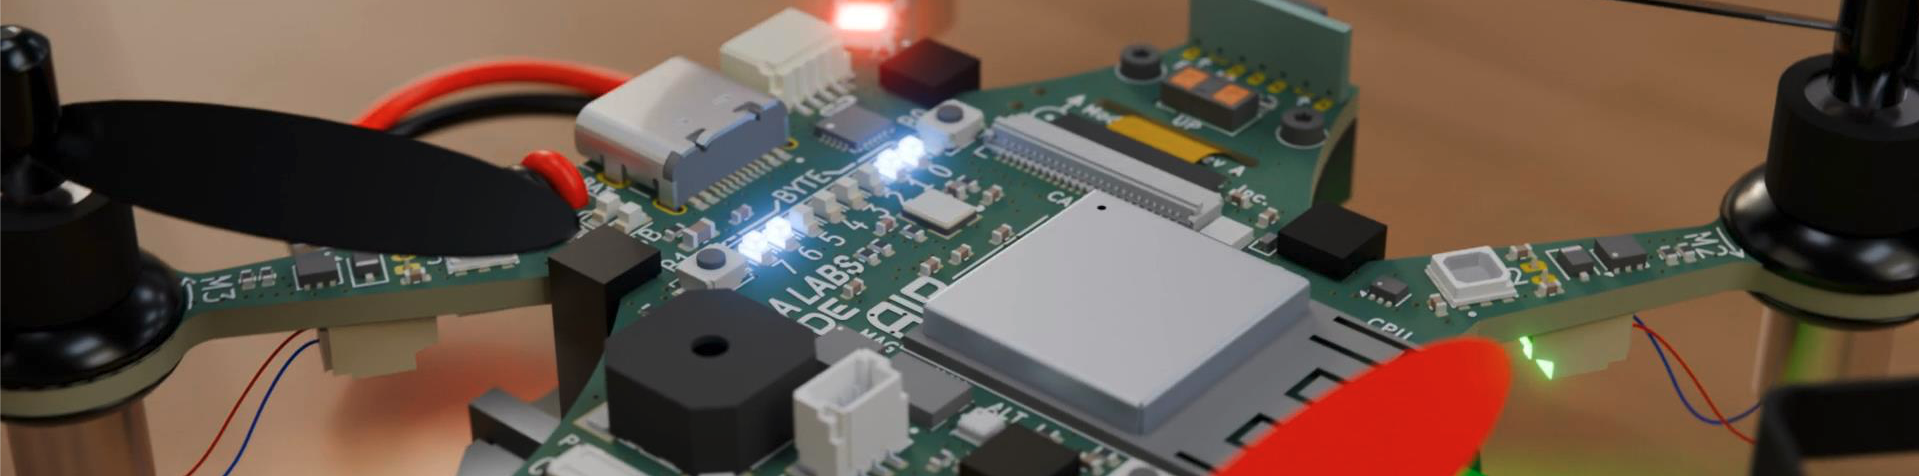
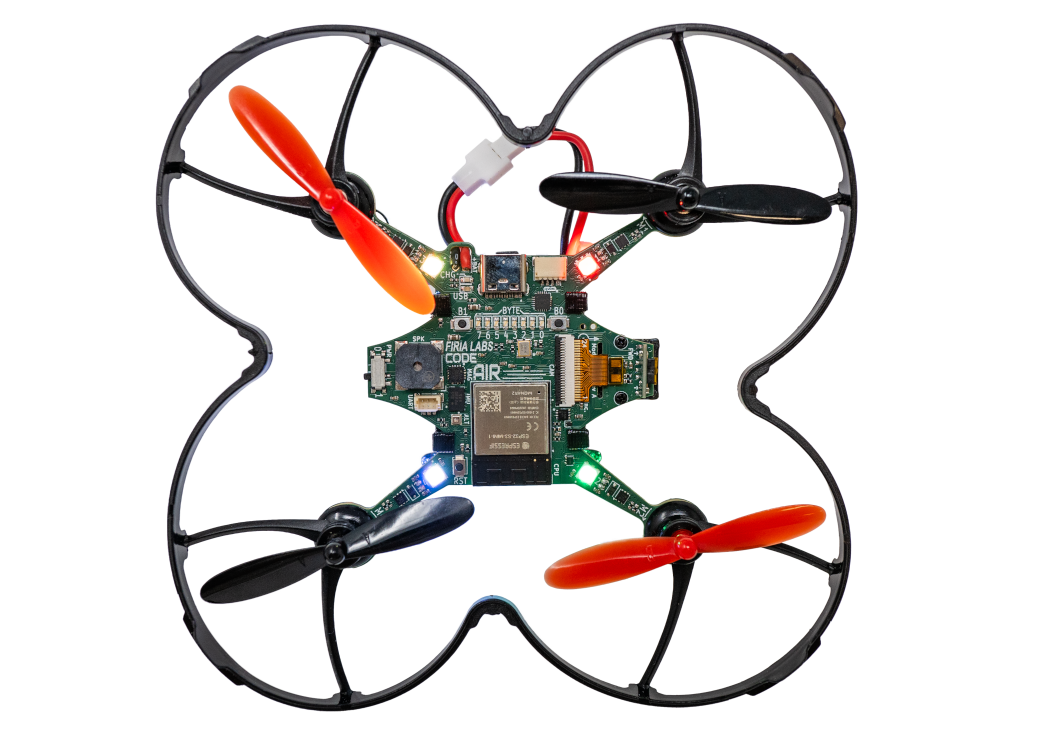
#CodeAIR to Fly
https://firialabs.com/collections/codeair™
- Weight: 55g
- Size (WxHxD): 130x130x35mm
- USB-C programming / onboard LiPo charger
-
Dedicated multi-core application CPU / AI accelerator
-
Camera – color CMOS UXGA (1632x1232) image sensor (OV2640)
- 3 axis accelerometer / gyroscope (BMI088)
- High precision barometric altimeter (BMP390)
-
3 axis magnetometer (QMC5883)
- Up / Down / Front laser range sensors (VL53L1CX)
- Optical ground-tracking flow sensor (PMW3901)
-
Hardware expansion port: QWIIC
- Flight data recorder has 8 GB capacity.
- Activate speaker onboard (to announce)
- AI accelerator runs TensorFlow Lite
Hold the CodeAIR by its prop guard.
To avoid damaging its sensitive components, before handling the CodeAIR, touch grounded metal (desk, doorknob) to discharge static.
Avoid touching the electronic parts.
CodeAIR has a camera - but it’s not an FPV (First Person View) drone.
https://resources.firialabs.com/curricula/fly-with-python
https://resources.firialabs.com/curricula/fly-with-python $69 https://firialabs.com/collections/codeair™/products/fly-with-python-license-renewal
Class:
- Mission 1 - Welcome
- Mission 2 - Introducing CodeAIR
- Mission 3 - Pre-Flight Check
- Mission 4 - Flight Safety
- Mission 5 - Hovering Flight
- Mission 6 - Navigate
- Mission 7 - Multitasking
- Mission 8 - Attitude Control
- Mission 9 - Survey
- Mission 10 - Reconnaissance
https://resources.firialabs.com/teacher-resources/codeair/Unmanned%20Aerial%20Systems%20Minimum%20Security%20Requirements.pdf
- Click “Progress Unlocker”.
- Click a mission item.
- Click “APPLY CHANGES TO CLASS”.
CodeAIR Programming
- Switch to the “CodeSpace Development Environment” tab.
-
Load program file from labs-demos:
https://bitbucket.org/firia/labs-demos/src/master/
https://resources.firialabs.com/curricula/codex-cross-curricular/lift-off-with-codex
CodeAIR Flight
- Insert the battery (a Lithium Polymer single cell (1S) pack) within the landing sled (cage).
-
Connect the white battery connectors according to the tab to show which side is polarized. So it only fits one way. The blue LED shine when powered up. Bend the retaining tabs slightly downward to allow the battery to slide out.
-
Connect the USB cable between your CodeAIR and your computer.
The cable that comes with CodeAIR is USB-A on older PCs, so you may need a USB-B to USB-C adapter.
- Turn ON the CodeAIR by sliding the power switch to on.
-
Check the connection bar in the bottom left corner.
- Hit RUN.
- Unplug the USB cable from CodeAIR.
- Place CodeAIR on the ground (or flying surface).
- Arm CodeAIR by pressing B0, the button closest to the front of the drone.
- Perform the mission by pressing B1, the button closest to the power switch.
https://docs.firialabs.com/codeair/hardware_reference/Troubleshooting.html
#CodeSpace IDE platform
-
Go to:
https://make.firialabs.com/
-
Click the green checkmark for the course.
- Create a program on the left.
-
Type something in the Text Editor.
- Click the class icon at the upper-right to select mission.
- Click the mission. Don’t expect a UI confirmation.
- Click OK at the lower-right.
#CodeBot robot with wheels
https://firialabs.com/collections/free-python-mission-packs Virtual Robotics same programming as the real physical one! go to sim.firialabs.com and click the “Join Class” button at the top-left. You’ll see the free Mission Packs listed there!
JumpStart or LiftOff for micro:bit on Chrome: https://makebit.firialabs.com/login
Brain Decoded curriculum
CodeX > Micro:bit
https://firialabs.com/collections/codex™/products/introducing-python-with-codex™
VIDEO: Load Code on CodeX Copy & Paste code.
Setup CodeX
- plug your CodeX in to the USB port of a computer that it shows up as a mass-storage device, like a flash drive.
NOTE: By default the USB-accessible filesystem is read-only, so a PC can’t for example copy new Python files onto the CodeX, or edit existing ones. But if you want to do such things, there’s a way to change it so the filesystem can be written to “like a flash drive”. Note that while it’s in this mode your Python code (and CodeSpace) will see the filesystem as read-only. You can’t have it writable from both directions.
To make the filesystem writable as a USB mass-storage device (until the next reset of CodeX) manually perform this bootup key-combination:
- Press and hold buttons A and L and keep holding them down…
- Briefly press the RESET button next to the BATT switch.
- Keep holding buttons A and L until you see the red LEDs light up from 0 to 3 in right-to-left order. You will see a double-flash of ALL red LEDs to confirm the filesystem is in USB-writable mode.
Upgrade Firmware
https://upgrade.firialabs.com/ CodeBot has version CB2 and CB3.
Erase code
VIDEO: Saving an empty file.
Log sensor data to a CSV fil
CodeSpace IDE
https://make.firialabs.com/ CodeSpace Dev Env On the right is the Mission Bar. Click 1
-
Start with loading the simplest “Known-good” program
-
https://docs.firialabs.com/codex/primer/LightsOn.html Turn on a RED LED
https://docs.firialabs.com/codex/primer/LightsOn.html Save your code
Python
https://bitbucket.org/firia/labs-demos/src/master/ Additional libraries: For CodeXair.py flight controller https://bitbucket.org/firia/labs-demos/src/master/codeair/CodeXair/CodeXair.py
CodeX Electronics
Power supply voltage and current
https://docs.firialabs.com/codex/primer/PixelGraphics.html
CodeX Operation
https://docs.firialabs.com/codex/primer/Neopixels.html NeoPixels
https://docs.firialabs.com/codex/primer/TextDisplay.html
CodeX Sensors
https://docs.firialabs.com/codex/primer/Sensors.html built-in sensors:
Ambient Light
Infrared
Sound
Temperature
Accelerometer
Mission Pack: Lift-Off! Perpherals Kit
https://resources.firialabs.com/curricula/codex-cross-curricular/lift-off-with-codex $199 https://firialabs.com/collections/mission-packs/products/mission-pack-lift-off-peripherals-kit has 22 sonsors
Log Review
- access log with a PC through the USB-attached filesystem.
CodeX Primer
CodeX Primer: https://docs.firialabs.com/codex/primer/primer.html
- Light Show!
- NeoPixels
- Text Windows
- Pixel Graphics
- Sensors
For CodeX: https://docs.firialabs.com/codex/python_modules.html Core:
- codex – CodeX hardware interface
- lis2dh – accelerometer device driver
- infrared – Send and Receive Messages via IR Light
- radio – Radio Communication Graphics:
- ascii_art – Make bitmaps from text
- bitmap – Pixel manipulations
- canvas – Graphics drawing canvas
- colors – Predefined color values
- gallery – Built-in Art Samples
- tft – Control of the TFT display
- tile_grid – 2D grid of images
- sprite – Tile Grids in motion Sound:
- codec – CodeX audio CODEC driver library
- funcgen – Function Generator for Audio Samples
- songplayer – Text Based Music Player
- soundlib – Sound Library for Tones, FX, MP3s
- trackplayer – Single Track component of songplayer
- waveforms – Various Sound Waves
For CodeAir: https://docs.firialabs.com/codeair/python_modules.html Core:
- codeair – CodeAIR hardware interface
- infrared – Send and Receive Messages via IR Light
- radio – Radio Communication
- colors – Predefined color values Flight Controller Interface:
- flight – Flight Controller Interface
- flightdb – Flight Controller Database, logging and param system
- selftest – Self test functions
- xfly – Factory default “Fly with CodeX” program
- crtp – Crazy Real Time Protocol
- embedded_data – Embedded Data Pipe
- recorder – Flight Data Recorder
- state_machine – State Machine
- img_utils – Image Utilities
- codeair_drivers – CodeAIR Drivers Flying API:
- Crazyflie Client Library
https://docs.google.com/presentation/d/1r3QgWszaOB7_SYEuEH1WqrWyZgWx8tXVVr-EYg_iEKY/edit?slide=id.p49#slide=id.p49 Use AI with CodeSpace
CodeAir Serial Interfaces
https://docs.firialabs.com/codeair/hardware_reference/Expansion.html I2C serial part Compatibility:
- https://www.sparkfun.com/qwiic”>Sparkfun QWIIC 4-pin JST SH connectors brings out regulated power and connects to the I2C serial communication bus.
- https://learn.adafruit.com/introducing-adafruit-stemma-qt/what-is-stemma-qt”>Adafruit STEMMA QT
- UART ESP32
- Pinout for this connector is compatible with the https://www.raspberrypi.com/products/debug-probe/”>Raspberry Pi Debug Probe
https://docs.firialabs.com/codeair/codeair.html