

How to use the UK-based Micro:bit hardware to learn Python programming of IoT devices
![]()
![]()
![]()
![]()
![]()
![]()
![]()
![]()
![]()
![]()
![]()
![]()
![]()
Overview
This is at https://wilsonmar.github.io/microbit
This is part of a series about low-cost, low-power SOC (System on a Chip) microcontrollers (MCUs):
- Arduino
- Raspberry Pi
- ESP32
- micro:bit
- zima
- Firia Labs
https://microbit.org/code/
https://www.parallax.com
https://www.parallax.com/product-category/sensors/
The proper orientation is the 25-pixel LEDs with gold connectors at the bottom.
QUESTION: have a stand?
Python
-
In a browser:
https://python.microbit.org/v/3
- Click the purple “Send to micro:bit” at the lower-left corner.
- Click Next to the micro:bit board illustration for plugging in the cable.
- Click Next to the instruction.
- Click “BBC micro:bit CMSIS-DAP”, then Next.
1st Python run to Serial monitor
From https://learn.parallax.com/tutorials/robot/cyberbot/get-started-microbit-and-python/use-serial-monitor
from microbit import *
import os, sys, machine
# https://microbit-micropython.readthedocs.io/en/v2-docs/os.html
print("os.uname():",os.uname())
print("")
print("sys.platform:",sys.platform)
print("sys.version_info:",sys.version_info)
print("sys.version:",sys.version)
print("sys.modules:",sys.modules)
print("sys.implementation:",sys.implementation)
print("")
print("machine.unique_id():",machine.unique_id())
print("machine.freq():",machine.freq())
- If “Show serial” does not appear at lower-right, click “Simulator”
-
Click the three vertical dots to the right of “High serial” text for this:
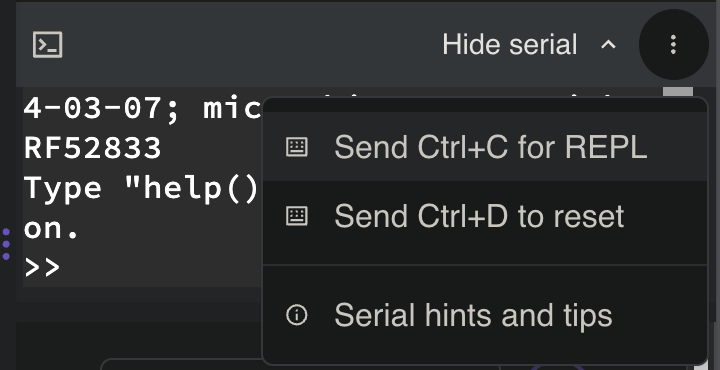
That’s a reminder to hold down the Ctrl key and D together to reset.
PROTIP: The micro:dot terminal does not understand the “clear” command.
-
The back of the micro:bit board has a reset button.
- Click “Show serial” at the lower-right so it turns to “Hide serial”.
- Click on the Serial monitor body (to switch the cursor from a square to a solid white rectangle).
- Click the right side of the purple “Send to micro:bit” icon (with three vertical dots) and select “Disconnect”. The response from the code above:
os.uname(): (sysname='microbit', nodename='microbit', release='2.1.2', version='micro:bit v2.1.2+0697c6d on 2023-10-30; MicroPython v1.18 on 2023-10-30', machine='micro:bit with nRF52833')

sys.platform: microbit, os
sys.version_info: (3, 4, 0)
sys.version: 3.4.0
sys.modules: {}
sys.implementation: (name='micropython', version=(1, 18, 0))

machine.unique_id(): b'j\x11\xe7S*\xcf\xc3\xee'
machine.freq(): 64000000
The following appears on every execution:
MicroPython v1.18 on 2023-10-30; micro:bit v2.1.2 with nRF52833
Type "help()" for more information.
>>>
NOTE: There is a uname command in every operating system.
- Click “Hide serial”.
Emulator
display.scroll('Hello')
- Click “Emulator” at the right-top.
LEDs
Make it flash a heart and the letters to “HeLLo” every minute:
from microbit import *
# Code in a 'while True:' loop repeats forever
while True:
    display.show(Image.HEART)
    sleep(1000)
    display.scroll('Hello')
microbit library
https://microbit-micropython.readthedocs.io/en/v2-docs/microbit_micropython_api.html
# sleep for the given number of milliseconds.
sleep(ms)
# returns the number of milliseconds since the micro:bit was last switched on.
running_time()
# returns the temperature in Celcius
temperature()
# converts a number from one scale of values to another
scale(value_to_convert, from_=(min_value, max_value), to=(min_value, max_value))
# makes the micro:bit enter panic mode (this usually happens when the DAL runs
# out of memory, and causes a sad face to be drawn on the display). The error
# code can be any arbitrary integer value.
panic(error_code)
# resets the micro:bit.
reset()
# sets the output volume (0-255) of the micro:bit speaker **V2** and
# external speaker or headphones connected to the edge connector pins.
set_volume(128)    # V2
Accelerometer
To play Yathzee?
from microbit import *
import random
while True:
    if accelerometer.was_gesture('shake') or button_a.was_pressed() or button_b.was_pressed():
        display.show(random.randint(1, 6))
randint(1,6) means return a number from 1 to 6.
Shake the micro:bit.
From https://python.microbit.org/v/3/ideas/dice
Buttons
Press A if correct, B if wrong
Thermometer
Press (left) Button A to show temperature in Celsius:
from microbit import *
display.show(Image.HEART)
while True:
    if button_a.was_pressed():
        # Function temperature() obtains the temp in Centigrade
        display.scroll(temperature())
    if button_b.was_pressed():
        # Convert temperature() obtains the temp in Centigrade
        celsius=temperature()
        fahrenheit = (celsius * 1.8) + 32
        # Truncate/pad a flot to no decimal without rounding:
        display.scroll(str(fahrenheit))  # for 75.2
NOTE: The default is Centigrade/Celsius because micro:bit was created for the BBC in the UK.
Microphone
The microphone senses sound from a small hole on the front of the micro:bit.
from microbit import *
lightsOn = False
while True:
    if microphone.was_event(SoundEvent.LOUD):
        lightsOn = not lightsOn
        if lightsOn:
            display.show(Image.HEART)
        else:
            display.clear()
    sleep(100)
Clap your hands.
From https://python.microbit.org/v/3/ideas/clap-lights
Sound insulation mixer
From https://microbit.org/projects/make-it-code-it/sound-insulation-meter/ two micro:bits are used: one a microphone and another a sound source of consistent volume and distance.
Speaker
from microbit import *
import music
speaker.on()
set_volume(255)  # from range 0 to 255 for loudest:
# By default notes are played in the 4th octave:
for x in range(2):
    music.play(['C4:4', 'D4', 'E4', 'C4'])
for x in range(2):
    music.play(['E4:4', 'F4', 'G4:8'])

if accelerometer.was_gesture('shake'):
    music.play(['c', 'd', 'e', 'c'])
if button_a.was_pressed():
    music.play(['c', 'd', 'e', 'c'])
if button_b.was_pressed():
    # Play in 3rd Octave:
    music.play(['c3', 'd3', 'e3', 'c3'])
The song should play as soon as the program is sent.
Use musical notation: https://python.microbit.org/v/3/reference/play-notes
From https://python.microbit.org/v/3/ideas/fr%C3%A8re-jacques
Speak!
from microbit import *
import speech
# Defaults per https://microbit-micropython.readthedocs.io/en/v2-docs/speech.html:
# STATUS: This is unintelligible:
words="hello"
speech.say(words, pitch=64, speed=72, mouth=128, throat=128, pin=pin0)
speech.pronounce("WAY2 SHUH7D AY WAO5K TUX DHAH STOH5R.")
from https://python.microbit.org/v/3/api/speech.pronounce
PROTIP: An external speaker is really needed!
Sound with for and sleep
Know what these sounds mean:
from microbit import *
import random
import music
from microbit import sleep
# speaker.on()
set_volume(255)  # from range 0 to 255 for loudest:
# 10 Built-in sounds https://pc-microbit-micropython.readthedocs.io/en/latest/sound/audio_sounds.html
def play(call):
    if call == 1:
        audio.play(Sound.HELLO)
        display.scroll('HELLO')
    if call == 2:
        audio.play(Sound.GIGGLE)
        display.scroll('GIGGLE')
    if call == 3:
        audio.play(Sound.HAPPY)
        display.scroll('HAPPY')
    if call == 4:
        audio.play(Sound.MYSTERIOUS)
        display.scroll('MYSTERIOUS')
    if call == 5:
        audio.play(Sound.SAD)
        display.scroll('SAD')
    if call == 6:
        audio.play(Sound.SLIDE)
        display.scroll('SLIDE')
    if call == 7:
        audio.play(Sound.SOARING)
        display.scroll('SOARING')
    if call == 8:
        audio.play(Sound.SPRING)
        display.scroll('SPRING')
    if call == 9:
        audio.play(Sound.TWINKLE)
        display.scroll('TWINKLE')
    if call == 10:
        audio.play(Sound.YAWN)
        display.scroll('YAWN')
    sleep(1)  # 1000 = 1 second
# MAIN:
for call in range(10):
    display.show(call)
    play(call)
Compass
To ensure the compass gives accurate readings, “TILT TO FILL SCREEN” scrolls across the display the first time you use the compass or command compass.calibrate() Stand the micro:bit on each edge until every LED light is lit for a happy face.
from microbit import *
while True:
    if button_a.was_pressed():
        display.scroll(compass.heading())
    if button_b.was_pressed():
        magnet_strength_x = compass.get_x()
        display.scroll(magnet_strength_x)
From https://python.microbit.org/v/3/reference/heading
Radio antenna
When you have two micro:bit boards:
https://learn.parallax.com/tutorials/robot/cyberbot/cybersecurity-radio-basics
Radio to Transmit Weather
From https://learn.sparkfun.com/tutorials/wireless-remote-weather-station-with-microbit/all
Use MakeCode’s radio blocks to have one micro:bit transmit a signal to a receiving micro:bit on the same channel. This is useful if your weather station is installed in a location that is difficult to retrieve data from the OpenLog.
There are a few different ways to send and receive data. Send MQTT protocol to a Raspberry Pi, which communicates with a Google Nest.
Alligator clips
https://makecode.microbit.org/reference/radio
https://forum.core-electronics.com.au/t/weather-bit-micropython-code-examples-needed/2212
https://microbit.org/projects/make-it-code-it/environment-data-logger/
https://www.hackster.io/idreams/lora-weather-station-with-bbc-micro-bit-3f14f8
Cyber:bot robot
Build the Robot car in the kit based on https://learn.parallax.com/tutorials/robot/cyberbot/build-your-cyberbot-rev-c-board $279 from https://www.parallax.com/product/cyberbot-robot-kit-with-microbit/
- Right-link URL below to “Save link” https://learn.parallax.com/tutorials/robot/cyberbot/add-modules-your-microbit
- Create new folder “microbit”
-
Click “Save” to download file “cyberbot-template-with-blink.hex” binary from:
https://www.parallax.com/package/cyberbot-library-python/
https://learn.parallax.com/support/reference/cyberbot-library-reference
-
Unzip the file.
-
In either Google Chrome or Microsoft Edge, go to the micro:bit Python Editor at
- Ignore the code already there.
- Click “Project” at the left edge.
- Click “Open”.
- Select the file “cyberbot-template-with-blink.hex” and click “Open”.
This enables you to use command:
from cyberbot import * - Make sure that static has been discharged from your body.
-
Lay the pieces down separately on a non-conductive surface (not on top of each other yet).
- Make sure the 5 AA batteries you have are all fully charged.
- In the battery pack, put in 5 AA batteries, each in a correct orientation.
- Put the black battery pack with cable coming out the middle of the aluminum frame.
-
Attach the cyber:bot board to the aluminum frame holding the batteries.
-
Plug the 5AA battery pack wire into the cyber:bot board.
Two green LEDs should shine on the board.
- Plug the micro:bit with the LEDs face up onto the cyber:bot board.
-
Connect the micro:bit board to the cyber:bot board.
- On the edge of the cyber:bot, set the PWR switch set to 1 or 2.
- Set PWR to 0, the script won’t run and green lights are off, to conserve battery.
- Set PWR to 1 to power everything while downloading code.
- Set PWR to 2 to powers all features except the servo ports (to keep the robot from running away while downloading code).
- Click the micro:bit Python Editor’s purple “Open” sausage button.
-
Browse to and open cyberbot-template-with-blink.hex.
from cyberbot import * while True: bot(21).write_digital(1) sleep(250) bot(21).write_digital(0) sleep(250) - Click “Send to micro:bit”, then Yes, Yes. Click your board name so “Micro:bit flashed” appears at the lower-left corner.
-
Click the Send to micro:bit button, and follow the Connect to micro:bit popups.
(For robot navigation apps, you’d be disconnecting the USB cable after this step.)
- Verify that the P21 light blinks.
OTA download code
From https://forum.micropython.org/viewtopic.php?t=11746
Microsoft MakeCode supports Bluetooth BLE on the micro:bit.
To control a micro:bit from a laptop, use a second micro:bit connected to the laptop. For both V1 and V2 micro:bits.
On the laptop running Linux with Python installed:
#!/usr/bin/python3

import serial
import time
from serial.tools.list_ports import comports as serial_ports
import sys

def find_microbit():

  ports = serial_ports()

  for port in ports:
    if "VID:PID=0D28:0204" in port.hwid:
      return port.device

  return None

port = find_microbit()

if port:
  print('\nMicro:bit found at port %s.\n' % port)
else:
  print('\nError: No micro:bit found.\n')
  sys.exit(1)

ser = serial.Serial(port=port, baudrate=115200, timeout=1)

while True:
    msg = input("Send message: ")
    if not msg:
        break
    else:
        msg = msg.encode("ascii")
        print(msg)
        ser.write(msg)
On the micro:bit connected to the laptop:
from microbit import *
import radio

radio.config()
radio.on()
uart.init(115200)

while True:
    msg = uart.read()
    if msg:
        msg = str(msg, 'UTF-8')
        display.scroll(msg, delay=80, wait=False)
        radio.send(msg)
On the microbit (with battery) you want to control remotely:
from microbit import *
import radio

radio.config()
radio.on()

while True:
    msg = radio.receive()
    if msg:
        display.scroll(msg, delay=80)
AI
https://learn.parallax.com/tutorials/series/artificial-intelligence-tutorial-series
See https://learn.parallax.com/node/2681
Ag Gardening app
https://www.youtube.com/watch?v=mUOAQRa17T4 MDeLuise/plant-it self-hosted, open source gardening companion
Remove CMSIS-DAP
If you are no longer using Microbit on a particular machine, don’t leave the connection active.
In browsers or WebUSB contexts, you can “forget” paired devices. For example, in Chrome you can click the lock icon in the address bar when on a relevant page and uncheck or remove “BBC micro:bit CMSIS-DAP” or “DAPLink CMSIS-DAP” from the USB device list to disconnect it from web applications.