

Connect to Windows machine in AWS or any cloud from within MacOS, Linux
![]()
![]()
![]()
![]()
![]()
![]()
![]()
![]()
![]()
![]()
![]()
![]()
![]()
Overview
This is a tutorial on the different ways to “remote into” a Windows instance from a MacOS or Linux machine.
Sandbox environment
Microsoft has a free sandbox: Exercise - Connect to a Windows virtual machine using RDP
Remote Desktop Connection on Windows machines
Remote Desktop Connection is installed with by default on all Windows machines.
Within Start Programs > Accessories, is a RDP (Remote Desktop Protocol) client program that can be used without being an Administrator. It uses uses port 3389. The RDP is also known as “Terminal Services”.
If you are running a Windows virtual instance (under VMWare Fusion), etc.,
-
If you were given a rdp file, click on it because the RDP program is associated with the “rdp” file extension:
ec2-54-219-170-140.us-west-1.compute.amazonaws.com.rdpThis way you see the dialog filled in.
Alternately, open the program manually:
- Click the Windows “Start” icon button at the lower left corner (or wherever you moved it).
-
Click the “Remote Desktop” icon on the Windows 10/2016 Desktop if it’s there:

Alternately, type enough of Remote to see “Remote Desktop Connection” appear for you to click.

Alternately, type mstsc to see “Remote Desktop Connection” appear for you to click.
Either way:
-
In the “Remote Desktop Connection” dialog, paste into the Computer Name: field the DNS name such as
ec2-54-219-170-140.us-west-1.compute.amazonaws.com -
Click “Show Options” for a pop-up:

-
Type in User Name “Administrator” if you’re using an Amazon EC2 instance, since Amazon EC2 makes use of PEM files for security.
Alternately, if you are working within an enterprise environment, you may need to add a network domain name in front of your assigned named, separated by a “backward slash”. This is because enterprises create for the same person different accounts for internal and external use.
- Click “Save”
- Click “Connect” to see a “Welcome” screen.
-
Click “OK” on the Welcome screen.
CAUTION: Remember to Log off, especially if you are sharing a machine with others.
Save rdp file from Amazon
-
Click the “Connect” icon at the top of the Console.

-
Click “Download Remote Desktop File” such as:
ec2-54-219-170-140.us-west-1.compute.amazonaws.com.<strong>rdp</strong> -
Double-click on the file to open the RDP client.
Back to the dialog:
- Click “Get Password”.
- Click “Browse…” and select Downloads, the .pem file downloaded earlier.
- Click “Decrypt Password”.
- Double-click on it to highlight it and press Ctrl+C to copy the string to your Windows Clipboard.
- Open a Notepad file and paste it there so you won’t lose it.
-
Click “Close” to dismiss the dialog.
RDP Client
- On Windows Explorer or MacOS Finder, double-click on the .rdp file saved earlier to invoke an RDP client program (if one is installed on Mac, see below).
- On the RDP client, click on the Password input field and paste the Clipboard contents.
-
Leave the Domain blank and click OK to connect.
- Click View Instances.
- Scroll down to copy the IPv4 Public IP such as 54.219.170.140
Other operating systems
On other operating systems (such as MacOS or Linux), if you have no administrative rights on your corporate Windows laptop, spin up cloud instances in the cloud and access them via a client that uses RDP.
RDP clients on Linux
On Linux machines, there is RDesktop at http://www.rdesktop.org
RDP clients on MacOS
On the Mac, these RDP clients can reach into instances of Amazon EC2 or other cloud that house Windows servers.
A) Royal TS is the enterprise client, at $29 each if you want to spend a little money.
B) Microsoft Remote Desktop for Mac from HockeyApp is what I recommend for free.
C) Microsoft Remote Desktop from Apple AppStore
D) Vagrant RDP
E) Microsoft’s Remote Desktop Client Connection 2.1.1 for Macintosh is gone
F) Chrome RDP Add-on is no longer supported?
G) CoRD from Sourceforge is obsolete
Microsoft Remote Desktop Client gone
Microsoft’s Remote Desktop Client Connection 2.1.1 for Macintosh (installer RDC_2.1.1_ALL.dmg at 9.4 MB) is no longer available for download from http://www.microsoft.com/mac/downloads
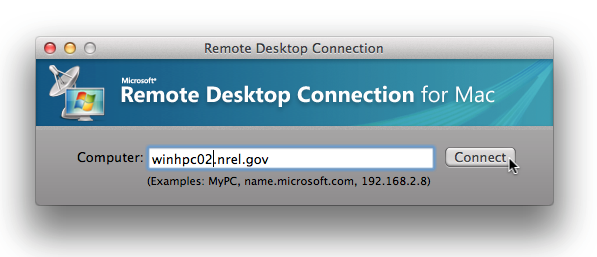
Image credit: https://hpc.nrel.gov/users/systems/winhpc/getting-started
Royal TSX
The licensed client is available for Windows and Mac.
-
Get to their download page at:
-
Click the “Download” button for Mac to download a file such as:
royaltsx_3.2.6.1000.dmg (23.3 MB)
- Click the file downloaded to unzip it.
-
Click the .dmg file to install it.
As this page says, those without a license can connect up to 10 application instances and a single document per application instance.
- Using Finder, go to your Applications folder.
- Drage the program to the Launch bar for easy access.
- Open the app by clicking on the Launch bar or Applications folder.
- Click Apply in the UI that pops up.
- Drag the orange logo and drop it on the blue (Applications) folder.
- Click Open to the confirmation.
- Click the red dot to dismiss the installer pop-up.
- Those who buy a perpetual license, have a way to store and retrieve the key string.
- Click to apply it.
- TODO: Install plugins
- TODO: Create document.
- TODO: Invoke.
Microsoft’s Remote Desktop for Mac OSX from Apple
-
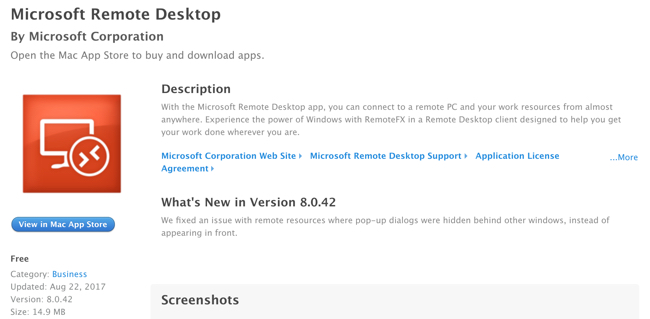
NOTE: This is newer than the edition that comes with Microsoft Office for Mac 2011.
- Click the blue “View in Mac App Store”.
- Within the Mac AppStore app, click Get.
- Click Install.
-
Click Open.
BLAH: The UX at time of writing is difficult because there are no favorites or sorting by last use, aliases, etc. (that I know of). I now have to scroll down the list every time, and remembering which of many cryptic names I want, which is difficult if you have a lot of servers on the list.
NOTE: http://docs.aws.amazon.com/quickstart/latest/rd-gateway/welcome.html Quick Start for Remote Desktop Gateway explains how to configure RDGW in detail.
Microsoft Remote Desktop for Mac (HockeyApp)
This enables you to run the most powerful of servers from a ChromeBook laptop with minimal RAM and hard disk.
-
Click this link to the
Microsoft Remote Desktop for Mac webpage, which is part of the HockeyApp.net used by Xamarin developers for Crash Reporting, User Feedback, User Metrics and In-App Updates. - Click “Open link” to open in the App Store on your laptop.
-
Click the cloud download icon and wait until the ring completes full circle:

- Click the blue “Open”.
-
Click “Allow” in the pop-up:

-
To open the program, rather than going to Finder, press command + space bar and type enough of “Microsoft Remote Desktop.app”, then press Enter.
-
To open the program, rather than going to Finder, press command + space bar and type enough of “Microsoft Remote Desktop.app”, then press Enter.
-
If the “Help us make your experience better?” appears, click “not now” or “Yes”.

-
Click “Add Desktop”


-
In the Quick Connect dialog, click on the white field and press Ctrl+V to paste the EC2 DNS Address or click “Skip” if you don’t have an address yet.
Close and Open again
- Click the program name “Microsoft Remote Desktop Beta” at the top and select “Quit”.
-
In Finder, Downloads folder, right-click and Move to Trash
Close and Open again
- Get to the Mac Launcher by squeezing your fingers and thumb together on the Touchpad.
-
Type “Mi” until you see “Microsoft Remote Desk”, then click it.
First time
TODO: Verify this.
- Click “Add desktop”.
- Click “Connect”.
- Copy the password from where you saved earlier.
- Click on Password field. Press Ctrl+V to paste it.
- Click “Continue” to get see the Windows start-up screen.
-
Click on the icon (in case you have several instances). You should now see a desktop.
Success!
- In Finder’s Devices left pane under, click the eject button for the “Microsoft Remote Desktop Beta” installer.
- In Finder, drag the “Microsoft Remote Desktop Beta” from within Downloads to drop on the Applications folder.
-
If you are using the program often, drag the “Microsoft Remote Desktop Beta” from within Applications to drop on the Task Bar so that it is visually avaiable.
- Click the red “Add desktop” icon.
- For User Account, select “Administrator” because that’s what Amazon does.
-
For PC Name, paste the name such as
ec2-54-219-170-140.us-west-1.compute.amazonaws.com
- Click “Save”.
Vagrant RDP
If you are getting into a Vagrant instance containing Windows:
-
Set the communicator and network ports in your Vagrantfile, such as:
  config.vm.communicator = "winrm"
  config.vm.network "forwarded_port", host:3389, guest: 3389
-
On a Terminal:
vagrant rdp
Chrome Add-on
- If you don’t have a Chrome browser, install it from the default Internet Explorer.
-
Open a Chrome browser to this site.
PROTIP: The fusionlabs.net web page does not use https. Use http://www.fusionlabs.net (the https on this doesn’t resolve).
rdpsupport@fusionlabs.net or 214.739.5454
-
Click the green “Launch App” button at the upper-right.
CAUTION: I get this running forever:

- Highlight the DNS address (such as “ec2-52-53-218-39.us-west-1.compute.amazonaws.com”) and press Ctrl+C to copy it into your Windows Clipboard.
-
Click on the blank field and press Ctrl+V to paste.
-
PROTIP: If you can’t connect, make sure RDP port 3389 is open among Inbound port rules.
- For Domain:
- For UserName:
- For Password:
CoRD on Sourceforge
CoRD on Sourceforge, which is for Mac OS X 10.5—10.8 (obsoleted when 10.12 Sierra is out).
CoRD_0.5.7.zip is 3.4 MB
After running this, drag it into your Applications folder.
To add a new server, click on the menu File.
Android Chrome Remote Desktop
Although it has a related named, the Android phone app Chrome Remote Desktop securely accesses your computers from your Android device.
-
Set up remote access on desktop computers using the Chrome Remote Desktop app from Chrome Web Store:
https://chrome.google.com/remotedesktop
Click Add to Chrome, then Add at the pop-up.
-
Launch the app.
Select Remote Assistance providing user-to-user screen sharing for technical support.
-
On your Android device, open the app and tap on any of your online computers to connect.