

Prove that tools emulating users (Playwright, JMeter, Selenium, etc.) can recognize the gamut of controls on a challenging web app.
![]()
![]()
![]()
![]()
![]()
![]()
![]()
![]()
![]()
![]()
![]()
![]()
![]()
Overview
- Challenges on The-Internet app
- Video introduction
- Recap: Architectural components
- How To Manual Steps
- Automating the-internet using Selenium
- Coding Flood Element Typescript
- Run Element script from client CLI
- Setup AWS manually
- Script A : Instantiate AWS Docker in EC2 build script
- Terminal - AWS Key Pair
- Terminal - AWS Key Pair
- Setup “NewRelic” in a EC2 Ubuntu containing Docker
- Save NewRelic License Key
- Install NewRelic instrumentation agent
- Install NewRelic agent in running “the-internet-app”
- Script B : Add in server.rb and create new Docker image
- Update Element .ts script for flood.io
- Instrument script for NewRelic
- Script C : Save instrumented Docker image to DockerHub for reuse
- Perpare for Flood
- Run flood against app in AWS under instrumentation
- Config New Relic Dashboard
- Other APM
- Security scans
- Playwright
- Python scripting
- Resources
NOTE: Content here are my personal opinions, and not intended to represent any employer (past or present). “PROTIP:” here highlight information I haven’t seen elsewhere on the internet because it is hard-won, little-know but significant facts based on my personal research and experience.
Challenges on The-Internet app
The table below presents several icons associated with each page of the sample app’s UI on-line at
“An example application that captures prominent and ugly functionality found on the web. Perfect for writing automated acceptance tests against.”
Ruby code to create “the-internet” was at account saucelabs but forked to:
The website was originally created at https://github.com/tourdedave/the-internet by Dave Haeffner since 2015 part 1 and part 2 of “Selenium Test Automation: Practical Tips & Tricks” presentation recorded in Israel. In his May 2016 “How to use Selenium successfully” slidedeck he said:
Click on ![]() to see the sample app’s GUI. The website was created by Dave Hoeffner to present 43 controls which provide challenges to those learning to code Selenium scripts that automate manual actions real users perform on an internet browser (such as Google Chrome). Dave created the site as the basis for his tutorials at ElementalSelenium.com and SeleniumGuidebook.com.
to see the sample app’s GUI. The website was created by Dave Hoeffner to present 43 controls which provide challenges to those learning to code Selenium scripts that automate manual actions real users perform on an internet browser (such as Google Chrome). Dave created the site as the basis for his tutorials at ElementalSelenium.com and SeleniumGuidebook.com.
Click on ![]() to view Playwright emulation scripts.
to view Playwright emulation scripts.
Click on ![]() to view JMeter XML scripts for the control.
to view JMeter XML scripts for the control.
Click on ![]() to view a video about manual actions and analysis of the UI page source code as the basis for test script creation.
to view a video about manual actions and analysis of the UI page source code as the basis for test script creation.
Additional columns of icons may be added to show sample run results for each test item.


 A/B Test Control (also known as split testing)
-
 Add/Remove Elements
 - Basic Auth (Sign in Username and Password: admin)
- Broken Images
- Challenging DOM - this is the one impacting server resource
- Checkboxes
- Context Menu
- Digest Authentication (user and pass: admin)
- Disappearing Elements
- Drag and Drop
- Dropdown
- Dynamic Content
- Dynamic Controls
- Dynamic Loading (using explicit wait for resilency)
- Entry Ad
- Exit Intent
- File Download (query HTTP HEADER first to make sure file contains something)
- File Upload (issue in Element handling Windows vs Linux, also in Selenium)
- Floating Menu
-
Forgot Password
-
Form Authentication (Login)
Logout (appears after login, not listed in the app’s menu)
- Frames (Nested) Frames (iFrames)
- Geolocation
- Horizontal Slider
- Hovers
- Infinite Scroll
- Inputs
- JQuery UI - Menus
- JavaScript Alerts
- JavaScript onload event error
- Key Presses
- Large & Deep DOM
- Multiple Windows
- Nested Frames
- Notification Messages (Growl listener)
- Redirect Link
- Secure File Download
- Shifting Content
- Slow Resources (blacklist slow resource with proxy server)
- (Sortable) Data Tables
- Status Codes
- Typos
- WYSIWYG Editor
NOTE: Some scripts are under development.
Video introduction
Below is the narration (transcript) of the video above.
Selenium makes use of older “Web Driver” APIs that control browsers from code written in a variety of programming languages.
But the new Google “Lighthouse” API exposes a comprehensive set of metrics that include performance timings for every manual action. They’ve been added to the “Audits” section of Chrome Developer Tools UI we’ve been using to figure out the classes and identifiers we code into Selenium scripts.
But since these “Lighthouse” diagnostics require manual effort each time, it can be tedious to keep repeating manual actions during each regression test. So we create scripts to automate manual actions in the Python (or JavaScript) programming language run by the PlayWright program. The program is installed locally using instructions in the README.md file.
There is currently no Docker image containing PlayWright. So it needs to be installed.
Typescript is a superset of the JavaScript programming language that control browsers. Typescript is used because its transpiler checks for errors sooner than JavaScript.
After scripts are git pushed to a remote GitHub repository, others can git clone onto their machine to run.
Both PlayWright and Selenium control a single user GUI at a time. But we also want to see what happens when many users on many browser instances run at the same time exercising the website. We want to see how much each JavaScript control can impact both the client and server environment’s memory, CPU, and other resources. «<
App Build
But we don’t want our experiments to overload Dave’s public site for everyone else.
So we run the app as a Docker container within the AWS or other cloud. The container and environment under test is built by invoking a build script that retrieves files from GitHub which makes use of a Docker image housed in Docker Hub and uses it to instantiate an app server for testing. It uses credentials for an AWS account associated with the appropriate groups with applicable permissions and roles needed.
Emulate using PlayWright
We use the PlayWright? service in the cloud (or on-premises) to emulate those many users by running automation scripts pulled from a GitHub repository.
PlayWright scripts are a new innovation because it emulates manual actions within each user’s browser.
Historically, Java code used by JMeter or Scala code used by Gatling emulate load by simply emulating just the exchange of what is sent between client browser and server. But a lot of work now occur inside the client browser.
Multi-user Flood runs are controlled by run parameters such as the number of virtual users being emulated. Run shell scripts can be used to manage various runs, test data, and results over various variations in run conditions.
Instrumentation
It’s important to have a metrics dashboard that helps people make sense of measurements collected over time. This article talks about use of New Relic.
We have an instrumentation script which installs an agent (newrelic-infra) to run alongside the app. Because the sample app under test was written in the Ruby language, the agent is installed as a rpm file (newrelic.rpm) specified in the Gemfile referenced during installation.
During runs, the agent sends notifications about events to a process installed using a Docker image in Docker Hub from New Relic. The monitoring process transfers events collected by agents to a metrics dashboard at newrelic.com.
To validate communications, a license key obtained manually from the New Relic website is installed when the agent is installed.
The license key, plus IP address and port number of the metrics collector are provided to Flood so that it can add its metrics to New Relic over time. These metrics include the number of users, transaction response times, the rate of transactions per second processed, network bandwidth throughput, and transaction pass/fail error rates.
When we also add the cost of each run, we would be able to identify which configurations would provide the most profitable number of transactions per dollar.
Recap: Architectural components

While learning on a local machine such as a Mac, Linux laptop, or Windows PC:
-
Chrome Developer Tools is used to extract identifiers, classess, and selectors in HTML and CSS to programmatically reach each GUI control used in each TypeScript.
-
The setup.sh CLI shell script is installed to run scripts to emulate a single user’s manual actions on a Google’s Chrome browser.
The system under (load) test (SUT) instantiated using Docker:
- The “the-internet” web app from a Docker image
- The monitoring process, which can be in another container or as another pod within the same container as the web app.
Additionally, the GUI of two cloud services:
-
https://flood.io which runs TypeScript to emulate the browsers for multiple users, which imposes an artificial load.
-
A New Relic dashboard which provides visualization (line graphs) of metrics collected during runs over time and under various configurations.
Project folders from GitHub
These steps are done manually on your local machine.
- Create or navigate to a project folder for this effort.
-
Clone automation scripts:
git clone https://github.com/flood-io/element/tree/master/examples/internet-herokuapp
- Review script coding.
How To Manual Steps
Here are the manual steps to make use of instructions in this tutorial:
NOTE: This assumes that you know how to open and use a Terminal program on a Mac or a Git Bash on Windows.
-
Clone the PlayWright script.
-
Get an AWS service account linked to AWS Roles assigned to Groups with Permissions. See https://wilsonmar.github.io/aws-onboarding, which describes editing files which store credentails (UserName and Password) in environment files which are invoked during runs to populate environment variables referenced by automation scripts.
-
Install within AWS “the-internet” app under test from DockerHub Flood Script Update-aws-ec2
NOTE: Automation for installation within the Azure cloud is on our Roadmap.
- Obtain logins to accounts for New Relic APM, New Relic Browser, and New Relic Infrastructure.
-
Install NewRelic’s monitoring process
- Define initial run parameters to control runs of flood.io in the cloud (Flood.io account, etc.) in flood-run-e2e.sh.
-
Run “flood-run-e2e” to launch runs in flood.io at scheduled times to take advantage of AWS Spot Rates.
PROTIP: Automation (shell or Python) scripts to bring up servers and conduct runs are designed to minimize spend (not waste money on idle resources). Services are deleted after each run.
- Configure New Relic dashboard
- Review warning and error messages. Analyze statistics collected by the Chrome Browser’s Lighthouse and sent to NewRelic’s dashboard in the cloud.
-
Identify the fastest realistic ramp-up time (without causing errors) by re-running with different rates which running users are added.
- Experiment with changes to JavaScript, HTML, and CSS in client application code in attempts to reduce timings and resource usage on browsers.
-
Modify TypeScript accordingly to identify the impact of changes made to the application before reruns.
NOTE: Concern about metrics is more about what is happening in client browsers than in the application server. The application under test here (“the-internet”) does not make use of separate authentication servers, a database, nor other back-end services.
-
Run separate isolated scenarios to isolate transactions to study:
-
Registration (to establish new users) - Login (to load authentication)
- Menus and static pages (when users are exploring)
- User data entry filling out forms (editing
and saving form data into a database) -
Client-side performance during batch reporting, backup, restore, or other back-end processing
-
-
Identify the mix of transactions in a standardized run of different transactions at a time.
PROTIP: This exercise stands up only one instance each and not multiple instances in a cluster for High Availability (HA).
-
Identify optimal scale-up and scale-down (instance type) configurations -
Identify optimal scale-out and scale-in configurations
Automating the-internet using Selenium
T.J. Myer wrote in his website June - July 2015 a series describing his adventures coding Selenium on Dave’s website:
- Sketch out the simple manipulation of a Login page
- Draft Common Utilities
- Storing Constants: static finals vs enums
- Storing Locators for Web Elements
- The Page Object Model
- Writing the Automated Test
References:
- http://bit.ly/se-exceptions-java list of exceptions in Selenium (2015)
- http://bit.ly/se-exceptions-howto exception handling in Selenium (2015)
Many of the issues addressed above also need to be addressed by any app automation tool.
Coding Flood Element Typescript
Typescript is a superset of the JavaScript programming language that control browsers. Flood Element makes use of the Typescript language, which transpiles to JavaScript. Typescript is used because its transpiler checks for errors sooner than with JavaScript.
QUESTION: Typescript
- Typescript variables are statically typed (not dynamic as in JavaSript)
- Typescript can be coded using object-oriented constructs
Rather than directly referencing application control IDs,
so that when an app changes, just one change is needed to make all tests pass again.
This is like Selenium ![]() page object helpers from http://bit.ly/po-html-elements Yandex and http://bit.ly/po-page-factory built into Selenium.
page object helpers from http://bit.ly/po-html-elements Yandex and http://bit.ly/po-page-factory built into Selenium. ![]() Similarly, Base Page Object library to migrate commands from one version to another.
Similarly, Base Page Object library to migrate commands from one version to another.
Run Element script from client CLI
An example summary report:
This flood simulated up to 1 users across 1 grid in us-east-1 for 7 minutes. The mean response time was 916ms with a standard deviation of 1,285 ms. The median was 169 ms and the 90th percentile was 3,010 ms. The maximum was 3,014 ms. A maximum of 12 rpm with a mean of 4 rpm was observed. 101 transactions passed with 0 failed.
Setup AWS manually
Based on https://wilsonmar.github.io/aws-onboarding
On an internet browser such as Google Chrome, Apple Safari, or Microsoft Edge:
- To limit financial exposure (to like $25 or whatever), buy a pre-paid reloadable Visa gift (debit) card pre-paid online (which has an expiration date and some have a monthly service fee). The Drawpay card provides a 1% refund on purchases. Others provide fee-Free cash withdrawal at over 25,000 MoneyPass ATMs
- Open AWS master account with email.
- In IAM, lock down master account.
- Create Security Group.
- In IAM, create service account.
- Define service account with permissions.
- Store key pair (credentials) for service account locally.
-
Select your AWS region.
Script A : Instantiate AWS Docker in EC2 build script
- Get to AWS EC2.
- Choose and AMI - Ubuntu 16.04 LTS
- Select EC2 instance type (t2.micro Free Tier eligible can handle up to 50 users), or “m5axlarge”.
- [10:23] Define Security Group add “All TCP Traffic”.
- Assign Key Pair name ___
- [2:29] Download Key Pair
- Save to file ???
- [2:37] Launch Instance
-
PROTIP: Name instance “the-internet-app” so that files referring to this name (such as newrelicc-infra.yml) don’t have to be changed.
Terminal - AWS Key Pair
- In Terminal store .pem file downloadd
-
SSH into instance.
Terminal - AWS Key Pair
Inside “the-internet” terminal:
-
[4:08] Within app server to hold “the-internet”, install prerequisites (GPG certs, Docker):
sudo apt update
sudo apt install apt-transport-https ca-certificates curl software-properties-common
curl -fsSL https://download.docker.com/linux/ubuntu/gpg | sudo apt-key add -
sudo add-apt-repository "deb [arch=amd64] https://download.docker.com/linux/ubuntu bionic stable"
sudo apt update
apt-cache policy docker-ce
sudo apt install docker-ce
# verify:
sudo systemctl status docker
sudo docker --version
DOCKER_IMAGE="gprestes/the-internet"
sudo docker pull "$DOCKER_IMAGE"
sudo docker run -d -p 7080:5000 "$DOCKER_IMAGE"
CONTAINER_ID=$( docker ps | grep "$DOCKER_IMAGE" | cut -d " " -f 1 )
WANIP4=$( curl http://canhazip.com" )  # public IP4 address.
-
[12:04] On a browser, verify external access to “the-internet” app using the external IP address from AWS, such as:
Setup “NewRelic” in a EC2 Ubuntu containing Docker
In a browser:
- Login to AWS using your service account.
- Get to AWS EC2.
- Choose and AMI - Ubuntu 16.04 LTS
- Select EC2 instance type (t2.micro Free Tier eligible can handle up to 50 users), or “m5axlarge”.
- [10:23] Define Security Group add “All TCP Traffic”.
- Assign Key Pair name ___
- [2:29] Download Key Pair
- Save to file ??? [15:07] ssh -i “ubuntu.pem” ubuntu@ec2-18-208-170-2.compute-1.amazonaws.com
- [2:37] Launch Instance
-
Name instance “NewRelic”
Save NewRelic License Key
Based on *
-
[8:13] On the NewRelic web page Account Settings, highlight and save the License Key text
-
Open file
./secrets.envNOTE: The secrets.env file is referenced in the
docker-compose.ymlfile cloned from GitHub.docker-compose build docker-compose up
-
[15:29] Update
newrelicc-infra.ymlwith license_key value.Install NewRelic instrumentation agent
- [8:13] Switch back to the terminal
-
TODO: Script to do this:
# TODO: Replace with reference to secrets.env by docker-compose
echo "license_key: a46bf7d3b4043cdfffcab3aaef677d29cc60d6be" | sudo tee -a /etc/newrelic-infra.yml
curl https://download.newrelic.com/infrastructure_agent/gpg/newrelic-infra.gpg | sudo apt-key add -

cat /etc/lsb-release
# [13:33] Based on NewRelic web page
# https://docs.newrelic.com/docs/infrastructure/new-relic-infrastructure/installation/
printf "deb [arch=amd64] https://download.newrelic.com/infrastructure_agent/linux/apt bionic main" \
| sudo tee -a /etc/apt/sources.list.d/newrelic-infra.list
sudo apt-get update
sudo apt-get install newrelic-infra -y
# Verify: more /etc/newrelic-infra.yml

# TODO: automate this:
vi  /etc/newrelic-infra.yml
sudo vi /etc/newrelic-infra.yml

# TODO: Identify the Docker ID to a variable:
$CONTAINER_ID=$(sudo docker ps)
# (value such as ba965ff40ef7)
sudo docker exec -i -t "$CONTAINER_ID" /bin/bash

# TODO: From inside NewRelic process:
sudo docker cp ba965ff40ef7:/app/server.rb .

# [19:31] Reboot:
sudo systemctl restart newrelic-infra
-
[19:57] Verify that NewRelic recognizes events from “the-internet-app” (subsituting the account number), such as:
https://infrastructure.newrelic.com/accounts/2256749/hosts
Install NewRelic agent in running “the-internet-app”
-
[20:38] Get inside Docker container:
# TODO: Identify the Docker ID to a variable:
$CONTAINER_ID=$(sudo docker ps)
# (value such as ba965ff40ef7)
sudo docker exec -i -t "$CONTAINER_ID" /bin/bash
Based on https://docs.newrelic.com/docs/agents/ruby-agent/installation/install-new-relic-ruby-agent
-
[23:17] Add
gem 'newrelic_rpm'in Gemfile.# TODO: From inside NewRelic process (example root@ba965ff40ef7): sudo docker cp "$CONTAINER_ID:/app/server.rb" . sudo docker cp server.rb "$CONTAINER_ID:/app/" # Backup existing cp Gemfile Gemfile.backup # TODO: Automate ??? gem 'newrelic_rpm # For the server.rb which is larger it’s not possible to echo and cat the file, # so I copied it locally and edit it to include the require 'newrelic_rpm' sudo docker cp ba965ff40ef7:/app/server.rb . # And copy it back to the container: sudo docker cp server.rb ba965ff40ef7:/app/
-
Verify
Script B : Add in server.rb and create new Docker image
This is so the Docker image can be used for scaling.
sudo docker run -d -p 7080:5000 ruby-bundle-update

# TODO: Identify the Docker ID to a variable:
$CONTAINER_ID=$(sudo docker ps)
# (value such as 363ddc8f7439)
sudo docker exec -i -t "$CONTAINER_ID" /bin/bash
# Save updated files:
sudo docker cp server.rb "$CONTAINER_ID:/app/"
sudo docker cp Gemfile "$CONTAINER_ID:/app/"
# Get inside:
sudo docker exec -i -t  "$CONTAINER_ID" /bin/bash
sudo docker ps
sudo docker commit "$CONTAINER_ID" ruby-bundle-update
sudo docker stop "$CONTAINER_ID"

sudo docker ps
sudo docker run -d -p 7080:5000 ruby-bundle-update
sudo docker ps

# TODO: copy file newrelic.yml from external
touch 1
vi q
vi 1
mv 1 newrelic.yml
vi newrelic.yml
ls -lart  # to verify manually

# TODO: Identify the Docker ID to a variable:
$CONTAINER_ID=$(sudo docker ps)
# (value such as 178e6dc45ab7)

sudo docker cp newrelic.yml "$CONTAINER_ID:/app/"
sudo docker commit "$CONTAINER_ID" final-version
sudo docker stop "$CONTAINER_ID"
# Verify:
sudo docker images
# Restart:
sudo docker run -d -p 7080:5000 final-version

sudo docker ps
history > /tmp/history.file
Update Element .ts script for flood.io
-
Update the IP address in the script (several locations):
await browser.visit('http://18.208.170.2:7080/')Instrument script for NewRelic
- Get license from newrelic.com
-
Insert license into script
NOTE: https://github.com/ThyWoof/geek-movie-shop
Script C : Save instrumented Docker image to DockerHub for reuse
- Docker save
Perpare for Flood
- If you don’t have a flood.io account, get one (manually).
- Confirm your account via email.
- Log into Flood.io.
- Get license token.
Run flood against app in AWS under instrumentation
This step runs a shell script file at
https://github.com/wilsonmar/DevSecOps/master/flood-io/flood-run-e2e.sh
It is customized from an example in Flood docs.
- If you don’t have a GitHub account, get one.
-
Use an internet browser to view:
-
Click “Fork” button to copy the repository under your own account.
- Open a Terminal.
-
Navigate to the containing folder where GitHub creates folders. Make a folders as necessary.
-
Clone the whole DevSecOps repo:
git clone https://github.com/wilsonmar/DevSecOps/
-
Navigate into the folder:
cd DevSecOps
cd flood-io
-
Edit the environment file using your favorite editor, such as:
nano flood-env.sh
- Insert the license token from flood.io.
- Save the file
-
Run the environment file to load variables into memory.
-
Edit the script using your favorite editor, such as:
nano flood-run-e2e.sh
- Define other parameters: run conditions.
-
Validate run pre-conditions.
- Initiate run.
- Stop run.
- Collect run results.
- Analyze run results / Generate visualizations.
-
Display summary statistics.
- Git add, commit, and push the changed script to GitHub.
Config New Relic Dashboard
Questions about several other dimensions, such as:
- What is the impact on the cloud bill (costs) of that cool JavaScript UI code?
- What is the capacity of a chosen instance type (such as the free tier t2.micro)?
- How much more is needed to run the anticipated peak load?
- What happens when that peak load is exceeded?
https://docs.newrelic.com/docs/insights/use-insights-ui/manage-dashboards https://learn.newrelic.com/get-started-with-apm https://learn.newrelic.com/dashboards-and-data-apps https://docs.newrelic.com/docs/plugins/plugins-new-relic/custom-dashboards-custom-views https://blog.newrelic.com/product-news/steal-this-dashboard/
Other APM
A full list of APM tools:
- New Relic
- Dynatrace OneAgent
- Dynatrace AppMon
- AppDynamics
- NudgeAPM
Security scans
In today’s ransomware environment, we all need to be extra vigilant to ensure security.
-
Install https://inspec.io (created by Chef)
-
Install CIS (Center for Internet Security) benchmarks for specific distributions and versions of Linux. For example:
- Distribution independent Linux
- Debian Linux 8
- Ubuntu Linux 16.04 LTS
- Amazon Linux 2
- Centos Linux 7
- Oracle Linux 7
- Red Hat Enterprise Linux 7
- SUSE Linux Enterprise 12
The Linux Audit Framework is used to identify potential security weaknesses or policy violations
-
Install
sudo apt install auditd
pidof auditd
-
Add rules and list them
sudo auditctl -w /usr/bin/dockerd -k docker
sudo auditctl -l
- Turn auditing on.
-
Analyze report
sudo aureport
Securing the Docker Platform by Nigel Brown Released 21 Jun 2018
Playwright
![]() Under development are our emulation (test) scripts that call the Playwright API that controls Chromium, Firefox, and WebKit internet browsers on macOS, Linux, and Windows machines.
Under development are our emulation (test) scripts that call the Playwright API that controls Chromium, Firefox, and WebKit internet browsers on macOS, Linux, and Windows machines.
Playwright’s marketing home page is at:
Playwright was open-sourced by Microsoft on April 16, 2016, with first tag on
Jan 31, 2020 at https://github.com/microsoft/playwright.
The library maintained by several active contributors:
-
Subscribe to the product’s social media, led by Debbie O’Brien, Sr. Tech PM @Microsoft
-
Create an environment for Node to run.
-
View Debbie’s YouTube series to get started.
- VIDEO: Install Playwright within VSCode (instead of CLI git clone)
- Add GitHub Actions in file playwrite.yml created within repo folder .github/workflows
- Each language that calls the API has its own documentation:
- Python using PyTest
- Node.js (JavaScript) running dotnet installing NUnitof MSTest
- .NET C#
- Java installed using mvn
Python scripting
The PlayWright documention talks about a test-sample.py script.
PROTIP: You can save hours of headache by using the repo I created after getting the uv package to work.
- Open a Bash scripting CLI such as Terminal or, better yet, Warp CLI from https://warp.dev.
- Create a folder where Git will create a folder using these commands:
git clone https://github.com/bomonike/playwright-scripts; cd playwright-scripts
- Create a folder where Git will create a folder using these commands:
cd test-example
python -m venv .venv
source .venv/bin/activate
uv pip install pytest pytest-playwright playwright -U
playwright install  #  browser binaries: Chromium, Firefox, WebKit, FFMPEG
# NOTE: cached in /Users/johndoe/Library/Caches/ms-playwright/ to run Playwright tests.

pytest test_example.py --browser chromium --headed --debug
- Run a sample test in the language of your choice from above. For Python:
pytest test_example.py --browser chromium --headed --debug
-
Generate emulation (test) scripts by recording actions as a human user.
Accelerate test creation and insights with AI-powered tooling.
-
Setup Microsoft’s Playwright Testing Service in the Azure cloud (Part of “Azure App Testing”) at:
https://azure.microsoft.com/en-us/products/playwright-testing (formerly at
https://playwright.microsoft.com)Within https://portal.azure.com/#home : Azure Web Tesing at https://portal.azure.com/#view/HubsExtension/AssetMenuBlade/~/overview/assetName/AzureAppTesting/extensionName/Microsoft_Azure_CloudNativeTesting which consists of two services:
- Playwright Workspaces for functional QA testing
- Azure Load Testing for performance testing
-
Read the documentation at https://learn.microsoft.com/en-us/azure/app-testing/
Under your subscription, create a globally unique workspace of up to 64 alphanumeric characters (no dashes, etc.).
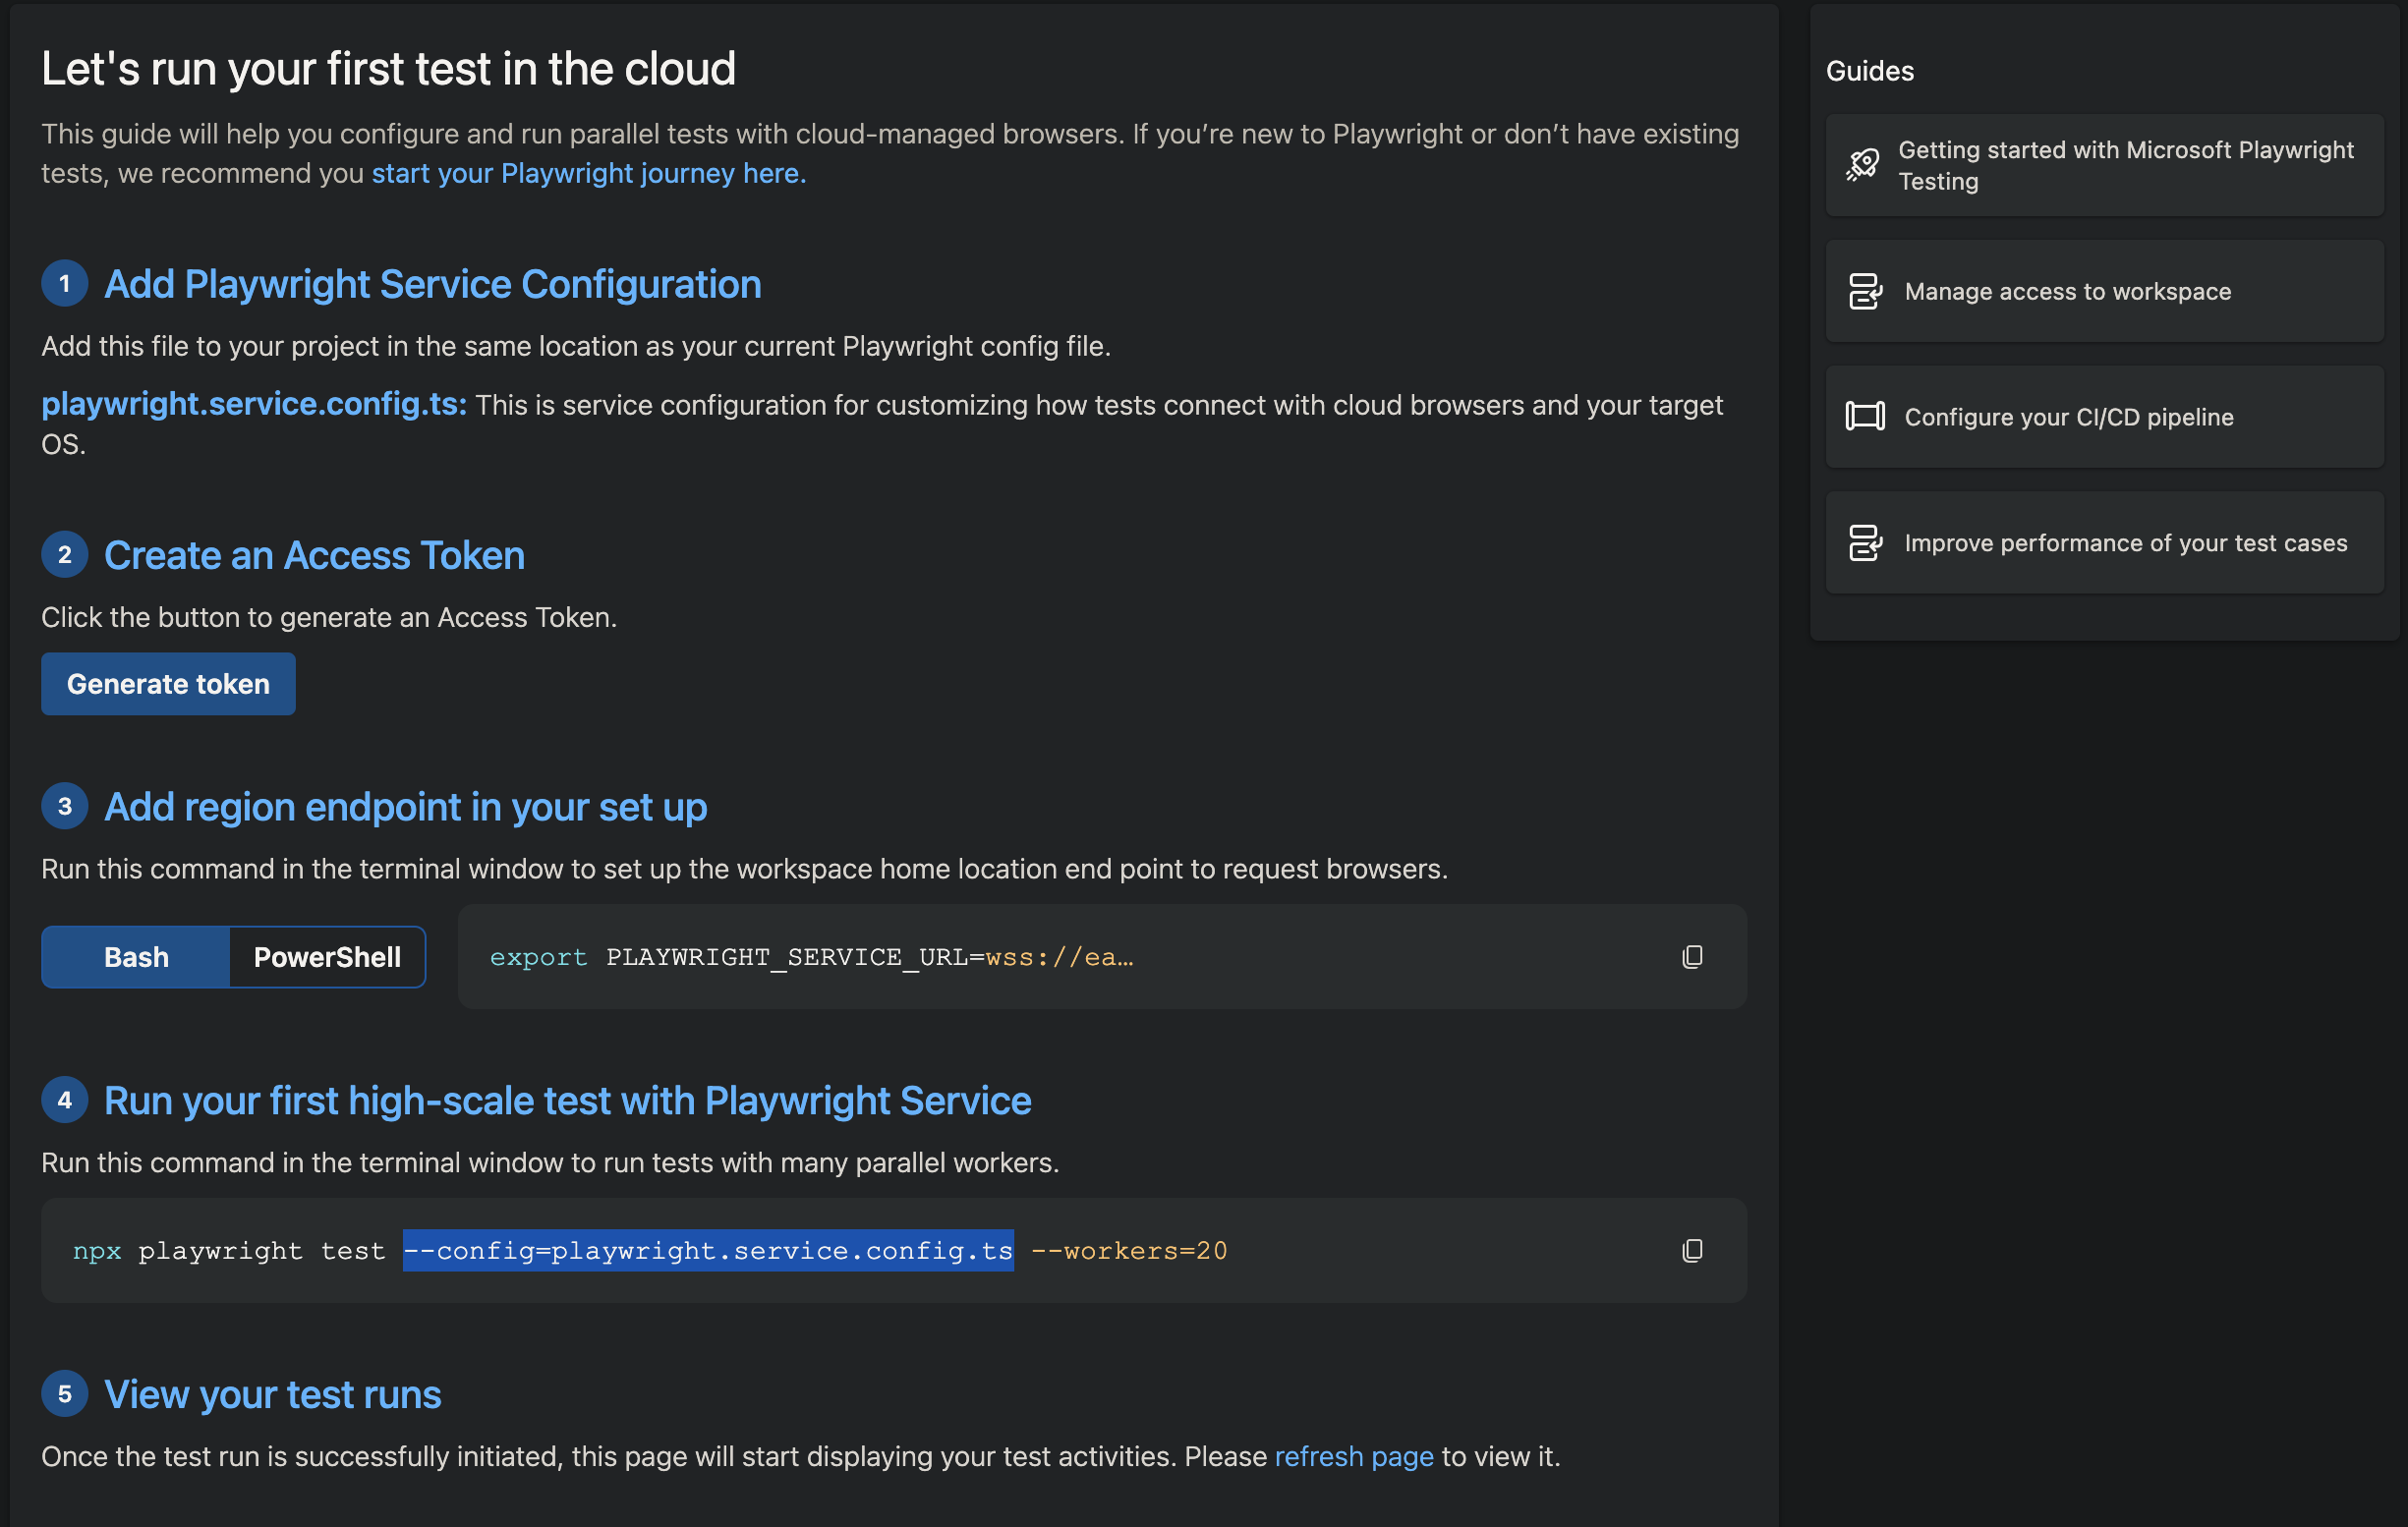
-
pricing
The same price is charged across the limited number of regions where the service is available during preview (East US, West US 3, East Asia, West Europe).
See the Pricing page at https://azure.microsoft.com/en-us/pricing/purchase-options/azure-account?icid=playwright-testing
The choice is embedded in the URL used to call the service, CLI variable used within test script code:
export PLAYWRIGHT_SERVICE_URL=wss://eastus.api.playwright.microsoft.com/api/authorize/connectSession echo PLAYWRIGHT_SERVICE_URL=”$PLAYWRIGHT_SERVICE_URL”
Generate the API Access token PLAYWRIGHT_SERVICE_ACCESS_TOKEN= and store it securely in an encrypted vault until needed.
The service provides browser and OS combinations (up to 50 in parallel, at scale). To run 50 Playwright tests:
npx playwright test --workers=50 --config=playwright.service.config.ts
For example: this playwright.service.config.ts file.
If each of 50 takes 12 seconds on average, you’ll be billed for 10 “test minutes”, calculated as 50 tests x 12 seconds ÷ 60 seconds in a minute. Each “Test minute” is when a Playwright test runs in the service’s cloud browsers.
After 100 test minutes during a free 30-day trial, pricing is $0.01/test minute on Linux and $0.01/test minute on Windows, billed by the second.
QUESTION: Would running apps hosted within Azure remove variability in time going through the public internet?
-
QUESTION: Use Playwright scripts to perform load testing?
We need to control https://portal.azure.com, particularly to create an AI Cognitive group in order to check the “Microsoft Responsible AI Agreement”. That is needed before automation such as Terraform and Bicep are allowed to create AI-related resources.
In response to https://www.reddit.com/r/QualityAssurance/comments/1cq4ja8/learning_playwright/
A tutorial by Artem is provided at https://www.bondaracademy.com/course/sdet-with-playwright (and on his Udemy class) for $139 for a quiz, or $499 for test case coding and code reviews using JavaScript (not Python).
VIDEO course by Mukesh Otwani.
Resources
PlayWright.