

Secure SSH accessing servers in AWS and other clouds: implement Zero-Trust with granular control of least-privilege just-in-time access using HashiCorp Boundary
![]()
![]()
![]()
![]()
![]()
![]()
![]()
![]()
![]()
![]()
![]()
![]()
![]()
Overview
- Why? The problem addressed
- Solution: Identity-based
- Different ways to run Boundary Server
- SaaS Boundary on SaaS HCP
- Install for local usage
- Connection Protocol Wrappers
- Boundary.app GUI
- Self-Hosted Local server
- Configuring Boundary Cluster
- Boundary Scope
- Migrate
- Use with Okta IdP
- Human-to-machine Access via Boundary
- Machine Auth & Auth using Vault
- Machine-to-machine Access using Consul
- Videos
- References
The world is rushing to HashiCorp’s Boundary due to the need to install Zero-Trust Networking, especially within the US federal government in repsonse to the White House Executive Order in 2020.
Zero-Trust is about shifting from obsolete assumptions, processes, and tools. For example:
“What were we thinking creating a system that leaves long-term SSH keys around to be stolen?”
Since its announcement on October 2020, HashiCorp’s Boundary is revolutionizing how we connect remotely into servers (such as PostgreSQL, MySQL, etc.) within AWS, Azure, Google, IBM, and other clouds.
NOTE: Content here are my personal opinions, and not intended to represent any employer (past or present). “PROTIP:” here highlight information I haven’t seen elsewhere on the internet because it is hard-won, little-know but significant facts based on my personal research and experience.
Why? The problem addressed

No more Bastion Host Jump Box
The now “traditional” (passe security-wise) is to go through a Linux SSH bastion host, with a command such as:
ssh -L
“What were we thinking when we create Bastion hosts – essentially paying for an additonal server for hackers to access?
Bastion host, users are not differentiated because the host provides “all or nothing” access.
And SSH takes some work to setup securely - users would need to mess with another set of secrets to a specific IP address.
No more VPN tunnels
VPNs improves on Bastion hosts in that VPNs controls access by each user’s IP address. VPNs are difficult to install by each user. And they’re expensive, introduce bandwidth limits, and don’t scale well. Multiple VPNs are difficult to setup, and even more costly.
That’s why Boundary manages the “identity” of each user.
Solution: Identity-based
- VIDEO: What is Boundary? (Whiteboard introduction to HashiCorp Boundary by CTO Armon Dadgar)
Boundary is called “Software-Defined Perimeter (SDP)” software because it provides secure access into a private network’s targets (app server endpoints) you want to access.
VIDEO:: HashiCorp’s Boundary authenticates & authorizes based on the identity name of a server rather than its IP address and port number. (via OIDC protocol) with a 3rd-party IdP (trusted identity provider such as Okta, GitHub, Auth0, AWS, Azure, GCP, etc.).
Boundary automates service discovery as workloads are created or changed dynamically.
Additionally, Boundary provides Just-In-Time network access. A user may be allowed access to a server for only, say, 5-minute session the same day. Credentials provided by Boundary are temporary, so it can’t be lost like a static secret. And if lost, damage is limited.
Boundary maintains a Dynamic Host Catalog of hosts and targets (in a Postgres database).
In other words, HashiCorp’s Boundary is an intelligent proxy.
Different ways to run Boundary Server
There are different ways:
-
SaaS Boundary on HCP - HashiCorp Boundary is available for enterprise use with support on SaaS cloud from HashiCorp.
-
Open-Source - Support from HashiCorp Customer Success is not currently available for those who install the free Open-Source edition.
SaaS Boundary on SaaS HCP
Boundary on HCP (SaaS service managed by HashiCorp) went (free) beta preview July 2022. HCP Pricing: HCP Boundary is FREE for the first 50 sessions each month, using less than 1GB of data transfer per session. Beyond that, you are charged $.50 per session and $.50/per additional GB of session transfer data.
-
Create a HCP account at
https://portal.cloud.hashicorp.com/sign-up?product_intent=boundary
- On the left HCP menu, click Services: Boundary.
-
Click the blue “Deploy Boundary”.

-
Define a Boundary name according to a convention such as:
base-boundary-cluster
-
Define an Administrator account name (according to a convention)
base-boundary-cluster-admin
- Define a strong password (more than 20 characters)
-
Click “Deploy”.
-
Copy and save the Admin UI, such as:
https://c805c67f-eaa7-43f8-90d4-4c2a4e28a9ea.boundary.hashicorp.cloud/scopes/global/authenticate/ampw_vPzFIBfZXJ
-
Copy the Cluster URL, such as:
https://c805c67f-eaa7-43f8-90d4-4c2a4e28a9ea.boundary.hashicorp.cloud
This is the address registered users would provide to gain access.
Install for local usage
TODO: I’m working on a shell file that does the following with one command.
-
In a browser specify URL:
Notice that HashiCorp supports a wide range of modern and legacy operating systems:
macOS, Windows, Linux, FreeBSD, NetBSD, OpenBSD, SolarisPROTIP: The Boundary executable contains functionality to be used as a client, worker, server, in Dev mode
Boundary consists of two server components: Controllers, which serve the API and coordinate session requests; and Workers, which perform the actual session handling. A normal Boundary installation will consist of one or more Controllers paired with one or more Workers. A single Boundary binary can act in either of these two modes.
HashiCorp has created executables for both CLI and <a href=”#GUI app.
CLI executable install
-
On macOS, HashiCorp doesn’t provide a “brew install boundary”, so:
brew upgrade
brew tap hashicorp/tap
brew install hashicorp/tap/boundary
NOTE: The installer recognizes whether you have a M1/M2 ARM or an Intel machine.
-
Install autocompletion to $HOME/.bash_profile and $HOME/.zshrc so this only needs to be done once:
boundary config autocomplete install
There is no response to that unless an error occures, such as running it more than once.
-
The above would enable you to press tab once or twice after typing:
boundary
accounts              credentials           managed-groups
auth-methods          database              roles
auth-tokens           dev                   scopes
authenticate          groups                server
config                host-catalogs         sessions
connect               host-sets             targets
credential-libraries  hosts                 users
credential-stores     logout                workers
-
Get the program’s version:
boundary version
or
boundary -v
Version information:
  Git Revision:        02e410af7a2606ae242b8637d8a02754f0a5f43e
  Version Number:      0.11.2
PROTIP: CLI code to get just the version (“0.11.2”) is:
BOUNDARY_VERSION=$( boundary -v | grep "Version" | awk '{print $3}' )
echo "BOUNDARY_VERSION=$BOUNDARY_VERSION"
NOTE: sed -n ‘4p’ is a (counter-intuitive) alternative to grep.
-
View the latest and previous releases and its SHA for the git commit creating a release at:
https://github.com/hashicorp/boundary/releases
CLI Shortcuts
-
Alternately, if you prefer less typing, for quicker invocation of “boundary”, set an alias to use “bdy” instead
alias bdy="boundary"
-
That would enable you to spend less time typing:
bdy version
Command List
-
Use the alias to get a list of commands (and functionality from Boundary):
bdy --help
A menu of concepts in alphabetical order:
Usage: boundary <command> [args]

Commands:
 accounts                  Manage Boundary accounts
 auth-methods              Manage Boundary auth methods
 auth-tokens               Manage Boundary auth tokens
 authenticate              Authenticate the Boundary command-line client
 config                    Manage resources related to Boundary's local configuration
 connect                   Connect to a target through a Boundary worker
 credential-libraries      Manage Boundary credential librarys
 credential-stores         Manage Boundary credential stores
 credentials               Manage Boundary credentials
 database                  Manage Boundary's database
 dev                       Start a Boundary dev environment
 groups                    Manage Boundary groups
 host-catalogs             Manage Boundary host catalogs
 host-sets                 Manage Boundary host sets
 hosts                     Manage Boundary hosts
 logout                    Delete the current token within Boundary and forget it locally
 managed-groups            Manage Boundary managed groups
 roles                     Manage Boundary roles
 scopes                    Manage Boundary scopes
 server                    Start a Boundary server
 sessions                  Manage Boundary sessions
 targets                   Manage Boundary targets
 users                     Manage Boundary users
 workers                   Manage Boundary workers
Documentation online
Clicking the question mark icon brings you to
https://developer.hashicorp.com/boundary/docs/concepts/domain-model/scopes%23organizations
Connection Protocol Wrappers
Boundary comes with built-in wrappers for popular layer 7 connection protocols, such as:
- ssh: defaults to the local SSH client (ssh)
- postgres: defaults to the official Postgres CLI client (psql)
- rdp: defaults to the built-in Windows RDP client (mstsc)
- http: defaults to curl
- kube: defaults to kubectl
### Postgres database in Docker
-
Install Docker Desktop and have it running on its default port.
-
Make use of the Docker container image in Docker Hub (https://hub.docker.com/_/postgres)
docker run --name postgres-db -e POSTGRES_PASSWORD=docker -p 5432:5432 -d postgres
This prevents this error message when you do boundary dev :
Error creating dev database container: unable to start dev database with dialect postgres: could not start resource: : dial unix /var/run/docker.sock: connect: connection refused
Boundary dev mode controller
-
Instantiate a Boundary controller-mode process locally on a Terminal session using default parameter values:
boundary dev
Sample reponse:
==> Boundary server configuration:

     [Controller] AEAD Key Bytes: vL7W9ben+hLr5vbwGl1H+9Sr1Psp38bc
       [Recovery] AEAD Key Bytes: gmHrDl6zSd8NtAe5+IhHBUbX9GZD86sV
    [Worker-Auth] AEAD Key Bytes: JpmOdRcp7RHwyVXOYb7r+dRQHsn/V9KU
            [Recovery] AEAD Type: aes-gcm
                [Root] AEAD Type: aes-gcm
 [Worker-Auth-Storage] AEAD Type: aes-gcm
         [Worker-Auth] AEAD Type: aes-gcm
                             Cgo: disabled
  Controller Public Cluster Addr: 127.0.0.1:9201
          Dev Database Container: sleepy_wiles
                Dev Database Url: postgres://postgres:password@localhost:55000/boundary?sslmode=disable
      Generated Admin Login Name: admin
        Generated Admin Password: password
       Generated Host Catalog Id: hcst_1234567890
               Generated Host Id: hst_1234567890
           Generated Host Set Id: hsst_1234567890
   Generated Oidc Auth Method Id: amoidc_1234567890
          Generated Org Scope Id: o_1234567890
  Generated Password Auth Method Id: ampw_1234567890
      Generated Project Scope Id: p_1234567890
             Generated Target Id: ttcp_1234567890
  Generated Unprivileged Login Name: user
 Generated Unprivileged Password: password
                      Listener 1: tcp (addr: "127.0.0.1:9200", cors_allowed_headers: "[]", cors_allowed_origins: "[*]", cors_enabled: "true", max_request_duration: "1m30s", purpose: "api")
                      Listener 2: tcp (addr: "127.0.0.1:9201", max_request_duration: "1m30s", purpose: "cluster")
                      Listener 3: tcp (addr: "127.0.0.1:9203", max_request_duration: "1m30s", purpose: "ops")
                      Listener 4: tcp (addr: "127.0.0.1:9202", max_request_duration: "1m30s", purpose: "proxy")
                       Log Level: info
                           Mlock: supported: false, enabled: false
                         Version: Boundary v0.11.0
                     Version Sha: 1d42091e81ca11353376ce116275890e3ae67f6b
      Worker Auth Current Key Id: auction-acutely-shawl-bonanza-semifinal-portal-worry-bodacious
        Worker Auth Storage Path: /var/folders/rq/rvb3xv916b976fm4sszjym400000gq/T/nodeenrollment3782666038
        Worker Public Proxy Addr: 127.0.0.1:9202

==> Boundary server started! Log data will stream in below:
...
WARNING: Notice in the output above that Boundary in dev mode by default uses an (insecure) login name ‘admin’ and password ‘password’.
VIDEO: Alternately, specify parameters:
boundary dev \
-api-listen-address=0.0.0.0 \
-cluster-listen-address=0.0.0.0 \
-proxy-listen-address=0.0.0.0 \
-worker-public-address=192.168.1.80
Alternately, run in background with the &:
boundary dev -database-url=postgres://postgres:postgres@boundary-database:5432/postgres?sslmode=disable \
-cluster-listen-address=0.0.0.0 \
-api-listen-address=0.0.0.0 &
-
Create a new Terminal window if you want to make any more CLI commands.
BOUNDARY_ADDR URL with port
-
Notice in the output above the Listener IP address, which defines the Boundary Controller URL address, with its standard port:
export BOUNDARY_ADDR="https://127.0.0.1:9200"
If instead the Boundary Controller is on a server:
export BOUNDARY_ADDR="https://11.22.33.44:9200"
Authentication
PROTIP: Craft and use a shell script so you don’t have to remember this.
-
Get a reminder:
boundary authenticate help
Usage: boundary authenticate [sub command] [options] [args]

  This command authenticates the Boundary commandline client using a specified auth
  method. Examples:

 Authenticate with a password auth method:

   $ boundary authenticate password -auth-method-id ampw_1234567890 -login-name foo

 Authenticate with an OIDC auth method:

   $ boundary authenticate oidc -auth-method-id amoidc_1234567890

  Please see the auth method subcommand help for detailed usage information.

Subcommands:
 oidc        Invoke the OIDC auth method to authenticate with Boundary
 password    Invoke the password auth method to authenticate with Boundary
-
Authenticate!
boundary authenticate password \
  -auth-method-id=ampw_1234567890 \
  -login-name=admin \
  -password=password \
  -keyring-type=none
If you see this error message:
Password flag must be used with env:// or file:// syntax or left empty for an interactive prompt
The expected response is something like this:
      Authentication information:
     Account ID:      apw_BPPNtEX82N
     Auth Method ID:  ampw_1234567890
     Expiration Time: Wed, 14 Oct 2020 18:30:40 PDT
     Token:
     at_6FOC0R3hDG_s1FFYccNfP479aLeEMpbGptDrQyG...snip...
     User ID:         u_1234567890
Boundary.app GUI
-
To install the Desktop client, click the .dmg (64-bit) on macOS.
Drag the Boundary.app icon and drop on the app folder at:
/Applications/Boundary.app
-
If you access it often, drag the icon and drop it among others.
-
Invoke the app by double-clicking or
-
Type the URI to the Boundary server:

-
Login Authentication

Boundary automates and standardizes the workflow for on-boarding and off-boarding hosts and targets.
It provides one-click deployment.
-
Select Roles.
-
Select Administration and then click the Principals tab.
Notice that admin user is listed. User, group, and project are a type of principal which can be assigned to roles.
-
Click on the Grants tab to view the permissions allowed on this role. Grants represent strings of actions on resources:
id=<resource_id>; action=<actions>
The grant for Administration role indicates that all actions (actions=) on all resources (id=;type=*) are permitted.
-
Return to the Roles list and select Login and Default Grants role.
-
Click the Grants to view its permissions
A role can have multiple grants defined. Those grants are deleted when the role is deleted. A grant is also deleted if its associated resource is deleted.
-
Select Projects and then Generated project scope.
Notice that you can see Sessions, Targets and Host Catalogs.
-
Select Host Catalogs.
-
Select Generated host catalog.
-
Click on the Host Sets tab and then Generated host set to view its details.
-
Click on the Hosts tab to view attached hosts.
Currently, Generated host with ID, hst_1234567890 is the only host attached to this host set. From the Manage menu, you can add or delete hosts from the host set.
-
Select Generated host. Its Address is set to localhost.
-
Select Targets from the left-pane.
-
Select Generated target. The generated target allows TCP connection, and its ID is ttcp_1234567890.
Using the Manage menu, you can add additional host sets to the target, or delete this target.
Self-Hosted Local server
-
To install Boundary on different platforms (on a single cloud region), navigate to a folder associated with the account where you’ll create cloned repositories:
export PROJDIR="$HOME/
github-wilsonmar" -
Because there are many other branches (taking up space), clone so that only the master branch is downloaded:
git clone git@github.com:hashicorp/boundary.git --depth 1
cd boundary
-
Clone the dev:
git clone git@github.com:hashicorp/boundary-reference-architecture.git --depth 1
cd boundary-reference-architecture/deployment
https://github.com/hashicorp/boundary-reference-architecture/tree/main/deployment
There is automation for aws, azure, docker (compose), docker_cts, gcp (Google Cloud Platform), Kubernetes. Most examples use Terraform for provisioning and configuring Boundary.
boundary auth-methods list
Configuring Boundary Cluster
<a name=scopes”></a>
Boundary Scope
Scopes are the foundational part of Boundary. They allow users to partition resources and assign ownership of resources to principals. modeled as a container.
There are three type of scopes within Boundary: Global, Org, and Project. There is only one global scope, which is the entry point for initial administration/setup and to manage the org scopes. Under the global scope, you can create multiple org scopes.
A scope can contain child scopes, forming a tree.
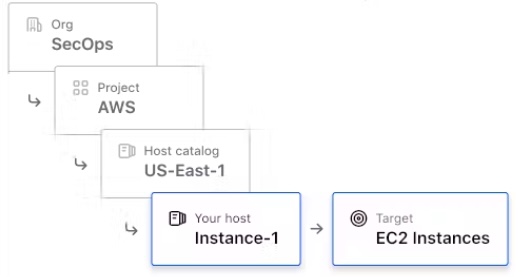
Org scopes are used to hold IAM-related resources and project scopes.
Explore resources in the Generated org scope using Boundary’s Admin Console.
### Organization scope
Each organization is a top-level container (scope) whichowns zero to many projects and zero to many authentication methods. An organization inherits from scope, allowing it to own zero to many groups, roles, policies, targets, host catalogs, or credential stores.
-
Specify different orgs (organizations) such as “Engineering”, etc.

Projects are child scope within an organization.
-
Specify project, each with its own scope ID (to organize targets and host catalogs):
-
DevOps - such as Jenkins (instead of SaaS GitHub Actions).
-
Dev - the environment used by developers to unit test functionality. Often scrubbed or obfuscated data for security purposes.
-
Test - an environment also known as pre-prod used to ensure merging with production systems can be performed successfully. May have full volume or production data to ensure functionality.
-
Staging - an environment also known as pre-prod used to ensure merging with production systems can be performed successfully. May have full volume or production data to ensure functionality.
-
Production – the production or live environment where all live data and systems inter-operate. Requires implementation of all security controls.
-
Support - contains CSM (Customer Support Management) system to track communications with customers
-
Migrate
-
To migrate a throw-away instance:
export BOUNDARY_DB_CONFIG="/etc/boundary/controller.hcl"
boundary database init -config $"{BOUNDARY_DB_CONFIG}" \
   -skip-auth-method-creation \
   -skip-scopes-creation \
   -skip-initial-login-role-creation
Additionally:
export BOUNDARY_TLS_INSECURE=true
Alternately, to migrate a long-running instance, specify those 3 skips in the controller.hcl file:
export BOUNDARY_DB_CONFIG="/etc/boundary/controller.hcl" boundary database init -config $"{BOUNDARY_DB_CONFIG}" -
Define a host catalog (a collection of hosts and host sets) for:
Within the DevOps project:
- CICD
Within each app project:
- Application Stack
- Monitoring
Inside the Boundary catalog are “host-sets” that are a collection of hosts which are identical except for access requirements. This allows a random host to be selected automatically so that it’s less fragile than specifying a specific host name.
- App Servers
- Log Servers
Groups
Group DevOps
Engr.Devs Testers Prod
AdminSOC Log
Del.Build Server Yes Yes - - - - SSH (all) Yes - - - - - Staging App Yes Yes - - - - Staging Logs Yes Yes Yes - - - Staging App Admin Yes Yes - - - - Prod. App Admin - - - - Yes - Prod. Logs Yes Yes - - - - Prod. Log Delete - - - - - Yes Hosts are specific Boundary server instances, created under a host set.
- CICD
-
Assign names using a convention such as “app-server_0” and “log-server_0” (numbers starting from zero?).
TODO: Assign IP address???
Boundary targets are the server which we seek to remote into.
- In each app project, specify a Boundary target as a logical collection of host sets which may be used to initiate sessions.
- Production Application Admin
- Production SSH
- Production Logs
Parameters for each target set:
- Name
- Description
- Maximum Duration (in seconds)
- Maximum Connections (specify 2 in case one gets stuck. -1 means infinite)
- Default Port
-
Optionally, in the Internal project, specify a target such as “Ticketing” for the ticketing app server.
grant scope to a particular project.
### KMS
-recover-config controller.hcl is specified in most every boundary command TODO:
Within AWS:
# Root KMS configuration block: this is the root key for Boundary
# Use a production KMS such as AWS KMS in production installs
    kms "awskms" {
      purpose = "root"
      region = "us-east-1"
      kms_key_id = "..."
    }
# Worker authorization KMS
# This key is the same key used in the worker configuration
    kms "awskms" {
      purpose = "worker-auth"
      region = "us-east-1"
      kms_key_id = "..."
    }
# Recovery KMS block: configures the recovery key for Boundary
    kms "awskms" {
      purpose = "recovery"
      region = "us-east-1"
      kms_key_id = "..."
    }
PROTIP: Remove the Recovery KMS block if recovery is not needed (such as on dev clusters).
config keys are also optional.
### Users
-
List users:
boundary users list -scope-id global \
-recover-config controller.hcl
-
Add
BOUNDARY_THIS_USER_ID="???"
BOUNDARY_THIS_ACCOUNT_ID="???"
boundary users add-accounts -id $"{BOUNDARY_THIS_USER_ID}" \
-account $"{BOUNDARY_THIS_ACCOUNT_ID}" \
-recovery-config controller.hcl
PROTIP: Creating a role also involves creating grants and principals:
-
Login admin role:
boundary roles create -grant-scope-id global -scope-id global \
-name Administration \
-recovery-config controller.hcl
-
add-grants to do everything for Administration :
BOUNDARY_THIS_GRANT_ID="???" boundary roles add-grants -id $"{BOUNDARY_THIS_GRANT_ID}" \ -grant "id=*;type=*;actions=*" \ -recovery-config controller.hcl -
add-principal for Administration:
BOUNDARY_PRINCIPAL_ID="???" \
   BOUNDARY_ORG_ID="???" \
   boundary roles add-principals -id $"{BOUNDARY_PRINCIPAL_ID}" \
   -principal $"{BOUNDARY_ORG_ID}" \
   -recovery-config controller.hcl
### For Users
-
Login globally:
boundary roles create -grant-scope-id global -scope-id global \
-name "Login and Default Grants" \
-recovery-config controller.hcl
-
add-grants templated for account.id:
BOUNDARY_THIS_GRANT_ID="???" boundary roles add-grants -id $"{BOUNDARY_THIS_GRANT_ID}" \ -grant "id=*;type-scope;actions=list,no-op" \ -grant "id=;actions=read,change-password" \ -grant "id=*;type=auth-token;actions=list,read:self,delete:self" \ -recovery-config controller.hcl -
add-principals
BOUNDARY_PRINCIPAL_ID="???"
boundary roles add-principals -id $"{BOUNDARY_PRINCIPAL_ID}" \
-principal u_anon \
-recovery-config controller.hcl
Use with Okta IdP
Within “$PROJDIR/boundary-reference-architecture/deployment/gcp/gcp/templates” are template (.tpl) files:
- boundary.hcl.tpl
- controller.hcl.tpl
- worker.hcl.tpl
On Linux, the worker service is specified in:
/etc/systemd/system/boundary-worker.service
-
Specify
boundary auth-methods create password -scope-id global \
-recovery-config controller.hcl
Alternately, specify the specific Method ID when creating passwords:
BOUNDARY_THIS_METHOD_ID="???"
boundary accounts create password -auth-method-id $"{BOUNDARY_THIS_METHOD_ID}" \
-login-name admin \
-recovery-config controller.hcl
Human-to-machine Access via Boundary
Hands-on interactive lab environment, HashiCorp Learn: https://learn.hashicorp.com/
Machine Auth & Auth using Vault
Machine-to-machine Access using Consul
Which app can talk with each service?
Videos
-
VIDEO: HashiCorp Boundary: Then & Now Jul 7, 2022
-
VIDEO: Secure Access to Hosts and Services with HashiCorp Boundary Nov 2, 2021
-
VIDEO: HashiCorp Boundary Demo for Secure Sessions Management Oct 26, 2020 by TeKanAid uses WireShark to see detailed communications of a Linux and Windows RDP connections.
References
VIDEO: HashiConf Digital Keynote - Boundary by CTO Armon Dadgar explains Boundary vs. Traditional Access approaches
https://goteleport.com/blog/how-uber-netflix-facebook-do-ssh/