

How to code your app to use HashiCorp Vault to get rid of static database passwords by generating credentials in Secret_ID temporarily in cubbyholes, wrapped for transfer, and accessed using AppRole
![]()
![]()
![]()
![]()
![]()
![]()
![]()
![]()
![]()
![]()
![]()
![]()
![]()
Overview
This article takes a deep dive into sample (template) code within a GitHub repo, giving technical explanations for devs (instead of generalities).
Why?
Keeping secrets secret is a fundamental skill for all developers, especially in today’s hostile internet full of scammers, ransomware gangs, and state-sponsored terrorism using “killware”.
Never lose another database password
To outwit hackers, HashiCorp Vault has created an amazing enterprise-capable approach that creates usernames and passwords for temporary use.
- https://developer.hashicorp.com/vault/docs/secrets/databases/postgresql
- https://play.instruqt.com/hashicorp/tracks/vault-dynamic-database-credentials
- https://developer.hashicorp.com/vault/docs/secrets/databases
This is like working on your TV the different remotes and logins to setup different streaming services. Once you go through the motions, you can get through quickly (for awhile until you change TV).
This article provides a step-by-step deep-dive tour, with commentary, contrasting code across several repositories created by developers inside and outside HashiCorp.
NOTE: Content here are my personal opinions, and not intended to represent any employer (past or present). “PROTIP:” here highlight information I haven’t seen elsewhere on the internet because it is hard-won, little-know but significant facts based on my personal research and experience.
Dev environment for you
Terraform is typically used to create resources in the cloud or in on-prem. machines for production usage. For resilience in productive use, Vault is usually setup in a cluster of several servers.
- https://github.com/hashicorp/vault-guides
But to learn to code your app to access Vault, app developers need a (temporary) rig that provides:
- A Vault single-node instance
- A database instance (PostgreSQL or MySQL for C#)
- Shell scripts so that only a single command (such as run.sh) creates the enviornment on new Apple M1 ARM64 chips as well as older Intel x86 macOS machines
- A sample app in your programming language of choice that demonstrates how to access the above.
This article describes such a rig.
App programs interacting with Vault client API libraries of various programming languages at:
For local development on laptops
But for app development work on laptops, it’s most convenient to have resources running locally.
To save app developers time and hassle of setting up the above, HashiCorp Vault developers figured out the intricacies of specifications to use docker-compose. Docker Compose is a Docker tool used to define and run multi-container applications. VIDEO: Meet the team which created this talk about their sample code (in Go).
Rigs for these languages so far, listed alphabetically:
- Bash
- https://github.com/hashicorp/hello-vault-dotnet (C# with MS-SQL)
- https://github.com/hashicorp/hello-vault-go
- Groovy - no plans
- Haskell - no plans
- https://github.com/hashicorp/hello-vault-python (under construction)
- https://github.com/hashicorp/hello-vault-spring (Maven, Java) using
https://spring.io/projects/spring-vault - https://github.com/hashicorp/hello-vault-ruby
- https://github.com/hashicorp/hello-vault-rust (under construction)
-
Obtain the repo for your language of choice. For example:
git clone https://github.com/hashicorp/hello-vault-spring
cd hello-vault-spring
Each repo uses Docker Compose to create a dev environment containing a dev Vault instance and an app database. All the example repos make calls to a PostgreSQL database, except for the C# (dotnet) example, which calls a MS-SQL database.
These repos provides single shell scripts to make it easier than following guides such as:
- https://spring.io/guides/gs/accessing-vault/
- https://github.com/mp911de/spring-cloud-vault-config-samples
-
Notice that each repo contains two folders with two example apps:
-
quick-start to write a secret, then read that secret back
-
sample-app to make API calls (using curl CLI commands) to an app server which interacts with a database
You can also run your own commands.
.gitignore from GitHub
-
-
If you have not already done so, create a global .gitignore configuration file on your machine $HOME folder:
On a Mac or Linux:
git config --global core.excludesfile ~/.gitignore
On Windows using CLI:
git config --global core.excludesfile "%USERPROFILE%\.gitignore"
On Windows using Powershell (credit: @kupmanj):
git config --global core.excludesFile "$Env:USERPROFILE\.gitignore"
The above results this entry in your .gitconfig file:
[core]
excludesfile = {path-to-home-dir}/.gitignore
Your global .gitignore file specifies extraneous (unnecessary) files and folders created by your operating system and editors from loading into GitHub.
-
Install and use a text editor such as code (for VSCode) to edit the file:
code .gitignore
-
Highlight and copy these lines and paste into your global .gitignore file this starter set. The specification format is explained here:
# MacOS:
.DS_Store

# WindowsOS:
Thumbs.db

# Ignore ALL files in ANY directory named temp:
temp/

# Ignore all .log files:
log/
*.log

# Node:
# npm-debug.log

# VSCode IDE (from Microsoft):
.vscode/

# WebStorm IDE:
.idea/

# vi editor:
*~

# iPython Jupyter Notebooks:
.ipynb_checkpoints/
venv/
We don’t want to hold within GitHub/GitLab files and folders generated because they will be re-generated again upon, such as temp folders.
The slash (/) in log/ ignores all contents in all folders named log. This would cover ignore of npm-debug.log generated by NodeJs.
We don’t want to hold log files in GitHub because that would quickly fill up GitHub servers. Log files are typically sent to AWS CloudWatch, Splunk, etc.
The asterisk (*) in *.log ignores all files ending with .temp
-
Add additional gitignore patterns for each technology you use. Each programming language would have different contents that it generates.
https://www.toptal.com/developers/gitignore
https://github.com/github/gitignore
In the .gitignore file for Spring/Java, there would be a spec for all contents within folder target/ generated during each run whould should not uploaded to GitHub.
Each IDE creates configuration files which should not be uploaded:
- .vscode/ for Visual Studio Code
- .idea/ for the IDEA IDE
- Several files generated by STS, NetBeans
In the .gitignore file for DotNet/C#, there is a spec to ignore bin and obj folders which can begin with either a lower or upper case letter:
[Bb]in/
[Oo]bj/
Let’s dive in by installing prerequities. Each technology has a different set of technologies:
Install on macOS:
-
On macOS, install the Apple XCode Command Line utilities, if needed.
-
Install OS package manager so that you can upgrade to the latest version with a single command.
On macOS, install Homebrew:
/bin/bash -c "$(curl -fsSL https://raw.githubusercontent.com/Homebrew/install/HEAD/install.sh)"
-
Install utilities using package manager.
On macOS:
brew install curl jq tree
NOTE: Brew now knows to not re-install the latest version if it’s already installed.
On Linux:
sudo apt-get install jq
-
On newer macOS laptops with the M1 ARM chip:
sudo softwareupdate --install-rosetta
-
Install the compiler for your language of choice:
Install Java
For Java, Zulu is my favorite open-source compiler:
brew install zulu
Alternately, to install the latest version of OpenJDK:
brew install --cask temurin
Alternately, to install a specific version of OpenJDK:
brew tap homebrew/cask-versions
brew install --cask temurin8
brew install --cask temurin11
Verify Java & Spring version to see if install took:
java --version
You should see something like this:
openjdk 19.0.1 2022-10-18
OpenJDK Runtime Environment Zulu19.30+11-CA (build 19.0.1+10)
OpenJDK 64-Bit Server VM Zulu19.30+11-CA (build 19.0.1+10, mixed mode, sharing)
- Java 17 the latest (3rd) LTS was released on September 14, 2021.
- Java 19 General Availability began on September 20, 2022.
See https://www.wikiwand.com/en/Java_version_history
Install Go
brew install golang
go version
Sample response:
go version go1.19.2 darwin/arm64
See https://formulae.brew.sh/formula/go https://jimkang.medium.com/install-go-on-mac-with-homebrew-5fa421fc55f5
mkdir -p $HOME/go/{bin,src,pkg}In ~/.bashrc or .zshrc
export GOPATH=$HOME/go
export GOROOT="$(brew --prefix golang)/libexec"
export PATH="$PATH:${GOPATH}/bin:${GOROOT}/bin"
Install C#
-
Click this link to download dotnet-sdk-6.0.402-osx-arm64.pkg at https://dotnet.microsoft.com (Ignore https://learn.microsoft.com/en-us/dotnet/core/install/macos)
- Expand the zip. Click Continue, Install. Password. Close.
-
Verify SDK installed:
dotnet --list-sdks
Sample response:
6.0.401 [/usr/local/share/dotnet/sdk]
6.0.402 [/usr/local/share/dotnet/sdk]
- Install Visual Studo Code Unversal Stable version from https://code.visualstudio.com by clicking this link for file “VSCode-darwin-universal.zip”.
- Unzip.
- In /Applications, open “Visual Studio Code.app”.
- Install the C# extension.
-
Verify .NET runtimes (.NET Core) installed:
dotnet --list-runtimes
Microsoft.AspNetCore.App 6.0.9 [/usr/local/share/dotnet/shared/Microsoft.AspNetCore.App]
Microsoft.NETCore.App 6.0.9 [/usr/local/share/dotnet/shared/Microsoft.NETCore.App]
C# versions:
C# 11 is supported only on .NET 7 and newer versions.
C# 10 is supported only on .NET 6 and newer versions.
C# 9 is supported only on .NET 5 and newer versions.Install Python
brew install python
python --version
pip install virtualenv   # used to:
python -m venv venv   # create venv enviornment to activate by:
source venv/bin/activate  # for (venv) prompt to:
pip install hvac   # needed for Python to work with HashiCorp Vault
virtualvenv is used to ensure that Python packages play nice with each other - so that other Python projects with competing or incompatible versions of the same add-ons (dependencies) don’t collide with this package.
Install Docker Compose
-
Install the Docker Desktop. On macOS, see https://docs.docker.com/desktop/mac/apple-silicon/
brew install docker
brew install docker-desktop
docker compose version
The response, at time of writing, was:
Docker Compose version 2.12.2
-
PROTIP: Get the Docker Desktop logo on your Mac Taskbar: pinch four fingers on your trackpad to drag and drop the logo onto your Taskbar. You should see the Docker logo when you point the mouse at the top of your screen.
-
Invoke the Docker Desktop app.
PROTIP: I have a shell script which checks if Docker Desktop is running, and bring it up if it’s not.
PROTIP: Remember there are limitations when using Docker:
-
All operations in Docker need to be run by root (i.e. privilage escalation needed for containers). So Docker can run malicious code within its Virtual Machines
-
Docker runs on a single process, so it can be a single point of failure.
-
If the docker daemon fails, all its child processes become orphaned.
Use Podman instead of Docker?
On August 31 2021 Docker Inc. announced a change in the licensing model for Docker Desktop. As of January 31 2022, Docker Desktop is no longer free and commercial users (businesses) need to pay a monthly subscription fee of $5 per month.
Alternatives to Docker’s container engine include LXD, Rkt, CRI-O, Podman.
Podman is a container image manager available free as it was open-sourced by Red Hat as a Linux-native tool designed to develop, manage, and run Open Container Initiative (OCI) containers and pods.
Podman is supposed to be more secure than Docker.
brew install podman
Although it’s said that “Podman doesn’t require an active container engine for its commands to work”.
The expected response is like this:
Downloading VM image: fedora-coreos-36.20221030.2.3-qemu.aarch64.qcow2.xz: done
   Extracting compressed file
   Image resized.
   Machine init complete
   To start your machine run:
      podman machine start
If instead you see this error message:
Error: podman-machine-default: VM already exists
follow instructions at the bottom of this post:
brew uninstall podman
   # Remove containers files:
   rm -rf ~/.config/containers/
   rm -rf ~/.local/share/containers
   rm ~/.ssh/podman*
   brew install podman
BLAH: Podman was designed to run on Linux (not Windows, macOS).
podman machine list
To restart podman after an upgrade:
brew services restart podman
Successfully started podman (label: homebrew.mxcl.podman)
podman machine start
To stop:
podman machine stop
NOTE: Podman’s architecture is daemonless. Podman has a similar directory structure than Docker (with Buildah, Skopeo, and CRI-O). So Podman audaciously suggests that all docker commands be automatically converted to podman within the CLI:
alias docker=podman
VIDEO:
But the problem comes with replacing docker-compose.
Many have proposed making intricate commands and settings to make Podman work with Docker-Compose.
* This
* https://gist.github.com/kaaquist/dab64aeb52a815b935b11c86202761a3
* https://balagetech.com/convert-docker-compose-services-to-pods/
* https://news.ycombinator.com/item?id=28462495
* https://news.ycombinator.com/item?id=28413470
* https://fedoramagazine.org/use-docker-compose-with-podman-to-orchestrate-containers-on-fedora/
RedHat is working on a replacement for podman-compose at https://github.com/containers/podman-compose
Before using it, consider the many issues currently open for podman-compose.
pip3 install podman-compose
PROTIP: I would wait until podman-compose works.
Alternately, instead of docker-compose, consider Kublet static pod.
References: https://durgesh-cdac.medium.com/docker-vs-podman-f6b4de217ef5
quick-start
-
Navigate into the quick-start folder:
cd quick-start
-
View the application program file using cat or a text editor such as code (for VSCode):
For Spring (Java):
cat src/main/java/com/hashicorp/quickstart/App.java
Alternately, it’s Program.cs for dotnet (C#).
Static dev APP_ADDRESS
In dev programs, the Host, Port, and Scheme are hard-coded for combination into “http://127.0.0.1:8200”.
But in production code, those are obtained from an environment variable APP_ADDRESS with a value such as vault.mycorp.com.
Dev Authentication
A message is not issued for authentication unless it’s unsuccessful: “unable to initialize Vault client:”
dev-only-token is hard-coded. But in production code, the VAULT_TOKEN environment variable is read by the app to retrieve a secure Token that is unique to each user for access to Vault. And the Token’s value should never be revealed in messages to ensure confidentiality.
Write/Read Static secrets
The program writes a static secret named “password” with a value of “Hashi123”, then reads it back. But normal apps would usually just read secrets written by another program.
Vault API library functions
Each programming language uses a different library to perform low-level functionality.
https://developer.hashicorp.com/vault/api-docs/libraries lists them.
In the dotnet (C#) repo, file quickstart.csproj defines the library used.
- “secret” is defined as the mountPoint
- “my-secret-password” is defined as the path
In Java/Spring:
- function opsForVersionedKeyValue()
- put function to “data”.
In Rust, Jonathan Lawn’s vault-client is a Rust-based (generated based on Swagger spec) native client library to access HashiCorp Vault APIs. It’s an alternative to Chris MacNaughton’s crates.io library, a less featured client that covers a broader range of the Vault API.
In Python:
- hvac is the library at https://github.com/hvac/hvac
- https://www.youtube.com/watch?v=wogkvUnaFtk How to use Python HVAC for Hashicorp Vault CRUD Operations
-
https://fakrulalam.medium.com/python-script-credentials-stored-in-hashicorp-vault-54ffa5ca2b04
- https://developers.google.com/vault/quickstart/python
- https://pypi.org/project/vault-cli/
- https://pypi.org/project/pyvault/
Expected output
When we run the program, we expect that:
- After writing a secret, the program outputs “Secret written successfully.”.
- After reading the secrets successfully, the program outputs “Access granted!”.
Of course, in your own program, you can output whatever text you want.
-
View file run.sh file using cat or a text editor such as code (for VSCode):
cat run.sh
Notice it uses docker compose commands to bring processes down then up again:
docker compose down --volumes
docker compose up -d --build
The –build parameter invokes a build referencing the Dockerfile.
Notice the dev Vault server is started with a parameter:
-e ‘VAULT_DEV_ROOT_TOKEN_ID=dev-only-token’
In production, several mechanisms can be used to start the Vault server securely, including access to cloud provider secret managers.
Source compilation
In the Spring (Java) repo, command mvn clean package references the pom.xml file to compile the source code file App.java into file quickstart.jar in the target folder.
java -jar target/quickstart.jar runs the result of App.java source file compilation.
In the dotnet (C#) repo, command dotnet run Program.cs compiles the Program.cs source file.
In the go repo, command go run main.go compiles the Go source and invokes the result.
-
If you want to keep the app running so you can make additional commands, insert a # character at the left edge of these commands to comment them out of executing:
# docker stop "${container_id}" > /dev/null \# echo "Vault server has stopped." -
Make sure that Docker Desktop is runnning.
-
Restart Docker to clear it from a previous run.
-
Invoke the shell script:
./run.sh
Wait for various lines to appear until this appears:
Secret written successfully.
Access granted!
Stopping Vault dev server..
Vault server has stopped.
dev Vault
To reduce manual efforts to add security necessary for production usage, here Vault is invoked using its built-in “dev-only-token” rather than a cryptographically-created one used in production mode.
container_id=$(docker run –rm –detach -p 8200:8200 -e ‘VAULT_DEV_ROOT_TOKEN_ID=dev-only-token’ vault:1.11.0)
-
The Vault -dev server is initiated with a “root” token:
curl -H "X-Vault-Request: true" -H "X-Vault-Token: root" http://127.0.0.1:8200/v1/sys/mounts | jq
VIDEO: shows the output
-
Open the Vault Explorer GUI in the default internet browser (Chrome):
open http://127.0.0.1:8200/ui/vault/secret
sign-in
sample-app
-
Navigate out of quick-start and into:
cd sample-app
run.sh
-
Let’s run it, then analyze the output:
./run.sh
If you get this response, it means you need to get Docker Desktop running:
Cannot connect to the Docker daemon at unix:///var/run/docker.sock. Is the docker daemon running?
Otherwise, you should see a bunch of lines scroll by until ending with this list and statuses:
 [+] Running 8/8
   ⠿ Network sample-app_default                       Created   0.1s
   ⠿ Volume "sample-app_trusted-orchestrator-volume"  Created   0.0s
   ⠿ Container sample-app-secure-service-1            Healthy  11.1s
   ⠿ Container sample-app-database-1                  Healthy  11.1s
   ⠿ Container sample-app-vault-server-1              Healthy  11.0s
   ⠿ Container sample-app-trusted-orchestrator-1      Healthy  11.9s
   ⠿ Container sample-app-app-1                       Healthy  22.7s
   ⠿ Container sample-app-healthy-1                   Started  22.9s
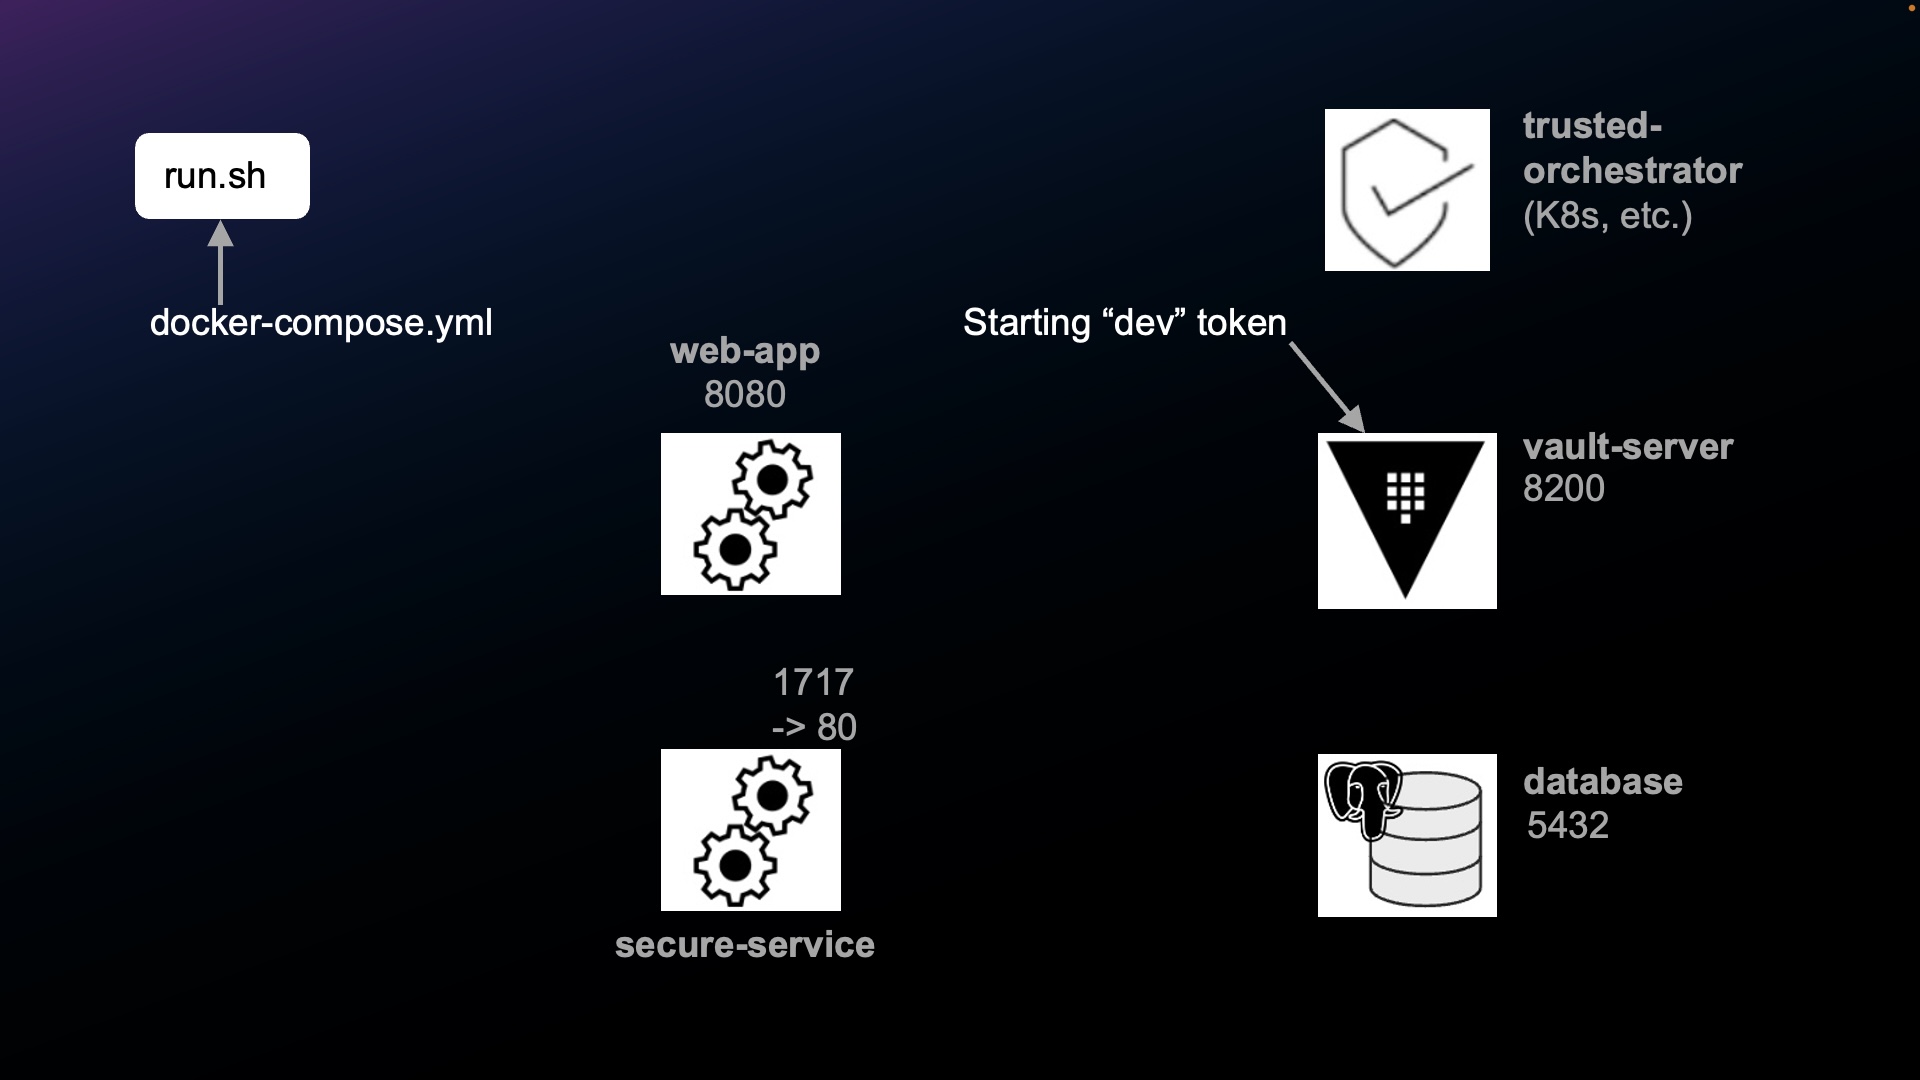
Containers diagram (with ports)
Each component illustrated in this diagram is a container running within Docker.
-
app - “Web App” listens for API calls from run.sh. Code for this is what app developers copy from for their own app. Java developers would code the App.java file which is compiled into the app.jar executable. Repos for other programming languages would run that language’s source file.
-
vault-server, initiated by /vault/entrypoint.sh, contains a default.conf.template file which issues the “hello world!” response if API calls succeed. This effort to setup a built-in Vault dev (unsecure) server is equivalent to the command:
vault server -dev
BTW Vault has other Secret Engines to handle other types of secrets not demonstrated by this sample program, such as generation of SSH certificates, X.509 certificates for SSL/TLS, etc.
-
-
secure-service - a simulated 3rd party (mock) service docker-entrypoint that responds to calls authenticated by a static API key sent as the value of the X-Vault-Token HTTP header in each REST API call. The expected response is 200 from GET & LIST and 204 from POST, PUT, DELETE.
-
database, from docker-entrypoint.s, contains SQL to 1- create the database, 2- populate with data, 3- define roles
-
trusted-orchestrator is created from a Dockerfile used to build its container image and an entrypoint.sh at the root. It is invoked when the service becomes active. It is the mechanism that launches applications and injects them with a Secret ID at runtime; typically something like Terraform, K8s, or Chef. ??? See https://learn.hashicorp.com/tutorials/vault/secure-introduction#trusted-orchestrator
-
app-healthy - a dummy service to block “docker compose up -d” from returning until all services are up & healthy
-
View file run.sh using cat or a text editor such as code (for VSCode).
cat run.sh
The two commands invokes docker compose first down, then up again.
docker compose down --volumes
docker compose up -d --build
docker-compose.xml
docker compose commands always invoke the docker-compose.yml in the same folder. It contains declarations to setup containers.
NOTE: Within hello-vault-dotnet</a>, a separate docker-compose.arm64.yaml is, at time of writing, needed to work around mssql/server’s incompatibility with arm64 architecture.
PROTIP: Run the shell files provided rather than running your own docker up/down commands. This would enable others to more easily help you recreate issues while debugging.
-
Let’s use a text editor code (VSCode) to look at the docker-compose.yml file within the sample-app folder:
cat docker-compose.yml
The file begins with …
version: "3.9"
services:

  app:
 build: WebService/
 environment:
   VAULT_ADDRESS:                    http://vault-server:8200
   VAULT_APPROLE_ROLE_ID:            demo-web-app
   VAULT_APPROLE_SECRET_ID_FILE:     /tmp/secret
   VAULT_API_KEY_PATH:               api-key
   VAULT_API_KEY_FIELD:              api-key-descriptor
   VAULT_DATABASE_CREDENTIALS_ROLE:  dev-readonly
   DATABASE_DATA_SOURCE:             tcp:database,1433
   DATABASE_INITIAL_CATALOG:         example
   DATABASE_TIMEOUT:                 30
   SECURE_SERVICE_ENDPOINT:          http://secure-service/api
...
This tutorial will come back to this file.
Here’s the correspondance between definition and container name above.
docker-compose.yaml Container/Volume in Docker app: sample-app-app-1 vault-server: sample-app-vault-server-1 trusted-orchestrator: sample-app-trusted-orchestrator-1 database: sample-app-database-1 secure-service: sample-app-secure-service-1 healthy: sample-app-healthy-1 volumes: sample-app_trusted-orchestrator-volume Edit run-tests.sh
-
Edit the run-tests.sh file (within folder sample-app) by using code to use VSCode) or other utility:
code run-tests.sh
-
If you don’t want processes to stop after the script ends (so you can issue more commands), type a “#” comment character in front of the docker compose down command line, like this:
# bring down the services on exit
 # trap 'docker compose down --volumes' EXIT
If you comment out the compose down and save the file, processes will continue to run unless you break out by pressing command+C.
-
Restart Docker.
-
Let’s run it, then analyze the output:
./run-tests.sh
Wait for a bunch of lines to scroll by until ending with this list and statuses:
 [+] Running 6/6
 ⠿ Container sample-app-database-1              Healthy               1.7s
 ⠿ Container sample-app-secure-service-1        Healthy               1.7s
 ⠿ Container sample-app-vault-server-1          Healthy               1.7s
 ⠿ Container sample-app-trusted-orchestrator-1  Healthy               1.7s
 ⠿ Container sample-app-app-1                   Healthy               2.3s
 ⠿ Container sample-app-healthy-1               Started               2.6s
These lines are output from the app (which we’ll examine next):
[TEST 1]: output: {"message":"hello world!"}
[TEST 1]: OK
[TEST 2]: output: [{"id":1,"name":"Rustic Webcam"},{"id":2,"name":"Haunted Coloring Book"}]
[TEST 2]: OK
These lines are output from Docker won’t appear if you edited out the removal command:
 [+] Running 8/8
 ⠿ Container sample-app-healthy-1                 Removed    0.0s
 ⠿ Container sample-app-app-1                     Removed    4.4s
 ⠿ Container sample-app-trusted-orchestrator-1    Removed    0.2s
 ⠿ Container sample-app-secure-service-1          Removed    0.2s
 ⠿ Container sample-app-vault-server-1            Removed    0.2s
 ⠿ Container sample-app-database-1                Removed    0.3s
 ⠿ Volume sample-app_trusted-orchestrator-volume  Removed    0.0s
 ⠿ Network sample-app_default                     Removed    0.0s
Container Ports used by each container
-
If you commented out, you can obtain the commands used to create each Docker process along with each of their ports. To avoid widening the width of the Terminal, specify columns using this command:
NAMES                               PORTS
sample-app-app-1                    0.0.0.0:8080->8080/tcp
sample-app-trusted-orchestrator-1
sample-app-vault-server-1           0.0.0.0:8200->8200/tcp
sample-app-secure-service-1         0.0.0.0:1717->80/tcp
sample-app-database-1               0.0.0.0:5432->5432/tcp
Container invocations
NAMES                               COMMAND
sample-app-app-1                    "java -jar /app.jar"
sample-app-trusted-orchestrator-1   "./entrypoint.sh"
sample-app-vault-server-1           "/vault/entrypoint.sh"
sample-app-secure-service-1         "/docker-entrypoint.…"
sample-app-database-1               "docker-entrypoint.s…"
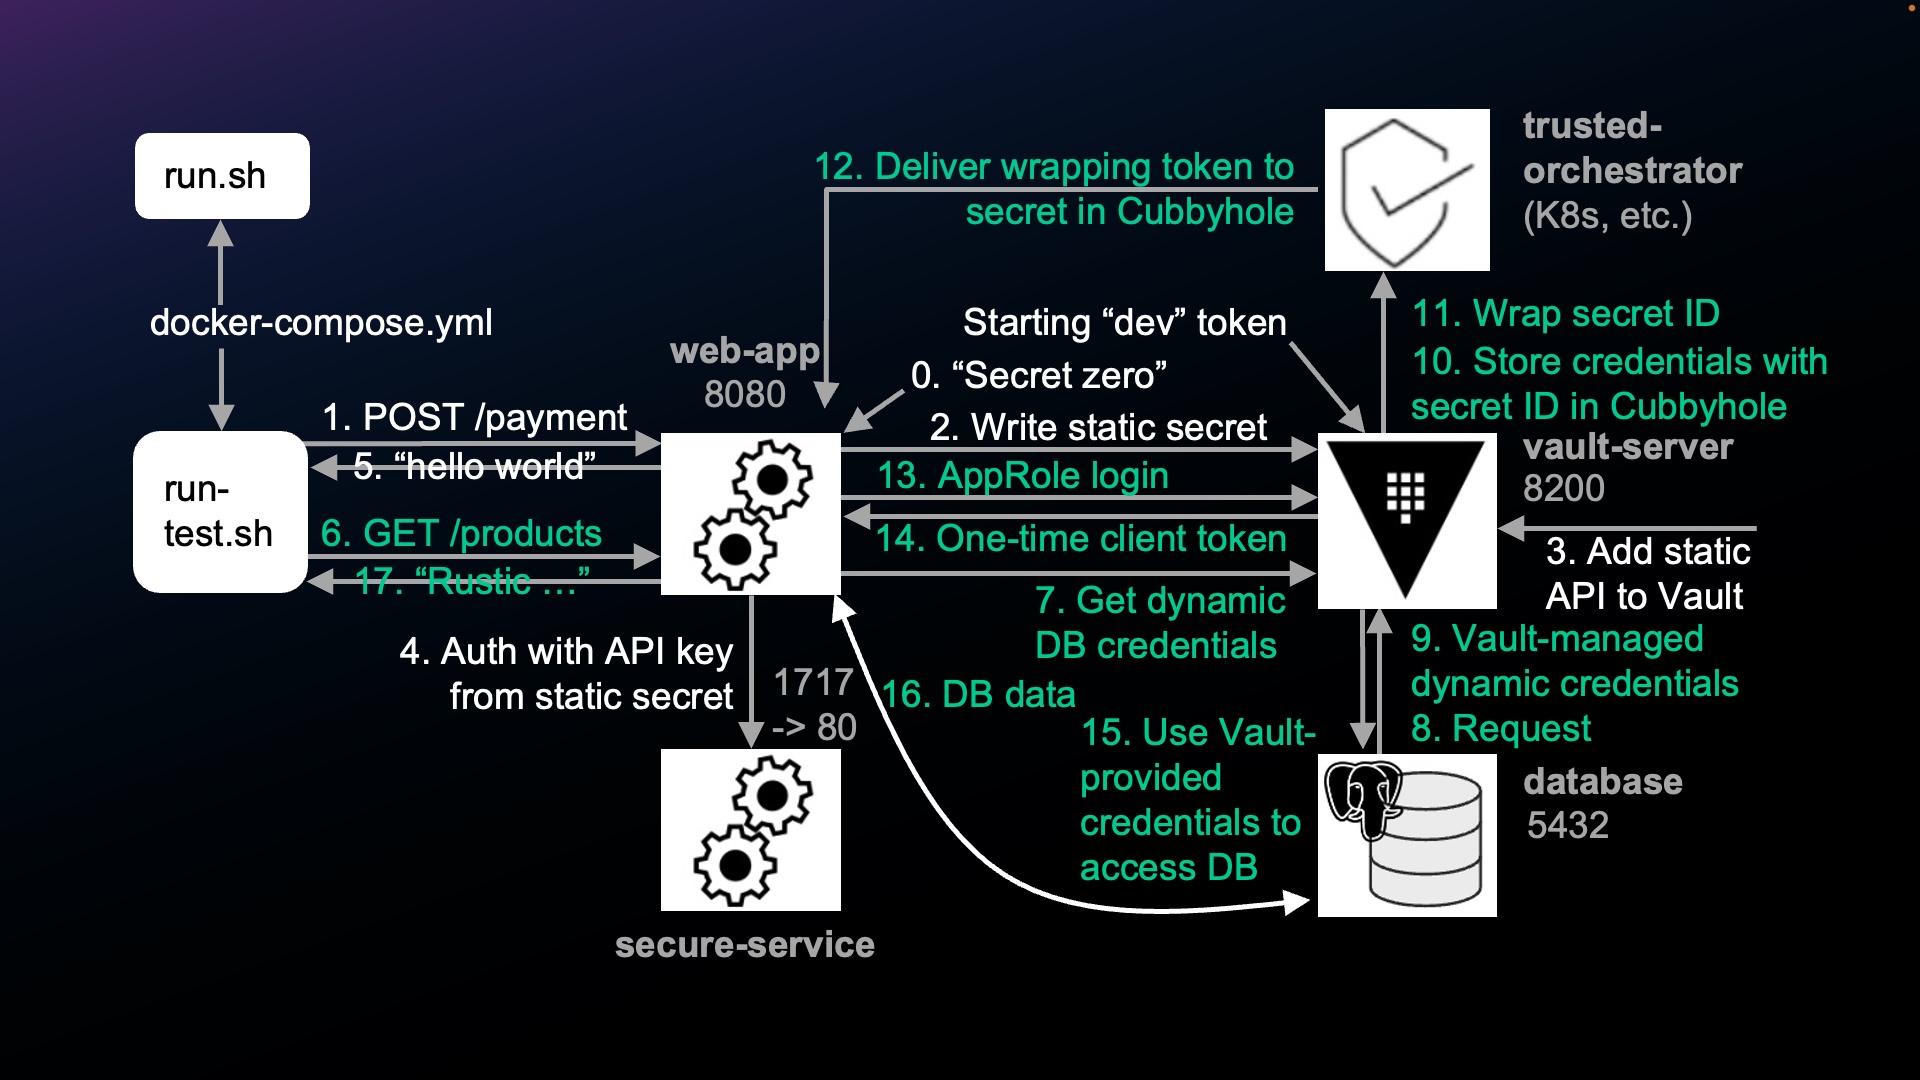
[TEST 1] flow

NOTE: A similar explanation (for containers) is at this VIDEO by Vault Principal Engineer Jeff Mitchell.
-
View the run-tests.sh file (within sample-app) using the built-in cat command or use a text editor code (VSCode):
cat run-tests.sh
The shell script run-tests.sh invokes two calls to the Web App:
“[TEST 1]” = POST /api/payments obtains static API keys to call the payments API
“[TEST 2]” = GET /api/products obtains dynamic credentials to call the products database
[TEST 1] flow
-
run-tests.sh calls POST /api/payments to write the static API keys to be used to call the payments API. The call can also be to a 3rd-party service (such as Twilio for mail, SMS, PayPal, etc.).
-
The app calls Vault (at APP_ADDRESS) to get static secret.
-
The static API key and value is added into Vault. For our mock example, at the right side of the diagram, we manually store the API key to our Secure Server using this Vault CLI command:
vault kv put kv-v2/api-key apikey=my-secret-key
Output logs
Print logs that were output from the app process:
docker logs sample-app-app-1

...
2022/01/11 20:29:01 getting secret api key from vault
2022/01/11 20:29:01 getting secret api key from vault: success!
[GIN] 2022/01/11 - 20:29:01 | 200 |    7.366042ms |   192.168.192.1 | POST     "/payments"


BTW, in production, there would be a background process that forwards logs to a central collection SIEM (Security Information and Event Management) system such as Splunk. This log centralization provides a detailed enterprise-wide history of operations that makes security forensics possible by the corporate SOC (Security Operations Center). -
The app adds the static API key in the HTTP header before calling the secure-service.
-
The response from the app to run-tests.sh is “hello world”.
[TEST 2] flow
(I am making a video to gradually (logically) reveal each component in this flow:)
-
run-tests.sh calls GET /api/products to access the products database based on dynamic credentials obtained by Vault.
-
Instead of using long-lived static passwords sitting around to be stolen, the app calls Vault to request dynamic DB credentials.
- https://aiven.io/blog/secure-your-db-with-vault provides code for populating PostgreSQL.
- https://aiven.io/blog/secure-your-db-with-vault provides code for populating PostgreSQL.
-
Vault uses a pre-defined PostgreSQL Database Secrets Engine postgresql-database-plugin to request that temporary (short-lived) credentials be created dynamically. The equivalent CLI command is:
vault write database/config/aiven-for-postgresql-database \
 plugin_name=postgresql-database-plugin \
 allowed_roles="metrics-readwrite" \
 connection_url="postgresql://\{\{username\}\}:\{\{password\}\}@[HOST]:[PORT]/defaultdb" \
 username=[USER] \
 password=[PASSWORD]
https://www.vaultproject.io/api-docs/secret/databases/postgresql
-
The database creates a username and password based on ROLE defined in its 3-define file:
CREATE ROLE vault_db_user LOGIN SUPERUSER PASSWORD 'vault_db_password';
CREATE ROLE readonly NOINHERIT;
GRANT SELECT ON ALL TABLES IN SCHEMA public TO "readonly";
NOTE: Although PostgreSQL is used in this sample, Vault also works with MySQL, Microsoft SQL Server, and other database vendors.
### Vault Cubbyholes
-
Vault stores the credentials from the database in a Cubbyhole Vault creates. “Cubbyhole” is an American phrase for a small safe place allocated to each individual. Each Cubbyhold can be read only once. It’s also temporary in that it has an expiration date. Also, only a specific user can retrieve it. Even Vault’s root account cannot read the contents of an individual Cubbyhole. – see COURSE at CloudAcademy.com
Secret ID and AppRole
Vault assigns a SecretID used to retrieve the contents of a Cubbyhole. The SecretID is like a password associated with a AppRole definition, which is like a username.
Functionally speaking, the token provides authorization to use an encryption key from Vault’s keyring to decrypt the data. See:
- VIDEO: Cubbyhold Vault GUI demo.
- https://www.hashicorp.com/blog/how-and-why-to-use-approle-correctly-in-hashicorp-vault
- https://developer.hashicorp.com/vault/tutorials/recommended-patterns/pattern-approle?in=vault%2Frecommended-patterns
- VIDEO: “Delivering Secret Zero: Vault AppRole with Terraform + Chef”, with repo by SE Teddy Sacilowski references Seth Vargo’s Chef + Vault blog/webinar
Trusted Orchestrator
Vault needs to send that Secret ID to the web-app through a Trusted Orchestrator (such as Kubernetes or Consul).
-
Rather than exposing database credentials in transmission, for safe delivery to the Web App, Vault “wraps” the SecretID (address) within a short-lived single-use Wrapper token.
- https://www.vaultproject.io/docs/concepts/response-wrapping
- https://developer.hashicorp.com/vault/docs/concepts/response-wrapping
- https://learn.hashicorp.com/tutorials/vault/cubbyhole-response-wrapping
- VIDEO: Using the Cubbyhole Secret’s Engine in HashiCorp Vault to Securely Share Secrets
-
The Trusted Orchestrator delivers the wrapping token to the web-app.
-
The Web App receives the wrapping token and “unwraps” it to obtain the SecretID associated with an AppRole.
BTW, the wrapping token can be revoked (just like any other token) to minimize risk of unauthorized access (especially in a “Break Glass” stop-loss action after a breach).
-
A one-time temporary token ??? is returned by Vault to the web-app.
-
The app uses the Vault-provided credentials to access the database.
Vault ensures that retrieval of a Cubbyhole’s contents can only occur once. Vault logs an error is logged (and sent to the SOC) if additional retrievals are attempted. Thus, the library can detect malfeasance with the response-wrapping token.
-
The database returns data to the web-app, like it always does.
-
The data returned from the database is output by run-tests.sh
[TEST 2]: output: [{“id”:1,”name”:”Rustic Webcam”},{“id”:2,”name”:”Haunted Coloring Book”}]
OK is output after the response is validated.
Security alerts
Most enterprises today have a SOC (Security Operations Center) to constantly monitor for anomalous events such as intrusion attempts.
-
Attempts at retrieving a wrapped token a second time returns a HTTP 400 error, which should trigger a security alert to the SOC to handle the new incident. This is typically tested during Penetration testing pre-production. TODO: Code (an additional shell file) for penetration testers to perform the malicious request to ensure it trigger alerts during penetration testing.
Diving into run-tests.sh
APP_ADDRESS
-
Notice APP_ADDRESS is hard-coded, referencing what was established by run.sh
APP_ADDRESS=”http://localhost:8080”
Notice the “http” protocol, which uses unencrypted communication.
But in production, the program would instead retrieve APP_ADDRESS from a system variable. Also, production APP_ADDRESS would, instead of “http”, specify use of secure “https” protocol (on default port 443).
Also, Production code would retrieve the APP_TOKEN to ensure valid identity for using Vault.
Dockerfile
-
docker compose up -d –build –quiet-pull builds based on the Dockerfile
FROM maven:3.8.4-openjdk-17 as build

COPY . /build-project
WORKDIR /build-project

RUN mvn clean package -DskipTests

FROM openjdk:17
EXPOSE 8080
COPY --from=build /build-project/target/hello-vault-spring.jar /app.jar
ENTRYPOINT ["java","-jar", "/app.jar"]

HEALTHCHECK \
    --start-period=1s \
    --interval=10s \
    --timeout=1s \
    --retries=30 \
        CMD curl --fail -s http://localhost:8080/healthcheck || exit 1
Occassional version update
The top line FROM clause retrieves from maven hub openjdk version 17. This would needs to be updated occassionally.
build-project folder???
-
This invokes Maven to compile programs:
RUN mvn clean package -DskipTests
Although unspecified in code, Maven always open file pom.xml
-
View file pom.xml using cat or a text editor such as code (for VSCode).
cat pom.xml
In the file, note that versions need to be updated over time. See
- https://github.com/spring-projects/spring-boot/releases is v2.7.5 as of October, 2022
- https://github.com/spring-projects/spring-framework/releases
-
File HelloVaultSpringApplicationTests.java within folder path /test/java/com/hashicorp/hellovaultsprint is compiled:
package com.hashicorp.hellovaultspring;

import org.junit.jupiter.api.Test;
import org.springframework.boot.test.context.SpringBootTest;

@SpringBootTest
class HelloVaultSpringApplicationTests {

    @Test
    void contextLoads() {
    }

}
which specifies java to compile using
-
Copy the app.jar file created to the root folder:
COPY –from=build /build-project/target/hello-vault-spring.jar /app.jar
-
Invoke the app.jar program from above:
ENTRYPOINT [“java”,”-jar”, “/app.jar”]
Invoking the app HEALTHCHECK
-
The HEALTHCHECK in the Dockerfile makes a call to the healthcheck API to the server.
-
The “trap” line is executed after the service exits:
/# bring down the services on exit
trap 'docker compose down --volumes' EXIT
-
This retrieves from Vault’s payments secret:
# TEST 1: POST /payments (static secrets)
output1=$(curl --silent --request POST "${APP_ADDRESS}/payments")
That is what causes the response:
[TEST 1]: output: {"message":"hello world!"}“hello world” was issued from file default.conf.template within folder /sample-app/setup/secure-service/default.conf.template which defines server responses:
server {
    listen       80;
    server_name  localhost secure-service;
    default_type application/json;

    location /healthcheck {
        return 200 "{\"message\":\"ok\"}";
    }

    location /api {
        if ($http_x_api_key != "${EXPECTED_API_KEY}") {
            return 401 "{\"error\":\"unauthorized\"}";
        }
        return 200 "{\"message\":\"hello world!\"}";
    }

    location / {
        return 404 "{\"error\":\"resource not found\"}";
    }
}
QUESTION: Can you think of a better response than “hello world”. How about “posted”?
QUESTION: In Production, “localhost” would not be there. What replaces it?
-
This obtains the products secret:
# TEST 2: GET /products (dynamic secrets)
output2=$(curl --silent --request GET "${APP_ADDRESS}/products")
That curl CLI command is what causes response:
[TEST 2]: output: [{"id":1,"name":"Rustic Webcam"},{"id":2,"name":"Haunted Coloring Book"}]
[TEST 2]: OK
PROTIP: “Rustic Webcam” and “Haunted Coloring Book” are returned because the database was loaded from the 2-data.sql file within folder /setup/database:
INSERT INTO products (name)
VALUES
    ('Rustic Webcam'),
    ('Haunted Coloring Book');

INSERT INTO customers (first_name, last_name, email, phone)
VALUES
    ('Winston', 'Higginsbury', 'higgs@example.com',    '555-555-5555'),
    ('Vivian',  'Vavilov',     'vivivavi@example.com', '555-555-5556');
Create username and password in Database
-
This 2-data.sql was invoked to define a role used to create a user within the database:
CREATE ROLE vault_db_user LOGIN SUPERUSER PASSWORD 'vault_db_password';
CREATE ROLE readonly NOINHERIT;

GRANT SELECT ON ALL TABLES IN SCHEMA public TO "readonly";
Ad hoc request
-
Open another Terminal to define the APP_ADDRESS defined earlier:
APP_ADDRESS="http://localhost:8080"
-
Issue an ad hoc call:
echo "$APP_ADDRESS"
curl --silent --request GET "${APP_ADDRESS}/products"
Inside the app
-
Set breakpoint in the Java program: ???
Renewal of wrapping tokens
We know that static passwords with unlimited validity are bad because that provides time when secrets can be stolen.
So we improve security by limiting the duration when each secret is valid by giving each secret a limited Time To Live (TTL) before expiration. We do this by creating a token that grants access with a specific TTL.
Monitoring is necessary to achieve a balance between two extremes:
-
A token which provides longer time than needeed exposes the asset to risk of compromise.
-
A token which provides not enough time would cause delay and errors in processing, which we want to avoid.
We track how often either condition occurs. And we track the distribution of how long leases are actually needed in order to set the TTL a bit longer after the average time needed.
PROTIP: Track the maximum time a lease is actually needed.
To reduce the disruption of apps experiencing expired tokens, we provide a way to renew tokens during a “grace period”. Renewals are done instead or re-issuing tokens because the cryptographic processing to create tokens require some effort. Renewals take less computing effort.
Thus, we have two TTLs for each component:
-
A default TTL for each individual token.
-
A maximum TTL when no more renewals are allowed, and authentication or reconnection is required again.
Additionally, there can be limits on the number of times a lease/token can be renewed.
This diagram illustrates the relationship of renewals among components.

Notice that the TTL is longest at the top component and gets shorter as we go down the stack toward the asset:
- Wrapping tokens managed by the Trusted Orchestrator have a TTL that is the token_max_ttl
- Account authorization tokens managed by Vault
- Each lease to access the database (the asset) has the shortest TTL
Each component has a different name for each TTL:
-
Each token for authorization into the system must be renewed before the token_ttl. When the maximum number of token renewals or token_max_ttl is reached, another login is necessary again.
-
The wrapping-token lifetime is limited by the token_max_ttl.
The lifetime of a wrapped token should be less than the lifetime of the SecretID being wrapped.
-
If an account needs to login again, that account must also getcreds and reconnect to the database.
-
Each lease to access the database must be renewed before the default_ttl. When the maximum number of lease renewals or max_ttl is reached, reconnection is necessary again.
Now let’s analyze the coding to achieve the above.
Coding for renewal is performed by vault_renewal.go. Currently, only hello-vault-go has renewal logic.
VIDEO: this sample code uses an extraordinaryly short TTL (Time To Live) in order to trigger renewals to show how it works. In production, timeouts are generally 30-60 minutes.
See VIDEO: Vault 1.2: Database Credential Rotation and Identity Tokens
“Not only are credentials unmanaged and uncontrolled in the case of sprawl, but also present an availability risk, particularly as we adopt more complex architectures where there is a higher possibility of shared services. As a result, should Jane, a developer, rotate the password for the database credentials to Application A, without notifying Application B, Application B may suffer an outage as a result. Conversely, if we broker the permissions to the database based on identity, we can rotate the database password without any concern for degradation of service.” – Sarah Polan
Legacy services that can’t handle token regeneration would use “periodic” tokens with no max_ttl.
The equivalent CLI command to specify daily renewal period (repeatable indefinitely):
vault write auth/token/create policies="example" period="24h"
Limiting the number of times that a token can be renewed to 2 is set by -use-limit=2
The equivalent CLI command to specify daily renewal period (repeatable indefinitely):
vault write auth/.../...approle \
   secret_id_num_uses=1 \
   secret_id_ttl=300s \
   token_ttl=1800s

   path "kv/pipeline-secrets" {
      capabilities="read"
   }
Security
Most enterprises today have a SOC (Security Opertions Center) to constantly monitor to anomalous events.
During Penetration testing, we want to ensure that attempts to obtain data triggers alerts.
Performance
You might be wondering:
“Doesn’t creating a new username and password with every session add a lot of overhead on the database server?”
To answer that question, internally HashiCorp has a benchmarking tool based on use of Vegata, first released August 13, 2013 by Tomás Senart from Portugal.
Because Vegata is written in Go and thus compiled to a single binary, no addtional install of runtimes is needed (unlike JMeter). There is an image from Docker Hub.
Articles:
- https://geshan.com.np/blog/2020/09/vegeta-load-testing-primer-with-examples/
- https://medium.com/@carlosaugustosouzalima/do-you-need-to-run-load-tests-vegeta-to-the-rescue-7e8818127a65
- https://www.reddit.com/r/golang/comments/uo3flw/vegeta_http_load_testing_tool_written_in_go/
Articles about install on various platforms:
- https://geshan.com.np/blog/2020/09/vegeta-load-testing-primer-with-examples/ for running on macos - Geshan Manandhar | 06-Sep-2020
- https://www.scaleway.com/en/docs/tutorials/load-testing-vegeta/ for running on Linux
- https://www.kimsereylam.com/aws/2018/12/21/vegeta-load-test.html for running on Windows
- https://serialized.net/2017/06/load-testing-with-vegeta-and-python/
using Python in Jupyter Notebooks
BTW, if you’re wondering what “it’s 9000!” means, see this Know Your Meme explanation.
Dynamic Database credentials within Kubernetes
VIDEO: “Dynamic Database Credentials with Vault and Kubernetes”</a> and associated blog of the same name by Nic Jackson with Anubhav Mishra references
-
Setup a Kubernetes instance with a dev. Vault service and open-source Postgres database.
https://github.com/nicholasjackson/demo-vault
-
Within Vault, enable database secrets engine at (path): database/
vault secrets enable database
-
Apply the ???
kubectl apply -f ./config/postgres.yml
-
Establish database: Vault connects to database for the first time, using initial credentials, no SSL (which are OK since there is not data yet):
vault write database/config/wizard plugin_name=postgresql-database-plugin \
connection_url="postgresql://\{username\}\}:\{\{password\}\}@postgres:5432/wizard/sslmode=disable" \
verify_connection=false \
allowed_roles="*" \
username="iampostgres" password="password"
The above is a one-time action to initialize.
-
Rotate root credentials and store in Vault:
vault write --force /database/rotate-root/wizard
-
Log in the database server:
kubectl exec -it postgres-123456789-abcde sh
-
Use the Postgres terminal:
psql -U postgres
Password for user postgres: iampostgres
password
-
At the postgres=#” prompt get back:
exit
-
Create a role (named the user name) using PSQL accepting variable user name, password, expiration date:
vault write database/roles/db-app
   db_name=wizard \
   connection_statements="CREATE ROLE \"\{\{name\}\}\";\" WITH LOGIN PASSWORD \{\{password\}\}' VALID UNTIL \{\{expiration\}\}'; \
   GRANT SELECT ON ALL TABLES IN SCHEMA public TO \"\{\{name\}\}\";\" \
   revocation_statements="ALTER ROLE \"\{\{name\}\}\" NOLOGIN;" \
   default_ttl="1h" \
   max_ttl="24h"
- [43:25]
vault read database/creds/db-app
- To get into Kubernetes, use policy file web-policy.hcl to only allow reading:
path "database/creds/db-app" {
      capabilities = ["read"]
   }
vault policy write web-dynamic ./config/web-policy.hcl
- Write:
vault write auth/kubernetes/role/web \
   bound_service_account_names-web \
   bound_service_account_namespaces=default \
   policies=web_dynamic \
   ttl=1h
- Run:
kubectl apply -f ./config/web-policy.hcl
- Run:
kubectl describe pod web-deployment-...
Notice that the vault-agent is automatically added.
- Get into web pod:
kubectl exec -it $(kubectl get pods --selector "app=web" -o jsonpath=="{.items[0].metadata.name}") -c web -- sh
- Get into web pod to view database connection string:
cd /vault/secrets
   cat db-creds
{
      "db_connection": "host=postgres port=5432 user=v-kubernet-db-app-... password=... dbname=wizard sslmode=disable"
   }
- exit
Notice that the second pod has different username and password generated:
- Get into web pod:
kubectl exec -it $(kubectl get pods --selector "app=web" -o jsonpath=="{.items[0].metadata.name}") -c web -- sh
References
- https://medium.com/hashicorp-engineering/essential-elements-of-vault-part-1-5a64d3de3be8
-
https://medium.com/hashicorp-engineering/essential-patterns-of-vault-part-2-b4d34976f1dc
-
VIDEO: Secret Zero Problem Solved for HashiCorp Vault by TeKanAid, with associated blog
- https://www.hashicorp.com/resources/vault-response-wrapping-makes-the-secret-zero-challenge-a-piece-of-cake
https://speakerdeck.com/misug/vault-response-wrapping-makes-secret-zero-challenge-a-piece-of-cake?slide=7 with demo repo by Giusseppe Misurelli (author of https://github.com/misurellig/terraform-vault-identities)
- https://github.com/averche/vault-guides
https://fakrulalam.medium.com/python-script-credentials-stored-in-hashicorp-vault-54ffa5ca2b04