

How to use Jira for good, not to create frustration
![]()
![]()
![]()
![]()
![]()
![]()
![]()
![]()
![]()
![]()
![]()
![]()
![]()
Overview
Jira is a venerable, powerful, and popular tool.
Here are my notes about it’s use, as a non-expert.
NOTE: Content here are my personal opinions, and not intended to represent any employer (past or present). “PROTIP:” here highlight information I haven’t seen elsewhere on the internet because it is hard-won, little-know but significant facts based on my personal research and experience.
Jira requires no programming to use. But it has complexities and excentricities because Jira has been around for a long time – there has been time for a massive number of features added over time. That also means it’s like a big box of Lego blocks. Each person builds something different.
The problem with Jira is that it’s like you building a whole house with Lego bricks in which you want several familes to “shelter in place”.
Jira has its own world view – which is the imposition of Left Brain” dominant way of how humans should work (logical and objective rather than intuitive and subjective):
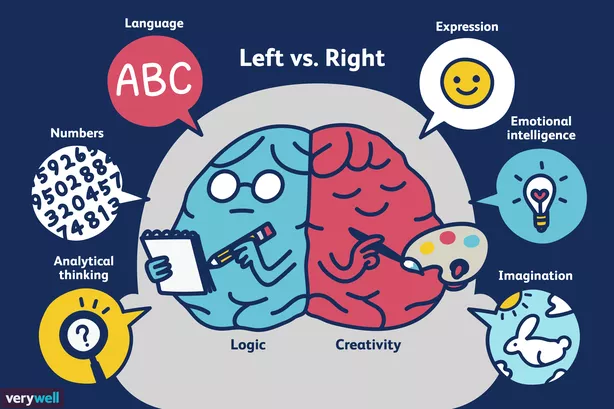
Research has shown that workers who perform best are those whose both sides of their brain collaborate.
Thus, without an inclusive, structured adoption process, team members will be confusing and frustrating each other. I have literally seen more than one shouting match caused by the way Jira affects a team’s Way of Working which the whole team needs to adopt.
I’ve also seen how an Agile Coach used Jira to keep a remote team totally aligned and productive, with ease.
Jira can be a tremendously helpful tool to improve inclusion when it becomes the “memory” for the team – what each person is doing, what the priorities are, what needs to be done, etc.
But to achieve that, each member of the team needs to be comfortable with the transparency that the process demands. This is why “Agile” teams have daily stand-ups and planning meetings when everyone on the team watches Jira being updated.
However, Jira can be a tool of oppression if the manager refuses to be accountable with having his/her own issues recorded, yet insists on having rank and file members use Jira like a time clock on Steriods.
Who makes Jira?
Jira is sold as both on-premises (individual Server or Jira Data Center) and in their cloud SaaS.
It integrates with Confluence, from the same company, Atlassian.
New project by Global Admin
Jira has a permissions structure such that projects are created by a Global Administrator of Jira.
-
Click the gear icon at the upper-right corner for the Settings.
Dictionary definitions: Issues
REMEMBER: All data entered for a project are collectively called “issues”.
PROTIP: Jira has a different usage for the word “issues” than in GitHub. Usage of the term is different from the societal connotation “that person has issues” which describes a problem condition, such as how a component or workflow is “broken” (not optimal).
REMEMBER: An issue is some unit of work defined as a “record” or “object” in the Jira database.
After a new issue is entered, its type can be changed to an Epic, a Story, a Bug, a Task, or Subtask.
All assets within a project are prefixed by a key code assigned for each project. Jira will recommend one based on the description of the project entered.
Stories > Tasks > Subtasks
- https://www.tutorialspoint.com/jira/jira_issue_types.htm
The default UI is for adding Stories, also called “user stories” – short requirements or requests written from the perspective of an end user. Ideally, each story is scoped so the team can commit to finish within a one or two-week sprint. Stories are listed in the Backlog.
The “User Story” format of a Story is written using a standard format: “As a role, I want feature so that reason/benefit</a>.” Each User Story may describe a feature of the product from the end-user’s point of view. Examples are “Login”, “Password recovery”. These do not begin with an action verb. Standard states of a User Story are “TODO”, “InProgress”, or “Done”.
SPIKE flags a story which does not aim to produce a shippable product, but to resolve questions or clarifies work processes which keeps a user story from being well estimated. The output of a spike is an estimate for the original story. Defined by Kent Beck, a spike is sometimes needed to “step outside the difficulties at hand to explore simpler and more compelling solutions,” when a story is too large or overly complex. There are research spikes, or architectural spikes, or refactoring spikes. “A spike is as an investment to figure out what needs to be built and how to build it — in advance of actually building it.” -“What’s a Spike, Who should enter it, and how to word it?”. PROTIP: “Don’t include spikes in velocity calulations - Handle all your spikes at one time, such as in a “sprint 0” or in a sprint between releases” – Don’t estimate a spike in agile.
Tasks are assignments to fulfill a particular story. Each Task describes engineering work that are not demonstrated to end-users in relation to a user story that end-users experience. Tasks are not estimated in teams that use story points to designate business value rather than effort.*
Subtasks track small pieces of work that are part of a larger task. Each Subtask describes development tasks to accomplish a specific user story. These begin with a verb such as “Design”, “Create”, etc. No story point estimates are made on these generally no more than 1-day tasks. The status of sub-tasks move from TODO to InProgress to QA Ready to Done. Sub-Tasks do not appear in the Backlog.
Bug (defect) is an issue type used by some organizations to describes a problem which impairs or prevents functioning of the product. A bug is usually specific to a single or related set of system components.
“Improvement” flags an enhancement to existing feature or task.
Collect them all, each ranked
It’s important to have a place where ideas for action are accumulated, so nothing “falls through the cracks”.
However, when too many accumulate, they can be overwhelming. PROTIP: So it’s best to rank each idea as they come in.
Reach, Impact, Confidence, Effort
An approach to calculate a single number to score work items (developed at messaging-software maker Intercom) has the acronym “RICE” (for Reach, Impact, Confidence, Effort). The scoring method is based on a combination of 5 custom fields which results in a cost-benefit analysis:

-
Reach is an estimate of how many people can be reached with a given timeframe (month/quarter/year). The metric can be quantified by the number of customer transactions, free-trial signups, or how many existing users try the new feature.
-
Impact can be measured by the number of new conversions or increasing customer delight such as the Net Promoter Score (NPS). This can be rather imprecise, so Intercom developed a five-tiered scoring system for estimating impact:
 3 = massive impact
 2 = high impact
 1 = medium impact
.5 = low impact
.25 = minimal impact
-
Confidence quantifies the trustworthiness of estimates. Intercom created a tiered set of discrete percentages to score confidence, so that its teams wouldn’t get stuck here trying to decide on an exact percentage number between 1 and 100. When determining your confidence score for a given project, your options are:
100% = high confidence
 80% = medium confidence
 50% = low confidence
-
Effort can be person-days/weeks/months of effort over a period of time. Intercom scores anything less than a month as a .5.
“MoSCoW” Rating
“MoSCoW” is not about a city in Russia, but an acronym for prioritizing the level of desire for each initiative:
- Must-have - minimum, non-negotiable product needs that are mandatory (being unsafe, illegal, not viable without it)
- Should-have - important initiatives that are not vital, but add significant value. May be painful to leave out, but the solution is still viable.
- Could-have - Nice to have initiatives tht will have a small impact if left out.
- Wish or Won’t-have (or will not have right now) - initiatives that are not priority for the specific time frame.
The acronym was coined by Software development expert Dai Clegg while working at Oracle. He designed the framework to help his team prioritize tasks during development work on product releases.
PROTIP: Before running a MoSCoW analysis, key stakeholders and the product team need to get aligned on objectives and prioritization factors. Then, all participants must agree on which initiatives to prioritize. Discuss how the team will settle any disagreements in prioritization. If you can establish how to resolve disputes before they come up, you can help prevent those disagreements from holding up progress. Finally, reach a consensus on what percentage of resources you’d like to allocate to each category.
Epics
- https://www.tutorialspoint.com/jira/jira_issue_types.htm
-
Enable the Roadmap where Epics can be configured to be shown over time in a Gantt chart like this example:

Each epic is a large body of work that can be broken down into a number of a series of related and interdependent stories. Most teams complete two or three epics each calendar quarter.
An Epic describes a general use case. Best to begin with a product name. “Within” each epic is a collection of user stories (product features) and Engineering Tasks that the team needs to do (such as “build QA server”, “schema change”, “dependency version upgrade”, etc.).
-
In the detail of each story, at the top left, you can associate an Epic to that story.
REMEMBER: An epic is selected by name in the drop-down, not key code name.
Cynefin framework
VIDEO: Cynefin by Liz Keogh
Higher-level hierarchies
The true power of Jira is unleashed when a team goes beyond using it as a giant ToDo list, and use its hierarchy.

Setup Initiative Type
References:
- VIDEO: Configuring issue hierarchy above epics in Advanced Roadmaps (as legend above epics in the roadmap)
- https://confluence.atlassian.com/jirasoftwareserver/configure-your-jira-software-instance-1044784156.html
- https://confluence.atlassian.com/advancedroadmapsserver0329/configuring-initiatives-and-other-hierarchy-levels-1021218664.html
- VIDEO: How Atlassian Uses Advanced Roadmaps
In the Roadmap Gantt Chart shown above, a collection of Epics that drive toward a common goal can be grouped under an Initiative. Initiatives often are completed in multiple quarters within a year.
Initiatives are high-level priorities that multiple teams work against in an organization.
VIDEO: TODO: Alternately, a “Theme” covers several Epics.
Global Administrator configure Initiatives
To configure Initiatives, you need to be assigned permissions of a “Global Administrator”.
If you’re not the “Global Administrator” with permissions to do configurations, you’ll see this:

If you have permissions, you’ll see the menu for Global Administrators:

Group Epics under an Initiative Label
- Click on “Issues” in the Settings menu.
- Click “Add issue type” box near the top-right.
-
Type the name of your Initiative in the Name box and leave the default “Standard Issue Type” selected.
The video uses the name “Legends”, but substitute that with your own Initiative name.
- Click Add.
- Click “Issue type schemes” on the left menu.
- To the right of “Legends”, click “Edit”.
- Drag “Legend” from “Available Issue Types” and drop in the “Issue Types for Current Scheme” list.
-
Click “Save”.
Configure Advanced Roadmaps
Use of initiatives require the “ADVANCED ROADMAPS FOR JIRA” Jira plug-in installed ( JIRA Server/Datacenter deployment), previously called “portfolio for JIRA”. The “Advanced Roadmaps” add-on enables Programs above Initiatives for even more complexity in the largest of organizations. So this is rarely used.

- Click on “Plans” at the top menu to select “Settings” in the drop-down menu.
- Click “+ Create Level” at the bottom of the “Hierarchy levels” list.
- Type “Legends” in the empty box that appears.
- Click the “Jira Issue Types” box to its right to select “Legends”.
-
Click “Save changes”.
- Click on “Plans” at the top menu to select the top item in the drop-down menu.
- Click the cog next to the plan at the top left, to select “Config”.
- Click “Issue sources”.
- Click “Edit issue sources” in the blue box, to get the “Connect to your teams’ work” page.
- Click the last “Board” to select “Project”.
-
Click on “Select board” to select “Legends (LEG)”.
- Click “+ Create issue” to select “Legend”.
-
In the entry field that appears, type the name of your Initiative and click the check to save.
Link Epics to Initiative
- Click each checkbox to the left of each Epic you want associated with its parent Initiative.
- Click “Bulk actions” to select “Parent”.
- In the Move pop-up, click the Name box to select the Initiative name defined. Click Apply.
-
Click the arrow to the right of your Initiative to expand Epics underneath it.
Review changes to save selected changes
- DON’T FORGET: Click “Review changes” blue button at the upper-right corner.
- Click “Save selected changes in Jira” blue button.
New Jira user
Unless your enterprise admin may has created another mechanism, here is the default way to grant access to new users:
- Click “Project settings” on the left menu. If you don’t see the option you don’t have admin. permissions.
- Click “Access”.
- Click the blue “Add people” button.
- In the pop-up, type a email address (you can also type a name, but an email address is most accurate).
- Click Add.
Configure your user profile
-
Set MFA:
https://id.atlassian.com/manage-profile/security
-
Set your language and time zone:
https://id.atlassian.com/manage-profile/account-preferences?ref=jira&src=personalsettings
-
Add profile picture:
https://id.atlassian.com/manage-profile/profile-and-visibility
JIRA workflow
The https://community.atlassian.com/t5/Jira-Core-questions/epic-vs-story-vs-task/qaq-p/204224
JIRA provides buttons so the status of an issue can be easily transitioned to a different state in the workflow
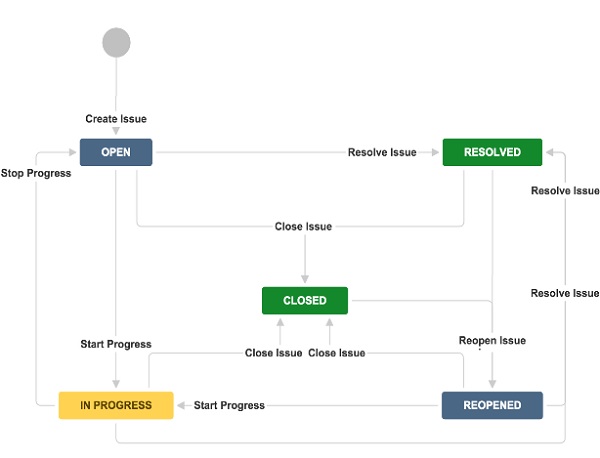
- TO DO
- IN PROGRESS - you’re working on it
- IN EDITOR REVIEW - you’re ready with your draft and your editor is doing the review
- FINAL REVIEW
- DONE
Estimates are used to plan milestones.
Issues
An article goes through these states one after the other, although it’s not always a straight line. Aan article may go back and forth - but ultimately that’s the progression.
So, when you start working on an article, set it to IN-PROGRESS and that you’re assigned to it.
When changing the state of an article, you should not change the assignee; you (the author) always remain the assignee.
When you’re done with your draft, move it to “TEST” or “IN EDITOR REVIEW”, etc.
Also make sure you add a link to cross-reference. Your team may requst that each topic on JIRA have a link to the in progress product in the description - so that we can easily and quickly find it.
When your GitHub PR is ready, have a link to it in your comment.
To mention a JIRA user, type “@” followed by the user name.
Bugs
Every bug report should include:
- What you expected to happen
- What happened instead
- Detailed steps to reproduce
Vote
The JIRA Vote features collects opinions from several people, on whether it is resolved or completed. *
To begin, the Admin needs to add permission for users to use this feature.
Each participant goes to the View Issue page where voting is required.
Click Vote for this issue to instantly vote for that issue.
Move items to another project
References:
- https://confluence.atlassian.com/servicemanagementserver/moving-an-issue-939937218.html
-
In the project to which you want to move your issue click project -> settings -> permissions to check whether you have “Create Issues” permission.
-
In the project from which you want to move your issue, click project -> settings -> permissions to check whether you have “Move Issues” permission.
- View (open) the issue that you wish to move.
-
Click the “…” menu to select “Move” for the “Step 1 of 2: Select destination project and issue type” page.
WARNING: Your issues’ destination project may have different settings than your source project. Even if they’re named the same, issue types may use different workflows and fields. You may lose data when moving issues between projects.
-
Learn more about migrating multiple issues at the same time
To avoid losing the relationship between this issue and its parent, move the epic issue as well as the issue.
See https://support.atlassian.com/jira-software-cloud/docs/migrate-between-next-gen-and-classic-projects/#keepInMind
-
Click “Next”.
- Click “Move”.
Export and Import Data from/into Jira
https://support.atlassian.com/jira-cloud-administration/docs/export-issues/
To export from Jira Cloud, first do a complete backup using the Backup Manager to back all projects. The files it exports:
├── activeobjects.xml
├── entities.xml
├── data
│   ├── attachments
│   └── avatars
└── logos
Migrate
https://ancaonuta.medium.com/how-to-migrate-a-jira-project-from-a-jira-instance-to-another-one-c774cbc04a1d explains it well
export a CSV of all the issues and then import first the Epics, User Stories, and then the Sub-tasks and update the exported CSV with the new IDs the import function will be able to link the children correctly.
CAUTION: Metadata information such as comments, attachments, and issue history will be lost in migrations.
https://learning.oreilly.com/live-events/advanced-jira-for-agile-projects/0636920086083/0636920093689/
Competition
Asana - a cloud-based service that allows employees within a company’s workspace to organize and track communication on projects more efficiently. Within Asana, employees can view a project’s workflow, goals, and collaborate with one another to maintain a timeline and stay on progress.
Trello - a task management application that gives a user a visual overview of both what is being worked on, as well as who is currently working on it, and where something is in the process. Trello can be used across an organization by anyone that needs to manage a project without necessary and complex tools.
Basecamp - a web-based project management platform that has a broad range of features to help teams collaborate more freely and with less restriction. It is user-friendly, has a smooth interface, and is designed for task management, internal and external file sharing, and messaging fellow team members.
Smartsheet - a spreadsheet-style interface to provide flexibility and manage various workflows. Users are able to track a project’s progress by subscribing to a sheet or even a specific row in a spreadsheet. Smartsheet also provides the ability to add comments and upload attachments within its platform.
Clarizen - offers configurable workflows that are easily customizable in order for an enterprise to ensure the project management software fits its needs completely. Additionally, Clarizen has automated business processes, real-time visibility, and dynamic reports and dashboards.