

Load test sooner by updating NeoLoad scripts from Selenium
![]()
![]()
![]()
![]()
![]()
![]()
![]()
![]()
![]()
![]()
![]()
![]()
![]()
Overview
- Why this software?
- Workflow
- User image on Google Cloud
- Docker image
- Install locally
- Sample Code on Sample Apps
- Export Selenium for NeoLoad
- Invoke from Eclipse
- Invoke by Maven
- NeoLoad Starter script
- Selenium Sample Code
- User data from a file
- Database Admin
- Monitoring
- Methods of the Selenium wrapper
- Start Selenium scripts
- See run results
- Jenkins for NeoLoad
- References
- Scraps - ignore
This article provides “newbies” a hands-on way to (on Macs and Windows machines) install and use Selenium and NeoLoad together in order to include performance testing during software development.
This makes for easier/faster way to software development such that load testing is performed alongside software development and then included as part of System Demos at the end of each Agile sprint.
Why this software?
Selenium automates functional testing by emulating signals from keyboards and mice. Selenium controls (automates) the keyboard and mouse, emulating human end-users.
This technology makes use of Selenium to control the keyboard and mouse while NeoLoad listens to the network traffic and updates its “user paths” (automation scripts) to emulate that network traffic.
After some editing, Neoload scripts are run on load generators that take the place of many real clients in order to impose a simulated load on web servers and the infrastructure around it (database, Web server, network components, etc.). During “load test” runs, user response times and other statistics are captured by additional monitoring software.
All this is not yet fulfill the complete vision where tests are automatically and fully created with the application code, But this does foster additional speed and agility we haven’t had before now to verify if existing scripts are still working.
Workflow
Here is how to do it, step-by-step: CAUTION: Work in progress!
- Get files from my GitHub using a Git client.
- Obtain an instance of all the components in the Google cloud, install on your own machine from a Docker image or as individual components.
- Run sample files to understand how everything works.
- Learn to organize user actions as transaction names in the sample app, sequenced under “run type” sequences.
- Create or reuse a NeoLoad starter script with an object recognition framework and data variation logic.
- Configure NeoLoad to be re-generated by Selenium.
-
The above can be done once before a sprint, leveraging assets from other projects.
As UI elements are created incrementally during a Sprint:
- Update the Selenium script of new actions and transactions for NeoLoad.
- Verify the Selenium script runs well (is functional).
- Edit the Selenium script to add code to NeoLoad transactions.
- Update the existing NeoLoad script by running the Selenium script.
- Edit the NeoLoad script to add correlations and verifications of new objects.
- Reuse my samples to test your own app.
User image on Google Cloud
If you are working on a Chromebook laptop or on a laptop that Corporate Security has locked down, instantiate a Dockerized server image in the Google Container Engine public cloud.
Create image
- Create a Google account if you don’t already have one. Login to it.
- Create a project in the Google Dashboard. (lower case letters). Google assigns a project name such as “temporal-loop-94520”.
-
Under the COMPUTE section, select Container Engine, Container clusters.

- If it appears, click “Enable API”. Deploying takes several minutes.
- Click Create Container cluster.
- Edit the name of your cluster.
- Select a zone nearest to you (such as us-central1-f).
- Leave the Cluster size at 1.
-
Click Create.
Google Cloud Platform Console
If you do not have permissions to install stuff,
-
Go to the Google Cloud Platform Console for your project at
https://console.cloud.google.com/home/dashboard
- Click the “>_” icon for the Google Cloud Shell.
- Click “START CLOUD SHELL”.
- Copy the Project ID assigned by Google (such as “temporal-loop-94520”).
-
Manually type the Google Cloud commands below.
CLI on your workstation
This is a good option if you’ll be working with Google Cloud instances so frequently that automation is a time-saver.
- Install Python 2.7 in the environment you’ll be using to issue Google Cloud commands.
- Install the
Google Cloud SDK, which includes the
gcloudcommand-line tool. -
Pick your operating system and follow the instructions.
Alternately, on a Mac, a Homebrew package of it is available:
brew tap caskroom/cask; brew install –cask google-cloud-sdk
-
Use
gcloudto installkubectl, the Kubernetes command-line tool:gcloud components install kubectl
-
Follow the documentation to initialize
gcloudwith credentialed accounts on your local environment:gcloud init
- Log in to your Google user account when prompted.
- Click “Allow” to grant permission to access Google Cloud Platform resources.
-
Select a project.
PROTIP: Although there is a way to set a default compute/zone, (such as
gcloud config set compute/zone us-central1-b) we do not recommend it because you will likely change it and need to be aware of what it is to avoi rogue instances eating your wallet.Local Google Cloud Command file
-
In a text editor, construct a command file you’ll use again, such as:
java-selenium-neoload-v1-start.sh - Copy the Project ID assigned by Google (such as “temporal-loop-94520”).
- Copy the commands below and save it in a file.
-
On a Mac, construct a command to enable running:
chmod +X java-selenium-neoload-v1-start.sh -
Run the command file:
./java-selenium-neoload-v1-start.shGoogle Cloud Commands
- Copy the Project ID assigned by Google (such as “temporal-loop-94520”).
-
Paste the value as you construct your version on these commands:
gcloud config set project temporal-loop-94520
gcloud config set compute/zone us-central1-f
gcloud config set containter/cluster cluster-1
gcloud beta container get-credentials
kubectl run webserver --image=java-selenium-neoload-windows-v1
kubectl get rc
NOTE: Even if this server crashes, Google will bring it up automatically.
The
image=java-selenium-neoload-windows-v1above refers to the Docker image described next.This sample is in the GitHub repo
- Install Bash for Windows to execute the sample above in Windows.
-
Run the script.
NOTE: This cannot currently be done on the AWS EC2 (Amazon Web Services Elastic Compute Cloud).
- https://www.youtube.com/watch?v=Yji-nfuUvIo
Docker image
The easiet way with work with this is to use Docker to download a single image which contains all the installers already run.
In a Terminal window:
Docker Pull
-
If you have Docker installed on your machine (and it has enough memory, CPU power, disk space), bring up an image that contins the image
docker pull ???/java-selenium-neoload-windows-v1
Alternately:
docker pull ???/java-selenium-neoload-linux-v1
TODO: Dockerize an image and put it in Docker Hub!
-
Navigate to the folder that contains the demo code. In our case:
cd /gits/wilsonmar/Java-Selenium-NeoLoad
-
Pull down the latest version of the demo code, which may have been updated since the Docker image was put together:
git pull
TODO: Instead, use a shell script to do the above, and more.
NeoLoad License
NeoLoad licenses require renewal every year.
-
Request one from http://go.neotys.com/NeoLoad-Free-Edition-Download.html
-
Save the file from your email.
Docker Pull
-
mvn install
Install locally
I’m working now to have a similar script using PowerShell.
But if you have a Mac, you can try my single line installer to get these directly on your own machine:
- Git client (to pull from GitHub)
- A Sample app to test (Ushahidi, JPetStore, JPetClinic, etc.)
- Java Development Kit
- Maven to build Java after processing the pom.xml file of dependencies
- Selenium Build automation for Mac installs:
- Selenium Web Driver
- Google Chrome browser
- ChromeDriver
- GeckoDriver is loaded directly by Selenium scripts
- Firefox browser
- Eclipse or IntelliJ IDE (which has JUnit built-in)
SikuliX install adds :
- OpenCV to recognize images
- Tesseract to recognize text
- NeoLoad 6.0 Install
- NeoLoad NLWebDriver (added manually or via Maven)
- NeoLoad Monitoring
All these are free open source software (FOSS), except NeoLoad which provides a free license for up to 50 simultaneous virtual users.
Get from GitHub
-
Change to or create a folder where Git will create a folder on your local hard drive:
cd ~/gits/wilsonmar
You need to substitute “wilsonmar” here with your own account name if you forked the repo.
-
Get the repo onto your local hard drive (using this command which wraps into two lines):
git clone https://github.com/wilsonmar/Java-Selenium-NeoLoad --depth=1
--depth=1specifies the depth of history downloaded, with 1 if you only want the latest version and no back versions. This saves some disk space. -
Dive into the folder created by git clone:
cd Java-Selenium-NeoLoad
The folder contains a pom.xml file for processing by Maven.
Maven clean install
-
Use a text editor to view the pom.xml file.
NeoLoad’s documentation states that NeoLoad integration has been tested on Selenium versions 2.53.0 and 3.0.1.
NOTE: The version of the Selenium Proxy for Maven is 2.0.6.
<dependencies>
  <dependency>
 <groupId>com.neotys.selenium</groupId>
 <artifactId>neotys-selenium-proxy</artifactId>
 <version>2.0.6</version>
  </dependency>
  <dependency>
 <groupId>org.seleniumhq.selenium</groupId>
 <artifactId>selenium-java</artifactId>
 <version>2.0.6</version>
  </dependency>
</dependencies>
NOTE: Projects not built using Maven would need to add the Selenium proxy JAR (with dependencies available for download) on the Neotys Labs page.
-
Have Maven download dependencies specified in the app’s pom.xml file:
mvn clean install
Maven creates a target folder.
???
NeoLoad NLWebDriver
(added manually or via Maven)
The wrapper NLWebDriver provided by Neotys enables Selenium scripts into NeoLoad User Paths.
It can be used without any interaction with NeoLoad. Therefore it doesn’t impact existing functional tests.
Sample Code on Sample Apps
There are several sample apps.
Setting the server up is beyond the scope of this article.
Ushahidi sample web app
-
Click the URL below:
http://ushahidi.demo.neotys.com
This URL is within code examples within Neotys on-line documentation at:
https://www.neotys.com/documents/doc/neoload/latest/en/html/#8266.htmLanding
 Click on image for a full-screen pop-up
According to Wikipedia: this app was initially released in 2009 as open source on GitHub to “crowdsource” reports from local citizens about voter intimidation and fraud.
Dots on the map shown shows the location of each observation reported around the world.
The word for “testimony” or “witness” in the Swahili language is “Ushahidi”, and thus the Ushahidi platform used to build the app shown.
The current implementation is not complete:
- Do not Click “Provide Feedback” at the bottom of the screen. A 404 page appears.
- “Get Alerts” is not clicked within scripts because the response is “This module is not available”.
-
There are no “Official & mainstream news” to view.
- TODO: How to reset the data is unknown.
- Reduce the width of the browser and note that the app is NOT “responsive” to different widths.
NewAccount
-
Click the “Login” link at the top of the page.
-
Click “Create an Account”.
http://ushahidi.demo.neotys.com/login/?newaccount
- Fill the information. Consider user data from a file, etc.
-
Click “Sign Up”.
ForgetPassword
-
Click the “Login” link at the too of the page.
-
Click “Forget Password”.
NOTE: In the HTML, the value for name “form_auth_token” is sent, not the email address. This is an example of why a value needs to be captured in the HTML so that it can be passed back to the server. Such work is called “correlation” of data. An example of HTML containing a form_auth_token value is:
<form action="http://ushahidi.demo.neotys.com/login" method="post" id="header_nav_userforgot_form">
<input type="hidden" name="form_auth_token" value="4cab5f2d740c2761e64b867c2b0180578e666517ff17f790fd72d25ed41a3495"  />
This value is obtained between left and right boundries:
- The left boundry is
form_auth_token\" value=\" - The right boundry is
\"
Login
- The left boundry is
-
Click the “Login” link at the too of the page.

Clicking Login within this app does not involve additional communication with the server.
NewItem
-
Click “How to Report” on the upper-right corner of the map for the different mechanisms of reporting. The URL is http://ushahidi.demo.neotys.com/reports/submit/

-
Click “By filing this form on our website”.
Alternately, the form can also be reached by clicking the “SUBMIT A REPORT” menu item.
Or the form can also be reached by clicking the “SUBMIT A REPORT” orange button at the upper right corner.
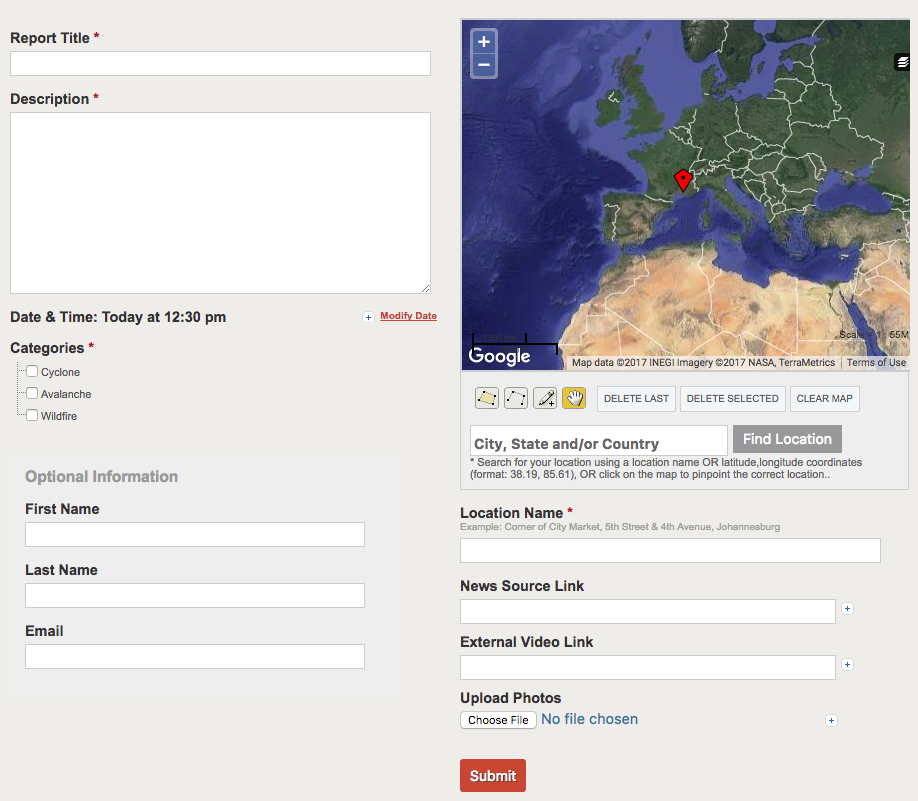 Click on image for a full-screen pop-up
QUESTION: How many files are downloaded initially? What is the size of each?
QUESTION: How many files are downloaded on the second iteration? (Is the cache populated)
-
Right-click any white space on the page and select “Inspect Element” for the HTML.
- There are iehacks css files for IE 6, 7, and 8.
- Text in HTML are not minified and not packaged together.
Search
- Type in “Selenium title” in the field to the left of the blue SEARCH button. That is the text added in the sample script.
-
Click the button.
List (Report)
-
Click the “REPORTS” menu item.
 Click on image for a full-screen pop-up
NOTE: Categories of observations currently are Cyclone, Avalanche, Wildfire.
The total number of reports in the database can be a factor in response time.
QUESTION: How much quicker would response time be if less observations are shown in the report? Although not relevant here since there is no way to change it, the number of reports listed per page can be a factor in response time as well.
So capture the number of reports in the HTML coming back from the server.
TODO: Where to save the number of reports in the page?
Plan of Transactions by Run Type
Functional of the app arranged by typical load testing run types:
- “Landing” (map display)
- “Menus”
- “NewAccount” - to stress database adds
- “LogInOut” - to stress authentication services
- “ForgotPassword” - to stress the email interface
- “NewItem” - “Submit a New Report” in the app at http://ushahidi.demo.neotys.com/reports/submit/
- “Search” -
- “List” -
Transaction Naming
Response times associated with transaction names from several scripts can be later combined together, so it’s a good idea to use transaction names that are unique, such as:
Usahidi1-Landing-HomeThe NeoLoad 6 User Path (script) (in default neoload_projects folder) is simply:
Usahidi1_NL6- WARNING: No dashes are accepted in NeoLoad project names.
- NeoLoad requires a conversion of scripts from the prior release (e.g., from 5 to 6).
The Selenium 4 script folder is simply:
Usahidi1_SL4
Export Selenium for NeoLoad
NOTE: After editing Selenium Java test scripts, the Java project must be exported to a “Runnable JAR file” so that it can be launched by NeoLoad.
To define a launch configuration that contains the test class to execute:
import org.junit.runner.JUnitCore;
import org.junit.runner.RunWith;
import org.junit.runners.Suite;

@RunWith(Suite.class)

@Suite.SuiteClasses({
   HomeTest.class,
   ReportTest.class
})

public class EndUserExperienceTestSuite {
  public static void main(String[] args) throws Exception {
         JUnitCore.main(EndUserExperienceTestSuite.class.getName()); // EndUserExperience only?
  }
}
-
Enter a project name, specify the directory where to save the JAR file:
in the /custom-resources folder of your NeoLoad project
in the /extlib directory of your NeoLoad installation for multi-project usage
-
Click Finish.
Invoke from Eclipse
Even though there is some controversy about include them in version control, the folder has a .settings folder containing two files that provide consistent Eclipse IDE settings:
org.eclipse.jdt.core.prefs sets the Java version used by the Eclipse Formatter.
It is set in Eclipse via project | Properties | Java Code Style | Formatter page. Enable project specific settings.
org.eclipse.m2e.core.prefs where “m2e” is Maven to Eclipse.
It is set in Eclipse via Project | Properties | Java Compiler.
See Eclipse IDE for use of keyboard shortcut keys.
Invoke by Maven
The Selenium driver can be invoked as a Maven task.
-
Launch all tests using a command:
mvn -Dnl.selenium.proxy.mode=Design\
-Dnl.design.api.url=http://ushahidi.demo.neotys.com/ \
clean test
The response ends with output such as:
[INFO] ------------------------------------------------------------------------
[INFO] BUILD SUCCESS
[INFO] ------------------------------------------------------------------------
[INFO] Total time: 2.157 s
[INFO] Finished at: 2017-08-06T11:43:30-04:00
[INFO] Final Memory: 12M/197M
[INFO] ------------------------------------------------------------------------
Maven Surefire plugin
To launch only a subset of unit tests, add and use the Maven surefire plugin.
-
First, include this in your pom.xml :
<plugin> <groupId>org.apache.maven.plugins</groupId> <artifactId>maven-surefire-plugin</artifactId> <version>2.19.1</version> <dependencies> <dependency> <groupId>org.apache.maven.surefire</groupId> <artifactId>surefire-junit47</artifactId> <version>2.19.1</version> </dependency> </dependencies> </plugin> -
Launch a test run using this command. For example, the asterisk in this launches only test classes that end with (for example) “PerformanceTest”:
mvn -Dnl.selenium.proxy.mode=Design -Dnl.design.api.url=http://ushahidi.demo.neotys.com/ -Dtest=*PerformanceTest clean testThe tests of course must have been defined within the test repository of your Maven project.
NeoLoad Starter script
In the GitHub repository is the NeoLoad starter script with an object recognition framework and data variation logic:
- Invoke NeoLoadGUI version 6.
-
Within NeoLoadGUI open the sample User Path:
Ushahidi1.???
PROTIP: The User Path name begins with the application name with a number designating the app’s release.
Run Configuration
-
Go to Run Configuration
[image here]
-
Set the mode, use the
nl.selenium.proxy.modeproperty as a VM option or a program argument. Example:-Dnl.selenium.proxy.mode=DesignThis is one of three modes to use the NeoLoad wrapper:
- “NoApi” - This is the default mode. In this mode, there is no interaction with NeoLoad.
- “Design” - a User Path is automatically created or updated through the Design API.
- “EndUserExperience” - Selenium time measurements are sent to NeoLoad through the Data Exchange API.
Selenium Sample Code
URL supplied from caller
Regular Java programs have a Main class the Java compiler uses as the “entry point” to begin execution.
public static void main(String[] args) throws Exception {
The args (arguments) string is how the program receives arguments given to execute the program.
JUnitCore.main(Ushadidi1-junit4.class.getName());
### Command arguments
https://www.neotys.com/documents/doc/neoload/latest/en/html/#8278.htm
describes additional information to feed into Selenium include:
The NeoLoad license API key:
-Dnl.api.key="32l234234abacdeeeffffgg2235523"
Operating system (Windows, Linux, Mac OS):
"-Dnl.os=Mac OS"
The URL under test:
-Dnl.design.api.url=http://localhost:7400/Design/v1/Service.svc/
Turn on debugging:
-Dnl.debug=true
### Suites
import org.junit.runner.JUnitCore;
import org.junit.runner.RunWith;
import org.junit.runners.Suite;

@RunWith(Suite.class)

@Suite.SuiteClasses({
   HomeTest.class,
   ReportTest.class
})

public class EndUserExperienceTestSuite {
  public static void main(String[] args) throws Exception {
         JUnitCore.main(EndUserExperienceTestSuite.class.getName()); // EndUserExperience only?
  }
}
TIP: The structure of suites is illustrated by the following diagram from the 2h 37m Unit Testing In Java With JUnit video class released 10 May 2013 on Pluralsight.

### Categories
import org.junit.experimental.categories.Category;
import org.junit.experimental.categories.Categories;
import org.junit.experimental.categories.Categories.IncludeCategory;

@RunWith(Categories.class)
@IncludeCategory(UTestGood.class)

@Test
@Category(UTestGood.class)
public class HelloTest {
   ...
}
TIP: The structure of suites is illustrated by the following diagram from the 2h 37m Unit Testing In Java With JUnit video class released 10 May 2013 on Pluralsight.

### Parametized Tests
### JUnit Annotations
In the sample code are these annotations for the Java compiler to see:
@Rule@BeforeClass@Test@AfterClass
These are kinda like a “magic spell” that applies additional generic code around the method under the annotation. That spell can be used on several lines, so annotations minimize coding.
To see the basic structure of code behind an annotation, see
https://github.com/ajitsing/JavaCustomAnnotations
which provides a simple example to create a
custom annotation. Basically, it uses Java Introspection features.
Additional code added are defined within classes imported at the top of the code.
import org.junit.Rule;
import org.junit.rules.TestName;
import org.junit.BeforeClass;
import org.junit.AfterClass;
Annotations here are introduced with version 4 of JUnit.
https://github.com/junit-team/junit4/wiki/Rules
explains that the @TestName Rule makes the current test name available inside test methods. The page begins by saying
“Rules allow very flexible addition or redefinition of the behavior of each test method in a test class. Testers can reuse or extend one of the provided Rules below, or write their own.”
JUnit rules can intercept then:
- access information about a test before it is run, such as setup and teardown a temporary database.
- modify a test before running it.
- modify test results after a run.
NOTE: @BeforeClass (@BeforeAll in Junit5) is used instead of @Before so that it is executed only once before the entire test fixture, thus sharing the same computationally expensive setup code. @Before is executed before every @Test. Between @BeforeClass and @AfterClass, various @Tests are not executed in the sequence in the source code.
This is “Inversion of Control” introduced in version 4 of JUnit. Junit Rules work on the principle of AOP (aspect oriented programming).
JUnit wraps your test method in a Statement object so statement.Execute() runs your test. Then instead of calling statement.Execute() directly to run your test, JUnit passes the Statement to a TestRule with the @Rule annotation. The TestRule’s “apply” function returns a new Statement given the Statement with your test. The new Statement’s Execute() method can call the test Statement’s execute method (or not, or call it multiple times), and do whatever it wants before and after. Now JUnit has a new Statement that does more than just run the test, and it can again pass that to any more rules before finally calling Execute.
- https://stackoverflow.com/questions/13489388/how-does-junit-rule-work
### @BeforeClass NeoLoad
Under the @BeforeClass is code to invoke NeoLoad and open the NeoLoad project designated by providing to JUnit the “driver” variable containing a path. There are two ways to do that.
One is to specify null for the currently opened NeoLoad project with a hard-coded NeoLoad User Path (script) file name.
   final String projectPath = null;
   driver = NLWebDriverFactory.newNLWebDriver(webDriver, "steve", projectPath);
Alternately, a hard-coded .nlp file path:
   final String projectPath = "C:\\Users\\anouvel\\Documents\\NeoLoad Projects\\v5.3\\Sample_Project\\Sample_Project.nlp";
   driver = NLWebDriverFactory.newNLWebDriver(webDriver, testName.getMethodName(), projectPath);
The getMethodName() function is within the class defined under the @Rule annotation
   @Rule
   public TestName testName = new TestName();
It, in turn references classes imported from:
import org.junit.rules.TestName;
Using wrapper code allows quick and easy integration with existing Selenium test cases with minimal changes to existing code. Page load times and any error messages are sent to NeoLoad as external data.
### Timeout Rule
To specify a particular test taking a maximum time of one second (in milliseconds):
@Test(timeout=1000)
To specify timeouts generically by adding this line:
driver.manage().timeouts().implicitlyWait(5, TimeUnit.SECONDS);
https://github.com/junit-team/junit/wiki
### Expect an Exception
To specify that test code is expected to throw an exception:
@Test(expected=Exception.class)
The @ErrorCollector rule collects several errors for display all at once rather than immediately.
### @Ignore
PROTIP: The test program is executed from top to bottom.
To skip a test, add under @Test the @Ignore annotation.
But this is rather static code.
To define code that can select which tests are run at run-time, we can vary the value of the “RunType” argument when invoking the test program.
### Test Structure
As UI elements are created incrementally during a Sprint, add them to the java program.
TIP: To make this easier, add an extra level of functions in a Selenium framework described by John Sonmez in his 3h46m Creating an Automated Testing Framework With Selenium video class released on 26 Sep 2013 on Pluralsight.
### @ClassRule
@ClassRule annotations define custom rules that add functional before or after a test runs.
### NeoLoad Transactions
driver.startTransaction("Home Page");
CAUTION: The transaction name should match transactions named within NeoLoad scripts Selenium updates.
### Object in HTML
To find the object associated with a menu item text to click on:
driver.findElement(By.partialLinkText("SUBMIT A REPORT")).click();
After you find the “class=” name by looking at the HTML returned from the server, specify it so Selenium can click on it. For example:
<div class="submit-incident clearingfix"><a href="http://ushahidi.demo.neotys.com/reports/submit">Submit a Report</a></div>
is activated by this Java code:
driver.findElement(By.className("submit-incident")).click();
### Select by CSS Selector
If you need to specify a selector in the CSS such as this, where class=”report_row” is repeated:
<div class="report_row">
          <input name="submit" type="submit" value="Submit" class="btn_submit" />
use this example:
driver.findElement(By.cssSelector("div.report_row > input[name=\"submit\"]")).click();
### Landing Page
The landing page may be used by every transaction that needs to begin from that page.
   String baseUrl = "http://ushahidi.demo.neotys.com";
     driver.startTransaction("Home Page");
     driver.get(baseUrl);
### Page Pattern
PROTIP: To make it easier/faster to edit the Java file, use a more “modular” approach to structuring lines of code. Instead of each test directly interacting with HTML elements, adopt the “Page Pattern” of coding:

### Start NeoLoad Transactions
Transactions are defined to begin and stop specific time counters.
In this example, transactions can be added with the startTransaction method
when creating or updating User Paths.
driver.startTransaction("home");
driver.get("http://ushahidi.demo.neotys.com/");
Whenever the mode is not set to “Design”, calls to startTransaction are ignored.
### Parametization
In order to identify
User data from a file
How quickly can new users can be added into a system?
That question is answered by load testing of the New Account UX.
Database Admin
Occassionally, the database would need to be cleared (reset). This is done by re-initializing the database.
Before that, the database may be archived.
The database can be optionally re-established from archives.
Monitoring
User Experience Measurements
Regarding user experience measurements, the navigation library is available in the browsers listed here.
Measurement of the time elapsed on the end-user side is enabled by the W3C Navigation Timing library at https://www.w3.org/TR/navigation-timing which on July 2017 is supported by leading modern internet browsers.
Methods of the Selenium wrapper
To specify the scenarios you want to update, launch tests with Maven without specifying particular options or use the Design option and several dedicated methods on top of the Selenium driver
-
NLWebDriver(Selenium webdriver,Name of the NeoLoad User Path, path to the NL project);
-
NLWebDriver is the constructor of the NeoLoad webdriver. This constructor allows you to specify the project that is to be updated with the new/updated User Path.
``` final FirefoxDriver webDriver = new FirefoxDriver(addProxyCapabilitiesIfNecessary(new DesiredCapabilities())); // projectPath used to open NeoLoad project, null to use the currently opened Project. final String projectPath = “C:\Users\apaul\projects\Sample_Project.nlp”; NLWebDriver driver = NLWebDriverFactory.newNLWebDriver(webDriver, “SeleniumUserPath”, projectPath); NLWebDriver(Selenium webdriver,Name of the NeoLoad User Path);
Project path is optional. If the project is not specified, the wrapper will use the currently opened project.
final FirefoxDriver webDriver = new FirefoxDriver(addProxyCapabilitiesIfNecessary(new DesiredCapabilities()));

NLWebDriver driver = NLWebDriverFactory.newNLWebDriver(webDriver, "SeleniumUserPath");
StartTransaction(Name of the current transaction);
This method sends all the Selenium HTTP/HTTPS traffic into a specific NeoLoad container.
This methods needs to be used before the Selenium actions related to a business transaction.
public void testGetAlerts() {
driver.startTransaction("home2");
driver.get("http://ushahidi.demo.neotys.com/");
driver.startTransaction("alerts");
driver.findElement(By.partialLinkText("GET ALERTS")).click();
}
UnitTest 1 Sample
The Selenium driver is started once and stopped at the end of the whole test.
Only one User Path is created or updated.
package com.selenium.test;
import static com.neotys.selenium.proxies.NLWebDriverFactory.addProxyCapabilitiesIfNecessary;
import java.io.File;
import org.junit.AfterClass;
import org.junit.BeforeClass;
import org.junit.Test;
import org.openqa.selenium.By;
import org.openqa.selenium.chrome.ChromeDriver;
import org.openqa.selenium.remote.DesiredCapabilities;
import com.neotys.selenium.proxies.NLWebDriver;
import com.neotys.selenium.proxies.NLWebDriverFactory;
public class UnitTest {
  private static final String CHROME_DRIVER_PATH = "C:\\Selenium\\chromedriver.exe";
  static {
    final File file = new File(CHROME_DRIVER_PATH);
    System.setProperty("webdriver.chrome.driver", file.getAbsolutePath());
  }
  static NLWebDriver driver;

  @BeforeClass
  public static void before() {
    final ChromeDriver webDriver = new ChromeDriver(addProxyCapabilitiesIfNecessary(new DesiredCapabilities()));

    // projectPath used to open NeoLoad project, null to use currently opened Project.
    final String projectPath = "C:\\Users\\anouvel\\Documents\\NeoLoad Projects\\v5.3\\Sample_Project\\Sample_Project.nlp";

    driver = NLWebDriverFactory.newNLWebDriver(webDriver, "SeleniumUserPath", projectPath);
  }

  @Test
  public void testSubmit() {
    driver.startTransaction("home1");
    driver.get("http://ushahidi.demo.neotys.com/");

    driver.startTransaction("reports");
    driver.findElement(By.id("mainmenu")).findElements(By.tagName("a")).get(1).click();

    driver.startTransaction("submit");
    driver.findElement(By.partialLinkText("SUBMIT")).click();
  }

  @Test
  public void testGetAlerts() {
    driver.startTransaction("home2");
    driver.get("http://ushahidi.demo.neotys.com/");

    driver.startTransaction("alerts");
    driver.findElement(By.partialLinkText("GET ALERTS")).click();
  }

  @AfterClass
  public static void after() {
    if (driver != null) {
      driver.quit();
    }
  }
}
Methods of the Selenium wrapper
Method Description Example
NLWebDriver(Selenium webdriver,Name of the NeoLoad User Path, path to the NL project);
NLWebDriver is the constructor of the NeoLoad webdriver.
This constructor allows you to specify the project that is to be updated with the new/updated User Path. final FirefoxDriver webDriver = new FirefoxDriver(addProxyCapabilitiesIfNecessary(new DesiredCapabilities()));
// projectPath used to open NeoLoad project, null to use the currently opened Project.
final String projectPath = "C:\\Users\\apaul\\projects\\Sample_Project.nlp";
NLWebDriver driver = NLWebDriverFactory.newNLWebDriver(webDriver, "SeleniumUserPath", projectPath);
NLWebDriver(Selenium webdriver,Name of the NeoLoad User Path);
Project path is optional.
If the project is not specified, the wrapper will use the currently opened project.
final FirefoxDriver webDriver = new FirefoxDriver(addProxyCapabilitiesIfNecessary(new DesiredCapabilities()));

NLWebDriver driver = NLWebDriverFactory.newNLWebDriver(webDriver, "SeleniumUserPath");
setCustomName
This method sets a custom name of the next Entry that will be sent to the Data Exchange server.
driver.SetCustomName("custom entry name");
Advanced usage
The Java proxy sets a custom name of the next Entry that will be sent to the Data Exchange server.
Additionally there is a method to retrieve the regular expression being used to create the path when the
nl.path.naming.policy argument is set to URL.
The example below illustrates these advanced uses:
NLWebDriver driver = WebDriverProxy.newInstance(new FirefoxDriver());
driver.setCustomName("custom entry name");
System.out.println("Escaped regular expression: " + driver.getRegexToCleanURLs());
Create manual timers
If the tested application is not compatible with the navigation timing library, you can still create your own timers manually by using the DataExchange client library.
In order to send external data to NeoLoad without Java, you can create custom timers manually, either from scratch or with the help of our utility TimerBuilder.
To create manual timers, you need first to create the Data Exchange API Client as described below.
The NeoLoad Data Exchange API Client provides the utility TimerBuilder in order to time a transaction (a set of business actions). Below is an example of Java code to add a timer.
import com.neotys.rest.dataexchange.model.TimerBuilder;

// Start timer
final TimerBuilder timer = TimerBuilder.start("scriptName", "timerName");

// Do some transactions, for example:
vpba16.avw_backboneCellarAndro.avw_.mo_cHATEAU_LE_DOYENNE.click();

// Stop timer
dataExchangeAPIClient.addEntry(timer.stop());
To enhance the timer’s information with specific data, for example a URL, a status, etc.
import com.neotys.rest.dataexchange.model.Status.State;
import com.neotys.rest.dataexchange.model.TimerBuilder;
import com.neotys.rest.dataexchange.model.Status;
import com.neotys.rest.dataexchange.model.Status.State;
import com.neotys.rest.dataexchange.model.StatusBuilder;

// Start timer
final TimerBuilder timer = TimerBuilder.start("scriptName", "timerName");

// Do some transactions, for example:
vpba16.avw_backboneCellarAndro.avw_.mo_cHATEAU_LE_DOYENNE.click();

// Specify URL
timer.url("myURL");

// Specify Status
final Status status = (new StatusBuilder()).code("code").message("message").state(State.PASS).build();

timer.status(status);

// Stop timer
dataExchangeAPIClient.addEntry(timer.stop());
The transactions’ timers are then accessible in the Runtime and Results views of NeoLoad:
Timers-Results
Metrics retrieved by the Selenium wrapper
The Selenium wrapper automatically retrieves navigation timers and sends them to the NeoLoad Data Exchange API.
All metrics sent to NeoLoad are specified in milliseconds.
These metrics are available during runtime and once the test is complete in the Runtime and Results sections:
- Time to First Byte
- DOM content loaded
- On Load
- Document complete
Start Selenium scripts
“User Experience” scripts created in Selenium are started by NeoLoad’s Java Test Script advanced action.
For more information about the Java Test Script advanced action, refer to the Java Test Script Launchers documentation.
The following configuration is required:
JRE is the path to the Java Runtime Environment executable on the Load Generator
- Attribute arg1 must be: -jar
- Attribute arg2 must contain the path of the JAR file that was exported, either its absolute path or the path relative to the custom-resources folder in the NeoLoad project: ${NL-CustomResources}/myjar.jar
- Attribute arg3 must contain the mode -Dnl.selenium.proxy.mode=EndUserExperience
- Attribute arg4 must contain the mode -Dnl.data.exchange.url=http://192.168.1.6:7400/DataExchange/v1/Service.svc/
nl-seleniumjavaproxyconfigoptions2.png
Configure the NeoLoad scenario
To configure your User Experience scenario, follow the guidelines documented in the End User Experience Integration User Guide.
See run results
The external data injected during execution is displayed in Results > Details. For more information, see by external data.
https://www.neotys.com/documents/doc/neoload/latest/en/html/#1484.htm#o7602
User Experience Integration
License module “Integration & Advanced Usage” is required to enable the End User Experience Integration.
- https://www.neotys.com/documents/doc/neoload/latest/en/html/#8269.htm
-
Get to the “NeoLoad Selenium Proxy Driver” from the
https://www.neotys.com/support/neotys-labs/selenium-proxy-driver-for-end-user-experienceNeotys Labs page at https://www.neotys.com/support/neotys-labs.
The direct link for Java at time of writing is:
https://www.neotys.com/support/neotys-labs/selenium-proxy-driver-for-end-user-experience
https://www.neotys.com/support/neotys-labs/selenium-proxy-driver-c-automated-script-maintenance-end-user-experience
The Selenium Proxy Driver allows you to use a Selenium script to create or update NeoLoad User Paths and/or measure the end user experience on one or a few browsers or mobile devices and to send these measurements to NeoLoad.
-
Click “Download: Jar” link to download file:
neotys-selenium-proxy-2.0.6.jar
-
Click “Jar-with-dependencies” link to download file:
neotys-selenium-proxy-with-dependencies-2.0.6
-
Optionally, click “Source” link to download file:
neotys-selenium-proxy-2.0.6-sources
-
Optionally, click “Javadoc” link to download file:
neotys-selenium-proxy-2.0.6-javadoc
-
In your Downloads folder, invoke the “Selenium Proxy Driver” from the
-
Modify Selenium scripts to indicate the NeoLoad Selenium driver.
-
Modify Selenium scripts to add timers that will be converted into NeoLoad “transactions”.
-
Set the mode appropriately for the Selenium execution:
https://www.neotys.com/documents/doc/neoload/latest/en/html/#23462.htm
Jenkins for NeoLoad
-
The Jenkins job to run Selenium would involve invoking the Selenium run Maven job.
-
The post-build action to a code “conversion”, if successful, is to run the load test.
-
For that, install the Jenkins plug-in for NeoLoad at
https://wiki.jenkins.io/display/JENKINS/NeoLoad+Plugin
Its source is at
https://github.com/jenkinsci/neoload-pluginSupport is at “plugin-support@neotys.com”.
-
The plug-in works with “Freestyle” projects, not “Pipeline” using Groovy scripts.
TODO: Steps to add a job for this.
References
Continuous Performance Testing and Monitoring in Agile Development by Neotys does not show the above techniques.
Scraps - ignore
NOTE: The NeoLoad API for Selenium also enables capture of end-user experience measurements and equate them back into the NeoLoad results set.
This makes use the NeoLoad’s Java Launcher action.
NeoLoad can collect end-user experience and sends to NeoLoad the metrics calculated on the client (browser or mobile devices).
We don’t have any dedicated integration for Karma, but we can definitely support it and reach the same level of benefit we have with Selenium.
We just need to:
1/ Instrument Karma script with additional javascript code to send EuE metric to the NeoLoad Data Exchange API: http://www.neotys.com/documents/doc/neoload/latest/en/html/#7676.htm
2/ Launch the Karma script from NeoLoad with command line custom action (which is definitely possible since they embed a remote control capability to trigger workflow from command line).