
Safely retrieve static secrets from the enterprise-scale HA multi-cloud SaaS AKeyless, automatically from various programming languages.
![]()
![]()
![]()
![]()
![]()
![]()
![]()
![]()
![]()
![]()
![]()
![]()
![]()
Overview
If someone gets access to your laptop, they can:
- use your SSH key pair (in ~/.ssh) to have their way with your GitHub account
- use your AWS credentials file (in ~/.aws) to have their way with what you can do in your AWS accounts
- use your API keys in .env files (within your $HOME folder) to have their way with cloud services you access
- use your browser bookmarks containing passwords to log into your web accounts
This article describes how your app code (in various programming languages) can retrieve static secrets externally (from the AKeyless Secrets Orchestration SaaS Platform running across multiple clouds).
NOTE: Content here are my personal opinions, and not intended to represent any employer (past or present). “PROTIP:” here highlight information I haven’t seen elsewhere on the internet because it is hard-won, little-know but significant facts based on my personal research and experience.
True SaaS
PROTIP: Unlike other secret-keeping services in the cloud, Akeyless administrators don’t have to specify the size and number of servers processing secrets, which requires constant monitoring for adjustment by Administrators over time. As a true SaaS solution, technicians within AKeyless take care of scaling and updates of the underlying infrastructure.
Vault services within Azure, AWS, and GCP are set up for a specific region. This means charges for data egress accrue and administrators need to set up vaults in several regions, with cross-region replication to ensure that data is available in case of a disaster. Akeyless does not charge for cross-region data egress.
The free level of Akeyless is limited to 2,000 secrets, 5 clients, and 3 days of log retention.
Licensed features
The paid level is $78/month for 10,000 secrets, 10 clients, and 30 days of log retention.
AKeyless is not cheap. But it’s a bargain compared to the cost of a breach.
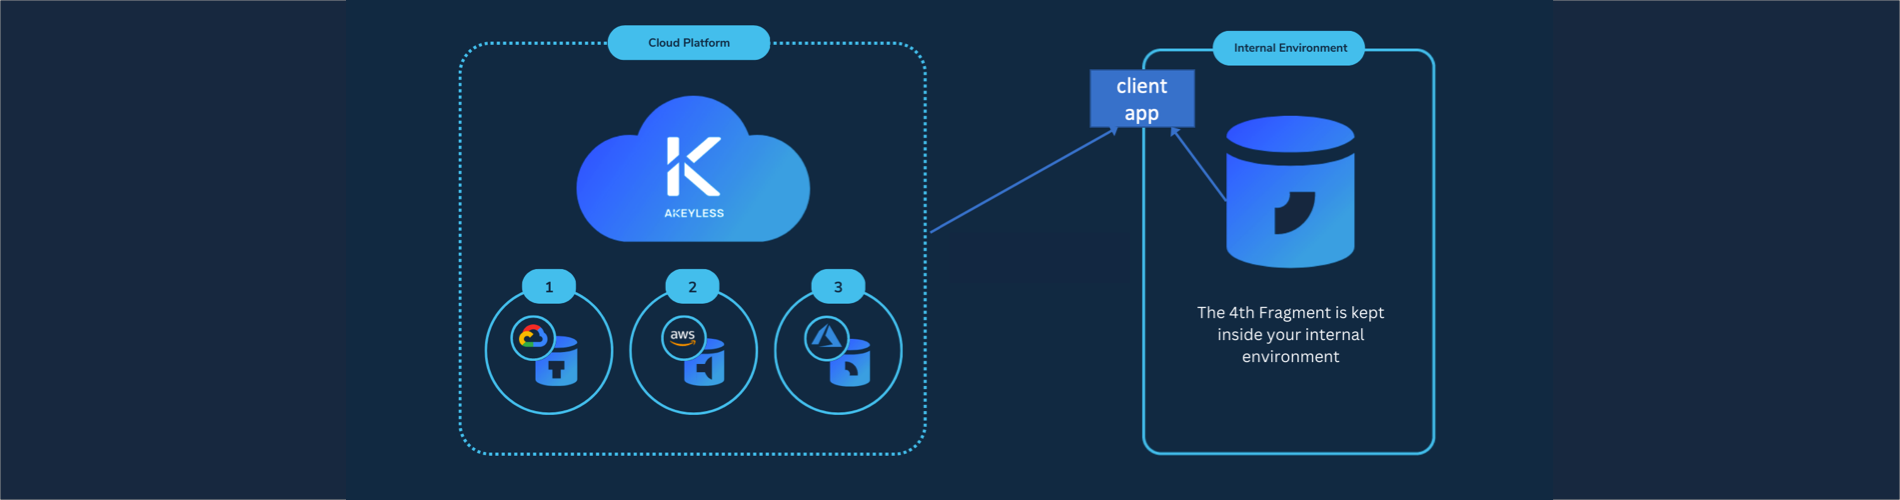
Additionally, as the illustration at the top shows, AKeyless provides a next-level “multi cloud” security mechanism by splitting of each secret into separate fragments that are distributed among multiple Availability Zones and Regions across multiple cloud platforms.
This makes for data residence sovereignty: for a customer located in the US, Akeyless replicates their keys in US regions. For those located in Germany, Akeyless replicates their data in regions within Germany.
At the right side of the diagram above, AKeyless keeps one of the fragments of each secret in an environment under its customer’s internal control. That’s the basis for “Keyless” in the company’s name. Even rogue employees within a cloud vendor CANNOT obtain access to customer secrets.
Paid users can use Akeyless’ secret sauce – the patented as Distributed Fragments Cryptography™ (DFC). Unlike Shamir’s secret hiding technique, DFC does not reassemble complete private keys. AKeyless calls it “Zero-Knowledge” because the Akeyless server does not know the secret.
PROTIP: All that enables DFC to provide a defense to the fast-approaching quantum supremacy that can quickly crack cryptographic keys. Unlike other secret-keeping services in the cloud that depend on the “strength” of cryptographic algorithms and key length to hide secrets, DFC takes a more secure route that structurally reduces the potential blast radius consequent to credentials being stolen from a party. The window for breach is reduced to the time between secret rotations, which AKeyless does automatically.
It’s FIPS 140-2 Level 2 compliant.
PROTIP: DFC is not a “quantum resistant” algorithm like Dilithium on AWS, Crystals-Kyber, FrodoKEM (Microsoft), lattice-based NTRU (N-th degree Truncated polynomial Ring Units), and others in the NIST Post-Quantum Cryptography project?
Mozilla and Fastly are developing OHTTP (Oblivious HTTP), a successor to HTTP that has been designed for priva‐cy. OHTTP separates information about the requestor from the request itself, so no single party ever has both pieces of information.
AKeyless websites
AKeyless posts videos on https://www.youtube.com/@Akeyless
https://www.linkedin.com/company/akeyless/
Akeyless has their server status and history for each service at: https://status.akeyless.io
The SLA (Service Level Agreement) for each level of pricing is at: https://www.akeyless.io/service-level-agreement with 99.9% availability. That translates to around 8.76 hours (one day) of unplanned downtime per year.
AKeyless is that it solves the “Secret Zero Problem” by using an “inherited identity derived from a parent SaaS system, together with an ephemeral token for “continuous” authentication”.
AKeyless Workflows
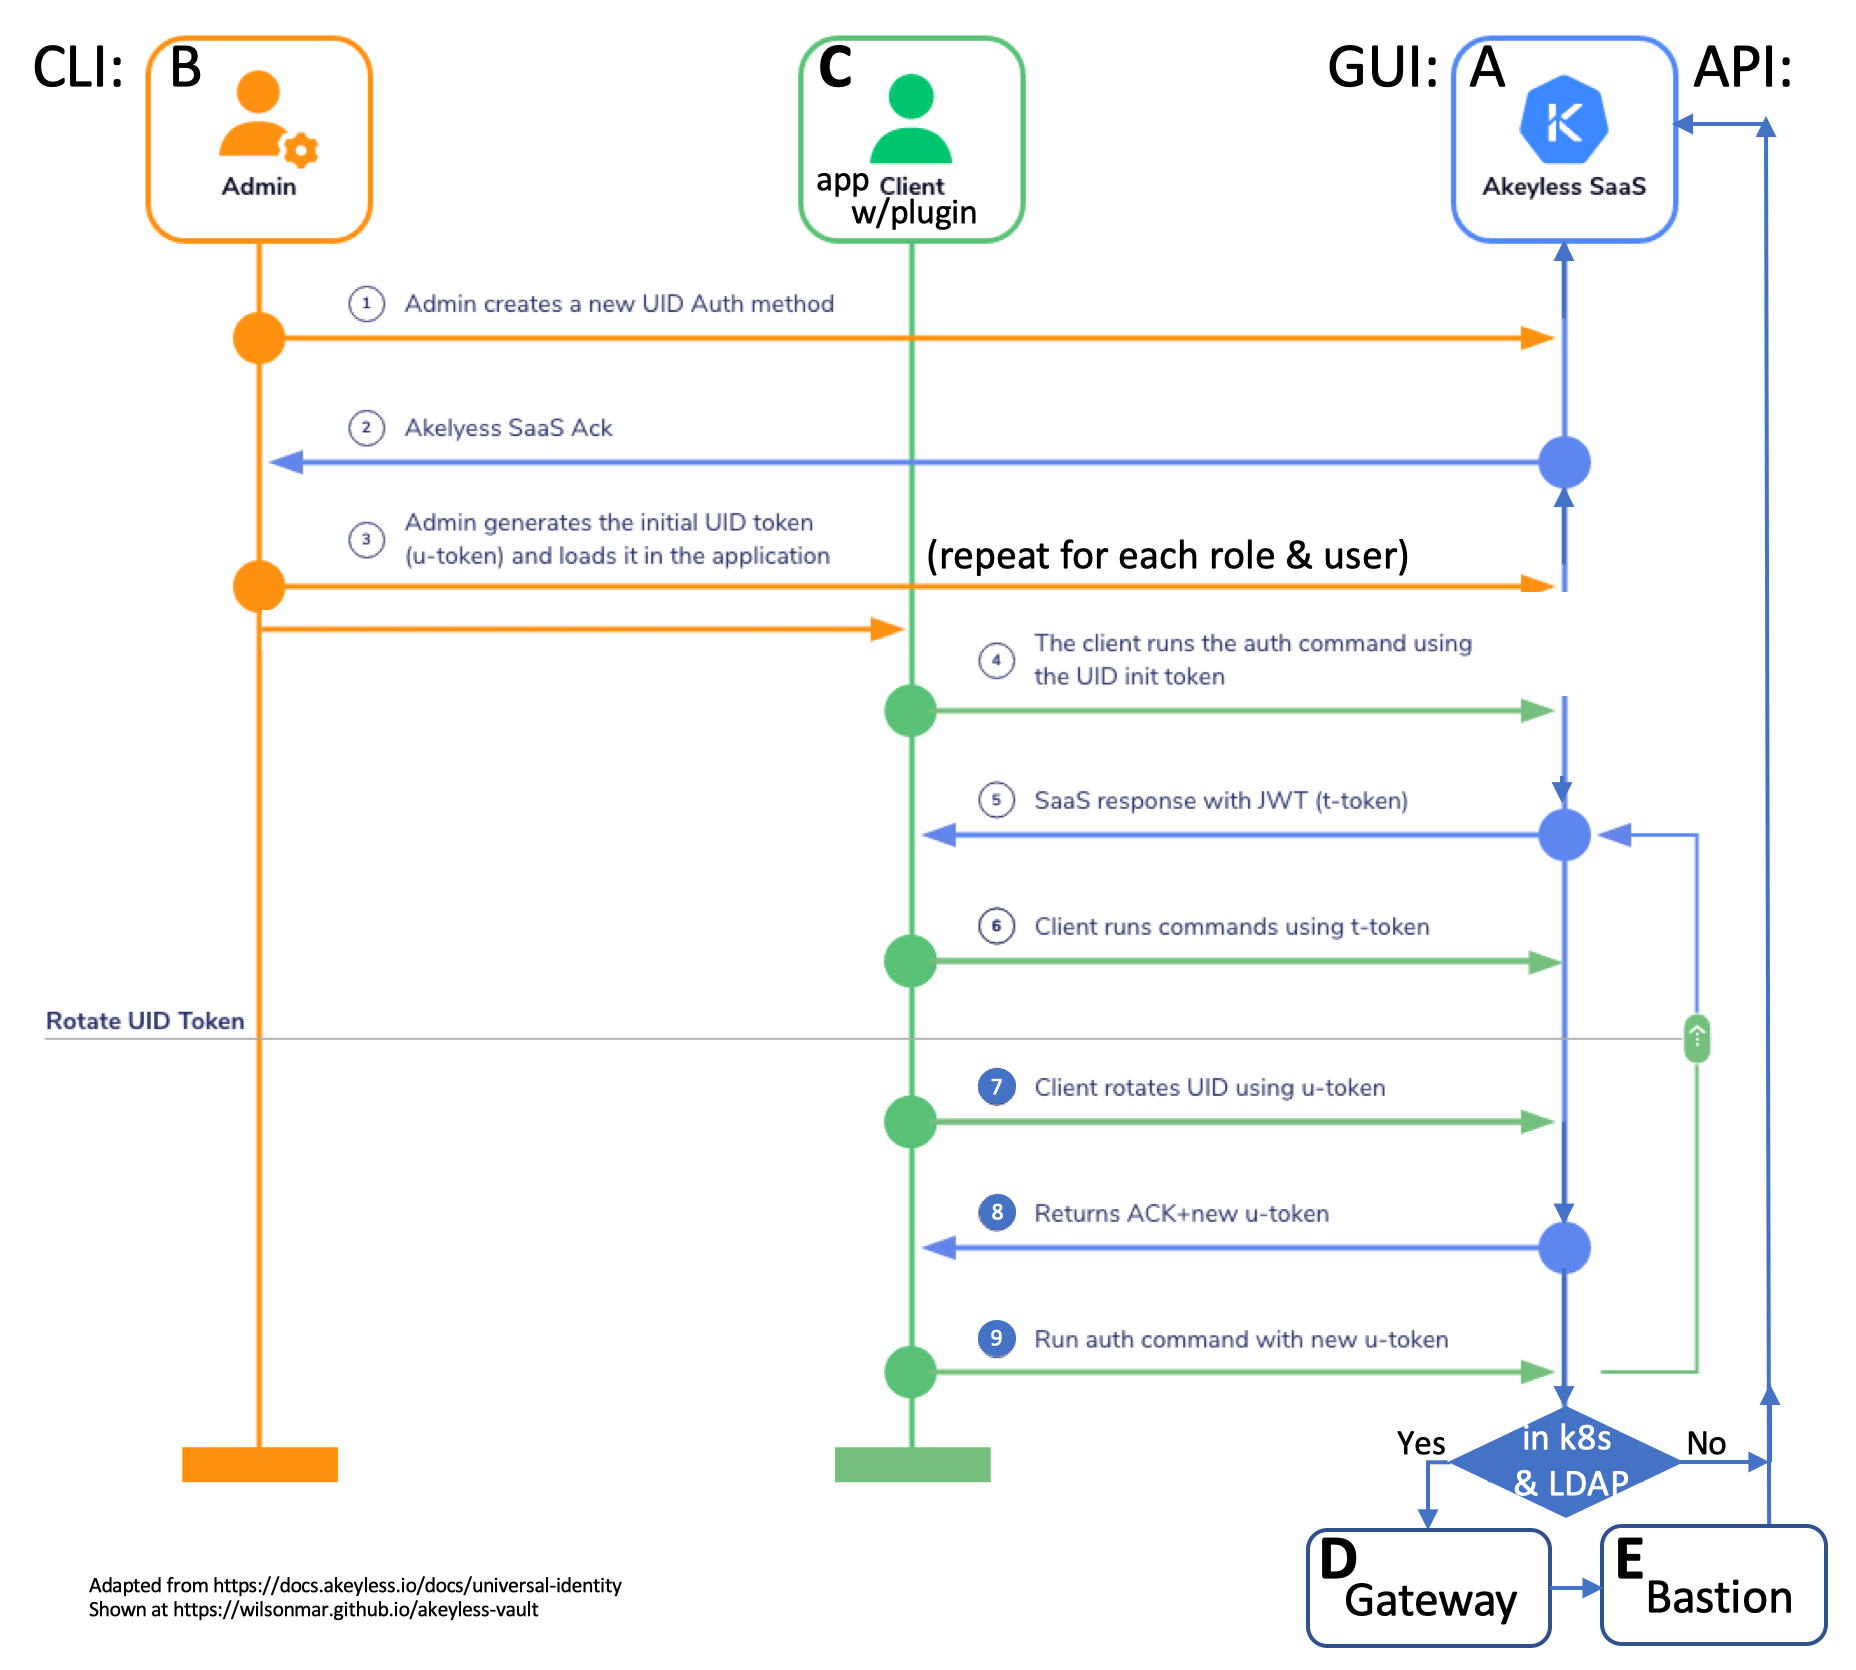
In the text below, we first use my automation and step-by-step manual instructions (with commentary) to set up components illustrated in this diagram: A, B, C, D, E, F, G.
 from this PowerPoint file
A. Akeyless SaaS Parent
A) Create and activate a Global Administrator account on the Akeyless SaaS Parent system website
-
Select an email to use for the Global Administrator, such as:
johndoe+akeyless1gadmin@supercorp.com
The first email address used to create the account is the Global Administrator, which has “god-like” power to change and delete anything, an account with too great a “blast radius” to use.
PROTIP: Even if you’re an individual developer, you will be using this for productive use on accounts that can run up a bill quickly. So create an email for use only to setup other accounts and pay bills as the Global Administrator.
PROTIP: Many enterprise environments create a service account email which is not associated with a human being, so that emails would go to multiple people. Emails to an individual would be ignored when that person is on vacation, etc.
PROTIP: Because it’s difficult to change later, mature enterprises plan out (in a spreadsheet) what account emails are used, along with what roles (with associated permissions) they have to specific locations (paths to secrets). For example, a different administrator would be responsible for secrets in the production environment than in pre-production (development, test, demo, training) environments. A different administrator is typically responsible for secrets in each sovereign geographical area (US, India, Germany, etc.).
Each Authentication Method object is associated with an Access Role that grants permission (including Create, Read, Update, Delete, List, and Deny) to this identity on Secrets, Targets, Roles, and Authentication Method objects stored inside the Akeyless SaaS solution.
PROTIP: My company has created examples, automation, and expert consultation to quickly establish all credentials, then train everyone. Contact me for details.
-
Store the Administrator’s email address as an environment variable AKEYLESS_ADMIN_EMAIL (accessible to Bash CLI scripts) by adding to the .bash_profile or .zshrc file in your user $HOME folder the email address accessing Akeyless:
export AKEYLESS_ADMIN_EMAIL="johndoe+akeyless1gadmin@supercorp.com"
This variable will be referenced in bash shell scripts below.
-
In a personal password safe such as 1Password, create a Login entry with the Administrator email and a password. The Chrome extension would enable you to login to the Parent SaaS system website without typing the password. Handy especially when you’re doing a demo.
-
Click the “Sign Up” link at the top of the Akeyless Parent SaaS system website: VIDEO:
-
Confirm the email address by clicking the link in the email sent to the Administrator’s email address.
Success is the menu appearing as shown on the right of this page:

Targets act as a connector between credentials and the items that need to utilize them, both saving time for the user and protecting your flows from credential breakage.
“Gateways” are the Akeyless machines (with IP addresses) that access the Targets.
Akeyless doesn’t require a credit card because it is free for the first 2,000 secrets forever, accessed by up to 5 clients. 3 days of log retention is also provided free.
The lock icon next to menu items highlight features requiring a paid Enterprise license, such as “Data Protection”. See the Pricing page at https://www.akeyless.io/pricing
Extended log retention and Log forwarding to a SIEM (Security Information and Event Management) system are also available for an additional fee.
-
Click menu item “Online Support”. Click the Slack log to register for their email: support@akeyless.io or Slack channel.
PROTIP: I’ve received instant replies at 7pm on a Sunday EST. Most of Akeyless are based in Israel. So they are 7 hours ahead of the US East Coast, 10 hours ahead of the US West Coast, and 2 hours ahead of the UK.
-
Use the Global Admin to create accounts and permissions to limit what yourself and others can do. Apply “Least Privilege” principles to limit the “blast radius” when credentials end up in the hands of someone malicious. this video about Role-Based Access Control (with API Key Authentication).
Each Authentication Method object is associated with an Access Role that grants permission (including Create, Read, Update, Delete, List, and Deny) to the identity on Secrets, Targets, Roles, and Authentication Method objects stored inside the Akeyless SaaS solution.
B. Akeyless Admin CLI
To install the Akeyless CLI for use by the Administrator on a Mac:
NOTE: I prefer to avoid the hassle of adding another folder in my .bash_profile or .zshrc file, from any folder (because Homebrew automatically figures out which folder to install the program into). That’s the approach by following the commands documented at:
https://docs.akeyless.io/docs/cli-reference
So, instead, install and use Homebrew to do the following:
-
In a Terminal session, on any folder, get information about the akeyless brew package in Homebrew:
brew info akeylesslabs/tap/akeyless
==> akeylesslabs/tap/akeyless: stable 1.90.0
Akeyless CLI
https://www.akeyless.io
Conflicts with:
  akeyless
Not installed
From: https://github.com/akeylesslabs/homebrew-tap/blob/HEAD/Formula/akeyless.rb
Note that the akeyless program is installed from github.
-
Switch to a browser to view Akeyless public GitHub repos at:
https://github.com/akeylesslabs/
NOTE: Code for the Akeyless server is NOT open source and not public on GitHub.com.
https://docs.akeyless.io/docs/github-actions-community-plugin describes how to retrieve static and dynamic secrets from Akeyless using GitHub Actions workflows at https://github.com/LanceMcCarthy/akeyless-action
CLI Install
-
Install the Akeyless CLI program from the internet onto your Mac:
brew install akeylesslabs/tap/akeyless
Brew automatically recognizes whether you have an Intel or Apple Silicon chip on your Mac and installs to the appropriate folder.
On an Intel (x86 AMD) chip:
cd /usr/local/bin
On an Apple Silicon (arm64 M1/M2/M3) chip:
cd /opt/homebrew/bin
-
Confirm where the program is installed:
ls `where akeyless`
lrwxr-xr-x@ 1 johndoe admin 38 Dec 29 21:06 /usr/local/bin/akeyless -> ../Cellar/akeyless/1.90.0/bin/akeyless
0B /usr/local/bin/akeyless
What is downloaded is not a folder but a binary executable program.
~/.akeyless folder
PROTIP: Unlike most others, during brew install Akeyless does not automatically create a configuration folder in the user’s $HOME folder. Instead, a .akeyless folder is created by the akeyless program itself in the folder where it is run. This enables the program to run from any folder, not just the user’s $HOME folder.
That install is done by the akeyless program itself, which creates a .akeyless folder in the folder where the akeyless program is run. This enables the program to run from any folder, not just the user’s $HOME folder.
CAUTION: Do on run .akeyless -v (version) until the akeyless folder is created.
-
Navigate to your user $HOME folder:
cd
-
Install the ~/.akeyless folder:
akeyless --init
AKEYLESS-CLI, first use detected
For more info please visit: https://docs.akeyless.io/docs/cli
Version: 1.92.0.4303fb1
The command creates several folders and files.
-
View the $HOME/.akeyless folder created by the above command:
ls -al ~/.akeyless
According to Linux conventions, the . in front of any folder name means that it is meant to be “hidden”.
drwx------@   2 johndoe  staff    64 Dec 31 02:00 .tmp_creds
-rw-r--r--@   1 johndoe  staff     7 Dec 31 01:40 cli-latest
-rw-r--r--@   1 johndoe  staff    40 Dec 29 21:07 settings
-
View the contents of cli-latest:
cat ~/.akeyless/cli-latest
shows the version of the CLI program:
1.92.0
The response is used in commands requiring the version of the CLI program without the GitHub SHA prefix identifying the build.
-
Verify CLI install success by getting the version:
akeyless -v
The version you see will likely be different than this:
Version: 1.92.0.4303fb1
The date and content of prior releases are listed at https://changelog.akeyless.io/cli
-
View the contents of settings:
cat ~/.akeyless/settings
contains:
dns="vault.akeyless.io"
protocol="https"%
-
Notice at this point there is no “profiles” folder.
(1) Create initial token
-
Create a starter token using the Auth ID method in the Akeyless server – by using the Akeyless Vault GUI
Setup GitHub OIDC IdP
This enables AKeyless to use your GitHub account login as an Identity Provider (IdP) to log into Akeyless GUI console website without presenting another password. Up to 2,000 requests per day are free.
-
Switch to a browser and go to your account at https://github.com/
- At the lower-left, click on a GitHub organization account you have admin. access to.
- Click the “Settings” tab, “Developer settings”, “OAuth Apps”.
- Click the green “Register an application” button.
- For Application name, “AKeyless”. See https://docs.akeyless.io/docs/github-oidc
- For Homepage URL, type “https://console.akeyless.io”
- For Authorization callback URL, type “https://auth.akeyless.io/oidc/callback”
- During training, don’t check “Enable Device Flow” which enforces MFA.
- Click the green “Register application” button.
- Highlight and copy the Client ID to a text file.
- Click “Generate a new client secret” button. Enter the Authentication code or password if prompted.
-
Click the icon to the right of the Client Secret value or Highlight and copy it. Paste it in a text file.
On AKeyless console
- Open to a new browser tab to log into the Akeyless SaaS Parent system website: https://console.akeyless.io/
-
Click “Users & Auth Methods” menu item on the left pane for the Authentication Methods menu.

- Click the icon named “OIDC”.
- For Name, enter “GitHub OIDC”.
-
Check box for “Require Sub Claim on role association”. Next.
Sub (Subject or registered) claim – the requester of JWT tokens created based on the JSON Web Tokens (JWT) open industry standard RFC 7519 method for representing claims securely between two parties. JWT.IO allows you to decode, verify and generate JWT.
- Click “Update application”.
- For Issuer URL, enter “https://github.com”.
- For Client ID, paste the Client ID copied from GitHub earlier.
- For Client Secret, paste the Client Secret copied from GitHub earlier.
-
For Unique Identifier, type “email” (a JWT subclaim). Finish.
- Click “Access Roles” menu item on the left pane.
- Click “(+) Associate” at the right for a pop-up.
- For Auth Method, select “/GitHub OIDC”.
- For Sub Claims, enter “email” and you email address used by GitHub (such as “johndoe+github@gmail.com”). Save.
- Click on Method “/GitHub OIDC”.
- Scroll down the right pane to click “Generate OIDC Bookmark URL” for a pop-up containing a URL.
-
Click the icon to the right of the URL to copy it to your invisible Clipboard.
WARNING: The URL contains an access_id token (to the “&”) which anyone can use like a password to log into your Akeyless account. So don’t share it with anyone.
- Close the pop-up.
- Save the URL as a Login item within 1Password.
- Log out of the Akeyless console.
- Login in within 1Password by clicking “Open and Fill” on the auth.akeyless URL.
- At the “Authorize AKeyless” pop-up, click the green “Authorize” button.
-
You should now but at URL https://console.akeyless.io/
-
Click your avatar picture at the top right to select “Show Sub Claims” for a pop-up list of items.

-
Hover over the pop-up and scroll down to the “email” key. The email address associated with your GitHub account should be displayed.
Set GitHub OIDC profile
- Click “Users & Auth Methods” menu item on the left pane.
- Click the icon to the right of the “GitHub OIDC” Access Id to copy it into your invisible Clipboard.
-
Paste the value in this environment variable within file mac-setup.env, such as:
AKEYLESS_ACCESS_ID="p-1234567890abcdef"
-
Switch to Terminal to view command actions:
akeyless -h
Read about each command at:
https://docs.akeyless.io/docs/cli-reference -
Construct the GitHub OIDC Access Id command from your Clipboard:
akeyless configure --access-id "${AKEYLESS_ACCESS_ID}" --access-type oidcResponse:
Profile default successfully configured
-
View the $HOME/.akeyless folder after the above command:
ls -al ~/.akeyless
According to Linux conventions, the . in front of any folder name means that it is meant to be “hidden”.
drwx------@   2 wilsonmar  staff    64 Jan 15 00:55 .tmp_creds
-rw-r--r--@   1 wilsonmar  staff     7 Jan 15 00:55 cli-latest
drwx------@   3 wilsonmar  staff    96 Jan 15 00:55 profiles
-rw-r--r--@   1 wilsonmar  staff    40 Jan 14 23:23 settings
QUESTION: What is the .tmp_creds folder for?
-
View the contents of profiles folder, file default.toml to shows the default profile formatted in TOML (Tom’s Obvious Minimal Language):
cat ~/.akeyless/profiles/default.toml
Contents:
["default"]
  access_id = 'p-12345678901234567890123='
  account_id = 'oidc'
This password is available to anyone who can access your laptop. So don’t use this method for production use.
PROTIP: If you want to avoid having static passwords on your laptop (which is the whole point of using Akeyless), use another type of authentication.
Login using GitHub OIDC
-
Display details of all items in JSON format (with text coloring added by piping to jp):
akeyless list-items | jq .
-
If you are not logged in, press Command+W to close the tab when you see a browser pop-up containing:
Authentication Succeeded
You may now close this tab and proceed
with your session…Press command+tab to switch back to Terminal.
Example response:
{
  "items": [
 {
   "item_name": "/MyFirstSecret",
   "item_id": 238833834,
   "display_id": "ytb1s0f989Tm-rvmpx5tfgafh",
   "item_type": "STATIC_SECRET",
   "item_sub_type": "generic",
   "item_metadata": "",
   "item_tags": null,
   "item_size": 0,
   "last_version": 1,
   "with_customer_fragment": false,
   "is_enabled": true,
   "public_value": "",
   "certificates": "",
   "protection_key_name": "",
   "cert_issuer_signer_key_name": "",
   "client_permissions": [
     "read",
     "list",
     "update",
     "delete",
     "create",
     "sra_transparently_connect",
     "sra_request_for_access",
     "sra_require_justification",
     "sra_approval_authority"
   ],
   "certificate_issue_details": {},
   "item_general_info": {
     "cert_issue_details": {},
     "dynamic_secret_producer_details": {},
     "rotated_secret_details": {},
     "classic_key_details": {},
     "secure_remote_access_details": {
       "use_internal_bastion": false
     },
     "static_secret_info": {}
   },
   "is_access_request_enabled": false,
   "access_request_status": "",
   "delete_protection": false,
   "creation_date": "2023-12-29T15:38:37Z",
   "modification_date": "2023-12-29T15:38:37Z",
   "gateway_details": null
 }
  ],
  "next_page": "eyJpIjoiL015Rmlyc3RTZWNyZXQifQ=="
}
The “next_page” value, a Base64-encoded string, provides a “blockchain” of items that can be used to ensure and verify the integrity of the list.
- TODO: To list just the Item Names using jp?
Other Auth Methods
See the Authentication Methods menu above.
akeyless create-auth-method-universal-identity --name uidAuth --ttl 60 --profile adminProfile
UID (Akeyless Universal Identity) tokens:
Akeyless’s Universal Identity (UID) authentication method is used by on-prem. machines.
NOTE: The starter token is only used once to authenticate to the Akeyless plugin.
C. Client app setup
Create secret from app
Create secret in CLI
-
Create a new secret
akeyless create-secret -n /folder/sec1 -v val
Response:
A new secret named /folder/sec1 was successfully created
Create DFC fragments in CLI
-
Create a new DFC key fragments
akeyless create-dfc-key -n /folder/sub-aes-key --alg AES256GCM
Encryption DFCKey Fragment #0 created successfully in 538ns milliseconds
Encryption DFCKey Fragment #1 created successfully in 539ns milliseconds
Encryption DFCKey Fragment #2 created successfully in 540ns milliseconds
=====================
A new AES256GCM DFC key named /folder/sub-aes-key was successfully created
(3) Admin generates initial u-token
-
The Administrator generates a new UID token and
loads it into the client app.(4) Client runs auth command using UID init token
-
The client runs Akeyless using the initial UID token.
https://docs.akeyless.io/docs/cli-reference
-
PROTIP: Retrieve secret key such that it’s not displayed in the log:
SECRET_VALUE=$( akeyless get-secret-value -n /folder/sec1 )
-
PROTIP: Retrieve DFC fragments such that it’s not displayed in the log:
DFC_SECRET=$( akeyless get-dfc-key -n /folder/sub-aes-key --alg AES256GCM )
(5) Client runs using t-token
-
The Akeyless server responds with a new JWT UID token.
(6) Use JWT token
-
The client runs app commands using the new JWT UID token.
???
(7) Client rotates UID using u-token
https://docs.akeyless.io/docs/create-an-ssh-rotated-secret
-
After the processing window passes, the client requests a rotation using the token.
REMEMBER: Rotation of secrets requires an enterprise license.
The client can request a new token at any time within the processing window. VIDEO:
akeyless create-secret --name MySecret1 --value MySecretPassword
The default processing window is 60 seconds.
(8) Returns ACK+new u-token
-
The Akeyless server returns a new key with u-token.
(9) Run auth with updated u-token
-
The client runs app commands using the updated JWT UID token.
Programming languages

Sample app code
TODO: Analyze code in these repos to see where secrets are used, and add use of Akeyless in the code.
This section lists code in several programming languages to retrieve static secrets externally (from the AKeyless SaaS cloud running across multiple clouds). In alphabetical order:
- Bash shell script: Azure Machine Learning CLI v2 Examples
- C#: Microsoft’s Code Samples
- Flutter: demonstrating the use of TCP sockets in Google Flutter
- Golang: Clean Architecture in Golang
- Java: port the original JPetStore-6 to Vaadin 8 and Spring Boot
- Kotlin (Android mobile): Stopwatch and JetCoMovie
- Node.js (JavaScript): Laravel-based app to book rooms and bookings
- PHP: 🔐An End-To-End Encrypted Diary Web App
- Python
- Ruby
- Rust: Rust Protobuf Example
- SwiftUI: declarative iOS & macOS (multi Apple platform) application “about my work and services” and AppCenterSwiftUI
x
Compilations:
Machines installed with Akeyless identify other machines in the network to ensure the data received is authentic. Akeyless uses its own plugin to allow the Vault and environment to interact in a secure fashion. Akeyless offers their “Universal Secrets Connector”. Akeyless removes the need for secret zero entirely through their package within their “Vaultless Platform”.
The process begins with a starter token created by a human employee that’s used once to authenticate the plugin. From there, Akeyless issues its own tokens and begins authenticating applications. That token is replaced by a new one in the next use for a specified amount of time.
Whenever a new entity is registered under this system, it inherits the identity and token of the original entity. This constant cycle of temporary, rotating identity tokens is a secure alternative to using a single secret zero.

Audit Logs, Analytics, and Usage Reports
https://docs.akeyless.io/docs/audit-logs
Kubernetes
Apps within Kubernetes use a Gateway to reach AKeyless SaaS. See https://docs.akeyless.io/docs/kubernetes-auth and https://docs.akeyless.io/docs/ldap
In Kubernetes environments, for client management and billing, Akeyless counts client entities conducted per namespace based on the secret profiles retrieved.
Akeyless Bastions
The best credentials are no credentials at all. So credentials (dynamic secrets, rotated secrets, and SSH certificates) are provided to customer apps Just In Time through a “bastion” server, a gateway to access encrypted resources from the Akeyless Secrets Store and decrypts it. There are several types of bastions.
- Akeyless Secure Remote Access (SRA) Bastion uses SSH with certificates.
- Web Access Bastion provides Secure Remote Access to any web application with session recording, including proxy service acting as an entry point to your internal web applications, where only after successful authentication users will get access, either via an isolated remote browser or directly to your target server based on your secret configuration.
VIDEO: Bastion configuration.
The SRA runs as a Kubernetes cluster setup using a Helm chart at:
https://akeylesslabs.github.io/helm-charts
BTW: On the right pane on GitHub, notice that there are many Contributors.
The repo uses the mustache languages to replace variables in YAML files.
PROTIP: GitHub incorrectly recognizes .tpl (template) file extensions as use of “Smarty” (an unrelated PHP package) rather than yaml. This PR has no functional impact because the error is in GitHub.
Uses kubernetes-auth.
Competitors
https://smallstep.com/blog/use-ssh-certificates/
https://infisical.com/
https://www.cyberark.com/products/privileged-account-security-solution/enterprise-password-vault
https://www.doppler.com/
https://www.hashicorp.com/products/vault
References
- BLOG by Jeremy Hess
KMIP - the OASIS-defined industry-standard Key Management Interoperability Protocol to secure transfer (delegation) of secrets among different systems.
https://www.akeyless.io/keyconf/ Recordings from Feb in San Francisco: https://www.akeyless.io/events/
https://techgptworld.com/top-5-secret-enterprise-management-platforms/
https://www.computer.org/publications/tech-news/trends/effective-secrets-management-best-practices
https://www.akeyless.io/integrations/?utm_content=278152991&utm_medium=social&utm_source=linkedin&hss_channel=lcp-33238033