

Get bits working in lightweight containers
![]()
![]()
![]()
![]()
![]()
![]()
![]()
![]()
![]()
![]()
![]()
![]()
![]()
Overview
This is among several articles about Docker:
- Docker glossary, ecosystem, certification
- Docker setup
- Docker is managed by Kubernetes
- Docker is fundamental to Istio Service Mesh
- Windows on Apple macOS
The objective of this tutorial is a succinct yet deep step-by-step instructions to setup of Docker on MacOS, CentOS Linux, and Windows.
- Docker glossary, ecosystem, certification
- Docker setup
- Docker is managed by Kubernetes
- Docker is fundamental to Istio Service Mesh
- Windows on Apple macOS
VMs on MacOS vs. Docker
This is a more complex diagram than others so that interrelationships can be illustrated. TODO: Video to gradually reveal this.

Click this for a pop-up containing a larger sized image.
Prior to Docker, a developer working on a Mac Pro can, in addition to native apps for Mac, also run Microsoft Visual Studio for Windows in a full install of Windows 10 by running them within a VMware Fusion or Vagrant hypervisor that manages Virtual Memory instances. See https://www.upguard.com/articles/docker-vs-vagrant
Each additional VM (virtual machine) instance would take several more Gigabytes of disk space and memory because operating system files are duplicated inside each VM instance.
By contrast, Docker’s containers take a more lightweight approach. Docker aims to cleanly separate applications that need the same shared operating system read-only files.
Docker for Mac
The Docker for Mac installer is downloaded from Docker’s website. It makes use of hypervisor software that doesn’t need Oracle’s Virtualbox previously needed.
Docker for Mac makes use of a Hyperkit hypervisor which runs Docker images such as NGINX.
Later Macs have Intel’s hardware support for MMU (memory management unit) EPT (Extended Page Tables) virtualization.
Docker images are obtained from Docker Hub on-line or a more private and trusted image repository. Many images are visible searches within Docker Hub.
That same container image can run on another platform unchanged, typically a GNU/Linux kernel such as Debian running on a commodity server within AWS EC2 cloud. Docker is designed with cloud computing providers in mind.
The Docker Engine takes care of loading images and running them. It is installed from the package manager over the internet.
Docker is lighter weight because it provides the read-only portion of a Linux operating system to be shared among several images. Each image has its own bin and lib folders.
Docker is also lightweight and thus more scalable because each image intends to run and watch one single process. SSH ports are not opened into images.
A data volume outside the image is referenced to read private keys.
Additional data volumes (such as InfluxDB) are shared for logging with an additional image. It receives stats collected by the cAdvisor image (from Google) and structures data for display in a Grafana dashboard.
Images that go into container repositories are created by a build command in Docker for Mac and Windows. The build is based on source code for an app in GitHub having a Dockerfile and .dockerignore file.
Docker for Mac was released in 2016 as a native app that keeps itself updated, so no Homebrew for it as with previous versions. This new version makes use of 64-bit processor in a 2010 or newer Mac, which has Intel’s hardware support for virtualization. The operating system is MacOS Yosemite version 10.10 or newer, such as El Capitan 10.11 or Sierra 10.12.
Docker for Mac uses underlying software not in prior versions, so NO obsoleted docker-machine commands that load and manage images depend on the installation of Virtualbox by the deprecated Docker Toolbox.
Recap
Click this for a pop-up containing a larger sized image.
To recap, Docker containers are created using docker images, built by parsing a Dockerfile containing Docker commands.
“By using containers, resources can be isolated, services restricted, and processes provisioned to have a private view of the operating system with their own process ID space, file system structure, and network interfaces. Multiple containers can share the same kernel, but each container can be constrained to only use a defined amount of resources such as CPU, memory and I/O.” – Wikipedia
Each container runs as an isolated process on a shared kernel. The isolation mechanisms that keeps resources (CPU, memory, filesystem, network, etc.) of each process isolated from others is a Linux kernel feature CGroups (abbreviated from “Control Groups”) developed within Google.
During PyCon on Friday, March 15, 2013. Solomon Hykes, the founder of Docker, gave a lightning talk on “The future of Linux Containers, delivered”.
Alternatives to Docker
-
CoreOS developed appc with a rkt (pronounced “rocket”) implementation in their Open Containers Initiative (OCI). The runC OS for spawning and running containers is built using Go v1.6+. CoreOS offers a Container Linux distribution, an upstream variant of Red Hat Enterprise Linux from projectatomic.io Atomic Host collection of distributions.
open-source LinuxKit originated from Docker, inc. as a tool for building minimal custom operating systems, to host the Docker platform.
-
Over the years, Kelsey Hightower - has updated his Kubernetes the hard way to use (instead of Docker) CRI-O, containerd, and gvisor. Other options include clearcontainers and katacontainers.
-
Red Hat created quay.io container registry to compete with DockerHub. But the “other shoe has dropped” when RHEL Enterprise Linux 8 Beta introduces a new Container Tools module which consists of the podman-docker.noarch package to emulate Docker CLI. Other bits include Buildah to build OCI images and Skopeo to copy images.
Linux installer boots
PROTIP: Docker was initially developed to run under different flavors of GNU/Linux (not FreeBSD nor Windows):
- Ubuntu
- CentOS
- BSDLinux
- Debian

Different operating systems use different file-system software for union-mount. For example, Debian uses bootfs. Wikipedia notes aufs (Advanced multi-layered Unification File System) was rejected for merging into mainline Linux. Its code was criticized for being “dense, unreadable, and uncommented”. Instead, OverlayFS was merged into the Linux kernel.
btrfs (B-tree File System) is intended to address the lack of pooling, snapshots, checksums, and integral multi-device spanning in Linux file systems.
Docker Engine-Community only target Docker for AWS and Docker for Azure. Docker Enterprise uses Docker certified infrastructure tooling, using Terraform and Ansible to target VMware, Azure, and AWS implementations.
Setup Shell Script
The contribution of this article is a shell script that automates the install of Docker and other stuff on macOS:
-
https://github.com/wilsonmar/mac-setup/blob/master/mac-setup.zsh/a>
</ul>
Techniques used in the Bash shell script are described in my bash coding tutorial.
1. The script does the following if "-k" is specified when calling the script:
if [ "${USE_DOCKER}" = true ]; then # -k
1. It senses if the Docker executable is available. If not, it installs it.
if ! command -v docker ; then
            brew install docker
1. It senses if the Docker app is running. If not, it invokes it:
# on mac: open "$HOME/Applications/Docker.app"
    # On Linux:
       sudo systemctl start docker
       sudo service docker start
1. There is a "Remove_Dangling_Docker function.
Separate scripts to run specific apps contain these additional steps.
There is a run-time parameter for each step below:
1. Code (for CONSUL, EGPLANT, etc.) is run when USE_DOCKER is true:
1. Docker images are created from Dockerfiles if specified.
1. Docker images are pulled from DockerHub or Jira Artifactory.
1. List of Docker images and processes are listed.
docker image ls -digests1. Apps in Docker containers are invoked if parameter is specified. 1. Metrics from run is displayed if parameter is specified. 1. Docker containers are stopped if parameter is specified. 1. Docker app is stopped if parameter is specified.
### GPG SecureApt Some scripts, especially those to install unvetted packages, public key it associates with the cryptographic signature it generates for each file so that you can verify whether files have been tampered with or bits lost during transit. Use of GPG (GNU Privacy Guard) or PGP (Pretty Good Privacy) is stronger than MD5 hashes. With Ansible, see this. 1. Download Docker's signature into your Debian local key vault:
# Add Docker's public GPG key :
curl -fsSL https://download.docker.com/linux/ubuntu/gpg | sudo apt-key add -
    # OK is the expected response.
The script captures the fingerprint in the response.
2. To verify the key downloaded, search for the last 8 characters of the signature's fingerprint (such as "0EBFCD88" below) to ensure it's same as what the publisher generated:
sudo apt-key fingerprint 0EBFCD883. Add the stable repository:
sudo add-apt-repository "deb [arch=amd64] https://download.docker.com/linux/ubuntu $(lsb_release -cs) stable"4. Update the apt package index again according to official site.
sudo apt-get update5. Install the latest version of Docker CE
sudo apt-get install docker-ceIf a packager does not offer one, skip validation of the signature by specifying RedHat’s yum has --nogpgcheck or Debian’s dpkg --no-debsig. Alternately, edit GPGCHECK=1 to 0. rpm (for MySQL) 6. We can check the version of the Docker:
sudo docker -v7. Run the hello world image to see whether it is installed successfully:
sudo docker run hello-worldThe response should be "Hello from Docker!". https://docs.docker.com/install/linux/docker-ce/ubuntu/ ## Install Docker on MacOS # PROTIP: Docker for Mac is a Mac native application, not a virtual machine running in VirtualBox. It uses the Mac's native virtualization system, Hypervisor, which is faster than VirtualBox. Before Docker for Mac, Docker Toolbox was used. Docker Toolbox is now deprecated. PROTIP: The version of Linux that comes with Mac (based on Debian) isn't completely compatible with Linux. So an extra layer was needed to emulate a Docker host. That’s Boot2Docker, which is a lightweight Linux distribution made specifically to run Docker containers. Boot2Docker is now deprecated: https://github.com/boot2docker/boot2docker 0. If you've previously installed Boot2Docker or Docker for Mac, uninstall it by deleting it within your Applications folder. https://docs.docker.com/docker-for-mac is the official docs. Versions of Mac before Yosemite would need to use the now deprecated Docker Toolbox, which is no longer used. It depended on Virtualbox. If Virtualbox version 5.1.2 is installed, it can be left installed. Docs here says VirtualBox prior to version 4.3.30 must NOT be installed (it is incompatible with Docker for Mac). Alternately, if you have are still running OS X 10.8 Mountain Lion or earlier, install https://www.docker.com/products/docker-toolbox 0. In Finder, within Applications, remove the Docker app and Docker folder. 0. Install the Stable version of Homebrew:
brew install --cask docker && docker psIf one was already installed, it is replaced:
 ==> Downloading https://download.docker.com/mac/stable/19611/Docker.dmg
==> Verifying checksum for Cask docker
==> Installing Cask docker
==> Moving App 'Docker.app' to '/Users/wilsonmar/Applications/Docker.app'.
🍺  docker was successfully installed!
Cannot connect to the Docker daemon at unix:///var/run/docker.sock. Is the docker daemon running?
Skip to Open Docker client app later in this doc. Alternately: ### Manual Docker for Mac Docker for Mac was added 2016 for installing Docker on macOS It uses the HyperKit VM ("xhyve", pronounced "x-hive") to virtualize the Docker Engine environment. That technology requires OS X 10.10.3 Yosemite or newer. Go to the page where you download the "Docker Community Edition (CE) Desktop for Mac" at:
https://store.docker.com/editions/community/docker-ce-desktop-mac 0. Scroll down to "Get Docker CE for Mac (stable)". 0. Click "Get Docker for Mac" to download Docker.dmg to your Downloads folder. 0. In the browser or Finder, navigate to you Download folder to double-click the Docker.dmg file 0. PROTIP: Change the file name if you're keeping back versions. | Date of file | Version | Download | Unzipped | | -----------: | ----------------- | -------: | -------: | | Oct 17, 2017 | Docker.dmg | 133.6 MB | 129.9 MB | | Aug 27, 2017 | Docker.dmg | 129.9 MB | 129.9 MB | | Oct 17, 2016 | Docker.dmg | 111.0 MB | 208.1 MB | | July 19, 2016 | Docker.dmg | 114.0 MB | 225.1 MB | | July 19, 2016 | Docker.dmg | 107.0 MB | 225.1 MB | | June 17, 2016 | 1.12.0-rc2-beta16 | 113.5 MB | 224.1 MB | 0. If you prefer, navigate in Finder to your Downloads folder to find the Docker.dmg file. 0. Double-click on Docker.dmg to open it. 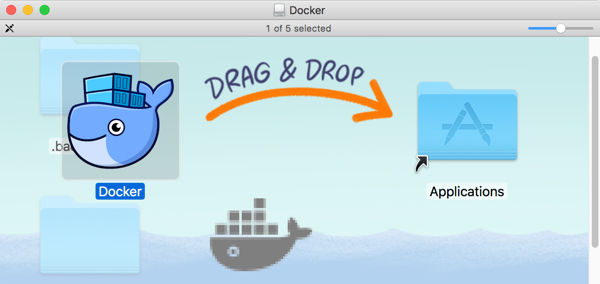 0. In the pop-up, drag and drop the "Docker.app" whale onto the Applications folder. 0. Click Replace the previous version with the new one, if applicable. 0. If the "Docker needs privileged access" pop-up appears, click OK and type it in, then dismiss the pop-up. 0. Click outside the drop-down to dismiss it. ### Clean up the installer 0. Exit the "Drag and Drop" pop-up. 0. Delete the Docker.dmg file within Finder (to reclaim disk space). 0. In the Applications folder, under the Devices section on the left, press the eject icon to the right of Docker. ### Open Docker client app 0. In the Applications folder, click on the Docker.app. PROTIP: The Docker command line stores its configuration files in a hidden directory .docker within your $HOME directory (cd ~). 0. Click "Open" if the pop-up appears. 0. Click "Next" at the "Welcome to Docker for Mac!". 0. Click "OK" to the "Docker needs privileged access" pop-up. 0. Provide your password when asked. 0. Click the whale icon at the top of your Mac for this menu:  0. PROTIP: If you are not a frequent user, click Preferences (or press command + comma) to un-check "Automatically start Docker when you log in" to avoid using up memory. 0. Skip to verify Docker install below. ### Previously VIDEO Obsolete instructions to install using Homebrew cask: Linux kernel-specific features for the Docker daemon. Alternately, Docker 0.8 or newer can be run on Macs thanks to a specially developed, lightweight VirtualBox VM. To start this, use the "quickstart terminal" which fires up Virtualbox. ## Install Docker on Windows 10+ # My recommendation is to install using Chocolately so you don't have to click through the https://docs.docker.com/docker-for-windows official installer.
choco install docker-desktophttps://community.chocolatey.org/packages/docker-desktop ### Install in Amazon EC2 clouds # Native Windows images have been running within AWS EC2 clouds. But since Docker images containing Windows OS can run on other machines (such as MacOS and Linux), their use would reduce testing and admin. effort. The marketing page about run Windows within AWS EC2 is
https://docs.docker.com/machine/examples/aws/ 1. Create an Amazon user account (after using IAM to create it using an Admin account used for billing). 0. Login to the Console at
https://console.aws.amazon.com/console/home Using the Amazone CLI: 0. Create `~/.aws/credentials` file based on keys copied during user creation in AWS IAM, such as:
   [default]
   aws_access_key_id = AKID1234567890
   aws_secret_access_key = MY-SECRET-KEY
This is so you don't need to specify the keys in the command line:
`--amazonec2-access-key AKI******* --amazonec2-secret-key 8T93C*******` 0. In AWS, create an EC2 instance named "aws-sandbox"
   docker-machine create --driver amazonec2 --amazonec2-region us-west-1 aws-sandbox
    --volumes-from ?
"amazonec2" is the driver name for Amazon EC2. Alternatives are "digitalocean" (with `--digitalocean-access-token=`) and
"azure" (with `--azure-subscription-id`). `--volumes-from` is how data volumes are associated (for sharing). * ### Install local Windows 10/11 # CAUTION: A 64-bit Windows machine is necessary to run Docker. Not 32-bit. 1. Enable Microsoft Hyper-V necessary to run Docker for Windows. CAUTION: This renders ususable Oracle Virtual Box VMs running Docker Toolbox. 2. Upgrade Windows 10 to at least the "Anniversary Update" 1607 (KB3194798) released October 11, 2016 or more recent. See the video. In Settings > Updates & Security > Windows Update > Update & Security > Check for Updates > Update. ### Chocolatey 3. The easiest approach is to use Docker on Chocolately.org
choco install -y dockerIgnore the installer "docker-machine". It's for an older version of Docker. 0. Skip to verify Docker install. ### Manual install 1. Alternately, at https://docs.docker.com/docker-for-windows,
Click "Get Docker for Windows (stable)" (not the more volatile Beta). 0. This downloads InstallDocker.msi (105 MB), typically to your account's Downloads folder. 0. Right-click file InstallDocker.msi to run (not just Save) the installer as Administrator. 0. Follow the install wizard to accept the license, authorize the installer, and proceed with the install. 0. Authorize Docker.app with your system password when prompted, since privileged access is needed to install networking components, links to the Docker apps, and manage the Hyper-V VMs. 0. Click Finish on the setup complete dialog to launch Docker. Modules are installed. 0. Skip to verify Docker install. ### Default folders The default NGINX configuration root directory * `/usr/share/nginx/html` is the root directory * `/etc/nginx` contains configuration files
To remap configuration files to a different location, specify that first:
-v /var/nginx/conf:/etc/nginx:ro## Alpine Linux # Within Docker for Mac, the Docker engine runs in an Alpine Linux distribution on top of a Mac xhyve (pronounced "x-hive") Virtual Machine. Alpine comes with Docker for Mac, but for additional information, see: https://alpinelinux.org | File Date | Download | Type | Size MB | | ---------- | ----------------: | ----- | -------: | | 2016-09-28 | alpine-virt-3.4.4-x86_64.iso | Virtual | 39 MB | | 2016-09-28 | alpine-3.4.4-x86_64.iso | Standard | 85 MB | | 2016-09-28 | alpine-extended-3.4.4-x86_64.iso | Extended | 311 MB | BTW, The Alpine Linux distribution (distro) is so small that there is an edition of it for the Raspberry Pi. ## Install Docker in CentOS # There are two methods for installing Docker on CentOS 7: 1. Installing Docker on an existing installation of the operating system. 2. Spin up a server with Docker Machine which auto-installs Docker. NOTE: Docker Cloud supercedes Docker Machine. See https://docs.docker.com/machine/reference/ls/ The Docker installation package available in the official CentOS 7 repository may not be the latest version. To get the latest and greatest version, install Docker from the official Docker repository. 0. First, update the package database:
sudo yum check-updateThe response:
Failed to set locale, defaulting to C
Loaded plug-ins: fastestmirror
Loading mirror speeds from cached hostfile
 * base: mirror.n5tech.com
 * extras: mirror.pac-12.org
 * updates: mirror.math.princeton.edu
0. Add the official Docker repository, download the latest version of Docker, and install it:
curl -fsSL https://get.docker.com/ | shThe response:
+ sh -c 'sleep 3; yum -y -q install docker-engine'
Failed to set locale, defaulting to C
warning: /var/cache/yum/x86_64/7/docker-main-repo/packages/docker-engine-selinux-1.11.2-1.el7.centos.noarch.rpm: Header V4 RSA/SHA512 Signature, key ID 2c52609d: NOKEY
Public key for docker-engine-selinux-1.11.2-1.el7.centos.noarch.rpm is not installed
Importing GPG key 0x2C52609D:
 Userid     : "Docker Release Tool (releasedocker) <docker@docker.com>"
 Fingerprint: 5811 8e89 f3a9 1289 7c07 0adb f762 2157 2c52 609d
 From       : https://yum.dockerproject.org/gpg
setsebool:  SELinux is disabled.
libsemanage.semanage_exec_prog: Child process /sbin/setfiles did not exit cleanly.
libsemanage.semanage_install_active: setfiles returned error code -1.
libsemanage.semanage_exec_prog: Child process /sbin/setfiles did not exit cleanly.
libsemanage.semanage_install_active: setfiles returned error code -1.
/usr/sbin/semodule:  Failed!

If you would like to use Docker as a non-root user, you should now consider
adding your user to the "docker" group with something like:

  sudo usermod -aG docker your-user

Remember that you will have to log out and back in for this to take effect!
0. With installation complete, start the Docker daemon:
sudo systemctl start dockerNo response is returned. NOTE: By default, docker commands require root privileges. So commands need to be prefixed with Linux sudo. 0. Verify it's running:
sudo systemctl status docker -lThe response: The output should be similar to the following, showing that the service is active and running:
● docker.service - Docker Application Container Engine
   Loaded: loaded (/usr/lib/systemd/system/docker.service; disabled; vendor preset: disabled)
   Active: active (running) since Wed 2016-07-27 22:37:40 UTC; 1min 10s ago
     Docs: https://docs.docker.com
 Main PID: 3158 (docker)
   Memory: 16.3M
   CGroup: /system.slice/docker.service
           ├─3158 /usr/bin/docker daemon -H fd://
           └─3161 docker-containerd -l /var/run/docker/libcontainerd/docker-containerd.sock --runtime docker-runc --start-timeout 2m

Jul 27 22:37:40 centos-512mb-sfo2-01 docker[3158]: time="2016-07-27T22:37:40.656780521Z" level=warning msg="Running modprobe bridge br_netfilter failed with message: modprobe: WARNING: Module br_netfilter not found.\ninsmod /lib/modules/3.10.0-327.22.2.el7.x86_64/kernel/net/llc/llc.ko \ninsmod /lib/modules/3.10.0-327.22.2.el7.x86_64/kernel/net/802/stp.ko \ninsmod /lib/modules/3.10.0-327.22.2.el7.x86_64/kernel/net/bridge/bridge.ko \n, error: exit status 1"
Jul 27 22:37:40 centos-512mb-sfo2-01 docker[3158]: time="2016-07-27T22:37:40.673905283Z" level=info msg="Firewalld running: false"
Jul 27 22:37:40 centos-512mb-sfo2-01 docker[3158]: time="2016-07-27T22:37:40.749552123Z" level=info msg="Default bridge (docker0) is assigned with an IP address 172.17.0.0/16. Daemon option --bip can be used to set a preferred IP address"
Jul 27 22:37:40 centos-512mb-sfo2-01 docker[3158]: time="2016-07-27T22:37:40.812028054Z" level=warning msg="mountpoint for pids not found"
Jul 27 22:37:40 centos-512mb-sfo2-01 docker[3158]: time="2016-07-27T22:37:40.812680271Z" level=info msg="Loading containers: start."
Jul 27 22:37:40 centos-512mb-sfo2-01 docker[3158]: time="2016-07-27T22:37:40.812815226Z" level=info msg="Loading containers: done."
Jul 27 22:37:40 centos-512mb-sfo2-01 docker[3158]: time="2016-07-27T22:37:40.812841211Z" level=info msg="Daemon has completed initialization"
Jul 27 22:37:40 centos-512mb-sfo2-01 docker[3158]: time="2016-07-27T22:37:40.812872955Z" level=info msg="Docker daemon" commit=b9f10c9 graphdriver=devicemapper version=1.11.2
Jul 27 22:37:40 centos-512mb-sfo2-01 docker[3158]: time="2016-07-27T22:37:40.850984219Z" level=info msg="API listen on /var/run/docker.sock"
Jul 27 22:37:40 centos-512mb-sfo2-01 systemd[1]: Started Docker Application Container Engine.
0. Configure to git it to start at every server reboot:
sudo systemctl enable dockerNOTE: This only needs to be done once per instance. The response: Created symlink from /etc/systemd/system/multi-user.target.wants/docker.service to /usr/lib/systemd/system/docker.service. 0. Skip to verify Docker install.
### Install Docker on Windows 10 1. Upgrade your Windows 10 to the Anniversary Edition update or later. 0. Download "Docker for Windows" https://www.docker.com/docker-windows NOTE: Do not download the Beta (as of September 2016) https://download.docker.com/win/beta/InstallDocker.msi as mentioned in https://stefanscherer.github.io/run-linux-and-windows-containers-on-windows-10/ and https://blog.docker.com/2016/09/build-your-first-docker-windows-server-container/ 0. https://docs.docker.com/docker-for-windows/ 0. Skip to verify Docker install below. 1. Spin up a standard AWS Linux 2 EC2 instance. 1. Login the instance and run:
   sudo yum update -y
   sudo amazon-linux-extras install docker
   sudo service docker start
1. Add the ec2-user to the docker group so you can execute Docker commands without using sudo:
sudo usermod -a -G docker ec2-user1. Log out and log back into your EC2 instance so ec2-user can assume the new permissions. 1. Verify the ec2-user can run Docker commands without sudo:
docker info1. Skip to verify Docker install below.
## After install, Menu, Verify # These instructions apply to Docker running within all operating systems. 1. Open a Terminal shell window. After Docker installation, the same Docker commands are applicable on all operating systems: PROTIP: Some Docker commands work without the Docker daemon running. 0. List all docker command options:
dockerThe response:
Usage:   docker COMMAND

A self-sufficient runtime for containers

Options:

  --config=~/.docker              Location of client config files
  -D, --debug                     Enable debug mode
  -H, --host=[]                   Daemon socket(s) to connect to
  -h, --help                      Print usage
  -l, --log-level=info            Set the logging level
  --tls                           Use TLS; implied by --tlsverify
  --tlscacert=~/.docker/ca.pem    Trust certs signed only by this CA
  --tlscert=~/.docker/cert.pem    Path to TLS certificate file
  --tlskey=~/.docker/key.pem      Path to TLS key file
  --tlsverify                     Use TLS and verify the remote
  -v, --version                   Print version information and quit

Commands:
    attach    Attach to a running container
    build     Build an image from a Dockerfile
    commit    Create a new image from a container's changes
    cp        Copy files/folders between a container and the local filesystem
    create    Create a new container
    deploy    Create and update a stack from a Distributed Application Bundle (DAB)
    diff      Inspect changes on a container's filesystem
    events    Get real time events from the server
    exec      Run a command in a running container
    export    Export a container's filesystem as a tar archive
    history   Show the history of an image
    images    List images
    import    Import the contents from a tarball to create a filesystem image
    info      Display system-wide information
    inspect   Return low-level information on a container, image or task
    kill      Kill one or more running container
    load      Load an image from a tar archive or STDIN
    login     Log in to a Docker registry.
    logout    Log out from a Docker registry.
    logs      Fetch the logs of a container
    network   Manage Docker networks
    node      Manage Docker Swarm nodes
    pause     Pause all processes within one or more containers
    plugin    Manage Docker plugins
    port      List port mappings or a specific mapping for the container
    ps        List containers
    pull      Pull an image or a repository from a registry
    push      Push an image or a repository to a registry
    rename    Rename a container
    restart   Restart a container
    rm        Remove one or more containers
    rmi       Remove one or more images
    run       Run a command in a new container
    save      Save one or more images to a tar archive (streamed to STDOUT by default)
    search    Search the Docker Hub for images
    service   Manage Docker services
    stack     Manage Docker stacks
    start     Start one or more stopped containers
    stats     Display a live stream of container(s) resource usage statistics
    stop      Stop one or more running containers
    swarm     Manage Docker Swarm
    tag       Tag an image into a repository
    top       Display the running processes of a container
    unpause   Unpause all processes within one or more containers
    update    Update configuration of one or more containers
    version   Show the Docker version information
    volume    Manage Docker volumes
    wait      Block until a container stops, then print its exit code

Run 'docker COMMAND --help' for more information on a command.
0. Get Docker version property using either the short or long form of parameter:
docker \-\-versionThe response:
Docker version 17.09.0-ce, build afdb6d4The "experimental" in previous versions has been removed. 0. Obtain the version number using a sub-command:
docker versionSample response on the Mac:
Client:
 Version:      17.09.0-ce
 API version:  1.32
 Go version:   go1.8.3
 Git commit:   afdb6d4
 Built:        Tue Sep 26 22:40:09 2017
 OS/Arch:      darwin/amd64

Server:
 Version:      17.09.0-ce
 API version:  1.32 (minimum version 1.12)
 Go version:   go1.8.3
 Git commit:   afdb6d4
 Built:        Tue Sep 26 22:45:38 2017
 OS/Arch:      linux/amd64
 Experimental: true
Sample response on Centos:
Client:
 Version:      1.11.2
 API version:  1.23
 Go version:   go1.5.4
 Git commit:   b9f10c9
 Built:        Wed Jun  1 21:23:11 2016
 OS/Arch:      linux/amd64

Server:
 Version:      1.11.2
 API version:  1.23
 Go version:   go1.5.4
 Git commit:   b9f10c9
 Built:        Wed Jun  1 21:23:11 2016
 OS/Arch:      linux/amd64
Sample response on Windows:
   Client:
   Version:      1.12.0
   API version:  1.24
   Go version:   go1.6.3
   Git commit:   8eab29e
   Built:        Thu Jul 28 21:04:48 2016
   OS/Arch:      windows/amd64
   Experimental: true

   Server:
   Version:      1.12.0
   API version:  1.24
   Go version:   go1.6.3
   Git commit:   8eab29e
   Built:        Thu Jul 28 21:04:48 2016
   OS/Arch:      linux/amd64
   Experimental: true
PROTIP: A Windows Server Docker image runs within a Linux Docker instance on a Windows 10 machine. Strange but true because Docker makes use of Linux drivers. ### Full Docker Info 0. PROTIP: The most detailed status is obtained using the info sub-command, which requires the docker daemon to be running.
docker infoAn example of command output for docker info on Windows:
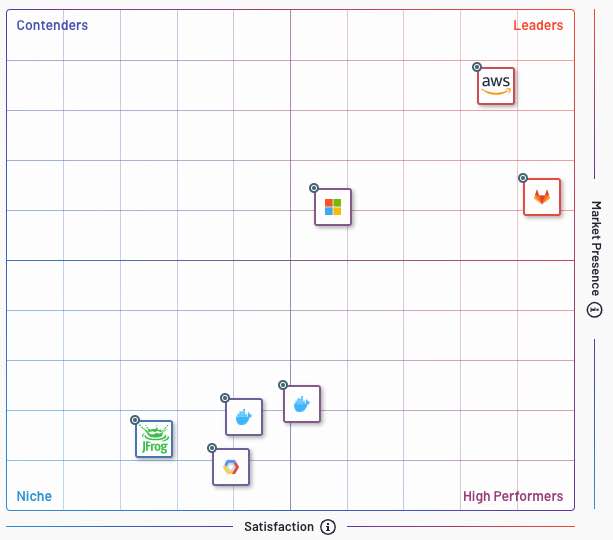
Containers: 0
 Running: 0
 Paused: 0
 Stopped: 0
Images: 0
Server Version: 17.09.0-ce
Storage Driver: overlay2
 Backing Filesystem: extfs
 Supports d_type: true
 Native Overlay Diff: true
Logging Driver: json-file
Cgroup Driver: cgroupfs
Plugins:
 Volume: local
 Network: bridge host ipvlan macvlan null overlay
 Log: awslogs fluentd gcplogs gelf journald json-file logentries splunk syslog
Swarm: inactive
Runtimes: runc
Default Runtime: runc
Init Binary: docker-init
containerd version: 06b9cb35161009dcb7123345749fef02f7cea8e0
runc version: 3f2f8b84a77f73d38244dd690525642a72156c64
init version: 949e6fa
Security Options:
 seccomp
  Profile: default
Kernel Version: 4.9.49-moby
Operating System: Alpine Linux v3.5
OSType: linux
Architecture: x86_64
CPUs: 4
Total Memory: 1.952GiB
Name: moby
ID: JCZB:QL6G:SWXG:GURD:53OL:57EY:WNDW:QDHX:GDPD:H3G7:PGU7:45HU
Docker Root Dir: /var/lib/docker
Debug Mode (client): false
Debug Mode (server): true
 File Descriptors: 18
 Goroutines: 29
 System Time: 2017-10-17T22:22:38.984450422Z
 EventsListeners: 1
No Proxy: *.local, 169.254/16
Registry: https://index.docker.io/v1/
Experimental: true
Insecure Registries:
 127.0.0.0/8
Live Restore Enabled: false
### Container Registries # * Amazon ECR (EC2 Container Registry) is designed to serve requests within AWS, at lower latency than external registries. ECR does not yet support vulnerability scanning. * GCR (Google Container Registry) * ACR (Azure Container Registry) supports all kinds of containers, including Mesosphere. Azure manages network latency by leveraging its vast cloud computing network so that the closest clusters are used. Good for use with Azure Kubernetes Service (AKS). * GitLab a container registry? * JFrog Artifactory G2 in 2019 gave these crowd-sourced ratings:
 Not in their analysis are: * quay.io container registry Red Hat (now IBM) created to compete with DockerHub by providing enterprise features such as vulnerability scanning. Its RHEL Enterprise Linux 8 Beta introduces a new Container Tools module to replace Docker. ### Setup Docker Hub # 0. https://hub.docker.com 0. If you don't have a Docker account already, Sign-up for an account and click the "Confirm your email" button in the email with subject "Please confirm email for your Docker ID". 0. Link Docker Hub to your GitHub account. Click on your photo at the upper right. Select Settings, "Linked Accounts & Services". If you're already linked, an "Unlink" appears. Proceeding as if there isn't. 0. CAUTION: Selecting "Public and Private" means Docker can see ALL your private repositories. PROTIP: Open a another set of GitHub and Docker accounts based on another email account to work only with public-facing repos for this exercise. 0. At the top menu, pull down the Create menu to select "Create Automated Build". Click the Github button. NOTE: The above is covered by a segment in this Pluralsight video. 0. Click on the repo. 0. Type in a short description and click Create. 0. Under the "Docker Pull Command" at the right pane, for example:
docker pull wilsonmar/99bottles-jmeterNotice that, to Dockerhub, "target" isn't a URL but an account name. 0. Copy and paste the command above. The response if you're in the right folder for Docker:
Using default tag: latest
Pulling repository docker.io/wilsonmar/99bottles-jmeter
Tag latest not found in repository docker.io/wilsonmar/99bottles-jmeter
### List and remove image 0. List images pulled:
docker images -a -qA sample response:
REPOSITORY          TAG                 IMAGE ID            CREATED             SIZE
jenkins/jenkins     latest              9ec0e1781a1b        41 hours ago        815MB
nginx               latest              1e5ab59102ce        8 days ago          108MB
0. Remove all images pulled, to save disk space:
docker rmi $(docker images -a -q)0. Remove a list of dangling images:
docker rmi $(docker images -f dangling=true -q)### Setup Credential Store https://github.com/docker/docker-credential-helpers/releases 0. Click the latest "osxkeychain": docker-credential-osxkeychain-v0.6.0-amd64.tar.gz 0. In Finder, double-click to expand the file 0. Move to within a $PATH:
cd ~/Downloads mv docker-credential-osxkeychain /usr/local/bin chmod 555 /usr/local/bin/docker-credential-osxkeychainCAUTION: The credential helper is used whenever it is discovered on $PATH, not only if config.json "credsStore" value declares it. 0. Open Apple's Keychain Access.app within Applications Utilities. 0. Store your Docker credentials:
docker-credential-osxkeychain store### Log into Docker Hub https://cloud.google.com/container-registry/docs/advanced-authentication https://github.com/docker/cli/blob/master/docs/reference/commandline/login.md 0. Login using your Docker: The response:
WARNING! Using --password via the CLI is insecure. Use --password-stdin.PROTIP: Using STDIN prevents the password from ending up in the shell's history and log files. 0. PROTIP: At your home folder create a `.secrets` file containing set statements:
cd
   echo set >.secrets
0. Edit the text file to contain the username and password you setup at https://hub.docker.com/ for example:
   export DOCKER_USERNAME=wilsonmar
   export DOCKER_PASSWORD=12345abcde7890jl;k
   echo $DOCKER_USERNAME
   echo "$DOCKER_PASSWORD" | docker login -u "$DOCKER_USERNAME" --password-stdin -e none
0. Run the file:
source .secretsYou should see your user name reflected. Alternately, supply the authentication information in the command (replacing **** with your own):
docker login -u "$DOCKER_USERNAME" -p "$DOCKER_PASSWORD"(The --email flag was required by Docker older that 1.11) PROTIP: TODO: Advanced users create a .dockercfg file. The successful response is:
WARNING: login credentials saved in C:\Users\...\\.docker\config.jsonWhen Docker is installed, it creates a .docker folder at your account root folder. It contains files daemon.json and ~/.docker/config.json:
{
  "auths" : {
    "https://index.docker.io/v1/" : {
         "auth": "YW11cmRhY2E6c3VwZXJzZWNyZXRwYXNzd29yZA==",
         "email": "amurdaca@redhat.com"
     }
  },
  "credsStore" : "osxkeychain"
}
On Linux, the credsStore is populated with the string `secretservice`.
PROTIP: Other auths can be added.
After a successful Docker login, Docker stores a base64 encoded string from the concatenation of the username, a colon, and the password and associates this string to the registry the user is logging into
file `...\myuser.docker\config.json`
The trouble with this is that it’s encrypted. The base64 string can be converted back to clear ASCII text:
echo YW11cmRhY2E6c3VwZXJzZWNyZXRwYXNzd29yZA== | base64 -d -0. The authentication information is removed upon:
docker logoutThe response is about `cat ~/.docker/config.json`
Removing login credentials for https://index.docker.io/v1/which would avoid the following error later:
docker: Error response from daemon: Get https://registry-1.docker.io/v2/library/hello-world/manifests/latest: unauthorized: incorrect username or password.However, if you are not setup correctly, you'll see:
Warning: failed to get default registry endpoint from daemon (Cannot connect to the Docker daemon at unix:///var/run/docker.sock. Is the docker daemon running?). Using system default: https://index.docker.io/v1/
Login with your Docker ID to push and pull images from Docker Hub. If you don't have a Docker ID, head over to https://hub.docker.com to create one.
Error response from daemon: Get https://registry-1.docker.io/v2/: unauthorized: incorrect username or password### Troubleshoot Docker daemon start 0. If you also see this message: `Cannot connect to the Docker daemon at unix:///var/run/docker.sock. Is the docker daemon running?` Use Linux operating system commands to see whether it starts up. On Linux: /etc/systemd/system/docker.service
systemctl status docker.serviceFor detail:
journalctl -u docker.serviceOn ubuntu server, restart: sudo shutdown -r now $ systemctl daemon-reload $ sudo service docker restart $ sudo service docker status (should see active (running)) To start:
systemctl start docker### Modules installed # Installing Docker gives you not just the Docker service (daemon) but also the docker command line utility, or the Docker client. Regardless of the OS, the installation provides: * Docker Machine * Docker CLI client * Docker Engine * Docker Compose * Docker Swarm
0. See the list of supported drivers at
https://docs.docker.com/machine/drivers 0. PROTIP: There's a different version of each Docker module:
docker-compose \-\-versionA sample response:
docker-compose version 1.14.0, build c7bdf9e0. PROTIP: There's a different version of each Docker module:
docker-machine \-\-versionA sample response:
docker-machine version 0.12.0, build 45c69ad## Set Maximum File Descriptors The `vm_max_map_count` kernel setting needs to be set to at least 262144 for production use. Depending on your platform: On Linux: 0. Edit file /etc/sysctl.conf
grep vm.max_map_count /etc/sysctl.conf
    vm.max_map_count=262144
The above sets permanently.
To apply the setting on a live system type:
sysctl -w vm.max_map_count=262144
macOS with Docker for Mac
The vm_max_map_count setting must be set within the xhyve virtual machine:
screen ~/Library/Containers/com.docker.docker/Data/com.docker.driver.amd64-linux/ttyLog in with root and no password. Then configure the sysctl setting as you would for Linux:
sysctl -w vm.max_map_count=262144MacOS with Docker Toolbox: The vm_max_map_count setting must be set via docker-machine:
docker-machine ssh## Run from Docker Hub PROTIP: Similar to Python, most people run commands within a Docker machine (which is the whole point of installing Docker). From https://docs.docker.com/v1.8/introduction/understanding-docker/ 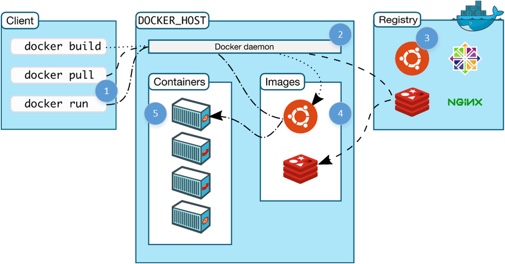 This section describes how to run a Docker image. 0. You need to be logged into Docker Hub. 0. To verify whether you can access a simple image:
sudo sysctl -w vm.max_map_count=262144
docker run hello-world Like Maven Central, a Docker run command automatically pulls from the public Docker Repository, such as:
https://hub.docker.com/_/hello-world It's defined at
https://github.com/docker-library/hello-world
with docs at
https://github.com/docker-library/docs/tree/master/hello-world If the image is not available locally, it is pulled from Dockerhub:Unable to find image 'hello-world:latest' locally latest: Pulling from library/hello-world c04b14da8d14: Pull complete Digest: sha256:0256e8a36e2070f7bf2d0b0763dbabdd67798512411de4cdcf9431a1feb60fd9 Status: Downloaded newer image for hello-world:latestThe expected response is:Hello from Docker! This message shows that your installation appears to be working correctly. To generate this message, Docker took the following steps: 1. The Docker client contacted the Docker daemon. 2. The Docker daemon pulled the "hello-world" image from the Docker Hub. 3. The Docker daemon created a new container from that image which runs the executable that produces the output you are currently reading. 4. The Docker daemon streamed that output to the Docker client, which sent it to your terminal. To try something more ambitious, you can run an Ubuntu container with: $ docker run -it ubuntu bash Share images, automate workflows, and more with a free Docker Hub account: https://hub.docker.com0. Run the container just downloaded in a Mac:docker run -it ubuntu bashPROTIP: Mac uses Ubuntu commands. The response:Unable to find image 'ubuntu:latest' locally latest: Pulling from library/ubuntu 43db9dbdcb30: Pull complete 2dc64e8f8d4f: Pull complete 670a583e1b50: Pull complete 183b0bfcd10e: Pull complete Digest: sha256:c6674c44c6439673bf56536c1a15916639c47ea04c3d6296c5df938add67b54b Status: Downloaded newer image for ubuntu:latest root@27eb89b0dc54:Wait for "Pull complete" for all the dependencies. Alternately, on a CentOS machine:docker run -it centos bashThe response:Unable to find image 'centos:latest' locally latest: Pulling from library/centos 8c3d77a518cb: Pull complete Digest: sha256:7b754086d2c7d74ac39dc0a2545d7b06d4266f873d502feb5b3e8bfca27c5dd8 Status: Downloaded newer image for centos:latestWARNING: The terminal prompt has changed because you are now inside the container. ### Docker Help `-it` means iteractive and TTY, which provides you the terminal prompt. 0. Get a list of all the docker run command parameters:docker run \-\-helpUsage: docker run [OPTIONS] IMAGE [COMMAND] [ARG...] Run a command in a new container Options: --add-host list Add a custom host-to-IP mapping (host:ip) -a, --attach list Attach to STDIN, STDOUT or STDERR --blkio-weight uint16 Block IO (relative weight), between 10 and 1000, or 0 to disable (default 0) --blkio-weight-device list Block IO weight (relative device weight) (default []) --cap-add list Add Linux capabilities --cap-drop list Drop Linux capabilities --cgroup-parent string Optional parent cgroup for the container --cidfile string Write the container ID to the file --cpu-count int CPU count (Windows only) --cpu-percent int CPU percent (Windows only) --cpu-period int Limit CPU CFS (Completely Fair Scheduler) period --cpu-quota int Limit CPU CFS (Completely Fair Scheduler) quota --cpu-rt-period int Limit CPU real-time period in microseconds --cpu-rt-runtime int Limit CPU real-time runtime in microseconds -c, --cpu-shares int CPU shares (relative weight) --cpus decimal Number of CPUs --cpuset-cpus string CPUs in which to allow execution (0-3, 0,1) --cpuset-mems string MEMs in which to allow execution (0-3, 0,1) -d, --detach Run container in background and print container ID --detach-keys string Override the key sequence for detaching a container --device list Add a host device to the container --device-cgroup-rule list Add a rule to the cgroup allowed devices list --device-read-bps list Limit read rate (bytes per second) from a device (default []) --device-read-iops list Limit read rate (IO per second) from a device (default []) --device-write-bps list Limit write rate (bytes per second) to a device (default []) --device-write-iops list Limit write rate (IO per second) to a device (default []) --disable-content-trust Skip image verification (default true) --dns list Set custom DNS servers --dns-option list Set DNS options --dns-search list Set custom DNS search domains --entrypoint string Overwrite the default ENTRYPOINT of the image -e, --env list Set environment variables --env-file list Read in a file of environment variables --expose list Expose a port or a range of ports --group-add list Add additional groups to join --health-cmd string Command to run to check health --health-interval duration Time between running the check (ms|s|m|h) (default 0s) --health-retries int Consecutive failures needed to report unhealthy --health-start-period duration Start period for the container to initialize before starting health-retries countdown (ms|s|m|h) (default 0s) --health-timeout duration Maximum time to allow one check to run (ms|s|m|h) (default 0s) --help Print usage -h, --hostname string Container host name --init Run an init inside the container that forwards signals and reaps processes -i, --interactive Keep STDIN open even if not attached --io-maxbandwidth bytes Maximum IO bandwidth limit for the system drive (Windows only) --io-maxiops uint Maximum IOps limit for the system drive (Windows only) --ip string IPv4 address (e.g., 172.30.100.104) --ip6 string IPv6 address (e.g., 2001:db8::33) --ipc string IPC namespace to use --isolation string Container isolation technology --kernel-memory bytes Kernel memory limit -l, --label list Set meta data on a container --label-file list Read in a line delimited file of labels --link list Add link to another container --link-local-ip list Container IPv4/IPv6 link-local addresses --log-driver string Logging driver for the container --log-opt list Log driver options --mac-address string Container MAC address (e.g., 92:d0:c6:0a:29:33) -m, --memory bytes Memory limit --memory-reservation bytes Memory soft limit --memory-swap bytes Swap limit equal to memory plus swap: '-1' to enable unlimited swap --memory-swappiness int Tune container memory swappiness (0 to 100) (default -1) --mount mount Attach a filesystem mount to the container --name string Assign a name to the container --network string Connect a container to a network (default "default") --network-alias list Add network-scoped alias for the container --no-healthcheck Disable any container-specified HEALTHCHECK --oom-kill-disable Disable OOM Killer --oom-score-adj int Tune host's OOM preferences (-1000 to 1000) --pid string PID namespace to use --pids-limit int Tune container pids limit (set -1 for unlimited) --privileged Give extended privileges to this container -p, --publish list Publish a container's port(s) to the host -P, --publish-all Publish all exposed ports to random ports --read-only Mount the container's root filesystem as read only --restart string Restart policy to apply when a container exits (default "no") --rm Automatically remove the container when it exits --runtime string Runtime to use for this container --security-opt list Security Options --shm-size bytes Size of /dev/shm --sig-proxy Proxy received signals to the process (default true) --stop-signal string Signal to stop a container (default "SIGTERM") --stop-timeout int Timeout (in seconds) to stop a container --storage-opt list Storage driver options for the container --sysctl map Sysctl options (default map[]) --tmpfs list Mount a tmpfs directory -t, --tty Allocate a pseudo-TTY --ulimit ulimit Ulimit options (default []) -u, --user string Username or UID (format: <name|uid>[:<group|gid>]) --userns string User namespace to use --uts string UTS namespace to use -v, --volume list Bind mount a volume --volume-driver string Optional volume driver for the container --volumes-from list Mount volumes from the specified container(s) -w, --workdir string Working directory inside the container### Docker terminal inside the container # 0. Make sure the Docker process can run by getting a Terminal inside the container:docker exec -it test ps auxCannot connect to the Docker daemon at unix:///var/run/docker.sock. Is the docker daemon running?docker: Cannot connect to the Docker daemon. Is the docker daemon running on this host?. See 'docker run --help'.BLAH: If you are running this within a corporate firewall, you may need to obtain permissions and/or specify client network settings. ### Docker pull 1. To bring the Dockerfile local without running it also:docker pull library/hello-worldA sample response:Using default tag: latest latest: Pulling from library/hello-world b04784fba78d: Pull complete Digest: sha256:f3b3b28a45160805bb16542c9531888519430e9e6d6ffc09d72261b0d26ff74f Status: Downloaded newer image for hello-world:latest0. List images downloaded locally:docker imagesThe response:REPOSITORY TAG IMAGE ID CREATED SIZE centos latest 50dae1ee8677 8 days ago 196.7 MB hello-world latest c54a2cc56cbb 3 weeks ago 1.848 kB node 0.10.44-slim f73347dab179 12 weeks ago 192.6 MBThe "centos" image contains CentOS with no apps installed. The "node" image contains CenOS with Node installed, but no custom Node apps. PROTIP: You won't find Docker images on your local folder. See Where are docker images stored? See https://www.digitalocean.com/community/tutorials/how-to-install-and-use-docker-on-centos-7 0. Turn your Wi-Fi off. 0. Run it again from your local cache using the default "library" user, so the command is equivalent to:docker run library/hello-world
### Dockviz PROTIP: Consider a third-party tool to display visualizations of image data: dockviz presents Docker image and container information in graphic form to help you understand what's going on inside the system.ImageLayers.io is an Adobe Flash site that shows how each command in Dockerfile contributes to the final Docker image, and discover which layers are shared by multiple images. It presents an ImageLayers badge about the size of an image, and how many layers it is composed of.
### Base DockerHub Search # See the Officially supported repositories at:
https://hub.docker.com/explore They include: * operating systems (ubuntu, centos) * database server base (redis, mongo, mysql, postgres, elasticsearch) * app server base (node, nginx, httpd) * blog app server base (wordpress, alpine)
### Windows Insider Images Before pulling Microsoft's images from https://hub.docker.com/u/microsoft/ note they are designed to be used from "Windows Insider program" Windows Server or Windows 10 Container hosts. They are of "beta" quality.docker pull microsoft/windowsservercore-insider### Ubuntu search 0. Search for Ubuntu images on the free and public repository at
https://hub.docker.comdocker search ubuntuThe response (27 Jul 2016):NAME DESCRIPTION STARS OFFICIAL AUTOMATED ubuntu Ubuntu is a Debian-based Linux operating s... 4343 [OK] ubuntu-upstart Upstart is an event-based replacement for ... 65 [OK] rastasheep/ubuntu-sshd Dockerized SSH service, built on top of of... 30 [OK] torusware/speedus-ubuntu Always updated official Ubuntu docker imag... 26 [OK] ubuntu-debootstrap debootstrap --variant=minbase --components... 25 [OK] nickistre/ubuntu-lamp LAMP server on Ubuntu 8 [OK] nuagebec/ubuntu Simple always updated Ubuntu docker images... 6 [OK] nickistre/ubuntu-lamp-wordpress LAMP on Ubuntu with wp-cli installed 6 [OK] nimmis/ubuntu This is a docker images different LTS vers... 5 [OK] maxexcloo/ubuntu Docker base image built on Ubuntu with Sup... 2 [OK] admiringworm/ubuntu Base ubuntu images based on the official u... 1 [OK] darksheer/ubuntu Base Ubuntu Image -- Updated hourly 1 [OK] jordi/ubuntu Ubunt u Base Image 1 [OK] esycat/ubuntu Ubuntu LTS 0 [OK] datenbetrieb/ubuntu custom flavor of the official ubuntu base ... 0 [OK] life360/ubuntu Ubuntu is a Debian-based Linux operating s... 0 [OK] konstruktoid/ubuntu Ubuntu base image 0 [OK] widerplan/ubuntu Our basic Ubuntu images. 0 [OK] croscon/ubuntu Crosconized Ubuntu 0 [OK] teamrock/ubuntu TeamRock's Ubuntu image configured with AW... 0 [OK] ustclug/ubuntu ubuntu image for docker with USTC mirror 0 [OK] smartentry/ubuntu ubuntu with smartentry 0 [OK] dorapro/ubuntu ubuntu image 0 [OK] lynxtp/ubuntu https://github.com/lynxtp/docker-ubuntu 0 [OK] webhippie/ubuntu Docker images for ubuntu 0 [OK]0. Widen the Terminal window so lines don't wrap. 0. Search for centos images on the free and public repository at
https://hub.docker.comdocker search centosThe response (27 Jul 2016):NAME DESCRIPTION STARS OFFICIAL AUTOMATED centos The official build of CentOS. 2475 [OK] jdeathe/centos-ssh CentOS-6 6.8 x86_64 / CentOS-7 7.2.1511 x8... 26 [OK] nimmis/java-centos This is docker images of CentOS 7 with dif... 13 [OK] million12/centos-supervisor Base CentOS-7 with supervisord launcher, h... 12 [OK] consol/centos-xfce-vnc Centos container with "headless" VNC sessi... 10 [OK] torusware/speedus-centos Always updated official CentOS docker imag... 8 [OK] nickistre/centos-lamp LAMP on centos setup 4 [OK] centos/mariadb55-centos7 3 [OK] nathonfowlie/centos-jre Latest CentOS image with the JRE pre-insta... 3 [OK] consol/sakuli-centos-xfce Sakuli end-2-end testing and monitoring co... 2 [OK] timhughes/centos Centos with systemd installed and running 1 [OK] darksheer/centos Base Centos Image -- Updated hourly 1 [OK] blacklabelops/centos CentOS Base Image! Built and Updates Daily! 1 [OK] ericuni/centos centos dev 0 [OK] kz8s/centos Official CentOS plus epel-release 0 [OK] grossws/centos CentOS 6 and 7 base images with gosu and l... 0 [OK] harisekhon/centos-scala Scala + CentOS (OpenJDK tags 2.10-jre7 - 2... 0 [OK] grayzone/centos auto build for centos. 0 [OK] aguamala/centos CentOS base image 0 [OK] dmglab/centos CentOS with some extras - This is for the ... 0 [OK] jsmigel/centos-epel Docker base image of CentOS w/ EPEL installed 0 [OK] januswel/centos yum update-ed CentOS image 0 [OK] ustclug/centos USTC centos 0 [OK] smartentry/centos CentOS with smartentry 0 [OK] repositoryjp/centos Docker Image for CentOS. 0 [OK]#### Quay.io private Dockerfiles https://github.com/codemy/dockerfile contains Docker images containing mysql and elasticsearch hosted at the quay.io private repository. BTW, a "quay" (pronounced "kee") is a wharf where boats dock. 0. Sign in at https://quay.io/signin using your GitHub or Google credentials. pricing begin from $12/month for security scanning and geo-replication redundancy. ## Run Dockerfile from GitHub ### Run from my GitHub 0. In a Terminal, navigate to where you can add a repo. 0. Get it and navigate into the repo:git clone https://github.com/wilsonmar/Dockerfiles && cd DockerfilesPROTIP: I recommend putting the Dockerfile for an app within that app's repository rather than in a separate one. 0. List the contents of the repo:ls -alcd hello-world;docker run hello-world0. Turn your Wi-Fi back on because the rest of this tutorial assumes it. ### Other Dockerfiles from GitHub Many have posted their collection of Dockerfiles publicly to GitHub: * https://github.com/veggiemonk/awesome-docker#dockerfile has an annotated list of public repositories containing Dockerfile * https://github.com/jessfraz/dockerfiles also live on dockerhub under jess. Because you cannot use notary with autobuilds on dockerhub I also build these continuously on a private registry at r.j3ss.co for public download. (You're welcome.) * https://github.com/yaronr/dockerfile * https://github.com/vimagick/dockerfiles has over 500 stars. * https://github.com/veggiemonk/awesome-docker has over 7.9K stars. * https://github.com/kstaken/dockerfile-examples has a build step for salt, couchdb, rethinkdb * https://github.com/jbergknoff/Dockerfile contains a Dockerfile for mysql, postgreSQL, redis, node, youtube-dl * https://stefanscherer.github.io/is-there-a-windows-docker-image-for/ Nano servers containing Windows with .Net, ASP.NET, NodeJs, Python, Go,
### Run Latest Nginx from Docker Hub 0. Run the latest version image pulled for nginx:docker run -i -t nginx:latest /bin/bash`-i` means interactive: Keep STDIN open even if not attached `-t` means tty: Allocate a pseudo-TTY (command line) Alternately: Run an NGINX web server detached:docker run -d -p 8080:80 nginx`-d` specifies running in detached mode so the container continues to run in background until stopped, but does not respond to commands run on the command line. `-p` means publish list: Publish a container's port(s) to the host to set port mappings manually. PROTIP: Even though we are using the MySQL default port, if we don't tell docker explicitly we want to map it, it will block access through that port (because containers are isolated until you tell them you want access). The "8000:80" means we'll use http://localhost:8080. The correct response is a hash, the container's ID, such as:254d5641eee4ef4882fe2d803068c9b6dd4477836406833a3cc71a0f7a31d36c0. To see if that machine responds:curl $(docker-machine ip default):8080 A common error message is like this:curl: (7) Failed to connect to 192.168.99.100 port 8000: Connection refusedFix the above by making sure you're specifying the correct port (8000 vs 80). ### List Docker processes 0. List the history of processes:docker ps -aWiden to see a response such as this, with random NAMES automatically assigned by Docker:CONTAINER ID IMAGE COMMAND CREATED STATUS PORTS NAMES 0b7f9b9eb35a hello-world "/hello" 4 hours ago Exited (0) 4 hours ago eager_lamarr ago compassionate_leakey aa2ccdb153cc nginx "nginx -g 'daemon ..." 5 hours ago Up 5 hours 0.0.0.0:80->80/tcp, 443/tcp webserverNOTE: The hello-world script contains an exit statement, so it automatically stopped on its own. However, other scripts, such as web services, do not exit on their own. 0. Get the history of space for an image:docker history hello-world0. To get the JSON associated with a 12-character container ID:docker inspect 0b7f9b9eb35a ### Stop 0. Stop running containers based on list:docker stop $(docker ps -a -q)The response is a list of container IDs like this:254d5641eee4 dad20a229af5 62aa89bb81700. Remove the list of all containers listed:docker rm $(docker ps -a -q)See https://www.digitalocean.com/community/tutorials/how-to-remove-docker-images-containers-and-volumes
## MySQL DOC To prevent attacks using default passwords, MySQL now requires its password to be changed when instantiated:docker run --name db -d \ -e MYSQL_ROOT_PASSWORD=123 \ -p 3306:3306 mysql:latest0. Connect to the image:docker exec -it db /bin/bashThe prompt changes to include the Container ID:root@39342b61defb:/#0. Run a process:mysql -uroot -p123The prompt changes to SQL after some information:mysql: [Warning] Using a password on the command line interface can be insecure. Welcome to the MySQL monitor. Commands end with ; or \g. Your MySQL connection id is 3 Server version: 5.7.20 MySQL Community Server (GPL) Copyright (c) 2000, 2017, Oracle and/or its affiliates. All rights reserved. Oracle is a registered trademark of Oracle Corporation and/or its affiliates. Other names may be trademarks of their respective owners. Type 'help;' or '\h' for help. Type '\c' to clear the current input statement. mysql>## Dependencies in Docker When an application starts, it's a problem if its dependencies are not available: * Load configuration settings from a JSON encoded config file * Access a working data directory * Establish a connection to an external mysql database
Traditionally, the approach is to ensure the database is started before starting the applications that depend on it by using Puppet, Chef, Ansible, or other configuration management tool. "This is nothing more then a band-aid covering up the larger problem." Kelsey Hightower says and recommends having app code handle the dependency problem. His sample in Go: https://github.com/kelseyhightower/12-fractured-apps/blob/master/v3/main.go TODO: Put startup-related code in a library for re-use. * load configuration files if it exists, but fall back to sane defaults. * Read environment variables to override configuration settings. * Manage working directories inside the application. If they are missing create them. * Retry the database connection, using some sort of backoff, and log errors along the way so alerts can be sent out. This "defensive programming" code is the "optimistic" approach. It's usually a transient problem. At some point the database will come online. ### MySQL security # Docker does have different security requirements which can seem to be a hindrance. Security can be integrated but it does require knowledge of the Linux container environment. https://blog.docker.com/2013/08/containers-docker-how-secure-are-they/
## Run custom reference 0. This blog shows this command to run image named "mynginx1":docker run \-\-name mynginx1 -P -d nginx \ fcd1fb01b14557c7c9d991238f2558ae2704d129cf9fb97bb4fadf673a58580d"-P" (capital P) tells Docker to map the Ports exposed by the NGINX image – ports 80 and 443 – to ports on the Docker host randomly selected from the range between 49153 and 65535 each time the container is started or restarted. This is to avoid conflicts on standard ports 80 and 443 if we later create multiple NGINX containers on the same Docker host. The `docker ps` command under PORTS would show something like this: 0.0.0.0:49166->443/tcp, 0.0.0.0:49167->80/tcp
## Ubuntu inside Mac 0. To run the latest Ubuntu box inside your Mac:docker run -it --rm --publish 3000:3000 ubuntu bash"--publish" forwards port 3000 on the host from port 3000 in the container. "bash" is the command issued in the container when it becomes active. Alternately, "ruby /app/hello_world.rb" would invoke a ruby program. Alternately, run version 14.04 of Ubuntu:docker run --net=host \ -ti ubuntu:14.04 bashAfter downloads, you should see a bash prompt such as:root@ee355a835ff8:/#0. Get version information using a Linux command (which doesn't work on MacOS):cat /etc/lsb-releaseThe response:DISTRIB_ID=Ubuntu DISTRIB_RELEASE=16.04 DISTRIB_CODENAME=xenial DISTRIB_DESCRIPTION="Ubuntu 16.04.1 LTS"NOTE: You can't run docker commands on this prompt because you're inside. 0. Press Control+C or type exit:exit### List Docker Containers # 0. List Docker containers and their identifiers:docker ps -aPROTIP: In Linux the ps command is for processes. In a way, that's what Docker containers are, a process. `-a` shows inactive as well as the default active listing. (Kinda counter-intuitive) Widen your screen to avoid wrapping:CONTAINER ID IMAGE COMMAND CREATED STATUS PORTS NAMES 2289fc019878 nginxdemos/hello "nginx -g 'daemon off" 32 minutes ago Up 32 minutes 0.0.0.0:32769->80/tcp, 0.0.0.0:32768->443/tcp trusting_euler 75ae035ab68b hello-world "/hello" 39 minutes ago Exited (0) 39 minutes ago serene_sammet0. PROTIP: Customize the layout by specifying a memory variable containing format template using tabs and line breaks.\nID\t\{\{.ID}}\nIMAGE\t\{\{.Image}}\nCOMMAND\t\{\{.Command}}\nCREATED\t\{\{.RunningFor\}\}\nSTATUS\t\{\{.Status}}\ndocker ps -a --format $FORMAT### Manage Images Downloaded 0. To list Docker images downloaded:docker imagesREPOSITORY TAG IMAGE ID CREATED SIZE nginxdemos/hello latest 0ec165d1eb3a 12 hours ago 54.24 MB ubuntu latest f753707788c5 4 weeks ago 127.2 MB hello-world latest c54a2cc56cbb 4 months ago 1.848 kB0. List Docker machines:docker-machine lsExample response:NAME ACTIVE DRIVER STATE URL SWARM DOCKER ERRORS default - virtualbox Running tcp://192.168.99.100:2376 v1.12.3See https://docs.docker.com/machine/get-started/ 0. Connect your shell to the new machine (per https://docs.docker.com/machine/reference/env/):eval "$(docker-machine env default)"No response is displayed because the "eval" command above runs the output of the command:docker-machine env default### Configre Docker client# export DOCKER_TLS_VERIFY="1" specifies authentication of the Docker daemon # the client attempts to communicate with: export DOCKER_TLS_VERIFY="1" # export DOCKER_HOST informs the client of the socket location to use when # communicating with the Docker daemon: export DOCKER_HOST="tcp://192.168.99.100:2376" # export DOCKER_CERT_PATH specifies the location of key and certificates the # client uses for TLS-enabled communication: export DOCKER_CERT_PATH="/Users/mac/.docker/machine/machines/default" export DOCKER_MACHINE_NAME="default" # Run this command to configure your shell: # eval $(docker-machine env)PROTIP: On a Mac, the docker-machine VM is called "default", existing in directory
/Users/\/.docker/machine/machines/default/ 1. Verify the environment variables are set: env | grep DOCKER1. In the tls folder, edit the file CA-CSR.json that defines the algorithm (rsa), the size of bits (4096), and names of the OU hierarchy used to generate the cert:cfssl gencert -initca ca-csr.json | cfssljson -bare ca -1. File daemon-csr.json defines the CN (Common Name) and hosts as well used to generate the cert:cfssl gencert -ca=ca.pem -ca-key=ca-key.pem \ -config=ca-config.json -profile=daemon daemon-csr.json \ | cfssljson -bare daemon -1. Verify the daemon-key.pem and daemon.pem files were generated:ls -l daemon*.pem1. Use regex to specify all files to make readable:chmod -v 0400 {ca,daemon}*.pem1. Copy the file to where they are referenced:sudo mkdir /etc/docker/tls sudo cp {daemon*,ca}.pem /etc/docker/tls rm -f daemon*.pem1. After use, to unset environment variables:eval $(docker-machine env -u)which runs:unset DOCKER_TLS_VERIFY unset DOCKER_HOST unset DOCKER_CERT_PATH unset DOCKER_MACHINE_NAME # Run this command to configure your shell: # eval $(docker-machine env -u)### Remove images 1. To remove an individual Docker image listed above (to free up disk space):docker rmi hello-worldA common error response if you have not first Error response from daemon: conflict: unable to remove repository reference "hello-world" (must force) - container 75ae035ab68b is using its referenced image c54a2cc56cbb 1. To stop all running docker containers:docker stop $(docker ps -a -q) The response is a list of CONTAINER ID's stopped, such as:aa2ccdb153cc1. To save disk space, remove containers identified in a list of container IDs obtained:docker rm $(docker ps -a -q)You may see this error message:Error response from daemon: You cannot remove a running container aa2ccdb153cc54070e6e2ef24e004b40e3e78555b0bca77badd143c3d984bb1c. Stop the container before attempting removal or force removeSee https://docs.docker.com/docker-for-windows Inside the container we will create a simple ‘Hello World’ script.nonepowershell.exe Add-Content C:\helloworld.ps1 'Write-Host "Hello World"'### No Error Report # PROTIP: Whenever an attempt to provision a Dockerized host using Docker Machine fails, or Docker Machine crashes, some diagnostic information is sent automatically to a Docker account on Bugsnag. 0. Disable this reporting by creating an empty file called no-error-report under your installations .docker/machine directory:touch ~/.docker/machine/no-error-report### Start using old boot2docker 0. Start again, you don't need to specify "default":docker-machine start default0. Connect:docker-machine sshYou should see a whale in ASCII art:## . ## ## ## == ## ## ## ## ## === /"""""""""""""""""\___/ === ~~~ {~~ ~~~~ ~~~ ~~~~ ~~~ ~ / ===- ~~~ \______ o __/ \ \ __/ \____\_______/ _ _ ____ _ _ | |__ ___ ___ | |_|___ \ __| | ___ ___| | _____ _ __ | '_ \ / _ \ / _ \| __| __) / _` |/ _ \ / __| |/ / _ \ '__| | |_) | (_) | (_) | |_ / __/ (_| | (_) | (__| < __/ | |_.__/ \___/ \___/ \__|_____\__,_|\___/ \___|_|\_\___|_| Boot2Docker version 1.12.3, build HEAD : 7fc7575 - Thu Oct 27 17:23:17 UTC 2016 Docker version 1.12.3, build 6b644ecNOTE: Docker deprecated the Boot2Docker command line in favor of Docker Machine. https://docs.docker.com/machine/migrate-to-machine/ 0. Now do whatever you need to do here. ## Stop # 0. Hard stop the default machine:docker-machine stop defaultPROTIP: Those who use this a often create aliases to limit typing. For example, "dmon" for the above command.
## docker-machine install # Docker Machine provisions Docker on virtual machines that reside on local or on a cloud provider. NOTE: Docker Machine makes it easy to provision and manage multiple Docker hosts remotely from your personal computer. 0. Type the command by itself for a list of sub-commands:docker-machineThe response shows the sub-commands and options available:Usage: docker-machine [OPTIONS] COMMAND [arg...] Create and manage machines running Docker. Version: 0.8.2, build e18a919 Author: Docker Machine Contributors - <https://github.com/docker/machine> Options: --debug, -D Enable debug mode --storage-path, -s "/Users/mac/.docker/machine" Configures storage path [$MACHINE_STORAGE_PATH] --tls-ca-cert CA to verify remotes against [$MACHINE_TLS_CA_CERT] --tls-ca-key Private key to generate certificates [$MACHINE_TLS_CA_KEY] --tls-client-cert Client cert to use for TLS [$MACHINE_TLS_CLIENT_CERT] --tls-client-key Private key used in client TLS auth [$MACHINE_TLS_CLIENT_KEY] --github-api-token Token to use for requests to the Github API [$MACHINE_GITHUB_API_TOKEN] --native-ssh Use the native (Go-based) SSH implementation. [$MACHINE_NATIVE_SSH] --bugsnag-api-token BugSnag API token for crash reporting [$MACHINE_BUGSNAG_API_TOKEN] --help, -h show help --version, -v print the version Commands: active Print which machine is active config Print the connection config for machine create Create a machine env Display the commands to set up the environment for the Docker client inspect Inspect information about a machine ip Get the IP address of a machine kill Kill a machine ls List machines provision Re-provision existing machines regenerate-certs Regenerate TLS Certificates for a machine restart Restart a machine rm Remove a machine ssh Log into or run a command on a machine with SSH. scp Copy files between machines start Start a machine status Get the status of a machine stop Stop a machine upgrade Upgrade a machine to the latest version of Docker url Get the URL of a machine version Show the Docker Machine version or a machine docker version help Shows a list of commands or help for one command Run 'docker-machine COMMAND --help' for more information on a command.0. Widen the Terminal window so lines don't wrap. 0. Create a Docker machine on the Digital Ocean cloud:docker-machine create -d digitialocean \ --digitalocean-access-token=secret0. List Docker machine instances:docker-machine lsThe response is a heading above lines, if any:NAME ACTIVE DRIVER STATE URL SWARM DOCKER ERRORS0. List Docker machine Internet Protocol addresses:docker-machine ipThe response:192.168.99.100### Create Docker machine 0. Using your Mac's Finder, look in your Applications folder for a Docker folder. In there is a Docker Quickstart Terminal. You can also invoke it by typing on the Mac's Search box. It creates a window containing:Creating CA: /Users/mac/.docker/machine/certs/ca.pem Creating client certificate: /Users/mac/.docker/machine/certs/cert.pem Running pre-create checks... (default) Default Boot2Docker ISO is out-of-date, downloading the latest release... (default) Latest release for github.com/boot2docker/boot2docker is v1.12.3 (default) Downloading /Users/mac/.docker/machine/cache/boot2docker.iso from https://github.com/boot2docker/boot2docker/releases/download/v1.12.3/boot2docker.iso... Creating machine... (default) Copying /Users/mac/.docker/machine/cache/boot2docker.iso to /Users/mac/.docker/machine/machines/default/boot2docker.iso... (default) Creating VirtualBox VM... (default) Creating SSH key... (default) Starting the VM... (default) Check network to re-create if needed... (default) Found a new host-only adapter: "vboxnet1" (default) Waiting for an IP... ## . ## ## ## == ## ## ## ## ## === /"""""""""""""""""\___/ === ~~~ {~~ ~~~~ ~~~ ~~~~ ~~~ ~ / ===- ~~~ \______ o __/ \ \ __/ \____\_______/ docker is configured to use the default machine with IP 192.168.99.100 For help getting started, check out the docs at https://docs.docker.com bash: print: command not found0. Create a Docker machine named node1 in the local Virtualbox, in debug mode:docker-machine create -d virtualbox node1Alternately, if you are running docker-machine on windows, you should use Hyper-V :docker-machine create \-\-driver hyperv vm## Docker Compose # See https://docs.docker.com/compose/install/. Compose file version 3 reference lists the correspondance between Compose file format and Docker Engine release. 1. Describe you stack in a docker-compose.yml. Example:web: build . command: python app.py ports: - "5000:5000" volumes: - .:/code links: - redis:redis redis: image : redisNOTE: Another example docker-compose.yml here 1. Type the command by itself for a list of sub-commands:docker-composeThe response:Define and run multi-container applications with Docker. Usage: docker-compose [-f <arg>...] [options] [COMMAND] [ARGS...] docker-compose -h|--help Options: -f, --file FILE Specify an alternate compose file (default: docker-compose.yml) -p, --project-name NAME Specify an alternate project name (default: directory name) --verbose Show more output -v, --version Print version and exit -H, --host HOST Daemon socket to connect to --tls Use TLS; implied by --tlsverify --tlscacert CA_PATH Trust certs signed only by this CA --tlscert CLIENT_CERT_PATH Path to TLS certificate file --tlskey TLS_KEY_PATH Path to TLS key file --tlsverify Use TLS and verify the remote --skip-hostname-check Don't check the daemon's hostname against the name specified in the client certificate (for example if your docker host is an IP address) Commands: build Build or rebuild services bundle Generate a Docker bundle from the Compose file config Validate and view the compose file create Create services down Stop and remove containers, networks, images, and volumes events Receive real time events from containers exec Execute a command in a running container help Get help on a command kill Kill containers logs View output from containers pause Pause services port Print the public port for a port binding ps List containers pull Pulls service images push Push service images restart Restart services rm Remove stopped containers run Run a one-off command scale Set number of containers for a service start Start services stop Stop services unpause Unpause services up Create and start containers version Show the Docker-Compose version informationhttps://docs.docker.com/compose/reference provides more detail. 1. Docker compose creates multiple containers with a single command:docker-compose up --x-smart-recreateThe above command refers to Dockerfile and compose.yml files. To start containers in the background and leaves them running:docker-compose up -dThe above aggregates the output of each container (essentially running docker-compose logs -f). ## Kubernetes TOOL: Kompose is a convenience tool to go from local Docker development to managing your application with Kubernetes. Transformation of the Docker Compose format to Kubernetes resources manifest may not be exact, but it helps tremendously when first deploying an application on Kubernetes. Install on Windows machines:choco install kubernetes-kompose### Monitoring There are several alternatives to collects stats for monitoring dashboard: opencensus.io vendor-agnostic distributes tracing to Zipkin, Yeager, Google Stackdriver Trace, etc. AppDynamics Docker monitoring Use https://github.com/google/cadvisor (Container Advisor) to analyzes resource usage and performance characteristics of running Docker containers. It keeps (in background) resource isolation parameters, historical resource usage, histograms of complete historical resource usage, and network statistics. Stats of NVIDIA GPU are also supported. Might want to change the port number when you run the command:sudo docker run \ --volume=/:/rootfs:ro \ --volume=/var/run:/var/run:ro \ --volume=/sys:/sys:ro \ --volume=/var/lib/docker/:/var/lib/docker:ro \ --volume=/dev/disk/:/dev/disk:ro \ --publish=8080:8080 \ --detach=true \ --name=cadvisor \ google/cadvisor:latestThis describes setting up cAdvisor can write to InfluxDB time-series database for display by Grafana. 1. Get the IP address of the running Docker instance:DOCKER_HOST=$(docker-machine ip $(docker-machine active)) curl -v http://$DOCKER_HOST # visit in your browser.## Docker Swarm # Docker Swarm creates and manages clustered (pool of) Docker servers. It scales containers by dispersing containers across multiple hosts. 1. Be at a folder. 1. Download the `wordpress-swarm.yml` 1. Initializing Docker Swarm launches a container that is used as the Swarm Manager master which communicates with all nodes in a Swarm cluster.docker swarm initThe response:*Swarm initialized: current node (x3t9fal0if4a84mn7o5y1o6mf) is now a manager. To add a worker to this swarm, run the following command: docker swarm join --token SWMTKN-1-0l1x7cjd605n2m1uo3w2il86kngdb2q0otzzhf2du2idshr0xw-0otui67aoq7r7tf7h3meqk6g1 192.168.65.3:2377 To add a manager to this swarm, run 'docker swarm join-token manager' and follow the instructions.2. Do it:docker stack deploy -c wordpress-stack.yml mywordpressresponse:Creating network mywordpress_default Creating service mywordpress_wordpress Creating service mywordpress_db3. Get IP address of the host ("192.168.0.195"):ip aen0: flags=8863<UP,BROADCAST,SMART,RUNNING,SIMPLEX,MULTICAST> mtu 1500 ether 8c:85:90:2b:ad:e9 inet6 fe80::10e1:325e:a565:1a27/64 secured scopeid 0x8 inet 192.168.0.195/24 brd 192.168.0.255 en04. Open the website:http://192.168.0.195:80If you get "Error establishing a database connection"
docker run swarm createSee https://docs.docker.com/swarmdocker run -d swarm join --addr=node_ip:2375 token://cluster_iddocker run -d -p swarm_port:2375 swarm manage token://cluster_idSee http://autopilotpattern.io ## Debug within container 1. To reach the CLI console inside a Docker container, substitute example values in:ssh -tt -i myKey user@remoteHost \ docker exec -it myContainer /bin/bash`myKey` is the path to the private key. `user` is the username for use by SSH. `remoteHost` is the IP address of the Docker instance. `myContainer` is the Docker Container ID listed by `docker ps`
## Securing Docker # OReilly video course: Container Security Fundamentals Aug 8-9, 2023 by Raju Gandhi references https://github.com/looselytyped/container-security-fundamentals/blob/master/README.md* cgroups are like dials where you can set limits on memory, CPU, etc. * Use a secure parent image from CIS or NIST. * Pin down the exact tag (or even better the digest to reference the image).
FROM alpine:3.17 # will get security fixes # Alternatively, more secure but you won't get any patches or fixes: FROM alpine@sha256:69665d02cb32192e52e07644d76bc6f25abeb5410edc1c7a81a10ba3f0efb90aImages that use the v2 or later format have a contentaddressable identifier called a digest. As long as the input used to generate the image is unchanged, the digest value is predictable. https://docs.docker.com/engine/reference/commandline/images/#digests * Inspect ancestor images for anything that can be inherited * Don't put secrets or sensitive information in env * Rather than copying secrets into images, exclude secrets in .dockerignore.git # Ignore vscode files .vscode/ .vagrant/ revealing-secrets.tar revealing-secrets/* Store secrets in files on a temporary volume (tmpfs) * Multi-stage allow for smaller images, makes builds faster keeps secrets safe allows for different builds to aid debugging/development * lint using Hadolint * Scan image for vulnerabilities using Trivy. In trivy-secret.yaml file:enable-builtin-rules: - aws-access-key-id - aws-account-id - aws-secret-access-key* multi-stage Dockerfiles * Be cognizant of what the host directories available to the container (via -v) * Only mount the docker socket under special circumstances * Use dedicated & immutable hosts to run your containers (IaC) * Consider smaller OS (eg RancherOS) for the host machine * Install as little as you can get away with on the host * Design immutable containers * Consider using read-only filesystem within containers * Reduce permissions with seccomp, apparmor, selinuz Kata containers
## References
## More on DevOps # This is one of a series on DevOps: 0. [DevOps_2.0](/devops_2.0/) 0. [ci-cd (Continuous Integration and Continuous Delivery)](/ci-cd/) 0. [User Stories for DevOps](/user-stories-for-devops/) 0. [Enterprise Software)](/enterprise-software/) 0. [Git and GitHub vs File Archival](/git-and-github-vs-file-archival/) 0. [Git Commands and Statuses](/git-commands-and-statuses/) 0. [Git Commit, Tag, Push](/git-commits/) 0. [Git Utilities](/git-utilities/) 0. [Data Security GitHub](/data-security-github/) 0. [GitHub API](/github-api/) 0. [TFS vs. GitHub](/tfs-vs-github/) 0. [Choices for DevOps Technologies](/devops-choices/) 0. [Pulumi Infrastructure as Code (IaC)](/pulumi/) 0. [Java DevOps Workflow](/java-devops-workflow/) 0. [Okta for SSO & MFA](/okta/) 0. [AWS DevOps (CodeCommit, CodePipeline, CodeDeploy)](/aws-devops/) 0. [AWS server deployment options](/aws-server-deploy-options/) 0. [AWS Load Balancers](/loadbal/) 0. [Cloud services comparisons (across vendors)](/cloud-services-comparisons/) 0. [Cloud regions (across vendors)](/cloud-regions/) 0. [AWS Virtual Private Cloud](/aws-vpc/) 0. [Azure Cloud Onramp (Subscriptions, Portal GUI, CLI)](/azure-quickly/) 0. [Azure Certifications](/azure-certifications/) 0. [Azure Cloud](/azure-cloud/) 0. [Azure Cloud Powershell](/azure-cloud-powershell/) 0. [Bash Windows using Microsoft's WSL (Windows Subsystem for Linux)](/bash-windows/) 0. [Azure KSQL (Kusto Query Language) for Azure Monitor, etc.](/kql/) 0. [Azure Networking](/azure-networking/) 0. [Azure Storage](/azure-storage/) 0. [Azure Compute](/azure-compute/) 0. [Azure Monitoring](/azure-monitoring/) 0. [Digital Ocean](/digital-ocean/) 0. [Cloud Foundry](/cloud-foundry/) 0. [Packer](/packer/) automation to build Vagrant images 0. [Terraform](/terraform/) multi-cloud provisioning automation 0. [Hashicorp Vault and Consul](/hashicorp-vault/) to generate and hold secrets 0. [Powershell Ecosystem](/powershell-ecosystem/) 0. [Powershell on MacOS](/powershell-on-mac/) 0. [Powershell Desired System Configuration](/powershell-dsc/) 0. [Jenkins Server Setup](/jenkins-setup/) 0. [Jenkins Plug-ins](/jenkins-plugins/) 0. [Jenkins Freestyle jobs](/jenkins-freestyle/) 0. [Jenkins2 Pipeline jobs using Groovy code in Jenkinsfile](/jenkins2-pipeline/) 0. [Docker (Glossary, Ecosystem, Certification)](/docker/) 0. [Make Makefile for Docker](/make-makefile/) 0. [Docker Setup and run Bash shell script](/bash-scripts/) 0. [Bash coding](/bash-coding/) 0. [Docker Setup](/docker-setup/) 0. [Dockerize apps](/dockerize/) 0. [Docker Registry](/docker-registry/) 0. [Maven on MacOSX](/maven-on-macos/) 0. [Ansible](/ansible/) 0. [Kubernetes Operators](/k8s-operators/) 0. [OPA (Open Policy Agent) in Rego language](/opa-rego/) 0. [MySQL Setup](/mysel-setup/) 0. [Threat Modeling](/threat-modeling/) 0. [SonarQube & SonarSource static code scan](/sonarqube/) 0. [API Management Microsoft](/api-management-microsoft/) 0. [API Management Amazon](/api-management-amazon/) 0. [Scenarios for load](/scenarios-for-load/) 0. [Chaos Engineering](/chaos-engineering/)