

A deep dive on how to orchestrate containers, especially in clouds, including OpenShift. Pass the CKAD and CKA exams.
![]()
![]()
![]()
![]()
![]()
![]()
![]()
![]()
![]()
![]()
![]()
![]()
![]()
Overview
- TL;DR My contribution
- Why Kubernetes?
- Index: Kubernetes Vocabulary
- Insider Knowledge
- Predecessor to K8s
- Distributions of Kubernetes
- CNCF Versions
- Kubernetes is complex
- What Kubernetes contributes
- Organize for Kubernetes as a Team Sport!
- Self-Healing Automation
- This article: Automation
- TL;DR Professional certifications in Kubernetes
- Kubernetes CSPs
- Cloud Playgrounds
- Hands-on Demos/labs
- Control Plane Orchestration within a Master Node
- Core K8s Internals
- Kubernetes Security Hardening
- Sidero Talos OS on Bare Metal
- Cloud K8s GUI & CLI
- CLI Setup
- On-premise
- Kubectl Commands
- Docker and Alternative Runtimes
- Inside each Node
- Networking
- Endpoints
- Aggregation Layer
- What’s CNCF?
- Container Orchestration?
- KCNA Exam
- CKAD Exam
- Exam Preparations
- Social media communities
- MacOS Laptop Installation
- Docker Desktop install on macOS
- Prep standalone SSH client on macOS
- CRI = Container Runtime Interface
- Cluster Configuration
- Customize Terminal
- K command tips and tricks
- Declarative Kubernetes Commands
- Namespaces
- Namespaces
- imperative kubectl run command
- Add-on Dashboard
- Declarative yaml
- OpenShift project wall namespaces
- Kustomize templating utility
- Jsonnet
- Dockerfile to Pod yaml correspondance
- Imperative one web server:
- Naked Pod command & yaml
- Declarative yaml
- kind: abbreviations
- CRD (Custom Resource Definitions)
- metadata:
- spec:
- Multi-Container Pods
- Controller objects
- Deployments
- Stateless apps
- Stateful Apps
- Stateful Sets
- DaemonSets (ds)
- svc = Services
- sa = ServiceAccounts
- Misc. List:
- Deleting Pods
- Plug-in manager
- Add-ons to Kubernetes
- Kapp
- netpol = NetworkPolicies
- HA Proxy cluster
- Autoscaler
- Health Checks
- Probes
- Multi-cloud
- GKS (Google Kubernetes Service)
- Google Kubernetes Threat Detection
- AWS CLI
- Microsoft’s Azure Kubernetes Service (AKS)
- Other Orchestration systems managing Docker containers
- Competing Orchestration systems
- Nodes
- Master Node (Control Plane)
- Volumes
- Taints and Tolerations
- Extract pod yaml from running podspec
- cAdvisor
- Testing K8s
- Installation options
- OS for K8s
- Architectural Details
- Admission Controller
- Container Storage Interface (CSI)
- Configmap
- Cloud Volumes (Geo-replicated)
- Storage Classes
- Sample micro-service apps
- Infrastructure as code
- pod.yml manifests
- Delete pods using selector
- Annotations
- Kubelet Daemonset.yaml
- Make your own K8s
- Kubeflow
- References
- Jobs for you
- Learning, Video and Live
- Kubernetes for Machine Learning
- Resources
- Secrets
- Debugging
- Blogs
- Production
- Quotas
- References
- Latest videos about K8s
- Video courses
- Rockstars
- Tutorials for sale
- Fun facts
- References
- Sample apps
- More on DevOps
TL;DR My contribution
Text here are my notes on how to use Kubernetes – a carefully sequenced presentation of complex material so it’s both easier to understand quickly yet more deeply.
NOTE: Content here are my personal opinions, and not intended to represent any employer (past or present). “PROTIP:” here highlight information I haven’t seen elsewhere on the internet because it is hard-won, little-know but significant facts based on my personal research and experience.
Why Kubernetes?
Kubernetes is called a “orchestration” system for automating application deployment, scaling, and management.
Kubernetes is needed to run multiple instances of an application on a single machine, and run multiple machines in a cluster. This is called horizontal scaling, typically in a server cloud such as AWS, Azure, GCP, etc.
Kubernetes manages Docker containers. That is because developers create their apps within Docker images for less “it works on my machine” issues of portability across environments. That is a huge time saver.
As my article on Docker describes, Docker images are much faster and smaller than VMware images previously used.
Index: Kubernetes Vocabulary
Below are technical terms and abbreviations you need to know, listed alphabetically in one page, with bolded words being abbreviations assigned by Kubernetes:
Admission Control, Annotations, APIs, API Server, apply, Auto-scaling, CKAD, Clusters, ClusterRoles, cm=configmaps, Contexts, Control Plane, Controllers, CRD (Custom Resource Definition), CronJobs, Declarative, Discovery, ds=DaemonSets, deployment/, ep=endpoints, Environment Variables, Expose, hashes, health checks, hpa=HorizontalPodAutoscaler, Imperative, Init Containers, Ingress, JSONPath, KEDA, Kind, Kubelet, kube-proxy, Labels, LoadBalancer, Logging, Metadata, ns=Namespaces, Networking, netpol=NetworkPolicies, no=Nodes, NodePort, OpenShift, po=Pods, Podspecs, Readiness Probes, Liveness Probes, Probes, Persistent Volumes, Port Forwarding, PVC (Persistent Volume Claim), Replication, Replicas, rs=ReplicaSets, Rollbacks, Rolling Updates, Secrets, Selectors, svc=Services, sa=ServiceAccounts, Service Discovery, sts=StatefulSets, Storage Classes, Teamwork, Taints, Tolerations, Vim (tool), Volumes, VPA, Workloads API
REMEMBER: Memorizing and using abbreviations while manually typing commands will save you much time.
They will come up during basic interview questioning.
Insider Knowledge
The English word “kubernetes” is from the ancient Greek word based on “to steer” for people who pilot cargo ships –- “helmsman” or “pilot” in English. That’s why Docker/Kubernetes experts are called “captains”. Docker Captains work together on github.com/docker-captains/
Associated products have nautical themes, such as Helm (the package manager for Kubernetes).
The registered trademark for the logo of a sailing ship’s wheel, and Kubernetes code, are owned and maintained by the Linux Foundation (founded in 2000). The Linux Foundation created CNCF in 2015 to advance container technology.
Kubernetes is often abbreviated as k8s (pronounced “kate”), with 8 replacing the number of characters between k and s. Thus, https://k8s.io redirects you to the home page for Kubernetes software:
Predecessor to K8s
Kubernetes was created inside Google (using the Golang programming language). Kubernetes was used inside Google for over a decade before being open-sourced in 2014 to the Cloud Native Computing Foundation (cncf.io) collective.
This blog and podcast revealed that the predecessor to Kubernetes was the “Project 7” which built “The Borg” because initial developers were fans of the “Star Trek Next Generation” TV series 1987-1994 and related films. In the series, the “Borg” society subsumes all civilizations it encounters into its “collective”.*

 The logo for Kubernetes inside the 6 sided hexagons representing each Google service has 7 sides. This is because a beloved character in the U.S. TV series (played by Jeri Ryan) is a converted Borg called “7 of 9”.
See Timeline of Kubernetes
The logo for Kubernetes inside the 6 sided hexagons representing each Google service has 7 sides. This is because a beloved character in the U.S. TV series (played by Jeri Ryan) is a converted Borg called “7 of 9”.
See Timeline of Kubernetes
The Kubernetes community repo provides icon image files (resources) labeled and unlabeled, in png and svg formats in 128 and 256 pixels.
Distributions of Kubernetes
The “k0s” distribution, open sourced at https://docs.k0sproject.io/stable, is an “all-inclusive Kubernetes distribution, which is configured with all of the features needed to build a Kubernetes cluster and packaged as a single binary for ease of use. Due to its simple design, flexible deployment options and modest system requirements, k0s is well suited for Any cloud, Bare metal, Edge and IoT” because it has no host OS external runtime dependencies.
CNCF Versions
-
The complete list of CNCF-certified releases is where Kubernetes source code is open-sourced, at:
-
On that page, notice that Kubernetes uses Semantic Versioning:
- v1.0 (first commit by Joe Beda within GitHub) for first release on July 21, 2015
- v1.6 was led by a CoreOS developer
- v1.7 was led by a Googler
- v1.8 was led by Jaice Singer DuMars (@jaicesd) after Microsoft joined the CNCF July 2017 VIDEO
- v1.22 - containerD replaces Docker as the default container runtime (Red Hat uses CRI-O instead)
- version 1.28 introduces robust sidecar support and independent upgrade of Control Plane components.
- 1.34
-
Scroll down to see the release marked “Latest” as a green sausage.
-
Open another browser tab to get that “Latest” release at:
- On a Terminal CLI, get that release as a System Variable:
K8_LATEST_VER=$( curl -L -s https://dl.k8s.io/release/stable.txt )
echo $K8_LATEST_VER
-L tells curl to follow redirects.
-s runs it in silent mode (no progress bar, only output).
Alternately,
K8_LATEST_VER=$( wget -qO- https://dl.k8s.io/release/stable.txt )
echo $K8_LATEST_VER
-q runs quietly (no logs).
-O- directs the output to standard output (stdout).
-
On a Terminal CLI, get the latest stable release defined in a single-line file at either of two locations:
K8_VERSION=$( curl -sS https://storage.googleapis.com/kubernetes-release/release/stable.txt )
echo $K8_VERSION
-
Get the version from Google, which is usually less recent (such as v1.31.0):
https://storage.googleapis.com/kubernetes-release/release/stable.txt
Kubernetes is complex
The power and flexibility provided by Kubernetes means there is a lot to learn.
Additionally, Kubernetes is typically run within one or more clouds, which require considerable time to learn fully.
Ideally, those who use Kubernetes would have specialists pave the way at each of the necessary steps to adopting Kubernetes. But that’s not the case in most organizations.
The (now legacy Cloud Native Trail Map summarizes the sequence of Kubernetes adoption:
- Containerization
- CI/CD (automation)
- Orchestration & Application Definition
- Observability & Analysis
- Service Proxy, Discovery, Mesh
- Networking, Prolicy, Security
- Distributed database & storage
- Streaming & messaging
- Container Registry & runtime
- Software Distribution

There are dozens of projects and products in the Kubernetes ecosystem, as shown in this landscape map:

What Kubernetes contributes
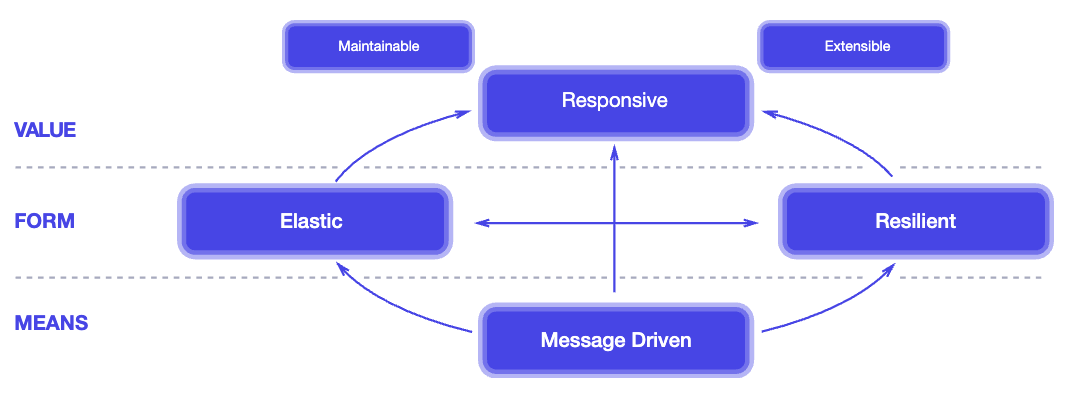
Kubernetes applies principles of the Reactive Manifesto of 2014:
- Infrastructure as code (IAC)
- Manage containers
- Naming and discovery
- Mounting storage systems
- Balancing loads
- Rolling updates
- Distributing secrets/config
- Checking application health
- Monitoring resources
- Accessing and ingesting logs
- Replicating application instances
- Horizontal autoscaling
- Debugging applications
Organize for Kubernetes as a Team Sport!
Kubernetes running in clouds has many moving parts that must be intricately configured and tuned to keep them reliable and secure.
Kubernetes was supposed to improve corporate agility and faster time to market.
However, most tutorials and courses are written to merely introduce individuals to learn Kubernetes basics rather than enabling a complex team to work together.
PROTIP: My assertion is that no one person can know everything about Kubernetes to operate it reliably and securely in a complex production enterprise. Hiring for superhumans expected to “know everything” is resulting in unnecessary turnover and down time.
PROTIP: Kubernetes in the cloud is so complex that most enterprises need to build a team of various specialists to ensure that Kubernetes is operated reliably and securely.
Kubernetes provides and enforces “significant decoupling between the layers of the serving stack: machine, operating system, application manager, and application code. This decoupling enables the development of specialized teams with agility and freedom to operate on their parts of the stack, thanks to separation of concerns:”
- hardware operations
- kernel operations
- cluster operations
- application operations
– From “How Kubernetes Changes Operations” by Brandan Burns.
BLAH: Most job descriptions for Kubernetes positions are written by people who don’t know Kubernetes enough to properly build a team around the complexity. So they search for people based only on technical certifications passed or based on counting years with “Kubernetes” in resumes.
Those who have a team exacerbate reliability by efforts to “protect” Kubernetes in production by limiting too-small a team of Operations specialists (separated from developers) who become a bottleneck to fast progress.
REMEMBER: Unlike other systems, in Kubernetes there are no “users”.
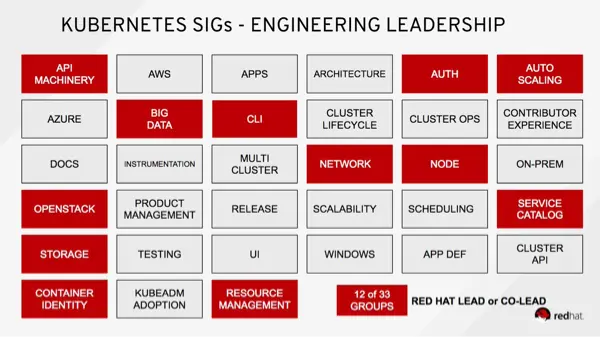
K8s API Special Interest Groups
Those who work on Kubernetes APIs are split into SIGs (Special Interest Groups), each with its own leadership structure. See https://kubernetes.io/docs/reference/generated/kubernetes-api/v1.19/ (which is one big page):
-
Service APIs: Endpoints, Ingress, Service
-
Workloads APIs: Container, Job, CronJob, Deployment, StatefulSet, ReplicaSet, Pod, ReplicationController
-
Config and storage APIs: ConfigMap, CSIDriver, Secret, StorageClass, Volume
-
Metadata APIs: Controller, CRD, Event, LimitRange, HPA (HorizontalPodAutoscaler), PodDistributionBudget, …
-
Cluster APIs: APIService, Binding, CSR, ClusterRole, Node, Namespace, Lease, PersistantVolume -> HostPathVolume.
After Red Hat (within IBM) bought CoreOS, it bragged that its people lead “11 of 29” SIGS:
How to build a Kubernetes team
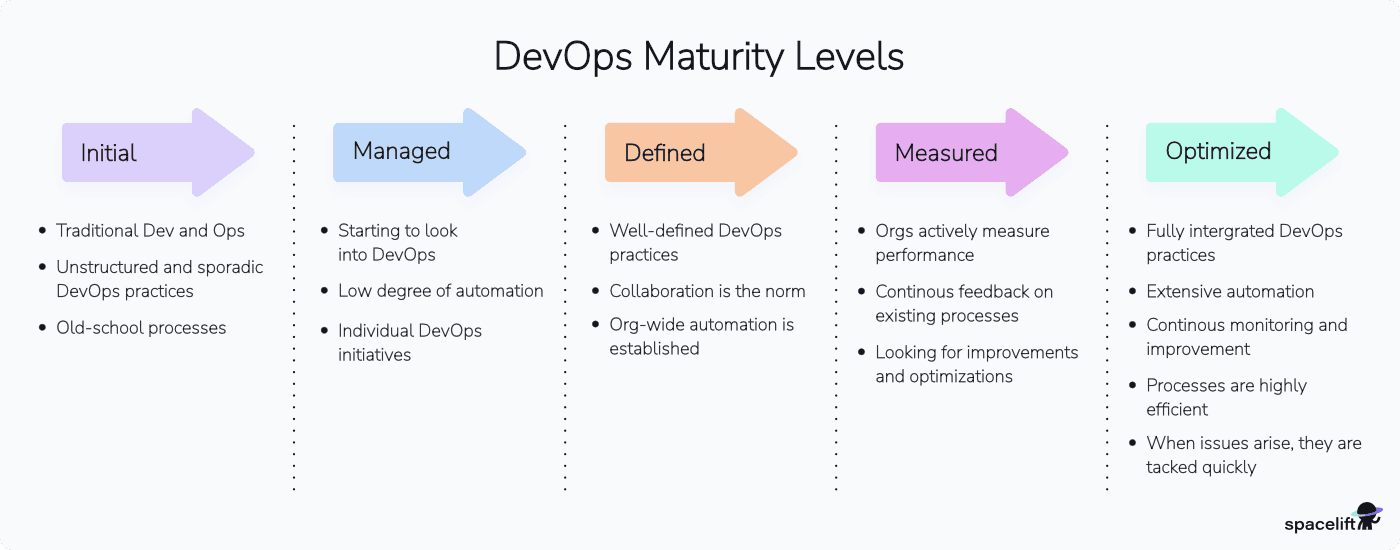
To achieve high maturity level:
-
Ensforce on-going use of a Team Calandar, Team KanBan, and Team file folders.
-
Schedule and hold sessions to sharing lessons learned and identify improvements as the only objective. Get a facilitator to enforce rules such as not criticizing ideas until it’s time.
This builds a culture that incentivizes helpfulness rather than competition and shaming.
-
Track unplanned work and categorize them by different dimensions in order to better allocate a budget instead of always being reactive (under seige). Having a list of projects enables better prioritization, and gives a complete picture for funding the team for 24/7 readiness that they are not just sitting around.
Assess the likelihood of its occurrence and the resulting level of impact if it does.
-
Identify barriers and dis-incentive for deep and well-rounded skills acquisition around Kubernetes and related skills. For example, work on defensive security is often neglected. A team that discusses lessons learned and innovations from other organizations can better avoid catastrophies.
Some like isolated Kubernetes skills because the shortage of Kubernetes skills has resulted in $300,000/year salaries for top Kubernetes jobs.
-
Form “buddy” sessions for paired work on problems together. This enables each to learn techniques that are learned through observation. Learnings are not just about debugging, but also optimal time management to maintain focus. This also what enables rotation among specialties so individuals are truely capable at many tasks.
-
Define a thorough on-boarding for those who join the team. Pre-install as much on each laptop as possible so work can begin immediately. This refines and standardizes tools and processes used by the team. Ensure joiners meet with everyone and can recall key info about the systems and others.
-
Clarify the basis for performance reviews, salary increases, and promotions – and what blocks advancement. Identify artifacts that individuals and teams can and should keep private (such as burndown charts, refactoring, automation, etc.).
-
Pay for on-line training and certifications to build knowledge and skills (in operating systems, security, networking, cloud, etc.). Vendors include KodeKloud.com. This helps build a “bench” of talent.
-
Managers track learning time and achievement versus budget for those they manage.
Many managers do not encourage skill advancement ahead of need because they are afraid of losing their people to other teams or companies. So this needs to be imposed on them by executives.
Many managers discourage skill advancement ahead of need to save money. This is reflected in hiring of contract workers (without benefits) who are not expected to be around long enough to learn.
-
Install full monitoring/observability tools and expose production analytics to everyone as the first step to develop understanding of how Kubernetes works. Evaluating what to use is a project. The “LGTM” stack is widely adopted because it’s fully open source, Kubernetes‑native, and flexible for self‑hosting or hybrid managed setups. LGTM stands for (Loki–Grafana–Tempo–Mimir/Prometheus): Loki (or OpenObserve) for logging, Grafana for visualization, Tempo (Jaeger) for tracing, Mimir and Prometheus for metrics. Others are Opentelemetry (OT) for instrumentation, SigNoz, Checkmk for Root Cause Analysis, OpenObserve, etc. Licensed options providing integrated functionality include Splunk, New Relic, Datadog, Dynatrace, Groundkover, Kloudfuse, etc. [Comparison] Opsgenie,
-
Define an error budget that matches mechanisms to establish redundancy. An enterprise which, every 3 months, redeploy everything in a different data enter in another region to ensure failover works, would have a smaller error budget. An error budget reflects the risks accepted by inaction. The great the risk, the more issues and longer downtime should be expected.
Expecting zero defects and no download without staffing for mechanisms described here is like turkeys burying their head in the sand. That leads to preventable turnover and unecessary office politics.
-
Maintain a duplicate environment to safely test making changes to production at scale. It’s needed to provide a “data-driven” approach to tune Kubernetes. For example, to ensure that the “thundering herd” problem does not occur when services come back up at scale.
This can be a waste of time if assets are not kept up to date with the latest version of Kubernetes and the latest versions of the many components that make up Kubernetes.
-
Compile playbooks of manual steps and tools in response to issues that occur, then automate them with self-healing tools that automatically apply fixes. VIDEO: Use n8n AI Article
-
Conduct regular “chaos engineering” exercises that purposefully injects faults to identify the timeliness and completeness of incident response. This is how the organization proves that it can handle problems, that alerts are issued based on trends and reach the appropriate people when needed.
Security people have defined their “Red Teaming” methodology, in which a team of testers deliberately probes the solution for weaknesses and attempts to produce harmful results. Although these are mandated by many audit requirements, this can be a waste of time if the exercises are not organized properly and results are hidden.
-
Construct “self-service” portals and utilities to simplify frequent processes and save developer’s time for common activities.
But portals can become “anti-patterns” because they can also limit innovation (new features) and block individual developers from learning to work quickly and troubleshoot independently.
Self-Healing Automation
One of the reasons for adopting Kubernetes is that it can automatically restore cluster health: * Looking at each level:
-
The kubelet service ensures containers are running, and restarts those that fail per the defined restartPolicy. Kubernetes automatically removes it from the Service’s endpoints. This ensures that traffic is routed only to healthy Pods.
-
If a node is running a Pod with a PersistentVolume (PV) attached, and the node fails, Kubernetes can reattach the volume to a new Pod on a different node.
However, if a persistent volume becomes unavailable (due to being full) or hardware failure, action outside of Kubernetes would be needed.
-
If a Pod in a Deployment or StatefulSet that is part of a DaemonSet fails, to maintain the specified number of replicas, the control plane creates a replacement Pod to run on the same node.
-
Application programming errors within underlying application issues must be addressed separately.
Add-on tools such as Komodor monitors it all and suggests actions, like a human expert would.
For “full node lifecycle management” to minimize downtime, reduce manual intervention, and improve security, the Devtron Resource Watcher detects and remediates common Kubernetes issues automatically in self-healing Kubernetes clusters created by Kured (Kubernetes Reboot Daemon), a CNCF Sandbox project. Kured manages node reboots safely after updates or failure detection, coordinating Pod rescheduling to minimize downtime.
Netdata stack provides real-time monitoring, anomaly detection, and automated alerts that can trigger remediation workflows with Ansible or Node-RED.
K9s Auto-Remediation Workflows automates recovery actions and integrates with observability tools for dynamic issue resolution.
This article: Automation
Because of the above issues, I am creating scripts that can, with one command, invoke a CI/CD workflow (on GitHub.com) that uses Terraform IaC and Sentinel PaC to stand up a Kubernetes cluster within AWS (after installing clients and establishing credentials), then identify the optimal Kunbernetes specifications by running tests of how quickly it takes Kubernetes to scale horizonatally and vertically.
But that’s just the beginning.
The contribution of this article is a carefully sequenced presentation of complex material so it’s both easier to understand quickly yet more deeply. “PROTIP” flags insightful commentary while hands-on activities automated in a shell script – an immersive step-by-step “deep dive” tutorial to both prepare for Kubernetes exams and to work as an SRE in production use.
TL;DR Professional certifications in Kubernetes
VIDEO:: If you’re here for advice on how to pass the KCNA, CKAD, here is my advice:
-
PROTIP: Instead of trying to memorize everything, during the test you’re given access only to Kubernetes official documentation, get used to navigating those set of pages to look stuff up. NOTE: There is support for other languages other than English. Foresake all other docs and utilities until after you pass (and get a real job using Kubernetes where you would consider Service Mesh, Kustomize, Jsonnet, etc.).
-
PROTIP: Instead of multiple choice questions, K8s exam consists of task-based practical responses while SSH’d into live clusters . So first minute into the exam, configure your Terminal with keyboard shortcuts (such as k instead of kubectl), and use command abbreviations.
-
PROTIP: Learn to be proficient at the text editor that come with Ubuntu Linux, which is vi.
-
PROTIP: Study using KodeKloud’s gamified hands-on troubleshooting pedagogy that moves you logically through 49 topics. Quizzes follow each topic. You can access it via Udemy.com.
-
Each exam includes one free fail retake.
Kubernetes CSPs
Kubernetes can run within private on-premises data centers on “bare metal” machines.
But being open-source has enabled Kubernetes to flourish on multiple clouds*
- ACK = Alibaba Cloud Kubernetes
- AKS = Azure Kuberntes Service using az aks commands
- ECS = Elastic Container Service (in AWS)
- EKS = Elastic Kubernetes Service (in AWS) using eksctl commands
-
GKE = Google Kubernetes Engine gcloud container
- IBM cloud Kubernetes Service
- OKD = OpenShift (Red Hat) Enterprise platform as a service (PaaS) Origin community distribution - OpenShift Dedicated, OpenShift Online
-
KUBE2GO
- PKS = VMWare Tanzu purchase of Pivotal, Heptio (Joe Bada, Craig McLukie), morph from PCS
- RKE = Rancher Kubernetes Engine
-
Rackspace’s Kubernetes as a Service
- DOKS = Digital Ocean (Istio)
-
OKS = Oracle
- PKE = Bonzai
- MKE = D2iQ (Day two iQ) rebranded from Mesos DC/OS meta clusters
-
Canonical
-
https://github.com/kubernetes-sigs/kubespray
- And others
Cloud Playgrounds
PROTIP: To follow along many tutorials, Admin permissions are needed for the account being used. So it’s best you use a “play” account rather than a work account.
You can learn to use Kubernetes even on a Chromebook laptop if you use a cloud-based learning environment (sandbox). A subscription is needed on some.
- KataKoda [FREE]
- Qwiklabs
- ACloudGuru [Subscription]
- CloudAcademy [Subscription]
KataKode
-
PROTIP: I prefer KataKoda because it provides Two terminal sessions when other options I have mess with jumping back and forth.
-
When you see the terminal prompt, type uname -a for:
Linux controlplane 4.15.0-122-generic #124-Ubuntu SMP Thu Oct 15 13:03:05 UTC 2020 x86_64 x86_64 x86_64 GNU/Linux
Notice “controlplane”.
Notice that KataKoda runs Linux Ubuntu, so use the installer appropriate for it.
-
Get status:
kubectl cluster-info
Kubernetes master is running at https://172.17.0.17:6443
KubeDNS is running at https://172.17.0.17:6443/api/v1/namespaces/kube-system/services/kube-dns:dns/proxy
Notice “master”. That’s what runs the control plane. To be culturally sensitive, “Master Node” has been renamed to “Control Plane Node”.
“KubeDNS”
-
Launch a two-node Kubernetes cluster with a single command:
launch.sh
Waiting for Kubernetes to start...
Kubernetes started
Next, consider [FREE] guided K8s Katas by Contino. It uses K8s Namespace “kube-system”. It also has a “kube-public” namespace where nothing runs, but contains a ConfigMap which contains the bootstrapping and certificate configuration for the Kubernetes cluster.
Now proceed to use other Kublectl commands.
ACloudGuru
-
https://acloudguru.com has both guided Labs and playground sandboxes on AWS, GCP, and Azure.
ACloudguru.com CKAD course by William Boyd has 3.5 hours of video organized according to exam domains, 13 hands-on labs, and 3 practice exams based on v1.13 (older version).
CloudAcademy.com
-
https://cloudacademy.com Playground lab enables you to skip all the install details
CloudAcademy’s 11-hour “Learning Path” course was updated August 27th, 2019 by Logan Rakai.
PROTIP: A browser-based session times out too quickly and is cumbersome to copy and paste. So use SSH instead.
KodeKloud
-
STAR: KodeKloud is especially effective because it’s gamified troubleshooting where it provides a situation you have to figure out the commands, just like in the certification tests.
A KodeKloud subscription includes access to a KataKoda-powered lab environment for one hour at a time, then you have to start over. The instances come up quickly, though.
KataKoda, Red Hat’s OpenShift Playground using its “oc” CLI program. The KataKoda playground environment is pre-loaded with Source-to-Image (S2I) builders for Java (Wildfly), Javascript (Node.JS), Perl, PHP, Python and Ruby. Templates are also available for MariaDB, MongoDB, MySQL, PostgreSQL and Redis.
PROTIP: The k alias for kubectl is already configured, so type k instead of kubectl.
Qwiklabs
-
Qwiklabs has several hands-on labs using Kubernetes on Google Cloud.
Occassionally, Google offers free time.
Try the FREE 30-minute Kubernetes Engine: Qwik Start which is one of the “quests” in Google’s Kubernetes in the Google Cloud Qwiklab quest. Tasks:
- Task 1: Set a default compute zone
- Task 2: Create a GKE cluster
- Task 3: Get authentication credentials for the cluster
- Task 4: Deploy an application to the cluster
- Task 5: Deleting the cluster
Deploying Google Kubernetes Engine Clusters from Cloud Shell
Qwiklabs QUEST: Secure Workloads in Google Kubernetes Engine consists of 8 labs covering 8 hours.
Qwiklabs are used in Coursera courses, which explains provides lab solutions videos such as:
- Accessing the Cloud Console and Cloud Shell
- Deploying GKE
- Implementing Role-Based Access Control with Google Kubernetes Engine
30 days free training instances after completing a Tour class.
Others
- https://play-with-k8s.com was provided free by Docker. Now defunct.
Hands-on Demos/labs
I think the quickest yet deepest way to learn Kubernetes is to follow step-by-step instructions after seeing guided Labs (“demos”) using pre-loaded data. Hands-on practice is how you develop the “muscle memory” need to operate Kubernetes confidently.
PROTIP: To pass Kubernetes exams, you need to master the many CLI commands that control the Native Kubernetes command line interface (CLI): kubectl (pronounced “cube cuddle” or “cube see-tee-el” or “cube control”).
https://kubernetes.io/docs/user-guide/prereqs
There are several options to run kubectl:
A. Just the Kubectl CLI program can be installed on your laptop for you to communicate directly to a K8s master.
B. More commonly in production use, you use SSH to tunnel into a “Bastion host” in the cloud. Cloud-based training vendor CloudAcademy provides training on how to setup Kubernetes.
C. In a Terminal on your laptop use the Cloud Shell/Console CLI programs provided by the cloud vendor (AWS, Azure, GCP, etc.), which may involve costly bills.
D. If you have a laptop with enough memory and CPU, install a Minimal distribution:
- Minikube (see below)
- AWS ECS & EKS Anywhere
- install from the K8s hypercube Docker container
- Rancher Desktop at https://rancherdesktop.io
- K3s
- Microk8s on Linux
- Minishift
- VIDEO: KIND (Kubernetes in Docker) https://kind.sigs.k8s.io/ builds K8s clusters out of Docker containers running Docker in Docker, good for integration with a CI/CD pipeline.
A K8s on Raspberry Pi run on separate computers that are cheap ($70 USD), silent, and private. So they don’t consume disk space on your laptop.
But Pi’s are limited to 8 GB of RAM and based on newer ARM architecture rather than Intel x86 architecture used by PC’s and MacOS.
On Sep 2021, Dan Tofan released on Pluralsight “How to build a Kubernetes Cluster on 3+ Raspberry Pi”.
Scott Hanselman built Kubernetes on 6 Raspberry Pi nodes, each with a 32GB SD card to a 1GB RAM ARM chip (like on smartphones). Hansel talked with Alex Ellis (@alexellisuk) keeps his instructions with shell file updated for running on the Pis to install OpenFaaS.
CNCF Ambassador Chris Short developed the rak8s (pronounced rackets) library to make use of Ansible on Raspberry Pi.
Others:
- https://blog.hypriot.com/getting-started-with-docker-on-your-arm-device/
- https://blog.sicara.com/build-own-cloud-kubernetes-raspberry-pi-9e5a98741b49
App containers within Pods
Kubernetes runs apps (application executables) that have been “dockerized” within a Container “image” folder stored for retrieval from a container image registry such as:
- Docker Hub cloud
- Docker Enterprise (on-prem)
- JFrog Artifactory
- Nexus
- Quay.io (operated by Red Hat)
Kubernetes runs apps containers within Pods.

Every app Container has its own unique port number to a unique internal IP assigned to each Pod.
App Containers within the same Pod share the same internal IP address, hostname, Linux namespaces, cgroups, storage Volumes, and other resources.
-
List all Container images in all namespaces:
kubectl get pods --all-namespaces -o jsonpath="{.items[*].spec.containers[*].image}" |\
tr -s '[[:space:]]' '\n' |\
sort |\
uniq -c
Fetch all Pods in all namespaces using kubectl get pods –all-namespaces Format the output to include only the list of Container image names using -o jsonpath={.items[].spec.containers[].image}. This will recursively parse out the image field from the returned json. See the jsonpath reference for further information on how to use jsonpath. Format the output using standard tools: tr, sort, uniq Use tr to replace spaces with newlines Use sort to sort the results Use uniq to aggregate image counts
Sidecars within Pods
Those who choose to use the Service Mesh Istio architecture place an “Envoy proxy” in each Pod to facilitate communictions and retry logic from app containers with business logic.
Within each Pod, all Containers share the same lifecycle – get created and removed together.
Pod Replicas within Worker Nodes

As illustrated on the right side of the diagram above:
“Worker Nodes”, the equivalent of physical host servers, are created to house various numbers of Pods.
LIMITS: Production setups have at least 3 nodes per cluster. K8s supports up to 5,000 node clusters of up to 150,000 pods (at v1.17).
Each Pod is “replicated” with the same set of Containers specified in a Deployment specification.
Again, “Replicas” of Pods are created within “Worker Nodes”.
PROTIP: “The median number of containers running on a single host is about 10.” – Sysdig, April 17, 2017. But there can be up to 100 pods per node (at v1.17)
Control Plane Orchestration within a Master Node
To run and manage (orchestrates) several Worker Nodes, the Master Node of each cloud vendor maintains its “control plane” consisting of several key processes (aka service components):
-
The API server (named “kube-apiserver”) receives all administrative commands as REST API calls. So it’s called the “front-end”. Command-line programs communicating with Kubernetes do so by converting commands into REST API calls to the API server.
-
etcd is the database (key-value data store) within each cluster. PROTIP: etcd is the one stateful component, so many run it in a cluster separate for its own HA redundancy.
-
The Kube-Controller-Manager watches the state (status) of each cluster (as persisted in etcd) and attempts to move the current state towards the desired state (as defined in Yaml files). Various Controllers actually instantiate the actual resource represented by Kubernetes resource definitions.
-
The kube-scheduler assigns Pods to Nodes and communicates to the Kubelet to sechedule Pods.
-
The kublet agent on all nodes ensures containers are started.
-
The cloud-controller-manager optionally runs containers within Kubernetes.
-
Container runtime runs containers within Kubernetes.
Core K8s Internals
Kubernetes automates resilience by abstracting the network and storage shared by ephemeral replaceable pods which the Kubernetes Controller replicates to increase capacity.

This diagram (from CloudAcademy) illustrates core technical concepts about Kubernetes. In the center at the right:

Pods consume static Configmaps and Secrets.
Volumes of persistent data storage
Auto-Scaling
Unlike within AWS, where Auto Scaling Groups (ASGs) are used to scale nodes,
Within Kubernetes are these auto-scaling mechanisms:
- https://spot.io/resources/kubernetes-autoscaling-3-methods-and-how-to-make-them-great/
- https://spot.io/resources/kubernetes-autoscaling/kubernetes-replicaset-kubernetes-scalability-explained/
-
https://docs.openshift.com/container-platform/4.8/nodes/pods/nodes-pods-vertical-autoscaler.html
-
Cluster Autoscaler (CA) adjusts the number of nodes in a cluster. It automatically adds or removes nodes in a cluster when nodes have insufficient resources to run a pod (adds a node) or when a node remains underutilized, and its pods can be assigned to another node (removes a node).
-
HPA (Horizontal Pod Autoscaler) scales more copies of the same pod (assuming that the hosted application supports horizontal scaling via replication). HPA uses custom metrics such as the number of incoming session requests by end-users to a service load balancer.
-
Event-Driven Autoscaler is a Red Hat/Microsoft project that can scale a wide range of objects automatically.
-
VPA (Vertical Pod Autoscaler) analyzes standard CPU and memory resource usage metrics to provide recommendations CPU and memory resource configuration to align cluster resource allotment with actual usage. An example of its recommendation output:
  status:
    conditions:
        - lastTransitionTime: "2020-12-23T10:33:13Z"
        status: "True"
        type: RecommendationProvided
    recommendation:
       containerRecommendations:
       - containerName: nginx
       lowerBound:
          cpu: 40m
          memory: 3100k
       target:
          cpu: 60m
          memory: 3500k
       upperBound:
          cpu: 831m
          memory: 8000k
The lowerBound limit defines the minimum amount of resources that containers need.
If configured, the VPA updater should be able to automatically restart nodes to carry out its recommendations and increase or decrease existing pod containers. But that is currently not recommended in production because of concerns about churn disrupting reliability – exceeding the Kubernetes PodDisruptionBudget (PDB) – minAvailable and maxUnAvailable.
Concerns about VPAs are: VIDEO:
- Complex YAML-based configuration for each container?
- Limited practicality at scale?
- Basic, reactive statistical modeling?
- Limited time-frame (looks at 8 days, which misses monthly, quarterly, yearly seasonality cycles)?
- Resource slack to reduce risk of throttling & OOM errors?
Thus, Google has come up with their service.
-
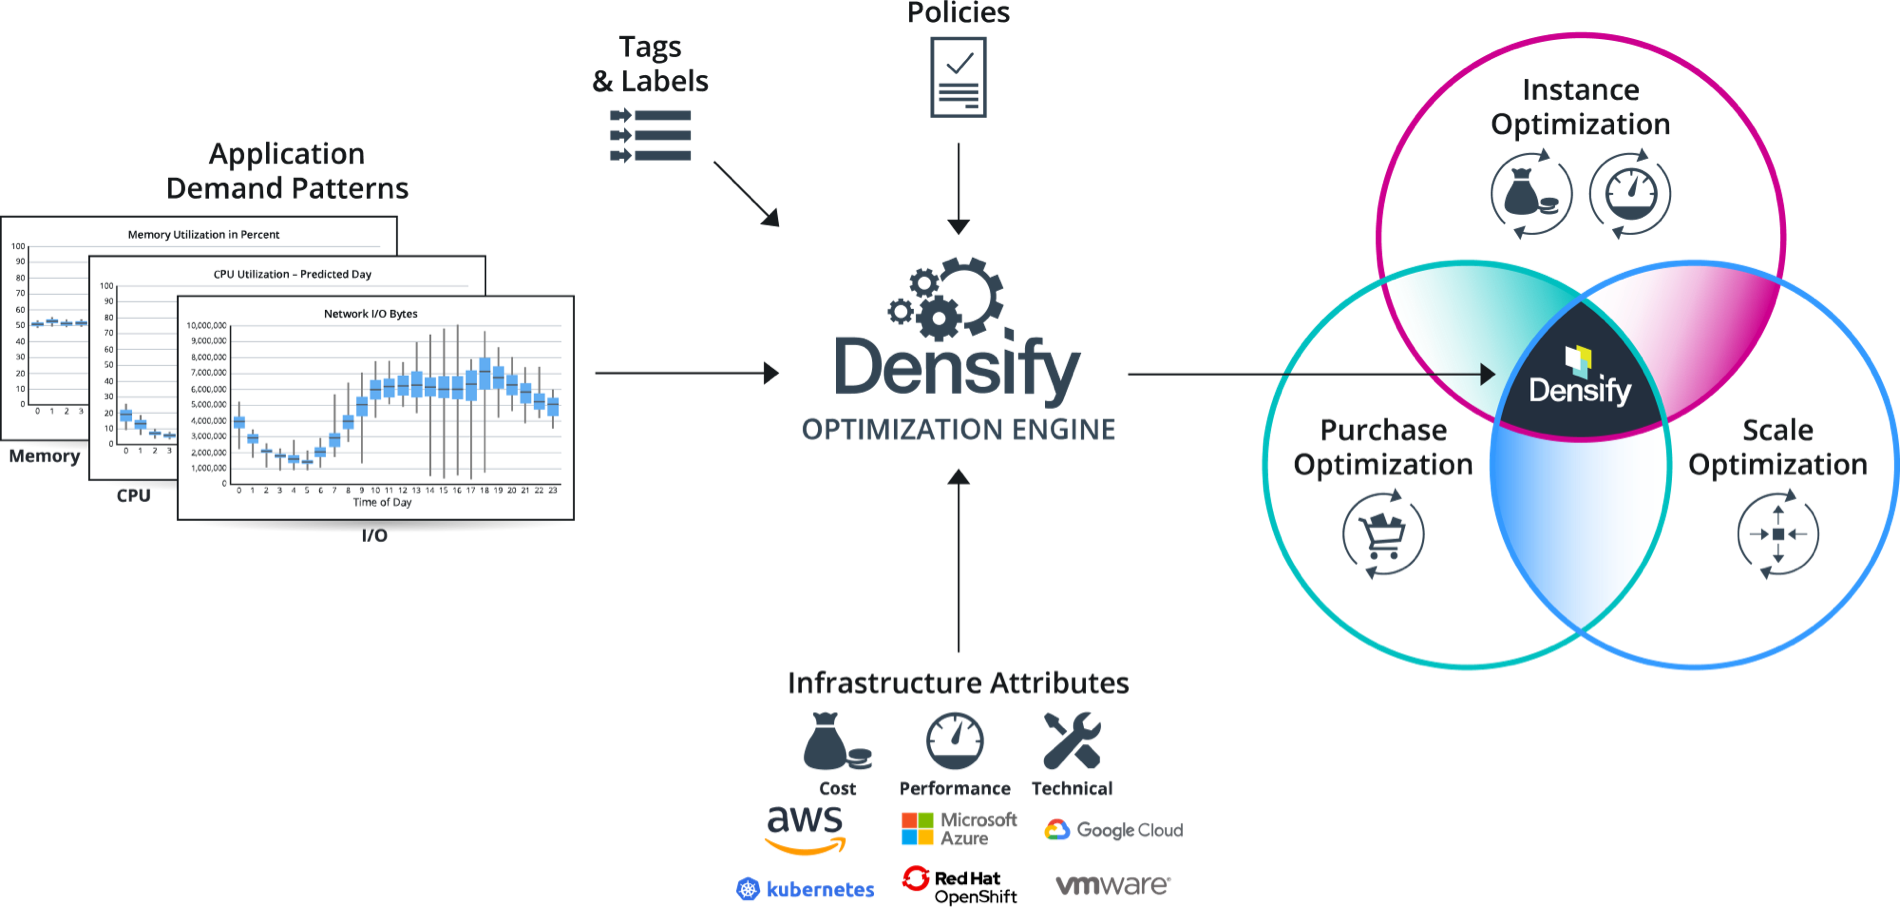
Densify.com provides a commercially available (paid) option which uses sophisticated Machine Learning mechanisms. It provides an API.
-
VIDEO: Stormforge.io uses Machine Learning to adjust based on experiments conducted in a dev instance.
- Prometheus Adapter for Kubernetes API?
VIDEO: Install the Metrics Server from https://github.com/kubernetes-sigs/metrics-server
VPA (Vertical Pod Autoscaler)
This section is based on several references:
- https://www.kubecost.com/kubernetes-autoscaling/kubernetes-vpa/ (the best description)
- https://www.densify.com/kubernetes-autoscaling/kubernetes-vpa (identifies issues with VPA)
- https://www.giantswarm.io/blog/vertical-autoscaling-in-kubernetes
- https://docs.aws.amazon.com/eks/latest/userguide/vertical-pod-autoscaler.html
- https://github.com/kubernetes/autoscaler/tree/master/vertical-pod-autoscaler
- https://cloud.google.com/kubernetes-engine/docs/concepts/verticalpodautoscaler
- BLOG:
- verticalpodautoscaler CRD
- https://blog.digitalis.io/kubernetes-capacity-planning-with-vertical-pod-autoscaler-7c1690dc38b3
- https://docs.oracle.com/en-us/iaas/Content/ContEng/Tasks/contengusingverticalpodautoscaler.htm
- https://www.alibabacloud.com/help/en/container-service-for-kubernetes/latest/vertical-pod-autoscaling
By default, the Kubernetes scheduler does not re-evaluate a pod’s resource needs after that pod is scheduled. As a result, over-allocated resources are not freed or scaled-down. Conversely, if a pod didn’t request sufficient resources, the scheduler won’t increase them to meet the higher demand. The implications of this is that:
-
If resources are over-allocated, unnecessary workers are added, waste unused resources, and monthly bills increase.
-
If resources are under-allocated, resources will get used up quickly, application performance will suffer, and the kubelet may start killing pods until resource utilization drops.
The Kubernetes Vertical Pod Autoscaler (VPA) VPA automatically adjusts the CPU and memory reservations for pods to “right size” applications. It analyzes resource usage over time to either down-scale pods that are over-requesting resources, and up-scale pods that are under-requesting resources. It maintains ratios between limits and requests specified in initial containers configuration. VPA frees users from manually adjusting resource limits and requests for containers in their pods.
To deploy the Vertical Pod Autoscaler to your cluster:
-
Define a Kubernetes Deployment that uses VPA for resource recommendations, using this sample YAML manifest:
apiVersion: apps/v1
kind: Deployment
metadata:
  name: nginx-deployment
  labels:
 app: nginx
spec:
  replicas: 2
  selector:
 matchLabels:
   app: nginx
  template:
 metadata:
   labels:
     app: nginx
 spec:
   containers:
   - name: nginx
     image: nginx:1.7.8
     ports:
     - containerPort: 80
Note that the file above has no CPU or memory requests. The pods in the Deployment belong to the VerticalPodAutoscaler (shown in the next paragraph) as they are designated with the kind, Deployment and name, nginx-deployment.
-
Define a VPA resource:
apiVersion: autoscaling.k8s.io/v1
kind: VerticalPodAutoscaler
metadata:
  name: app-vpa
spec:
  targetRef:
 apiVersion: "apps/v1"
 kind: Deployment
 name: app
  resourcePolicy:
 containerPolicies:
   - containerName: '*'
     controlledResources:
       - cpu
       - memory
     maxAllowed:
       cpu: 1
       memory: 500Mi
     minAllowed:
       cpu: 100m
       memory: 50Mi
  updatePolicy:
 updateMode: "Auto"
The targetRef (reference) allows specification of which workload is subject VPA actions. The above example says kind: Deployment, it can also be any of Deployment, DaemonSet, ReplicaSet, StatefulSet, ReplicationController, Job, or CronJob.
- Create an existing Amazon EKS cluster.
- The Metrics server must be deployed in your cluster.
- Open a terminal window.
-
Upgrade openssl to at least version 1.1.1 (currently LibreSSL 2.8.3):
openssl version
- Navigate to a directory that corresponds to your GitHub account, where you want to download source code.
-
View the documentation
https://github.com/kubernetes/autoscaler/tree/master/vertical-pod-autoscaler
Autoscaling is configured with a Custom Resource Definition object called VerticalPodAutoscaler.
CAUTION: There is a VPA version specific to each version of Kubernetes.
-
Clone the kubernetes/autoscaler GitHub repository and change to directory:
git clone https://github.com/kubernetes/autoscaler.git
cd autoscaler/vertical-pod-autoscaler/
-
unset environment variables $REGISTRY and $TAG unless you want to use a non-default version of VPA.
-
(Optional) If you have already deployed another version of the Vertical Pod Autoscaler, remove it:
If running on GKE, clean up role bindings created in Prerequisites:
kubectl delete clusterrolebinding myname-cluster-admin-binding
./hack/vpa-down.sh
If VPA stops running in a cluster, resource requests for the pods already modified by VPA will not change, but any new pods will get resources as defined in your controllers (i.e. deployment or replicaset) and not according to previous recommendations made by VPA.
-
This assumes your nodes have internet access to the k8s.gcr.io container registry. If not, pull the following images and push them to your own private repository. For more information about how to pull the images and push them to your own private repository, see https://docs.aws.amazon.com/eks/latest/userguide/copy-image-to-repository.html Copy a container image from one repository to another repository.
k8s.gcr.io/autoscaling/vpa-admission-controller:0.10.0
k8s.gcr.io/autoscaling/vpa-recommender:0.10.0
k8s.gcr.io/autoscaling/vpa-updater:0.10.0
If you’re pushing the images to a private Amazon ECR repository, then replace k8s.gcr.io in the manifests with your registry. Replace 111122223333 with your account ID. Replace region-code with the AWS Region that your cluster is in. The following commands assume that you named your repository the same as the repository name in the manifest. If you named your repository something different, then you’ll need to change it too.
sed -i.bak -e 's/k8s.gcr.io/111122223333.dkr.ecr.region-codeamazonaws.com/' ./deploy/admission-controller-deployment.yaml
sed -i.bak -e 's/k8s.gcr.io/111122223333.dkr.ecr..dkr.ecr.region-codeamazonaws.com/' ./deploy/recommender-deployment.yaml
sed -i.bak -e 's/k8s.gcr.io/111122223333.dkr.ecr..dkr.ecr.region-codeamazonaws.com/' ./deploy/updater-deployment.yaml
-
Check if all Kubernetes system components are running: 3 pods (recommender, updater and admission-controller) all in Running state:
kubectl --namespace=kube-system get pods|grep vpa
-
Check that the VPA service actually exists:
kubectl describe -n kube-system service vpa-webhook
Name:              vpa-webhook
Namespace:         kube-system
Labels:            <none>
Annotations:       <none>
Selector:          app=vpa-admission-controller
Type:              ClusterIP
IP:                <some_ip>
Port:              <unset>  443/TCP
TargetPort:        8000/TCP
Endpoints:         <some_endpoint>
Session Affinity:  None
Events:            <none>
-
Check that the VPA admission controller is running correctly:
kubectl get pod -n kube-system | grep vpa-admission-controller
Sample output:
vpa-admission-controller-69645795dc-sm88s 1/1 Running 0 1m
-
Check the logs of the admission controller using its id from the previous command, such as:
kubectl logs -n kube-system vpa-admission-controller-69645795dc-sm88s
If the admission controller is up and running, but there is no indication of it actually processing created pods or VPA objects in the logs, the webhook is not registered correctly.
-
Deploy the Vertical Pod Autoscaler to your cluster:
./hack/vpa-up.sh
CAUTION: Whenever VPA updates pod resources, the pod is recreated, which causes all running containers to be restarted. The pod may be recreated on a different node.
VPA recommendation might exceed available resources (e.g. Node size, available size, available quota) and cause pods to go pending. This can be partly addressed by using VPA together with Cluster Autoscaler.
-
Check that the VPA Custom Resource Definition was created:
kubectl get customresourcedefinition | grep verticalpodautoscalers
-
Verify that the Vertical Pod Autoscaler pods have been created successfully:
kubectl get pods -n kube-system
Sample output:
NAME                                        READY   STATUS    RESTARTS   AGE
...
metrics-server-8459fc497-kfj8w              1/1     Running   0          83m
vpa-admission-controller-68c748777d-ppspd   1/1     Running   0          7s
vpa-recommender-6fc8c67d85-gljpl            1/1     Running   0          8s
vpa-updater-786b96955c-bgp9d                1/1     Running   0          8s
The VPA project’s components:
-
Recommender monitors the current and past resource consumption and, based on it, provides recommended values for the containers’ cpu and memory requests.
-
Updater checks which of the managed pods have correct resources set and, if not, kills them so that they can be recreated by their controllers with the updated requests.
-
K8s Admission Plugin sets the correct resource requests on new pods (either just created or recreated by their controller due to Updater’s activity).
kind: Pod are defined by a PodSpec configuration file such as:
kind: Pod metadata: name: nginx spec: containers: - name: nginx image: nginx:1.14.2 ports: - containerPort: 80 -
-
To verify that it works, deploy the hamster.yaml Vertical Pod Autoscaler:
kubectl apply -f examples/hamster.yaml
Example contents at autoscaler/vertical-pod-autoscaler/examples/hamster.yaml
apiVersion: autoscaling.k8s.io/v1
kind: VerticalPodAutoscaler
metadata:
  name: my-app-vpa
spec:
  targetRef:
 apiVersion: "apps/v1"
 kind:       Deployment
 name:       my-app
  updatePolicy:
 updateMode: "Auto"
-
updateMode = auto applies the recommendations directly by updating/recreating the pods. CAUTION: When VPA applies the change, each pod restarts, which causes a workload disruption.
-
updateMode = initial applies the recommended values to newly created pods only.
-
updateMode = off simply stores the recommended values for reference. This is preferred in production environments. Feed the recommendations to a capacity monitoring dashboard such as Grafana, and apply the recommendations in the next deployment cycle.
-
-
Get pod IDs from the hamster sample application:
kubectl get pods -l app=hamster
Sample output:
hamster-c7d89d6db-rglf5   1/1     Running   0          48s
hamster-c7d89d6db-znvz5   1/1     Running   0          48s
-
Describe one of the pods to view its cpu and memory reservation to replace “c7d89d6db-rglf5” with one of the IDs returned in from the previous step:
kubectl describe pod hamster-c7d89d6db-rglf5
Sample output:
Containers: hamster: Container ID: docker://e76c2413fc720ac395c33b64588c82094fc8e5d590e373d5f818f3978f577e24 Image: k8s.gcr.io/ubuntu-slim:0.1 Image ID: docker-pullable://k8s.gcr.io/ubuntu-slim@sha256:b6f8c3885f5880a4f1a7cf717c07242eb4858fdd5a84b5ffe35b1cf680ea17b1 Port:
Host Port: Command: /bin/sh Args: -c while true; do timeout 0.5s yes >/dev/null; sleep 0.5s; done State: Running Started: Fri, 27 Sep 2019 10:35:16 -0700 Ready: True Restart Count: 0 Requests: cpu: 100m memory: 50Mi </pre> See that the original pod reserves 100 millicpu of CPU and 50 mebibytes of memory. For this example application, 100 millicpu is less than the pod needs to run, so it is CPU-constrained. It also reserves much less memory than it needs. The Vertical Pod Autoscaler vpa-recommender deployment analyzes the hamster pods to see if the CPU and memory requirements are appropriate. If adjustments are needed, the vpa-updater relaunches the pods with updated values. -
Wait for the vpa-updater to launch a new hamster pod. This should take a minute or two. You can monitor the pods:
Note: If you are not sure that a new pod has launched, compare the pod names with your previous list. When the new pod launches, you will see a new pod name.
kubectl get --watch pods -l app=hamster
The response is a pod ID such as “hamster-c7d89d6db-jxgfv”.
-
When a new hamster pod is started, describe it and view the updated CPU and memory reservations.
kubectl describe pod hamster-c7d89d6db-jxgfv
Sample output:
Containers:
  hamster:
 Container ID:  docker://2c3e7b6fb7ce0d8c86444334df654af6fb3fc88aad4c5d710eac3b1e7c58f7db
 Image:         k8s.gcr.io/ubuntu-slim:0.1
 Image ID:      docker-pullable://k8s.gcr.io/ubuntu-slim@sha256:b6f8c3885f5880a4f1a7cf717c07242eb4858fdd5a84b5ffe35b1cf680ea17b1
 Port:          <none>
 Host Port:     <none>
 Command:
   /bin/sh
 Args:
   -c
   while true; do timeout 0.5s yes >/dev/null; sleep 0.5s; done
 State:          Running
   Started:      Fri, 27 Sep 2019 10:37:08 -0700
 Ready:          True
 Restart Count:  0
 Requests:
   cpu:        587m
   memory:     262144k
In the sample output above, see that the cpu reservation increased to 587 millicpu, which is over five times the original value. The memory increased to 262,144 Kilobytes, which is around 250 mebibytes, or five times the original value. This pod was under-resourced, and the Vertical Pod Autoscaler corrected the estimate with a much more appropriate value.
-
View the new recommendation:
kubectl describe vpa vpa/hamster-vpa
Sample output was shown above:
recommendation:
 containerRecommendations:
 - containerName: nginx
  	lowerBound:
 	cpu: 40m
 	memory: 3100k
  	target:
 	cpu: 60m
 	memory: 3500k
  	upperBound:
 	cpu: 831m
 	memory: 8000k
-
View the new recommendation:
kubectl describe vpa/hamster-vpa
Sample output:
Name: hamster-vpa Namespace: default Labels:
Annotations: kubectl.kubernetes.io/last-applied-configuration: {"apiVersion":"autoscaling.k8s.io/v1beta2","kind":"VerticalPodAutoscaler","metadata":{"annotations":{},"name":"hamster-vpa","namespace":"d... API Version: autoscaling.k8s.io/v1beta2 Kind: VerticalPodAutoscaler Metadata: Creation Timestamp: 2019-09-27T18:22:51Z Generation: 23 Resource Version: 14411 Self Link: /apis/autoscaling.k8s.io/v1beta2/namespaces/default/verticalpodautoscalers/hamster-vpa UID: d0d85fb9-e153-11e9-ae53-0205785d75b0 Spec: Target Ref: API Version: apps/v1 Kind: Deployment Name: hamster Status: Conditions: Last Transition Time: 2019-09-27T18:23:28Z Status: True Type: RecommendationProvided Recommendation: Container Recommendations: Container Name: hamster Lower Bound: Cpu: 550m Memory: 262144k Target: Cpu: 587m Memory: 262144k Uncapped Target: Cpu: 587m Memory: 262144k Upper Bound: Cpu: 21147m Memory: 387863636 Events: <none> </pre> -
Print YAML contents with all resources that would be understood by kubectl diff|apply|… commands:
./hack/vpa-process-yamls.sh print
-
Delete it by running the same yaml file as used to create it:
kubectl delete -f examples/hamster.yaml
Kubernetes Security Hardening
BOOK: Hacking Kubernetes by Andrew Martin, Michael Hausenblas
LIVE: “Attacking and Defending Kubernetes” by Marco De Benedictis
Sidero Talos OS on Bare Metal
There is on-going debate about what Operating System to use with Kubernetes to reduce overhead and security exposures. Options are Ubuntu, Debian, CentOS, Red Hat Enterprise Linux (RHEL), Fedora. Operating systems compatible with Google Kubernetes Engine on Linux:
- https://cloud.google.com/migrate/containers/docs/compatible-os-versions
- https://computingforgeeks.com/minimal-container-operating-systems-for-kubernetes/
Reaching v1.0 April 2022, the open-source headless Talos Linux OS is purpose-built for Kubernetes.
Talos has no shell, no SSH, a read-only file system – making it small and secure.
To get the most performance possible out of hardware, with minimal overhead, run Kubernetes on bare-metal machines.
To simplify the creation and management of bare metal Kubernetes clusters, Sidero Labs, the company behind Talos Linux, also released Sidero Metal, a cluster API provider for bare metal, that installs Talos Linux based Kubernetes clusters, in a scalable and declarative way. (It’s built around the Cluster gRPC API (CAPI) project’s clusterctl CLI tool.
Replace failed node
PROTIP: Consider what happens if adding a new member results in an error and cannot join the cluster (due to a misconfiguration). See https://kubernetes.io/docs/tasks/administer-cluster/configure-upgrade-etcd/#replacing-a-failed-etcd-member
-
To remove a failed node, first remove the failed nodes before adding new ones.
If you have a 3-node etcd cluster, even if one failed, adding another node would make it a 4-node cluster (counting the down node). That results in upping the minimum quorum to 3 nodes to prevent “split brain” cluster failure. If the new member is misconfigured, and cannot join the cluster, you now then have two failed nodes, and not meet the required quorum of 3.
Use of Talos Linux makes recovery of Kubernetes simpler because Talos Linux has helper functions that automate the removal of down etcd nodes.
talosctl etcd remove-member ip-172-31-41-76
kubectl delete node ip-172-31-41-76
Without Talos, adding an extra node increases quorum, which is actually not a good thing. For example, if you have a 3-node etcd cluster, a quorum of 2 nodes is required for the cluster to continue processing writes. Removing a working node would remove fault tolerance. A failure during the transition before another node is successfully added would cause the cluster to be downed. So…
With Talos, adding an extra node does NOT increase quorum. Since Talos Linux uses the Learner feature of etcd — all new control plane nodes join etcd as non-voting learners. When they have caught up with all transactions, the node is automatically promoted to a voting member.
-
To add a new control plane node under Talos Linux, boot a new node with the controlplane.yaml used to create other control plane nodes.
Replace working node
If the node to be replaced is still working, the order of actions is the opposite of when the node has failed. For example, if you have a 3-node etcd cluster, a quorum of 2 nodes is required for the cluster to continue processing writes. Removing a working node would remove fault tolerance. A failure during the transition before another node is successfully added would cause the cluster to be downed. So…
-
BEFORE removing the working node, add the new node, (with a more preferable AWS server type for different CPU or memory). This would increase a 3-node cluster to increased to 4 nodes.
A failure during the transition would reduce the cluster to 3 nodes, still a viable cluster.
Add the new control plane node by booting using the controlplane.yaml file.
-
Remove the working node by telling the node that it is being replaced to leave the cluster. Using a sample IP address:
talosctl -n 172.31.138.87 reset
kubectl delete node
Since Talos is aware that it’s in a control plane node, it knows to gracefully leave etcd (be erased) when it receives the reset command.
A multi-master configuration is required so a single Master does not become a single point of failure. Workers connect to and communicate with any master’s kube-apiserver via a high availability load balancer. See https://dominik-tornow.medium.com/kubernetes-high-availability-d2c9cbbdd864
Talos
The lifecycle of each Talos machine is managed by a SideroLabs (Videos, sidero.dev, @SideroLabs) workload cluster, open-sourced at github.com/siderolabs/sidero. Sidero provides bootstrap/controlplane providers for running Talos machines on bare-metal x86 or arm64 machines on-prem, or on Raspberry Pi (VIDEO by Spencer Smith: “metal-rpl_4-arm64.img.xz” on 16GB SD).
VIDEO: Try within Docker on MacOS.
Sidero offers a declarative way to provision, assign, wipe servers (“machines as cattle”).
Sidero uses port 8081 for a combined iPXE and gRPC service, UDP 69 for TFTP, and UDP 51821 for the IPv6 SideroLink Wireguard keyed point-to-point connections. Talos’ KubeSpan yaml config automates WireGuard encryption to securely add workers on remote networks. KubeSpan delivers a solution to the coordination and key exchange problem, allowing all nodes to discover and communicate in an encrypted channel with all other nodes – even across NAT and firewalls. It supports roaming of devices, and transparently handles the correct encryption of traffic that is destined to another member of the cluster, while leaving other traffic unencrypted.
All that enables Kubernetes to operate multi-region/multi-cloud. Arges is its multi-environment management service.
An ISC DHCP server (such as on Ubiquiti EdgeRouter products) is needed.
Sidero uses IPMI information to control Server power state, reboot servers and set boot order automation. Sidero also supports BMC automation.
Talos node sends over the SideroLink connection two streams: kernel logs (dmesg) and Talos events.
Cloud K8s GUI & CLI
Each cloud SaaS vendor listed above provides its own GUI on internet browser (such as Google Chrome) for Kubernetes Administrators to access.
Each cloud vendor also has its own CLI command program (such as AWS eksctl) to provide proprietary features.
kubctl processes manifests (in yaml format) by translating them to API calls to the Kubernetes API program, a part of the “k8s master”.
CLI Setup
PROTIP: Training vendors provide you a choice to use a browser without installing anything. But a more performant (satisfying) approach is to install credentials and work from your laptop’s Terminal program.
Use of a browser would require copy and pasting of accounts and passwords, bringing up CLI, creating environment variables, etc. every time.
However, using a CLI would require some installation and configuration work.
Use my step-by-step instructions to get CLI installed and configured on your laptop:
-
For AWS CLI, see https://wilsonmar.github.io/aws-onboarding/
-
For Azure CLI, see https://wilsonmar.github.io/azure-onboarding/
-
For GCP CLI, see https://wilsonmar.github.io/gcp/
On-premise
Kubernetes distributions with on-prem. focus:
- Canonical Kubernetes
- Google Anthos
- K3s
- Red Hat OpenShift
- SUSE Rancher
- VMware Tanzu
AWS ECS & EKS Anywhere
https://aws.amazon.com/ko/blogs/aws/getting-started-with-amazon-ecs-anywhere-now-generally-available/
https://aws.amazon.com/eks/eks-anywhere (open-sourced with an Apache-2.0 license at https://github.com/aws/eks-anywhere, tested using Prow) manages Kubernetes clusters using VMware vSphere on premises using AWS EKS Distro
https://anywhere.eks.amazonaws.com/
https://anywhere.eks.amazonaws.com/docs/getting-started/install/
brew install aws/tap/eks-anywhere
eksctl anywhere version
Kubectl Commands
CAUTION: The trouble with lab enviornments is that you are given a limited amount of time each session – as little as 30 minutes.
Shell scripts in SSH
PROTIP: Because all work is lost at the end of each session, I have found it useful to create shell scripts I can paste in a Shell Conole.
-
On AWS: sample.sh
-
On Azure: https://github.com/wilsonmar/aws-quickly describes use of:
bash -c "$(curl -fsSL https://raw.githubusercontent.com/wilsonmar/DevSecOps/main/gcp/gks-cluster.sh)"
- On GCP:
bash -c "$(curl -fsSL https://raw.githubusercontent.com/wilsonmar/DevSecOps/main/gcp/gks-cluster.sh)"
The script downloads what it needs from the public GitHub and runs it automatically.
The programmatic approach of scripts mean that code is needed to check conditions before each command (to see if the command needs to run). Code is also needed to obtain values in variables passed to the next step.
Docker and Alternative Runtimes
VIDEO: Kubernetes only need the Container Runtime from Docker’s Engine, which Kubernetes created a “dockershim” to use Docker’s Container Runtime. Then Docker extracted and gave to CNCF “containerd”.
This diagram of Sander on a lightboard:
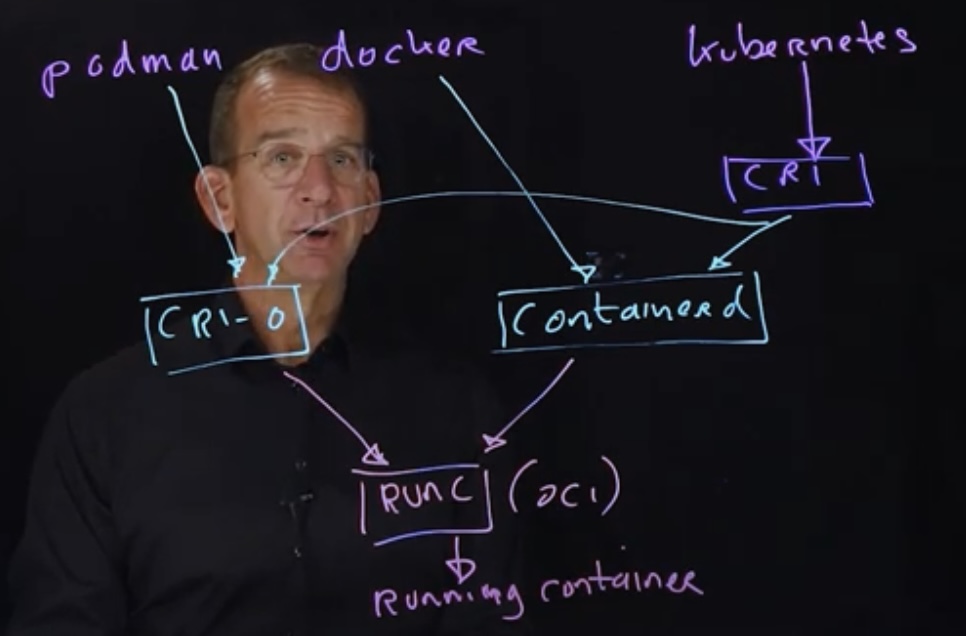
Runc is supported by CRI-O, Docker, ContainerD. Runc is the low-level tool which does the “heavy lifting” of spawning a Linux container. (See CVE-2019-5736).
BTW Kubernetes had worked with rkt (pronounced “rocket”) containers, which provided a CLI for containers as part of CoreOS. Rkt became the first archived project of CNCF after IBM bought Red Hat and its competing cri-o technology used with OpenShift.
Inside each Node
- VIDEO: How Kubernetes Works explained by Brendan Burns (K8s co-founder)

Networking
Within Kubernetes are four types of network traffic:
- Container-to-container traffic is handled within the Pod.
- Pod-to-Pod traffic is handled by a SDN (Software-Defined Network).
- Pod-to-Service traffic is handled by kube-proxy and packet filters on the node.
- External-to-Service traffic is handled by kube-proxy and node-based packet filters (such as Consul)
Endpoints
Pods expose themselves to services via endpoints.
Kubernetes keeps a pool of endpoints
kubectl get endpoints
Endpoint Slices breakup endpoints into smaller, more manageable segments.
Each endpoint Slice is limited to 100 pods.
Aggregation Layer
The aggregation layer lets you install additional Kubernetes-style APIs in your cluster.
- Load balancing for Compute Engine instances
- Node pools to designate subsets of nodes within a cluster for additional flexibility
- Automatic scaling of your cluster’s node instance count
- Automatic upgrades for your cluster’s node software
- Node auto-repair to maintain node health and availability
- Logging and Monitoring with Cloud Monitoring for visibility into your cluster
What’s CNCF?
CNCF DEFINITION: “Cloud Native technologies” emplower organizations to build and run scalable applications in modern, dynamic, environments such as public, private, and hybrid clouds. Containers, services, meshes, microservices, immutable infrastructure, and declarative APIs exemplify this approach.
These techniques enable loosely coupled systems that are resilient, manageable, and observable.
Combined with robust automation, they allow engineers, to make high impact changes, frequently and predictably with minimal toil.
The Cloud Native Foundation seeks to drive adoption of this paradigm by fostering and sustaining an ecosystem of open source, vendor-neutral projects.
We democratize state-of-the-art patterns to make these innovations acdessible for everyone.
Container Orchestration?
Kubernetes is called “container orchestration” software because it automates the deployment, scaling, and management of containerized applications[Wikipedia].
- Authentication -> Authorization -> Admission Control
- Load balancing
- Mixed operating systems (Ubuntu, Alpine, Talos, etc.)
- Using images in Docker avoids the “it works on my machine” troubleshooting of setup or dependencies
- Unlike Elastic Beanstalk, the k8s master controls what each of its nodes do
KCNA Exam
The Kubernetes and Cloud Native Associate is the entry level certification in Kubernetes. But it’s very hands-on with Terminal kubctl command experience.
https://www.cncf.io/certification/kcna
FAQ: The $250 closed-book exam is proctored by PSI online for two tries. Allocate 120 minutes of seat time. Answer 75% for 90 minutes to answer 60 multiple-choice questions in 1.5 hours (1.5 minutes/question). Good for 3 years.
The PDF exam Handbook lists:
- Kubernetes Fundamentals 46% (27-28 questions)
- Kubernetes Resources
- Kubernetes Architecture
- Kubernetes API
- Containers
- Scheduling
- Container Orchestration 22% (25 questions)
- Container Orchestration Fundamentals
- Runtime
- Security
- Networking
- Service Mesh
- Storage
- Cloud Native Architecture 16% (25 questions)
- Autoscaling
- Serverless
- Community and Governance
- Roles and Peronas
- Open Standards
-
Cloud Native Observability 8% (4-5 questions)
- Cloud Native Application Delivery 8% (4-5 questions)
- Application Delivery Fundamentals
- GitOps
- CI/CD
The CNCF Curriculum page recommends these resources:
- https://training.linuxfoundation.org/training/kubernetes-and-cloud-native-essentials-lfs250/
- https://www.edx.org/course/introduction-to-cloud-infrastructure-technologies
- https://www.edx.org/course/introduction-to-kubernetes
- https://www.edx.org/course/introduction-to-kubernetes-on-edge-with-k3s
- https://kube.academy
- https://www.edx.org/course/introduction-to-linux
- https://civo.com/academy
- KCNA Course Overview *KCNA study course on freeCodeCamp
Andrew Brown (FreeCodeCamp)
Andrew Brown (@andrewbrown) creates/sells Exampro practice exams, but he created in May 2022 a 14-hour VIDEO associated with his curriculum at FreeCodeCamp.com.
CKAD Exam
Here is the full text of the CNCF’s exam curriculum
13% Core Concepts (APIs, Create and configure basic pods, namespaces)
- Understand Kubernetes API primitives
18% Configuration (ConfigMaps, SecurityContexts, Resource Requirements, Create & consume Secrets, ServiceAccounts
10% Multi-Container Pods design patterns (e.g., ambassador, adapter, sidecar)
18% Observability (Liveness & Readiness Probes, Container Logging, Metrics server, Monitoring apps, Debugging)
20% Pod Design (Labels, Selectors, Annotations, Deployments, Rolling Updates, Rollbacks, Rollbacks, Jobs, CronJobs)
13% Services & Networking (NetworkPolicies)
08% State Persistence (Volumes, PersistentVolumeClaims) for storage

CKA Exam Domains
3-hour Certified Kubernetes Administrator (CKA) exams CNCF first announced November 8, 2016.
|
19% Core Concepts 12% Installation, Configuration & Validation 12% Security 11% Networking 11% Cluster Maintenance 10% Troubleshooting 08% Application Lifecycle Management 07% Storage 05% Scheduling 05% Logging / Monitoring |
+https://github.com/walidshaari/Kubernetes-Certified-Administrator lists links by exam domain.
Certificed Kubernauts.io Practioner (CKP)
https://trainings.kubernauts.sh/ describes a certification offered independently by https://kubernauts.de/en/home/ (@kubernauts in Germany) which also provides free namespaces (using Rancher) at https://kubernauts.sh
CKS Exam Domains
Starting November, 2020 at the KubeCon North America pre-conference: CKS exam is $300 for 2 hours.
It’s for those who hold a CKA certification.
- 10% Cluster Setup - Best practice for configuration to control environment access, rights, and platform conformity.
- 15% Cluster Hardening - to protect K8s API and utilize RBAC
- 15% System Hardening - to improve the security of OS & Network; restrict access through IAM
- 20% Minimize Microservice Vulnerabilities - to use various mechanisms to isolate, protect, and control workload.
- 20% Supply Chain Security - forcontainer-oriented security, trusted resources, optimized container images, CVE scanning
- 20% Monitoring, Logging, and Runtime Security - to analyse and detect threads
DockerDocker (specifically, Docker Engine) provides operating-system-level virtualization in containers.
-
Kubernetes Installation and Configuration Fundamentals” by Anthony Nocentino (@nocentio, centinosystems.com).
-
Pluralsight “Configuring and Managing Kubernetes Security” by Anthony Nocentino (@nocentio, centinosystems.com) is the one to take.
-
https://github.com/NodyHub/docker-k8s-resources/tree/master/k8s-pods sample Security yaml
-
https://ravikirans.com/cks-kubernetes-security-exam-study-guide/
-
https://github.com/walidshaari/Certified-Kubernetes-Security-Specialist by Walid Shaari (author in Medium).
-
https://github.com/ijelliti/CKSS-Certified-Kubernetes-Security-Specialist
-
https://ravikirans.com/cks-kubernetes-security-exam-study-guide
Whizlabs.com
Known for their sample exams, $99/year on sale from $199 for all courses, by instructors from India. If you want faster video playback, you have to set it for every video. Annoying.
-
Certified Kubernetes Application Developer (CKAD) [05:25:21]
-
Certified Kubernetes Administrator(CKA) [08:09:07]
-
* Learn Kubernetes with AWS And Docker [04:01:16
Exam Preparations
PROTIP: CAUTION: Whatever resource you use, ensure it is to the version of Kubernetes being tested (e.g., v1.19 as of 1 Sep 2020).
Sign up for exam
CNCF is part of the Linux Foundation, so…
-
Get an account (Linux Foundation credentials ) at https://identity.linuxfoundation.org. https://myprofile.linuxfoundation.org/
NOTE: It’s a non-profit organization, thus the “.org”.
https://docs.linuxfoundation.org/tc-docs/certification/lf-candidate-handbook
https://docs.linuxfoundation.org/tc-docs/certification/faq-cka-ckad-cks
https://docs.linuxfoundation.org/tc-docs/certification/tips-cka-and-ckad
-
Login to linuxfoundation.org and join as a member for a $100 discount toward certifications.
-
Go to https://training.linuxfoundation.org/linux-courses/system-administration-training/kubernetes-fundamentals and pay for the $300 exam plus $199 more if you want to take their class.
Alternately, if you have a Registration code: https://trainingportal.linuxfoundation.org/redeem
-
Find dates and times when you’re in a quiet private indoor place where no one else (co-workers) are near.
Select a date when your mental and physical are in peak Biorythm
- Open a Chrome browser.
-
Use your Linux Foundation credentials to create an account at
- Select the date, your time zone. The website is incredibly slow.
-
Click the date again in orange. Click the time range.
-
[Terraform] Install the Chrome extension used to take exams, verified during exam scheduling.
Click the green “I agree”, then “Confirm Reservation”.
-
Pick a date when your Biorythms are positive on Intellectual and Physical, not hitting bottom or crossing from positive to negative:
-
Sign-in at examslocal.com. For “Sponsor and exam”, type one of the following:
- Linux Foundation : Certified Kubernetes Application Developer (CKAD) - English
- Linux Foundation : Certified Kubernetes Administrator (CKA) - English
- Linux Foundation : Certified Kubernetes Security (CKS) - English ?
Click on the list, then Click “Next”.
Click the buttons in the Checklist form and select time of exam until you get all green like this:
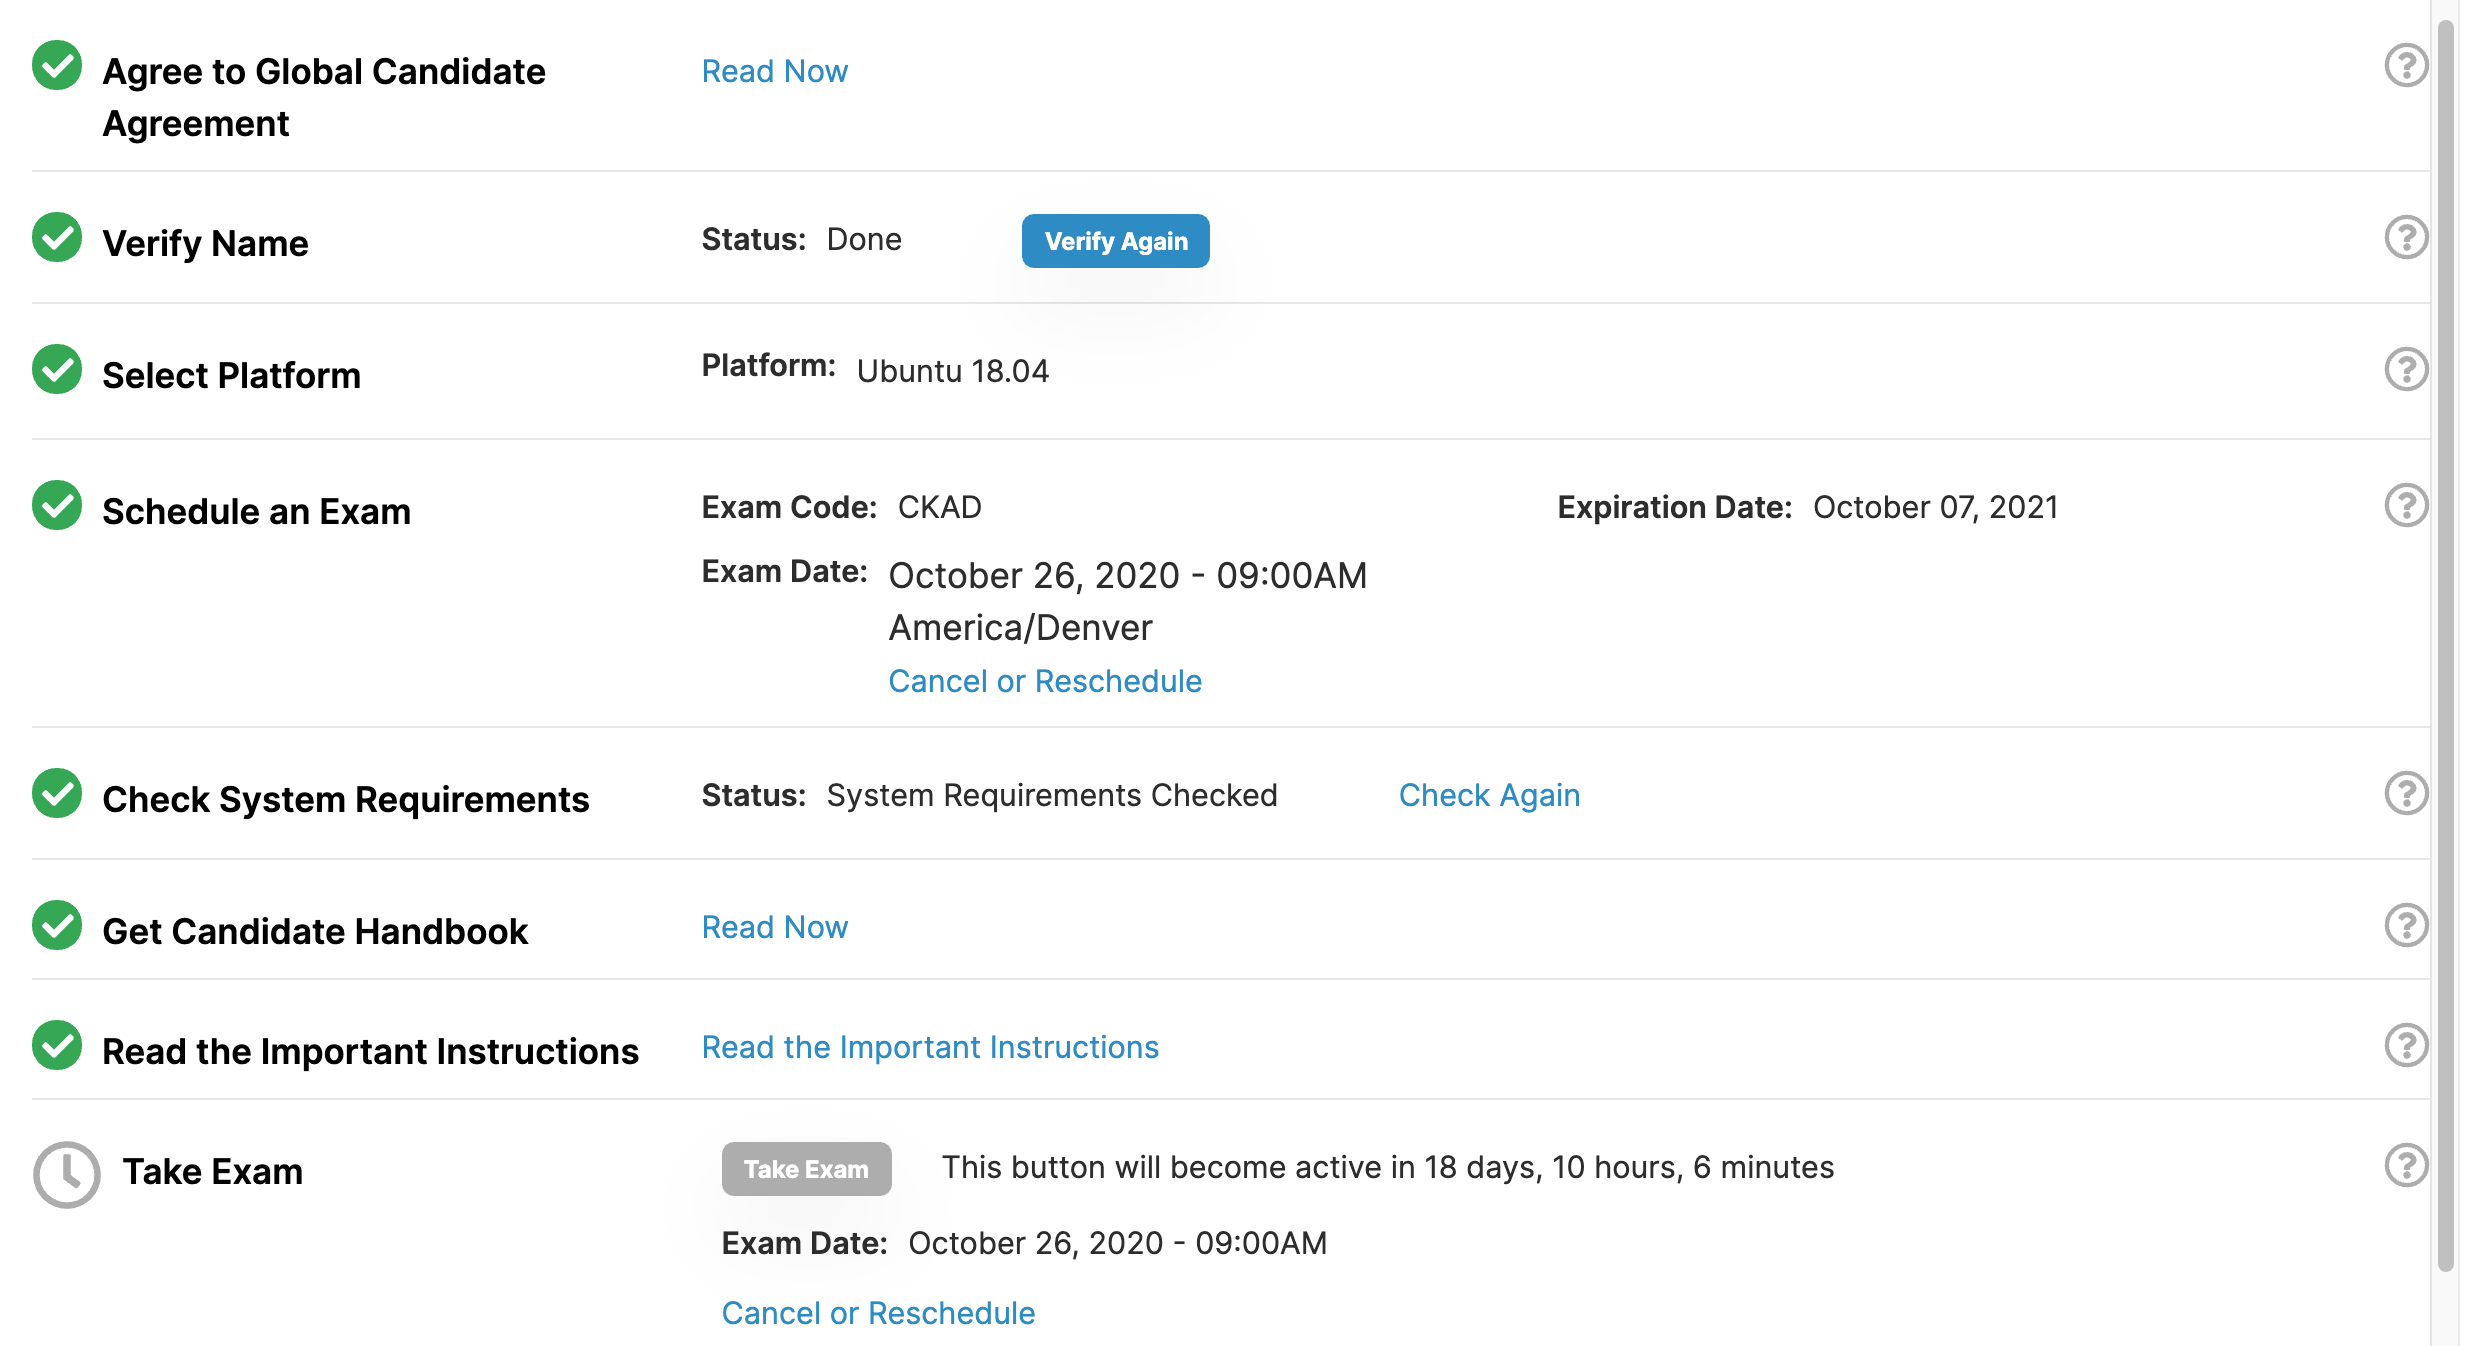
pod-overview Docs and tutorials from Kubernetes.io.
- Click “Or Sign In With” tab and select “Sign in for exams powered by the Linux Foundation”.
- Log in using your preferred account.
-
Click “Handbook link” to download it.
https://trainingportal.linuxfoundation.org/learn/course/certified-kubernetes-application-developer-ckad/exam/exam
-
PROTIP: You’ll need a corded (Logitech) webcam (not one built-in).
-
Setup your home computer to take the exam Compatibility Checka using the Chrome extension from “Innovative Exams”, which uses your laptop camera and microphone watching you use a virtual Ubuntu machine.
Sample exam questions
-
[Terraform] https://github.com/dgkanatsios/CKAD-exercises by Dimitris-Ilias Gkanatsios (of Microsoft) provides sample exercises to prepare for the CKAD exam.
-
Build speed
-
See 3 preview exam questions (with answer explained) after signing up at https://killer.sh (Killer Shell’s) CKA/CKAD Simulator provides close replica of the CKAD exam browser terminal with 20 CKAD and 25 CKA questions, at 29.99€ for two sessions (before 10% discount). Each session includes 36 hours of access to a cluster environment. They recommend you start the first session when you’re at the beginning of your CKA or CKAD journey.
-
Practice Keyboard shortcuts for Bash
-
Get proficient with the vim editor so that commands are intuitive (where you don’t have to pause for remembering how to do things in vim). Use the vimtutor program that usually gets installed when you install the normal vim/gvim package.
Bookmarks to docs
You are allowed one browser window: kubernetes.io, so:
-
PROTIP: Rather than typing from scratch, copy and paste commands from pages in Kubernetes.io.
Key sections of kubernetes.io are:
- Documentation
- Getting started
- Concepts
- Tasks
- Tutorials
- Reference
PROTIP: Create bookmarks in Chrome for links to ONLY kubernetes.io pages

Day before exam
- Arrange to sleep well the night before the exam.
-
If you travel, make sure you are living in the correct time zone.
- Move files from your Downloads and Documents folder.
- Clear your desk of papers, books. The proctor will be checking.
Before start of exam questions
- Take a shower. Put on a comfortable outfit. Brush your teeth. Make your bed.
- Eat proteins rather than carbohydrates and sugar before the exam.
-
Fill a clear bottle with no labels holding clear liquids (water). You’re not allowed to eat snacks.
-
Put on music that helps you concentrate. Turn it off before starting the test.
-
Start calm, not rushed. Be setup and be ready a half hour before the scheduled exam.
-
You may start your exam up to 15 minutes prior to your scheduled appointment time.
-
Have your ID out and ready to present to the video camera.
- The exam takes 180 minutes (3 hours), so before you start, go to the bathroom.
- To the proctor, show your ID and pan all the way around the room.
Start of exam
-
Enter website and click grey “Take Exam” button.
-
19 questions means less than 10 minutes per question. So avoid getting bogged down on the longer complex questions. First go through all the questions to answer the easiest ones first. Along the way, mark ones you want to go back to.
NOTE: Although there are 19 objectives, not all objectives planned are in every exam.
-
PROTIP: Avoid writing yaml by scratch.
PROTIP: Learn to search within kubernetes.io to copy code.
Generate a declarative yaml file from an imperative command:
-
Create yaml file as well as pod:
kubectl create -f file.pod.yaml --record
-
Paste to the Notpad available during the exam. Save commands there for copy rather than retype.
k -n pluto get all -o wide
-
Use kubectl explain.
-
Use help as in kubectl create configmap help .
-
Run a busybox web server to test retrieval of externally (using wget):
k run tmp --restart=Never --rm --image=busybox -i -- wget -O- 10.12.2.15
Notice “Never” is title cased.
-
Do not delete/remove what you have done! People/robots review your servers after the test.
After exam
- Create an Acclaim.com account to manage publicity across many certifications.
-
If you pass the exam (score above 66%), go to acclaim to get your digital badge to post on social media.
https://trainingportal.linuxfoundation.org/pages/exam-history
Social media communities
-
community.cncf.io/manly to sign up for access to the “cncf-community-manly” community for discussions about KubeCon takeaways.
-
https://discuss.kubernetes.io is where issues with each version of K8s are discussed.
- https://kubeweekly.io, a weekly podcast [subscribe!]
-
https://kubernetespodcast.com podcast is hosted by the Clound Native advocacy team at Google Cloud: Craig Box and Adam Glick. On Apple Podcasts, etc.
- https://kubernetes.io/community
-
https://www.reddit.com/r/kubernetes “subreddit”
- https://community.kodekloud.com
- https://kubernetes.slack.com
- https://slack.k8.io
- Stackoverflow for developers
- Google+ Group: Kubernetes
- for announcements
- Contributors to the Kubernetes project to discuss design and implementation issues.
-
Kubernetes Google Community video chats weekly going back to 2017 but stopped July 2020
-
https://cloud.google.com/support/docs/issue-trackers to report bugs.
- https://www.meetup.com/kubernauts
- https://www.meetup.com/topics/kubernauts
- KubeCon.io Conferences (#KubeConio)
MacOS Laptop Installation
$ brew search rancher
==> Formulae
rancher-cli                rancher-compose            ranger
==> Casks
font-ranchers                            rancher
nerdctl
kim (Kubernetes Image Manager) uses K8s instead of Docker
https://redhat-scholars.github.io/kubernetes-tutorial/kubernetes-tutorial/installation.html
Runc is the OCI standardized container runtime
Kubernetes can use alternative container runtimes than CRI - Docker:
- Docker (Containerd runtime using Runc)
- LXC (Linux native containers)
- RedHat’s Podman (CRI-o runtime using Runc)
- Systemd-nspawn
k3d:
go install github.com/rancher/k3d
k3d create
Minikube install
- REF:
- Minikube at https://minikube.sigs.k8s.io/docs/start/
-
To install minikube on your laptop: https://github.com/kubernetes/minikube
-
Identify the version:
minikube version
minikube version: v1.28.0
commit: 986b1ebd987211ed16f8cc10aed7d2c42fc8392f
NOTE: Minikube goes beyond older Docker For Mac (DFM) and Docker for Windows (DFW) and includes a node and a Master when it spins up in a local environment (such as your laptop).
CAUTION: At time of writing, https://github.com/kubernetes/minikubehas 257 issues and 20 pending Pull Requests, but we’re using it anyway. MUST READ: Known Issues with Minikube (Ingress and ingress-dns addons are not supported on Linux)
-
Before starting minikube, in command+Spacebar type “Activity Monitor.app” and click to open it.
-
Start your Docker Desktop (or Podman) or you’ll see this message output from the next command:
💣  Exiting due to PROVIDER_DOCKER_NOT_RUNNING: "docker version --format -" exit status 1: Cannot connect to the Docker daemon at unix:///var/run/docker.sock. Is the docker daemon running?
💡  Suggestion: Start the Docker service
📘  Documentation: https://minikube.sigs.k8s.io/docs/drivers/docker/
-
Start using a driver (docker or podman?). It will take several minutes:
minikube start --vm-driver=docker
😄  minikube v1.28.0 on Darwin 12.6.1 (arm64)
🆕  Kubernetes 1.25.3 is now available. If you would like to upgrade, specify: --kubernetes-version=v1.25.3
✨  Using the docker driver based on existing profile
👍  Starting control plane node minikube in cluster minikube
🚜  Pulling base image ...
💾  Downloading Kubernetes v1.23.3 preload ...
 > preloaded-images-k8s-v18-v1...:  317.16 MiB / 317.16 MiB  100.00% 16.93 M
🔄  Restarting existing docker container for "minikube" ...
🐳  Preparing Kubernetes v1.23.3 on Docker 20.10.12 ...
 ▪ kubelet.housekeeping-interval=5m
🔎  Verifying Kubernetes components...
 ▪ Using image gcr.io/k8s-minikube/storage-provisioner:v5
🌟  Enabled addons: storage-provisioner, default-storageclass

❗  /opt/homebrew/bin/kubectl is version 1.25.4, which may have incompatibilities with Kubernetes 1.23.3.
 ▪ Want kubectl v1.23.3? Try 'minikube kubectl -- get pods -A'
🏄  Done! kubectl is now configured to use "minikube" cluster and "default" namespace by default
Because PKI certificates (crt files) used for authentication were defined in file ~/.kube/config, you can now run kubectl commands on the CLI
-
Get the status of -All pods (Kubernetes components) on all namespaces:
minikube kubectl -- get pods -A
NAMESPACE     NAME                                           READY   STATUS    RESTARTS       AGE
consul        consul-client-xpfwk                            1/1     Running   1 (94s ago)    169d
consul        consul-connect-injector-9fd87d987-2hrkc        1/1     Running   37 (94s ago)   169d
consul        consul-connect-injector-9fd87d987-khpjl        1/1     Running   35 (94s ago)   169d
consul        consul-controller-6564fc54b-9ksjv              1/1     Running   45 (94s ago)   169d
consul        consul-server-0                                1/1     Running   1 (94s ago)    169d
consul        consul-webhook-cert-manager-59546c4b99-bh4ks   1/1     Running   1 (94s ago)    169d
consul        prometheus-server-86f7fbf8fd-bctn5             2/2     Running   4 (94s ago)    169d
kube-system   coredns-64897985d-zpfxq                        1/1     Running   1 (94s ago)    171d
kube-system   etcd-minikube                                  1/1     Running   1 (94s ago)    171d
kube-system   kube-apiserver-minikube                        1/1     Running   1 (94s ago)    171d
kube-system   kube-controller-manager-minikube               1/1     Running   1 (94s ago)    171d
kube-system   kube-proxy-vvv4q                               1/1     Running   1 (94s ago)    171d
kube-system   kube-scheduler-minikube                        1/1     Running   1 (94s ago)    171d
kube-system   storage-provisioner                            1/1     Running   30 (43s ago)   171d
-
Get the status of pods (Kubernetes components) within a single namespace:
minikube kubectl get pods kube-apiserver-minikube -n kube-system
NAME                                           READY   STATUS    RESTARTS       AGE
kube-system   kube-apiserver-minikube                        1/1     Running   1 (94s ago)    171d
-
Click the “% CPU” tab label to sort on it. Note the number for process “com.docker.hyperkit”. If the mac’s fan spins constantly: in Docker’s Properties Resources, adjust Memory higher.
NOTE: Each node in a cluster uses at least 300 MiB of memory.
-
Define cluster
GO111MODULE="on" go get sigs.k8s.io/kind@v.0.4.0
kid create cluster
CAUTION: This utility is built for the Kubernetes team’s convenience and thus does not have some convenience features and add-ons.
More about drivers:
- https://docs.okd.io/latest/minishift/getting-started/setting-up-virtualization-environment.html
- https://minikube.sigs.k8s.io/docs/drivers/
Docker Desktop install on macOS
NOTE: Docker drivers do not currently support ARM architecture (only AMD64).
-
Follow Install Docker for Desktop:
-
If the Docker Desktop icon appears (it’s already installed), right-click on it and shut it down.
Then upgrade it:
brew cask upgrade docker
This automatically installs the HyperKit hypervisor for macOS.
So there is no need to do what older docs say:
brew install docker-machine-driver-xhyveMake sure Docker Desktop is running:
Minikube on Windows
-
Start Docker before installing/starting minikube:
systemctl enable --now docker
-
Verify your Docker container type:
docker info --format '\{\{.OSType\}\}'On macOS, the response is “Linux”.
On Windows, (pardoxically) make sure Docker Desktop’s container type setting is Linux and not windows. see docker docs on switching container type.
See https://minikube.sigs.k8s.io/docs/drivers/hyperv/
Minikube on MacOS using Docker Desktop
-
I do not recommend using curl to obtain a specific back version of Minikube:
curl -LO https://storage.googleapis.com/minikube/releases/latest/minikube_1.7.2-0_amd64.deb \ && sudo dpkg -i minikube_1.7.2-0_amd64.deb -
Install on a Mac Minikube is the recommended appraoch
brew info minikube
A lot prints out, to get the caveats about what was installed:
Warning: Treating minikube as a formula.
minikube: stable 1.23.0 (bottled), HEAD
Run a Kubernetes cluster locally
https://minikube.sigs.k8s.io/
/usr/local/Cellar/minikube/1.23.0 (9 files, 68.1MB)
  Poured from bottle on 2021-09-16 at 08:52:22
From: https://github.com/Homebrew/homebrew-core/blob/HEAD/Formula/minikube.rb
License: Apache-2.0
==> Dependencies
Build: go ✘, go-bindata ✘
Required: kubernetes-cli ✔
==> Options
--HEAD
 Install HEAD version
==> Caveats
Bash completion has been installed to:
  /usr/local/etc/bash_completion.d
==> Analytics
install: 28,783 (30 days), 77,316 (90 days), 383,609 (365 days)
install-on-request: 28,682 (30 days), 77,049 (90 days), 367,126 (365 days)
build-error: 0 (30 days)
Compare growth in size from previous versions:
/usr/local/Cellar/minikube/1.15.1 (8 files, 62.4MB) *
  Poured from bottle on 2020-11-22 at 11:46:27
install: 44,822 (30 days), 110,033 (90 days), 415,969 (365 days)
install-on-request: 37,280 (30 days), 92,684 (90 days), 342,920 (365 days)
build-error: 0 (30 days)
There is no longer a need to do what older docs say: Make hyperkit the default driver*:
minikube config set driver hyperkit -
brew install minikube
Warning: Treating minikube as a formula.
==> Downloading https://ghcr.io/v2/homebrew/core/kubernetes-cli/manifests/1.22.1
==> Downloading https://ghcr.io/v2/homebrew/core/kubernetes-cli/blobs/sha256:1c7
==> Downloading from https://pkg-containers.githubusercontent.com/ghcr1/blobs/sh
==> Downloading https://ghcr.io/v2/homebrew/core/minikube/manifests/1.23.0
==> Downloading https://ghcr.io/v2/homebrew/core/minikube/blobs/sha256:aabf29b10
==> Downloading from https://pkg-containers.githubusercontent.com/ghcr1/blobs/sh
==> Installing dependencies for minikube: kubernetes-cli
==> Installing minikube dependency: kubernetes-cli
==> Pouring kubernetes-cli--1.22.1.mojave.bottle.tar.gz
🍺  /usr/local/Cellar/kubernetes-cli/1.22.1: 226 files, 57.5MB
==> Installing minikube
==> Pouring minikube--1.23.0.mojave.bottle.tar.gz
==> minikube cask is installed, skipping link.
==> Caveats
Bash completion has been installed to:
  /usr/local/etc/bash_completion.d
==> Summary
🍺  /usr/local/Cellar/minikube/1.23.0: 9 files, 68.1MB
Removing: /usr/local/Cellar/minikube/1.20.0_1... (9 files, 63.5MB)
==> Caveats
==> minikube
Bash completion has been installed to:
  /usr/local/etc/bash_completion.d
-
Installation should have created folder:
ls $HOME/.minikube
The result:
addons              cache               files               proxy-client-ca.crt
apiserver.crt       cert.pem            key.pem             proxy-client-ca.key
apiserver.key       certs               last_update_check   proxy-client.crt
ca.crt              client.crt          logs                proxy-client.key
ca.key              client.key          machines
ca.pem              config              profiles
-
PROTIP: Assign permissions to avoid run error:
sudo chown -R $USER $HOME/.minikube
chmod -R u+wrx $HOME/.minikube
No response is expected on success.
-
Make sure you’re running the version just installed:
minikube version
If you see:
-bash: minikube: command not found
The expected result:
minikube version: v1.15.1
commit: 23f40a012abb52eff365ff99a709501a61ac5876
Start Minikube with Docker driver
PROTIP: If you start minikube with sudo you’ll get:
-
PROTIP: Define this as an alias to your ~/.desktop_profile:
alias mk8s="minikube delete;minikube start --driver=docker --memory=4096"
–memory=1990 can be adjusted per instructions below.
PROTIP: Before starting minikube, minikube delete to avoid this error message:
💢  Exiting due to GUEST_DRIVER_MISMATCH: The existing "minikube" cluster was created using the "docker" driver, which is incompatible with requested "hyperkit" driver.
💡  Suggestion: Delete the existing 'minikube' cluster using: 'minikube delete', or start the existing 'minikube' cluster using: 'minikube start --driver=docker'
PROTIP: Don’t use sudo minikube or you’ll get this error message:
❌ Exiting due to DRV_AS_ROOT: The "hyperkit" driver should not be used with root privileges.
Alternately, start within Virtualbox *:
sudo minikube start --memory=4096
An example of an expected response:
😄  minikube v1.15.1 on Darwin 10.15.7
✨  Using the docker driver based on user configuration
👍  Starting control plane node minikube in cluster minikube
🚜  Pulling base image ...
💾  Downloading Kubernetes v1.19.4 preload ...
 > preloaded-images-k8s-v6-v1.19.4-docker-overlay2-amd64.tar.lz4: 486.35 MiB
🔥  Creating docker container (CPUs=2, Memory=1990MB) ...
🐳  Preparing Kubernetes v1.19.4 on Docker 19.03.13 ...
🔎  Verifying Kubernetes components...
🌟  Enabled addons: storage-provisioner
🏄  Done! kubectl is now configured to use "minikube" cluster and "default" namespace by default
If Docker Desktop is not running, you won’t see the icon at the top of the screen and you’ll get this error:
🤷  Exiting due to PROVIDER_DOCKER_NOT_FOUND: The 'docker' provider was not found: exec: "docker": executable file not found in $PATH
💡  Suggestion: Install Docker
📘  Documentation: https://minikube.sigs.k8s.io/docs/drivers/docker/
An example of a good start:
🙄  "minikube" profile does not exist, trying anyways.
💀  Removed all traces of the "minikube" cluster.
😄  minikube v1.15.1 on Darwin 10.15.7
✨  Using the docker driver based on user configuration
👍  Starting control plane node minikube in cluster minikube
🔥  Creating docker container (CPUs=2, Memory=1987MB) ...
🐳  Preparing Kubernetes v1.19.4 on Docker 19.03.13 ...
🔎  Verifying Kubernetes components...
🌟  Enabled addons: storage-provisioner, default-storageclass
🏄  Done! kubectl is now configured to use "minikube" cluster and "default" namespace by default
Alternately, start the minikube service, with add-ons (which each runs in a pod):
On Mac:
minikube start ... --addons=dashboard --addons=metrics-server --addons=ingress --addons="ingress-dns"
On Windows:
minikube start --vm-driver=hyperv
-
To enable services after starting minikube:
minikube addons enable metrics-server
Prep standalone SSH client on macOS
- Open an SSH client Terminal by pressing command+spacebar for the Spotlight, then type “Terminal” and select “Terminal.app”.
- Enter your user password if prompted.
-
Create a folder “k8s-class”, then navigate into it:
cd .. && mkdir -p k8s-cloud && cd k8s-cloud
- Switch to the CloudAcademy lab page. Automatically launched are four EC2 instances in the “us-west-2b” AWS Availability Zone: The “bastion” exposed to a public internet subnet and, within a private subnet, a “k8s-master” t3.micro and two “k8s-node” t3.small. In about 10 minutes, all instance status reach “running” and Alarm Status “finish loading”.
- Click the box to the left of “bastion-host”. When “Connect” changes from gray, click it.
- Click the PEM file (such as “554282681613.pem”) and save the file in that folder.
- Copy the PEM file name and save to your Clipboard.
- Switch to the Terminal.
-
Construct a variable set command because it’s referenced several times:
PEMF="554282681613.pem"
-
Set permissions (so your key is not publicly viewable for SSH to work):
chmod 400 "$PEMF"
-
Compose the command to connect to your instance by typing and pasteing its Public DNS: first type “ssh -i”, then paste the pem file, then type “ubuntu@” for the user name inside the host, then switch to the EC2 page to copy and paste the “Public DNS (IPv4)” URL:
ssh -i "$PEMF" ubuntu@ec2-34-210-196-19.us-west-2.compute.amazonaws.com
The wizard should automatically detects the key you used to launch the instance. But if the response is: “ubuntu@github.com: Permission denied (publickey).”, try to rename file by:
mv ~/.ssh/config config.sav
-
Type yes and press Enter when you see:
The authenticity of host 'ec2-34-210-196-19.us-west-2.compute.amazonaws.com (34.210.196.19)' can't be established.
ECDSA key fingerprint is SHA256:sg0jaN4L4RX8ZAxGDo/elIf6HFU+H/3OTG4DALwU5Ik.
Are you sure you want to continue connecting (yes/no/[fingerprint])?
You should see a prompt such as:
ubuntu@ip-10-0-128-5:~$
-
Switch to the CloudAcademy.com page and scroll down to the list of commands. If you customized alias k:
Using the alias setup above, ensure you can see master and nodes:
k get nodes
-
Make use of files at https://github.com/cloudacademy/intro-to-k8s/tree/master/src described by this Intro to Kubernetes course:
cd src && ls
10.1-namespace.yaml         5.1-namespace.yaml
10.2-data_tier_config.yaml  5.2-data_tier.yaml
10.3-data_tier.yaml         5.3-app_tier.yaml
10.4-app_tier_secret.yaml   5.4-support_tier.yaml
10.5-app_tier.yaml          6.1-app_tier_cpu_request.yaml
1.1-basic_pod.yaml          6.2-autoscale.yaml
1.2-port_pod.yaml           7.1-namespace.yaml
1.3-labeled_pod.yaml        7.2-data_tier.yaml
1.4-resources_pod.yaml      7.3-app_tier.yaml
2.1-web_service.yaml        8.1-app_tier.yaml
3.1-namespace.yaml          9.1-namespace.yaml
3.2-multi_container.yaml    9.2-pv_data_tier.yaml
4.1-namespace.yaml          9.3-app_tier.yaml
4.2-data_tier.yaml          9.4-support_tier.yaml
4.3-app_tier.yaml           metrics-server
PROTIP: Kubernetes is immutable, so rather than changing a running pod, delete it and recreate it.
-
To create a pod using the nginx image:
kubectl run nginx --image=nginx --restart=Never
-
To list pods and the nodes they were placed in:
kubectl get pods -o wide
NAME            READY   STATUS    RESTARTS   AGE   IP           NODE           NOMINATED NODE   READINESS GATES
nginx           1/1     Running   0          18m   10.42.0.9    controlplane   <none>           <none>
-
Create and delete pod (all named “mypod”):
kubectl create -f 1.1-basic_pod.yaml
kubectl get pods
kubectl describe pod mypod | more
kubectl delete po mypod --grace-period=0 --force
PROTIP: --grace-period=0 --force for immediate execution (especially during exam)
-
Get the “image:” name -internal within the output:
k describe pod xxx | grep -i image
-
Get the Node name:
k get pods -o wide
CRI = Container Runtime Interface
Kubernetes’ Container Runtime Interface (CRI) specification ensures that every image can be run within every K8s runtime.
Command crictl is used to monitor containers (instead of docker).
-
SSH into minikube instance:
minikube ssh
-
List running containers:
sudo crictl ps
CONTAINER  IMAGE  CREATED  STATE  NAME  ATTEMPT  POD ID
abc...
-
Inspect CONTAINER identifier starting with “abc”:
sudo crictl inspect abc
-
Remember to exit the session:
exit
Get API Services List
-
To see whether the metrics-server is running, or another provider of the resource metrics API (metrics.k8s.io), run the following command:
kubectl get apiservices
The response:
NAME                                   SERVICE   AVAILABLE   AGE
v1.                                    Local     True        24s
v1.admissionregistration.k8s.io        Local     True        24s
v1.apiextensions.k8s.io                Local     True        24s
v1.apps                                Local     True        24s
v1.authentication.k8s.io               Local     True        24s
v1.authorization.k8s.io                Local     True        24s
v1.autoscaling                         Local     True        24s
v1.batch                               Local     True        23s
v1.certificates.k8s.io                 Local     True        23s
v1.coordination.k8s.io                 Local     True        23s
v1.events.k8s.io                       Local     True        23s
v1.networking.k8s.io                   Local     True        23s
v1.rbac.authorization.k8s.io           Local     True        23s
v1.scheduling.k8s.io                   Local     True        23s
v1.storage.k8s.io                      Local     True        23s
v1beta1.admissionregistration.k8s.io   Local     True        24s
v1beta1.apiextensions.k8s.io           Local     True        24s
v1beta1.authentication.k8s.io          Local     True        24s
v1beta1.authorization.k8s.io           Local     True        24s
v1beta1.batch                          Local     True        23s
v1beta1.certificates.k8s.io            Local     True        23s
v1beta1.coordination.k8s.io            Local     True        23s
v1beta1.discovery.k8s.io               Local     True        23s
v1beta1.events.k8s.io                  Local     True        23s
v1beta1.extensions                     Local     True        23s
v1beta1.networking.k8s.io              Local     True        23s
v1beta1.node.k8s.io                    Local     True        23s
v1beta1.policy                         Local     True        23s
v1beta1.rbac.authorization.k8s.io      Local     True        23s
v1beta1.scheduling.k8s.io              Local     True        23s
v1beta1.storage.k8s.io                 Local     True        23s
v2beta1.autoscaling                    Local     True        24s
v2beta2.autoscaling                    Local     True        24s
-
If you plan on doing a lot of work, configure Docker with more memory: The default is 1990MB.
Click the Docker icon on your Mac, then select “Preferences” then “Resources”:
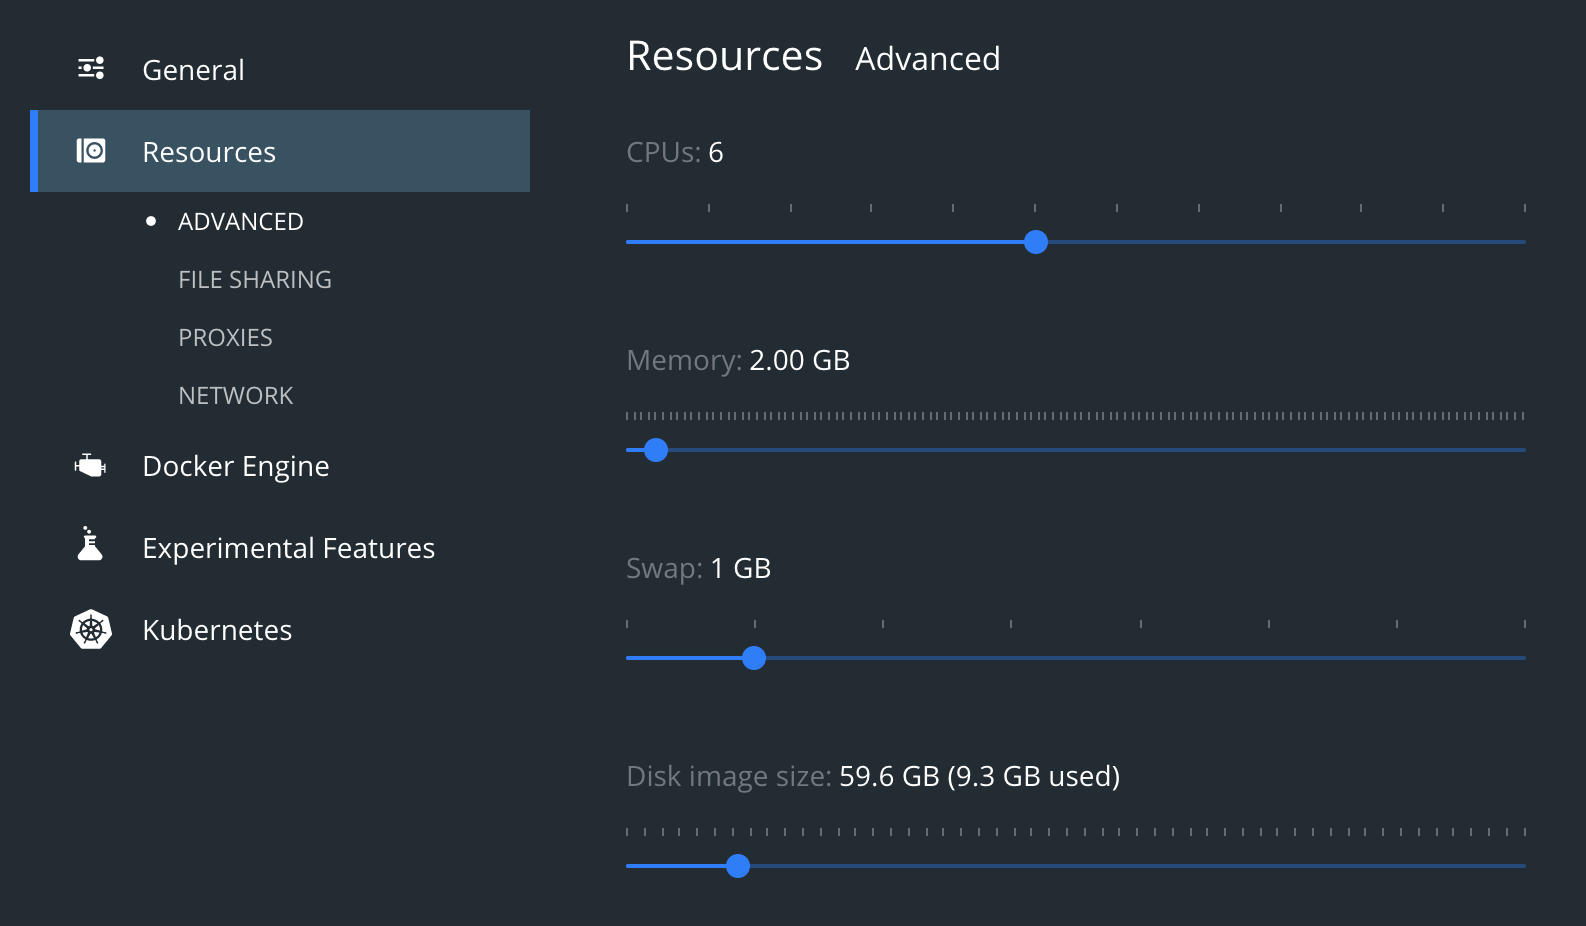
TODO: Check how much memory is already being used.
Slide the appropriate tab to specify a larger number.
Kubectl CLI install
NOTE: REF: kubectl CLI (kubernetes-cli) is installed by minikube install.
-
Install kubectl command:
sudo apt-get update && sudo apt-get install -y apt-transport-https
kubectl CLI client install
Kubernetes administrators use kubectl (kube + ctl) the CLI tool running outside Kubernetes servers to control them. It’s automatically installed within Google cloud instances, but on Macs clients:
-
Install on a Mac:
brew install kubectl
🍺  /usr/local/Cellar/kubernetes-cli/1.8.3: 108 files, 50.5MB
1.19.2
It’s required by eksctl and minikube.
-
Verify:
kubectl version
If you see this: ???
Client Version: version.Info{Major:"1", Minor:"21", GitVersion:"v1.21.3", GitCommit:"ca643a4d1f7bfe34773c74f79527be4afd95bf39", GitTreeState:"clean", BuildDate:"2021-07-15T21:04:39Z", GoVersion:"go1.16.6", Compiler:"gc", Platform:"darwin/amd64"} -
Verify the version installed:
kubectl version --client
At time of writing:
Client Version: version.Info{Major:"1", Minor:"21", GitVersion:"v1.21.3", GitCommit:"ca643a4d1f7bfe34773c74f79527be4afd95bf39", GitTreeState:"clean", BuildDate:"2021-07-15T21:04:39Z", GoVersion:"go1.16.6", Compiler:"gc", Platform:"darwin/amd64"}NOTICE that Golang programming is a component.
Without –client you get this error message:
The connection to the server 127.0.0.1:55000 was refused - did you specify the right host or port?
Install Docker & Kubernetes on CentOS
-
Install the the Docker Desktop app
On CentOS/RHEL 7:
yum install docker
On CentOS/RHEL 8, Docker is not installed by default, so there download docker-ce from docker.io:
https://docks.docker.com/install/linux/docker-ce/centos/
The Open Container Initiative at https://opencontainers.org defined the image-spec to define how to package contaiiners in a “filesystem bundle” and run them in a container. This ensures comptibility among containers, no matter the originating enviroment.
Start Minikube within VM
-
To run minikube within a VM so we will need to use the None (bare-metal) driver. The none driver requires minikube to be run as root, until #3760 can be addressed. To make none the default driver:
sudo minikube config set vm-driver none
These changes will take effect upon a minikube delete and then a minikube start
Stop Minikube
-
Stop the service:
minikube stop
-
Recover space:
minikube delete
🔥  Deleting "minikube" in docker ...
🔥  Deleting container "minikube" ...
🔥  Removing /Users/wilson_mar/.minikube/machines/minikube ...
💀  Removed all traces of the "minikube" cluster.
Scale Replicas
Since Kubectl 1.8, scale is the preferred way to control graceful delete:
kubectl scale --replicas=3 deployment nginx-deployment
Since Kubectl 1.8, rollout and rollback support stateful sets:
kubectl set image deployment.v1.apps/nginx-deployment nginx=nginx:1.9.1 --record
kubectl rollout status deployment.v1.apps/nginx-deployment
kubectl rollout history deployment nginx-deployment
-
To rollback, undo
kubectl rollout undo deployments nginx-deployment kubectl rollout history deployment/nginx-deployment –revision=3
-
To continue, start minikube again.
Cluster Configuration
Service cluster IPs and ports are found through Docker –link compatible environment variables specifying ports opened by the service proxy.
-
REMEMBER: Unlike k describe, k cluster-info is a single verb:
kubectl cluster-info
Example response:
Kubernetes master is running at https://127.0.0.1:32768
KubeDNS is running at https://127.0.0.1:32768/api/v1/namespaces/kube-system/services/kube-dns:dns/proxy
To further debug and diagnose cluster problems, use 'kubectl cluster-info dump'.
-
To further debug and diagnose:
kubectl cluster-info dump
Configure Contexts
-
Show the current context:
kubectl config current-context
The expected response on macOS is “minikube”. In production, it would include cloud, region, availability zone, etc.
gke_p-1yly4mizr0ot-0_europe-west1-c_consul-dc1
-
To avoid “The connection to the server localhost:8080 was refused”
https://kubernetes.io/docs/tasks/debug-application-cluster/troubleshooting
sudo touch $HOME/.kube/config
sudo chown $USER $HOME/.kube/config
chmod 600 $HOME/.kube/config
Deleted the old config from ~/.kube and then restarted docker (for macos) and it rebuilt the config folder.
-
What is in the Kubernetes configuration file showing configuration settings and current context:
cat $HOME/.kube/config
Sample response:
apiVersion: v1
clusters:
       - cluster:
 certificate-authority: /Users/wilson_mar/.minikube/ca.crt
 server: https://127.0.0.1:32768
  name: minikube
contexts:
       - context:
 cluster: minikube
 namespace: default
 user: minikube
  name: minikube
current-context: minikube
kind: Config
preferences: {}
users:
       - name: minikube
  user:
 client-certificate: /Users/wilson_mar/.minikube/profiles/minikube/client.crt
 client-key: /Users/wilson_mar/.minikube/profiles/minikube/client.key
REMEMBER: When a namespace is not specified in yaml, the name “default” is assumed.
-
The same JSON as in file ~/.kube/config is displayed by:
kubectl config view
PROTIP: If your server is not up, you’ll see this error message when attempting a kubectl command:
The connection to the server 127.0.0.1:32772 was refused - did you specify the right host or port?
Customize Terminal
-
Save a few seconds typing:
Resource Creation Tips for the Kubernetes CKA / CKD Certification Exam by John Tucker
Setup prompt at left
-
Setup the prompt so it always appear at the left:
export PS1="\n \w\[\033[33m\]\n$ "
Setup k aliase
-
Setup a shorthand alias so you can type “k” instead of kubectl:
alias k=kubectl
complete -F __start_kubectl k
-
Setup alias:
export do="--dry-run=client -o yaml"
Bash Autocompletion
-
Save a few seconds by setting up autocompletion. On bash:
bash completion
source <(kubectl completion bash)
echo "source <(kubectl completion bash)" >> ~/.bashrc
On ZSH:
source <(kubectl completion zsh)
echo "[[ $commands[kubectl] ]] && source <(kubectl completion zsh)" >> ~/.zshrc
Vim Editor - indentation
PROTIP: vim is the only editor available, so learn to search lines in vim (Esc, /, the text to be searched).
:set shiftwidth=2
To indent several lines with one command: Esc Shift+V for Visual Line mode, highlight lines, Shift . to shift left, Shift , to shift right.
VIDEO “Vim crash course”.
K command tips and tricks
Its code page has a summary description of:
- "Production-Grade Container Scheduling and Management"
-
Specify the kubectl command by itself to list its sub-commands.
-
Specify the kubectl command with –help get info:
k completion --help
Declarative Kubernetes Commands
K8s recognizes both imperative commands on kubectl and declarative yaml files.
Declarative vs. Declarative
REF:
-
Imperative commands act directly on live objects.
-
Imperative commands provide no track record history (other than Terminal history)
-
Declarative commands act on yaml files which define objects.
-
Declarative commands can be generated from imperative
k create deployment ghost --image=ghost --dry-run=client -o yaml >deploy.yaml
NOTE: image=ghost obtains the image from Docker Hub.
TASK: Create a pod with the ubuntu image to run a container to sleep for 5000 seconds. (Modify file ubuntu-sleeper-2.yaml)
apiVersion: v1
kind: Pod
metadata:
  name: ubuntu-sleeper-2
spec:
  containers:
  - name: ubuntu
    image: ubuntu
    command:
    - “sleep”
    - “5000”
The command can also be written as: ???
command: [ "sleep", "5000" ]
This references Dockerfile (aka Containerfile):
ENTRYPOINT ["python", "app.py"]
CMD ["--color", "red"]
PROTIP: Names of resources can be up to 253 characters. No underlines (use dashes and dots).
-
A pod that adds to an emptyDir volume a HTML file every 10 seconds (so you can tell it’s running from a browser):
apiVersion v1 kind: pod spec: volumes: -name: html containers: - name: nginx image: nginx:alpine volumeMounts: - name: html mountPath: /usr/share/nginx/html readOnly: true - name: html-updater image: alpine command: ["/bin/sh", "-c"] args: - while true; do date >> /html/index.html; sleep 10; done volume Mounts: - name: html mountPath: /html -
Socket hostPath Volume which disappears when each pod dies:
apiVersion v1 kind: pod spec: volumes: - name: docker-socket hostPath: path: /var/run/docker.sock type: Socket containers: - name: docker image: docker command: ["sleep"] volume Mounts: - name: docker-socket mountPath: /var/run/docker.sock -
Generate a Deployment from image :
Namespaces
Every request is namespaced:
- GET https://localhost:8001/api/v1/namespaces/default/pods
Namespaces are intended for use in environments with many users spread across multiple teams.
Namespaces provide isolation among different project teams, so one team can’t overwrite each other’s definitions.
Namespaces provide a scope for names, as a way to divide cluster resources.
Each namespace has its own set of quotas, network policies, RBAC.
PROTIP: Each UUID created (described) by K8s is unique across all namespaces within a cluster.
K8s namespaces are used to separate resources (network, files, users, processes, IPCs, etc.) into virtual clusters inside a K8s cluster.
- Nginx-Ingress controller
- Database (shared mysql-service or mongodb-service)
- Logging: Elastic stack
-
Monitoring
- Development
- Staging
- Blue/Green production
Secrets and ConfigMaps are not shared across namespaces.
Different limits on resources (CPU, RAM, storage) can be defined for each namespace.
Thus, separation of different namespaces is useful within large enterprises.
You don’t need to create or think about the default namespace.
-
Specify a namespace in a command:
k run nginx –image=nginx
-
Attach a namespace as the context for all subsequent commands:
k config set-context –current –namespace=namespace-1
-
List pods across a namespace across a cluster:
k get pods –all=namespace
-
API Resources within a namespace:
k api-resources –namespaced=true
The response is a long unsorted list with SHORTNAMES and KIND.
Many of the objects shown are for SysAdmins (storageclasses, etc.)
-
API versions:
k api-versions
-
List where KubeDNS is running:
Out of the box, without creating anything:
Namespaces
k get ns
kubectl get namespace
-
default holds resources users create without specifying a namespace
-
kube-public contains publically accessible (without auth) ConfigMaps ? which contain cluster info (kubectl cluster-info)
-
kube-system holds k8s internal system processes (master, kubectl, etc.) manages objects created by the system itself (Controllers, ConfigMap, Secrets, Deployments). Engineers deploying apps are not supposed to mess with this namespace.
-
kube-node-lease holds lease objects containing heartbeats of nodes and the availability of nodes since it’s used to detect node failures by sending heartbeats.
-
kubernetes-dashboard is created only within minikube.
kubectl create namespace production
TODO: apply system quota restrictions (of mem, compute) on a namespace to avoid overuse.
Resource names need to be unique within a namespace.
REMEMBER: ConfigMaps and Secrets cannot be shared across namespaces.
Global Volumes and Nodes cannot be bound to a namespace.
A service and pods can belong to multiple namespaces. -
imperative kubectl run command
-
Make an imperative command:
kubectl run --image=nginx web
pod/web created
kubectl get pods -o wide
NAME   READY   STATUS    RESTARTS   AGE
web    1/1     Running   0          2m59s
-
Details:
kubectl describe pod web
Name:         web
Namespace:    default
Priority:     0
Node:         minikube/172.17.0.3
Start Time:   Sun, 04 Oct 2020 07:02:16 -0600
Labels:       run=web
Annotations:  &LP;none>
Status:       Running
IP:           172.18.0.3
IPs:
  IP:  172.18.0.3
Containers:
  web:
 Container ID:   docker://ecd03de690f64202c6bdf35d4b4192e5af32854d9c77093f31136570507cc600
 Image:          nginx
 Image ID:       docker-pullable://nginx@sha256:c628b67d21744fce822d22fdcc0389f6bd763daac23a6b77147d0712ea7102d0
 Port:           &LP;none>
 Host Port:      &LP;none>
 State:          Running
   Started:      Sun, 04 Oct 2020 07:02:49 -0600
 Ready:          True
 Restart Count:  0
 Environment:    &LP;none>
 Mounts:
   /var/run/secrets/kubernetes.io/serviceaccount from default-token-72hc5 (ro)
Conditions:
  Type              Status
  Initialized       True
  Ready             True
  ContainersReady   True
  PodScheduled      True
Volumes:
  default-token-72hc5:
 Type:        Secret (a volume populated by a Secret)
 SecretName:  default-token-72hc5
 Optional:    false
QoS Class:       BestEffort
Node-Selectors:  &LP;none>
Tolerations:     node.kubernetes.io/not-ready:NoExecute for 300s
              node.kubernetes.io/unreachable:NoExecute for 300s
Events:
  Type    Reason     Age    From               Message
  ----    ------     ----   ----               -------
  Normal  Scheduled  4m40s  default-scheduler  Successfully assigned default/web to minikube
  Normal  Pulling    4m39s  kubelet, minikube  Pulling image "nginx"
  Normal  Pulled     4m7s   kubelet, minikube  Successfully pulled image "nginx" in 31.950535327s
  Normal  Created    4m7s   kubelet, minikube  Created container web
  Normal  Started    4m7s   kubelet, minikube  Started container web
Add-on Dashboard
The Kubernetes dashboard add-on to Kubernetes was originally intended to provide a convenient web-based way for administrators to manage a cluster. In the past, it was backed by a highly privileged kubernetes service account by default.
The default configuration expose a public interface vulnerable to remote attacks.
So completely disable the kubernetes dashboard by default.
Instead of using the Kubernetes dashboard, use the GSP console’s built-in GKE dashboard or Kubectl commands. They provide all the old dashboard’s functionality (and more) without exposing an additional attack service.
-
Open the Minkube Dashboard server localhost:53764 poped upped on your default browser:
minikube dashboard
🔌  Enabling dashboard ...
🤔  Verifying dashboard health ...
🚀  Launching proxy ...
🤔  Verifying proxy health ...
🎉  Opening http://127.0.0.1:54702/api/v1/namespaces/kubernetes-dashboard/services/http:kubernetes-dashboard:/proxy/ in your default browser...
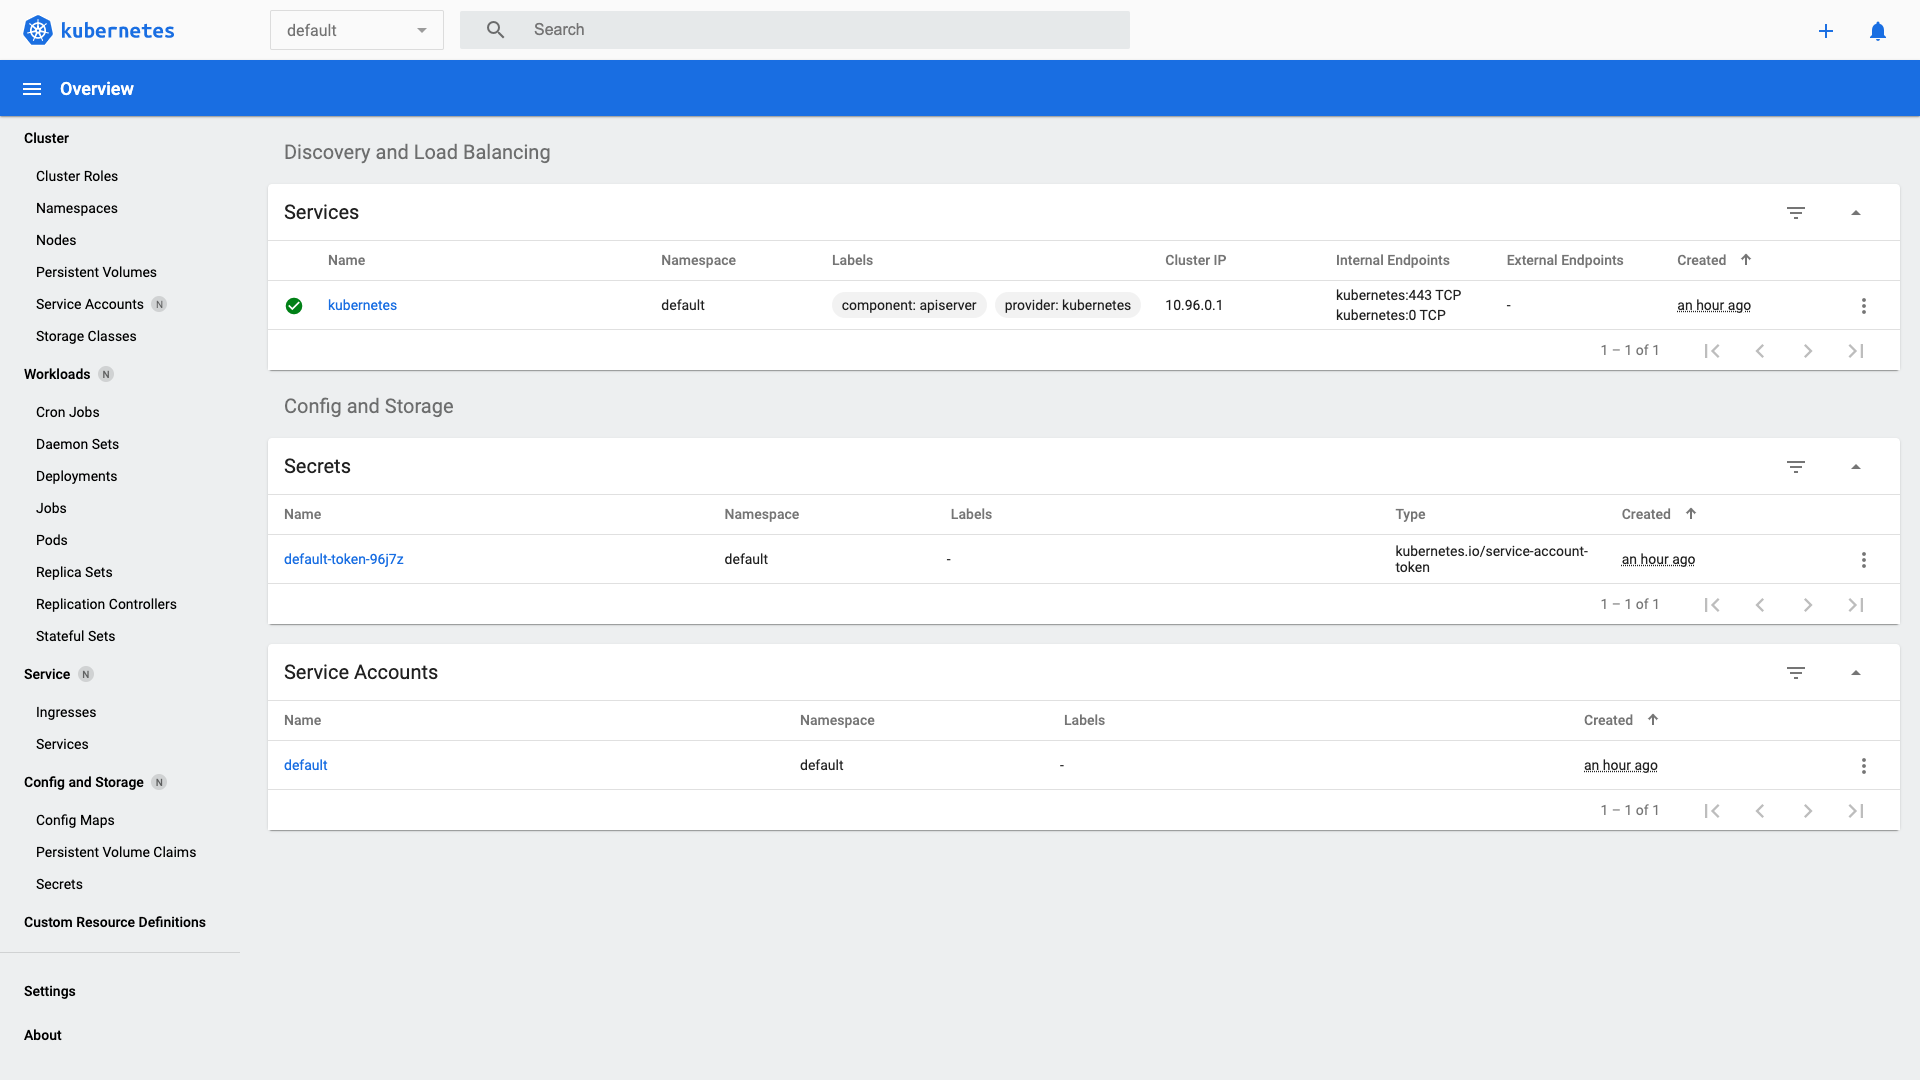
-
Escape by pressing ctrl+C.
Declarative yaml
-
Declarative yaml to define a new namespace:
apiVersion: v1   # Object controller version
kind: Namespace          # Object classification
metadata:                # Associated data
  labels:
 venue: opera
 watch: cpu
spec:                    # specific object details
Alternately, imperative commands to define a new namespace:
kubectl create namespace ticketing
kubectl label namespace ticketing venue=opera watch=cpu
kubectl get namespaces
kubectl get namespace apps-collection -o YAML
-
REMEMBER: List api-resources (not just resources) not bound to a namespace (NOT namespaced) so they can be referenced by named namespaces, such as shared Volumes, nodes:
k api-resources --namespaced=false
-
On minikube, delete all resources from the default namespace:
kubectl delete --all pods --namespace=default
kubectl delete --all deployments --namespace=default
kubectl delete --all services --namespace=default
Kubernetes can manage several namespaces running in each cluster.
“The primary grouping concept in Kubernetes is the namespace. Namespaces are also a way to divide cluster resources between multiple uses. That being said, there is no security between namespaces in Kubernetes; if you are a “user” in a Kubernetes cluster, you can see all the different namespaces and the resources defined in them.” – from the book: OpenShift for Developers, A Guide for Impatient Beginners by Grant Shipley and Graham Dumpleton.
PROTIP: Install https://github.com/ahmetb/kubectx command to switch among clusters. kubens to switch among namespaces. Written in Bash and Go. References:
- https://computingforgeeks.com/manage-multiple-kubernetes-clusters-with-kubectl-kubectx/
OpenShift project wall namespaces
“OpenShift can be considered the distribution of a container platform that works with Kubernetes as the ‘kernel’.” – https://itnext.io/openshift-vs-kubernetes-what-is-the-difference-cadee96497b7
Red Hat’s OpenShift product runs only on top of Red Hat Enterprise Linux Atomic Host (RHELAH), Fedora, or CentOS.
OpenShift adds Projects as “walls” between namespaces, ensuring that users or applications can only see and access what they are allowed to. OpenShift projects wrap a namespace by adding security annotations which control access to that namespace. Access is controlled through an authentication and authorization model based on users and groups.
This diagram illustrates what OpenShift adds:

OpenShift’s CLI command oc
OpenShift uses DeploymentConfig (DC), which is equivalent to a Kubernetes Deployment.
Red Hat offer support only for OpenShift enterprise, not OpenShift’s OKD (Origin Key Distribution) (aka “Origin”), the community distribution of Kubernetes that powers Red Hat OpenShift. Origin supports Go, Node.js, Ruby, Python, PHP, Perl, and Java. OKD is a sibling Kubernetes distribution to Red Hat OpenShift.
Kustomize templating utility
The kustomize provider from Kustomize.io provides a way to create customized raw, template-free YAML (overlay) files for multiple purposes (dev, prod). It leaves the base (original) YAML file untouched and usable as is. For example, dev would have replicas: 1 while pro would have replicas: 5. References:
- VIDEO by The DevOps Guy
- VIDEO Kustomize Getting Started
- https://kubernetes.io/blog/2020/06/working-with-terraform-and-kubernetes/
Some feel Kustomize doesn’t provide enough flexibility and that it results in too many different files for one application.
Alternatives are yq and Jsonnet.
Jsonnet
Jsonnet (pronounced “jay sonnet”) at jsonnet.org (from a 20% project within Google) is a DSL templating language which can generate .json, .conf, .sh, and .ini files. Its Creative Commons-licensed C++ code is at github.com/google/jsonnet.
A faster go-jasonnet is written in Go language and built using Bazel. There’s also Json.NET.
Sample code in this article shows how Jsonnet templating’s ability to extends JSON to “use variables, conditionals, functions, etc. to generate JSON, and feels more like writing JavaScript in some cases than writing a template.”

“This ticked all our boxes: giving us the repeatability of a templating environment with the power of something closer to a programming language.”
“We combine Jsonnet with ArgoCD to scale our deployments across thousands of microservices.”
Dockerfile to Pod yaml correspondance

NOTE: Type double-quote characters (“ to the right of the Return key on keyboards) instead of the slanty quotes shown in the graphic above.
Imperative one web server:
Klab:
-
For Docker to create an Nginx web server:+
docker run --name my-nginx -p 80 nginx:1.19.2
Naked Pod command & yaml

-
For Kubernetes to establish a “naked” pod using the nearly-deprecated run command (use deployment instead):
kubectl run my-nginx --port 80 --image=nginx:1.19.2
The recommended alternate is this pod definition defined within as a template within a deployment (as additional indentation):
apiVersion: v1
kind: Pod
metadata:
  labels:
 app: nginx
spec:
  containers:
         - name: my-nginx
 image: nginx:1.19.2
 ports:
 - containerPort: 80
PROTIP: Specification of a label in the k run command creates a pod rather than a deployment. So no need to set flag “–restart=Never”.
-
The opposite is “delete pod x”.
-
List pods
k get pods
-
Copy a specific pod name generated to paste in the command to see its logs:
kubectl logs pod/pod-name
-
Output log file to a pod (named “pod-x”):
k logs pod-x | sudo tee ~/opt/answers/mypod.logs
TOOL: stern,
elasticsearch, kibana: https://github.com/kubernetes/kubernetes/tree/master/cluster/addons/fluentd-elastisearch
Fluent Bit is a log processor and forwarder that collects logs and metrics from various sources, processes them, and sends them to multiple destinations. It is lighter for performance, but less feature-rich than fluentd, making it suitable for containerized and embedded systems.Both are from the Cloud Native Computing Foundation (CNCF). It supports various input sources (files, syslog, HTTP, etc.) and output destinations (Elasticsearch, Splunk, Kafka, etc.).
k port-forward service/kibana-logging 5601:5601 –namespace=kube-system
-
Find all pods that have been started with the kubectl run command: ???
kubectl get pods nginxpod –show-labels grep run kubectl run pod test –image=nginx –dry-run=client -o jasonpath=’{metadata.labels}’
-
Execute iteractive terminal on a pod with bash installed (most Linux have –bin/sh installed):
kubectl exec -it pod-name --bin/bash
Declarative yaml
-
Generate a declarative yaml file from an imperative command:
k run redis --image=redis --dry-run=client -o yaml > mypod.yaml
-
Vi pod.yaml to edit*
Every K8s yaml file must have these top-level properties:
apiVersion:
kind:
metadata:
spec:
apiVersion: v1 apps/v1 kind: Pod
ServicceReplicaSet Deployment
kind: abbreviations
PROTIP: Use abbreviations (in lower case) of basic Kubernetes components to save time typing:
| k get | po | no | svc | rs | deployment |
| abbreviation: | pods | nodes | services | replicaset | deployment |
REMEMBER: kind: full value must be Title case (first character upper case), singular (not plural).
REMEMBEER: IRL Admins do not code to work with individual pods, because the whole point of K8s is to automate that chore.
Admins define abstractions for deployment of images (Docker containers) which define templates (blueprints) for creating pods.
CRD (Custom Resource Definitions)
![]()
CRDs define a custom/another/new resource kind stored in etcd.
CRD line apiVersion: apiextensions.k8s.io (like built-in code for StatefulSets).
Alternately, Improbable.io makes use of crd for its etcdclusters (apiVersion: etcd.improbable.io). For examaple: kubectl tree etcdcluster example
See my Kubernetes Operators and Red Hat’s OperatorHub.io holding Helm, Ansible, and Go operators.
Terraform Provider Alpha
For a dynamic way to manage any Kubernetes API resource using HashiCorp Terraform. The kubernetes_manifest resource using terraform-plugin-go to provide an HCL analog for Kubernetes YAML manifests to create any resource, including CRDs and custom resources.
Once the plan has been generated, we use server side apply to apply the manifest.
It graduated (from alpha) into the official Kubernetes provider as a beta in July 2021.
BLOG: Beta Support for CRDs in the Terraform Provider for Kubernetes
metadata:
metadata contains a dictionary indented name: and label:
spec:
In spec: is a dictionary item containers: specifying a list/array represented by a dash in front of each item:
spec:
  containers:
    - name: nginx-containers
      image: nginx
REMEMBER: Under containers:, the dash in front of name is indented.
-
Create instance by applying yaml -file
k apply -f mypod.yml
-
Edit the pod’s yaml file:
k edit pod mypod.yaml
-
Extract a declaration yaml file from a running pod:
k get pod mypod -o yaml > definition.yaml
But this can be messy because you’ll have to delete all item: lines.
In vi normal mode, delate 5 lines, including the cursor, 5dd.
-
A Busybox image contains several apps:
apiVersion: v1
kind: Pod
metadata:
  name: busybox-ready
  namespace: default
kubectl apply makes changes if its subject already exists (the command is declarative?).
REMEMBER: kubectl create throws an error if the resource already exists, whereas kubectl apply won’t. kubectl create says “create this thing” whereas kubectl apply says “do whatever is necessary (create, update, etc) to make it look like this”.
The resulting file includes additional annotations.
Multi-Container Pods
![]()
- 2h 26m VIDEO course: “Kubernetes for Developers: Integrating Volumes and Using Multi-container Pods” by Nigel Poulton Apr 23, 2020
- VIDEO: Kubernetes and Container Orchestration 101 - Computer Stuff They Didn’t Teach You #11 by Microsoft legend Scott Hanselman.
The kube-scheduler assigns pods to nodes at runtime. Before scheduling, it checks resources, QoS, policies, user specs.
This needs application executables to be designed and built as microservices (independent, small, reuseable code) instead of a monalith.
Several containers: the webapp, log-agent, Istio, etc.
Patterns:
An Init container prepares the main container started from the same Pod.
So Init containers are run before the main container.
The ambassador pattern is a proxy in front of accessing data.
Use cases:
-
chard data among several physical databases, for better performance and redundancy*
-
make consistent the format of dates sent to the database.
-
route requests to one of several databases (dev/test/prod).
The Adapter pattern presents a standardized interface across multiple pods, to normalize output logs and monitoring data. Adapts third-party software.
The Sidecar pattern
| Pod ... | Affinity | Anti-Affinity |
|---|---|---|
| To Pods | podAffinity | topologySpreadContraints |
| To Nodes | nodeAffinity | Taints and Tolerations |
Controller objects
VIDEO: “Kubernetes Un-Scaried” by Phil Taprogge (of Snyk) offers this diagram:

- Deployments
- ReplicaSets, which replaces Replication Controllers
- StatefulSets
- DaemonSets for a single pod on every node
- Jobs
- Serviceaccounts controller
- Endpoints controllers
- Replication controller
Deployments
A Deployment is an API object that manages a replicated application, typically by running Pods with no local state.
- auth.yaml
- frontend.yaml
- hello-green.yaml
- hello-canary.yaml
- hello.yaml
-
Create a yaml file from a command to deploy 3 replica pods:
kubectl create deployment nginx-lab8 --image=nginx --replicas=3 --dry-run=client -o yaml > lab8.yaml
-
To delete a deployment:
kubectl delete deployments.app pod mydep ???
Deployment strategies
These Kubernetes Deployment strategy offers a unique approach and benefit to manage updates:
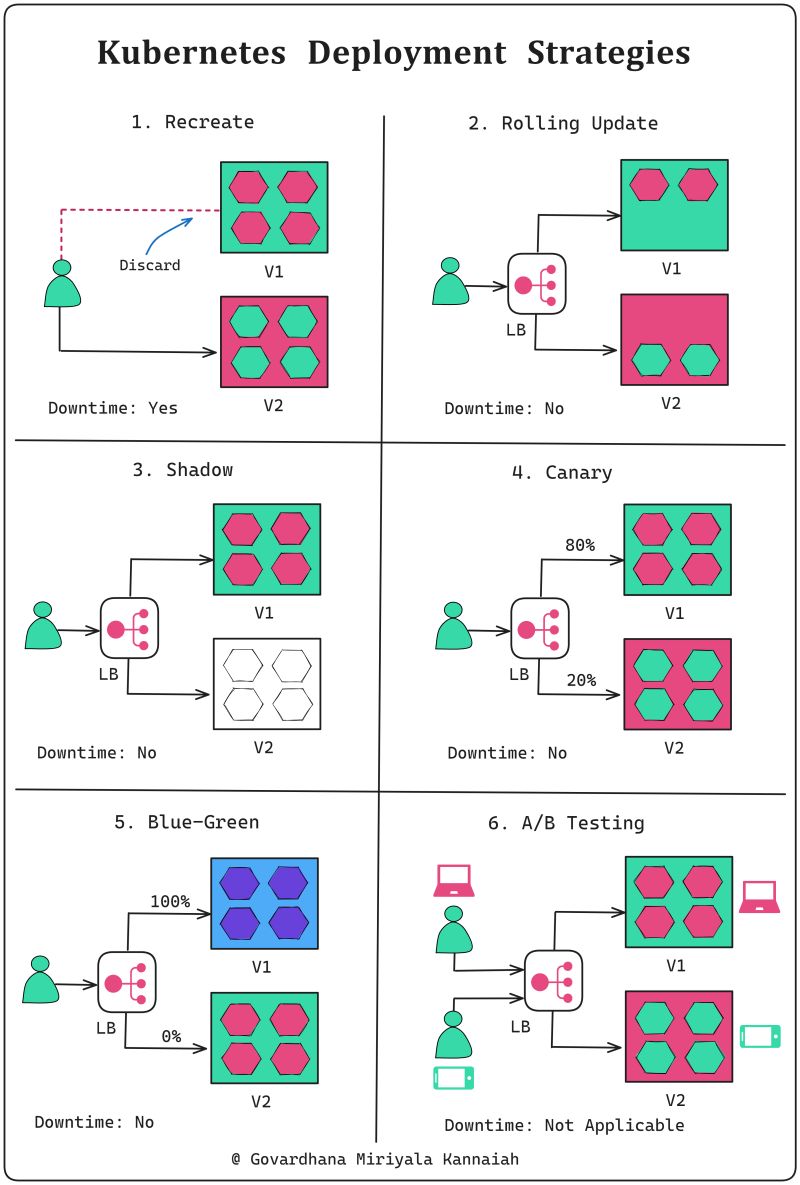
by Govardhana Miriyala Kannaiah
-
Recreate:
All existing instances are terminated and discarded immediately. Updated instances version are created anew.
CAUTION: This is the default strategy, and it involves downtime.
𝘜𝘴𝘦 𝘤𝘢𝘴𝘦: Non-critical applications or during initial development stages
-
Application instances are updated one by one, ensuring high availability during the process
𝘜𝘴𝘦 𝘤𝘢𝘴𝘦: Periodic releases
-
Shadow:
A copy of the live traffic is redirected to the new version for testing without affecting production users.
This is the most complex deployment strategy and involves establishing mock services to interact with the new version of the deployment.
𝘜𝘴𝘦 𝘤𝘢𝘴𝘦: Validating new version performance and behavior in a real environment
-
Canary:
The new version is released to a subset of users or servers for testing before broader deployment
𝘜𝘴𝘦 𝘤𝘢𝘴𝘦: Impact validation on a subset of users
-
Blue/Green:
Two identical environments are created to run simultaneously: one with the current version (blue) and the other with the updated version (green).
Traffic starts with blue, then switches to the prepared green environment for the updated version.
𝘜𝘴𝘦 𝘤𝘢𝘴𝘦: High-stake updates
-
A/B Testing:
Multiple versions are concurrently tested on different users to compare performance or user experience.
𝘋𝘰𝘸𝘯𝘵𝘪𝘮𝘦: Not directly applicable
𝘜𝘴𝘦 𝘤𝘢𝘴𝘦: Comparing and optimizing user experience during development
Deploy Replicas for Replication, Rolling Updates
![]()
Deployments let you create, update, roll back, and scale Pods, using ReplicaSets.
Much training focuses on Deployments because Deployments provide a helpful “front end” to ReplicaSets.
Deployments manage their own ReplicaSets to achieve the declarative goals you prescribe, so you will most commonly work with Deployment objects.
A ReplicaSet controller ensures that a population of Pods, all identical to one another, are running at the same time. So it enables Load Balancing across several machines for more capacity, redunancy, and rolling updates without downtime.
ReplicaSets enable deployment of several pods, and check their status as a single unit (replicas). ReplicaSets monitor the number of pods and create pods to match the number of replicas for the label type requested in the yaml.
Deployments let you do declarative updates to ReplicaSets and Pods.
kubectl run deployment-name \
   --image [IMAGE]:[TAB] \
   --replicas 3 \
   --labels [KEY]=[VALUE] \
   --port 8080 \
   --generator deployment/apps.va \
   --save-config
A sample ReplicaSet.yml template: is copied from a pod definition yaml, then indented.
apiVersion: v1
kind: ReplicaSet
metadata:
  name: my-app
  labels:
    app: myapp
    type: front-end
spec:
  template:
    metadata:
      name: myapp-pod
      labels:
        app: myapp
        type: front-end
        pec:
      containers:
      - name: nginx-container
        image: nginx:1.19.2
        ports:
        - containerPort: 80
replicas: 3
selector:
  matchLabels:
    type: front-end
REMEMBER: A selector is required within ReplicaSet yaml.
PROTIP: Indent paste using vi
-
PROTIP: Remember the “.apps” when listing replicasets:
k get replicasets.apps
-
Identify the image:
k describe replicasets.apps replicaset-1 | grep -i image:
Modify replicas to scale
-
Edit the file, then
k replace -f replicaset-def.yamlREMEMBER: several formats don’t modify the file:
-
k scale –relicas=6 -f replicaset-def.yaml
-
k scale –replicas=6 replicaset myapp-replicaset
-
Scale based on load
-
Practice test with quiz about pod commands: https://kodekloud.com/courses/kubernetes-certification-course-labs/lectures/12039431
Rolling Updates
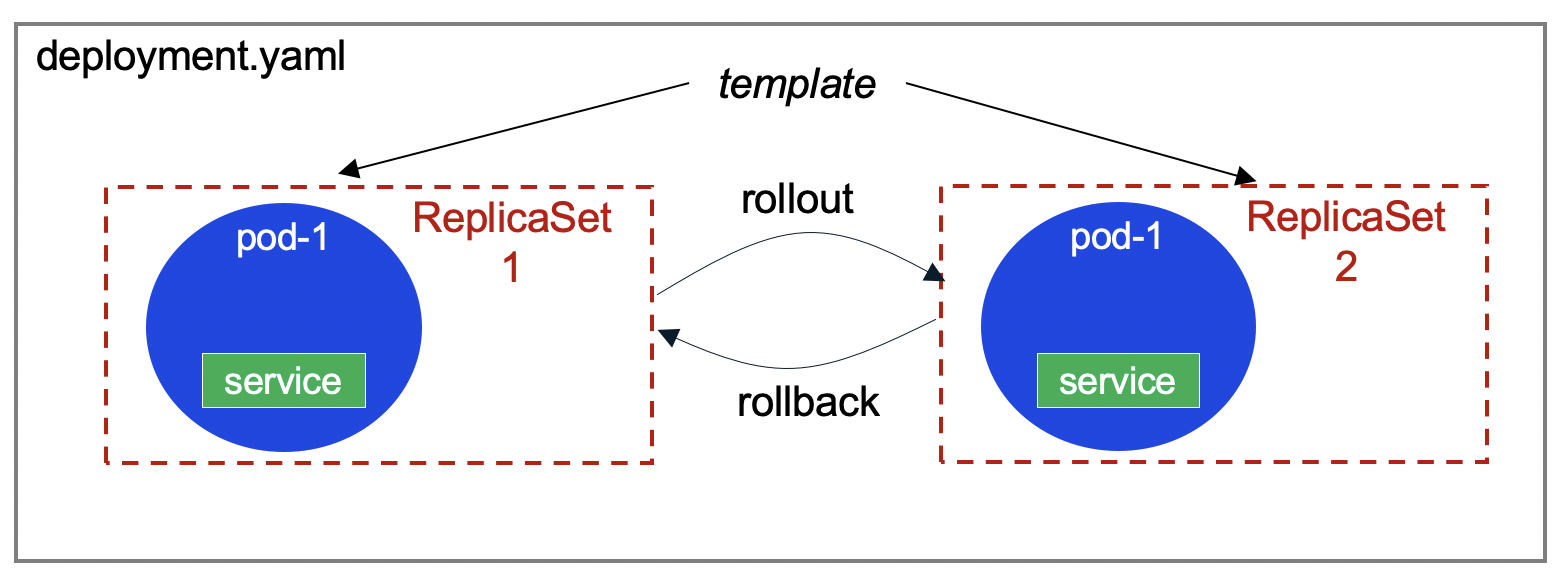
For example, when you perform a rolling upgrade of a Deployment, the Deployment object creates a second ReplicaSet, and then increases the number of Pods in the new ReplicaSet as it decreases the number of Pods in its original ReplicaSet.
(The ReplicaSet process replaces the older ReplicationController. Replication Controllers perform a similar role to the combination of ReplicaSets and Deployments, but their use is no longer recommended.)
To upgrade gradually in a production environment without downtime, do a rolling update.
Deployments make use of Replicasets.
kubectl run --restart=Always      # creates deployment
kubectl run --restart=Never       # creates pod
kubectl run --restart=OnFailure   # creates job
To perform an upgrade, the Deployment object will create a second ReplicaSet object, and then increase the number of (upgraded) Pods in the second ReplicaSet while it decreases the number in the first ReplicaSet.
-
List deployments, different ways:
k get deployment
k get deployments
k get deployment.app
k get deployments.app
Practice test with quiz about deployments: https://kodekloud.com/courses/kubernetes-certification-course-labs/lectures/12039434
Stateless apps
Stateless apps don’t keep a record of state (such as shopping cart items). Each request is completely new, without regard for what activity occured before. So they can be defined using deployment components: Standard Pods are identical and interchangeable, with the same service name, created in random order with random hashes. Data passes through NodeJs.
Stateful Apps
Each Stateful app (such as mysql-app) that stores data (updates a database such as MongoDB) about the state of each transaction are defined using Kubernetes StatefulSets (STS) components:
- Previous State Data (in data replicas) is queried and updated depending on the data state
- STS Pods are NOT identical. Each pods has a sticky identity, .{governing service domain}
- STS Pods have individual service names, not interchangeable
- STS Pods are created in sequence, after success of each Pod, based on a persistent individual identify
Add pods can read. But only Master pods can write.
To ensure each Pod maintains the latest state in local storage, continuous data sync occurs from master to slaves.
Stateful Sets
![]()
Use of a StatefulSet is preferred over a Deployment to deploy applications that maintain local state, with traffic sent to a specific pod.
Pods created by StatefulSet and Deployments use the same container spec. But:
Pods created through Deployment are NOT given persistent identities.
Pods created using StatefulSet have unique persistent identities with stable network identity and persistent disk storage.
If a pod is rescheduled, the original PV is mounted to ensure data integrity and consistency.
REMEMBER: StatefulSets require a “headless” service to 1) manage network identities and 2) provide read access to pods.
Each StatefulSet has a unique and predictable name and address.
A StatefulSet assigns to each Pod an ordinal index number. StatefulSet pods always start in the same order, and are terminated in reverse order.
apiVersion: apps/v1
kind: StatefulSet
metadata:
  name: web
spec:
  selector:
    matchLabels:
      app: nginx  # has to match .spec.templatemetadata.labels below
    serviceName: "nginx"
    replicas: 3  # 1 by default
    minReadySeconds: 10  # 0 by default
    template:
      metadata:
        labels:
          app: nginx  # has to match .spec.selector.matchLabels above
      spec:
        terminationGracePeriodSeconds: 10
        containers:
          name: nginx
          image: k8s.gcr.io/nginx-slim:0.8
          ports:
          - containerPort: 80
            name: web
          volumeMounts:
          - name: www
            mountPath: /usr/share/nginx/html
   volumeClaimTemplates:
   - metadata:
       name: www
     spec:
       accessModes: [ "ReadWriteOnce" ]
       storageClassName: "my-storage-class"
       resources:
         requests:
           storage: 1Gi
DaemonSets (ds)
![]()
To run the same Pod on all nodes within the cluster or on a selection of nodes, use DaemonSet. When new nodes are added, DaemonSet will automatically set up Pods in those nodes with the required specification.
The word “daemon” is a computer science term meaning a non-interactive process that provides useful services to other processes.
For example, a Kubernetes cluster might use a DaemonSet to ensure that a logging agent like fluentd is running on all nodes in the cluster.
Usually for system services or other pods that need to physically reside on every node in the cluster, such as for network services.
They can also be deployed only to certain nodes using labels and node selectors.
REMEMBER:
-
When draining a node out of service temporarily for maintenance, remember to specify ignore daemonsets:
kubectl drain node3.mylabserver.com --ignore-daemonsets
-
To return to service, uncordon:
kubectl uncordon node3.mylabserver.com
svc = Services
![]()
Services provide an un-changing IP address to pods in the back-end.
PROTIP: Services are defined with a port.
Internal services are only reachable within a cluster.
Types of services:
- ClusterIP exposes only inside the cluster
- NodePort exposes a port through the node to the world
- LodBalancer exposes the service externally using a cloud provider’s load
REMEMBER: Port numbers in deployment yaml must match port numbers in services yaml.
Example yaml of services:
- auth.yaml
- frontend.yaml
- hello-blue.yaml
- hello-green.yaml
- hello.yaml
- monolith.yaml
sa = ServiceAccounts
![]()
-
Administrator: Create a new service account named “backend-team”:
kubectl create serviceaccount backend-team
-
Define the service 2.1-web_service.yaml:
spec: selector: app: nginx ports: - protocol: TCP port: 80 targetPort: 8080 -
Verify visibility using curl:
kubectl create -f 2.1-web_service.yaml
kubectl get services
kubectl describe service webserver  # copy IP: value 10.108.171.76
kubectl describe nodes | grep -i address -A 1
curl 10.0.0.100:3#### (replace #### with the actual port digits)
PROTIP: A secret is assigned automatically each service.
-
To show all components in a mongodb app:
kubectl get all | grep mongodb
Expose service within deployment
PROTIP: External services are exposed by Endpoints: (NodePoints).
https://kubernetes.io/docs/reference/generated
k expose deployment deployment --port=6379 -n namespace --name=service-name
LoadBalancer
One type of service is a LoadBalancer with a external IP extended from nodePort service which extends an ClusterIP :
apiVersion: v1
kind: Service
metadata:
  name: la-lb-service
spec:
  type: LoadBalancer
  sessionAffinity: ClientIP
  selector:
 app: la-lb
  ports:
         - protocol: TCP
 port: 3200  # clusterIP
 targetPort: 3000
 nodePort: 30010
  clusterIP: 10.0.171.223
  loadBalancerIP: 78.12.23.17
sessionAffinity: ClientIP to ensure that each client’s first request to determine which Pod will be used for all subsequent connections, when switching versions mid-transaction can cause issues.
Notice static IP addresses are being specified here. Is that a good thing?
k get svc
The LoadBalancer type service assigns an EXTERNAL-IP address which accepts external requests.
Service Discovery
-
cat /etc/resolve.conf
search default.svc.cluster.local  svc.cluster.local  cluster.local
nameserver 10.96.0.10
options ndots:5
-
List the URL:
minkube service mongo-extress-service
To text, create a database.
ConfigMaps
DEFINITION: ConfigMap is an API object used to store non-confidential data in key-value pairs.
Pods can consume ConfigMaps as environment variables, command-line arguments, or as configuration files in a volume.
shared mysql-service yaml ConfigMap
-
Define a commonly used ConfigMap within a service named “database”:
apiVersion: v1
kind: ConfigMap
metadata:
  name: mysel-configmap
data:
  db_url: mysel-service.database
REMEMBER: “.database” above references the namespace. [1:15:17]
-
View
k get configmap -n my-namespace
Kind: Job
![]()
Batch (background) jobs are “one off” supervisor processes that run once and are immediately completed.
-
To execute a CronJob based on a repeating schedule:
kubectl create cronjob repeater --image=busybox --schedule="*/1 * * * *" -- echo "Hello World"
-
To create pods and keep retrying until a specified number of pods successfully terminate:
kubectl create job something --image=busybox -- echo "Hello World"
The Job controller within the Control Plane creates one or more Pods required to run a task.
spec: completions: 5 defines the number of pods started within a job.
spec: parallelism: 1 defines the number of pods running at the same time.
When the task is completed, the Job terminates.
3 types of jobs:
- completions=1 & parallelism=1 for non-parallel: one pod is started
- completions=n & parallelism=m for n fixed completions in parallel
- completions=1 & parallelism=m for n jobs work queue started until 1 completed (rarely used)
If a node fails while a Job is executing on that node, Kubernetes restarts the Job on a node that is still running.
To fail jobs that don’t finish within a set number seconds: This example-job.yaml uses perl language built-in command to compute the value of Pi to 2,000 places and then prints the result:
apiVersion: batch/v1
kind: Job
metadata:
  # Unique key of the Job instance
  name: example-job
spec:
  template:
    metadata:
      name: example-job
    spec:
      containers:
      - name: pi
        image: perl
        command: ["perl"]
        args: ["-Mbignum=bpi", "-wle", "print bpi(2000)"]
      # Do not restart containers after they exit
      restartPolicy: Never
kubectl apply -f example-job.yaml
-
For the job’s start time and success status, describe the job:
Start Time:     Thu, 20 Dec 2023 14:34:09 +0000
Pods Statuses:  0 Running / 1 Succeeded / 0 Failed
-
Additional conditions:
...
spec:
  backoffLimit: 4
  activeDeadlineSeconds: 300
  template:
  ...
-
Delete job after finish:
ttlSecondsAfterFinished: 20
-
When a job is completed, the Job terminates Pods used unless:
kubectl delete job job-name --cascade false
-
After running, check the status of jobs
kubectl get jobs
NAME     COMPLETIONS   DURATION   AGE
somejob   5/5           27s        9m41s
Kind: Cronjob
![]()
-
When a job is complete, view results in logs:
kubectl logs pod-name
The API Server authenticates using one of several methods (basic, certificates, tokens, etc.).
“Authorization” refers to determining whether the requester is allowed to perform based on role (using RBAC).
The API Server routes several kinds of yaml declaration files: Pod, Deployment of pods, Service, Job, Configmap.
The CronJob controller runs Pods on a time-based schedule like Linux cron uses (minute, hour, day, month, day of week 0-6)
-
apply example-cronjob.yaml with batch apiVersion and kind: Cronjob, with a schedule spec:
apiVersion: batch/v1beta1
kind: CronJob
metadata:
  name: hello
spec:
  schedule: "*/1 * * * *"
  jobTemplate:
 spec:
   template:
     spec:
       containers:
       - name: hello
         image: busybox
         args:
         - /bin/sh
         - -c
         - date; echo "Hello, World!"
       restartPolicy: OnFailure
Additional:
...
spec:
  schedule: "*/1 * * * *"
  startingDeadlineSeconds: 3600    # to stop repeated unsuccessful attempts to start
  concurrencyPolicy: Forbid        # or replace existing concurrent jobs
  suspend: True
  successfulJobsHistoryLimit: 3    # retained in history
  failedJobsHistoryLimit: 1        #
  jobtemplate:
    ...
-
Add-on for jetbrains:
Misc. List:
kubectl get -n kube-system serviceaccounts
QUESTON: Create a Cron job that will run ???
Podspecs
Podspecs are yaml files that describe a pod.
apiVersion: v1
kind: Pod
metadata:
  name: busybox-ready
  namespace: default
Deleting Pods
k delete pod frontend --grace-period=0 --force
Plug-in manager
-
Like apt-get, but for use within Kubernetes:
kubectl krew install tree
From the krew-index plug repository on the internet.
-
For a deployment, list its Pods within ReplicaSet:
kubectl tree deployment ???
Add-ons to Kubernetes
Kubernetes is a platform used for building platforms such as OpenShift, Helm, EKS, CrossPlane.
- AppsCode provides several utiities for Kubernetes.
- CoreOS Tectonic multi-cloud is being integrated with RedHat.
- Containership Kubernetes Engine
- Giant Swarm managed Kubernetes
- IBM Cloud Kubernetes Service (IKS) works with their IBM Cloud Container Registry. See tutorial
- Mail.Ru Cloud Solutions Containers
- Mirantis’ Cloud Platform
- PKS (Pivotal Kubernetes Service)
- Platform 9 provide OpenStack with Kubernetes
-
Stackpoint
-
Buddy automates Kubernetes workflows.
- Octant cluster visualization
- RabbitMQ for AMQP messaging with StatefulSet app
helm install -name prometheus stable/prometheus-operator
k port-forward service/prometheus-grafana 9091:80
https://github.com/Albertoimpl/k8s-for-the-busy by Alberto C. Rios (@albertoimpl)
https://github.com/ojhughes/k8s-for-the-busy-java-developer by Ollie Hughes (@olliehughes82)
Helm charts
VIDEO: Helm (helm.sh) is the default package manager for Kubernets (like pip and NuGet). It was started by a company called Deis in October 2015 out of a hackathon.
Helm templating creates yaml.
Helm is further automated with Tilt.
The Illustrated Children’s Guide to Kubernetes by Deis, Inc.
Helm Charts are a collection of templates that can be pulled from a version-controlled Helm repo to define, install, and upgrade complex Kubernetes applications, thus reducing copy-and-paste (and room for error in repetition).
A Helm chart can be used to quickly create an OpenFaaS (Serverless) cluster:
git clone https://github.com/openfaas/faas-netes && cd faas-netes
   kubectl apply -f ./namespaces.yml
   kubectl apply -f ./yaml_armhf
Videos:
- Helm Explained by “Nana’s TechWorld” (Nana Janashia)
- IBM: Deploy a scalable web application to Kubernetes using Helm
Kapp
Kapp (open sourced at https://carvel.dev/kapp) replaces the kubectl command:
kapp deploy -a deploy1 -f d.yaml -f
It is used by Google for its Marketplace to leverage labels.
ArgoCD
Argo CD is a declarative, GitOps Continuous Delivery tool for Kubernetes.
“GitOps” means ArgoCD monitors GitHub and applies changes of declarative yaml to K8s Controllers automatically:
- Architecture diagram
- argoproj.github.io/argo-cd home page
- Introduction to ArgoCD : Kubernetes DevOps CI/CD
- Open sourced at github.com/argoproj/argo-cd
OpenShift routes to services
OpenShift’s Router is instead a HAProxy container (taking the place of NGINX).
HAProxy uses a VRRP (Virtual Router Redundancy Protocol) automatically assigns available Internet Protocol routers to participating hosts.

Services can be referenced by external clients using a host name such as “hello-svc.mycorp.com” by using OpenShift Enterprise, which uses routes that define the rules the HAProxy applies to incoming connections.
Routes are deployed by an OpenShift Enterprise administrator as routers to nodes in an OpenShift Enterprise cluster. To clarify, the default Router in Openshift is an actual HAProxy container providing reverse proxy capabilities.
netpol = NetworkPolicies
![]()
The IP assigned each pod is on the Service Network.
HA Proxy cluster
For network resiliency, HA Proxy cluster distributes traffic among nodes.
Endpoints track the IP addresses of Pods with matching selectors.
EndpointSlice groups network endpoints together with Kubernetes resources.
A private ClusterIP is accessible by nodes only within the same cluster.
Services listen on the same nodePort (TCP 30000 - 32767 defined by --service-node-port-range).
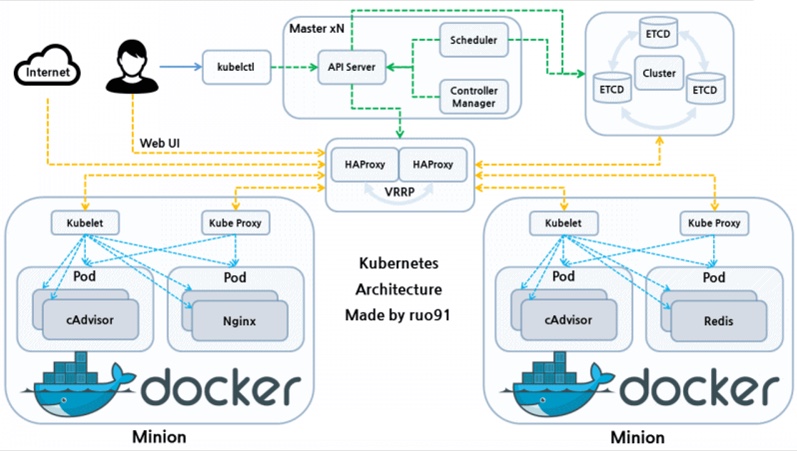
The diagram above is referenced throughout this tutorial, particularly in the Details section below. It is by Yongbok Kim who presents animations on his website.
Communications with outside service network callers occur through a single Virtual IP address (VIP) going through a kube-proxy pod within each node. The Kube-proxy load balances traffic to deployments, which are load-balanced sets of pods within each node. Kube-proxy IPVS Mode is native to the Linux kernel. CBR0 (Custom Bridge zero) forwards the eth0, which rewrites the destination IP to a pod behind the Service3:18 into chapter 6 Big Picture
Kubernetes manages the instantiating, starting, stopping, updating, and deleting of a pre-defined number of pod replicas based on declarations in *.yaml files or interactive commands.
The number of pods replicated is based on deployment yaml files. Service yaml files specify what ports are used in deployments.

Auto-scaling
The Horizontal Pod Autoscaler add more pods by updating the replicas count in the Deployment
- In v1, based on targetCPUUtilizationPercentage: 50
- In v2, based on targetCPU and Memory, and custom metrics
The Cluster Autoscaler adds more nodes to the cluster.
In 2019 Kubernetes added auto-scaling based on metrics API measurement of demand.
To create a cluster with autoscaling:
gcloud container clusters create cluster-name --num-nodes 30 \
   --enable-autoscaling --min-nodes 15 --max-nodes 50 --zone comput-zone
To scale nodes in a cluster node pool:
gcloud container clusters resize projectdemo --node-pool default-pool --size 6
To disable auto-scaling:
... --no-enable-autoscaling ...
Autoscaler
- https://github.com/kubernetes/kubernetes/blob/release-1.0/docs/proposals/autoscaling.md now obsolete
- https://github.com/kubernetes/community/blob/master/contributors/design-proposals/autoscaling/horizontal-pod-autoscaler.md
- https://www.tutorialspoint.com/kubernetes/kubernetes_replica_sets.htm
- resize the amount of CPU/RAM for a specific Pod or Container. https://github.com/kubernetes/kubernetes/issues/2072
AWS K8s Cluster Autoscaler
https://github.com/kubernetes/autoscaler/blob/master/cluster-autoscaler/cloudprovider/aws/README.md provides deep-dive notes and code.
HPA (HorizontalPodAutoscaler)
increases the instance count.
This Architectural Diagram pdf:
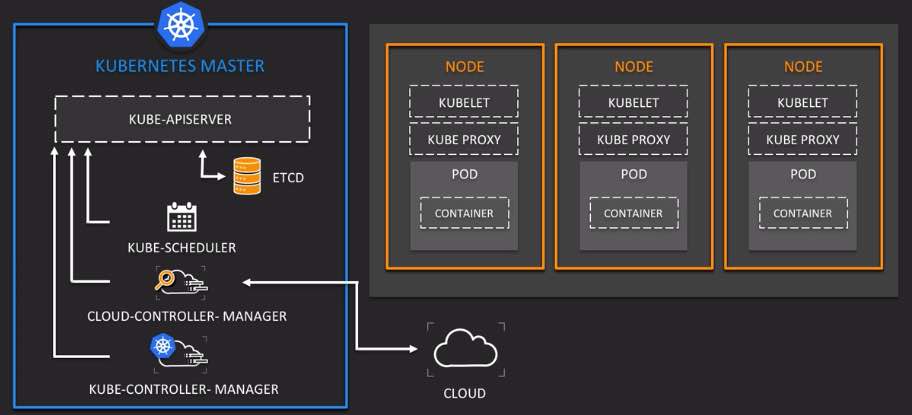 is described in
Linux Academy’s CKA course of 5:34:43 hours of videos by Chad Miller (@OpenChad).
is described in
Linux Academy’s CKA course of 5:34:43 hours of videos by Chad Miller (@OpenChad).
- Kubernetes Fundamentals $299 video course offered on EdX.com from LinuxFoundation.
Source: X-Team
PROTIP: To list clusters and switch between them, consider brew installing utilities https://github.com/ahmetb/kubectx and kubens.
kube-ps1.sh creates a shell pod envbin.
KEDA-supported Scale Trigger
KEDA (Kubernetes-based Event Driven Autoscaler) is a lightweight component that scales Kubernetes containers based on the number of events needing processing, including autoscaling to zero.
KEDA’s architecture consists of event sources (external triggers), scalers (monitoring event sources), and a controller (scaling deployments based on rules).
It can efficiently scale workloads based on external events or triggers. The Kubernetes External Metrics API to translate metrics from external sources for autoscaling.
KEDA offers a catalog of 50+ built-in scalers for various platforms and different workload types, plus community-maintained scalers and supports triggers across various cloud providers and products.
The KEDA Operator has a controller that implements a reconciliation loop and activates ScaledObject resources by creating Horizontal Pod Autoscalers. The ScaledObject defines the source of metrics and trigger criteria. It’s a metrics adapter (translating metrics for HPA).
It works alongside Kubernetes Horizontal Pod Autoscaler to explicitly map apps for event-driven scaling.
https://kubernetes.io/docs/concepts/workloads/controllers/cron-jobs/
k create cronjob my-job --image=busybox --schedule="*/1 * * * *" --logger hello
Health Checks
- kubernetesbyexample.com: Health Checks
- How to monitor multi-cloud Kubernetes with Prometheus and Grafana (on Equinix Metal) Inlets blog December 15, 2020 by Johan Siebens
Probes
| Accept traffic? | readinessProbe | actuator/health |
| Restart the container? | livenessProbe | actuator/info |
-
Configure “livenessProbe” (in folder health) and
“readinessProbe” (in folder readiness) on port 80
In healthy-monolith-with-probes.yaml
...
  livenessProbe:
 httpGet:
   path: "/actuator/info"
   port: 8080
 failureThreshold: 3      # Default is 3
 successThreshold: 1
 initialDelaySeconds: 5   # after init/startup before applying probe
 periodSeconds: 30        # Default is 10
 timeoutSeconds: 10       # Default is 1
  readinessProbe:
 httpGet:
   path: "/actuator/health"
   port: 8080
 failureThreshold: 3      # Default is 3
 successThreshold: 1
 initialDelaySeconds: 15  # before applying health checks
 periodSeconds: 30        # Default is 10
 timeoutSeconds: 10  # Needed?
- ExecAction executes an action inside the container
- TCPSocketAction checks against the container’s IP address on a specified port
- HTTPGetAction - HTTP Get request against container
Alternately:
 httpGet:
      path: "/index.html"
      port: 80
Probes with Dekorate
...
  startupProbe:
    httpGet:
      path: "/healthz"
      port: liveness-port
    failureThreshold: 30
    periodSeconds: 10
Skaffold
Oketeto
Logging
-
Get pod name
kubectl get pods
-
List log entries for pod:
kubectl logs -f POD NAME HERE event-simulator
PROTIP: To display the tail end of logs for containers and multiple pods (rather than scrolling through an entire log), install stern at https://github.com/wercker/stern/tree/master/stern. It’s from Wercker (which was acquired by Oracle in 2017). BTW, on a ship stern is the tail end. Install from https://github.com/wercker/stern/releases
Multi-cloud
Kubernetes in the cloud also enables multi-region setups.
GCP has –horizontal-pod-autoscaler-downscal-stabilization to provide a wait period (5 minutes) before another scale-down action*
IBM CloudLabs
https://www.youtube.com/watch?v=aSrqRSk43lY&list=PLOspHqNVtKABAVX4azqPIu6UfsPzSu2YN&index=2
Equinix Metal, orion-equinix
https://inlets.dev/blog/2020/12/15/multi-cluster-monitoring.html
GKE (Google Kubernetes Engine) in GCP
Google Kubernetes Engine (GKE) is Google’s container management SaaS offering. GKE runs within the Google Compute Platform (GCP) on top of Google Compute Engine (GCE) providing machines.
-
The marketing home page for all GCP is at:
-
Click on the Products drop-down and select “Google Kubernetes Engine”:
-
CLick “Docs” for Documentation (video).
-
If you don’t have an GCP account, get one, then get on the Google Cloud using a GCP account (for money):
https://console.cloud.google.com/start
“4-way autoscaling” includes Cluster autoscaling working on a per-node-pool basis and vertical pod autoscaling continuously analyzes the CPU and memory usage of pods, automatically adjusting CPU and memory requests.
-
On the GCP left menu, in the COMPUTE category, click “Kubernetes Engine” for this submenu:

The menu grows over time. Previously:

GKE provides networking within VPC, monitoring, logging, and CI/CD (Google Build).
-
Click on “Google Kubernetes Engine” you’ll see:

-
Click “Enable”. It takes a few minutes.

-
Click “CREATE CLUSTER”. DEFINITION: A cluster consists of at least one cluster control plane machine and multiple worker machines called nodes.

-
If you are not familiar with Autopilot, click “COMPARE” and “Learn more”, then return here after reading.
-
Click “CONFIGURE” associated with “GKE Autopilot”. Click “TRY THE DEMO” for a 13-step tutorial on creating Autopilot.
-
Click “CREATE NOW”.
-
Click the “CONFIGURE” associated with “GKE Standard”.
-
Rather than the default “cluster-1”, customize a name for this cluster if you want.
-
Rather than the default “us-central1-c”, choose a zone for this cluster if you want.
-
Click on the default-pool node pool.
-
Change the size to 4 nodes. ???
-
Click CREATE to create the cluster. It takes a few minutes for the cluster to finish provisioning.
Notice the left menu is the GKE Sub-menu.
-
When the Status reaches a green checkmark, click “Run in Cloud Shell” for CLI.
-
Click the blue “Continue”.
-
Following the tutorial, get the “Online Boutique” sample application from GitHub to run on your cluster
git clone \
 https://github.com/GoogleCloudPlatform/microservices-demo.git
-
Open the Cloud Shell Editor (workspace) to the directory just created from github:
cloudshell workspace microservices-demo
Let’s take a few minutes to explore the sample application.
Notice the source of each microservice resides in the src directory. For example, the frontend lives in the src/frontend directory.
Once a release gets created, each microservice is compiled and processed into a Docker image according to rules set in a Dockerfile (such as src/frontend/Dockerfile).
Finally, the sample application contains a set of Kubernetes resources in the form of YAML files (such as release/kubernetes-manifests.yaml) to define the various Services and Deployments.
-
To connect to the cluster, click the Editor left menu icon which has the name “CLOUD CODE - KUBERNETES”.
-
Click “Add a cluster to the KubeConfig” blue box.
-
Select “Google Kubernetes Engine”.
-
Select the name of your node (“cloud-1” by default).
- Click “Open Terminal” at the top.
-
Deploy an app workload to your new GKE cluster.
cd microservices-demo/
kubectl apply -f ./release/kubernetes-manifests.yaml
The command deploys Kubernetes Deployments and Services corresponding to the different microservices in the sample application.
-
On the Kubernetes Explorer, expand your cluster details by double-clicking on its name.
-
Expand the “Namespaces > Pods” section, where you can track your deployment progress. As the pods are deployed, they’ll display a green “Running” state:
Once all pods are in a running state, the application has been fully deployed.
Open the live application in your browser:
To allow the application to be accessible externally, you have deployed a Service of type LoadBalancer called “frontend-external” which gets bound to an external IP address.
-
In the Kubernetes Explorer, navigate to “Namespaces > Services > frontend-external”.
-
Copy the IP address under “External IPs”.
-
Open a new web browser tab and visit your application by connecting to the IP address.
The application should now be running and accessible publicly!
Delete a cluster:
-
Click the “DELETE” icon at the top.
-
Open the Navigation menu, then click Kubernetes Engine.
-
Click the name of your cluster.
-
Click Delete, then click Delete.
GKS (Google Kubernetes Service)
-
A search for “Kubernetes” within the GCP Console yields:

- In the Google Cloud Console, on the Navigation menu, in the Dashboard, click “Go to APIs Overview.
- Confirm Country and Terms of Service, then click “AGREE AND CONTINUE”.
- Click to expand APIs & Services. Click “+ ENABLE APIS AND SERVICES”.
- In the Search for APIs & Services box, enter “Cloud Build”.
- In the resulting card for the “Cloud Build API”, if you do not see “API enabled”, click the ENABLE button.
- Use the Back button to return to the previous screen with a search box. In the search box, enter “Container Registry”.
-
Click card “Google Container Registry API”. If you do not see “API enabled”, click the ENABLE button.
- Click the “Activate Cloud Shell” icon. Drag the Console devider to see more.
-
Create file: nano quickstart.sh
#!/bin/sh
echo "Hello, world! The time is $(date)."
- Press ctrl+S to save and ctrl+X to exit.
-
Create file: nano Dockerfile
FROM alpine
COPY quickstart.sh /
CMD ["/quickstart.sh"]
-
Press ctrl+S to save and ctrl+X to exit.
-
In Cloud Shell, build an image based on the “Dockerfile”:
gcloud builds submit --tag gcr.io/${GOOGLE_CLOUD_PROJECT}/quickstart-image .Notice the dot at the end to specify that the source filecho $?e is in the current working directory.
- Authorize Cloud Shell.
-
Create a soft link as a shortcut to the working directory ~/ak8s:.
ln -s ~/training-data-analyst/courses/ak8s/v1.1 ~/ak8s
-
Get the repo (wait for it to finish):
git clone https://github.com/GoogleCloudPlatform/training-data-analyst
ln -s ~/training-data-analyst/courses/ak8s/v1.1 ~/ak8s
cd ~/ak8s/Cloud_Build/a
-
Confirm on the Navigation menu UI: scroll down to TOOLS section. Click Container Registry to select Images. Click quickstart-image for a list.
-
Run Google Cloud Build:
cd ~/ak8s/Cloud_Build/b
gcloud builds submit --config cloudbuild.yaml .
-
Confirm whether the command shell knows the build failed (returns 1 instead of 0):
echo $?
-
cat cloudbuild.yaml
... steps: - name: 'gcr.io/cloud-builders/docker' args: [ 'build', '-t', 'gcr.io/$PROJECT_ID/quickstart-image', '.' ] images: - 'gcr.io/$PROJECT_ID/quickstart-image' -
Start a Cloud Build
gcloud builds submit --config cloudbuild.yaml .
- Back in the Navigation menu UI, click Container Registry > Images and then click quickstart-image to see two versions of quickstart-image listed (a and b).

https://google-run.qwiklab.com/focuses/639?parent=catalog
PROTIP: For GKE we disable all legacy authentication, enable RBAC (Role Based Access Control), and enable IAM authentication.
Pods are defined by a manifest file read by the apiserver which deploys nodes.
Pods go into “succeeded” state after being run because pods have short lifespans – deleted and recreated as necessary.
The replication controller automatically adds or removes pods to comply with the specified number of pod replicas declared are running across nodes. This makes GKE “self healing” to provide high availability and reliability with “autoscaling” up and down based on demand.
PROTIP: The virtual reality mobile game Pokemon Go released in 2018 was the largest deployment of GKE at the time.
In this diagram:
-
Create demo-cluster:
gcloud container clusters create demo-cluster --num-nodes=3
kubectl create deployment demo-app –image=gcr.io/demo-project-123/demo:1.0
kubectl expose deployment demo-app –type=LoadBalancer –port 5000 –target-port 5000
-
List all pods, including in the system namespace:
kubectl get nodes --all-namespaces
-
Scale:
kubectl scale deployment demo-app --replicas=3
-
Loop responses:
while true; do sleep 0.1; curl http://xx.xx.xx.xxx:5000/; echo -e; done
-
Delete GKE cluster:
kubectl delete service demo-app
gcloud container cluster delete demo-cluster
gcloud container images delete gcr.io/demo-project-123/demo:1.0
gcloud container images delete gcr.io/demo-project-123/demo:2.0
Google Kubernetes Threat Detection
Google’s Kubernetes Service offers KTD (Kubernetes Threat Detection). On each node a KTD daemonset that collects, interprets, and annotates signals for a back-end KTD Detection Plane that uses Machine Learning to make findings for the Google SCC (Security Command Center) and Cloud Logging:

Google’s approach enables detection of broad, new classes of infection such as forclosing reverse shells (phoning home).
AWS CLI
-
Identify version
aws --version
CAUTION: If you don’t see “aws-cli/2.x.x”, please upgrade to version 2.
-
Identify:
which aws
-
To upgrade the AWS CLI version:
sudo ./aws/install --bin-dir /usr/bin --install-dir /usr/bin/aws-cli --update
Amazon AWS ECS & EKS
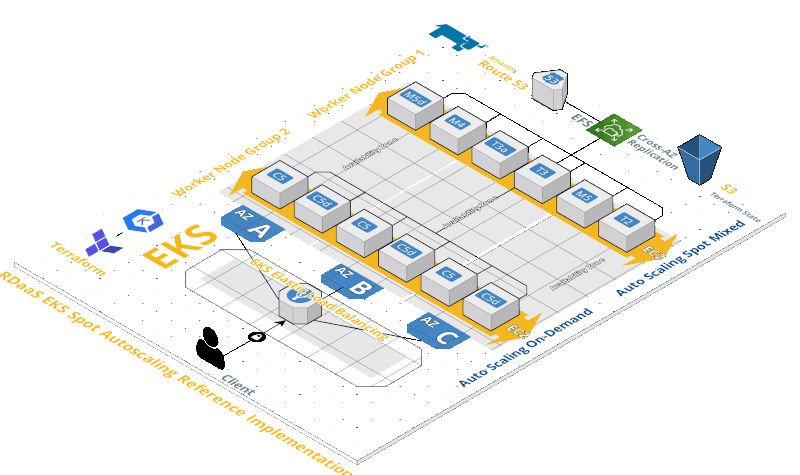
https://docs.aws.amazon.com/eks/latest/userguide/kubernetes-versions.html
Amazon ECS (Elastic Container Service for Kubernetes) is “supercharged” by the
Amazon EKS (Elastic Kubernetes Service), which provides deeper integration into AWS infrastructure (than ECS) for better reliability (at higher cost). Amazon said it runs upstream K8s, not a fork (such as AWS ELasticSearch), so it should be portable to other clouds and on-premises.
ECS is free since Amazon charges for the underlying EC2 instances and related resources for each task ECS runs.
But each EKS cluster costs an additional $144 USD per month (20 cents per hour in the lowest cost us-east-1 region), for EKS to administer a “Control Plane” across Availability Zones.
The diagram (from cloudnaut) illustrates the differences between ECS vs. EKS clusters.
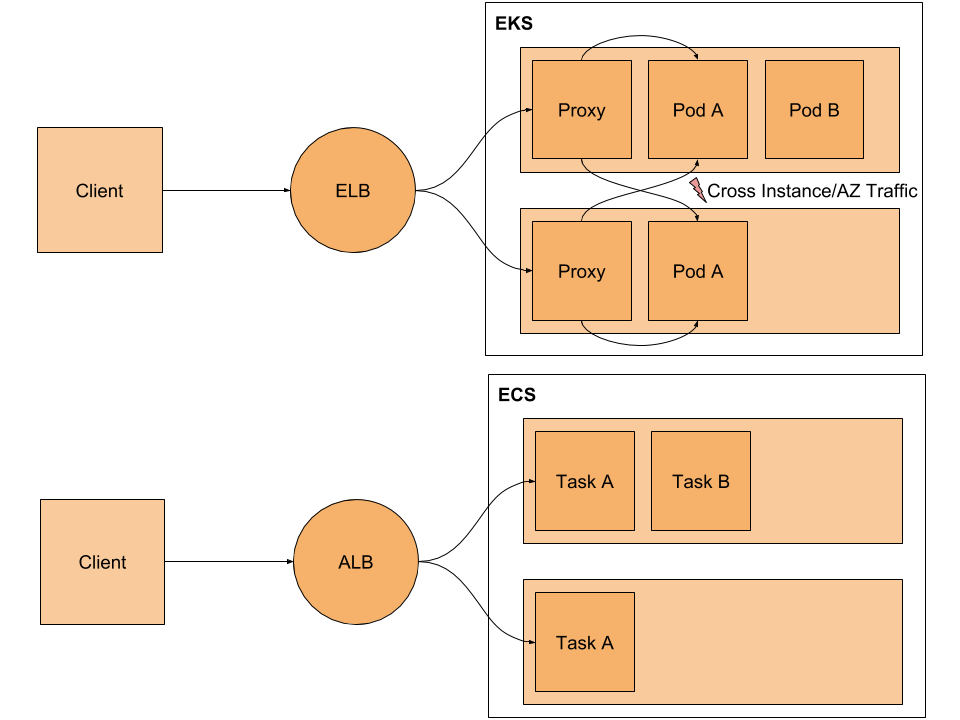
ECS uses an Application Load Balancer (ALB) to distribute load servicing clients. When EKS was introduced December 2017, it supported only Classic Load Balancer (CLB), with beta support for Application Load Balancer (ALB) or Network Load Balancer (NLB).
Within the cluster, distribution among pods can be random or based on the round robin algorithm.
EKS incurs additional cross-AZ network traffic charges because, to ensure high availability, EKS runs within each node a proxy to distribute traffic in and out of pods across three Kubernetes masters across three Availability Zones. So this additional processing may also require larger instance types, which EKS automatically selects.
Instance type selection is an important consideration because AWS limits the number of IP Addresses per network interface based on instance size, from 2 to a max of 15. Not all AWS EC2 instance types are equipped with the Elastic Network Interface (ENI) that ECS and EKS need to virtually redistribute load among pods. Both ECS and EKS detects and automatically replaces unhealthy masters, provide version upgrades, and automated patching for masters. A secondary private IPv4 network interface is used so that in the event of an instance failure, that interface and/or secondary private IPv4 address can be transferred to a hot standby instance by EKS.

While ECS assigns separate ENI to each ECS task (a group of containers), EKS attaches multiple ENIs per instance, with multiple private IP addresses assigned to each ENI. Since EKS shares network interfaces among pods, a different Security Group cannot be specified to restrict a specific pod.

Moreover, network interfaces, multiple private IPv4 addresses, and IPv6 addresses are only available for instances running under a isolated VPC (Virtual Private Cloud) and perhaps with AWS PrivateLink access. So EKS requires AWS VPC. For best isolation (rather than sharing), create a different VPC and Security Group for each cluster.
Both ECS and EKS is accessed from its ECS CLI console and supports ECS API commands and Docker Compose. AWS CloudTrail logging.
Also, EKS leverage IAM authentication, but did not provide out-of-the-box support Task IAM Roles (pods) used to grant access to AWS resources like ECS (AmazonEKSClusterPolicy and AmazonEKSServicePolicy).
For example, to allow containers to access S3, DynamoDB, SQS, or SES at runtime.
Behind the scenes, Amazon used HashiCorp Packer config. scripts to make EKS-optimized AMIs run on Amazon Linux 2. The machines are preconfigured with Docker, kubelet, and the AWS/Heptio AMI Authenticator DaemonSet, plus a EC2 User Data bootstrap script that automatically join an EKS cluster. AMIs that have GPU support are also generated for users who have defined a AWS Marketplace Subscription.
See the EKS Manifest diagram explained by Mark Richman (@mrichman) in his video class, with code at https://github.com/linuxacademy/eks-deep-dive-2019.
PROTIP: My sample.sh installs the utilities and brings up a EKS cluster with one command. It costs $110 per month.
EKS makes use of AWS Fargate Launch Type provides for horizontal scaling on Amazon’s own fleet of EC2 clusters. It’s informally called the “AWS Container Manager”.
Fargate supports “awsvpc” network mode natively so that tasks running on the same instance share that’s instance’s ENI.
“Once you do get your cluster running, there’s nothing to worry about except monitoring performance and, as demand changes, adjusting the scale of your service.” – David Clinton*
This totalcloud.io article compares ECS, EKS, and Fargate.
A concern with Fargate is its time to load.
KOPS
KOPS for AWS (at https://github.com/kubernetes/kops) is open-source to enable multi-master, multi-AZ cluster setup and management of multiple instance groups. Admins must stand up the master (Control Plane), unlike in ECS/EKS. See “How Qubit built its production ready Kubernetes (k8s) environments”
https://cast.ai/blog/aws-eks-vs-ecs-vs-fargate-where-to-manage-your-kubernetes/
-
Manage EKS nodepgroups:
eksctl get nodegroup --cluster=demo-cluster-ec2
eksctl scale nodegroup --cluster=demo-cluster-ec2 --nodes=1 --name=ng-exxx
-
Delete to stop charges:
kubectl delete service demo-app
eksctl delete cluster --name demo-cluster-ec2
aws ecr list-images --repository-name demo
aws ecr batch-delete-image --repository-name demo --image-ids xxx
aws ecr delete-repository --repository-name demo --force
Microsoft’s Azure Kubernetes Service (AKS)

AKS manages the Control Plane master node.
kubectl is included as part of the Azure Cloud Shell.
SF (Service Fabric) is the core technology.
ACR (Azure Container Regustry) stores Docker images (like DockerHub).
- Users are named like “user1.azurecr.io”
- Change the “$mine.yaml” to specify use of ACR user instead of “Microsoft” in Dockerhub.
- Lock down Container Registry access
- RBAC
QUESTION: Azure and Notary to reference images as certs?
ACI (Azure Container Instances) provides hypervisor isolation. See Quickstart: hands-on Deploy AKS to ACI ACI (Azure Container Instances) connector :
az container create --resource-group myResourceGroup -- name mycontainer --image microsoft/acl-helloworld --dns-name --label myClustre --port 80
Deploy a model as web service on Azure Container Instances by combining ACI with ACI Logic Apps connector, Azure queues, Azure Functions, Azure Machine Learning to
- To run an app in AKS, post App Descriptor to the K8s API Server, and Scheduler schedules worker nodes.
- kubtl apply -f “$mine.yaml”
- kubectl get service “$APPNAME” –watch
- kubectl scale replicas=3 “deployment/$APPNAME”
- kubectl get pods
- Scale by CPU: az aks scale –name $appname –node-count 3 \
–resource-group $container_rg
- Add metrics to Container service:
- Number of pods by phase
- Number of pods in Ready state
- Total amount of available memory in a managed cl…
- Total number of available cpu cores in a managed …
- To scan containers, add from Marketplace one of these:
- Twistlock
- Aqua cloud native security platform
- Sysdig
- NeuVector
https://blog.digitalis.io/vals-operator-managing-kubernetes-secrets-866f0a419759
https://blog.digitalis.io/kubernetes-how-do-we-do-it-cc7b38b06d91
https://cert-manager.io/ creates TLS certs automatically using the company’s internal CA or letsencrypt
References:
-
Manoj Nair (ManojNair.in) on Pluralsight: Azure Kubernetes Service (AKS) – The Big Picture
-
Whizlabs: Deploying Microservices to Kubernetes using Azure DevOps [06:43:32]
-
How to enable consistent Azure Kubernetes operations everywhere using Azure Arc.
Microsoft Draft
Microsoft created Draft (like Scaffold) to simplify getting started in Azure to lift-and-shift Windows ASP.NET apps. It has two commands:
   draft create  # helm chart and Dockerfile
   draft up      # deploy
Draft uses language packs for Ruby, C# .NET Core 2.2 with Windows packs, authenticated to Azure Container Registry (ACR) and AKS.
- “Baseline architecture for an Azure Kubernetes Service (AKS) cluster” reference architecture https://github.com/mspnp/aks-secure-baseline
Other Orchestration systems managing Docker containers
- OpenShift dedicated
- OpenShift Online (cloud-based)
- Kubernetes by Google
- Centos
- Atomic
- Consul, Terraform
- Serf
- Cloudify
- Helios
Competing Orchestration systems
-
Docker Swarm incorporated Rancher from Rancher Labs (#RancherK8s).
Rancher Kubernetes Engine (RKE) simplifies cluster administration (on EC2, Azure, GCE, Digital Ocean, EKS, AKS, GKE, vSphere or bare metal) - (provisiong, authentication, RBAC, Policy, Security, monitoring, Capacity scaling, Cost control). Its catalog is based on Helm. See Creating an Amazon EC2 Cluster using Rancher.
-
Mesosphere DC/OS (Data Center Operating System) runs Apache Mesos to abstract CPU, memory, storage to provide an API to program a multi-cloud multi-tenant data center (at Twitter, Yelp, Ebay, Azure, Apple, etc.) as if it’s a single pool of resources. Kubernetes can run on top of it, but the DC/OS has premium (licensed) enterprise features. So it’s not for you if you never want to pay for anything.
Mesos from Apache, which runs other containers in addition to Docker. K8SM is a Mesos Framework developed for Apache Mesos to use Google’s Kubernetes. Installation.
See Container Orchestration Wars (2017) at the Velocity Conf 19 Jun 2017 by Karl Isenberg (@karlfi) of Mesosphere
-
HashiCorp Nomad is a lighter-weight orchestrator, not just for containers.
-
Red Hat (which IBM bought in 2018) offers its OpenShift to enable Docker and Kubernetes for the enterprise by adding external host names (projects) that add role-based security around namespaces. OpenStack enables running of k8s containers in other clouds or within private data centers.
OpenShift runs under OKD (Origin Kubernetes Distribution) which include a container and Istio mesh. NOTE: IBM is pushing its “containerd”, its replacement for Docker. Azure uses containerd by default.
See https://www.redhat.com/en/technologies/cloud-computing/openshift,
- What is OpenShift? Aug 1, 2019
- Kubernetes vs. OpenShift: is not open-source. OpenShift is opinionated about a Docker Registry and CI/CD.
Each cluster has a master and several nodes.
Nodes
Each node is created with a kubelet process, container tooling (Docker), kube-proxy, supervisord.
Internally, Kubernetes itself does NOT create nodes.
Cluster admins use the kubeadm CLI to create nodes and add them to Kubernetes.
-
To list resource usage across nodes of the cluster:
kubectl top nodes
NAME                            CPU(cores)   CPU%  MEMORY(bytes)  MEMORY%
gke-standard-cluster-1-def...   29m          3%    431Mi          16%
-
To list resource usage across pods of the cluster:
kubectl top pods
NAME                            CPU(cores)   CPU%  MEMORY(bytes)  MEMORY%
gke-standard-cluster-1-def...   29m          3%    431Mi          16%
GCP GKE masters
Within a GCP, GKE provides the master node Kubernetes Control Plane components, which include node creation by deploying and registering Google Compute Engine instances as nodes.
GKE exposes IP addresses, which can be isolated from the public internet.
GCP does not charge for the master, which is an abstract part of the GKE service not exposed to GCP customers
Each Google regional cluster spans several physical Zones, each with a master and its worker nodes. The same number of nodes is the same in each zone.
Multiple GCP projects can run on a single cluster.
Use the Google Console to specify the size of hardward in each node pool (a GKE feature).
Master Node (Control Plane)
- Kubernetes Control Plane security: https://cloud.google.com/kubernetes-engine/docs/concepts/control-plane-security
Each Cloud Kubernetes offering provides (hides) its Control Plane.
Secure communications between the master and nodes within a cluster automatically relies on the shared root of trust provided by certificates issued by a CA. Each cluster has its own root Certificate Authority (CA). An internal Google service manages root keys for the CA, so you can’t manually rotate the etcd certificates and GKE.
GKE uses a separate per cluster CA to provide certificates for the etcd databases within a cluster.
Separate CA’s are used for each separate cluster. When a new node of a Kubernetes cluster is created, the node is injected with a shared secret as part of its creation. This secret is then used by its kubelet to submit certificate signing requests to the cluster root CA. That way, it can get client certificates when the node is created, and new certificates when they need to be renewed or rotated
Secret can be accessed by pods and by extension their containers, unless metadata concealment is enabled.
- Create a new IP address for the cluster master along with its existing IP address.
New credentials are issued to the control plane. Note that the API server will not be available during this period although pods continue to run. After the masters reconfigured, the nodes are automatically updated by GKE to use the new IP and credentials.
This causes GKE to also automatically upgrade the node version to the closest supported version. All of your API clients outside the cluster must also be updated to use the new credentials. Rotation must be completed for the cluster master to start serving with the new IP address and new credentials, and remove the old IP address and old credentials. If the rotation is not completed manually, GKE will automatically complete the rotation after seven days.
Note that you can also rotate the IP address for your cluster. This essentially goes through the same process because their certificates must be renewed when the master IP address is changed, but with different commands:*
-
Initiate credential rotation:
gcloud container clusters update [CLUSTER-NAME] --start-credential-rotation
-
Complete credential rotation:
gcloud container clusters update [CLUSTER-NAME] --complete-credential-rotation
-
Initiate IP rotation:
gcloud container clusters update [CLUSTER-NAME] --start-ip-rotation
-
Complete IP rotation:
gcloud container clusters update [CLUSTER-NAME] --complete-ip-rotation
Pods can access the metadata of the nodes that they’re running on, such as the node secret that is used for node configuration. If a pod is compromised, this could potentially be used in unintended ways. To prevent such exposure, always configure the Cloud IAM service account for the node with minimal permissions.
But don’t confuse as Google service account with the Kurbenetes Service account. This is the Cloud IAM service account used by the node VM itself.
Don’t use the compute.instances.get permission through a service account, compute instance admin role, or any custom roles. Omitting this permission blocks holders of the role from getting metadata on GKE nodes by making direct Compute Engine API calls to those nodes.
Disable legacy metadata APIs. V1 APIs restrict the retrieval of metadata. But Compute Engine API endpoints using versions 0.1 and V1 beta-1, support querying of metadata.
From GKE version 1.12+, legacy Compute Engine metadata endpoints are disabled by default. With earlier versions, they can only be disabled by creating a new cluster or adding a new node port to an existing cluster.
metadata concealment
To prevents a pod from accessing node metadata, there is a temporary solution that will be deprecated as better security improvements are developed in the future. It does this by restricting access to cube NF which contains cubic credentials and the virtual machines instance identity token. See “protecting cluster metadata”
Pod Security contexts
By default, containers inside a pod allow privilege elevation, and can access the host file system and the host network. But although convenient, that can be undesirable from a security perspective.
To restrict what containers in a pod can do, set security contexts in the pod specification so it’s applied to all of the pod’s containers.
-
To display the current context ID within GKE:
kubectl config current-context
gke_[PROJECT_ID]_us-central1-a_standard-cluster-1
-
To list all cluster contexts’ namespace and AUTHINFO:
kubectl config get-contexts
-
To change context:
kubectl config use-context gke_${GOOGLE_CLOUD_PROJECT}_us-central1-a_standard-cluster-1Using security contexts in a pod definition, you can exercise a lot of control over the use of the host namespace, networking, file system, and volume types, whether privilege containers can run, and whether code in the container can escalate to root privileges.
This sample privileged-pod.yaml is used to define a pod’s security policy:
kind: Pod
apiVersion: v1
metadata:
  name: privileged-pod
spec:
  containers:
         - name: privileged-pod
 image: nginx
 securityContext:
   privileged: true
This sample provides specific user and group context for containers:
...
spec:
  securityContext:
 runAsUser: 1000
   fsGroup: 2000
runAsUser ID “1000” for any containers in the pod. This should not be zero because, in a Linux system, zero is the privileged root user’s User ID. Taking away root privilege from the code running inside the container limits what it can do in case of compromise.
fsGroup ID “2000” is associated with all containers in the pod.
- Enable #Seccomp to block code running in containers from making system calls.
- Enable AppArmor to restrict individual program actions.
Such direct configuration of security contexts in each individual pod can be a lot of work.
psp = Pod Security policies
![]()
NSA’s Kubernetes Hardening Guidance include use of Admission Control Webhook:

A request can be passed through multiple controllers. If the request fails at any point, the entire request is rejected immediately, with the end user receiving an error.
Pod security policies apply to multiple pods without having to specify and manage those details in each pod definition. Defining pod security policies creates reusable security contexts. It’s easier to define and manage security configurations separately, and then apply them to the pods that need them.
Each pod security policy consists of an object and an admission controller.
The pod security policy object (a set of restrictions, requirements, and defaults) are defined in the same way as a security context inside a pod, and can be used to control the same security features.
The pod security policy admission controller acts on the creation and modification of pods.
During the creation or update of a pod, the Container Runtime enforces pod security policies based on the requested security context which defines whether the pod should be admitted.
For pod to be admitted to the cluster, it must fulfill all of security conditions defined in the pod security policy. These rules are only applied when a pod is being created or updated.
The pod security policy admission controller validates or modifies requests to create or update pods against security policies. A non-mutating admission controller just validates requests. A mutating and mission controller can modify and validate requests.
apiversion: policy/v1beta1
kind: PodSecurityPolicy
metadata:
  name: demo-psp
spec:
  privileged: false   # Don't allow privileged pods
  allowPrivilegeEscalation: false
  volumes:
    - 'configMap'
    - 'emptyDir'
    - 'projected'
    - 'secret'
    - 'persistentVolumeClaim'
  hostNetwork: false
  hostIPC: false
  hostPID: false
  selLinux:
    rule: 'RunAsAny'
  fsGroup:
    rule: RunAsAny
  runAsUser:
    rule: 'MustRunAsNonRoot'
  readOnlyRootFileSystem: false
  volumes:
  - '*'
After defining a pod security policy, authorize it. Otherwise it’ll prevent other Pods from being created.
Securing Google Kubernetes Engine with Cloud IAM and Pod Security Policies 90m.
More fine grained/dynamic policies can be defined by third-party add-on Styra for K8s, which is a use case for Styra’s more generic OPA (Open Policy Agent) policy language which decouples a policy model from app code. Since OPA API works for many products and services it provides a unified toolset and framework for policy enforcement across the cloud native stack.
This is similar to what Terraform Enterprise provides.
In the future, policies can be generated from AI/ML model processing, perhaps dynamically.
ClusterRoles
You can authorize a policy using Kubernetes Role-Based Access Control.
Here, a clusterRole allows the pod security policy to be used: restricted-pods-role.yaml
apiVersion: rbac.authorization.k8s.io/vi
kind: ClusterRole
metadata:
  name: psp-clusterole
rules:
- apiGroups:
  - extensions
  resources:
  - podsecuritypolicies
  resourceNames:
  - demo-psp
  verbs:
  - use
Next define a role binding to bind the previous cluster role to users or groups. In this example, two subjects for the role binding are specified.
apiVersion: rbac.authorization.k8s.io/vi
kind: RoleBinding
metadata:
  name: psp-rolebinding
  namespace: demo
roleRef:
  apiGroup: rbac.authorization.k8s.io
  kind: ClusterRole
  name: psp-clusterrole
subjects:
- apiGroup: rbac.authorization.k8s.io
  kind: Group
  name: system.serviceaccounts
- kind: ServiceAccount
  name: service@example.com
  namespace: demo
The first is a group containing all service counts within the demo name-space. The other is a specific service account in the demo name space. The role binding can grant permission to the creator of the pod, which might be a deployment, replica set or other template controller.
It can grant permission to the created pods service account. Note that granting the controller access to the policy, would grant access for all pods created by that controller. So the preferred method for authorizing policies is to grant access to the pods service account. Without a pod security policy controller, pod security policies mean nothing. You need both to define policies, and to enable the pod security policy controller. Careful, the order here matters. If you enable the pod security policy controller before defining any policies, you’ve just commanded that nothing is allowed to be deployed. In GKE, the pod security policy controller is disabled by default. If you choose to use pod security policies, first define them, and then enable the controller with the G-Cloud command shown here. Name represents the name of your cluster.
You can take additional security measures in kubernetes, and many of these are enabled by default in GKE, especially if you choose to run recent versions of kubernetes in your GKE cluster.
For example, GKE by default uses Google’s container optimized OS for the node OS. Unlike a general purpose Linux distribution, the container optimized OS implements a minimal read-only file system. Performs system integrity checks and implements firewalls, audit logging, and automatic updates. You can enable node auto upgrades to keep all of your nodes running the latest version of Kubernetes. You can choose to run private clusters, which contain nodes without external IP addresses. You can also choose to run the cluster master for a private cluster without a publicly reachable end point using Master authorized networks.
By default, private clusters do not allow TCP IP addresses to access the cluster master end point. Using private clusters with master authorized networks, makes your cluster master reachable only by the specific address ranges that you choose.
Nodes within a cluster VPC network can still access the master, and so can Google’s internal production jobs that manage it for you.
Protect your secrets by using encrypted secrets.
To store sensitive configuration information rather than storing them in config maps. Whenever possible, grant privilege to groups rather than individual users. This applies both to Cloud IAM which lets you grant rules to Google groups, as well as kubernetes are back which lets you grant roles to kubernetes groups.
If you grant privileges to an administrator who later leaves your company, you now must track down all the places where that administrator has privileges, in order to remove them. That’s tedious and error-prone.
So it’s best practice to always grant privileges based on groups rather than to individual users, so you can remove access simply by taking someone out of the administrator group.
Qwiklab: Implementing Role-Based Access Control with Google Kubernetes Engine:
Master node
Nodes are joined to the master node using the kubeadm join program and command.
The master node runs the kube-apiserver and componenets etcd, controller, scheduler.
The master node itself is crated by the kubeadm init command which establishes folders and invokes the Kubernetes API server. That command is installed along with the kubectl client. There is a command with the same name used to obtain the version.
-
View memory and CPU usage of pods across nodes from the K8s Metrics Server:
kubectl top node
kubectl top pod
API Server
The kubectl client communicates using REST API calls to an API Server which handles authentication and authorization.
kubectl get apiservices
API’s were initially monolithic but has since been split up into:
- core “” to handle pod & svc & ep (endpoint)
- apps to handle deploy, sts, ds
- authorization to handle role, rb
- storage to handle pv (persistent volume) and pvc, sc (storage classes)
Kube-proxy
The kube-proxy maintains network connectivity among the Pods in a cluster.
kube-proxy watches the API server for addition and removal requests. For each new service, kube-proxy opens a randomly chosen port on the local node. It then makes proxied connections to one of the corresponding back-end pods.
The “proxy” in kube-proxy means that it can do simple network stream or round-robin forwarding across a set of backends.
Three modes:
- User space mode
- Iptables mode
- Ipvs mode (alpha as of v1.8)
Kubelet
A Kublet agent program is automatically installed in each node created.
Kubelet serves as Kubernetes’s agent on each node.
Kubelet only manages containers created by the API server - not any container running on the node.
Kublet communicates with the API server to see if pods have been assigned to nodes.
Kubelets communicate with the Kubernetes API server using secured network communications protocols TLS and SSH based on certificates issued by the clusters root CA to support those protocols.
Kubelet takes a set of Podspecs provided bythe kube-apiserver to ensure that containers described are running and healthy.
Kubelet mounts and runs pod volumes and secrets.
Image pull secrets authenticates with private container registries.
Kubelet executes health checks to identify pod/node status.
Service accounts can also store image pull secrets.
Each kubelet manages the “Control Pane” which allocates IP addresses and runs nodes under its control.
Kublet constantly compares the status of pods against what is declared in yaml files, and starts or deletes pods as necessary to meet the request.
Restarting Kublet itself depends on the operating system (monit on Debian or systemctl on systemd-based systems).
RBAC (Role-Based Access Control)
Scheduler Pod stats
The API Server puts nodes in “pending” state when it sends requests to bring them up and down to the Scheduler to do so only when there are enough resources available. The scheduler operate according to a schedule.
Pod phases:
- Pending - accepted, but being scheduled (being pull from repo)
- Running after being attached to a node and containers created
- Succeeded means all containers are running (terminated as specified)
- Failed -
- Unknown - communication error
-
CrashLoopBackOff - pod not configured correctly
Rules obeyed by the Scheduler about pods are called “Tolerances”.
Volumes
Kubernetes Volumes enable data to survive beyond container lifetimes.
Volumes enable sharing / passing of data among different containers.
However, Kubernetes Volumes do not offer high security.
Taints and Tolerations
- REF:
- https://mckinsey.udemy.com/course/certified-kubernetes-application-developer/learn/lecture/12903100#notes
KLab: Taints and tolerations work together to ensure that pods are not scheduled onto inappropriate nodes and pods.
-
Taints on nodes with keyname=value:effect in commands targeting nodes.
-
Tolerations on pods in PodSpec yaml with matching taints.
Taints repel from nodes
To taint nodes, KLab:
-
Use the taint nodes subcommand to specify to the Scheduler a node to repel pods matching the key:
kubectl taint nodes node1 keyname=value:taint-effect dedicated=group1:NoSchedule
taint-effect defines what happens to pods which do not tolerate the taint.
-
NoSchedule
-
effect: “PreferNoSchedule” defines a “preference” or “soft” version of NoSchedule – the system will try to avoid placing a pod that does not tolerate the taint on the node, but it is not required.
-
effect: “NoExecute” causes any pods that do not tolerate the taint to be evicted immediately, and pods that do tolerate the taint will never be evicted.
-
-
PROTIP: tolerationSeconds: 3600 optionally added to NoExecute effect dictates how many seconds the pod stays bound to the node after the taint is added. If this pod is running and a matching taint is added to the node, then the pod will stay bound to the node for 3600 seconds, and then be evicted. If the taint is removed before that time, the pod will not be evicted.
NOTE: No more than one taint can be applied to a node.
-
PROTIP: Remove a taint by a dash after the taint effect:
kubectl taint nodes node1 key=value:NoSchedule-
Tolerations attract into pods
-
Tolerate (ignore taints) in PodSpec yaml spec: to allow (but do not require) certain pods to schedule onto nodes with matching taints.
NOTE: Tolerations are one of a few PodSpec items which can be edited while active, along with containers&91;*].image, initContainers&91;*].image, and Job activeDeadlineSeconds.
spec:
  ...
  tolerations:
  - key: "app"
    operator: "Equal"
    value: "blue"
    effect: "NoSchedule"
The equivalent imperative command format:
kubectl taint nodes node1 app=blue:NoSchedule
-
Such details are reaveled using the kubectl describe nodes command.
kubectl edit pod pod name
If attempt fails, the file is saved to /tmp/kubectl-edit-ccvrq.yaml
NodeSelectors
For pods defined with nodeSelector such as:
  nodeSelector:
    size: Large
That k8s matched them with nodes specs are defined:
???
nodeAffinity & podAntiAffinity
- KK VIDEO
- https://www.coursera.org/learn/deploying-workloads-google-kubernetes-engine-gke/lecture/aJh3H/affinity-and-anti-affinity
“Node affinity” is a property of Pods that attracts them to a set of nodes (either as a preference or a hard requirement). The Node controller uses built-in taints to specify conditions: “network-unavailable”, “unshedulable”, “cloudprovider unitialized”, “not-ready”, “memory-pressure”, “disk-pressure”, “out-of-disk”,
spec:
  containers:
  ...
  affinity:
    nodeAffinity:
    requiredDuringScheduleingIgnoredDuringExecution:
      nodeSelectorTerms:
      - matchExpressions:
        - key: size
          operator: In
          values:
          - Large
Affinity settings are used to put in each zones one and only one web server Pod and cache Pod:

Types:
- requiredDuringScheduleingIgnoredDuringExecution:
- preferredDuringScheduleingIgnoredDuringExecution:
- requiredDuringScheduleingRequiredDuringExecution: Put another way:
| . | DuringScheduling | DuringExecution |
|---|---|---|
| Type 1 | Required | Ignored |
| Type 2 | Preferred | Ignored |
| Type 3 | Required | Required |
Alternatively: To a single Node with nodeAffinity:
apiVersion: v1
kind: PersistentVolume
metadata:
  name: local-pv
spec:
  capacity:
    storage: 100 Gi
  volumeMode: Filesystem
  accessModes:
    - ReadWriteOnce
  persistentVolumeReclaimPolicy: Delete
  storageClassName: local-storage
  local:
    path: /mnt/disks/ssd1
  nodeAffinity:
    required:
      nodeSelectorTerms:
      - matchExpressions:
        - key: kubernetes.io/hostname
          operator: In
          values:
          - node-name
volumeMode: Block
persistentVolumeReclaimPolicy (Recycling) policies are:
- Delete
- Retain (keep the contents)
- Recycle (Scrub the contents).
Extract pod yaml from running podspec
kubectl get pod <pod name> -o yaml > my-new-pod.yaml
https://kodekloud.com/courses/kubernetes-certification-course-labs/lectures/12039454
etcd storage
The API Server and Scheduler persists their configuration and status information in a ETCD cluster (from CoreOS).
Kubernetes data stored in etcd includes jobs being scheduled, created and deployed, pod/service details and state, namespaces, and replication details.
It’s called a cluster because, for resiliancy, etcd replicates data across nodes. This is why there is a minimum of two worker nodes per cluster.
eksctl
-
See https://eksctl.io about installing the eksctl CLI tool for creating clusters on EKS. It is written and supported (via Slack) by GitOps vendor weave.works in Go, and uses CloudFormation.
-
To create a EKS cluster:
eksctl create cluster
Node Controllers and Ingress
The Node controller assigns a CIDR block to newly registered nodes, then continually monitors node health. When necessary, it taints unhealthy nodes and gracefully evicts unhealthy pods. The default timeout is 40 seconds.
Load balancing among nodes (hosts within a cloud) are handled by third-party port forwarding via Ingress controllers. See Ingress definitions.
![]()
REMEMBER: A Kubernetes “Ingress” is a collection of rules that allow inbound connections to reach the cluster services. “Ingress Resource” defines the connection rules.
In Kubernetes the Ingress Controller could be a NGINX container providing reverse proxy capabilities.
In Google Kubernetes Engine, by default LoadBalancers give access to a regional Network Load Balancing configuration. To get access to a global HTTP(S) Load Balancing configuration, use an Ingress object.
Plug-in Network
PROTIP: Kubernetes uses third-party services to handle load balancing and port forwarding through ingress objects managed by an ingress controller.
CNI (Container Network Interface) spec
An alternative is kubenet
Other CNI vendors include Calico, Cilium, Contiv,
Weavenet. Flannel on Azure?
-
Find which cni is installed:
ps -ef | grep cni
student   3638  9589  0 23:24 pts/0    00:00:00 grep --color=auto cni
root      9735     1  3 Oct07 ?        00:54:09 /usr/bin/kubelet --bootstrap-kubeconfig=/etc/kubernetes/bootstrap-kubelet.conf
--kubeconfig=/etc/kubernetes/kubelet.conf
--config=/var/lib/kubelet/config.yaml
--network-plugin=cni
--pod-infra-container-image=k8s.gcr.io/pause:3.2
-
Identify the Network Bridge:
ip a
3: docker0 ...
link...
inet 172.17.0.1/16 brd 172.17.255.255 scope global docker0
...
The address “172.17.0.1” is an address accessible only from the same machine (not outside).
-
View cni installer files (to troubleshooting network configuration issues):
sudo more $(sudo find / -name *install-cni* | grep /log/containers)
sudo less /var/log/calico/cni/cni.log
sudo less /etc/cni/net.d/calico-kubeconfig
cAdvisor
To collect resource usage and performance characteristics of running containers, many install a pod containing Google’s Container Advisor (cAdvisor). It aggregates and exports telemetry to an InfluxDB database for visualization using Grafana.
Google’s Heapster is also be used to send metrics to Google’s cloud monitoring console.
Containers are declared by yaml such as this to run Alphine Linux Docker container:
apiVersion: v1
kind: Pod
metadata:
  name: alpine
  namespace: default
spec:
  containers:
  - name: alpine
    image: alpine
    command:
      - sleep
      - "3600"
    imagePullPolicy: IfNotPresent
  restartPolicy: Always
Other command:
command:
    - sh
    - "-c"
    - echo Hello Kubernetes! && sleep 3000
Nodes Architecture diagram
Yongbok Kim (who writes in Korean) posted (on Jan 24, 2016) a master map of how all the pieces relate to each other:
Click on the diagram to pop-up a full-sized diagram:

BTW What are now called nodes were previously called “minions”, perhaps in deference to NodeJs, which refers to nodes differently.
Klab: Nodes are managed together within each namespace.
Testing K8s
-
Dry-run
kubectl create -f pod.yaml --dry-run=client
End-to-end tests by those who develop Kubernetes are coded in Ginko and Gomega (because Kubernets is written in Go).
The Kubtest suite builds, stages, extracts, and brings up the cluster. After testing, it dumps logs and tears down the test rig.
Installation options
There are several ways to obtain a running instance of Kubernetes.
Rancher
Rancher is a deployment tool for Kubernetes that also provides networking and load balancing support. Rancher initially created it’s own framework (called Cattle) to coordinate Docker containers across multiple hosts, at a time when Docker was limited to running on a single host. Now Rancher’s networking provides a consistent solution across a variety of platforms, especially on bare metal or standard (non cloud) virtual servers. In addition to Kubernetes, Rancher enables users to deploy a choice of Cattle, Docker Swarm, Apache Mesos upstream project for DCOS (Data Center Operating System). Rancher eventually become part of Docker Swarm.
Within KOPS
Minikube offline
B) Minikube spins up a local environment on your laptop.
NOTE: Ubuntu on LXD offers a 9-instance Kubernetes cluster on localhost.
PROTIP: CAUTION your laptop going to sleep may ruin minikube.
Server install
C) install Kubernetes natively on CentOS.
D) Pull an image from Docker Hub within a Google Compute or AWS cloud instance.
CAUTION: If you are in a large enterprise, confer with your security team before installing. They often have a repository such as Artifactory or Nexus where installers are available after being vetted and perhaps patched for security vulnerabilities.
See https://kubernetes.io/docs/setup/pick-right-solution
On GCP
-
On GCP:
gcloud container clusters get-credentials guestbook2
kubectl get pods –all-namespaces
OS for K8s
As a brainchild of the Linux Founderation, one would expect Kubernetes to run on different flavors of Linux.
CentOS
First, install kubeadm
cp -i /etc/kubernetes/admin.conf $HOME/.kube/config chown $(id -u):$(id -g) $HOME/.kube/config
cat < /etc/yum.repos.d/kubernetes.repo
&91;kubernetes]
name=Kubernetes
baseurl=https://packages.cloud.google.com/yum/repos/kubernetes-el7-x86_64
enabled=1
gpgcheck=1
repo_gpgcheck=1
gpgkey=https://packages.cloud.google.com/yum/doc/yum-key.gpg https://packages.cloud.google.com/yum/doc/rpm-package-key.gpg
EOF
Also:
cat <  /etc/sysctl.d/k8s.conf
net.bridge.bridge-nf-call-ip6tables = 1
net.bridge.bridge-nf-call-iptables = 1
EOF
Since K8s v1.11 Kube-proxy uses IPVS Mode instead of IPTABLES. It is more scalable because it uses a Linux kernel IP Virtual Server with a native Layer 4 load balancer that supports more load balancing algorithms.
Ubuntu
-
On Ubuntu, install:
apt install -y docker.io
-
To make sure Docker and Kublet are using the same systemd driver:
cat <<EOF >/etc/docker/daemon.json { "exec-opts": &91;"native.cgroupdriver=systemd"] } EOF -
Install the keys:
curl -s https://packages.cloud.google.com/apt/doc/apt-key.gpg | apt-key add -
-
sources:
cat <<EOF >/etc/apt/sources.list.d/kubernetes.list
<deb http://apt.kubernetes.io/ kubernetes-xenial main
<EOF
-
To download new sources:
apt update
-
To download the programs:
apt install -y kubelet kubeadm kubectl
Architectural Details
This section further explains the architecture diagram above.
- Select “CloudNativeKubernetes” sandboxes.
- Select the first instance as the “Kube Master”.
- Login that server (user/123456).
-
Change the password as prompted on the Ubuntu 16.04.3 server.
Deploy Kubernetes master node
![]()
-
Use this command to deploy the master node which controls the other nodes. So it’s deployed first which invokes the API Server
sudo kubeadm init --pod-network-cidr=10.244.0.0/16

The address is the default for Flannel.
Flow diagram

The diagram above is by Walter Liu
Flannel for Minikube
When using Minikube locally, a CNI (Container Network Interface) is needed. So setup Flannel from CoreOS using the open source Tectonic Installer (@TectonicStack). It configures a IPv4 “layer 3” network fabric designed for Kubernetes.
The response suggests several commands:
-
Create your .kube folder:
mkdir -p $HOME/.kube
-
Copy in a configuration file:
sudo cp -i /etc/kubernetes/admin.conf $HOME/.kube/config
-
Give ownership of “501:20”:
sudo chown $(id -u):$(id -g) $HOME/.kube/config
-
Make use of CNI:
sudo kubectl apply -f https://raw.githubusercontent.com/coreos/flannel/v0.9.1/Documentation/kube.flannel.yml
The response:
clusterrole "flannel" created
clusterrolebinding "flannel" created
serviceaccount "flannel" created
configmap "kube-flannel.cfg" created
daemonset "kube-flannel.ds" created
ConfigMaps in cfg files are used to define environment variables.
-
List pods created:
kubectl get pods --all-namespaces -o wide
Specifying wide output adds the IP address column
Included are pods named:
- api server (aka “master”) accepts kubectl commands
- etcd (cluster store) for HA (High Availability) in control pane
- controller to watch for changes and maintain desired state
- dns (domain name server)
- proxy load balances across all pods in a service
- scheduler watches api server for new pods to assign work to new pods
System administrators control the Master node UI in the cloud or write scripts that invoke kubectl command-line client program that controls the Kubernetes Master node.
Kubernetes in 5 mins Desired State Management
Proxy networking
The Kube Proxy communicates only with Pod admin. whereas Kubelets communicate with individual pods as well.
Each node has a Flannel and a proxy.
The Server obtains from Controller Manager ???
- Switch to the webpage of servers to Login to the next server.
- Be root with sudo -i and provide the password.
-
Join the node to the master by pasting in the command captured earlier, as root:
kubeadm join --token ... 172.31.21.55:6443 --discovery-token-ca-cert-hash sha256:...
Note the above is one long command. So you may need to use a text editor.
Deployments manage Pods.

- Switch to the webpage of servers to Login to the 3rd server.
- Again Join the node to the master by pasting in the command captured earlier:
-
Get the list of nodes instantiated:
kubectl get nodes
-
To get list of events sorted by timestamp:
kubectl get events --sort-by='.metadata.creationTimestamp'
-
Create the initial log file so that Docker mounts a file instead of a directory:
touch /var/log/kube-appserver.log
-
Create in each node a folder:
mkdir /srv/kubernetes
-
Missing: Get a utility to generate TLS certificates:
brew install easyrsa
-
Run it:
./easyrsa init-pki
Master IP address
-
Run it:
MASTER_IP=172.31.38.152
echo $MASTER_IP
-
Run it:
./easyrsa --batch "--req-cn=${MASTER_IP}@`date +%s`* build-ca nopassWatchers
To register watchers on specific nodes.??? Kubernetes supports TLS certifications for encryption over the line.
REST API CRUD operations are used
Admission Controller
The K8s Admission Controller enables less coding in yaml files by adding what is necssary.
kubectl details?
In the example folder (for each node):
- basic_auth.csv user and password
- ca.crt - the certificate authority certificate from pki folder
- known_tokens.csv kublets use to talk to the apiserver
- kubecfg.crt - client cert public key
- kubecfg.key - client cert private key
- server.cert - server cert public key from issued folder
- server.key - server cert private key
-
Copy from API server to each master node:
cp kube-apiserver.yaml /etc/kubernetes/manifests/
The kublet compares its contents to make it so, uses the manifests folder to create kube-apiserver instances.
-
For details about each pod:
kubectl describe pods
Expose
Deploy service
-
To deploy a service:
kubectl expose deployment *deployment-name* &91;options]
Container Storage Interface (CSI)
https://github.com/container-storage-interface/spec
Configmap
Use ConfigMaps as environment variables or using a volume mount in a specific namespace.
env:
  - name: SPECIAL_LEVEL_KEY
    valueFrom:
      configMapKeyRef:
        name: special-config
        key: special.how
Within a pod manifest, valueFrom key and the configMapKeyRef value to read the values:
volumes:
  - name: config-volume
  configMap:
    name: special-config
Volumes of persistent data storage
![]()
VIDEO: from “Nana’s TechWorld”

Docker Containers share attached data volumes available within each Pod:
REMEMBER: Local Volumes defined in pods disappear when each pod dies.
Sample pod yaml definining the volumes mounted within its containers:
apiVersion: v1
kind: Pod
metadata:
  name: mypod
spec:
  containers:
    - name: myfrontend
    image: nginx
    volumeMounts:
    - mountPath: "/var/www/html"
      name: mypd
  volumes:
    - name: mypd
      persistentVolumeClaim:
        claimName: pvc-name
Persistent Volume (PV)
![]()
- kubernetesbyexample.com: Persistent Volumes
- Persistent Volumes on Kubernetes for beginners by That DevOps Guy
PV’s are a cluster resource, not to a specific _____.
Admins create a Persistent Volume (PV) to provision blocks of storage (of specific Gigabit capacity sizes) for use within a specific cluster.
PV’s are like an external plugin to a cluster.
A complete list in kubernetes.io.
For a elastic-app, define several volume types in a container referencing PVC names in awsElasticBlockStore:
spec:
  containers:
  - image: elastic:latest
    name: elastic-container
    ports:
    - containerPort: 9200
    volumeMounts:
    - name: es-persistent-storage
      mountPath: /var/lib/data
    - name: es-secret-dir
      mountPath: /var/lib/secret
    - name: es-config-dir
      mountPath: /var/lib/config
  volumes:
  - name: es-persistent-storage
    persistentVolumeClain:
      claimName: es-pv-claim
  - name: es-secret-dir
    secret:
      secretName: es-secret
  - name: es-config-dir
    configMap:
      name: es-config-map
For a NFS (Network File System):
apiVersion: v1
kind: PersistentVolume
metadata:
  pv-name
spec:
  capacity:
    storage: 5 Gi
  volumeMode: Filesystem
  accessModes:
    - ReadWriteOnce
  persistentVolumeReclaimPolicy: Recycle
  storageClassName: slow
  mountOptions:
    - hard
    - nfsvers=4.0
  nfs:
    path: /dir/path/on/nfs/server
    server: nfs-server-ip-address
On a Google Cloud ext4 type volume:
apiVersion: v1
kind: PersistentVolume
metadata:
  name: google-cloud-volume
  labels:
    failure-domain.beta.kubernetes.io/zone: us-central1-a__us-central1-b
spec:
  capacity:
    storage: 400 Gi
  volumeMode: Filesystem
  accessModes:
    - ReadWriteOnce
  gcePersistantDisk:
    pdName: my-data-disk
    fsType: ext4
Cloud Volumes (Geo-replicated)
- AWS Elastic Block Store (EBS)
- GCP GCE Persistent Disk
-
Azure Disk and Azure FIle
apiVersion: v1
kind: Pod
metadata:
name: azure-pod-azure
spec:
volumes:
- name: data
  azureFile:   # Azure File storage
    secretName: azure-secret
    shareName: share-name
    readOnly: false
containers:
- image: someimage
  name: my-app
  volumeMounts:
  - name: data
    mountPath: /data/storage
Alternately on Google:
    gcePersistentDisk:
      pdName: datastorage
      fsType: ext4
Alternately:
    awsElesticBlockStore:   # AWS EBS
      volumeID: volume_ID
      fsType: ext4
Storage Classes
![]()
A storage class (sc) is a type of template used to dynamically provision data storage.
Create persistent volumes dynamically:
apiVersion: storage.k8s.io/v1
kind: StorageClass
metadata:
  name: storage-class-name
provisioner: kubernetes.io/aws-ebs
parameters:
  type: io1
  iopsPerGB: "10"
  fsType: ext4
REMEMBER: name: storage-class-name must match PVC config storageClassName: storage-class-name
Persistant Volume Claim (PVC)
![]()
A Persistent Volume Claim (PVC) is a request for that storage by a user.
Once granted, a PVC is used as a “claim check” for the storage.
apiVersin: v1
kind: PersistentVolumeClaim
metadata:
  name: pvc-name
spec:
  storageClassName: manual
  accessModes:
  - ReadWriteOnce
  resources:
    requests:
      storage: 10Gi
  storageClassName: storage-class-name
REMEMBER: The metadata: name: in the PVC definition needs to match the Pod’s claimName: pvc-name.
Kubernetes tries to find a PV that matches the capacity: 10Gi with a compatible persistent volume in the cluster.
REMEMBER: name: storage-class-name in pod definition must match PVC config storageClassName: storage-class-name
More:
- https://redhat-scholars.github.io/kubernetes-tutorial/kubernetes-tutorial/volumes-persistentvolumes.html
- https://github.com/burrsutter/9stepsawesome/blob/master/9_databases.adoc
Sample micro-service apps
Bob Reselman’s 3-day hands-on classes on Kubernetes makes use of bash scripts and sample app at https://github.com/reselbob/CoolWithKube
The repo is based on work from others, especially Kelsy Hightower, the Google Developer Advocate.
- https://github.com/kelseyhightower/app - an example 12-Factor application.
- https://hub.docker.com/r/kelseyhightower/monolith - Monolith includes auth and hello services.
- https://hub.docker.com/r/kelseyhightower/auth - Auth microservice. Generates JWT tokens for authenticated users.
- https://hub.docker.com/r/kelseyhightower/hello - Hello microservice. Greets authenticated users.
- https://hub.docker.com/r/ngnix - Frontend to the auth and hello services.
These sample apps are manipulated by https://github.com/kelseyhightower/craft-kubernetes-workshop
- Install
- Create a Node.js server
- Create a Docker container image
- Create a container cluster
- Create a Kubernetes pod
-
Scale up your services
- Provision a complete Kubernetes cluster using Kubernetes Engine.
- Deploy and manage Docker containers using kubectl.
- Break an application into microservices using Kubernetes’ Deployments and Services.
This “Kubernetes” folder contains scripts to implement what was described in the “Orchestrating the Cloud with Kubernetes” hands-on lab which is part of the “Kubernetes in the Google Cloud” quest.
Infrastructure as code
-
Use an internet browser to view
https://github.com/wilsonmar/DevSecOps/blob/master/Kubernetes/k8s-gcp-hello.sh
The script downloads a repository forked from googlecodelabs: https://github.com/wilsonmar/orchestrate-with-kubernetes/tree/master/kubernetes
Declarative
This repository contains several kinds of .yaml files, which can also have the extension .yml. Kubernetes also recognizes .json files, but YAML files are easier to work with.
The files are call “Manifests” because they declare the desired state.
-
Open an internet browser tab to view it.
reverse proxy to front-end
The web service consists of a front-end and a proxy served by the NGINX web server configured using two files in the
nginxfolder:- frontend.conf
- proxy.conf
These are explained in detail at https://www.digitalocean.com/community/tutorials/how-to-configure-nginx-as-a-web-server-and-reverse-proxy-for-apache-on-one-ubuntu-14-04-droplet
SSL keys
SSL keys referenced are installed from the
tlsfolder:- ca-key.pem - Certificate Authority’s private key
- ca.pem - Certificate Authority’s public key
- cert.pem - public key
- key.pem - private key
pod.yml manifests
apiVersion: v1
kind: Pod
metadata:
  name:   cadvisor
spec:
  containers:
    - name: cadvisor
      image: google/cadvisor:v0.22.0
      volumeMounts:
        - name: rootfs
          mountPath: /rootfs
          readOnly: true
        - name: var-run
          mountPath: /var/run
          readOnly: false
        - name: sys
          mountPath: /sys
          readOnly: true
        - name: docker
          mountPath: /var/lib/docker
          readOnly: true
      ports:
        - name: http
          containerPort: 8080
          protocol: TCP
      args:
        - --profiling
        - --housekeeping_interval=1s
  volumes:
    - name: rootfs
      hostPath:
        path: /
    - name: var-run
      hostPath:
        path: /var/run
    - name: sys
      hostPath:
        path: /sys
    - name: docker
      hostPath:
path: /var/lib/docker
Labels and Selectors
app labels are specified in pods for services to reference them:

Sample labels and values:
- app: myapp
- release: stable, canary
- environment: eve, qa, production
- tier: frontend or backend or cache
- team: ecommerce, auth, purchasing, marketing
- author: name
- maintainer: joe
- tech-lead: name
- application-type: ui
- release-version: 1.0
-
Create label automatically
kubectl expose ...
-
Overwrite (Add) a label after a pod created:
k label po/helloworld app=helloworldapp --overwrite
-
List labels for a pod created:
k get pods --show-labels
... app=helloworldapp
kubectl describe
-
View labels using grep flags:
k describe po mssaging | grep -C 5 -i labels
BLAH: grep commands are simple and display extra text.
JSONPath
VIDEO within course with quiz: To precisely define extracts for processing by another command, use JSONPath: JMESPath
-
Get the IP of the pods with label app=nginx, using JSONPath:
kubectl get pods -l app=nginx -o jsonpath='{range .items&91;*]}{.status.podIP}{"\n"}{end}'instead of
kubectl get pods -o wide --no-headers | awk '{print $1,$6}'Note that JSONPath references object names which makes the request more understandable than awk referencing relative positions in output, which can change over time.
More examples of JSONPath: https://github.com/himadriganguly/k8s-jsonpath/tree/main/pods
-
List containers running within a pod:
kubectl get pods &91;pod-name-here] -n &91;namespace] -o jsonpath='{.spec.containers&91;*].name}* -
Custom columns
https://kubernetes.io/docs/reference/kubectl/cheatsheet/#formatting-output
Label Selectors
for pods defined with:
metadata:
name: nginx-web
labels:
  env: prod
  app: nginx-web
  app.kubernetes.io/name: mysql
  app.kubernetes.io/component: database
  app.kubernetes.io/managed-by: helm
  app.kubernetes.io/created-by: controller-manager
...
-
Show labels defined for pods running:
kubectl get pods --show-labels
-
Select K8s object based on the label applied to pods, with values matching in list of values:
k get pods -l 'release-version in (1.0, 2.0)'
Label Selectors above select a set of objects using a single statement.
Delete pods using selector
Delete pods using –selector rather than -l
k delete pods --selector application-level=1.0
”=”, “!=”, IN, NOTIN, EXISTS are valid selectors.
NOTE: After a pod is deleted, Kubernetes automatically creates another one to ensure the number of replicas are fulfilled.
-
Field selector selects k8s objects based on object data (such as Metadata, status, etc.)
-
Node selector selects nodes for very specific pod placement.
Annotations
Annotations are arbitrary non-identifying metadata attached to objects.
Some tool and library clients such a Ingress use the rewrite-target annotation to communicate with Ingress Controllers.
kind: Ingress
metadata:
  name: minimal-ingress
  annotations:
    nginx.ingress.kubernetes.io/rewrite-target: /
Replication rc.yml
A ReplicaSet configures a Deployment controller to create and maintain a specific version of the Pods that the Deployment specifies.
The rc.yml (Replication Controller) defines the number of replicas and
apiVersion: v1
kind: ReplicationController
metadata:
  name: cadvisor
spec:
  replicas: 5
  selector:
     app hello
  template:
    metadata:
      labels:
        app: hello-world
  spec:
    containers:
    - name: hello
      image: account/image:latest
      ports:
        containerPort: 8080
-
Apply replication:
kubectl apply -f rc.yml
The response expected:
replicationcontroller "hello" configured
-
List, in wide format, the number of replicated nodes:
kubectl get rc -o wide
DESIRED, CURRENT, READY
-
Get more detail:
kubectl describe rc
Service rc.yml
The svc.yml defines the services:
apiVersion: v1
kind: Service
metadata:
  name: hello-svc
    labels:
      app: hello-world
spec:
  type: NodePort
  ports:
  - port: 8080
    protocol: TCP
  selector:
    app: hello-world
The .spec.template field specifies how to create new pods in this ReplicaSet—containers using the nginx image on Docker Hub. New containers are named the value in metadata.nam”.
The .spec.selector field defines how to find pods to manage as part of this ReplicaSet—in this case using MatchLabels PROTIP: The selector should match the pods.xml.
-
To create services:
kubectl create -f svc.yml
The response expected:
service "hello-svc" created
-
List:
kubectl get svc
-
List details:
kubectl describe svc hello-svc
-
List end points addresses:
kubectl describe ep hello-svc
Deploy yml Deployment
The deploy.yml defines the deploy:
apiVersion: apps/v1beta2
kind: Deployment
metadata:
  name: nginx-deployment
spec:
  replicas: 2
  selector:
    matchLabels:
      app: nginx
  template:
    metadata:
      labels:
        app: nginx
  spec:
    containers:
    - name: nginx
      image: nginx:1.7.9
      ports:
      - containerPort: 80
        protocol: TCP
    nodeSelector:
      net: gigabit
...
spec:
  resources:
    requests:
      memory: "300Mi"
      cpu: "250m"  # 1/4 core
    limits:
      memory: "400Mi"
      cpu: "1000m"  # 1 core
Deployment wraps around replica sets, a newer version of doing rolling-update on Replication Controller. Old replica sets can revert roll-back by just changing the deploy.yml file.
PROTIP: Don’t run apt-upgrade within containers, which breaks the image-container relationship controls.
-
Retrieve the yaml for a deployment:
kubectl get deployment nginx-deployment -o yaml
Rolling Update Strategy
In the yaml, RollingUpdate is part of strategy:
strategy:
  RollingUpdate:
 maxSurge: 25%
 maxUnavilable: 25%
  type: RollingUpdate
-
Begin rollout of a new desired version from the command line:
kubectl set image deployment/nginx-deployment nginx=nginx:1.8
Alternately, edit the yaml file to nginx:1.9.1 and:
kubectl apply -f nginx-deployment.yaml
-
View Rollout a new desired version:
kubectl rollout status deployment/nginx-deployment
-
Pause Rollout to control what is included in update:
kubectl pause deployment/nginx-deployment
-
Describe the yaml for a deployment:
kubectl describe deployment nginx-deployment
-
List the DESIRED, CURRENT, UP-TO-DATE, AVAILABLE:
kubectl get deployments
-
List the DESIRED, CURRENT, UP-TO-DATE, AVAILABLE:
kubectl get deployments
Record Rollback history
--record=true# to save rollback history obtained by:k rollout history deployment/some-deployment
-
List the history:
kubectl rollout history deployment/nginx-deployment --revision=3
-
rollout (rollback) Backout the revision to a specific revision:
kubectl rollout undo deployment/nginx-deployment --to-revision=2
PROTIP: Notice the difference between –to-revision= and –revision=
-
Undo rollout (rollback):
k rollout undo deployment/my-deployment --revision=v1.2
The default spec.revisionHistoryLimit is 10 versions retained.
Security Context
This security.yml defines a secrurity context pod:
apiVersion: v1
kind: Pod
metadata:
  name: security-context.pod
spec:
  securityContext:
    runAsUser: 1000
    fsGroup: 2000
  volumess:
  - name: sam-vol
    emptyDir: {}
  containers:
  - name: sample-container
    image: gcr.io/google-samples/node-hello:1.0
    volumeMounts:
    - name: sam-vol
      mountPath: /data/demo
    securityContext:
      allowPrivilegeEscalation: false
-
Create the pod:
kubectl create -f security.yaml
This can take several minutes.
-
Bring up a shell the security context pod:
kubectl exec -it security-context-pod -- sh
-
Bring up shell and execute shell command (such as ls, ps aux to see processes):
kubectl exec -c container id -it pod name -- command
-c if there are several containers in a pod.
-
Within the instance, install networking utilities:
apt-get install iputils-ping curl dnsutils iproute2 -y
-
See that the group is “2000” as specified:
cd /data && ls -al
-
Exit the security context:
exit
-
Delete the security context:
kubectl delete -f security.yaml
Kubelet Daemonset.yaml
Kubelets instantiate pods – each a set of containers running under a single IP address, the fundamental units nodes.
A Kubelet agent program is installed on each server to watch the apiserver and register each node with the cluster.
PROTIP: Use a DaemonSet when running clustered Kubernetes with static pods to run a pod on every node. Static pods are managed directly by the kubelet daemon on a specific node, without the API server observing it.
- https://kubernetes.io/docs/concepts/workloads/controllers/daemonset/
A DaemonSet ensures that all (or some) Nodes run a copy of a Pod. As nodes are added to the cluster, Pods are added to them. As nodes are removed from the cluster, those Pods are garbage collected.
Deleting a DaemonSet will clean up the Pods it created. Some typical uses of a DaemonSet are:
- running a cluster storage daemon, such as glusterd, ceph, on each node.
- running a logs collection daemon on every node, such as fluentd or logstash.
- running a node monitoring daemon on every node, such as Prometheus Node Exporter, collectd, Datadog agent, New Relic agent, or Ganglia gmond.
-
Start kubelet daemon:
kubelet --pod-manifest-path=the directory
This periodically scans the directory and creates/deletes static pods as yaml/json files appear/disappear there.
Note: Kubelet ignores files starting with a dot when scanning the specified directory.
PROTIP: By default, Kubelets exposes endpoints on port 10255.
Containers can be Docker or rkt (pluggable)
/spec, /healthz reports status.
The container engine pulls images and stopping/starting containers.
- https://kubernetes.io/docs/tasks/inject-data-application/define-command-argument-container/
Plugins
In Cloud Native projects, “in-tree” refers to plugins in the main repository. “Out-of-tree” plugins are external, so must be installed to extend or replace default behavior.
CNI Plugins
The Controller Network Interface (CNI) is installed using basic cbr0 using the bridge and host-local CNI plugins.
The CNI plugin is selected by passing Kubelet the command-line option, such as:
--network-plugin=cni
See https://kubernetes.io/docs/concepts/cluster-administration/network-plugins/
| Plugin | - | vxlan | L2 | L3 | Pol | Encrypt |
|---|---|---|---|---|---|---|
| Project Calico | Y | - | Y | - | Y | |
| Calico with Canal | Y | Y | - | Y | Y | |
| Flannel | Y | Y | - | - | - | |
| Weave Works (Weave Net) | Y | Y | - | Y | Y | |
| Romana | - | - | Y | Y | - | |
| Kube Router | - | - | Y | Y | - | |
| Kopeio | Y | Y | - | - | Y |
Others:
- Cisco ACI
- Cilium
- Contiv
- Contrail
- NSX-T
- OpenVswitch
- Multus
DNET directly exposes Pod IP address to the outside.
Make your own K8s
Kelsey Hightower, in https://github.com/kelseyhightower/kubernetes-the-hard-way, shows the steps of how to create Compute Engine yourself:
- Cloud infrastructure firewall and load balancer provisioning
- setup a CA and TLS cert gen.
- setup TLS client bootstrap and RBAC authentication
- bootstrap a HA etcd cluster
- bootstrap a HA Kubernetes Control Pane
- Bootstrap Kubernetes Workers
- Config K8 client for remote access
- Manage container network routes
- Deploy clustesr DNS add-on
Kubeflow
https://github.com/kubeflow/kubeflow makes deployment of Kubernetes for Machine Learning (TensorFlow) using Kafka
References
by Adron Hall:
-
Kubernetes with GCloud and Terraform April 5, 2017
-
Setting up a GCP Container Cluster - Part I January 31, 2017.
Julia Evans
- https://jvns.ca/categories/kubernetes/
Drone.io
http://www.nkode.io/2016/10/18/valuable-container-platform-links-kubernetes.html
https://medium.com/@ApsOps/an-illustrated-guide-to-kubernetes-networking-part-1-d1ede3322727
https://cloud.google.com/solutions/heterogeneous-deployment-patterns-with-kubernetes
https://cloud.google.com/solutions/devops/
https://docs.gitlab.com/ee/install/kubernetes/gitlab_omnibus.html
https://www.terraform.io/docs/providers/aws/guides/eks-getting-started.html
https://devops.college/the-journey-from-monolith-to-docker-to-kubernetes-part-1-f5dbd730f620
https://github.com/ramitsurana/awesome-kubernetes
Jobs for you
Kubernetes Dominates in IT Job Searches
Learning, Video and Live
Kubernetes for Beginners by Siraj Jan 8, 2019 [11:04]
Kubernetes Deconstructed Dec 15, 2017 [33:14] by Carson Anderson of DOMO (@carsonoid)
Solutions Engineering Hangout: Terraform for Instant K8s Clusters on AWS EKS by HashiCorp
Introduction to Microservices, Docker, and Kubernetes by James Quigley
Kubernetes in Docker for Mac April 17, 2018 by Guillaume Rose, Guillaume Tardif
YOUTUBE: What is Kubernetes? Jun 18, 2018 by Jason Rahm
Kubernetes for Machine Learning
This article talks about Jupyter notebooks correctness and functionality being dependent on their environment, called “training serving skew”. To get around that, use the Binder service which takes Jupyter notebooks within a Git repository to build a container image, then launches the image in a Kubernetes cluster with an exposed route accessible from the public internet.
OpenShift’s Source-to-image (S2I) and Graham Dumpleton’s OpenShift S2I builder builds artifacts from source and injects them into docker images.
It’s used by Seldon-Core to scale Machine Learning environments. There are Seldon-Core Examples
Seldon-Core is used by Kubeflow makes deployments of machine learning (ML) workflows on Kubernetes simple, portable and scalable. It provides templates and custom resources to deploy TensorFlow and other machine learning libraries and tools on Kubernetes. Included in Kubeflow is JupyterHub to create and manage multi-user interactive Jupyter notebooks. It began as TensorFlow Extended at Google.
https://github.com/kubernetes-incubator is a collection of repositories such as the spartakus Anonymous Usage Collector, metrics-server, external-dns which configures external DNS servers (AWS Route53, Google CloudDNS and others) for Kubernetes Ingresses and Services, and kube-aws which is a command-line tool to declaratively manage Kubernetes clusters on AWS.
https://radanalytics.io Oshinko empowers intelligent app developement on the OpenShift platform deploying and managing Apache Spark clusters It has a spark cluster management app (oshinko-webui)
Resources
8 Lightboard VIDEOS: Understanding Kubernetes series by VMware.
https://github.com/hjacobs/kubernetes-failure-stories
Kubstack
Daniel Pacak’s experience with CKAD (from Aqua Security)
GCP PODCAST: Kubernetes and Google Container Engine hosts Francesc Campoy Flores and Mark Mandel interview Brian Dorsey, Developer Advocate, Google Cloud Platform. Comments at r/gcppodcast
O’Reilly book Kubernetes adventures on Azure, Part 1 (Linux cluster) Having read several books on Kubernetes, Ivan Fioravanti, writing for Hackernoon, says it’s time to start adventuring in the magical world of Kubernetes for real! And he does so using Microsoft Azure. Enjoy the step-by-step account of his escapade (part 1).
Microsoft’s “PDF: 50 days from zero to hero with Kubernetes” includes:
-
[Terraform] Phippy Goes to the Zoo is a children’s book character Phippy (from Docker) introduct pods, replica sets, deployments, ingress.
-
The 6-part YouTube videos by Brendan Burns drawing behind glass.
-
Kubernetes core concepts for Azure Kubernetes Service (AKS) explore basic concepts like YAML definitions, networking, secrets, and application deployments from source code.
-
Katacoda provides a Bash terminal as if you are running Minikube and kubectl locally just by clicking the code on the left pane rather than typing.
-
Microservices architecture on Azure Kubernetes Service (AKS) describes a reference implementation at https://github.com/mspnp/microservices-reference-implementation
-
https://aksworkshop.io/ is a hands-on workshop to create a Kubernetes cluster, deploy a microservices-based application, and set up a CI/CD pipeline.
- Kubernetes deployments, services and ingress
- Deploying MongoDB using Helm
- Azure Monitor for Containers, Horizontal Pod Autoscaler to add more pods by updating the replicas count in the Deployment (based on targetCPUUtilizationPercentage: 50) and the Cluster Autoscaler to add more nodes to the cluster
- Building CI/CD pipelines using Azure DevOps and Azure Container Registry
- Scaling using Virtual Nodes, setting up SSL/TLS for your deployments, using Azure Key Vault for secrets
-
A visual guide on troubleshooting Kubernetes deployments DECEMBER 2019
-
[Terraform] https://coreos.com/blog/kubectl-tips-and-tricks
VIDEO from Jun 22, 2017 Covers bash completion
cgroups
A cgroup (control group) is a group of Linux processes providing resource allocation, with optional resource isolation, accounting, and limits. Cgroups ensure that a container cannot get more than the resources specified for it.
chroot
CGroups evolved from chroot. The chroot jail, introduced in the 1970s, is still used as the foundation of each container. It isolates processes from the root by presenting only the contents of a specific directory (folder) to the process.
Secrets
![]()
- kubernetesbyexample.com: Secrets
- In https://kubernetes.io/docs/concepts/secret/#best-practices
- https://kubernetes.io/docs/tasks/administer-cluster/encrypt-data Enable encryption at rest for cluster data
Banzai cloud vault uses a mutating admission webhook to inject an executable into containers inside Pods, which then request secrets from HashiCorp Vault through special environment variable definitions. This project was inspired by a number of other projects (e.g. channable/vaultenv, hashicorp/envconsul), but one thing that makes it unique is that it is a daemonless solution.
PROTIP: BLOG: Don’t follow the Kubernetes default of storing credentials in Secret resource in plain text, for acess by everyone who has access to Kubernetes clusters. You don’t have to modify source code to inject a secret from AWS Secret Manager into env. if you use Piggy (https://piggysec.com) for Elastic Kubernetes Service (EKS) in a Helm chart (as annotation). See https://github.com/KongZ/piggy/tree/main/demo
- Piggy mutates pods during pod creation
- Piggy authenticates pods using a pod service account token with Kubernetes API. After pod has been authenticated, Piggy exchanges the ephemeral token with AWS STS (Security Token Service) to read values from AWS Secret Manager. This ephemeral token is time limited. Piggy does not keep tokens in the application.
- Secrets from AWS Secret Manager are injected into the container process.
See https://docs.aws.amazon.com/IAM/latest/UserGuide/id_credentials_temp.html
Base64 Encoding
What Kubernetes calls its secrets are actually Base64 encoded text.
PROTIP: custom controller turn proxies into Secrets. sealed secrets:
- Bitnami’s Secret Controller has a key in the Controller used to do asymmetric encrypt and decrypt of external secrets stored in Git.
- AWS Secrets Manager (ASM)
-
Encode (not encrypt) plain text to base64 encoding using program within coreutils that comes with macOS/Linux operating systems:
echo -n 'supersecret' | base64 > encoded_file ; cat encoded_file
(echo -n removes invisible new line characters for conversion)
c3VwAXJzZWNyZXQ=
-
Decode a base64 encoded file to text:
base64 --decode encoded_file
-
Create a secret from a text literal and store in K8s:
k create secret generic my-secret-literal \
 --from-literal=my-password
k create secret generic my-db-password \
 --from-literal=db-password='password'
 --from-literal=db-root-password='password'
-
Create a secret keypair and store in K8s:
k create secret generic my-secret-file \
 --from-file=ssh-privatekey=~/.ssh/id_rsa
 --from-file=ssh-publickey=~/.ssh/id_rsa.pub
-
Create a secret from a keypair:
k create secret tls tls-secret  \
 --cert=path/to/tls.cert
 --key=path/to/tls.key
Secrets - custom controllers
REMEMBER: Pods consume static ConfigMaps and Secrets.
PROTIP: To monitor for changes apply updates to hash in PodSpec, then triggers changes: install custom controller “Wave” at https://github.com/pusher/wave.
-
Use encoded secret (saved insecurely encoded in Base64):
apiVersion: v1 kind: Secret metadata name: database-secrets type: Opaque data: DB_PASSWORD: "c3VwAXJzZWNyZXQ=" # encoded Base64 (not secret) volumes: - name: database-secrets secrets: secretName: database-secrets- Encrypting data on rest: https://kubernetes.io/docs/tasks/administer-cluster/encrypt-data/
- Using Sealed Secrets that allow us to encrypt everything in Git: https://github.com/bitnami-labs/sealed-secrets
- Using Vault to store them: https://github.com/coreos/vault-operator
PROTIP: K8s stores secrets in memory (tempfs on a Node, not on disk) in etcd (which should be limited to admin users).
TOOL: “Studio 3T” to connect to MongoDB.
Debugging
K8s does not come with debuggers. Output to logs, then use tracing. Printlines.
DatadogHQ.com for metrics & traces
unu uses Jaeger for auto-instrumentation
Mindspace.net provides IDE connecting to node remote debugging.
cluster-api.sigs.k8s.io printlines
KubeMonkey is a Chaos Monkey forcing random failures within Kubernetes – to test the fault tolerance of our deployments.
Blogs
https://kubernetesbyexample.com provides in-depth yet concise coverage, with sample code:
- API Server
- Deployments
- Environment Variables
- Health Checks
- Init Containers
- Jobs
- Labels
- Logging
- Namespaces
- Nodes
- Pods
- Persistent Volumes
- Port Forward
- Secrets
- Services
- Service Discovery
- Stateful Sets
- Volumes
IBM’s Kubernetes 101 is an excellent overview.
From zero to CKAD in 30 days August 9, 2020 by Pranam Mohanty
https://lnkd.in/f3BciG5
Sandeep Dinesh (@sandeepdinesh) from 2018
- https://medium.com/google-cloud/kubernetes-best-practices-season-one-11119aee1d10
- https://www.youtube.com/playlist?list=PLIivdWyY5sqL3xfXz5xJvwzFW_tlQB_GB
Burr Sutter (burrsutter.com) As a Red Hat employee:
- https://github.com/redhat-scholars/kubernetes-tutorial
- bit.ly/9stepsawesome
- 11 Steps to Awesome with Kubernetes, Istio, and Knative
- https://developers.redhat.com/devnation/master-course/kubernetes (fundamentals)
Alex Soto (lordofthejars.com)
- https://github.com/redhat-scholars/kubernetes-tutorial
https://itnext.io/bootstrapping-kubernetes-clusters-on-aws-with-terraform-b7c0371aaea0 using kubeadm on AWS
Production
Google on Coursera has a video course Architecting with Google Kubernetes Engine: Production by Maya Kaczorowski (Product Manager, Container Security).
Every operation on a GCP resource is performed using an API call for which accesses is controlled using a permission.
OpenID Connect to API server operates on top of OAuth, safer than x509 certs. Windows AD servers can sync one-way via Google Cloud Directory Sync (GCDS) by grouping GCP permissions into roles based on common user flows. NOTE: Permissions can’t be individually assigned to members,
Get a G-Suite Domain or Cloud Identity domain (free).
Cloud IAM policy grants roles to users. Cloud IAM defines a list of bindings designating which members can view or change GKE cluster configurations.
An IAM policy can be attached to a specific resource, a project, a project folder, or a whole organization.
Inside the cluster, K8s RBAC, Pod Security.
Access control can be setup at any level within the GCP organizational hierarchy and choose the most appropriate level for each IAM policy. Within an organization, you can have multiple folders containing multiple projects and so on.
Cloud IAM policies applied at higher levels of a GCP organizational hierarchy are inherited by resources lower down that hierarchy. An IAM policy attached at the organizational level will automatically have access to all folders, all projects, and ultimately all relevant resources. There’s no way to grant a permission at higher level in the hierarchy and then take it away below.
So, in general, the policies applied at higher levels should grant very few permissions and policies applied at lower levels should grant additional permissions to only those who need them.
There are three kinds of roles in cCloud IAM: primitive, predefined, and custom. Primitive roles grant users global access to all GCP resources within a project (app engine, compute engine, and cloud storage). They existed before Cloud IAM, but can still be used with Cloud IAM. The three primitive roles: viewer role permits read-only actions, such as viewing existing resources or data across the whole project. editor role adds modifying of existing resources. owner role adds the right to manage roles and permissions and set up billing for a project.*
kubectl apply -f pod-reader-role.yaml
kind: Role
apiVersion: rbac.authorization.k8s.io/v1
metadata:
  namespace: production
  name: pod-reader
rules:
- apiGroups: &91;""]
  resources: &91;"pods"]
  verbs: &91;"create", "get", "list", "watch"]
GKE provides several Predefined roles to provide granular access to Kubernetes engine resource. GKE viewer role gives read-only access as might be needed for auditing. GKE developer role grants developers and release engineers full control to all resources within a cluster. GKE admin role gives project owners, system administrators, and on-call engineers full access to clusters and Kubernetes engine resource is inside the clusters (create, delete, update, view clusters), but provides no access to Kubernetes resources.
GKE custom roles provides even more granular control to a specific user account managing software running inside a certain GKE cluster, but not have any access to view GCP resources, and nothing else.
Quotas
![]()
References
K8s failure stories at k8s.af
K8s experts Fairwinds.com has https://github.com/FairwindsOps/apprentice-learning-plan for new Site Reliability Engineers. Fairwinds also has open-source tools at their FairwindsOps GitHub using @goreleaser:
- Polaris validates best practices as defined at their K8s Best Practices” white paper PDF
- reckoner to declaratively install and manage multiple Helm chart releases
- terraform-bastion instance to proxy SSH and API access to a private Kubernetes cluster.
- gemini to automate backups of PersistentVolumeClaims in Kubernetes using VolumeSnapshots
- ClusterOps
- https://github.com/FairwindsOps/k8s-workshop
k8s-school.fr:
- https://k8s-school.fr/resources/en/blog/kubectl-run-deprecated/
LevelUpEducation:
- https://github.com/LevelUpEducation/kubernetes-demo/issues/31
https://www.tutorialspoint.com/kubernetes/kubernetes_replica_sets.htm
Exam by Brad McCoy
https://www.linkedin.com/pulse/effectively-choosing-k8-node-size-capacity-anurag-gupta/
https://kubernetes.io/docs/concepts/scheduling-eviction/pod-overhead/
https://medium.com/windmill-engineering/why-does-developing-on-kubernetes-suck-4f4ae6812c8d
https://www.tikalk.com/posts/2020/05/14/2020-05-14-Kubexperience-for-developers/
Factors taken into account for scheduling decisions include, individual and collective resource requirements, hardware/software/policy constraints, affinity and anti-affinity specifications, data locality, inter-workload interference and deadlines.
Latest videos about K8s
For the most up-to-date information by practioners:
Kubernetes Concepts Explained in 9 minutes! Oct 31, 2019 by Mumshad Mannambeth
Kubcon conferences are held 3 times a year in Asia, Europe, and US from https://events.linuxfoundation.org.
Others:
- weekly video chat on Heptio’s YouTube channel of Duffie Cooley (@mauilion).
O’Reilly’s Infrastructure & Ops Superstream Series: Session 3 Oct. 21, 2020: Kubernetes
Interactive KataKoda lab on OReilly.com: Deploying Python APIs on Kubernetes: Deploying a Development Kubernetes Cluster using the slim K3s Kubernetes distribution from Rancher, a Certified Lightweight Kubernetes Distribution built for IoT and Edge remote ecomputing. It stores data using sqlite3 instead of etcd. It bootstrap script K3sup installer at https://github.com/alexellis/k3sup.
k3s.io with traefix.io/traefix based on https://github.com/lima-vm/lima
Techno Tim on YouTube has a VIDEO: “100% automated” Ansible-fueled build using k3s with kube-vip, MetalLB, datree, etc. at techno-tim/k3s-ansible. He’s also hasvideos on Rancher.
arkade - portable Kubernetes marketplace
BOOK: Kubernetes Patterns by Bilgin Ibryam, Roland Huß
Jonathan Johnson
-
Kubernetes Pipelines: Python Pipeline to Kubernetes (using Tekton Pipelines to package Python in an efficient container) Kaniko container
@EllenKorbes: “Successful Kubernetes Development Workflows”
Jonathan Johnson’s live online training “Kubernetes in Three Weeks” courses through O’Reilly:
-
Part I - Meshing and Observability
-
Part II - Operators and Serverless
-
Part III - CI/CD Pipelines on Kubernetes
Programming Kubernetes (book)
Kubernetes Best Practices (book)
Kubernetes Up and Running, second edition (book)
Video courses
Research into learning point to “spaced repetition” as the way to get what want to remember in our long-term memory.
Different instructors explain concepts in different logical sequences.
So looking at different video classes provides that.
KodeKloud also from Udemy.com
PROTIP: This I think is the most thoroughly and logically presented tutorials for CKAD and CKA.
I have several tabs open taking it:
-
The courses is available for USD $228/year (less occassional discounts) at KodeKloud.com where Videos are presented on KodeKloud.com (using the Teachable.com platform).
-
The courses can also be purchased at Udemy.com:
- Kubernetes Certified Application Developer (CKAD) with Tests, with 9 hours of videos, and
Kubernetes Certified Application Developer (CKA) with Tests, with 18 hours of videos.
- Kubernetes Certified Application Developer (CKAD) with Tests, with 9 hours of videos, and
-
Either way purchased, the course includes access to a KataKoda-powered lab environment for one hour at a time.
PROTIP: The k alias for kubectl is already configured, so type k instead of kubectl.
-
A “Quiz Portal” invoked from within the labs UI provides challenge questions and answers.
Some hints reference answer files in folder “/var/answers”, viewed by a command in the Terminal, such as:
cat /var/answers/answer-ubuntu-sleeper-2.yaml
-
Within the quiz, some links to solutions to labs on YouTube are broken. So stay on the Udemy UI for Solution videos.
KodeKloud’s YouTube channel still provides a series for absolute beginners on Git, Ansible, Puppet, Shell, Docker, Kubernetes. https://www.youtube.com/watch?v=QJ4fODH6DXI
-
Teacher and founder Mumshad Mannambeth (living in Singapore) also created a free work simulator for people to gain “real” work experience at https://kodekloud.com/p/kodekloud-engineer.
-
For CKA, he also authored https://github.com/mmumshad/kubernetes-the-hard-way (on Virtualbox and Vagrant using Docker instead of containerd) which takes a manual approach to bootstrap a Kubernetes cluster from scratch, for learning to understand each task performed by the automation. The tutorial adapts the original using GCP developed by Kelsey Hightower.
-
[Terraform] Join the Slack channel for CKAD and CKA students.
-
KodeKloud’s Mock Tests, which Ansar (Amoury) Memon’s “The FrontOpsGuys” on YouTube answers for Test 1 and Test 2
For CKA, https://github.com/kodekloudhub/certified-kubernetes-administrator-course
Linux Foundation LFS258
On would think the definitive courses would be from the same organization that created the exam.
The 35-hour video/on-site course LFD259 $199 upgrade offered with the CKAD exam sign-up covers this series of topics:
- Course Introduction
- Kubernetes Architecture
- Build
- Design
- Deployment Configuration
- Security
- Exposing Applications
- Troubleshooting
LFD459 is the 3-day on-site equivalent course code.
PROTIP: LF class materials ( https://training.linuxfoundation.org/cm/prep) are distributed in .bz2 format which can be opened on macOS by the Unarchiver
I took https://training.linuxfoundation.org/cm/prep/?course=LFS258 but found it to be like “drinking water from a fire hose” in that the 600 page coureware is comprehensive. But exercises during the class are not repeatable after the class.
The Linux Foundation exam focuses only on “pure” Kubernetes commands and excludes add-ons such as OpenStack, Helm, Istio. However, LFD259 covers Istio anyway.
Ready-for.sh establishes the environment:
wget http://bit.ly/LFready -O ready-for.sh
   chmod 755 ready-for.sh
   ./ready-for.sh --help
   # Not for macOS
https://github.com/cncf/curriculum - v1.19 contains one-page curriculum pdf’s.
Nana’s TechWorld on YouTube
YouTube channel “Nana’s TechWorld” by entrepreneur Nana Janashia (from Austria) features animated illustrations.
Docker Tutorial for Beginners [Full Course in 3 Hours].
VIDEO intro of Unique Udemy course Logging in Kubernetes with EFK Stack | The Complete Guide covers how to set up K8s clusters from scratch and configure logging with ElasticSearch, Fluentd and Kibana
EdX
CNCF offers classes through edx.org at https://www.cncf.io/certification/training/ free without certificates ($149 for certificate): reference https://github.com/cncf/curriculum/
- Introduction to Kubernetes by Chris Pokorni vs. LFS158x: Introduction to Kubernetes
- Kubernetes Fundamentals
- Kubernetes for Developers
- Kubernetes Security Essentials
- Monitoring Systems and Services with Prometheus
- Cloud Native Logging with Fluentd
- Service Mesh Fundamentals
- Managing Kubernetes Applications with Helm
- Introduction to Serverless on Kubernetes
edX.org publishes some courses from Linux Founcation.
CNCF
https://www.cncf.io/certification/training
https://github.com/cncf/curriculum
O’Reilly
Certified Kubernetes Application Developer (CKAD) Prep Course July 2019 [4h 53m] uses https://github.com/bmuschko/ckad-study-guide and https://github.com/bmuschko/ckad-crash-course “In-depth and hands-on practice for acing the exam” by Benjamin Muschko (@bmuschko, bmuschko.com, automatedascent.com)
https://github.com/bmuschko/cka-crash-course
Sander’s class
7h video class over 3 days live course by Sander van Vugt, who, as a Linux expert, provides in-depth CentOS install advice (including SELinux) and files available nowhere else. His diagrams are drawn on a lightboard.
https://github.com/sandervanvugt/kcna
BLAH: O’Reilly’s videos are annoying because you have to unmute the sound on every new chapter.
Pluralsight
PROTIP: Pluralsight videos can be viewed as a Tivo app on my TV. That’s a big plus. No others offer that.
Pluralsight has a 14-hour series of videos on CKAD by Dan Wahlin (@danwahlin, codewithdan.com). Courses in chron order:
- Kubernetes for Developers: Core Concepts 4h 34m Sept 15, 2019 with files at https://github.com/DanWahlin/DockerAndKubernetesCourseCode shows setup and troubleshooting of a whole NGINX app with Redis and MongoDB. VIDEO: His sample code references environment variables set on the Terminal before invoking K8s:
export APP_ENV=development
   export DOCKER_ACCT=codewithdan
-
Kubernetes for Developers: Deploying Your Code 3h 4m Feb 26, 2020
-
Kubernetes for Developers: Moving to the Cloud by Craig Golightly (@seethatgo, seethatgo.com) 1h 3m Dec 19, 2019 deploys the same simple sample Python app (kubernetes-developers-moving-cloud.zip) to AKS, EKS, and GKE clouds.
CAUTION: aws v2 CLI became generally available in Feb 2020 shortly after this course was published.
- Kubernetes for Developers: Moving from Docker Compose to Kubernetes 2h 20m May 28, 2020
Nigel Poulton (@NigelPoulton, nigelpoulton.com), Docker Captain:
-
Getting Started with Kubernetes 22 May 2017
-
2h 26m VIDEO course: “Kubernetes for Developers: Integrating Volumes and Using Multi-container Pods” by Nigel Poulton Apr 23, 2020
-
Book: “Docker for Sysadmins”
-
Book: “Docker Deep Dive”
-
Book: “Kubernetes Deep Dive”
-
Video course “Kubernetes Deep Dive” (released Oct 2018) references a WordPress sample app at VIDEO: https://github.com/nigelpoulton/k8s-sample-apps
Coursera
Coursera’s “Architecting with Google Kubernetes Engine Specialization” is focused on building efficient computing infrastructures using Kubernetes and Google Kubernetes Engine (GKE). The specialization introduces participants to deploying and managing containerized applications on GKE and the other services provided by Google Cloud Platform. Through a combination of presentations, demos, and hands-on labs, participants explore and deploy solution elements, including infrastructure components such as pods, containers, deployments, and services; as well as networks and application services. The specialization also covers deploying practical solutions including security and access management, resource management, and resource monitoring.
-
[Terraform] Google Cloud Platform Fundamentals: Core Infrastructure
This course introduces you to concepts and terminology for working with Google Cloud Platform (GCP). You learn about, and compare, many of the computing and storage services available in Google Cloud Platform, including Google App Engine, Google Compute Engine, Google Kubernetes Engine, Google Cloud Storage, Google Cloud SQL, and BigQuery. You learn about important resource and policy management tools, such as the Google Cloud Resource Manager hierarchy and Google Cloud Identity and Access Management. Hands-on labs give you foundational skills for working with GCP.
-
Architecting with Google Kubernetes Engine: Foundations reviews the layout and principles of Google Cloud Platform, followed by an introduction to creating and managing software containers and an introduction to the architecture of Kubernetes.
-
Architecting with Google Kubernetes Engine: Workloads by Alex Hanna. Covers: GKE Cluster; Deployments;Jobs and Cronjobs; Cluster Scaling; Pod placement; Pod Autoscaling and Node Pools; Pod networking; Services, Ingress; Load balancing; Network security; Volumes, Stateful Sets; ConfigMaps; Secrets; Persistent Data;
LinkedIn Learning (formerly Lynda)
“Kubernetes Essential Training: Application Development” by Matt Turner (from England) is hands-on using minikube 1.9.2 and kubernetes-cli 1.18.2 on a Mac:
- Running a local cluster
- Running containers
- Viewing logs
- Remotely executing commands
- Orchestrating real-world workloads
- Batch processing with jobs and cron jobs
- Managing resource usage
- Keeping containers secure
- Advanced deployment patterns
- Analyzing traffic
- Extending Kubernetes
- DRY deployment and debugging tools
- The class has quizzes and covers 3rd-party tools such as Helm, Kustomize, kubectl sniff (WireShark), Skaffold, telepresence.
Learning Kubernetes (on a Mac) by Karthik Gaekwad (when he was at Oracle) references files in https://github.com/karthequian/Kubernetes/blob/master/CourseHandout.md.
“DevOps Foundations: Transforming the Enterprise Transforming your organization” by Mirco Hering, Global DevOps Practice Lead at Accenture
LinuxAcademy
The CKAD Troubleshooting class is highly recommended.
Udemy
“Learn Kubernetes” provides a tutorial on yaml.
Udemy.com has a CKAD course with Tests updated 09/2020 with 9.5 hours of video. It includes 30-minute lightning rounds to practice the stress of taking the exam. Surviging this gives you confidence.
“Docker and Kubernetes: The Complete Guide” by Stephen Grider. Diagrams for the 21h video uses draw.io accessing https://github.com/StephenGrider/DockerCasts/tree/master/diagrams
Others on CKAD:
-
[1] Alta3 Research’s Playlist includes VIDEO [11:02] : How to CRUSH the CKAD Exam! Jul 27, 2020 shows sample quetions and suggestions to each of 19 objectives.
-
VIDEO: CKAD Certification Exam Tips by Cloud and Beyond shows commands that threw him off:
kubectl set image deployment/nginx nginx=nginx:191
To set autocomplete with alias to Kubernetes:
alias k=kubectl
 complete -F __start_kubectl k
- VIDEO: How to pass the Certified Kubernetes Application Developer (CKAD) exam by Santiago Alejandro Agüero
- “How I passed the CKA Exam” by Krystian Nowaczyk (who maintains github.com/ramitsurana/awesome-kubernetes) provides a list of resources he used.
Tips from Tips on preparing for CKAD by Muralidaran Shanmugham
- Kubernetes Tutorial for Beginners [Full Course in 4 Hours] Nov 6, 2020 (using k8s v1.17.0) by TechWorld with Nana
K21Academy
https://k21academy.com/docker-kubernetes/certified-kubernetes-security-specialist-cks-step-by-step-activity-guide-hands-on-lab/ is normally $997, with a 60 day money-back guarantee.
Others on CKA:
- “How to ace the CKA exam in 7 days is click-bait?
- Certified Kubernetes Application Developer (CKAD) Cert Prep: Exam Tips by Benjamin Muschko
https://cloud.google.com/kubernetes-engine/docs/concepts/verticalpodautoscaler
Rockstars
https://echoglobal.tech/technologies/kubernetes/
Brendan Burns (interview), co-founder of the Kubernetes project and one of its original architects. Now VP Azure at Microsoft.
- https://github.com/jbeda
- Heptio (acquired by VMWare 2018) with Craig McLuckie
- https://github.com/craigmcl Stephen Augustus
- https://github.com/justaugustus
- Heptio
- https://ifup.org/
- https://github.com/philips
Liz Rice (Cillium eBPF)
- https://github.com/lizrice
- kOps, the “kubectl for clusters”
- https://github.com/justinsb
Janet Kuo from Taiwan
- SIG Apps
- https://github.com/janetkuo
- 2024 CNCF “Top Committer”
- https://github.com/thockin
- Kubernetes Resource Model
- https://github.com/bgrant0607
- https://github.com/smarterclayton
- CoreWeave
- https://github.com/michelleN
- Helm
- VMWare
- https://github.com/nikhita
- Principal Engineer at AWS
- https://github.com/dims
- “Mastering Kubernetes Labels and Selectors”
- https://github.com/saad-ali
Shon Lev-Ran (who lives in Tel Aviv) Kubernetes resources under the hood series: Part 1 Part 2 Part 3
Tutorials for sale
https://learnk8s.io/academy has a library of written materials for $499.
Fun facts
NOTE: The Container Host Interface is NOT a common standard.
https://csrc.nist.gov/CSRC/media/Presentations/dod-enterprise-devsecops-initiative/images-media/DoD%20Enterprise%20DevSecOps%20Initiative%20%20v2.5.pdf
References
Demo of Fairwinds Insights dashboard Trivy, Goldilocks to suggest CPU settings for “right sizing”.
VIDEO: AWS EKS vs Azure AKS vs Google GKE by Tung Nguyen, CEO of BoltOps
VIDEO: GKE Autopilot - Fully Managed Kubernetes Service From Google Dec 13, 2021
https://tech.ebayinc.com/engineering/how-ebay-leverages-kubernetes-helm-charts-and-jenkins-pipelines-to-deliver-high-quality-software/
STAR: “Understanding Kubernetes in a visual way” 20-part series by Aurélie Vache, in French with English subtitles. Like the French film Amelie, well worth the effort.
https://www.youtube.com/watch?v=oC0UZ-pms9o&list=RDCMUCBdfli20jrAscmR9COL35qg&start_radio=1&rv=oC0UZ-pms9o
Cloud with Raj
https://medium.com/@mengkiatlim/how-to-add-ssl-to-your-services-k8s-704a6d2d5fd8
OReilly video class: Kubernetes Observability and Monitoring by Vallard Benincosa, with https://github.com/vallard/K8sClass shows a Slack sign-up app referencing Secrets Manager.
Book: Kubernetes Security and Observability October 2021 by Brendan Creane and Amit Gupta
Packt Book: Kubernetes in Production Best Practices March 2021 by Aly Saleh and Murat Karslioglu
OReilly Book: Zero Trust Architecture in Kubernetes November 2022 by Kim Crawley
100 days of Kubernetes, starting as a newbie.
https://medium.com/@rupeshthakur/logging-guide-in-kubernetes-4293e3748038
https://blog.devops.dev/kubernetes-complete-reference-badbc2ed9834
Cloud Native IT being responsible by GitOps, compared against who are responsible the Shared Responsiblity Model – Lachlan White (@LachieWhite7)
For $29/month, https://www.educative.io/path/devops-for-developers is a 50-hour video course “DevOps for Developers” with quizzes and hands-on labs covering:
- Network Fundamentals
- Git and GitHub
- Docker for Developers
- Docker Compose for Developers
- A Practical Guide to Kubernetes
- Kubernetes Monitoring, Logging and Auto-Scaling
- Jenkins X with Kubernetes
- Kubernetes Chaos Engineering
- Terraform: From Beginner to Master with Examples in AWS
- Ansible
The course was created by Ian Miell (from Oxford) and Arnaud Weil (from France).
Sample apps
TODO: Create automation to install and run these apps under load to see breaking points reached and alerts generated.
https://docs.aws.amazon.com/eks/latest/userguide/sample-deployment.html deploys a eks-sample-linux-service.yaml with a LoadBalancer service type.
https://github.com/kubernetes/examples from the Kubernetes team has examples written in Go, Redis, guestbook WordPress/SQL using Persistent Volumes with Claim, and Cassandra using Daemon Set, Stateful Set, Replication Controller.
- https://kubernetes.io/docs/tutorials/stateless-application/guestbook/
https://github.com/digitalocean/kubernetes-sample-apps
- The bookinfo-example from Istio app has Java reviews, Node ratings, Ruby details.
- doks-example - plication (workload) to a fresh DOKS cluster.
- emojivoto-example - Deploy the Emojivoto sample application.
- game-2048-example - Build and deploy the 2048 game application.
- podinfo-example - Deploy the Podinfo sample application.
For a VMware demo app, William Lamb suggests Yelb (Yet Another Sample App) as a simple app consisting of a UI Frontend, Application Server, Database Server, and Caching Service using Redis.
Discussion: https://www.reddit.com/r/kubernetes/comments/j181tq/anyone_know_of_a_good_demo_app_for_kubernetes/ states the criteria:
1) scalable
2) demonstrate dependencies or sidecar containers
3) demonstrate shared state across replicas
https://cloudsecdocs.com/containers/kubernetes/usage/sample_apps/ provides a series of YAML references with canonical and as-simple-as-possible demonstrations of kubernetes functionality and features.
- https://github.com/ContainerSolutions/kubernetes-examples/
- https://k8s-examples.container-solutions.com/
Weave Works https://www.weave.works/blog/deploying-an-application-on-kubernetes-from-a-to-z
https://github.com/hajowieland/terraform-kubernetes-multi-cloud described at https://napo.io/posts/terraform-kubernetes-multi-cloud-ack-aks-dok-eks-gke-oke/
Sebastien Goasguen (@sebgoa), author of “Kubernetes Cookbook” and “Docker Cookbook” at https://github.com/sebgoa/oreilly-kubernetes
https://www.youtube.com/watch?v=dk2-_DbWb80 Setup Prometheus & Grafana Monitoring On Kubernetes Using Helm by Thetips4you
https://www.youtube.com/watch?v=mLPg49b33sA Prometheus Monitoring - Steps to monitor third-party apps using Prometheus Exporter | Part 2 by TechWorld with Nana
https://falco.org/docs/getting-started/installation/ Falco is a rule-based IDF for privileged containers. It’s a CNCF project.
https://grafana.com/grafana/dashboards/16695-kubernetes-event-monitoring/ https://grafana.com/grafana/dashboards/8171-kubernetes-nodes/
https://grafana.com/grafana/dashboards/16839-kubernetes-cluster-resource-summary/ This dashboard will help you on maintaining a good TCO (Total Cost of Ownership) for your K8s cluster. You can analyse the overall resources usage Vs request and you can tweak the application resources accordingly. Currently the tables created are more focusing on the requests configured and its usages against the cluster resources. If the AVG request usage percentage is very less, your cluster is over provisioned. You need to tweak the resource request of your applications accordingly. This will help you to reduce the cost of your infrastructure.
This dashboard will help you on maintaining a good TCO (Total Cost of Ownership) for your K8s cluster. You can analyse the overall resources usage Vs request and you can tweak the application resources accordingly.
Currently the tables created are more focusing on the requests configured and its usages against the cluster resources.
If the AVG request usage percentage is very less, your cluster is over provisioned. You need to tweak the resource request of your applications accordingly. This will help you to reduce the cost of your infrastructure.
The panels uses recording rules which come by default with the Prometheus operator. You can see it by editing the panels.
https://github.com/dstamen/Kubernetes with demo-applications minio and wordpress using vagrant by David Stamen
https://github.com/iximiuz awesome go repos for container debugging, query & parse logs as time series, labs.iximiuz.com by Ivan Velichko
More on DevOps
This is one of a series on DevOps:
- DevOps_2.0
- ci-cd (Continuous Integration and Continuous Delivery)
- User Stories for DevOps
- Git and GitHub vs File Archival
- Git Commands and Statuses
- Git Commit, Tag, Push
- Git Utilities
- Data Security GitHub
- GitHub API
- Choices for DevOps Technologies
- Pulumi Infrastructure as Code (IaC)
- Java DevOps Workflow
- AWS DevOps (CodeCommit, CodePipeline, CodeDeploy)
- AWS server deployment options
- Cloud services comparisons (across vendors)
- Cloud regions (across vendors)
- Azure Cloud Onramp (Subscriptions, Portal GUI, CLI)
- Azure Certifications
- Azure Cloud Powershell
- Bash Windows using Microsoft’s WSL (Windows Subsystem for Linux)
- Azure Networking
- Azure Storage
- Azure Compute
- Digital Ocean
- Packer automation to build Vagrant images
- Terraform multi-cloud provisioning automation
-
Hashicorp Vault and Consul to generate and hold secrets
- Powershell Ecosystem
- Powershell on MacOS
- Jenkins Server Setup
- Jenkins Plug-ins
- Jenkins Freestyle jobs
- Docker (Glossary, Ecosystem, Certification)
- Make Makefile for Docker
- Docker Setup and run Bash shell script
- Bash coding
- Docker Setup
- Dockerize apps
- Ansible
- Kubernetes Operators
- Threat Modeling
- API Management Microsoft
- Scenarios for load
- Chaos Engineering