

Enterprise-grade secure Zero-Trust routing to replace East-West load-balancing using service names rather than static IP addresses. Enhance Service Mesh with mTLS and health-based APIs in AWS, Azure, GCP, and other clouds running Kubernetes as well as ECS, EKS, VMs, databases, even mainframes outside Kubernetes
![]()
![]()
![]()
![]()
![]()
![]()
![]()
![]()
![]()
![]()
![]()
![]()
![]()
Overview
- Most Popular Websites about Consul
- Why Consul?
- Due to Microservices
- 4 pillars and 6 principles of modern app design
- Legacy networking infrastructure mismatches
- Legacy mismatches solved by Consul Editions
- Security Frameworks
- Mitigation Actions
- BOOK: Consul: Up and Running
- Ways to setup Consul with demo infra
- Demo apps
- Certification exam
- B. On HashiCorp’s Consul Cloud SaaS HCP (HashiCorp Cloud Platform)
- The Automated Way
- Create resources within AWS
- CTS for NIA
- Hashicorp Cloud Account
- Store secrets
- (optional) Configure kubectl
- Create a HashiCorp Virtual Network (HVN)
- Peer HVN to a AWS VPC
- Create a HCP Consul cluster
- Enable a public or private IP
- Configure L3 routing and security ???
- Configure Consul ACL Controller
- Run Consul clients within the provisioned AWS VPC
- Run a demo application on the chosen AWS runtime
- Destroy Consul
- Service Discovery Workflow
- C. On a macOS laptop using Docker
- Consul CLI commands
- Consul Keyboard shortcuts
- Raft configuration
- serf_lan and serf_wan
- Chaos Engineering
- Service Graph Intentions
- Services
- (Consul) Nodes (Health Checks)
- ACL (Access Control List) Operations
- D. In a single datacenter (with Kubernetes)
- Kubernetes with Consul
- Sidecar proxy injection
- Service Discovery Registry DNS Queries
- Assist or Replaces Kubernetes
- D. In a single datacenter using Kubernetes
- E. In a single 6-node datacenter (survive loss of an Availability Zone)
- F. For HA on multiple datacenters federated over WAN
- Enterprise configuration
- Manage from another Terminal
- Consul Tutorials from HashiCorp
- G. Integrations to legacy VMs, mainframes, etc.
- Customize HTTP Response Headers
- Collaborations
- Competitors
- References
- References
- HashiCorp Corporate Social
Consul is “a multi-cloud service networking platform to connect and secure any service across any runtime platform and public or private cloud”.**
NOTE: Content here are my personal opinions, and not intended to represent any employer (past or present). “PROTIP:” here highlight information I haven’t seen elsewhere on the internet because it is hard-won, little-know but significant facts based on my personal research and experience.
This is not a replacement for you going through professionally developed trainings.
This takes a deep dive bottom-up hands-on appraoch to usage in production. So automation (shell scripts) are used to minimize you typing and clicking (which is not repeatable and error-prone). But rather than throwing a bunch of buzzwords for you to memorize, commentary logically sequenced to introduce concepts in the context of what you just typed. All without sales generalizations. All in this one single big page for easy search.
Most Popular Websites about Consul
The most popular websites about Consul:
-
The marketing home page for HashiCorp’s Consul:
https://www.consul.io/ -
Wikipedia entry:
https://www.wikiwand.com/en/Consul_(software)“Consul was initially released in 2014 as a service discovery platform. In addition to service discovery, it now provides a full-featured service mesh for secure service segmentation across any cloud or runtime environment, and distributed key-value storage for application configuration. Registered services and nodes can be queried using a DNS interface or an HTTP interface.[1] Envoy proxy provides security, observability, and resilience for all application traffic.”
-
Live classes on HashiCorp’s Enterprise Academy:
https://events.hashicorp.com/hashicorp-enterprise-academy -
Source code:
https://github.com/hashicorp/consulInitiated in 2014, this repo has garnered nearly 25,000 stars, with over a million downloads monthly. It’s 1.5K bytes after git clone … -depth 1 (just the latest main branch contents)
-
Detailed technical documentation:
https://www.consul.io/docs -
Tutorials from HashiCorp:
https://learn.hashicorp.com/consulhttps://learn.hashicorp.com/tutorials/consul/service-mesh
-
Hands-on tutorials:
https://play.instruqt.com/hashicorp?query=Consul -
Specifications:
https://cloud.hashicorp.com/docs/consul/specifications -
Technical Discussions:
https://discuss.hashicorp.com/c/consul/29 -
Stackoverflow has highly technical questions & answers:
https://stackoverflow.com/search?q=%23hashicorp-consul -
Reddit:
https://www.reddit.com/search/?q=hashicorp%20consul -
Licensed Support from HashiCorp is conducted using those authorized to access HashiCorp’s ZenDesk system:
https://hashicorp.zendesk.com/agent/dashboard
Why Consul?
There are several compelling uses for HashiCorp Consul.
Fundamentally, Consul secures networking between microservices based on “Zero Trust” principles.
Consul overcomes several deficiencies in Kubernetes.
The most compelling use of Consul is for those who have installed a Service Mesh. Adding Consul as an additional sidecar to Envoy provides the enterprise a multi-DC, hybrid-cloud, multi-cloud global mesh.
Consul’;’s “Secure Service Networking” provides Enterprise-scale features and support needed by complex Global 2000 - multi-cloud, hybrid-cloud, multi-platform global mesh
Generic benefits from adoption of Consul and just about anything else:
- Faster Time to Market and velocity of getting things done from less manual mistakes
- Reduce cost via tools (operational efficiency through more visibility and automation)
- Reduce cost via people from improved availability (uptime)
- Reduce risk of downtime from better reliability
- Reduce risk of breach from better guardrails (using Sentinel & OPA)
- Compliance with regulatory demands (central source of truth, immutable, automated processes)
Technical words that describe what Consul can do (listed at https://www.consul.io/):
- Consul on Kubernetes
- Control access with Consul API Gateway
- Discover Services with Consul
- Enforce Zero Trust Networking with Consul
- Load Balancing with Consul
- Manage Traffic with Consul
- Multi-Platform Service Mesh with Consul
- Network Infrastructure Automation with Consul
- Observability with Consul
Due to Microservices
Consul provides a “backbone” for a microservice architecture.
In hopes of building more reliable systems in the cloud faster and cheaper, enterprises create distributed microservices instead of monolithic architectures (which are more difficult to evolve).
“Microservices is the most popular architectural approach today. It’s extremely effective. It’s the approach used by many of the most successful companies in the world, particularly the big web companies.” –Dave Farley
Microservices is based on development of separate programs providing services. Each program can move and scale independently of other programs, existing in an ephemeral (temporary) way. Because dev teams won’t have the same “hard-coded” dependencies in monolithic approaches, there is less need to wait for teams to finish work at the same time. This increases agility and greater operational efficiency.
4 pillars and 6 principles of modern app design
from Libby Meren, Senior Manager for OSS Evangelism, NGINX at F5.
Here are nuances of attributes of ‘modern apps’ crucial to respond to the intense pressure of spinning up additional compute infrastructure quickly to meet unexpected demand: four pillars: scalability, portability, resiliency, and agility.
-
Pillar 1: Scalability
Fast scaling - increase an application’s capacity by 100% within five minutes. Can the application expand quickly capacity to meet unforeseen increases in demand?
Long scaling - increase an application’s capacity 10x over a year or more, without requiring a major refactoring of code or large shifts in infrastructure requirements. Does the app have a clean design with loose dependencies and loose couplings to infrastructure components.
-
Pillar 2: Portability
Functional portability - app code runs inside a container without external dependencies tightly coupled to a single environment. Can core functional elements, code, and logic of an application remain the same regardless of the environment in which it is running?
Management portability - Can the app be monitored, secured, and observed in the same way, with the same tooling and same sets of reporting capabilities, regardless of the environment?
-
Pillar 3: Resiliency
User‑facing resiliency - Do application users, either machine or human, notice a performance issue or functionality problem caused by a fault or failure of either a modern app itself or any service or infrastructure it depends on? Or do failures cascade, impacting even automated services and highly dependent microservices?
Failover resiliency - A modern app is able to restore within five minutes any critical service to 100 percent of what is necessary to handle average workloads. Designers should think about failing over to unaffected compute resources as a key part of application design and one that is implicit in self‑healing, and environmentally aware.
-
Pillar 4: Agility
Code agility - Is the app’s code designed to constantly absorb new code? To enforce loose coupling and reduce intra‑application code dependencies and rigidity, applications are composed of microservices and linked via APIs.
Infrastructure agility - Can the app’s infrastructure be spun up or down to satisfy the needs of all customers including application development teams, security teams, and DevOps teams?
The six principles of modern apps most modern apps employ architectures following these six principles:
-
Be platform agnostic - Build applications to run without any consideration of the platforms or environments where it is likely to run containers have become the de-facto standard for platform‑agnostic runtimes.
-
Prioritize open source software - So that developers can “look under the hood of the code” in order to design for portability and scalability.
-
Define everything (possible) by code - To move at faster-than-human speed to make changes and approvals.
-
Design with automated CI/CD as a native/default state - for complete and quick code pushes, infrastructure deployment, and security requirements.
-
Practice secure development - “shift left” to test all code as early as possible in the development process using software composition analysis (SCA), static application security testing (SAST), dynamic code analysis (DCA), and formatting checkers.
-
Widely distribute storage and infrastructure. Replicating storage and compute across multiple zones or clouds or hybrid deployments can ensure greater resiliency and scalability.
Legacy networking infrastructure mismatches
However, each new paradigm comes with new problems.
Implementation of microservices within legacy infrastructure and “fortress with a moat” mindset (rather than “Zero Trust” and other security principles) creates these concerns:
A. When traffic is routed based on static IP addresses, traffic is sent blindly without identity authentication (a violation of “Zero Trust” mandates).
B. Traffic routing mechanisms (such as IPTables) were designed to manage external traffic, not traffic internally between services.
C. Mechanisms intended to secure external traffic (such as IPTables) are usually owned and managed for the whole enterprise by the Networking department. So when their mechanism is drafted for use to secure internal traffic, app services developers need to spend time requesting permissions for accessing IP addresses. And Network departments now spend too much time connecting internal static IP addresses for internal communications among services when many don’t consider it part of their job.
D. Due to lack of authentication (using IP Addresses), current routing does not have mechanisms for fine-grained permission policies that limit what operation (such as Read, Write, Update, Delete, etc.) is allowed. That implements “Least Privilege” principles.
E. Also due to lack of authentication, current routing does not have the metadata to segment traffic in order to split a percentage of traffic to different targets for various types of testing.
-
DEFINITION: "Micro segmentation" is the logical division of the internal network into distinct security segments at the service/API level. Its use enables granular access control to, and visiblity of, discrete service interface points. [Reference]
The segmentation that "East-West" (internal) Load Balancers with advanced "ISO Level 7" capability (such as F5) can perform is more limited that what Consul can do with its more granualar metadata about each service.
Not only that, Load Balancers are a single point of failure. So an alternative is needed which has been architected for (lower cost) resilience and high availability to failures in individual nodes, Availability Zones, and whole Regions.
F. To mitigate the network features lacking, many developers now feel they spend too much time coding network-related communication logic into each application program (for retries, tracing, secure TLS, etc.). When different developers use different techniques for that, errors occur which are difficult to track down.
Kubernetes a partial solution
Kubernetes (largely from Google) has been popular as “orchestrator” to replace instances of pods (holding Containers) when any of them go offline.
However, core Kubernetes defaults currently has these deficiencies:
G. Kubernetes does not check if a service is healthy before trying to communicate with it. This leads to the need for coding of applications to perform time-outs, which is a distraction and usually not a skill by most business application coders.
H. Kubernetes does not encrypt communications between services.
I. Kubernetes does not provide a way to communicate with components and cloud services outside Kubernetes such as databases, ECS, other EKS clusters, Serverless, Observability platforms, etc. Thus, Kubernetes by default does not by itself enable deep transaction tracing.
J. Kubernetes is currently not mature when it comes to automatically adding more pods (to scale up) or removing pods (to scale down).
References:
Legacy mismatches solved by Consul Editions
Consul provides a mechanism for connecting dynamic microservices with legacy networking infrastructure.
The list below send you to how each edition of Consul solves the mismatches described above.
- Paid Enterprise for self-installed/managed on-prem or in private clouds
- SaaS in the HCP (HashiCorp Platform) in the HashiCorp-managed cloud
A common explanation of what Consul does references three technical categories:
“Consul is a datacenter runtime that provides 1) service discovery, 2) network segmentation, and 3) orchestration.”
This is explained here.
Consul Concepts in UI Menu
PROTIP: Here are Agile-style stories requesting use of HashiCorp Consul (written by me):
The Consul Enterprise edition menu can serve as a list of concepts about Consul:
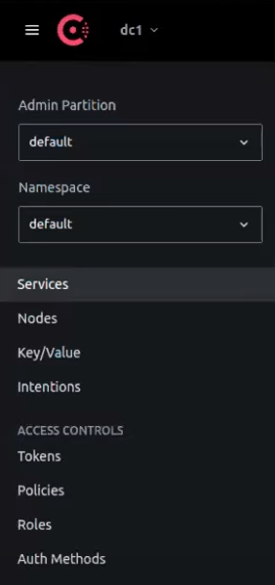 “dc1” is the name of a Consul “datacenter” – a cluster of Consul servers within a single region.
Multiple “Admin Partitions” and “Namespaces” are Consul Enterprise features.
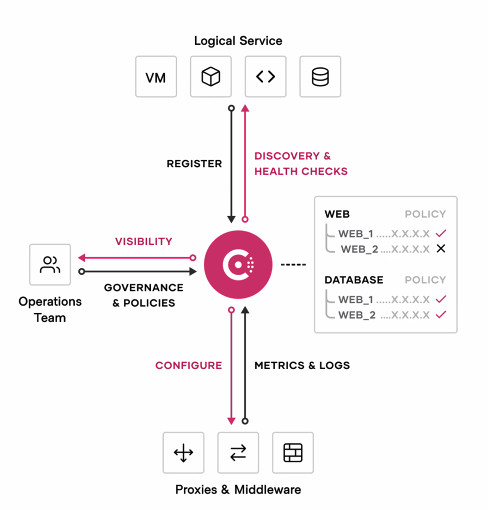
Consul manages applications made available as Services on the network.
Nodes are Consul servers which manage network traffic. They can be installed separately from application infrastructure.
-
Rather than A. blindly routing traffic based on IP addresses, which have no basis for authentication (a violation of “Zero Trust” mandates), Consul routes traffic based on named entities (such as “C can talk to A” or “C cannot talk to A.”).
Consul Enterprise can authenticate using several Authentication Methods
-
Rather than B. routing based on IPTables designed to manage external traffic, Consul routes from its list of “Intentions” which define which other entities each entity (name) can access.
Consul does an authentication hand-shake with each service before sending it data. A rogue service cannot pretend to be another legitimate service unless it holds a legitimate encryption certificate assigned by Consul. And each certificate expires, which Consul works to rotate.
-
Rather than C. manually creating a ticket for manual action by Networking people connecting internal static IP addresses, Consul discovers the network metadata (such as IP addresses) of each application service when it comes online, based on the configuration defined for each service. This also means that Network people would spend less time for internal communications, freeing them up for analysis, debugging, and other tasks.
Roles and Policies
-
Consul’s Key/Value store holds a “service registry” containing ACL (Access Control List) policy entries which define what operations (such as Read, Write, Update, Delete, etc.) is allowed or denied for each role assigned to each named entity. This adds fine-grained security functionality needed for “Zero Trust”.
As Consul redirects traffic, it secures the traffic by generating certificates used to encrypt traffic on both ends of communication, taking care of automatic key rotation hassles, too. BTW This mechanism is called “mTLS” (mutual Transport Layer Security).
-
Instead of E. requiring a Load Balancer or application coding to split a percentage of traffic to different targets for various types of testing, Consul can segment traffic based on attributes associated with each entity. This enables more sophisticated logic than what traditional Load Balancer offer.
Consul can route based on various algorithms (like F5) “Round-robin”, “Least-connections”, etc.
That means Consul can, in many cases, replace “East-West” load balancers, to remove load balancers (in front of each type of service) as a single-point-of-failure risk.
-
With Consul, instead of F. Developers spending too much time coding network communication logic in each program (for retries, tracing, secure TLS, etc.), networking can be managed by Consul and made visible in the Consul GUI.
Consul is “platform agnostic” because Consul is added as additional servers in parallel in the same infrastructure, changes usually involve configuration rather than app code changes. Thus, Consul can connect/integrate services running both on-prem servers and in clouds, inside and outside Kubernetes.
-
Within the system, obtain the health status of each app server so that traffic is routed only to healthy app services, so provide a more aware approach than load balancers blindly routing (by Round-Robin, etc.).
Partial Kubernetes Remediation using Service Mesh
References:
To overcome G. Kubernetes not checking if a service is healthy before trying to communicate, many are adding a “Service Mesh” to Kubernetes. Although several vendors offer the addition, “Service Mesh” generally means the installation of a network proxy agent (a “sidecar”) installed within each pod alongside app containers.
“Envoy” is currently the most popular Sidecar proxy. There are alternatives.

When app developers allow all communication in and out of their app through a Sidecar proxy, they can focus more on business logic rather than the intricacies of retries after network failure, traffic encryption, transaction tracing, etc.
Due to G. Kubernetes and Sidecars not encrypting communications between services, Consul is becoming a popular add-on to Kubernetes Service Mesh because it can add mTLS (use of mutual TLS certificates used to encrypt transmissions on both server and clients) without coding in application code.
Although H. Kubernetes does not check if a service is healthy before trying to communicate, Consul performs health checks and maintains the status of each service. Thus, Consul never routes traffic to known unhealthy pods. And so apps don’t need to be coded with complex timeouts and retry logic.
Although I. Kubernetes does not provide a way to communicate with components and cloud services outside Kubernetes, Consul can dynamically configure sidecars such as Envoy to dynamically route or duplicate traffic to “Observability” platforms such as Datadog, Prometheus, Splunk, New Relic, etc. who performs analytics they display on dashboards created using Grafana and other tools.
Paid Enterprise (Production) Features
Larger enterprises running in production need features for higher security, greater teamwork, and larger scalability that open-source can provide. Those additional features are provided by the Enterprise edition of Consul which is self-installed and managed by customers.
- Namespaces
- Enhanced read scalability
- Network segments
- Redundancy zone
- Advanced federation for complex network topologies
- Automated backups
- Automated upgrades
- Audit Logging
- SSO Support
- Multi-Tenancy with Admin Partitions
Below are more details.
A. Authenticate using a variety of methods. In addition to ACL Tokens, use enteprise-level identity providers (such as Okta and GitHub, Kuberos with Windows, etc.) for SSO (Single Sign On) based on indentity information maintained in email and other systems, so that additions, modifications, and deletions of emails get quickly reflected in Consul. Such immediacy is important to minimize the time when credentials are stale and thus available for compromise.
B. Automatic Upgrades (“Autopilot” feature) of a whole set of nodes at once – this avoids the need for manual effort and elimination of times when different versions exist at the same time.
C. Enhanced Audit logging – to better understand access and API usage patterns. A full set of audit logs makes Consul a fully enterprise-worthy utility.
D. Policy enforcement using Sentinel extend the ACL system in Consul beyond the static “read”, “write”, and “deny” policies to support full conditional logic during writes to the KV store. Also integrates with external systems. For example:
- when ACL processing is disabled, the SOC team is alerted.
- When the consul agent is set to bind with all IP addresses on the open internet, a warning is issued.
E. Enable Multi-Tenancy of tenants enabled using “Admin Partitions” as “Namespaces” to segment data into separate different teams within a single Consul datacenter, a key “Zero Trust” principal to diminish the “blast radius” from potential compromise of credentials to a specific partition.
- https://learn.hashicorp.com/tutorials/consul/amazon-ecs-admin-partitions
- Consul on ECS & Admin Partitions Learn Guide
F. Consul can take automatic action when its metadata changes, such as notifying apps and firewalls, to keep security rules current (using NIA CTS).
-
The "consul-terraform-sync" (CTS) module broadcast changes recognized which can be used to update Terraform code dynamically for automatic resources reconfiguration -- This decreases the possibility of human error in manually editing configuration files and decreases time to propagate configuration changes to networks.
G. Better Resilency from scheduled Backups of Consul state to snapshot files – this makes backups happen without needing to remember to take manual effort.
H. Consul is designed for additional Consul servers to be added to a Consul Cluster to achieve enterprise-scale scalability. The performance scaling mechanism involves adding “Redundancy Zones” which only read metadata (as “non-voting” nodes).
- Large enterprises have up to 4,000 microservices running at the same time.
- “Performance begins to degrade after 7 voting nodes due to server-to-server Raft protocol traffic, which is expensive on the network.”
- Global Consul Scale Benchmark tests (below) proved Consul’s enterprise scalability.
I. Consul Service Mesh (also called Enterprise “Consul Connect”) enables a Kubernetes cluster to securely communicate with services outside itself. Connect enables communication between a Sidecar proxy in Kubernetes to reach an API Gateway (which acts like a K8s Sidecar proxy) surrounding stand-alone databases, ECS, VMs, Severless, even across different clouds.
-
As with HashiCorp's Terraform, because the format of infrastructure configuration across multiple clouds (AWS, Azure, GCP, etc.) are similar in Consul, the learning necessary for people to work on different clouds is reduced, which yields faster implementations in case of mergers and acquisitions which require multiple cloud platforms to be integrated quickly. VIDEO
J. Consul can be setup for Disaster Recovery (DR) from failure to an entire cloud Region. Consul has a mechanism called “WAN Federation” which distributes service metadata across regions to enable multi-region capability. Alternately, use

-
Fail-over to a whole Region is typically setup to involve manual intervention by the SOC (Security Operations Center).
Use of Consul Service Mesh with Health Checks enables automated failover.
Multi-region redundancy using complex Network Topologies between Consul datacenters (with "pairwise federation") -- this provides the basis for disaster recovery in case an entire region disappears.
References:
- VIDEO: “Consul and Complex Networks”
- https://hashicorp-services.github.io/enablement-consul-slides/markdown/architecture/#1
- Consul’s network coordinate subsystem
Security Frameworks
This section provides more context and detail about security features of Consul.
There are several frameworks which security professionals use to organize controls they install to prevent ransomware, data leaks, and other potential security catatrophes. Here are the most well-known:
- Well-Architected Framework
- “Zero Trust” in CIA
- “Kill Chain”
- ATT&CK Enterprise Framework
- SOC2/ISO 27000 attestations
PROTIP: Within the description of each framework, links are provided here to specific features which Consul provides (as Security Mitigations).
Well-Architected Framework (WAF)
A “Well-Architected Framework” is referenced by all major cloud providers.
- https://wa.aws.amazon.com/wat.pillar.security.en.html
Security professionals refer to the “CIA Triad” for security:
- Confidentiality by limiting access
- Integrity of data that is trustworthy
- Availability for reliable access
Zero-trust applies to those three:

-
Identity-driven authentication (by requester name instead of by IP address)
-
Mutually authenticated – both server and client use a cryptographic certificate to
-
Encrypt for transit and at rest (baked into app lifecycle via CI/CD automation)
-
Each request is time-bounded (instead of long-lived static secrets to be hacked)
-
Audited & Logged (for SOC to do forensics)
References:
- VIDEO: “The six pillars of Zero Trust”
- US NIST SP 800-207 defines “Zero Trust Architecture” (ZTA) at PDF: https://nvlpubs.nist.gov/nistpubs/SpecialPublications/NIST.SP.800-207.pdf (50 pages)
- INSTRUQT Consul: Zero Trust Networking with Service Mesh”
The “Kill Chain” (created by Lockheed-Martin) organizes security work into the 9 stages how malicious actors work.
Specific tools and techniques that adversaries use (on specific platforms) are organized within PDF: 14 goals in the “ATT&CK” Enterprise Matrix lifecycle from Mitre Corporation (a US defense think-tank) in 2013.
A comparison between the above:
| Kill Chain | Mitre ATT&CK | Mitigations |
|---|---|---|
| 1. Reconnaissance (harvesting) |
Reconnaissance, Resource Development | Authentication |
| 2. Weponization (exploit of backdoor into a deliverable payload) |
Initial Access, Execution | mTLS |
| 3. Delivery (into victim) |
Persistence, Privilege Escalation | Audit logs & Alerts |
| 4. Exploitation (of vulnerability) | Defense Evasion (Access Token Manipulation) | ACL |
| 5. Installation (of malware) |
Credential Access, Discovery (System Network Connections Discovery), Lateral Movement (Exploitation of Remote Services, Remote Service Session Hijacking ), Collection (Man-in-the-Middle) | Authorization |
| 6. Command and Control (remote manipulation) | Command and Control (Application Layer Protocol, Web Service, Dynamic Resolution) | Segmentation |
| 7. Actions on Objectives |
Exfiltration, Impact | DLP (Data Loss Prevention) |
Mitigation Actions
Part of a Cloud Operating Model suite
Consul is part of the HashiCorp “Cloud Operating Model” product line which provides modern mechanisms for better security and efficiency in access and communication processes:

These products are collectively referred to as “HashiStack”.
Consul, Vault, and Boundary together provides the technologies and workflows to achieve SOC2/ISO27000 and “Zero Trust” mandates in commercial enterprises and within the U.S. federal government and its suppliers.
References:
- VIDEO Microservices with Terraform, Consul, and Vault
Zero Trust Maturity Model
HashiCorp’s HashiStack is used by many enterprises to transition from “Traditional” to “Optimal”, as detailed by the US CISA “Zero Trust Maturity Model”:
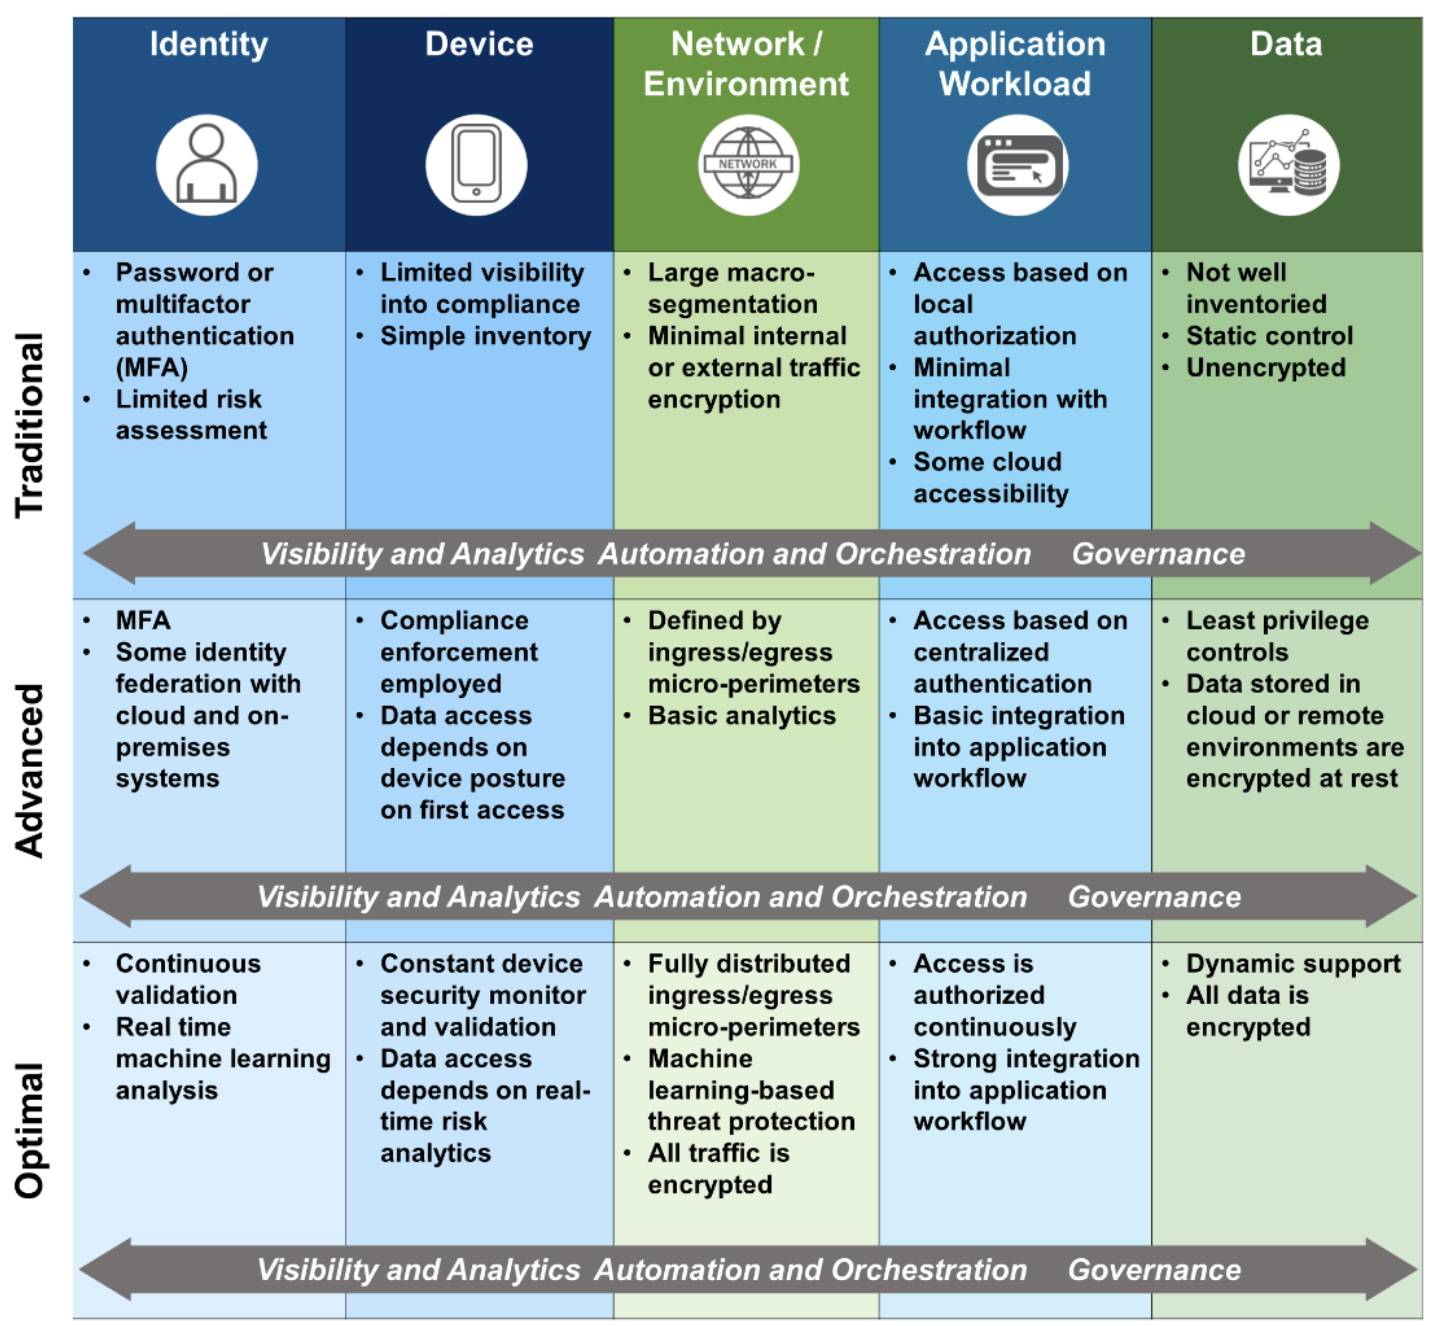
Categories of “Defense in Depth” techniques listed in PDF: Mitre’s map of defense to data sources:
- Password Policies
- Active Directory Configuration
- User Account Control
- Update Software
- Limit Access to Resources Over Network
- Audit (Logging)
- Operating System Configuration
- User Account Management
- Execution Prevention
- Privileged Account Management
- Disable or Remove Feature or Program
- Code Signing
- Exploit Protection
- Application Isolation and Sandboxing
- Antivirus/Antimalware
- Filter Network Traffic
- Network Segmentation
- User Training
- SSL/TLS Inspection
- Restrict Web-based Content
Additionally:
-
To prevent Lateral Movement (Taint Shared Content): Immutable deployments (no live patching to “cattle”)
-
IaC CI/CD Automation (processes have Security and Repeatability baked-in, less toil)
-
Change Management using source version control systems such as Git clients interacting with the GitHub cloud
BOOK: Consul: Up and Running
Canadian Luke Kysow, Principal Engineer on Consul at HashiCorp, top contributor to hashicorp/consul-k8s, wrote in his BOOK: “Consul: Up and Running”:
“A small operations team can leverage Consul to impact security, reliability, observability, and application delivery across their entire stack —- all without requiring developers to modify their underlying microservices.”
Code for the book (which you need to copy and paste into your own GitHub repo) is organized according to the book’s chapters:
- Service Mesh 101
- Introduction to Consul
- Deploying Consul within K8s (in cloud or minikube for automatic port-forwarding) and on VMs
- Adding Services to the Mesh
- Ingress Gateways
- Security
- Observability
- Reliability
- Traffic Control
- Advanced Use Cases
and Discord server for the book)
The above are used for showing Proof of Value (POV) from product/workflow adoption.
- https://www.consul.io/docs/intro
- https://learn.hashicorp.com/well-architected-framework
YouTube: “Getting into HashiCorp Consul”
VIDEO: Consul Roadmap – HashiConf Global 2021
Ways to setup Consul with demo infra
PROTIP: Become comfortable with the naming conventions used by the architecture, workflows, and automation by building several environments, in order of complexity:
By “use case” (Sales Plays):
A. There is a public demo instance of Consul online at:
https://demo.consul.io/ui/dc1/overview/server-status
B. On HashiCorp’s Consul SaaS on the HCP (HashiCorp Cloud Platform):
- QUESTION: You can use Consul this way with just a Chromebook laptop???
- Use this to learn about creating sample AWS services in a private VPC using Terraform, createing a HCP account, cloud peering connections across private networks to HVN, day-to-day workflows on https://cloud.hashicorp.com/products/consul
- On AWS or Azure
C. On a macOS laptop install to learn Consul Agent with two nodes (to see recovery of loss from a single node):
- Use automation to install the Consul agent along with other utilities needed
- Use this to learn about basic CLI commands, starting/stopping the Agent, API calls, GUI menus using a single server within a Docker image
- Follow a multi-part video series on YouTube to install and configure 5 Consul nodes in 3 Availability Zones (AZs) within a single region, with app Gateways, Sidecar monitoring
E. In a single 6-node datacenter (with Nomad) to survive loss of an Availability Zone
- Use this to learn about manual backup and recovery using Snapshots and Enterprise Snapshot Agents,
- Conduct Chaos Engineering recovering failure of one Availability Zone
- Telemetry and Capacity proving to identify when to add additional Consul nodes
F. For multiple datacenters federated over WAN
- Use this to learn about configuring the Enterprise Autopilot feature for High Availability across multiple regions (which is a major differentiator of HashiCorp Consul), Chaos Engineering.
G. Integrations between K8s Service Mesh to outside database, ECS, VMs, mainframes, etc.
- Discovery to central service registry across several Kubernetes clusters
- Use this to learn about configuring for integrating HashiCorp Consul to work with a Payment processor, integrate with load balancers that isn’t Consul-aware, and across the entire Enteprise landscape of technologies (another major differentiator of HashiCorp Consul)
Other demos:
- https://www.hashicorp.com/resources/getting-started-with-managed-service-mesh-on-aws First Beta Demo of HCP Consul Service Mesh on AWS.
Demo apps
PROTIP: Adapt the samples and naming conventions here to use your own app after achieving confidence you have the base templates working.
- VIDEO: 12-Factor Apps and the HashiStack by Kelsey Hightower (Google)
https://medium.com/hashicorp-engineering/hashicorp-vault-performance-benchmark-13d0ea7b703f
https://cloud.hashicorp.com/docs/hcp/supported-env/aws
https://github.com/pglass/202205-consul-webinar-demo
-
HashiCorp-provided demo apps included in the practice environments are defined at:
https://github.com/hashicorp-demoapp/
“Hashicups” from https://github.com/hashicorp-demoapp/hashicups-setups comes with a Go library.
-
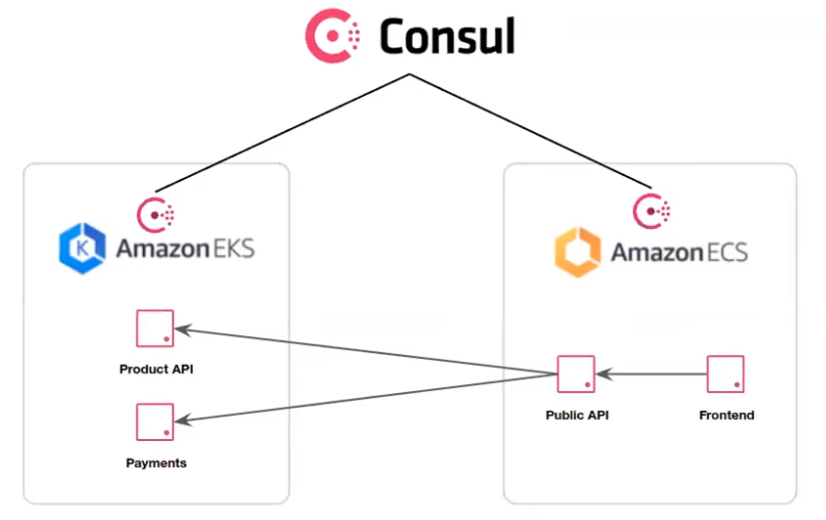
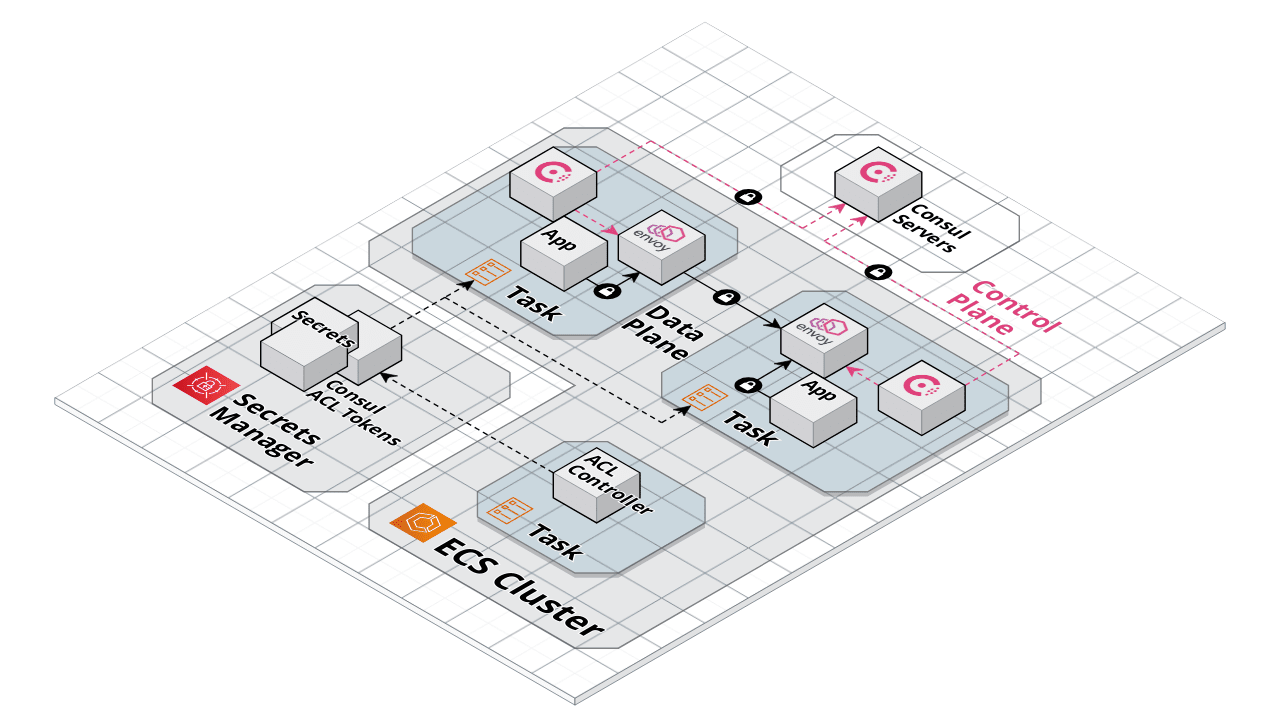
Consider the HashiCups datacenter which uses both ECS and EKS within AWS:
- Run front-end services task within a ECS (Elastic Container Service) cluster
- Run back-end services task within a EKS (Elastic Kubernetes Service) cluster
See VIDEO “Securely Modernize Application Development with Consul on AWS ECS” by Jairo Camacho (Marketing), Chris Thain, Paul Glass (Engineering)
-
Create the above environment by running Terraform ???
https://github.com/pglass/202205-consul-webinar-demo
https://github.com/hashicorp/terraform-aws-consul-ecs
-
Use HCP Consul for Service Mesh (without Kubernetes)

The Envoy proxy in Data Plane ???
Control Plane to Consul servers within HCP ???
Consul’s Layer 7 traffic management capabilities. ???
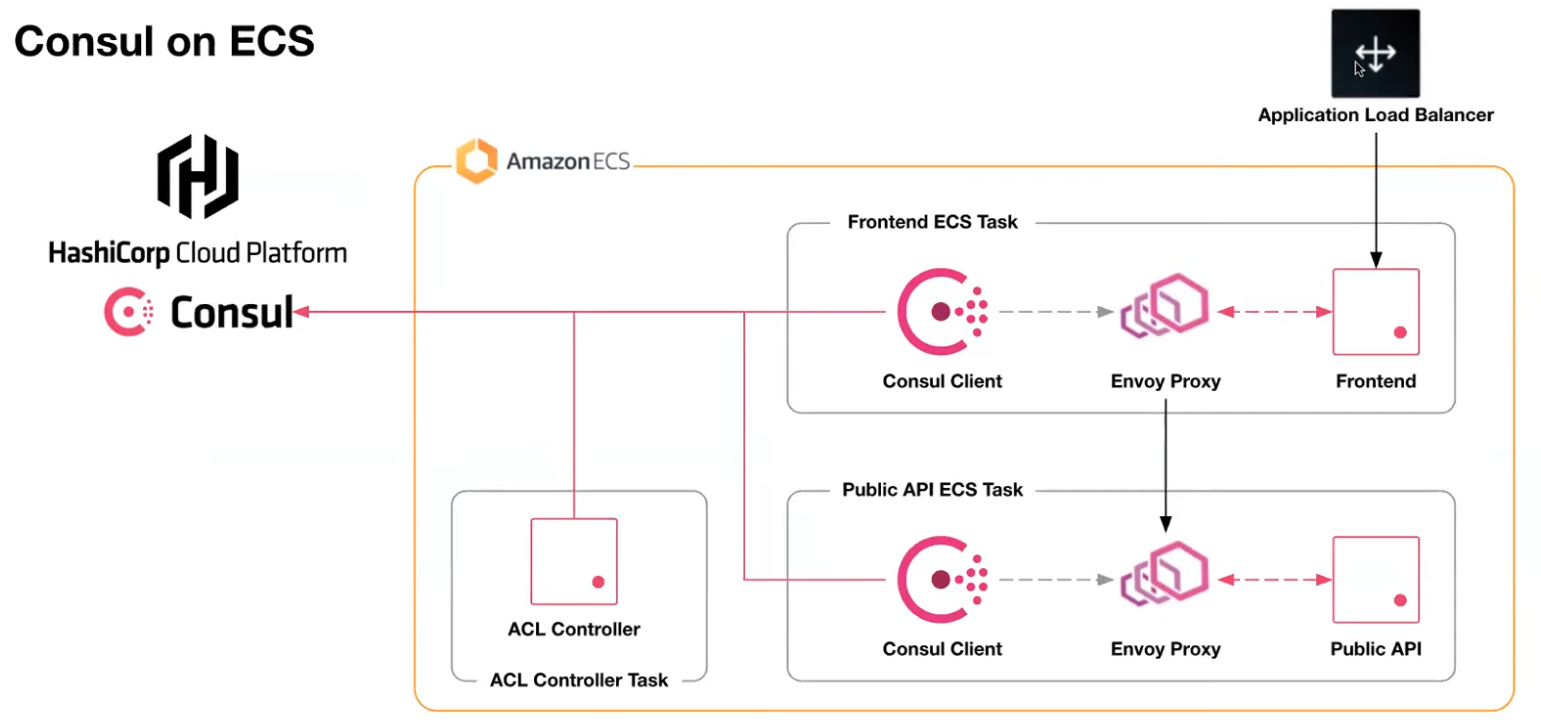
ACL Controller
The ACL (Access Control List) Controller is provided by HashiCorp for install within AWS.
To provide least-privilege access to Consul using Terraform and Vault: https://www.hashicorp.com/blog/managing-hashicorp-consul-access-control-lists-with-terraform-and-vault

Observability
REMEMBER: Enterprise editions of Consul is a different binary than OSS edition.
Terraform adds Datadog for Observability.
https://www.pagerduty.com/docs/guides/consul-integration-guide/ shows how to configure Consul-Alerts to trigger and resolve incidents in a PageDuty service. PagerDuty is an alarm aggregation and dispatching service for system administrators and support teams. It collects alerts from monitoring tools, gives an overall view of all of monitoring alarms, and alerts an on-duty engineer if there’s a problem. The Terraform Pagerduty provider is a plugin for Terraform that allows for the management of PagerDuty resources using HCL (HashiCorp Configuration Language).
Certification exam
Because this document aims to present concepts in a logic flow for learning, it has a different order than topics for the Consul Associate one-hour proctored on-line $70 exam at: https://www.hashicorp.com/certification/consul-associate
-
Explain Consul architecture
1a. Identify the components of Consul datacenter, including agents and communication protocols
1b. Prepare Consul for high availability and performance
1c. Identify Consul’s core functionality
1d. Differentiate agent roles -
Deploy a single datacenter
2a. Start and manage the Consul process
2b. Interpret a Consul agent configuration
2c. Configure Consul network addresses and ports
2d. Describe and configure agent join and leave behaviors -
Register services and use Service Discovery [BK]
3a. Interpret a service registration
3b. Differentiate ways to register a single service
3c. Interpret a ServiceConfiguration”>service configuration with health check
3d. Check the service catalog status from the output of the DNS/API interface or via the Consul UI
3e. Interpret a prepared query
3f. Use a prepared query
-
Access the Consul key/value (KV)
4a. Understand the capabilities and limitations of the KV store
4b. Interact with the KV store using both the Consul CLI and UI
4c. Monitor KV changes using watch
4d. Monitor KV changes using envconsul and consul-template -
Back up and Restore [BK]
5a. Describe the content of a snapshot 5b. Back up and restore the datacenter
5c. [Enterprise] Describe the benefits of snapshot agent features -
Use Consul Service Mesh
6a. Understand Consul Connect service mesh high-level architecture
6b. Describe configuration for registering a service proxy
6c. Describe intentions for Consul Connect service mesh
6d. Check intentions in both the Consul CLI and UI -
Secure agent communication
7a. Understanding Consul security/threat model
7b. Differentiate certificate types needed for TLS encryption
7c. Understand the different TLS encryption settings for a fully secure datacenter -
Secure services with basic access control lists (ACL)
8a. Set up and configure a basic ACL system
8b. Create policies
8c. Manage token lifecycle: multiple policies, token revoking, ACL roles, service identities
8d. Perform a CLI request using a token
8e. Perform an API request using a token -
Use Gossip encryption
9a. Understanding the Consul security/threat model
9b. Configure gossip encryption for the existing data center
9c. Manage the lifecycle of encryption keys
Bryan Krausen provides links to discount codes to his Udemy, “Getting Started with HashiCorp Consul 2022” has 8.5 hours of video recorded at Consul 1.7. It provides quizzes and a >mind-map of each topic and references https://github.com/btkrausen/hashicorp/tree/master/consul
Also from Bryan is “HashiCorp Certified: Consul Associate Practice Exam” three full exams of 57 questions each.
KodeKloud Q&A for HashiCorp Certification Courses
B. On HashiCorp’s Consul Cloud SaaS HCP (HashiCorp Cloud Platform)
- LEARN: “Create a HCP Consul cluster for an existing EKS run time”
- VIDEO: “Community Office Hours: HCP Consul with Terraform” with Daniele Carcasole (HC Ed.)
Perhaps the fastest and easiest way to begin using Consul is to use the Hashcorp-Managed HashiCorp Cloud Platform (HCP) Consul Cloud. It provides a convenient clickable Web GUI rather than the CLI/API of FOSS (free open-source software).
HCP provides a fully managed “Service Mesh as a Service (SMaaS)” Consul features not provided with the “self-managed” Enterprise edition. That means:
- Monitoring to ensure disk space, CPU, memory, etc. is already staffed
- Capacity testing to ensure configurations are made optimal by specialists
- No risk of security vulnerabilities introduced by inexperienced personnel
- Backups taken care of automatically
-
Restores performed when needed
- Rest from on-going hassles of security patches and version upgrades
- Enable limited in-house IT personnel to focus on business needs.
- Faster time to value and time to market
On the other hand, at of this writing, HCP does not have all the features of Consul Enterprise.
References about HCP Consul:
- https://github.com/hashicorp/learn-hcp-consul
- https://github.com/hashicorp/learn-terraform-multicloud-kubernetes
-
Part 12: HCP Consul [2:18:49] Mar 17, 2022
- HashiCorp’s 7 tutorials on HCP Consul:
- https://www.hashicorp.com/products/consul/service-on-azure
- announced Sep 2020
-
VIDEO: “Introduction to HashiCorp Cloud Platform (HCP): Goals and Components”
- VIDEO: “Service Mesh - Beyond the Hype”
-
hashicorp/consul-snippets Private = Collection of Consul snippets. Configuration bits, scripts, configuration, small demos, etc.
- https://github.com/hashicorp/field-workshops-consul = Slide decks and Instruqt code for Consul Workshops
- https://github.com/hashicorp/demo-consul-101 = Tutorial code and binaries for the HashiCorp Consul beginner course.
-
https://github.com/hashicorp/learn-consul-docker = Docker Compose quick starts for Consul features.
-
https://github.com/hashicorp/terraform-aws-vault A Terraform Module for how to run Consul on AWS using Terraform and Packer
-
https://github.com/hashicorp/hashicat-aws = A terraform built application for use in Hashicorp workshops
-
https://github.com/hashicorp/consul-template = Template rendering, notifier, and supervisor for @hashicorp Consul and Vault data.
-
https://github.com/hashicorp/consul-k8s = First-class support for Consul Service Mesh on Kubernetes, with binaries for download at https://releases.hashicorp.com/consul-k8s/
-
https://github.com/hashicorp/consul-replicate = Consul cross-DC KV replication daemon.
- hashicorp/learn-consul-kubernetes
-
https://github.com/hashicorp/learn-consul-service-mesh
-
https://github.com/hashicorp/consul-demo-traffic-splitting = Example application using Docker Compose to demonstrate Consul Service Mesh Traffic Splitting
-
hashicorp/consul-esm = External service monitoring for Consul
- https://github.com/hashicorp/terraform-aws-consul-starter = A Terraform module for creating an OSS Consul cluster as described by the HashiCorp reference architecture.
The Automated Way
- Obtain an AWS account credentials with adequate premissions
- Create an AWS VPC and associated resources to be managed by additional Consul infra
- Identify your lb_ingress_ips used in the load balancer security groups, needed to limit access to the demo app.
- Configure kubectl
- Create a HashiCorp Platform (HCP) cloud account and organization
- Store secrets in a safe way
- Create a HashiCorp Virtual Network (HVN)
- Peer the AWS VPC with the HVN
- Create a HCP Consul cluster
- Configure Consul ACL Controller
- Run Consul clients within the provisioned AWS VPC
- Destroy Consul cluster and app infra under test
Obtain AWS account credentials
-
Obtain AWS credentials (AWS_) and populate file ~/.aws/configuration or environment variables.
export AWS_ACCESS_KEY_ID=your AWS access key ID
export AWS_SECRET_ACCESS_KEY=your AWS secret access key
export AWS_SESSION_TOKEN=your AWS session token
Alternately, copy and paste credentials in the ~/.aws/credentials file that every AWS CLI command references.
BTW If you are a HashiCorp employee, they would be obtained for the “Doormat” website, which grants access to your laptop’s IP address for a limited time.
Create resources within AWS
There are several ways to setup infrastructure in a cloud datacenter managed by Consul.
Instead of performing manual steps at https://learn.hashicorp.com/tutorials/cloud/consul-deploy, this describes use of Terraform to create a non-prod HCP Consul environment to manage an ECS cluster, and various AWS services:
-
Navigate to where you download GitHub repo.
-
Do not specify –depth 1 when cloning (because we will checkout a branch):
git clone git@github.com:hashicorp/learn-consul-terraform.git
cd learn-consul-terraform
-
Before switching to a branch, get a list of the branches:
git tag
git checkout v0.5
-
Navigate to the folder within the repo:
cd datacenter-deploy-ecs-hcp
TODO: Study the Terraform specifications:
- variables.tf - Parameter definitions used to customize unique user environment attributes.
- data.tf - Data sources that allow Terraform to use information defined outside of Terraform.
- providers.tf - AWS and HCP provider definitions for Terraform.
-
outputs.tf - Unique values output after Terraform successfully completes a deployment.
- ecs-clusters.tf - AWS ECS cluster deployment resources.
- ecs-services.tf - AWS ECS service deployment resources.
- load-balancer.tf - AWS Application Load Balancer (ALB) deployment resources.
- logging.tf - AWS Cloudwatch logging configuration.
- modules.tf - AWS ECS task application definitions.
- secrets-manager.tf - AWS Secrets Manager configuration.
- security-groups - AWS Security Group port management definitions.
-
vpc.tf - AWS Virtual Private Cloud (VPC) deployment resources.
- network-peering.tf - HCP and AWS network communication configuration.
- hvn.tf - HashiCorp Virtual Network (HVN) deployment resources.
- hcp-consul.tf - HCP Consul cluster deployment resources.
See https://learn.hashicorp.com/tutorials/consul/reference-architecture for Scaling considerations.
https://learn.hashicorp.com/tutorials/consul/production-checklist?in=consul/production-deploy
-
Identify your IPv4 address (based on the Wi-Fi you’re using):
curl ipinfo.io
{ "ip": "129.222.5.194", -
terraform.tfvars.example
-
Configure Terraform variables in a .auto.tfvars (or terraform.tfvars) file with, for example:
lb_ingress_ips = "47.223.35.123"
region         = "us-east-1"
suffix         = "demo"
region - the AWS region where resources will be deployed. PROTIP: Must be one of the regions HCP suppors for HCP Consul servers.
lb_ingress_ips - Your IP. This is used in the load balancer security groups to ensure only you can access the demo application.
suffix text value AWS appends to resource names its creates. This needs to be changed in each run because, by default, secrets created by AWS Secrets Manager require 30 days before they can be deleted. If this tutorial is destroyed and recreated, a name conflict error will occur for these secrets.
-
Run using terraform init
VIDEO: Try it:
-
In the folder containing main.tf, run terraform to inititate :
terraform init
Example response:
Initializing modules... Downloading registry.terraform.io/hashicorp/consul-ecs/aws 0.2.0 for acl_controller... - acl_controller in .terraform/modules/acl_controller/modules/acl-controller Downloading registry.terraform.io/hashicorp/consul-ecs/aws 0.2.0 for example_client_app... - example_client_app in .terraform/modules/example_client_app/modules/mesh-task Downloading registry.terraform.io/hashicorp/consul-ecs/aws 0.2.0 for example_server_app... - example_server_app in .terraform/modules/example_server_app/modules/mesh-task Downloading registry.terraform.io/terraform-aws-modules/vpc/aws 2.78.0 for vpc... - vpc in .terraform/modules/vpc Initializing the backend... Initializing provider plugins... - Finding hashicorp/hcp versions matching "~> 0.14.0"... - Finding hashicorp/aws versions matching ">= 2.70.0, > 3.0.0"... - Installing hashicorp/hcp v0.14.0... - Installed hashicorp/hcp v0.14.0 (signed by HashiCorp) - Installing hashicorp/aws v4.16.0... - Installed hashicorp/aws v4.16.0 (signed by HashiCorp) Terraform has created a lock file .terraform.lock.hcl to record the provider selections it made above. Include this file in your version control repository so that Terraform can guarantee to make the same selections by default when you run "terraform init" in the future. Terraform has been successfully initialized! You may now begin working with Terraform. Try running "terraform plan" to see any changes that are required for your infrastructure. All Terraform commands should now work. If you ever set or change modules or backend configuration for Terraform, rerun this command to reinitialize your working directory. If you forget, other commands will detect it and remind you to do so if necessary. -
In the folder containing main.tf, run terraform to design:
time terraform plan
After many minutes, sample response ends with:
Apply complete! Resources: 64 added, 0 changed, 0 destroyed.

Outputs:

client_lb_address = "http://learn-hcp-example-client-app-1643813623.us-east-1.elb.amazonaws.com:9090/ui"
consul_ui_address = "https://dc1.consul.b17838e5-60d2-4e49-a43b-cef519b694a5.aws.hashicorp.cloud"
-
If Sentinel or TFSec was installed:
tfsec
-
In the folder containing main.tf, run terraform to instantiate in AWS:
time terraform apply
-
(optional) Configure kubectl
aws eks --region $(terraform output -raw region) update-kubeconfig --name $(terraform output -raw local.eks_cluster_name)
kubectl get pods -A
\
-
To access the Consul UI in HCP, print the URL and bootstrap token to access the Consul UI. The bootstrap token can be used to login to Consul.
terraform output consul_public_endpoint_url
terraform output consul_bootstrap_token
-
Access the demo application in ECS: print the URL for the demo application:
terraform output ecs_ingress_address
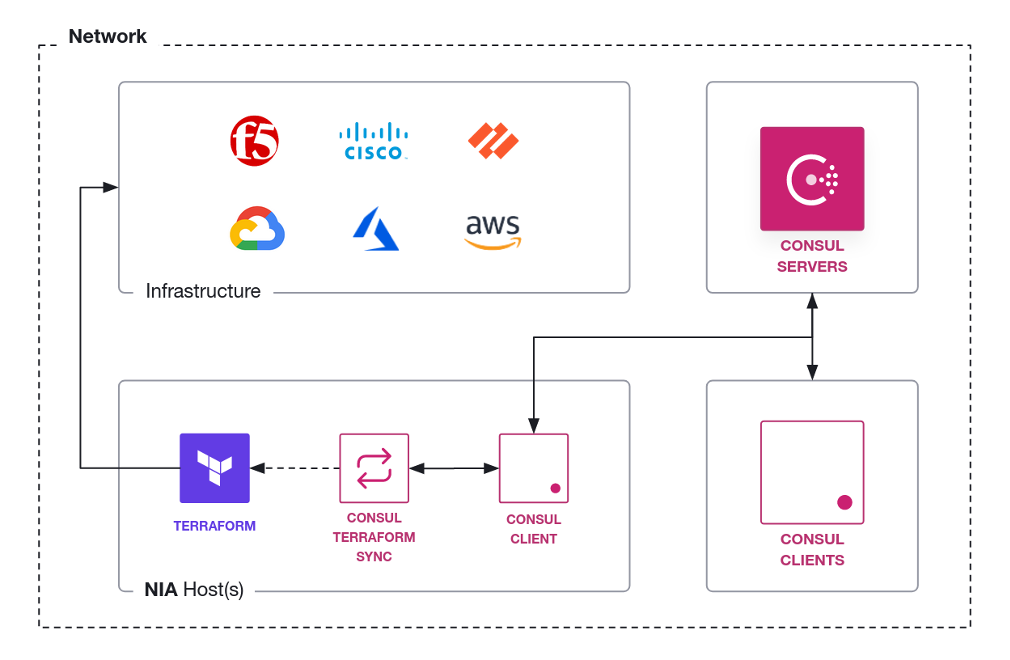
CTS for NIA
HashiCorp’s “Network Infrastructure Automation (NIA)” marketing page (consul.io/docs/nia) promises to scale better, decrease the possibility of human error when manually editing configuration files, and decrease overall time taken to push out configuration changes.
PROTIP: There are current no competitors in the market for this feature.
LEARN: Network Infrastructure Automation with Consul-Terraform-Sync hands-on, which uses the sample counting service at port 9003 and dashboard service in port 9002, from https://github.com/hashicorp/demo-consul-101/releases
-
Intro (using terraform, Consul “consul-terraform-sync” CLI) 17 MIN
- Consul-Terraform-Sync Run Modes and Status Inspection task execution status using REST API. 9 MIN
- CTS and Terraform Enterprise/Cloud integration. 14 MIN
- Build a Custom CTS Module. 20 MIN
- Secure Consul-Terraform-Sync for Production. 13 MIN
- Partner Guide - Consul NIA, Terraform, and A10 ADC. 12 MIN
- Partner Guide - Consul NIA, Terraform, and F5 BIG-IP. 12 MIN
- Partner Guide - Consul NIA, CTS, and Palo Alto Networks. 12 MIN
References:
- https://www.consul.io/docs/nia/configuration
- https://www.consul.io/docs/nia/terraform-modules
- VIDEO by Kim Ngo & Melissa Kam.
- Part 13: Consul-Terraform-Sync

CTS (Consul-Terraform Sync) Agent is an executable binary (“consul-terraform-sync” daemon separate from Consul) installed on a server.
NOTE: HashiCorp also provides binaries for various back releases at
https://releases.hashicorp.com/consul-terraform-sync/
Notice the “+ent” for enterprise editions.
brew tap hashicorp/tap
brew install hashicorp/tap/consul-terraform-sync
consul-terraform-sync -h
When the daemon starts, it also starts up a Terraform CLI/API binary locally.
See https://www.consul.io/docs/nia/configuration
CTS interacts with the Consul Service Catalog in a publisher-subscriber paradigm.
CTS has Consul acting as the central broker – changes trigger Consul to subscribe to Terraform assets. CTS can respond to changes in Service Registry. CTS can also watch for changes in its KV (Key-Value) store.
When CTS recognizes relevant changes requiring action, it dynamically generates files that invoke Terraform modules. Thus, CTS can interact with Terraform Cloud Driver’s Remote Workspaces. Advantages of this:
- Remote Terraform execution
- Concurrent runs within Terraform using secured variables
- State versions, audit logs, run history with triggers and notifications
- Option for Sentinel to enforce governance policies as code
CTS is how changes can trigger automatic dynamic update of network infrastructure devices such as applying firewall policies, updating load balancer member pools, etc.
- VIDEO: CTS can update network devices that are not Consul-aware (not F5 or NGINX, which are).
- VIDEO: Network Automation on Terraform Cloud With CTS
- CTS is used to keep configurations up-to-date on Fortinet physical and virtual NGFW (Next-Generation FireWall)
- VIDEO: “Future of Service Networking”
CTS v0.3 was announced Sep 2021
References:
- VIDEO “Integrating Terraform with Consul”
- https://learn.hashicorp.com/tutorials/cloud/consul-end-to-end-ecs
Each task consists of a runbook automation written as a CTS compatible Terraform module using resources and data sources for the underlying network infrastructure. The consul-terraform-sync daemon runs on the same node as a Consul agent.
Alternative repo:
Consul Global Scale Benchmark
The biggest way to go is using https://github.com/hashicorp/consul-global-scale-benchmark used to prove that a Service Mesh Control Plane of 5 HashiCorp Consul Servers across 3 availability zones in us-east-1 are able to update 10,000 Consul/Nomad client nodes and 172,000+ services in under 1 second. Each Consul Server run on c5d.9xlarge instance types on EC2 having 36 vCPUs and 72 Gigabytes of memory. It’s described by White paper: “Service Mesh at Global Scale” and Podcast with creator: Anubhav Mishra (Office of the CTO).
See also: https://github.com/hashicorp/consul-global-scale-benchmark = Terraform configurations and helper scripts for Consul Global Scale Benchmark
Identify Terraform repo in GitHub
To create the app infra which Consul works on, consider the
https://github.com/hashicorp-guides
Consistent workflows to provision, secure, connect, and run any infrastructure for any application.
* https://github.com/hashicorp-guides/hashistack
They reference 22 https://github.com/hashicorp-modules such as:
* https://github.com/hashicorp-modules/network-aws
Each module has an examples folder.
https://www.terraform.io/language/settings/backends/remote Terraform Remote State back-ends
https://github.com/hashicorp/field-workshops-consul/tree/master/instruqt-tracks/secure-service-networking-for-aws
a. https://learn.hashicorp.com/tutorials/cloud/terraform-hcp-consul-provider - it provisions resources that qualify under the AWS free-tier.
Files:
- consul.tf: describes the HPC Consul cluster you are going to create.
- vpc_peering.tf: describes the AWS VPC and the peering with the HVN.
- variables.tf: sets the variables for your deployment.
b. The following steps are based on https://learn.hashicorp.com/tutorials/cloud/consul-deploy referencing https://github.com/hashicorp/terraform-aws-hcp-consul which uses Terraform to do the below:
Among https://github.com/hashicorp/docker-consul = Official Docker images for Consul.
https://github.com/hashicorp/terraform-aws-hcp-consul is the Terraform module for connecting a HashiCorp Cloud Platform (HCP) Consul cluster to AWS. There are four examples containing default CIDRs for private and public subbnets:
- existing-vpc
- hcp-ec2-demo
- hcp-ecs-demo
-
hcp-eks-demo
- hcp-ec2-client - [For Testing Only]: installs Consul and runs Consul clients with EC2 virtual machines.
- hcp-eks-client - [For Testing Only]: installs the Consul Helm chart on the provided Kubernetes cluster.
- k8s-demo-app - [For Testing Only]: installs a demo application onto the Kubernetes cluster, using the Consul service mesh.
https://github.com/hashicorp/terraform-azurerm-hcp-consul
Hashicorp Cloud Account
-
Sign into: https://cloud.hashicorp.com/products/consul
- Verify your email if it’s your first time, or type your email.
- The first time, select the Registration Name (such as “wilsonmar-org”), country to create a new org.
-
You get $50! You can skip giving out your credit card until you want a PRODUCTION instance or use larger size node servers. For development use, an extra-small (XS) cluster size is deployed by default to handle up to 50 service instances.
-
Select Consul on the left product menu. Bookmark the URL, which contains your account ID so you’ll go straight to it:
https://portal.cloud.hashicorp.com/services/consul?project_id=…
- Click “Access control (IAM)” menu.
-
Click “Service principals” from the menu and specify the 3 examples below (with your name) for each of 3 roles with ID such as wilsonmar-123456@12ae4567-f584-4f06-9a9e-240690e2088a
- Role “Admin” (as full access to all resources including the right to edit IAM, invite users, edit roles)
- Role “Contributor” (Can create and manage all types of resources but can’t grant access to others.)
- Role “Viewer” (Can only view existing resources.)
PROTIP: Once logged in, a cookie is saved in the browser so that you will be logged in again automatically.
-
For each service principal, click the blue “Create service principal key”.
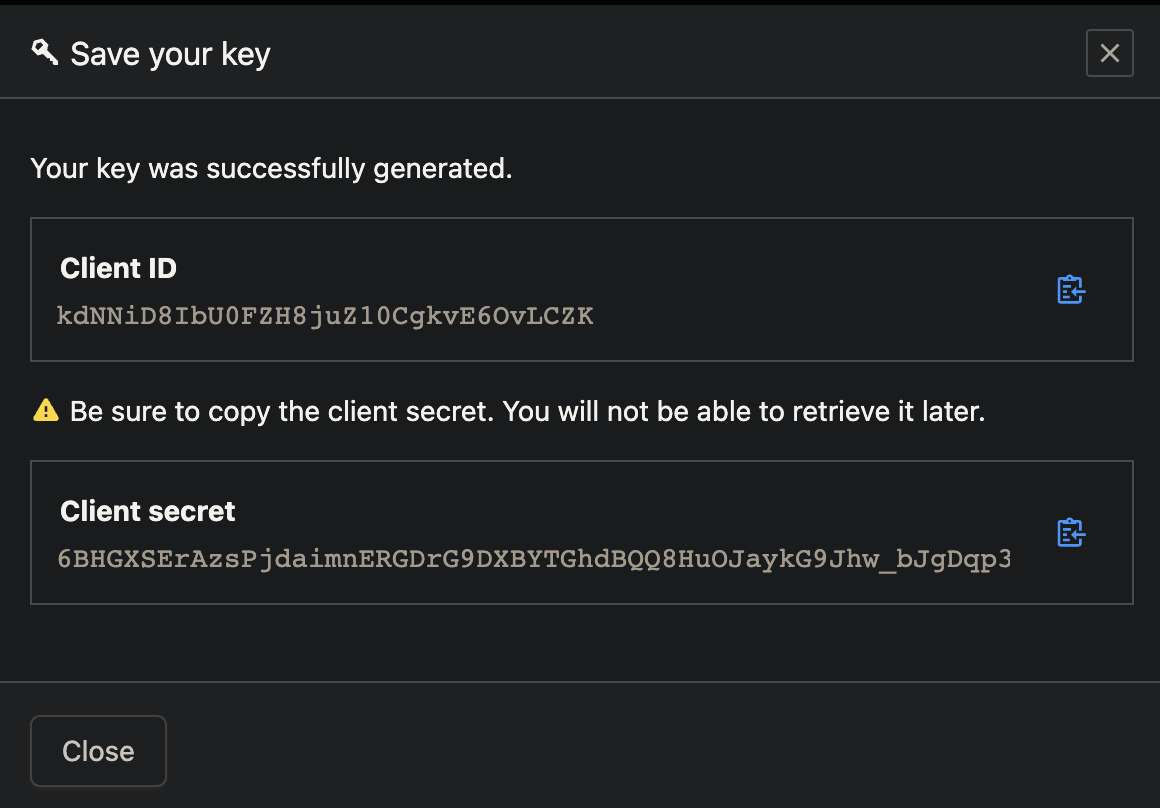
-
Click the copy icon to save each generated value to your Clipboard (for example):
export HCP_CLIENT_ID=kdNNiD8IbU0FZH8juZ10CgkvE6OvLCZK
export HCP_CLIENT_SECRET=hvs.6BHGXSErAzsPjdaimnERGDrG9DXBYTGhdBQQ8HuOJaykG9Jhw_bJgDqp35OkYSoA
Alternately, copy-paste the values directly into provider config file:
provider "hcp" { client_id = "service-principal-key-client-id" client_secret = "service-principal-key-client-secret" }CAUTION: The secret is not shown after you leave the screen.
Store secrets
-
In a file encrypted and away from GitHub, store secrets:
TODO: Use Vault to keep the above secrets secure (in a cloud).
For now, create file config
https://github.com/hashicorp/consul-guides = Example usage of HashiCorp Consul
(optional) Configure kubectl
aws eks --region $(terraform output -raw region) update-kubeconfig --name $(terraform output -raw local.eks_cluster_name)
kubectl get pods -A
Create a HashiCorp Virtual Network (HVN)
REMEMBER: Each resource in HCP can only be located in one HVN. You cannot span two different HVNs with a single product deployment, and product deployments cannot be moved from one HVN to another. Additionally, HVNs cannot be changed after they are deployed.
References:
- https://registry.terraform.io/providers/hashicorp/hcp/latest/docs/resources/hvn
Peer HVN to a AWS VPC
- https://registry.terraform.io/providers/hashicorp/hcp/latest/docs/resources/hvn
-
In the HVN overview page, select the Peering connections tab, and click the Create peering connection link.
-
Input the following information:
-
AWS account ID
-
VPC ID
-
VPC region
-
VPC CIDR (Classless Inter-Domain Routers) block
-
-
Click the Create connection button to begin the peering process.
Peering status begins at “Creating”.
-
Accept the connection at the AWS console.
-
Navigate to the Peering Connections area of your AWS Console.
You should have an entry in the list with a status of Pending Acceptance.
-
Click Actions -> Accept Request to confirm acceptance.
Status should change to “active”.
-
Once the HVN is deployed, the status updates to “Stable” on the HVN overview tab.
-
You can return to this screen to delete the peering relationship. However, deleting this peering relationship means you will no longer be able to communicate with your HVN.
Create a HCP Consul cluster
- Enterprise Academy: Deploy a Consul Cluster (Configure, start, and validate high availability of a Consul Enterprise cluster).
- Enterprise Academy: Deploy a Consul Cluster (Configure, start, and validate high availability of a Consul Enterprise cluster).
-
Create Cluster (such as “consul-cluster-1”), Network ID (“hvn”), Region,
CIDR Block 172.25.16.0/20 is the default CIDR block value.
In HVN, IPv4 CIDR ranges used to automatically create resources in your cloud network are delegated in HVN. The CIDR range you use cannot overlap with the AWS VPC that you will be peering with later.
Enable a public or private IP
WARNING: A public IP makes the Consul UI and API conveniently available from anywhere in the public internet for development use. But it is not recommended for production because it is a less secure configuration.

Configure L3 routing and security ???
-
Configure L3 routing and security
-
Create a security group
-
Create a route
-
Define ingress and egress rules
https://learn.hashicorp.com/tutorials/cloud/terraform-hcp-consul-provider
Configure Consul ACL Controller
The Consul ACL Controller is added by Terraform code used to create other app VPC resources.
TODO: Auto-discovery?
Run Consul clients within the provisioned AWS VPC
-
Connect your AWS VPCs to the HVN so that the clients in your VPC can communicate with the HCP server after the next step.
-
Install Consul into those AWS VPC.
This is not in Terraform code???
Run a demo application on the chosen AWS runtime
Destroy Consul
-
Destroy resources
TODO:
References about HVN (HashiCorp Virtual Network):
- https://cloud.hashicorp.com/docs/hcp/network
- https://learn.hashicorp.com/tutorials/cloud/consul-deploy
- https://learn.hashicorp.com/tutorials/cloud/terraform-hcp-consul-provider#hcp_consul_base
Service Discovery Workflow
- Instruqt: Consul F5 Service Discovery
- Enterprise Academy: Service Discovery (See how Consul’s Service Discovery feature works by connecting multiple services)
- Enterprise Academy: Service Discovery and Health Monitoring
HCP Consul Cloud Pricing
https://registry.terraform.io/providers/hashicorp/hcp/latest/docs
https://cloud.hashicorp.com/products/consul/pricing
https://cloud.hashicorp.com/docs/consul#features
| Plan | Base | + per svc instance hr | Limits |
|---|---|---|---|
| Individual Development | 0.027/hr $20/mo | - | Up to 50 service instances. No uptime SLA. |
| "Standard" prod. | $0.069/hr $49/mo | Small: $0.02/hr | SLA |
| "Plus" prod. | $0.104/hr | - | SLA, multi-region |
PROTIP: Assume a 5:1 Consul node to app services ratio.
C. On a macOS laptop using Docker
- https://learn.hashicorp.com/tutorials/consul/get-started-agent?in=consul/getting-started
- https://cloudaffaire.com/how-to-install-hashicorp-consul/
One Agent as Client or Server
PROTIP: The Consul executable binary is designed to run either as a local long-running client daemon or in server mode.
CAUTION: Do not use the manual approach of downloading release binaries from GitHub because
So that you avoid the toil the configuring PATH, etc. see install instructions below to use a package manager for each operating system (x86 and ARM):
* Homebrew (brew command) on macOS
* apt-get on Linux
* Chocolately (choco command) on Windows
Work with the Consul Agent using:
- CLI (Command Line Interface) on Terminal sessions
- API calls using curl or within a custom program (written in Go, etc.)
- GUI (Graphic User Interface) on an internet browser such as Google Chrome
REMEMBER: Normally, there is no reason to SSH directly into Consul servers.
The UI and API are intended to be consumed from remote systems, such as a user’s desktop or an application looking to discover a remote service in which it needs to establish connectivity.
The API at /connect/intentions/exact provides the most features to create Service Intentions.
### Environment Variables
The shell script I wrote makes use of several custom environment variables, which minimizes mistakes when several commands use the same values. When applicable, my script also captures values output from one step to use in subsequent commands, to avoid the toil and mistakes from manual copy and pasting.
Use of environment variables also enable the same command call to be made for both DEV and PROD use, further avoiding mistakes.
-
export DATACENTER1_ID=”dc1” - or by default is obtained from my laptop’s $(hostname)
-
CONSUL_AGENT_TOKEN
-
export LICENSE_FILE=”/etc/consul.d/consul.hclic”
### Install Consul Agent on Linux
Accordingly: TODO: Add signature verification.
apt-get update
# Install utilities curl, wget, jq,
apt-get -y install curl wget software-properties-common jq
curl -fsSL https://apt.releases.hashicorp.com/gpg | apt-key add -
# Get version:
lsb_release -cs
# Add the official HashiCorp Linux repository:
apt-add-repository "deb [arch=amd64] https://apt.releases.hashicorp.com \
   $(lsb_release -cs) main"
# Install Consul Enterprise on the node:
apt-get -y install consul-enterprise
Install Enterprise Consul Agent on macOS
A different installer for Consul (named “+ent”) contains Enterprise features such that both FOSS and Enterprise editions of the Consul agent have the same name (“consul”). This makes for minimal impact when upgrading from FOSS to Enterprise.
But the Enterprise edition looks for a license file within configuration settings. The Enterprise edition is provided in the AMI image of consul on Amazon Marketplace, which charges $8,000 per year for up to 50 nodes and bronze support.
Homebrew does not have an installer for the enterprise edition of Consul.
-rwxr-xr-x 1 wilsonmar staff 127929168 Jun 3 13:46 /usr/local/bin/consul
PROTIP: I wrote a shell script to make it both safer and easier for you to install the Enterpise edition of Consul. It uses the GPG utility to ensure that what is downloaded is exactly what the author intended, as defined in signature files the author created at time of creation. The shell script which follows the manual install, but adds automated checks before and after each step.
The shell script makes use of Homebrew’s brew command for other utilities.
https://github.com/wilsonmar/hashicups/blob/main/consul-download.sh
This command below runs the RAW format of the script.
-
Use your mouse to triple-click zsh in the command below to highlight the line, then press command+C to copy it to your Clipboard:
TODO: https://raw.githubusercontent.com/wilsonmar/hashicups/main/consul-download.sh
zsh -c "$(curl -fsSL https://raw.githubusercontent.com/wilsonmar/mac-setup/main/mac-setup.zsh)" \
-v -I -U -consul
CAUTION: Do not click on the URL (starting with httpd) since the terminal program opens a browser to that URL.
-v specifies optional verbose log output.
-Golang specifies install of Go programming language development components
-I specifies -Install of utilities XCode CLI, Homebrew, git, jq, tree, Docker, and components in the HashiCorp ecosystem, including Terraform, Vault, Nomad, envconsul.
-U specifies -Update of utilities. Do not specify -I and -U after initial install (to save a few seconds).
Utilities for working with AWS, Azure, GCP, and other clouds require their own parameter to be specified in order to be installed.
When no version is specified, the script identifies the latest version and installs that. Alternately, a specific verify can be specified.
-
Press command+Tab to switch to the Terminal.app.
-
Click anywhere in the Terminal window and Press command+V to paste the command from your Clipboard.
-
Press Return/Enter on your keyboard to begin execution.
-
Skip to use CLI commands
Here is a description of the steps that script takes:
-
Use a browser to view a list of releases:
https://releases.hashicorp.com/consul/
-
Click one that is NOT “alpha” or “beta”, such as:
consul_1.12.2+ent
for https://releases.hashicorp.com/consul/1.12.2+ent/
-
Click the “darwin”. “arm64” if your macOS laptop has Apple Silicon M1/M2 chip.
consul_1.12.2+ent_darwin_arm64.zip
Check SHA256SUM
File names containing “SHA256SUMS” are for verifying whether download was complete.
The steps below generate a hash of the downloaded file, then compares it with the hash generated by the author, also downloaded. Since even one bit difference between the zip file would generate a different hash, we compare the before and after to determine if the file was corrupted.
HashiCorp provides 3 different hash files. See https://www.hashicorp.com/security
-
Show the hash of files listed within the SHA256SUMS file:
cat consul_1.12.2+ent_SHA256SUMS
dc7d0b536b2646812a3b6bea88648f9b0b6f9ec13a850ebc893383faf2267f1d  consul_1.12.2+ent_darwin_amd64.zip
1213b93c6465de0c66de043bc3f7afa9934d5122e8f662cb76885a156af58a88  consul_1.12.2+ent_darwin_arm64.zip
-
Select whether to use gpg instead of shasum.
See https://www.youtube.com/watch?v=4bbyMEuTW7Y
Use GPG
-
Click to download the “.sig” file such as
consul_1.12.2+ent_SHA256SUMS.72D7468F.sig
BTW: “72D7468F” is described at “PGP Public Keys” within https://www.hashicorp.com/security
BTW: The file was created using a command such as
gpg –detach-sign consul_1.12.2+ent_darwin_arm64.zip (which outputs gpg: using “C7AF3CB20D417CAE08C03507A931D0E933B64F94” as default secret key for signing).consul_1.12.2+ent_SHA256SUMS.sig
- Switch to Terminal.
-
If you have not installed gpg, do so. Verify if you have it installed:
where gpg
The desired response is:
/usr/local/bin/gpg -
Command:
gpg --verify consul_1.12.2+ent_SHA256SUMS.sig \
consul_1.12.2+ent_darwin_arm64.zip
The response desired is “Good signature”:
gpg: assuming signed data in 'consul_1.12.2+ent_SHA256SUMS'
gpg: Signature made Fri Jun  3 13:58:17 2022 MDT
gpg:                using RSA key 374EC75B485913604A831CC7C820C6D5CD27AB87
gpg: Can't check signature: No public key
QUESTION: Huh?
- Skip to use CLI commands
Use shasum to check SHA256SUM
-
Verify if you have the program installed:
where shasum
If the response is “/usr/bin/shasum”, download
consul_1.12.2+ent_SHA256SUMS for use with the shasum utility -
Generate a hash based on the zip file downloaded:
shasum consul_1.12.2+ent_darwin_arm64.zip
-
Compare hashes:
sha256sum -c consul_1.12.2+ent_SHA256SUMS
The zip file is not corrupted if you see:
consul_1.12.2+ent_darwin_arm64.zip: OK
Ignore lines containing “FAILED open or read” for other hashes in the SHASUM file.
-
Unzip the zip file: within Finder, click the zip file to unzip it to yield file: consul (with no file extension).
- mv consul /usr/local/bin
- rm consul_1.12.2+ent_darwin_arm64.zip
-
rm consul_1.12.2+ent_SHA256SUMS
- Skip to use CLI commands
B. Install from Homebrew using brew
-
I
brew search consul
==> Formulae
consul                    hashicorp/tap/consul ✔             hashicorp/tap/consul-template
consul-backinator         hashicorp/tap/consul-aws           hashicorp/tap/consul-terraform-sync
consul-template           hashicorp/tap/consul-esm           hashicorp/tap/envconsul
envconsul                 hashicorp/tap/consul-k8s           iconsur

==> Casks
console
Install using Brew taps on MacOS
In the script, the Consul Agent is installed using HashiCorp’s tap, as described at:
- https://learn.hashicorp.com/tutorials/consul/get-started-install?in=consul/getting-started
Instead of the usual:
brew install consul
or
brew tap hashicorp/tap
brew install hashicorp/tap/consul
Notice the response caveats from brew install consul:
The darwin_arm64 architecture is not supported for this product
at this time, however we do plan to support this in the future. The
darwin_amd64 binary has been installed and may work in
compatibility mode, but it is not fully supported.

To start hashicorp/tap/consul now and restart at login:
  brew services start hashicorp/tap/consul
Or, if you don't want/need a background service you can just run:
  consul agent -dev -bind 127.0.0.1
==> Summary
🍺  /opt/homebrew/Cellar/consul/1.12.0: 4 files, 117.1MB, built in 3 seconds
-bind is the interface that Consul agent itself uses.
-advertise is the interface that Consul agent asks others use to connect to it. Useful when the agent has multiple interfaces or the IP of a NAT device to reach through.
Consul CLI commands
-
Verify install:
consul version
Alternately:
consul --version
The response if the Enterprise (“+ent”) version was installed:
Consul v1.12.2+ent
Revision 0a4743c5
Protocol 2 spoken by default, understands 2 to 3 (agent will automatically use protocol >2 when speaking to compatible agents)
The response if the Open Source version was installed:
Consul v1.12.2+ent
Revision 19041f20
Protocol 2 spoken by default, understands 2 to 3 (agent will automatically use protocol >2 when speaking to compatible agents)
-
Obtain the menu of 31 command keywords listed alphabetically:
consul
(–help is not needed)
Usage: consul [--version] [--help] <command> [<args>]

Available commands are:
 acl            Interact with Consul's ACLs
 agent          Runs a Consul agent
 catalog        Interact with the catalog
 config         Interact with Consul's Centralized Configurations
 connect        Interact with Consul Connect
 debug          Records a debugging archive for operators
 event          Fire a new event
 exec           Executes a command on Consul nodes
 force-leave    Forces a member of the cluster to enter the "left" state
 info           Provides debugging information for operators.
 intention      Interact with Connect service intentions
 join           Tell Consul agent to join cluster
 keygen         Generates a new encryption key
 keyring        Manages gossip layer encryption keys
 kv             Interact with the key-value store
 leave          Gracefully leaves the Consul cluster and shuts down
 lock           Execute a command holding a lock
 login          Login to Consul using an auth method
 logout         Destroy a Consul token created with login
 maint          Controls node or service maintenance mode
 members        Lists the members of a Consul cluster
 monitor        Stream logs from a Consul agent
 operator       Provides cluster-level tools for Consul operators
 reload         Triggers the agent to reload configuration files
 rtt            Estimates network round trip time between nodes
 services       Interact with services
 snapshot       Saves, restores and inspects snapshots of Consul server state
 tls            Builtin helpers for creating CAs and certificates
 validate       Validate config files/directories
 version        Prints the Consul version
 watch          Watch for changes in Consul
Links have been added above.
CLI commands are used to start and stop the Consul Agent.
-
Get a list that all fits on the screen by typing consul then press the Tab key on the keyboard:
acl          event        keygen       logout       rtt          watch
agent        exec         keyring      maint        services
catalog      force-leave  kv           members      snapshot
config       info         leave        monitor      tls
connect      intention    lock         operator     validate
debug        join         login        reload       version
The above appears only if ~/.zshrc or ~/.bashrc contains:
complete -o nospace -C /usr/local/bin/consul consul
That line is inserted to the correct file by:
consul -autocomplete-install
Each command in the list above are defined by code within the GitHub repository at:
https://github.com/hashicorp/consul/tree/main/command
NOTE: Subcommand force-leave is in folder forceleave
These folders are in addition to subcommands: cli, flags, helpers.
Since Consul is written in the Go programming language, each command is process by a go language file in each folder.
The GUI is in JavaScript with Handlebars templating, SCSS, and Gherkin.
Consul Keyboard shortcuts
Below are the most commonly use command statements typed on Terminal.
PROTIP: If you find it tedious to repeatedly type out long commands every time, consider memorizing these keyboard shortcuts, defined as aliases in a file that executes everytime your Terminal starts (https://github.com/wilsonmar/mac-setup/blob/master/aliases.zsh). You may change your alias key to anything that is not already used by another program.
alias csl="curl http://127.0.0.1:8500/v1/status/leader"
alias cacc="consul agent -config-dir /etc/consul.d/config"
alias ccn="consul catalog nodes"
alias ccs="consul catalog services"
alias cml="consul members -wan"
alias cmld="consul members -detailed"
alias cnl="consul namespace list"
alias crl="consul operator raft list-peers"
alias crj="cat /var/consul/raft/peers.json"
-
ccn for the list of nodes, instead of:
consul catalog nodes
Node                  ID        Address    DC
wilsonmar-N2NYQJN46F  5a5a1066  127.0.0.1  dc1
-
cml for the list of node members, instead of:
consul members
Node             Address           Status  Type    Build       Protocol  DC   Partition  Segment
consul-server-1  10.132.0.90:8301  alive   server  1.12.2+ent  2         dc1  default    <all>
consul-server-2  10.132.0.42:8301  alive   server  1.12.2+ent  2         dc1  default    <all>
consul-server-3  10.132.0.37:8301  alive   server  1.12.2+ent  2         dc1  default    <all>
consul-server-4  10.132.1.11:8301  alive   server  1.12.2+ent  2         dc1  default    <all>
consul-server-5  10.132.0.35:8301  alive   server  1.12.2+ent  2         dc1  default    <all>
consul-server-6  10.132.0.41:8301  alive   server  1.12.2+ent  2         dc1  default    <all>
-
cmld for the list of node members with details, instead of:
consul members -details
???
-
cmw for the list of node members, instead of:
consul members -wan
Node                      Address         Status  Type    Build   Protocol  DC   Partition  Segment
wilsonmar-....dc1    127.0.0.1:8302  alive   server  1.12.2  2         dc1  default    <all>
Node                 Address           Status  Type    Build       Protocol  DC   Partition  Segment
consul-server-0.dc1  10.52.2.9:8302    alive   server  1.13.2+ent  2         dc1  default    <all>
consul-server-0.dc2  10.232.2.7:8302   alive   server  1.13.2+ent  2         dc2  default    <all>
consul-server-1.dc1  10.52.0.11:8302   alive   server  1.13.2+ent  2         dc1  default    <all>
consul-server-1.dc2  10.232.1.10:8302  alive   server  1.13.2+ent  2         dc2  default    <all>
consul-server-2.dc1  10.52.1.8:8302    alive   server  1.13.2+ent  2         dc1  default    <all>
consul-server-2.dc2  10.232.0.10:8302  alive   server  1.13.2+ent  2         dc2  default    <all>
-
ccs for the list of services, instead of:
consul catalog services
When no Consul service has been configured yet, the response is:
Node                      Address         Status  Tags
wilsonmar-N2NYQJN46F.dc1  127.0.0.1:8302  alive   acls=0,ap=default,build=1.12.2:19041f20,dc=dc1,ft_fs=1,ft_si=1,id=5a5a1066-8c29-8c1e-c5a9-bdcbb01c24c7,port=8300,raft_vsn=3,role=consul,segment=<all>,vsn=2,vsn_max=3,vsn_min=2
See TODO: for more information about Tags.
-
cnl for the list of raft peers, instead of:
consul namespace list
Example output:
 # app-team:
 #    Description:
 #       Namespace for app-team managing the production dashboard application
 #    Partition:   default
 # db-team:
 #    Description:
 #       Namespace for db-team managing the production counting application
 #    Partition:   default
 # default:
 #    Description:
 #       Builtin Default Namespace
-
crl for the list of raft peers, instead of:
consul operator raft list-peers
Example:
Node             ID                                    Address              State     Voter  RaftProtocol
consul-server-1  5dbd5919-c144-93b2-9693-dccfff8a1c53  10.132.255.118:8300  leader    true   3
consul-server-2  098c8594-e105-ef93-071b-c2e24916ad78  10.132.255.119:8300  follower  true   3
consul-server-3  93a611a0-d8ee-0937-d1f0-af3377d90a19  10.132.255.120:8300  follower  true   3
-
csc for the contents of server.hcl configuration file in its default folder path:
code ???/server.hcl
You may come up with other aliases.
## Consul agent
-
Invoke -dev (for “development” only) on a Terminal:
consul agent -dev
The response begins with some build info:
==> Starting Consul agent...
        Version: '1.12.2+ent'
        Node ID: '5b9b8b16-4e67-4808-dae8-e594948eb261'
      Node name: 'wilsonmar-N2NYQJN46F'
     Datacenter: 'dc1' (Segment: '<all>')
         Server: true (Bootstrap: false)
    Client Addr: [127.0.0.1] (HTTP: 8500, HTTPS: -1, gRPC: 8502, DNS: 8600)
   Cluster Addr: 127.0.0.1 (LAN: 8301, WAN: 8302)
        Encrypt: Gossip: false, TLS-Outgoing: false, TLS-Incoming: false, Auto-Encrypt-TLS: false

==> Log data will now stream in as it occurs:
DEFINITION:
Server: true says it’s running server mode (as node type: server).
Server: false means it’s running client mode (as node type: client).Datacenter: ‘dc1’ is the default data center value.
-
Define variables for other CLI commands:
export DATACENTER1_ID="dc1"</strong>
-
Analyze protocol info returned from the command above:
Client Addr: [127.0.0.1] (HTTP: 8500, HTTPS: -1, gRPC: 8502, DNS: 8600)
means that you can access the UI web page at: http://127.0.0.1:8500 - see Consul GUI below.HTTPS: -1 means it’s not available (until SSL/TLS certificates are defined)
gRPC: 8502 Remote Procedure Call
Consul DNS
DNS: 8600 is the port number (the default) for Consul’s built-in DNS server.
The Domain Name Service (DNS) matches IP addresses with server names. It’s a major component of TCP networking.
By working in the environment around application program, Consul doesn’t require changes to application code.
dig command for DNS
-
“Discover” nodes using DNS interface dig command to the Consul agent’s DNS server, which runs on port 8600 by default:
dig @127.0.0.1 -p 8600
Where no services have been defined yet:
; <<>> DiG 9.10.6 <<>> @127.0.0.1 -p 8600
; (1 server found)
;; global options: +cmd
;; Got answer:
;; ->>HEADER<<- opcode: QUERY, status: REFUSED, id: 60743
;; flags: qr rd; QUERY: 1, ANSWER: 0, AUTHORITY: 0, ADDITIONAL: 0
;; WARNING: recursion requested but not available

;; QUESTION SECTION:
;.				IN	NS

;; Query time: 2 msec
;; SERVER: 127.0.0.1#8600(127.0.0.1)
;; WHEN: Sat Jul 16 01:30:09 MDT 2022
;; MSG SIZE  rcvd: 17
QUESTION: NOTE the response include “REFUSED”.
### Configure Enterprise license
About the Enterprise license key:
- https://learn.hashicorp.com/tutorials/nomad/hashicorp-enterprise-license?in=consul/enterprise
-
If you installed an Enterprise edition of Consul:
consul agent -dev
If no license was installed, you’ll see log lines like these returned:
2022-07-12T12:18:00.234-0600 [ERROR] agent: Error starting agent: error="license is missing. To add a license, configure "license_path" in your configuration file, use the CONSUL_LICENSE environment variable, or use the CONSUL_LICENSE_PATH environment variable. For a trial license of Consul Enterprise, visit https://consul.io/trial."
2022-07-12T12:18:00.234-0600 [INFO]  agent: Exit code: code=1
If an expired Enterprise license was installed, you’ll see log lines like these returned:
2022-07-14T19:01:32.448-0600 [ERROR] agent: Error starting agent: error="error initializing license: 1 error occurred:
 * license is no longer valid
REMEMBER: After Expiration, licenses still work until Termination date 10 years later.
-
In a browser, fill out the form for a 30-day evaluation license of Enterprice Consul at
https://www.hashicorp.com/products/consul/trial for a 30-day trial
-
Configure your browser to pop up for this URL:
https://license.hashicorp.services/customers
TODO: hcp-activations@hashicorp.com?
For Consul agent installed using brew: TODO:
Run in Foreground
Run Consul in foreground, which occupies the Terminal and does not start again at login:
consul agent -dev -bind 127.0.0.1 -node machine
[DEBUG] agent.router.manager: Rebalanced servers, new active server: number_of_servers=1 active_server="wilsonmar-N2NYQJN46F (Addr: tcp/127.0.0.1:8300) (DC: dc1)"
Alternately,
consul agent -dev -datacenter="aws-1234567890" \
-data-dir=/opt/consul  -encrypt="key" \
-join="10.0.10.11,10.1.2.3" \
-bind="127.0.0.1" -node machine
-join will fail if the IP addresses (4 or 6) fails to start.
PROTIP: In production, use configuration file to auto-join:
{
"bootstrap": false,
"boostrap_expect": 3,
"server": true,
"retry_join": ["10.0.10.11,"10.1.2.3"]
}
-bind defines the IP addresses of clients which the agent will work with. “0.0.0.0” means everyone.
For cluster communications within nodes/conf/server.hcl the bine_addr is .
bind_addr = "/{/{ GetPrivateInterfaces | include \"network\" \"10.0.0.0/16\" | attr \"address\" }}"For client communications (via UI,DNS,API):
client_addr = "0.0.0.0"
recursors = ["1.1.1.1"]

data_dir = "/consul/data"
Alternately, if you installed Consul using brew (which we don’t recommend), to run it in background so it restarts automatically at login:
brew services start hashicorp/tap/consul
QUESTION: Setup compatibility mode?
## Consul GUI
-
In the address bar within a browser:
http://localhost:8500/services
Consul web GUI
After the Consul server is invoked, on the Terminal window:
-
Open
open "http://localhost:8080/ui/${DATACENTER1_ID}/services"
The Consul GUI provides a mouse-clickable way for you to convienently work with these:
-
Services (in the Service Catalog)
-
Nodes is the number of Consul instances
-
Key/Value datastore of IP address generated
-
ACL (Access Control List) entries which block or allow network access based on port number
-
Intentions to allow or deny connections between specific services by name (instead of IP addresses) in the Service Graph
CLI API
PROTIP: All Consul’s endpoints registered are defined at https://github.com/hashicorp/consul/blob/main/agent/http_register.go Beware of deprecated ones at the bottom of the list.
-
-
For all configuration information, run this API:
curl localhost:8500/v1/agent/self
In the “Stats” section:
The JSON file returned includes build values also displayed by consul version command:
        "build": {
         "prerelease": "",
         "revision": "19041f20",
         "version": "1.12.2",
         "version_metadata": ""
“runtime” settings are about the “arm64” chip, “darwin” operating system, and Golang version:
           "runtime": {
         "arch": "arm64",
         "cpu_count": "10",
         "goroutines": "105",
         "max_procs": "10",
         "os": "darwin",
         "version": "go1.18.1"
About Consul operations:
        "agent": {
         "check_monitors": "0",
         "check_ttls": "0",
         "checks": "0",
         "services": "0"
     },
     "consul": {
         "acl": "disabled",
         "bootstrap": "false",
         "known_datacenters": "1",
         "leader": "true",
         "leader_addr": "127.0.0.1:8300",
         "server": "true"
Raft configuration
Settings for the Raft protocol:
        "raft": {
         "applied_index": "1849",
         "commit_index": "1849",
         "fsm_pending": "0",
         "last_contact": "0",
         "last_log_index": "1849",
         "last_log_term": "2",
         "last_snapshot_index": "0",
         "last_snapshot_term": "0",
         "latest_configuration": "[{Suffrage:Voter ID:5a5a1066-8c29-8c1e-c5a9-bdcbb01c24c7 Address:127.0.0.1:8300}]",
         "latest_configuration_index": "0",
         "num_peers": "0",
         "protocol_version": "3",
         "protocol_version_max": "3",
         "protocol_version_min": "0",
         "snapshot_version_max": "1",
         "snapshot_version_min": "0",
         "state": "Leader",
         "term": "2"
Raft concensus algorithm
Consider these dynamic illustrations about how the Raft mechanism works:
- http://thesecretlivesofdata.com/raft/ provides a visualization
- https://raft.github.io/
To ensure data consistency among nodes (even across different Availability Zones), the Raft consensus algorithm (a simpler implementation of Paxos) maintains consistent state storage for updating data maintained by Consul’s (catalog, session, prepared query, ACL, and KV state).
Each transaction is considered “comitted” when more than half the followers register it.
If the LEADER server fails, an election is automatically held among a quorum (adequate number of) FOLLOWERs to elect a new LEADER from among candidates.
The last stanza provides a list of (Service Mesh) Envoy proxies compatible with the Consul version installed:
 "xDS": {
     "SupportedProxies": {
         "envoy": [
             "1.22.0",
             "1.21.1",
             "1.20.2",
             "1.19.3"
         ]
     },
     "Port": 8502
Ports used by Consul
The default ports (which some organizations change in hope of “better security through obfuscation”):
-
8300 TCP for RPC (Remote Procedure Call) by all Consul server agents to handle incoming requests from other Consul agents to discover services and make Value requests for Consul KV
- 8301 TCP/UDP for Serf LAN Gossip within the same region cluster for Consensus communication, for agreement on adding data to the data store, and replication of data
-
8302 TCP/UDP for Serf WAN Gossip across regions
- 8500 & 8501 TCP-only for localhost API and UI
- 8502 TCP-only for Envoy sidecar proxy xDS gRPC API (not configured by default)
-
8558 - Consul-Terraform-Sync daemon
-
8600 TCP/UDP for DNS queries
- 21000 - 21255 TCP (automatically assigned) for Sidecar proxy registrations
For bootstrapping and configuration of agent.hcl, see https://learn.hashicorp.com/tutorials/consul/access-control-setup-production
To change the DNS port, edit at folder kv/conf/ file agent.hcl
ports {
   dns = 53
   grps = 8502
}
Envoy uses “xDS” for dynamic discovery.
serf_lan and serf_wan
There is a “serf_lan” and “serf_wan” each:
            "coordinate_resets": "0",
         "encrypted": "false",
         "event_queue": "1",
         "event_time": "2",
         "failed": "0",
         "health_score": "0",
         "intent_queue": "0",
         "left": "0",
         "member_time": "1",
         "members": "1",
         "query_queue": "0",
         "query_time": "1"
Serf LAN & WAN Gossip
- https://learn.hashicorp.com/tutorials/consul/federation-gossip-wan
- https://www.consul.io/docs/intro/vs/serf
To ensure that data is distributed with reliable communication not assumed, Consul makes use of the Gossip protocol powered by the multi-platform Serf library open-sourced by HashiCorp at https://github.com/hashicorp/serf (writte in Golang). Serf is based on the Gossip protocol also used by the Apache Serf library, which is a modified version of the SWIM (Scalable Weakly-consistent Infection-style Process Group Membership) protocol.
Serf provides for:
-
Events broadcasting to perform cross-datacenter requests based on Membership information.
-
Failure detection to gracefully handle loss of connectivity
server.hcl
node_name = "sec"
connect {
  enabled                            = true
  enable_mesh_gateway_wan_federation = true
}
primary_gateways = [
  "consul-primary-client:4431",
]
primary_gateways_interval = "5s"
retry_interval_wan        = "5s"
envconsul
- https://github.com/hashicorp/envconsul
The envconsul utility launches a subprocess after reading and seting environmental variables from data obtained from the Consul Agent.
The tool is inspired by envdir and envchain, but works on many major operating systems with no runtime requirements. It is also available via a Docker container for scheduled environments.
envconsul is installed automatically when the Consul Agent is installed.
-
For a full list of parameters:
envconsul -h
Watches values from Consul’s K/V store and Vault secrets to set environment variables when the values are changed. It spawns a child process populated with the environment variables.
-
With a Consul agent running …
-
To have envconsul connect to Consul and read data from its KV (key-value) store based on the KV prefix such as “my-app” specified :
envconsul -log-level debug -prefix my-app env
BLAH QUESTION: This outputs a list of all environment variables and their values.
-
The above will error out unless you’ve written data to that prefix, such as:
consul kv put my-app/address 1.2.3.4
consul kv put my-app/port 80
consul kv put my-app/max_conns 5
The response expected:
Success! Data written to: my-app/address
Success! Data written to: my-app/port
Success! Data written to: my-app/max_conns
NOTE: The command above launches a subprocess with environment variables using data from @hashicorp Consul and Vault.
-
Read secrets from Vault:
envconsul -secret secret/my-app ./my-app
Install HCDiag
-
HCDiag is open-sourced by HashiCorp at github.com/hashicorp/hcdiag
-
Get hands-on tutorials from HashiCorp at: learn.hashicorp.com/search?query=hcdiag
-
Install for macOS from Homebrew:
brew install hcdiag
==> Downloading https://releases.hashicorp.com/hcdiag/0.2.0/hcdiag_0.2.0_darwin_amd64.zip
==> Installing hcdiag from hashicorp/tap
==> Caveats
The darwin_arm64 architecture is not supported for this product
at this time, however we do plan to support this in the future. The
darwin_amd64 binary has been installed and may work in
compatibility mode, but it is not fully supported.
==> Summary
🍺  /opt/homebrew/Cellar/hcdiag/0.2.0: 5 files, 7.2MB, built in 2 seconds
==> Running `brew cleanup hcdiag`...
Disable this behaviour by setting HOMEBREW_NO_INSTALL_CLEANUP.
Hide these hints with HOMEBREW_NO_ENV_HINTS (see `man brew`).
-
Verify installation by viewing the help:
hcdiag -h
Usage of hcdiag:
  -all
 	DEPRECATED: Run all available product diagnostics
  -config string
 	Path to HCL configuration file
  -consul
 	Run Consul diagnostics
  -dest string
 	Shorthand for -destination (default ".")
  -destination string
 	Path to the directory the bundle should be written in (default ".")
  -dryrun
 	Performing a dry run will display all commands without executing them
  -include-since 72h
 	Alias for -since, will be overridden if -since is also provided, usage examples: 72h, `25m`, `45s`, `120h1m90s` (default 72h0m0s)
  -includes value
 	files or directories to include (comma-separated, file-*-globbing available if 'wrapped-*-in-single-quotes')
 	e.g. '/var/log/consul-*,/var/log/nomad-*'
  -nomad
 	Run Nomad diagnostics
  -os string
 	Override operating system detection (default "auto")
  -serial
 	Run products in sequence rather than concurrently
  -since 72h
 	Collect information within this time. Takes a 'go-formatted' duration, usage examples: 72h, `25m`, `45s`, `120h1m90s` (default 72h0m0s)
  -terraform-ent
 	(Experimental) Run Terraform Enterprise diagnostics
  -vault
 	Run Vault diagnostics
  -version
 	Print the current version of hcdiag
-
Before submitting a Service ticket to HashiCorp, obtain diagnostics about the HashiCorp utility (originating from ) while a HashiCorp server is running:
hcdiag -dryrun
[INFO]  hcdiag: Checking product availability
[INFO]  hcdiag: Gathering diagnostics
[INFO]  hcdiag: Running seekers for: product=host
[INFO]  hcdiag: would run: seeker=stats
-
Configure environment variables to provide the URL and tokens necessary, per this doc.
-
Specify the parameter to specify data desired for each product:
- hcdiag -terraform-ent for for Consul
- Vault
- Nomad
- hcdiag -terraform-ent for Terraform Enterprise.
Warning: The hcdiag tool makes no attempt to obscure secrets or sensitive information. So inspect the bundle to ensure it contains only information that is appropriate to share.
-
If you don’t have a sample app, consider: github.com/hashicorp/petshop
-
Mark Christopher West’s fork of HCDiag and github.com/hashicorp/translator
Consul Templates
VIDEO: Consul-template is a separate binary/executable which reads a template file to substitute variables defined between {{ }} (“moustashe quotes”) and replace each with values. An example:
[client]
host=/{/{ env "DB_HOSTNAME" }}
port=/{/{ env "DB_PORT" }}
/{/{ with secret "database/cred/my-backend" }}
user=/{/{ .Data.username }}
password=/{/{ .Data.password }}
# Lease: /{/{ .LeaseID }}
/{/{ end }}
“Cassandra SSL certificates rotation” shows how The consul-template daemon can query Vault to retrieve the SSL cert with two added bonuses: it will update the cert when it expires and it can run an arbitrary command (a script here) used to reload the certificates. The template definition (contents in the example) can be stored into different files but Sergio shows how to use it all in one as it reduces the number of config files that need to copy over to each database node.
Definition of the templating language
Start Consul Agent in forground
-
Use a text editor to customize file /etc/consul.d in .ini format:
[unit]
Description=Consul
Requires=network-online.target
After=network-online.target

[Service]
Restart=on-failure
ExecStart=/usr/local/bin/consul agent -config-dir="/etc/consul.d"
User=consul
-
If your Consul Agent is running locally:
consul agent -dev -node "$(hostname)" -config-dir="/etc/consul.d"
-node “$(hostname)” is specified for macOS users: Consul uses your hostname as the default node name. If your hostname contains periods, DNS queries to that node will not work with Consul. To avoid this, explicitly set the name of your node with an environment variable.
Start Consul Server in background (macOS)
Alternately, referencing the environment created:
Because HashiCorp’s Homebrew tap was used to install:
brew services start hashicorp/tap/consul
Alternately, on Linux:
/bin/start_consul.sh
Sample response:
Starting HashiCorp Consul in Server Mode...
CMD: nohup consul agent -config-dir=/consul/config/ > /consul.out &
Log output will appear in consul.out...
nohup: redirecting stderr to stdout
Consul server startup complete.
-
Start Consul Server:
systemctl start consul
No message is returned unless there is an error.
Leave (Stop) Consul gracefully
CAUTION: When operating as a server, a graceful leave is important to avoid causing a potential availability outage affecting the consensus protocol.
-
Gracefully stop the Consul by making it leave the Consul datacenter and shut down:
consul leave
QUESTION: No need to specify the node (like in start) because Gossip is supposed to propagate updated membership state across the cluster. That’s “Discovery” at work.
CAUTION: Leaving a server affects the Raft peer-set, which results in auto-reconfiguration of the cluster to have fewer servers.
The command notifies other members that the agent left the datacenter. When an agent leaves, its local services running on the same node and their checks are removed from the catalog and Consul doesn’t try to contact with that node again.
Log entries in a sample response (without date/time stamps):
[INFO]  agent.server: server starting leave
[INFO]  agent.server.serf.wan: serf: EventMemberLeave: wilsonmar-N2NYQJN46F.dc1 127.0.0.1
[INFO]  agent.server: Handled event for server in area: event=member-leave server=wilsonmar-N2NYQJN46F.dc1 area=wan
[INFO]  agent.router.manager: shutting down
[INFO]  agent.server.serf.lan: serf: EventMemberLeave: wilsonmar-N2NYQJN46F 127.0.0.1
[INFO]  agent.server: Removing LAN server: server="wilsonmar-N2NYQJN46F (Addr: tcp/127.0.0.1:8300) (DC: dc1)"
[WARN]  agent.server: deregistering self should be done by follower: name=wilsonmar-N2NYQJN46F partition=default
[DEBUG] agent.server.autopilot: will not remove server as a removal of a majority of servers is not safe: id=40fee474-cf41-1063-2790-c8ff2b14d4af
[INFO]  agent.server: Waiting to drain RPC traffic: drain_time=5s
[INFO]  agent: Requesting shutdown
[INFO]  agent.server: shutting down server
[DEBUG] agent.server.usage_metrics: usage metrics reporter shutting down
[INFO]  agent.leader: stopping routine: routine="federation state anti-entropy"
[INFO]  agent.leader: stopping routine: routine="federation state pruning"
[INFO]  agent.leader: stopping routine: routine="intermediate cert renew watch"
[INFO]  agent.leader: stopping routine: routine="CA root pruning"
[INFO]  agent.leader: stopping routine: routine="CA root expiration metric"
[INFO]  agent.leader: stopping routine: routine="CA signing expiration metric"
[INFO]  agent.leader: stopped routine: routine="intermediate cert renew watch"
[INFO]  agent.leader: stopped routine: routine="CA root expiration metric"
[INFO]  agent.leader: stopped routine: routine="CA signing expiration metric"
[ERROR] agent.server: error performing anti-entropy sync of federation state: error="context canceled"
[INFO]  agent.leader: stopped routine: routine="federation state anti-entropy"
[DEBUG] agent.server.autopilot: state update routine is now stopped
[INFO]  agent.leader: stopped routine: routine="CA root pruning"
[DEBUG] agent.server.autopilot: autopilot is now stopped
[INFO]  agent.leader: stopping routine: routine="federation state pruning"
[INFO]  agent.leader: stopped routine: routine="federation state pruning"
[INFO]  agent.server.autopilot: reconciliation now disabled
[INFO]  agent.router.manager: shutting down
[INFO]  agent: consul server down
[INFO]  agent: shutdown complete
[DEBUG] agent.http: Request finished: method=PUT url=/v1/agent/leave from=127.0.0.1:62886 latency=11.017448542s
[INFO]  agent: Stopping server: protocol=DNS address=127.0.0.1:8600 network=tcp
[INFO]  agent: Stopping server: protocol=DNS address=127.0.0.1:8600 network=udp
[INFO]  agent: Stopping server: address=127.0.0.1:8500 network=tcp protocol=http
[INFO]  agent: Waiting for endpoints to shut down
[INFO]  agent: Endpoints down
[INFO]  agent: Exit code: code=0
Consul automatically tries to reconnect to a failed node, assuming that it may be unavailable because of a network partition, and that it may be coming back.
List Consul Nodes
-
Custom programs (written in Go, etc.) can communication with Consul using HTTP API calls defined in:
-
To list nodes in JSON using API:
curl "http://localhost:8500/v1/catalog/nodes"
[
  {
 "ID": "019063f6-9215-6f2c-c930-9e84600029da",
 "Node": "Judiths-MBP",
 "Address": "127.0.0.1",
 "Datacenter": "dc1",
 "TaggedAddresses": {
   "lan": "127.0.0.1",
   "wan": "127.0.0.1"
 },
 "Meta": {
   "consul-network-segment": ""
 },
 "CreateIndex": 9,
 "ModifyIndex": 10
  }
]
TODO: DNS -consul specifies installation of HashiCorp Consul agent.
Prepared Queries
- https://www.consul.io/api-docs/query
BLAH: This feature is only available when using API calls (not CLI).
More complex DNS queries can be made using API calls than limiting entry points exposed by DNS.
To get a set of healthy nodes which provide a given service:
-
Edit a prepared query template file in this format:
{ "Template": { "Type": "name_prefix_match", "Regexp": "^geo-db-(.*?)-([^\\-]+?)$", "RemoveEmptyTags": false } } -
Register a query template (named, for example “banking-app”) using in-line:
curl "${CONSUL_URL_WITH_PORT_VER}/query" \
 --request POST \
 --data @- << EOF
{
  "Name": "banking-app",
  "Service": {
 "Service": "banking-app",
 "Tags": ["v1.2.3"],
 "Failover": {
   "Datacenters": ["dc2", "dc3"]
 }
  }
}
EOF
Alternately, instead of EOF, create a file:
CONSUL_QUERY_FILENAME="payload.json"
-
Make the request by providing a valid Token:
curl --request PUT \
 --data "@${CONSUL_QUERY_FILENAME}" \
 "${CONSUL_URL_WITH_PORT_VER}/query/${CONSUL_AGENT_TOKEN}"
Queries are also used for ACL
Query execution is subject to node/node_prefix and service/service_prefix policies.
Chaos Engineering
Practicing use of the above should be part of your pre-production Chaos Engineering/Incident Management process.
Failure modes:
-
Failure of single app node (Consul should notice and send alert)
- Failure of a Consul Non-Voting server (if setup for performance)
- Failure of a Consul Follower server (triggers replacement)
-
Failure of the Consul Leader server (triggering an election)
- Failure of an entire Consul cluster Availability Zone
- Failure of an entire Consul cluster Region
Degraded modes:
-
Under-performing app node
- Under-performing Consul Leader server
- Under-performing Consul Follower server
-
Under-performing Consul Non-voting server
- Under-performing transfer between Consul Availability Zones
- Under-performing WAN Gossip protocol transfer between Consul Regions
Down for maintenance
-
To bring a node offline, enable maintenace mode:
consul maint -enable -server redis -reason "Server patching"
This action is logged, which should trigger an alert to the SOC.
-
To bring a node back online, disable maintenace mode:
consul maint -disable -server redis
Backup Consul data to Snapshots
- https://learn.hashicorp.com/tutorials/consul/get-started-create-datacenter
- https://www.consul.io/commands/snapshot
- https://www.consul.io/api-docs/snapshot
- Enterprise Academy: Backup and Restore
- BK on Udemy
- Ensuring Security in HashiCorp Consul video class
- https://bit.ly/consul-security-threat-model
- Similar to Vault & AWS Lambda: Towards a Sub Minute Recovery by Kevin De Notariis
Consul keeps its data in memory (rather than in a database on a hard drive).
So data in a Consul agent has to be captured in complete point-in-time snapshots (gzipped tar file) of Consul’s committed state. Other data also in the Snapshot include:
- Sessions
- Prepared queries
-
Specify the ACL Token (such as “12345678-1234-abcd-5678-1234567890ab”) (also used for UI login):
export CONSUL_HTTP_TOKEN="${CONSUL_ACL_TOKEN}" -
PROTIP: Name files with a timestamp in UTC time zone, such as 2022-05-16T03:10:15.386UTC.tgz
brew install coreutils
CONSUL_BACKUP_FILENAME="$( gdate -u +'%Y-%m-%dT%H:%M:%S.%3N%Z' ).tgz"
Snapshots are typically performed on the LEADER node, but when the Cluster has no Leader, a FOLLOWER can take it if the --stale flag is specified.
-
Create the snapshot manually using the CLI, API,
consul snapshot save "${CONSUL_BACKUP_FILENAME}"curl --header "X-Consul-Token: "${CONSUL_ACL_TOKEN}" \ "${CONSUL_URL_WITH_PORT_VER}/snapshot -o ${CONSUL_BACKUP_FILENAME}" -
View snapshots available on the local filesystem:
consul snapshot inspect
-
PROTIP: It’s more secure to transfer snapshots offsite, held under an account separate from day-to-day operations.
- Amazon S3
- Azure Blob Storage
- Google Cloud Storage
For example, define an S3 bucket. PROTIP: Use different cloud service account to write and another to receive snapshots.
Enterprise Snapshot Agent
Enterprise-licensed users can run the Consul Snapshot Agent Service to automatically collect agents periodically.
-
Ensure that an enterprise license is configured.
-
Define the configuration file, such as this sample consul-snapshot.d file to take a snapshot every 30 minutes:
{
  "snapshot_agent": {
  "http_addr": "127.0.0.1:8500",
  "token": "12345678-1234-abcd-5678-1234567890ab",
  "datacenter": "dc1",
  "snapshot": {
     "interval": "30m",
     "retain": 336,
     "deregister_after": "8h"
  },
"aws_storage": {
   "s3_region": "us-east-1",
   "s3_bucket": "my-consul-snapshots-bucket"
 }
  }
}
In PRODUCTION, ACLs are enabled, so token need to be generated and included in the file.
336 snapshots are retained, with the oldest automatically discarded.
De-register the service if it’s dead over 8 hours.
-
Run:
consul snapshot agent -config-dir=/etc/consul-snapshot.d
Registration is done automatically.
https://www.consul.io/commands/snapshot/agent
Service file
A systemd agent configuration file in Linux, such as:
/etc/systemd/system/snapshot.service
[unit]
Description="HashiCorp Consul Snapshot Agent"
Documentation=https://www.consul.io/
Requires=network-online.target
After=consul.service
ConditionFileNotEmpty=/etc/snapshot.d/shapshot.json

[Service]
User=consul
Group=consul
ExecStart=/usr/local/bin/consul snapshot agent -config-dir=/etc/snapshot.d/
KillMode=process
Restart=on-failure
LimitNOFILE=65535

[Install]
WantedBy=multi-user.target
- https://unix.stackexchange.com/questions/506347/why-do-most-systemd-examples-contain-wantedby-multi-user-target
Restore from Snapshot
Snapshots are intended for full Disaster Recovery, not for selective restore back to a specific point in the past (like GitHub can do).
- https://unix.stackexchange.com/questions/506347/why-do-most-systemd-examples-contain-wantedby-multi-user-target
-
To restore to a fresh set of Consul servers.
consul snapshot restore
CAUTION: A Consul server stops processing while performing a restore. You don’t want it working anyway.
Alternately, using API:
curl --header "X-Consul-Token: "${CONSUL_ACL_TOKEN}" \
--request PUT \
--data-binary "@${CONSUL_BACKUP_FILENAME}" \
"${CONSUL_URL_WITH_PORT_VER}/snapshot
PROTIP: There is no selective restore of data.
-
After each configuration change, make a backup copy of the file seed (version) file to establish quorum, at:
raft/peers.json
That file contains information needed for manual Recovery:
[
  {
 "id": "12345678-1234-abcd-5678-1234567890ab",
 "address": "10.1.0.1:8300",
 "non-voter": false
  }
  ...
]
See https://learning.oreilly.com/library/view/consul-up-and/9781098106133/ch02.html#building-consensus-raft
PROTIP: As per CAP Theorem, Raft emphasizes Consistency (every read receives the most recent write value) over Availability.
Service Graph Intentions
The Consul GUI enables search for connections by name (instead of IP addresses) as well as specifying connections between specific services by name (instead of IP addresses):

PROTIP: Working with service names using a GUI not only reduces hassle but also minimizes mistakes, which have dire Security consequences.
-
On the CLI, Deny the web server from talking to anything:
consul intention create -deny web '*'
-
On the CLI, Allow the web server to talk to db (the database):
consul intention create -allow web db
Rules are set on the service itself, not on where they are implemented.
Services
- https://www.consul.io/docs/discovery/services
Consul discovers services which are setup to be discovered with a file on the service machine.
-
Edit the file:
{
  "service": {
  "id": "unique-server-01",
  "name": "retail-web-1234567890",
  "token": "12345678-1234-abcd-5678-1234567890ab",
  "tags": ["v1.02","production"],
  "address": "10.1.2.2",
  "port": 80,
  "checks": [ {
     "args": ["/usr/local/bin/check_mem.py"],
     "interval": "30s"
  } ],
  }
}
A check is needed for memory (“mem”) because it’s internal to the app’s process.
https://www.consul.io/docs/discovery/checks
-
Construct the file CONSUL_SVC_REGIS_FILE such as /etc/consul.d/redis.json (or hcl):
{ "service": { "name": "retail-web", "token": "12345678-1234-abcd-5678-1234567890ab", "port": 80, "check": { "id": "http", "name": "web check", "tcp": "localhost:80", "interval": "5s", "timeout": "3s } } } -
A service instance is defined by a service name + service ID.
QUESTION: “web check”?
-
PROTIP: Provide Consul read permissions on the directory/file used above as a variable so the same CLI can be used in dev & prod (for less mistakes):
CONSUL_SVC_REGIS_FILE="redis.hcl"
-
Define the Consul Registration Service:
CONSUL_SVC_REGIS_FRONT="http://localhost:8500"
Alternately, in production (for example):
CONSUL_SVC_REGIS_FRONT="https://consul.example.com:8500}"
-
Register the service:
consul services register redis.hcl
Alternately, make an API call specifying -config-file name:
curl -X PUT --data "@${CONSUL_SVC_REGIS_FILE}" \ "${CONSUL_SVC_REGIS_FRONT}/v1/agent/service/register -
Consul does not watch that file after loading, so changes to it after load must be reloaded using:
sysctl consul reload
-
“Service discovery” finds available service instance addresses and ports.
-
TODO: Define default connection limits, for better security.
-
Consul API Gateway =
- VIDEO: Consul API Gateway with Jeff Apple, PM of API Gateway
- https://www.hashicorp.com/blog/announcing-hashicorp-consul-api-gateway
- https://learn.hashicorp.com/tutorials/consul/kubernetes-api-gateway?in=consul/developer-mesh
- https://github.com/hashicorp/consul-api-gateway = The Consul API Gateway is a dedicated ingress solution for intelligently routing traffic to applications running on a C…
- Community Office Hours: Consul API Gateway & Chaos Engineering
- https://www.hashicorp.com/blog/consul-api-gateway-now-generally-available Feb 24 2022
-
QUESTION: Linux Security Model integrated into operating system, such as AppArmor, SELinux, Seccomp.
See https://www.consul.io/docs/security/security-models/core
-
Consul load balances across instances.
-
Define memory variable:
CONSUL_CONFIG_KIND="extra-config"
-
Define a CONSUL_CONFIG_FILE
config_entries { bootstrap { kind = "proxy-defaults" name = "global" config { local_connect_timeout_ms = 1000 handshake_timeout_ms = 1000 } } } bootstrap { kind = "service-defaults" name = "web" namespace = "default" protocol = "http" } -
consul config write “${CONSUL_CONFIG_FILE}”
-
Read back
consul config read -kind proxy-defaults -name web
(Consul) Nodes (Health Checks)
Red x’s identify Consul nodes which failed health checks.
Moreover, Consul servers Gossip with each other about state changes.
Consul can use several techniques to obtain health info: Docker, gRPC, TCP, TTL heartbeats, and Nagios-compatible scripts.
-
To perform a health check manually using an API call:
curl http://127.0.0.1:8500/v1/health/checks/my-service
Parse the JSON response:
[
  {
 "Node": "foobar",
 "CheckID": "service:redis",
 "Name": "Service 'redis' check",
 "Status": "passing",
 "Notes": "",
 "Output": "",
 "ServiceID": "redis",
 "ServiceName": "redis",
   "ServiceTags": ["primary"]
  }
]
Consul External Services Monitor (ESM)
- https://github.com/hashicorp/consul-esm
- https://learn.hashicorp.com/tutorials/consul/service-registration-external-services
When a local Consul agent cannot be installed locally, such as in cloud-managed services or incompatible hardware, to keep Consul’s service catalog up to date, periodically poll those services by installing the Consul ESM on ___. Such a health check is added to service registration like this:
token "12345678-1234-abcd-5678-1234567890ab",
  check {
    id = "some-check"
    http = "http://localhost:9002/health",
    method = "GET",
    interval = "1s",
    timeout = "1s"
  }
ACL (Access Control List) Operations
- https://www.udemy.com/course/hashicorp-consul/learn/lecture/24724816#questions/17665170/
ACLs define access granted through specific ports through firewalls (on Enterprise network traffic in “L3” segments).
ACLs are used to:
- Add & Remove nodes to the datacenter
- Add & Remove services
- Discover services
- Consul KV (CRUD) transactions
- API/CLI operations to interact with the datacenter
- Block Catalog Access
Vault works the same way as this: An ACL Token encapsulates multiple policies, with each policy aggregating one or more rules.
SECURITY PROTIP: To reduce the “blast radius”, create a rules.hcl file for each node. For each node, specifically name the node within each node’s rules.hcl file.
TODO: Use a templating utility to create a rules.hcl file containing a different node name for each node.
-
Environment Variable names I use in scripts involving ACL:
ACL_POLICY_FILE_NAME=”some-service-policy.hcl”
ACL_POLICY_NAME=”some-service-policy“
ACL_POLICY_DESC=”Token” -
Create the file defined in ACL_POLICY_FILE_NAME:
# Policy A
service "web" {
policy = "read"
}
key-prefix "foo-path/" {
policy = "write"
}
# Policy B service "db" { policy = "deny" } node "" { policy = "read" }Policy dispositions in rules include “read”, “write”, “read”, “list”.
TODO: To define according to “Least Privilege” principles, provide “remove” permissions to a separate account than the account which performs “add”.
-
Initiate the policy using the policy file:
consul acl policy create -name "${ACL_POLICY_NAME}" \ -rules @"${ACL_POLICY_FILE_NAME}" -
Create the Token GUID from the policy created:
ACL_TOKEN=$( consul acl token create -description "${ACL_POLICY_DESC}" \ -policy-name @"${ACL_POLICY_NAME}" ) -
Add ACL_TOKEN value
service {
  name = "dashboard",
  port = 9002,
  token = "12345678-1234-abcd-5678-1234567890ab",
}
D. In a single datacenter (with Kubernetes)
In HashiCorp’s YouTube channel covering all their 8 products:
Rosemary Wang (joatmon08.github.io, Developer Advocate) with J. Cole Morrison hold fun hashicorplive Twitch parties [about two hours each] to show how to learn Consul “the hard way” by setting it up from scratch, using code from github.com/jcolemorrison/getting-into-consul
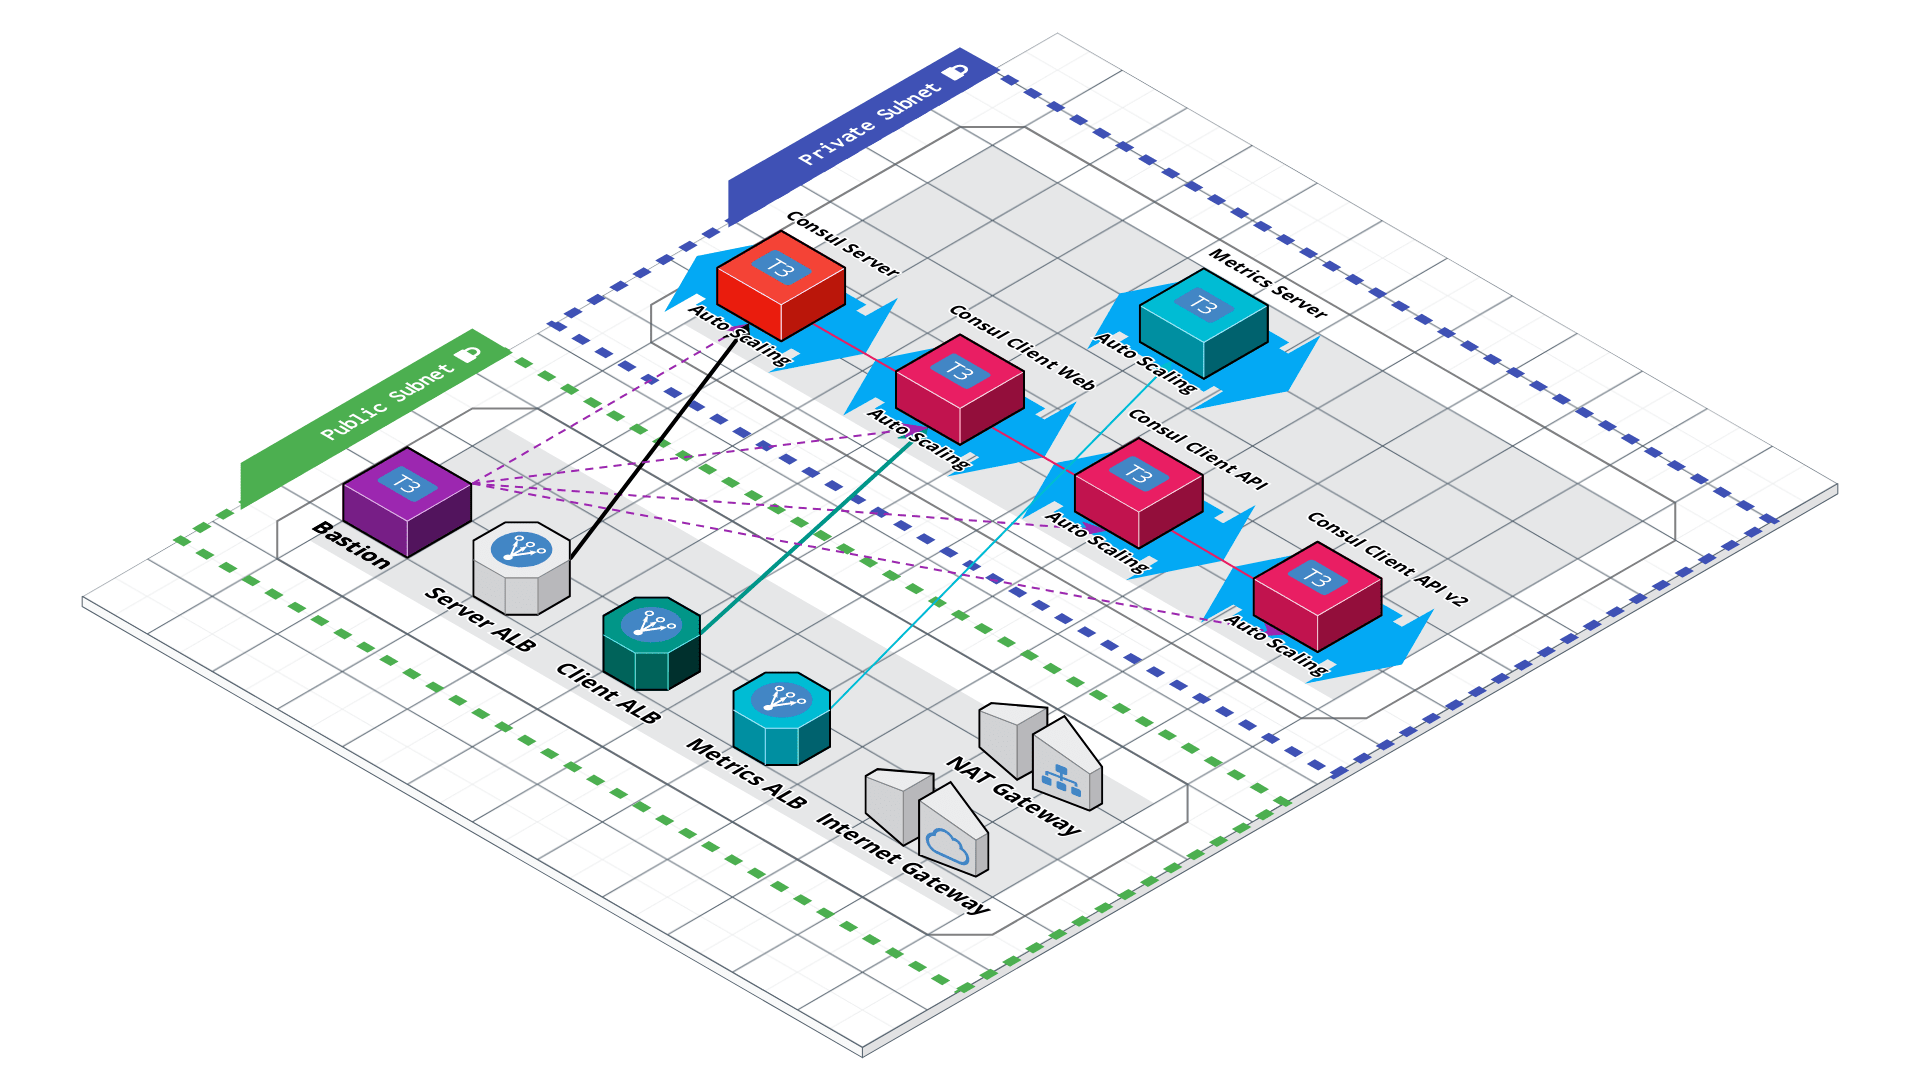
Consul offers three types of Gateways in the data path to validate authenticity and traffic flows to enforce intentions between services: Enterprise Academy:
- Service Mesh Gateway
- Enterprise Academy: Ingress Gateways
-
Terminating Gateways
- DOC: Transit gateway
(https://play.instruqt.com/hashicorp/tracks/vault-advanced-data-protection-with-transform)
- Enterprise Academy: Deploy Consul Ingress Gateways (Deploy an Ingress Gateway for Inbound Mesh Connectivity)
Kubernetes with Consul
- Enterprise Academy: Running Consul on Kubernetes (Learn how to install Consul on Kubernetes)
Kubernetes with Service Mesh and Consul
- VIDEO: “How Consul and Kubernetes work together”
- https://www.consul.io/docs/connect
- https://www.udemy.com/course/hashicorp-consul/learn/lecture/24649092#questions
- VIDEO: “Zero Trust Security for Legacy Apps with Service Mesh”
- VIDEO: “Consul Service Mesh: Deep Dive”
This Consul Enterprise feature is called the “Consul Connect”. VIDEO
Envoy install
To ensure a specific version tested with the tutorial, instead of using brew install func-e envoy:
-
Install Envoy proxy (specifically version 1.20.1) using https://func-e.io/:
curl https://func-e.io/install.sh | bash -s -- -b /usr/local/bin
  % Total    % Received % Xferd  Average Speed   Time    Time     Time  Current
                              Dload  Upload   Total   Spent    Left  Speed
100  9791  100  9791    0     0  17341      0 --:--:-- --:--:-- --:--:-- 17421
tetratelabs/func-e info checking GitHub for latest tag
tetratelabs/func-e info found version: 1.1.3 for v1.1.3/darwin/arm64
tetratelabs/func-e info installed /usr/local/bin/func-e
If using ARM:
export FUNC_E_PLATFORM=darwin/amd64
func-e use 1.20.1
downloading https://archive.tetratelabs.io/envoy/download/v1.20.1/envoy-v1.20.1-darwin-amd64.tar.xz
-
Move Envoy from the .func-e folder to a path common in $PATH:
sudo mv ~/.func-e/versions/1.20.1/bin/envoy /usr/local/bin/
-
Verify if can be found in PATH:
envoy --version
envoy version: ea23f47b27464794980c05ab290a3b73d801405e/1.20.1/Modified/RELEASE/BoringSSL
NOTE: brew install envoy installs version 1.22.2 (at time of writing).
Twitch Recordings
A series of recordings live on Twitch.tv by Developer Evangelists Rosemary Wang and J. Cole Morrison:
-
Part 3: Scaling, Outage Recovery, and Metrics for Consul on AWS
-
Part 4: Security, Traffic Encryption, and ACLs
- secure Gossip communication between Consul agents, encrypt RPC calls between client and server with TLS, and begin setting up ACLs.
- Generate 32-bit encryption key. Apply key to agents. Rotate keys.
-
Part 9: Service Mesh Proxy Metrics
- Install/config. prometheus.io static & dynamic scrape, exposing Envoy
- Part 10: Terminating & Ingress Gateways
- https://play.instruqt.com/HashiCorp-EA/tracks/consul-ingress-gateways-deployment
-
Coming soon after re-edits.
-
Part 13: Consul-Terraform-Sync
- https://consul.io/docs/nia/configuration
Sidecar proxy injection
Consul comes with a Sidecar proxy, but also supports the Kubernetes Envoy proxy (from Lyft). (QUESTION: This means that migration to Consul can occur gradually?)
You can use Helm but consul-k8s CLI is now the recommended way because it validates your environment and gives you much better error messages and helps with a clean installation
-
To register (inject) Consul as a Sidecar proxy, add this annotation in a Helm chart:
apiVersion: v1 kind: Pod metadata: name: cats annotations: "consul.hashicorp.com/connect-inject": "true" spec: containers: - name: cats image: grove-mountain/cats:1.0.1 ports: - containerPort: 8000 name: http -
Yaml file:
- helm-consul-values.yaml changes the default settings to give a name to the datacenter, specify the number of replicas, and enable Injection
- consul-helm
- counting.yaml
- dashboard.yaml
-
As instructed, install Helm:
brew install helm
-
Ensure you have access to the Consul Helm chart and you see the latest chart version listed. If you have previously added the HashiCorp Helm repository, run helm repo update.
helm repo add hashicorp https://helm.releases.hashicorp.com
helm search repo hashicorp/consul
NAME                CHART VERSION   APP VERSION DESCRIPTION
 hashicorp/consul    0.35.0          1.10.3      Official HashiCorp Consul Chart
-
Install Consul with the default configuration which if not already present, creates a Consul Kubernetes namespace and install Consul on the dedicated namespace:
helm install consul hashicorp/consul --set global.name=consul --create-namespace -n consul
NAME: consul
Alternately:
helm install consul -f helm-consul-values.yaml ./consul-helm
-
On a new Terminal window:
kubectl port-forward svc/consul-tonsul-ui 8080:80
Forwarding from 127.0.0.1:8080 -> 8500
Forwarding from [::1]:8080 -> 8500
-
Register with Consul agent (which doesn’t start the Sidecar proxy):
{ "service": { "name": "front-end-sidecar", "port": "8080", "connect": { "sidecar_service": {} } } } -
In the hcl file defining each service, registering a Service Proxy:
{
"service": {
   "id": "someweb-01",
   "name": "front-end-sidecar",
   "tags": ["v1.02","production"],
   "address": "",
   "port": 80,
   "checks": [ {
      "sidecar_service": {
         "proxy": {
            "upstreams": [{
               "destination_name": "db01"
            }
         ]
      }
   }
   "connect": [ {
      "sidecar_proxy": {
         "proxy": {
            "upstreams": [{
               "destination_name": "db01"
               "local_bind_port": "6000"
            }
         ]
      }
   }
}
}
CAUTION: Even though it’s a “name”, its value is used to match to register the service.
https://www.udemy.com/course/hashicorp-consul/learn/lecture/24649144#questions
-
Start the Sidecar proxy process.
???
-
View the Consul dashboard:
http://localhost:8080/ul/datacenter/services
References about Kubernetes with Consul:
- https://github.com/hashicorp/consul-k8s
- https://learn.hashicorp.com/tutorials/consul/kubernetes-reference-architecture?in=consul/kubernetes-production
- VIDEO: Introduction to HashiCorp Consul
-
VIDEO: “What is the Crawl, Walk, Run Journey of Adopting Consul”
-
VIDEO: “HashiCorp Consul Introduction: What is a Service Mesh?” by (former) Developer Advocate Nicole Hubbard showing use of Shipyard and K3s.
- VIDEO: How does Consul work with Kubernetes and other workloads?
- https://platform9.com/blog/understanding-kubernetes-loadbalancer-vs-nodeport-vs-ingress/
- https://learn.hashicorp.com/tutorials/terraform/multicloud-kubernetes?in=consul/kubernetes
Service Discovery Registry DNS Queries
LEARN: In enviornment where Infosec limit DNS traffic to the default UDP port 53, we setup dnsmasq or BIND forwarding from port 53 to 8600 because we don’t want to use root privileges requiredd to use ports below 1024.
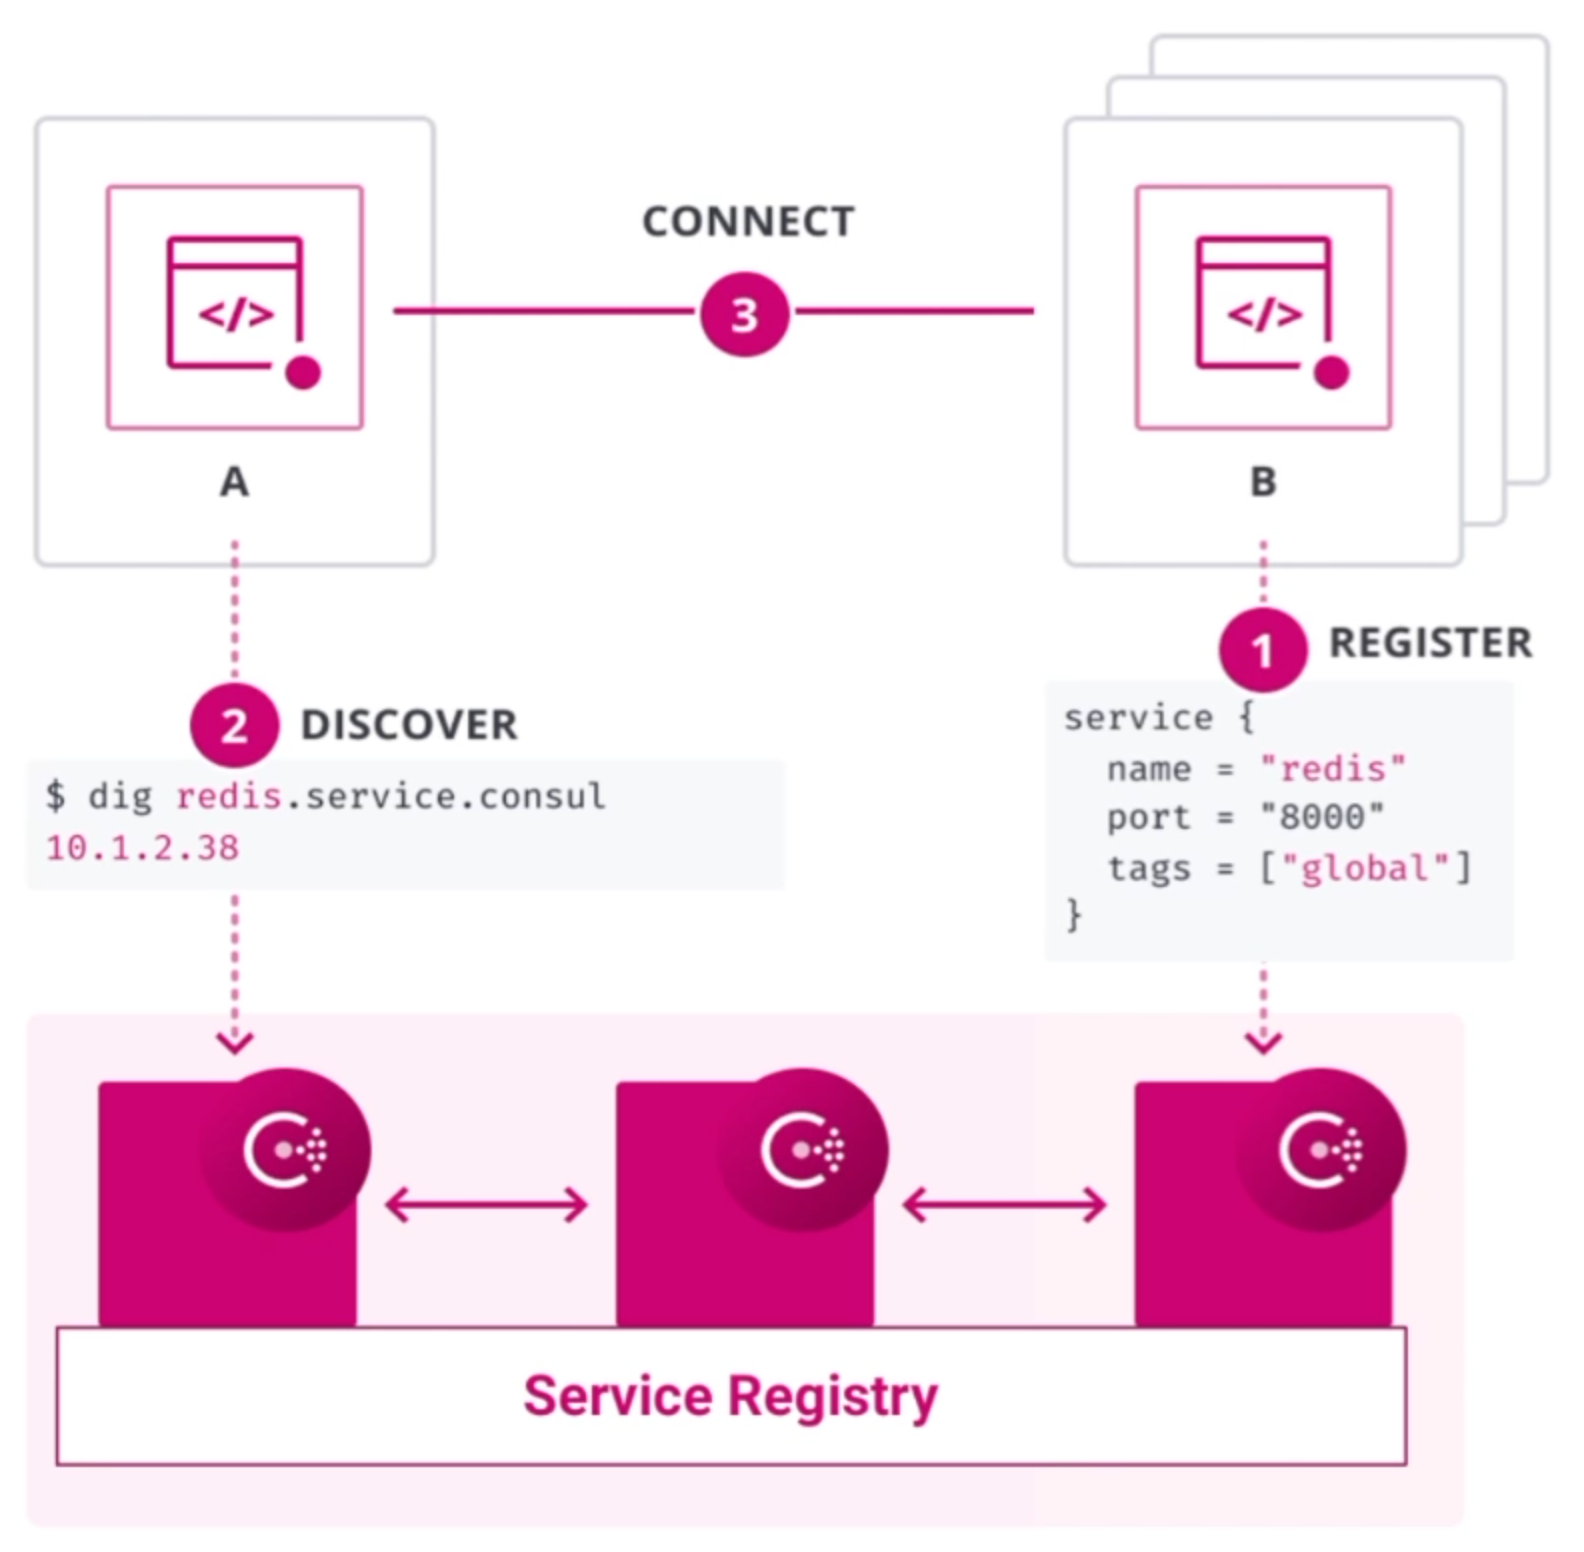
Consul servers maintain a DNS “Services Registry”
-
Each service (such as Redis cache in this example) is registered:
service { name = "web", port = 9090, token = "12345678-1234-abcd-5678-1234567890ab", connect:{ sidecar_service { port = 20000 proxy { upstreams { destination_name = "payments" local_bind_address = "127.0.0.1" local_bind_port = 9091 } } } } }- Proxy Defaults to control proxy configuration
- Service Defaults configures defaults for all instances of a service
Discovery: Service Router -> Service Spliter -> Service Router
- Service Router defines where to send Layer 7 traffic
- Service Splitter defines how to divide traffic for a single HTTP route
- Service Resolve matches service instances with Consul upstreams
PROTIP: Include a health check stanza in the service registration, such as:
service {
  ...
  "check": {
  "id": "mem-util",
  "name": "Memory utilitization",
  "script": "/usr/local/bin/check_mem.py",
  "interval": "10s"
  }
}
Once registered, a service should appear as available within the Consul service registry.
Centralized ???
Consul External Services Monitor (ESM)
When a local Consul agent cannot be installed locally, such as in cloud-managed services or incompatible hardware, to keep Consul’s service catalog up to date, periodically poll those services by installing the Consul ESM on ___.
Such a health check added to service registration:
token "12345678-1234-abcd-5678-1234567890ab",
  check {
    id = ""
  }
-
Discover DNS SRV record
- https://www.wikiwand.com/en/SRV_record
curl \ http://localhost:8500/v1/catalog/services/redis
PROTIP: Consul cleints return only healthy nodes and services because it maintains the health status.
- https://www.wikiwand.com/en/SRV_record
-
Each local Consul caches lookups for 3 days.
Each entry can be tagged, such as
tag.service.service.datacenter.domain
tag.service.service.datacenter.${DNS_TLD}
db.redis.service.dc1.consul
PROTIP: Consul is the #1 discovery tool with AWS Route53 (via delegation from resolver)
Traditional DNS services ( bind, iptables, dnsmasq ) can be configured to forward requests with the DNS_TLD suffix (“consul”):
-
NOTE: Consul can also received forwarded DNS requests from in below:
server=/consul/127.0.0.1#8600
-
To configure bind server
zone "consul" IN{ type forward forward only forwarders { 127.0.0.1 port 8600 } } -
To configure iptables in Linux servers:
iptables -t nat -A PREROUTING  -p tcp -m tcp --dport
iptables -t nat -A PREROUTING  -p udp -m upd --dport
iptables -t nat -A OUTPUT -d localhost -d tcp -m
iptables -t nat -A OUTPUT -d localhost -d upd -m
The response is 53 -j REDIRECT --to ports 8600
References about templating/generating JSON & YAML:
- https://learnk8s.io/templating-yaml-with-code
- Jsonnet
- https://golangexample.com/a-tool-to-apply-variables-from-cli-env-json-toml-yaml-files-to-templates/
- https://github.com/krakozaure/tmpl?ref=golangexample.com
- https://wryun.github.io/rjsone/
Consul workflows beyond Kubernetes
-
Service Discovery: (kube-dns, kube-proxy) to identify and connect any service on any cloud or runtime. with Consul DNS
-
Service Configuration: (K8s Configmaps) but Consul also updates F5 and other load balancer rules, for dynamic configuration across distributed services (in milliseconds)
-
Segmentation: (Network Policy + Controller), providing network infrastructure automation
Service Discovery With Consul on Kubernetes
Service Mesh
Multi-service Service Mesh: secure service-to-service traffic with Mutual TLS certificates, plus enable progressive application delivery practices.
- Application networking and security with identity-based authorization
- L7 traffic management
- Service-to-service encryption
- Health checking to automatically remove services that fail health checks
Consul Enterprise Academy: Service Mesh
Deploying a Service Mesh at Enterprise Scale With Consul - HashiConf Global 2021
Beyond:
- Access Control
- Billing
- Networking
- Identity
- Resource Management
Mutual TLS
- https://www.consul.io/docs/security/encryption#rpc-encryption-with-tls
- https://www.udemy.com/course/hashicorp-consul/learn/lecture/24723260#questions
To encrypt traffic between nodes, each asset is given an encrypted identity in the form of a TLS certificate (in X.509, SPIFFE-compatible format). Consul also provides a Proxy to enforce communications between nodes using “Mutual TLS” where each party exchange certificates with each other.
Consul’s auto-join provider enables nodes running outside of Kubernetes to join a Consul cluster running on Kubernetes API.
Consul can auto-inject certifictes into Kubernetes Envoy Sidecars to secure communication traffic (within the Service Mesh).
RECOMMENDED: Have Consul use HashiCorp Vault to generate dynamic x.509 certificates.
Consul Connect (Service Mesh)
- VIDEO: “Introduction to HashiCorp Consul Connect”
- Instruqt: Getting started with Consul Connect
- A10 & HashiCorp Network Infrastructure Automation with Consul-Terraform-Sync
- Observability with HashiCorp Consul Connect (Service Mesh)
- “Combining DevOps with PKI Compliance Using HashiCorp Vault & Consul”
Integration between Consul and Kubernetes is achieved by running Consul Service Mesh (aka Consul Connect) on Kubernetes:
Catalog Sync: Sync Consul services into first-class Kubernetes services and vice versa. This enables Kubernetes to easily access external services and for non-Kubernetes nodes to easily discover and access Kubernetes services.
-
Have Vault act as the Certificate Authority (CA) for Consul Connect. On an already configured Vault, enable:
vault secrets enable pki
vault secrets enable consul
-
A sample Consul configuration to use Vault for Connect:
connect { enabled = true ca_provider = "vault" ca_config { address = "https://vault.example.com:8200" token = "s.1234567890abcdef12" root_pki_path = "connect_root" intermediate_pki_path = "connect_inter" leaf_cert_ttl = "24h" rotation_period = "2160h" intermediate_cert_ttl = "8760h" private_key_type = "rsa" private_key_bits = 2048 } } -
Configure access to Consul to create tokens (using the admin token):
vault write consul/config/access \
address=https://consul:8200 \
token=12345678-1234-abcd-5678-1234567890ab
-
Create a role for each permission set:
vault write consul/roles/my-role policies=readonly
-
Generate credentials (lease-id, lease_duration 768h, lease_renewable true, token):
vault read consul/creds/my-role
-
For each access, human users generate a new ACL token from Vault.
Capturing Network Traffic
- explained
- https://formulae.brew.sh/formula/tcpflow
- https://www.onworks.net/programs/tcpflow-online?amp=0
- https://developer.apple.com/documentation/network/recording_a_packet_trace
To prove whether communication over the network is encrypted.
-
On MacOS, install Tcpflow :
brew install tcpflow
-
Construct command:
tcpflow -i eth0 -gc
-i eth0 specifies the Ethernet network interface.
-gc adds color to the output going to STDOUT (rather than to a file).
- Issue a curl command.
- Press control+C to stop collection.
Assist or Replaces Kubernetes
- https://learn.hashicorp.com/tutorials/nomad/consul-service-mesh
^ https://www.consul.io/docs/k8s/installation/install
Consul combines with Nomad, Vault, and Terraform to provide a full alternative to Kubernetes for Docker container orchestration:

Nomad, by itself, is a cluster manager and task scheduler.
Nomad, like Kubernetes, orchestrates Docker containers. But Nomad also orchestrates non-containerized apps. Nomad demonstrated its scalability in the Nomad’s “C2M Challenge”, which shows it versatile and lightweight to support over 2,000,000 tasks.
The smallest units of deployment in Nomad are called “Tasks” – the equivalent to “Pods” in Kubernetes.
Kubernetes (as of publishing date) claims to support clusters up to 5,000 nodes, with 300,000 total containers, and no more than 150,000 pods.
Nomad, originally launched in 2015, as part of Cloudflare’s development environment [transcript] – a company which routes 10% of the world’s internet traffic) and a cornerstone of Roblox’s and Pandora’s scaling.
Nomad may not be as commonly used as Kubernetes, but it already has a tremendous influence.
D. In a single datacenter using Kubernetes
-
The repo for using Consul on Kubernetes is at
https://github.com/hashicorp/consul-k8s
-
Get the official Helm chart:
git clone https://github.com/hashicorp/consul-k8s/tree/main/charts/consul
(previously https://github.com/hashicorp/consul-helm.git)
-
Customize file values.yaml such as:
global:
enabled: true
image: "consul:1.5.1"
imagek8: "hashicorp/consul-k8s:0.8.1"
domain: consul
datacenter: primarydc
server:
  enabled: true
  replicas: 3
  bootstrapExpect: 3
See https://www.consul.io/docs/k8s/helm
-
Identify the latest release for image: “consul at:
https://github.com/hashicorp/consul/releases
which was v1.12.0 on April 20, 2022.
-
STAR: Identify the latest release of imagek8: “hashicorp/consul-k8s: at:
https://github.com/hashicorp/consul-k8s/releases
which, at time of writing, was v0.44.0 (May 17, 2022).
This is reflected at: https://artifacthub.io/packages/helm/hashicorp/consul
See https://www.consul.io/docs/k8s/installation/install
-
Deploy using Helm:
helm install consul.helm -f values.yaml
E. In a single 6-node datacenter (survive loss of an Availability Zone)
HA (High Availability)
In order for a datacenter to withstand the sudden loss of a server within a single Availability Center or the loss of an entire Availability Zone, setup 6 servers for best resilience plus performance under load:

The yellow star in the diagram above marks the LEADER Consul server. The leader is responsible for ingesting new log entries of cluster changes, writing that to durable storage, and replicating to followers.
PROTIP: Only the LEADER processes requests. FOLLOWERs do not respond to request as their job is just to receive replication data (enjoy the food and stand by like a Prince). This architecture is similar to Vault’s.

IMPORTANT: For better scalability, use Consul’s Enterprise “Autopilot” mechanism to setup “NON-VOTER” Consul server nodes to handle additional processing for higher performance under load. See https://play.instruqt.com/HashiCorp-EA/tracks/consul-autopilot
The NON-VOTER is in Zone 2 because leadership may switch to different FOLLOWER servers over time.
So keep the above in mind when using this page to describe the Small and Large server type in each cloud.
PROTIP: The recommended maximum number of Consul client nodes for a single datacenter is 5,000.
CAUTION: A Consul cluster cannot operate in a single Availability Zone.
Actually, HashiCorp’s Consul Enterprise Reference Architecture for a single cluster is 5 Consul server nodes across 3 availability zones.

Within an Availability Zone, if a voting FOLLOWER becomes unavailable, a non-voting member in the same Availability Zone is promoted to a voting member:

No Vault - Hard Way
If Vault is not used, do it the hard way:
-
Generate Gossip encryption key (a 32-byte AES GCM symmetric key that’s base64-encoded).
-
Arrange for regular key rotation (using the Keyring built in Consul)
-
Install encryption key on each agent.
-
Review Gossip Telemetry output.
NOTE: To manage membership and broadcast messages to the cluster,
Refer to the Serf documentation
F. For HA on multiple datacenters federated over WAN
REMEMBER: Like Vault, Consul Datacenter federation is not a solution for data replication. There is no built-in replication between datacenters. consul-replicate is what replicates KV between datacenters.
- Enterprise Academy: Federate Multiple Datacenters (Securly connect multiple Consul datacenters with ACL replication)
- https://github.com/hashicorp/consul-k8s-wan-fed-vault-backend
The Enterprise edition of Consul enables communication across datacenters using Federate Multiple Datacenters coordinated using WAN Gossip protocol.

- https://learn.hashicorp.com/tutorials/consul/federation-gossip-wan?in=consul/networking
Setup Network Areas
Create compatible areas in each datacenter:
-
Define DATACENTER IDs
DATACENTER1_ID="dc1"
DATACENTER2_ID="dc2"
-
Repeat for each DATACENTER ID value:
consul operator area create \
-peer-datacenter="${DATACENTER1_ID}"
consul operator area create \ -peer-datacenter="${DATACENTER2_ID}" -
Run for the first datacenter with its DATACENTER_IP value:
consul operator area join \
-peer-datacenter="${DATACENTER1_ID}"  "${DATACENTER_IP}"
This establishes the handshake.
consul-replicate
-
To perform cross-data-center Consul K/V replication, install a specific tag of the consul-replicate daemon to run continuosly:
https://github.com/hashicorp/consul-replicate/tags
The daemon consul-replicate integrates with Consul to manage application configuration from a central data center, with low-latency asynchronous replication to other data centers, thus avoiding the need for smart clients that would need to write to all data centers and queue writes to handle network failures.
QUESTION: No changes since 2017, so doesn’t work with TLS1.3, arm64, new Docker versions. Developer Seth Vargo is now at Google.
https://learn.hashicorp.com/tutorials/consul/federation-gossip-wan?in=consul/networking
Replicate ACL entries
Cache ACLs for them to “ride out partitions”.
-
Configure primary datacenter servers and clients
{ "datacenter": "dc1" "primary_datacenter": "dc1" "acl": { "enabled": true, "default_policy": "deny", "enable_token_persistence": true } } -
Create ACL policy
acl = "write"
operator = "write"
service_prefix "" {
  policy = "read"
  intentions = "read"
}
REMEMBER: Intentions follow a top-down ruleset using Allow or Deny intentions. More specific rules are evaluated first.
-
Create ACL replication token
create acl token create \
  -description "ACL replication token" \
  -policy-name acl-replication
Sample response:
AccessorID:
SecretID:
Description:
Local: false
Create Time:
Policies:
-
Configure secondary datacenter agents (servers and clients):
{ "datacenter": "dc2" "primary_datacenter": "dc1" "acl": { "enabled": true, "default_policy": "deny", "enable_token_persistence": true, "enable_token_replication": true } } -
Apply replication token to servers in secondary datacenter:
Enterprise configuration
From v1.10.0 on, a full license file must be defined in the server config file before installation:
log_level     = "INFO"
server         = true
ui             = true
datacenter     = "us-east-1"
license_path   = "/opt/consul/consul.hclic"
client_addr    = "0.0.0.0"
bind_addr      = "10.1.4.11"
advertise_addr = "10.1.4.11"
advertise_addr_wan = "10.1.4.11"
TODO: Handle the license file as a secret.
license_path = "/etc/consul.d/consul.hclic"
advertise_addr
are reacheable outside the datacenter.
Agent configurations have a different IP address and these settings to auto-join based on cloud (AWS) tags:
data_dir  = "/opt/consul/data"
bootstrap_expect = 5
retry_join       = ["provider=aws region=us-east-1 tag_key=consul tag_value=true"]
retry_join_wan   = ["10.1.2.3","10.1.2.4"]
connect = {
   enabled = true
}
performance = {
   raft_multiplier = 1
}
license_path - PROTIP: some use “.txt” or “.hcl” instead of “.hclic” to avoid the need to change text editor preferences based on file extension.
retry_join specifies the cloud provider and other metadata for auto-discovery by other Consul agents.
retry_join_wan specifies the IP address of each datacenter ingress.
WAN encryption has its own encryption key.
connect refers to Consul Connect (disabled by default for security).
raft_multiplier = 1 overrides for high-performance production usage the default value 5 for dev usage. This setting multiplies the time between failed leader detection and new leader election. Higher numbers extends the time (slower) to reduce leadership churn and associated unavailability.
TLS configuration
Consul has root and intermediate CA capability built-in to create certificates.
Vault can also be used.
A CA is named “server.datacenter.domain”.
-
Generate TLS .pem files.
-
Add “verify_” TLS encryption settings to the Consul Agent config file:
...
verify_incoming = true
verify_outgoing = true
verify_server_hostname = true

ca_file = "consul-agent-ca.pem"
cert_file = "dc1-server-consul-0.pem"
key_file = "dc1-server-consul-0-key.pem"
encrypt = "xxxxxxxx"
Enterprise Autopilot CLI Commands
- Enterprise Academy: Autopilot Upgrades (Automate Upgrades with Consul Enterprise)
- Enterprise Academy: Federate Multiple Datacenters (Securly connect multiple Consul datacenters with ACL replication)
For write redundancy through automatic replication across several zones, add a tag “az” for “availability zone” to invoke the Enterprise feature “Consul Autopilot”:
autopilot = {
  redundancy_zone_tag = "az"
  min_quorum          = 5
   }
node_meta = {
   az = "Zone1"
}
The Enterprise Autopilot feature performs automatic, operator-friendly management of Consul servers, including cleanup of dead servers, monitoring the state of the Raft cluster, automated upgrades, and stable server introduction.
Autopilot enables Enterprise Redundancy Zones to improve resiliency and scaling of a Consul cluster. It can add “non-voting” servers which will be promoted to voting status in case of voting server failure. Unless during failure, Redundant zones do not participate in quorum, including leader election.
-
To get Autopilot configuration settings:
consul operator autopilot get-config
Sample response:
CleanupDeadServers = true
LastContactThreshold = 200ms
MaxTrailingLogs = 250
MinQuorum = 0
ServerStabilizationTime = 10s
RedundancyZoneTag = ""
DisableUpgradeMigration = false
UpgradeVersionTag = ""
Alternately, make an API call for JSON response:
curl http://127.0.0.1:8500/v1/operator/autopilot/configuration
{ "CleanupDeadServers": true, "LastContactThreshold": "200ms", "MaxTrailingLogs": 250, "MinQuorum": 0, "ServerStabilizationTime": "10s", "RedundancyZoneTag": "", "DisableUpgradeMigration": false, "UpgradeVersionTag": "", "CreateIndex": 5, "ModifyIndex": 5 } - Start a Consul server
-
See which Consul servers joined:
consul operator raft list-peers
Node             ID                                    Address            State     Voter  RaftProtocol
consul-server-1  12345678-1234-abcd-5678-1234567890ab  10.132.1.194:8300  leader    true   3
After a quorum of servers is started (third new server), autopilot detects an equal number of old nodes vs. new nodes and promotes new servers as voters. This triggers a new leader election, and demotes the old nodes as non-voting members.
Mesh Gateway
When performing cross-cloud service communication:
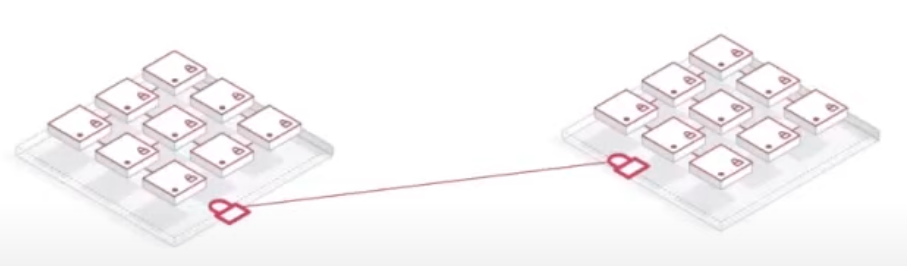
services avoid exposing themselves on public networks by using Mesh Gateways (built upon Envoy) which sit on the public internet to accept L4 traffice with mTLS. Mess Gateways perform NAT (Network Address Translation) to route traffic to endpoints in the private network.
Consul provides an easy SPOC (Single Point of Contact) to specify rules for communication instead of requesting Neworking to manually configure a rule in the firewall.
-
Generate GATEWAY_TOKEN value
-
Start the Mesh Gateway:
consul connect envoy \ -gateway mesh -register \ -service "mesh-gateway" \ -address "${MESH_PRIVATE_ADDRESS}" \ -wan-address "${MESH_WAN_ADDRESS}" \ -admin-bind 127.0.0.1:0 \ -token="${GATEWAY_TOKEN}" -
Configure one Consul client with access to each datacenter WAN link:
-
Envoy
-
Enable gRPC
Telemetry and capacity tests
Adequate reserve capacity for each component are necessary to absorb sudden increases in activity.
Alerts are necessary to request manual or automated intervention.
Those alerts are based on metrics for each component described at https://www.consul.io/docs/agent/telemetry
Artificial loads need to be applied to ensure that alerts and interventions will actually occur when appropriate. Load testing exposes the correlation of metric values at various levels of load. All this is part of a robust Chaos Engineering needed for pre-production.
-
At scale, customers need to optimize for stability at the Gossip layer.*
Manage from another Terminal
-
At the Terminal within a Consul agent instance,
create another Terminal shell instance to interact with the Consul agent runningconsul members
A sample successful response:
Node         Address         Status  Type    Build  Protocol  DC   Partition Segment
Judiths-MBP  127.0.0.1:8301  alive   server  1.12.0  2         dc1  default <all>
PROTIP: The above command is only needed once to join a cluster. After that, agents Gossip with each other to propagate membership information with each other.
This error response reflects that CLI commands are a wrapper for API calls:
Error retrieving members: Get "http://127.0.0.1:8500/v1/agent/members?segment=_all": dial tcp 127.0.0.1:8500: connect: connection refused
BTW, to join a WAN, it’s
consul members -wan
-
For more detail about Tags:
consul members -detailed
Sample response:
Node                  Address         Status  Tags
wilsonmar-N2NYQJN46F  127.0.0.1:8301  alive   acls=0,ap=default,build=1.12.0:09a8cdb4,dc=dc1,ft_fs=1,ft_si=1,id=40fee474-cf41-1063-2790-c8ff2b14d4af,port=8300,raft_vsn=3,role=consul,segment=<all>,vsn=2,vsn_max=3,vsn_min=2,wan_join_port=8302
Rejoin existing server
If a Consul server fails in a multi-server cluster, bring the server back online using the same IP address.
consul agent -bootstrap-expect=3 \
-bind=192.172.2.4 -auto-rejoin=192.172.2.3
Consul Tutorials from HashiCorp
Leader/Follower (instead of Master/Slave)
https://learn.hashicorp.com/tutorials/cloud/get-started-consul?in=consul/cloud-get-started
G. Integrations to legacy VMs, mainframes, etc.
- https://medium.com/hashicorp-engineering/supercomputing-with-hashicorp-5c827dcb2db8
Use this to learn about configuring for integrating HashiCorp Consul to work across the entire Enteprise landscape of technologies (another major differentiator of HashiCorp Consul).
Multi-platform (VMWare, mainframe)
VIDEO: Many enterprises also have legacy applications running VMware or still in a mainframe.
That’s where HashiCorp Consul comes in, with multi-platform/cloud

VIDEO: Kubernetes was designed with features to address each, but Consul sychronizes across everal Kubernetes instances – in different clouds – and also sychronizes with Serverless, Cloud Foundry, OpenShift, legacy VMs, even mainframes.
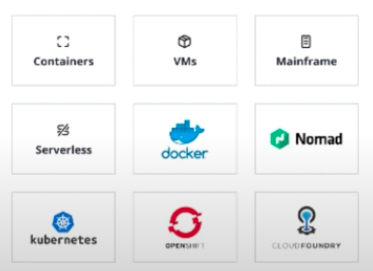
Consul provides better security along with less toil (productivity) for both Kubernetes and legacy platforms, across several clouds.
That’s full enterprise capabilities.
“Multi-platform and multi-cloud choose you, due to corporate mergers and acquisitions and capacity limits in some cloud regions”
You can see how Consul behaves on Power 9 (PPC) and IBM Z (S390x) “mainframe supercomputers” without the expense, emulate them with Hercules or QEMU on pure X86_64 Windows PC, Xeon Linux workstation and KVM but it can also be done on a Mac. Power9, ended up being much simpler than S390.
Using Vagrant
-
VIDEO: Based on a Kubernetes 5-node cluster created using this Helm chart:
-
Install Vagrant and download the Vagrantfile
brew install vagrant  # Vagrant 2.2.19
curl -O https://github.com/hashicorp/consul/blog/master/demo/vagrant-cluster/Vagrantfile
CAUTION: As of this writing, Vagrant does not work on Apple M (ARM) chipset on new macOS laptops.
vagrant up
SSH into each server: vagrant ssh n1
helm install ./consul-helm -f ./consul-helm/demo.values.yaml --name consul
- Install Consul binary
- Add Consul Connect to a Kube app
- Integrate legacy apps with Kubernetes
Kubernetes runs a sample “emojify” app which runs an NGNX website calling the “facebox” service API running a machine-learning model to add emoji images on the faces people in input photos (from Honeycomb.io)

“502 Bad Gateway” appears during deployment.
Connect to a Payment service outside Kubernetes.
Customize HTTP Response Headers
- Ask whether you app should have additional security headers such as X-XSS-Protection for API responses.
Collaborations
Ambassador’s Edge Stack (AES) for service discovery.
Competitors
See https://www.consul.io/docs/intro/vs
“[23:07] “Consul Connect is probably the most mature simply because of Consul. Consul is a decade of polished technology, battle-tested in each production environment. It’s a safe choice in terms of stability and features.” – The Best Service Mesh: Linkerd vs Kuma vs Istio vs Consul Connect comparison + Cilium and OSM on top
Service Discovery: Hystrix, Apache, Eureka, SkyDNS
CASE STUDY: Self-Service Service Mesh With HCP Consul Tide abandoned its adoption of AWS AppMesh in favor of HashiCorp Consul, making the transition in only 6 weeks with no downtime and no big-bang migration.
Istio
GitLab
https://konghq.com/kong-mesh
Cisco
H3C
ManageEngine OpManager
Extreme Networks, Inc
Arista Networks
Big Cloud Fabric
Equinix Performance Hub
HPE Synergy
NSX for Horizon
OpenManage Network Manager
CenturyLink
Huawei Cloud Fabric
Aricent
Cloudscaling
Cumulus
HostDime
ArgoCD
Compare against these Reference architecture diagram:
- Architecture for Gateway Load Balancer – East/West Inspection Use Gateway Load Balancer and Transit Gateway to create a highly available and scalable bump-in-the-wire solution for East/West inspection.
-
https://learn.hashicorp.com/tutorials/cloud/amazon-transit-gateway
-
Architecture for Gateway Load Balancer – Centralized Egress Inspection Use Gateway Load Balancer to build highly available and scalable centralized egress environments with traffic inspection.
- Workload Discovery on AWS is a tool to visualize AWS Cloud workloads. Use Workload Discovery on AWS to build, customize, and share detailed architecture diagrams of your workloads based on live data from AWS. https://www.cloudcraft.co/ or https://www.lucidchart.com/blog/how-to-build-aws-architecture-diagrams
References
https://www.hashicorp.com/blog/consul-1-12-hardens-security-on-kubernetes-with-vault?
https://www.pagerduty.com/docs/guides/consul-integration-guide
Simplifying Infrastructure and Network Automation with HashiCorp (Consul and Nomad) and Traefik
VIDEO: “Community Office Hours: HashiCorp Consul on AWS ECS” by Rosemary Wong and Luke Kysow
VIDEO: “Service Mesh and Your Legacy Apps: Connecting to Kubernetes with Consul” by Marc LeBlanc (with Arctiq)
“A Practical Guide to HashiCorp Consul — Part 1 “ by Velotio Technologies
https://thenewstack.io/3-consul-service-mesh-myths-busted/
https://www.youtube.com/watch?v=UHwoEGSfDlc&list=PL81sUbsFNc5ZgO3FpSLKNRIIvCBvqm-JA&index=33 The Meshery Adapter for HashiCorp Consul
https://webinars.devops.com/getting-hashicorp-terraform-into-production (on Azure) by Mike Tharpe with TechStrong
https://github.com/alvin-huang/consul-kv-github-action GitHub Action to pull a value from Consul KV
https://www.hashicorp.com/resources/unboxing-service-mesh-interface-smi-spec-consul-kubernetes
BOOK: “HashiCorp Infrastructure Automation Certification Guide”by Ravi Mishra
Packt BOOK: “Full Stack Development with JHipster - Second Edition” has a section on management of a full-featured sample Java Spring app using Consul instead of the default Eureka (JHipster Registry) which only supports Spring Boot. The author says The main advantages of using Consul are:
- It has a lower memory footprint.
- It can be used with services that are written in any programming language.
- It focuses on consistency rather than availability.
“Consul also provides service discovery, failure detection, multi-datacenter configuration, and key-value storage.”
VIDEO: “HashiCorp Consul: Service Networking Made Easy”
Service Configuration
REMEMBER: There is a striction on each KV store object size of 512 KB.
REMEMBER: Unlike Vault which uses slashes as folders within a hierarchial path, Consul treats slashes as any other chacter in a string.
References
It’s amazing to me that much of Consul was described by Armon Dadgar in this video at the March 7, 2014 qconsf.com (Slide deck here).
“Consul: Microservice Enabling Microservices and Reactive Programming” Mar. 27, 2015 by Rick Hightower provides a concise yet deep description of Consul:
- Consul is a service discovery system that provides a microservice style interface to services, service topology and service health.
With service discovery you can look up services which are organized in the topology of your datacenters. Consul uses client agents and RAFT to provide a consistent view of services. Consul provides a consistent view of configuration as well also using RAFT. Consul provides a microservice interface to a replicated view of your service topology and its configuration. Consul can monitor and change services topology based on health of individual nodes.
Consul provides scalable distributed health checks. Consul only does minimal datacenter to datacenter communication so each datacenter has its own Consul cluster. Consul provides a domain model for managing topology of datacenters, server nodes, and services running on server nodes along with their configuration and current health status.
Consul is like combining the features of a DNS server plus Consistent Key/Value Store like etcd plus features of ZooKeeper for service discovery, and health monitoring like Nagios but all rolled up into a consistent system. Essentially, Consul is all the bits you need to have a coherent domain service model available to provide service discovery, health and replicated config, service topology and health status. Consul also provides a nice REST interface and Web UI to see your service topology and distributed service config.
Consul organizes your services in a Catalog called the Service Catalog and then provides a DNS and REST/HTTP/JSON interface to it.
To use Consul you start up an agent process. The Consul agent process is a long running daemon on every member of Consul cluster. The agent process can be run in server mode or client mode. Consul agent clients would run on every physical server or OS virtual machine (if that makes more sense). Client runs on server hosting services. The clients use gossip and RPC calls to stay in sync with Consul.
A client, consul agent running in client mode, forwards request to a server, consul agent running in server mode. Clients are mostly stateless. The client does LAN gossip to the server nodes to communicate changes.
A server, consul agent running in server mode, is like a client agent but with more tasks. The consul servers use the RAFT quorum mechanism to see who is the leader. The consul servers maintain cluster state like the Service Catalog. The leader manages a consistent view of config key/value pairs, and service health and topology. Consul servers also handle WAN gossip to other datacenters. Consul server nodes forwards queries to leader, and forward queries to other datacenters.
A Datacenter is fairly obvious. It is anything that allows for fast communication between nodes, with as few or no hops, little or no routing, and in short: high speed communication. This could be an Amazon EC2 availability zone, a networking environment like a subnet, or any private, low latency, high
VIDEO: “Consul and Complex Networks” by James Phillips, Consul Lead at HashiCorp</a> (Slidedeck)
References on Consul:
- Video course on Pluralsight: “Getting Started with HashiCorp Consul” by Wes Higbee refercing code at https://github.com/g0t4/course2-consul-gs which uses docker compose referencing Docker images at https://hub.docker.com/washigbee
- VIDEO: “Consul eliminates load balancers”
-
VIDEO: “Using Consul for Network Observability & Health Monitoring” referencing this repo
-
Pluralsight “Ensuring Security in HashiCorp Consul” by Chris Green (direct-root.com)
-
Amplify Your Service Mesh Without Compromising Zero Trust Security”
- VIDEO: “A Closer Look at HashiCorp Consul” by Janakiram MSV
HashiCorp Corporate Social
Twitter: @hashicorp
Ambassadors (first announced March, 2020)
LinkedIn: https://www.linkedin.com/company/hashicorp
Facebook: https://www.facebook.com/HashiCorp
- VIDEO: Demystifying Service Mesh by Stephen Wilson (Chief Enablement Architect)
- VIDEO: Consul Service Mesh - Deep Dive