

Pick which crew of robots to build your servers
![]()
![]()
![]()
![]()
![]()
![]()
![]()
![]()
![]()
![]()
![]()
![]()
![]()
Overview
- Manually configure component services
- Elastic Beanstalk
- Opsworks Chef
- Ansible using CloudFormation
- EC2
- Amazon EC2 Cloud Images
- Client WorkSpaces in AWS cloud
- Launch Workspaces
- Set-up Users
- Amazon WorkSpaces Application Manager (WAM)
- Install WorkSpaces client
- Repeat Login
- Configure Remote Assistance
- Configure Windows 7 Folder Options
- Configure Windows 7 Toolbar
- Install posh-git for PowerShell
- Install clients using Chocolatey
- Clone Samples
- Shut-down and Resume
- Custom WorkSpaces
- Docker
- More on Amazon
- More on DevOps
This tutorial describes the options AWS provides to automate setup of multi-stage (dev+QA+prod) enterprise environments within EC2.
- Amazon EC2 Cloud Images of server machines
- On an internet browser to Amazon WorkSpaces (virtual Desktop machines)
- Docker Windows instance
NOTE: Content here are my personal opinions, and not intended to represent any employer (past or present). “PROTIP:” here highlight information I haven’t seen elsewhere on the internet because it is hard-won, little-know but significant facts based on my personal research and experience.
The options:
-
Manually configure the various components using the AWS Management Console at http://aws.amazon.com/ on internet browsers. See my AWS On-boarding for a tutorial on the AWS Management Console and Consoles on mobile devices.
-
Elastic Beanstalk for developers to quickly bring up standard server configurations with no SSH capability.
-
Opsworks “configuration as code service” which sets up servers by running Chef recipies obtained from a Chef Cookbook repository.
-
CloudFormation for sysadmins to create JSON template files which configure ALL AWS services.
-
Value-added services outside Amazon, such as Terraform (and licensed Atlas) from HashiCorp.
Manually configure component services
Each environment within AWS for enterprise use requires several services. Here is the sequence of dependencies:
Elastic Beanstalk
![]()
Before doing this, setup default VPC, subnets, and Security Groups.
-
Services > Compute > Beanstalk
NOTE: You can’t SSH into individual servers.
-
Specify an Application Name.
PROTIP: Define a convention that applies to apps, such as a project, feature, and version number, such as PS1-bean2-node-v01.
PROTIP: Include in the name a code for the platform being used.
-
Select a Platform.
-
Click Configure more options.
Beanstalk is considered a “Platform-as-a-Service” (PaaS), that does the “heavy lifting” to get infrastructure online, with load balancing, autoscaling, and health monitoring.
The Virtual Machine is for the Platform chosen in the previous step.
The Low cost configuration preset is the default.
In the Scaling section, the Environment type is single instance.
-
Click the Highly available configuration preset.
Notice the Environment type changed to “loadbalancing, autoscaling” with Scale instance: 1-4.
Beanstalk is free to use. You only pay for servers deployed by it.
-
Click Modify in the Notifications section and input your email address.
-
Switch temporarily to your email to confirm the subscription.
-
Since this is a tutorial, select the Low cost single instance.
-
Scroll down to click Create app.
Beanstalk Settings
Configuration information stored in the .ebextensions folder containing:
-
a dynamodb.config
The file contains functions definitions such as
Fn::GetOptionSetting:with parameters. -
a options.config files.
-
The .elasticbeanstalk folder ???
Opsworks Chef
Opsworks is a higher level tool than CloudFormation, offering more customization than Elastic Beanstalk.
-
Click Add your first stack.
NOTE: You cannot mix and match Windows with Linux servers.
Opsworks is called a “configuration as code service” because it sets up servers by running Chef recipies obtained from a Cookbook repository.
NOTE: There is no equivalent for Puppet.
Each “layer” is a blueprint and container for instances. (JSON) defining stacks:
- OpsWorks
- ECS
-
RDS
A different Chef recipie for each event within the lifecycle :
- Setup
- Configure
- Deploy
- Undeploy
- Shutdown
Opsworks Cookbooks from @Danilop.
NOTE: Each server has a Chef agent installed.
The lack of agents is why Ansible is becoming more popular.
Ansible using CloudFormation
My tutorial on AWS High-Availability using CloudFormation, which is the current rage (June 2016).
EC2
Amazon EC2 Cloud Images
A hardened Amazon Machine Image (AMI) containing Visual Studio 2017 Community Edition on Windows Server 2016 costs 28 cents per hour on a t2.medium in the US. 20 cents of that goes pays for support from Cognosys, its creator. 888.489-2723
Cost per hour increases in a straight line (linear) way for number of CPUs:

Cost per hour increases in the same way for amount of Memory (RAM):

ec2instances.info provides a spreadsheet.
WARNING: On AWS EC2, Windows Server 2016 Nano servers do not support RDP, only Windows PowerShell.
A t2.medium has 2 cores and 4 GB.
PROTIP: With Amazon, you pay for hourly increments. With Google, you pay per minute.
Connect to an instance in AWS EC2:
- Create an Amazon EC2 account at http://aws.amazon.com/ec2/.
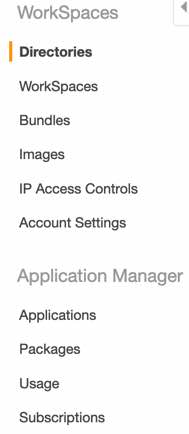
Client WorkSpaces in AWS cloud
This approach works not just a MacOS laptop, but for any computer running a modern browser, such as on a Chromebook. No files are transferred, just graphic images of a screen on servers within the AWS cloud. This makes for more stringent security, but also means significant lag that affect productivity.
-
Use an appropriate AWS IAM account to login to the WorkSpaces Console at
https://console.aws.amazon.com/workspaces/home
- Select the region.
- Click “Directories” menu and set up a Directory.
- Launch. Select the Directory.
- For the simplest approach, select “Simple AD” Next. Small AWS Managed Microsoft AD”.
- Use a password generator UoyJhssxbcQzrDwT8ciF. Next.
- Choose VPC and two subnets.
-
Wait for Status to go from “Requested” to “Creating” to “Active”.
Launch Workspaces
An image contains only the OS, software, and settings. A bundle is a combination of both that image and the hardware from which a WorkSpace is launched.
The Free Tier provides two Standard bundle WorkSpaces for up to 40 hours of combined use per month, for two calendar months, from the time you create your first WorkSpace. Usage time accrues while you’re actively using your WorkSpace as well as the time it takes to stop after a specified period of inactivity, which by default is set to one hour. If you exceed the Free Tier limits, you will be charged the standard Amazon WorkSpaces hourly rate for the additional resources you use. At the end of two calendar months, the WorkSpaces you launched in the Free Tier will automatically be billed at the applicable hourly rate.
Amazon’s regular pricing is $25 to $75 per month per user, which Amazon estimates is 59% less than traditional Virtual Desktop Infrastructures (VDI) from Citrix and VMware.
Amazon’s approach uses newer tech than VDI.
- Click “WorkSpaces” in menu.
- Click blue “Launch WorkSpaces”.
-
Select the Directory and Subnets.
Set-up Users
-
Specify for each user his/her Username, First Name, Last Name, and Email for the Bundle selected.
PROTIP: Use a email as the Username.
- Click “Create Users”.
-
Check the user you want.
If a new user input was already defined, the form is cleared.
- Click “Show All Users”.
- Check the user.
- Click “Next Step”.
- Select Bundle for the OS (with default 80 GB root and 50 GB user volume).
- Select Running Mode (AlwaysOn or AutoStop hours).
-
Click “Next Step”.
- Click Launch Workspace (for all users).
- Wait (about 20 minutes) for the Workspace Console goes from PENDING to AVAILABLE (in green letters).
-
To refresh the page, type command+R or click the recycle icon.
Amazon WorkSpaces Application Manager (WAM)
-
Switch to return to managed users in the Amazon WorkSpaces Application Manager (WAM) for your current region at:
https://us-west-2.console.aws.amazon.com/wam/home
CAUTION: There is no moving WorkSpaces from one region to another.
There is a WAM Standard for additional functionality.
Install WorkSpaces client
- In each user’s email client, open the welcome email and click the link.
- Set your WorkSpaces credentials with a password.s
-
Highlight the registration code in the email and copy to your Clipboard.
-
Choose the link for your laptop model at
http://clients.amazonworkspaces.com -
Click to download the “WorkSpaces.pkg” to your Downloads folder.
On a MacOS, it’s file “WorkSpaces.pkg” (38.2 MB taking 115.3 MB space).
On a Chromebook, click “ADD TO CHROME” at the upper-right corner.
-
Switch to Finder and click to invoke the installer the Chrome application to enable the proprietary PC over IP (PCoIP) protocol (from Teradici) to compress, encrypt and rapidly transport image pixels between client and server.
-
Double-click on the installer and click Continue and finally, Install. Provide your password when requested.
-
Move the installer file (WorkSpaces.pkg) to Trash, to recover disk space.
-
Do a Chromebook search to verify that the Amazon WorkSpaces client app icon appears.
-
BLAH: The full graphic streaming virtual desktops tends to eat up much bandwidth. So measure how much you have used before and after sessions.
Optionally, your company’s existing on-premises Active Directory (AD) can be reached by Amazon via an Amazon Virtual Private Cloud (VPC) with a hardware virtual private network (VPN) connection or a dedicated connection with AWS Direct Connect.
Once linked up, you use the AWS Management Console to select the users in your Active Directory who will receive a WorkSpace.
- Open the app for the first time.
- Type your user name and password and choose Sign In.
- Switch to your user’s email client and highlight the registration code from the “Your Amazon WorkSpace” email, then paste on the form.
-
Click Register.
Repeat Login
NOTE: 1Password cannot auto-fill Username and Password on the MacOS WorkSpaces app nor on Chrombook.
-
Login using the Username and password for the WorkSpaces client.
If your Amazon WorkSpaces administrator has enabled multi-factor authentication for your organization’s WorkSpaces, you are prompted for a passcode to complete your login.
CAUTION: Only one browser can be used at the same time. Amazon logs off a session when another session is started on another computer.
-
If your Amazon WorkSpaces administrator has not disabled the “Remember Me” feature, you are prompted to save your credentials securely so that you can connect to your WorkSpace easily in the future. Your credentials are securely cached while the application is running.
After the client application connects to your WorkSpace, your WorkSpace desktop is displayed.
-
(Optional) If your WorkSpace uses an AD Connector directory, update the maximum lifetime of the Kerberos ticket by following the steps in Configuring Kerberos Policies in the Microsoft TechNet Library.
-
If you need to disable the “Remember Me” feature, search for help in the Amazon WorkSpaces forum.
Configure Remote Assistance
- Open PowerShell window.
-
Install Remote Assistance using this PowerShell command:
Add-WindowsFeature Remote-Assistance </tt>
Open port 3389 in the firewall and in the Security Group, Remote Desktop should work using the username and password in the traditional way.
Configure Windows 7 Folder Options
- Click the Windows Start round icon at the bottom left of the screen.
- Type “folder options” (without the quotes) until the line “Folder Options” appears for you to click at the top of the menu.
- In the “Folder Options” dialog box, click the “View” tab at the top of the window.
- Select “Show hidden files, folders, and drives”.
- Click to uncheck the box for “Hide extensions for known file types”.
-
Click the “OK” button at the bottom of the dialog box.
Configure Windows 7 Toolbar
- Click the Windows Start round icon at the bottom left of the screen.
- Click All Programs, Accessories. All the usual tools are there.
-
Drag Notepad and drop it on the tool bar at the bottom of the screen.
- Click the Windows PowerShell folder.
-
Drag “Windows PowerShell” and drop it on the tool bar at the bottom of the screen.
- Open Windows Explorer from the tool bar at the bottom of the screen.
- Click on “Computer”. Notice there is no C: drive and no access to C:\Windows internals.
-
Double-Click on “User Profile D:” drive.
Notice there are 50 GB for you.
-
Double-Click on D: and navigate into folder Users, your account name.
PROTIP: Here is the default location when command line windows open by default. So place scripts here (among folders).
- Right-Click Windows PowerShell to select “Run as Administrator”.
-
Type:
echo $Env:USERPROFILE
This is your user home folder.
-
Set permissions:
set-executionpolicy remotesigned
Execution Policy Change
The execution policy helps protect you from scripts that you do not trust. Changing the execution policy might expose
you to the security risks described in the about_Execution_Policies help topic at
http://go.microsoft.com/fwlink/?LinkID=135170. Do you want to change the execution policy?
[Y] Yes  [N] No  [S] Suspend  [?] Help (default is "Y"): Y
-
Type Y to confirm.
-
Within PowerShell you can also go to your home folder by typing a tilde:
cd ~
-
Verify whether you can create a PowerShell script file:
Add-Content helloworld.ps1 ‘Write-Host “Hello World”’
This is the PowerShell equivalent of
echo "Hello World" >helloworld.ps1. -
List directory:
dir
-
Type the first letter h and press Tab to auto-complete:
./helloworld.ps1
Instead of “Hello World”, if you get this, it means executionpolicy was not set correctly:
 + CategoryInfo          : SecurityError: (:) [], PSSecurityException
 + FullyQualifiedErrorId : UnauthorizedAccess
Install posh-git for PowerShell
TODO: file:///C:/Program%20Files%20(x86)/AWS%20Tools/Documentation/AWSToolsForWindows.html AWS Tools for Windows AWS SDK for .NET
-
To exchange files among a group of people, setup:
https://amazonworkdocs.com/en/clientsInstall clients using Chocolatey
- Right-click on cmd and select “Run as Administrator”.
-
Copy this and right-click in the command window:
@"%SystemRoot%\System32\WindowsPowerShell\v1.0\powershell.exe" -NoProfile -InputFormat None -ExecutionPolicy Bypass -Command "iex ((New-Object System.Net.WebClient).DownloadString('https://chocolatey.org/install.ps1'))" && SET "PATH=%PATH%;%ALLUSERSPROFILE%\chocolatey\bin" -
Install Java Development Kit for version 8 using Chocolatey:
choco install jdk8 -y
-
Install Chrome browser:
choco install googlechrome -y
-
Install Git for Windows client:
choco install git -y
Alternately, to add a Git client manually, open Firefox, search for “Git for Windows”. Click Download. Click Save file. Click the down arrow for a list of downloads. Click to Open File. Run. Yes to UAC. Next all, but Git LFS. then Finish. Close Firefox. Click Windows icon. All Programs. Click Git, Git Bash.
-
Install Posh Git for PowerShell:
choco install poshgit -y
- Launch each and configure the window properties to enable Quick Edit and set Layout Height (scroll buffer) to 9999 lines.
https://www.develves.net/blogs/asd/articles/using-git-with-powershell-on-windows-10/#fn:start
Clone Samples
Download Git repository containing bootstrap script:
- Open a Git Bash window.
-
cd to where you add Git repositories:
cd gits;
git clone https://github.com/wilsonmar/loadrunner.git --depth=1
git clone https://github.com/wilsonmar/git-utilities.git --depth=1Shut-down and Resume
BLAH: It takes many minutes to stop and resume.
Custom WorkSpaces
-
As an administrator, in the Console, select the WorkSpace and select “Create Image” to create an image with your applications and settings.
NOTE: Custom images created from Amazon WorkSpaces Graphics bundles can only be used with Graphics bundles, and custom images created from Value, Standard, Performance, or Power bundles can only be used with those bundles. Most Amazon WorkSpace images are available within 45 minutes.
See http://docs.aws.amazon.com/console/workspaces/images
Docker
Docker is now a favored approach because it runs the same (unaltered) (Dockerized apps) on Windows, Mac, and Linux platforms.
Docker provides a transparent interface to operating systems.
More on Amazon
This is one of a series on Amazon:
- AWS Cloud Services Comparisons
- AWS Well-Architected Cloud
- AWS Cloud Services
- AWS IAM
- AWS CLI
- AWS On-boarding (GUI, CLI, API)
- AWS Security
- AWS Data Tools
- AWS DevOps (CodeCommit, CodePipeline, CodeDeploy)
- AWS server deployment options
- AWS CDK
- Build load-balanced servers in AWS EC2
- AWS Networking
- AWS Xray
- IoT on AWS
- AWS Lambda
- AWS Lambda
More on DevOps
This is one of a series on DevOps:
- DevOps_2.0
- ci-cd (Continuous Integration and Continuous Delivery)
- User Stories for DevOps
- Git and GitHub vs File Archival
- Git Commands and Statuses
- Git Commit, Tag, Push
- Git Utilities
- Data Security GitHub
- GitHub API
- Choices for DevOps Technologies
- Pulumi Infrastructure as Code (IaC)
- Java DevOps Workflow
- AWS DevOps (CodeCommit, CodePipeline, CodeDeploy)
- AWS server deployment options
- Cloud services comparisons (across vendors)
- Cloud regions (across vendors)
- Azure Cloud Onramp (Subscriptions, Portal GUI, CLI)
- Azure Certifications
- Azure Cloud Powershell
- Bash Windows using Microsoft’s WSL (Windows Subsystem for Linux)
- Azure Networking
- Azure Storage
- Azure Compute
- Digital Ocean
- Packer automation to build Vagrant images
- Terraform multi-cloud provisioning automation
-
Hashicorp Vault and Consul to generate and hold secrets
- Powershell Ecosystem
- Powershell on MacOS
- Jenkins Server Setup
- Jenkins Plug-ins
- Jenkins Freestyle jobs
- Docker (Glossary, Ecosystem, Certification)
- Make Makefile for Docker
- Docker Setup and run Bash shell script
- Bash coding
- Docker Setup
- Dockerize apps
- Ansible
- Kubernetes Operators
- Threat Modeling
- API Management Microsoft
- Scenarios for load
- Chaos Engineering