

It’s less like Power Rangers clicking rings, more like living among expats in a foreign country
![]()
![]()
![]()
![]()
![]()
![]()
![]()
![]()
![]()
![]()
![]()
![]()
![]()
Overview
NOTE: Content here are my personal opinions, and not intended to represent any employer (past or present). “PROTIP:” here highlight information I haven’t seen elsewhere on the internet because it is hard-won, little-know but significant facts based on my personal research and experience.
June 2017 was the first “beta” release of Microsoft’s WSL (Windows Subsystem for Linux).
Around May 2019, Microsoft released WSL2 (version 2).
WSL is so much simpler than Cygwin
VIDEO and BLOG: Scott Hanselman explains it all: VS Code with Remote Extension, Docker, and the Windows Terminal.
Architecture
The diagram for WSL1: (TODO: Update for WSL2 needed)
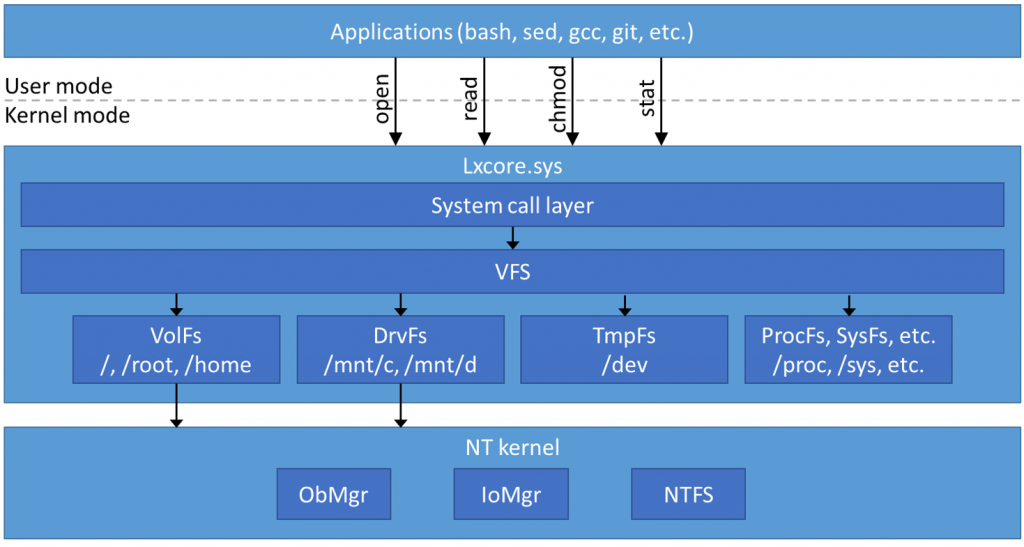
gcc is installed by ???. bash, git can be installed using Choclately.
Lxcore.sys is the driver that recognizes Bash commands and other Linux utilities such as chmod to change permissions.
VFS is the Virtual File System.
From inside Bash, DrvFS gets to Windows.
From inside Windows, VolFS gets to Linux symbolic files and its case sensitivity.
NTFS (New Technology File System) is the file system controlling hard drives.
CAUTION: WSL provides no GPU support, so it can’t run Linux GUI programs such as Gnome, KDE, etc.
Got 64-bit?
Verify your PC’s CPU architecture and Windows version/build number:
-
Start: Click the Windows icon/keyboard key to open Settings, System, About (at the bottom of the list).
Windows 10:

-
Get a newer computer if you don’t see:
System type 64-bit operating system, x64-based processor.
The technical requirement is that WSL currently runs “ELF64 Linux binaries”.
-
If you have configured PowerShell to run commands, get your Windows Server build number within PowerShell:
systeminfo | Select-String "^OS Name","^OS Version"
Example response:
OS Name: Microsoft Windows 11 Home
OS Version: 10.0.22621 N/A Build 22621
-
Get the installer: NOTE: We’re not using the Register to be in the Windows Insider Build.
wsl --install
- Ubuntu-18.04 - CanonicalGroupLimited.Ubuntu18.04onWindows_1804.2018.817.0_x64__79rhkp1fndgsc
- Ubuntu 18.04 ARM for running on Raspberry Pi?
- Ubuntu-16.04 - Ubuntu_1604.2019.523.0_x64.appx
- Debian GNU/Linux - DebianGNULinux_1-1-3-0_x64__76v4gfsz19hv4
- Kali Linux
- OpenSUSE Leap 42
- SUSE Linux Enterprise Server 12
- Fedora Remix for WSL (licensed)
- Pengwin is paid/licensed. Based on Debian.
- WLinux ???
Virtualization
Virtualization must be enabled in the computer bios, instructions for this vary between manufacturers but it’s usually a simple on/off listing in the BIOS.
Enable WSL Windows Feature
-
Press the Windows Start button and immediately type in the search box that appears:
Turn Windows features on or off
-
Type enough until the option appears in the menu, then click on the option.
Wait a while for all items to appear.
- Scroll down to check “Windows Subsystem for Linux”, then click OK to exit dialog, then Restart your computer.
(This option was added since the “Anniversary” and “Creators Update” of Windows 10.)
## Windows Terminal
- Click the Windows Start and get in the Microsoft Window Store to install the new Windows Terminal. It is like tmux - it makes it easy to open multiple panes with different prompts for bash, command prompt and PowerShell.
## Download installer
-
Following instructions at https://docs.microsoft.com/en-us/windows/wsl/wsl2-install, in PowerShell, enable the ‘Virtual Machine Platform’ optional component (whatever that means):
dism.exe /online /enable-feature /featurename:Microsoft-Windows-Subsystem-Linux /all /norestart
dism.exe /online /enable-feature /featurename:VirtualMachinePlatform /all /norestart
-
Confirm whether Windows Subsystem for Linux is enabled in PowerShell:
Get-WindowsOptionalFeature -Online -FeatureName Microsoft-Windows-Subsystem-Linux
The response I got:
FeatureName      : Microsoft-Windows-Subsystem-Linux
DisplayName      : Windows Subsystem for Linux
Description      : Provides services and environments for running native user-mode Linux shells and tools on Windows.
RestartRequired  : Possible
State            : Enabled
CustomProperties :
                ServerComponent\Description : Provides services and environments for running native user-mode
                Linux shells and tools on Windows.
                ServerComponent\DisplayName : Windows Subsystem for Linux
                ServerComponent\Id : 1033
                ServerComponent\Type : Feature
                ServerComponent\UniqueName : Microsoft-Windows-Subsystem-Linux
                ServerComponent\Deploys\Update\Name : Microsoft-Windows-Subsystem-Linux
Set Linux distro to be backed by WSL 2
-
PROTIP: WSL provides a choice of Linux distributions. For a list:
wsl -l
Distributions:
Ubuntu (Default)
docker-desktop
docker-desktop-data
PROTIP: Ubuntu was the first distro tested with WSL, so it’s probably the most well tested. But it’s not supported by Windows 10 S. Both Ubuntu and Debian make use of the apt-get (Advanced Packaging Tool) package manager and dpkg command.
BTW Ubuntu is a Linux distribution from Canonical, Inc. which also created Virtualenv for Python.
Kali Linux is used by security researchers (not for production use).
Ubuntu version/release
-
In a web browser, know what the latest version of Ubutu is:
Note there is a name for each release.
WARNING: Time is needed for integration into Windows, so WSL probably does not support the very latest version of Ubuntu.
- From the Start menu, select the Microsoft Windows Store.
-
Search for Ubuntu:
Scroll to see the latest version of Ubuntu for Windows (such as 22.4.5 LTS).
-
Click “Get”:
Once installed, the ‘Install’ button will change to ‘Launch’, click the ‘Launch’ button.
One can, but don’t: alternately, download the “.appx” installer by constructing the curl command for the Ubuntu version listed above, such as:
curl -L -o ubuntu-1604.appx https://aka.ms/wsl-ubuntu-1604
This is instead of the Invoke-WebRequest PowerShell command or Microsoft Store for Business used within enterprises.
-
Set the distribution code for the Linux distro downloaded (I don’t know why):
wsl --set-version Ubuntu 2
-
Verify what versions of WSL your distros are using:
wsl -l -v
-
Make WSL 2 your default architecture (as if you’ll ever want to go back):
wsl.exe --set-default-version 2

## Where is WSL?

PROTIP: WSL runs within the Vemmem process.
-
Open Task Manager to see it.
Ubuntu Install, Launch, and configure
https://kubernetes.io/blog/2020/05/21/wsl-docker-kubernetes-on-the-windows-desktop/
- In the Windows Start menu section titled “WSL Linux Distros”,
-
Scroll to “Ubuntu on Windows”. Right-click and select “Pin to Start”

- Repeat to select “Pin to taskbar” at the edge of every screen.
-
Repeat to “Run as Administrator” or Launch a new instance.
- The first time a newly installed distro runs, a Console window opens, and you’ll see
Installing, this may take a few minutes...
Then…
Installation successful
   Please create a default UNIX user account. The username does not need to match your Windows username.
   For more information visit: https://aka.ms/wslusers
   Enter new UNIX username: _
- Enter a username your make up.
PROTIP: The WSL user is not “root” with admin priviledges.
- PROTIP: Get the password copied into your Clipboard from 1Password or other Password Manager, then paste onto the screen.
A shortcut is added to your start menu named:
Bash on Ubuntu on Windows
-
Click the shortcut.
By default, the prompt is your Linux user name @ your machine name:/mnt/c/Users/%USERNAME%$
You should now see a pop-up window showing Ubuntu, such as this example:
The authenticity of host '192.168.1.16 (192.168.1.16)' can't be established. ED25519 key fingerprint is SHA256:j8f47S7QkzcnJ+hXpwnEQpL4RveqD2MQx79yVhiYXDE. This key is not known by any other names Are you sure you want to continue connecting (yes/no/[fingerprint])? yes Warning: Permanently added '192.168.1.16' (ED25519) to the list of known hosts. kermitv@192.168.1.16's password: Welcome to Ubuntu 22.04.1 LTS (GNU/Linux 5.15.0-57-generic x86_64) * Documentation: https://help.ubuntu.com * Management: https://landscape.canonical.com * Support: https://ubuntu.com/advantage System information as of Sun Jan 8 01:00:39 AM UTC 2023 System load: 1.12841796875 Processes: 235 Usage of /: 43.5% of 9.75GB Users logged in: 0 Memory usage: 22% IPv4 address for docker0: 172.17.0.1 Swap usage: 0% IPv4 address for ens33: 192.168.1.16 60 updates can be applied immediately. To see these additional updates run: apt list --upgradable -
You brave enough:
apt list --upgradable
sudo apt-get upgrade
-
View details of the Linux distro currently running:
lsb_release -a
The version at time of this writing:
No LSB modules are available.
Distributor ID: Ubuntu
Description: Ubuntu 22.04.1 LTS
Release: 22.04
Codename: jammy
### Linux Folders and variables
-
See where Ubuntu is installed using a Windows system variable referenced using a Windows % wrapper rather than Bash $ prefix:
%localappdata%\lxss\
Note the directory is marked as a hidden system folder. That’s a clue that you should not modify files in your bash environment using Windows File Explorer, console, or apps.
Creating and/or modifying files in this location using Windows tools and apps corrupts the system because it is read-locked. Here is an explanation.
### Within Ubuntu
-
Type your admin password for all subsequent commands:
su -l
### Install kubectl
-
Install latest release of kubectl on Ubuntu:
sudo apt-get update && sudo apt-get install -y apt-transport-https
curl -s https://packages.cloud.google.com/apt/doc/apt-key.gpg | sudo apt-key add -
echo "deb https://apt.kubernetes.io/ kubernetes-xenial main" | sudo tee -a /etc/apt/sources.list.d/kubernetes.list
sudo apt-get update
sudo apt-get install -y kubectl
-
Install latest release of Minikube:
curl -Lo minikube https://storage.googleapis.com/minikube/releases/latest/minikube-linux-amd64 && chmod +x minikube
sudo install minikube /usr/local/bin
-
If you see this error: Exiting due to GUEST_MISSING_CONNTRACK: Sorry, Kubernetes 1.25.3 requires conntrack to be installed in root’s path
sudo apt-get install conntrack
-
In the Ubuntu Linux terminal, verify:
minikube version
minikube version v1.28.0
commit: 986b1ebd987211ed16f8cc10aed7d2c42fc8392f
-
In the Ubuntu Linux terminal, start minikube:
minikube start --vm-driver=none
If you see:
😄  minikube v1.28.0 on Ubuntu 20.04 (amd64)
✨  Using the none driver based on existing profile

🤷  Exiting due to PROVIDER_NONE_NOT_FOUND: The 'none' provider was not found: running the 'none' driver as a regular user requires sudo permissions
Alternately, (from CHATGPT4) run the dockerd server:
sudo dockerd --exec-opt native.cgroupdriver=none
Install & Configure Utilities
-
TODO: Use brew to install additional utilities: git, Python/pip, tree, jq, etc.
https://medium.com/swlh/wsl-2-docker-edge-tech-preview-native-linux-containers-w-o-emulation-b41667e6dbef
-
Use pip to install Virtualenv.
-
Install keyboard aliases to use custom commands:
NOTE: To run Python for Selenium controlling Firefox, install Xming with gekoDriver.
Profile to define prompt
-
Open the Bash command prompt</strong> (click Windows Start and type Bash until you can select it from the list that arises):
NOTE: You can run Linux binaries such as ls from the Windows Command Prompt (CMD or PowerShell) by invoking wsl.exe there. These are called interop features.
-
Open the Visual Studio Code text editor to the file in the $HOME folder, which is what ~ stands for, just like in macOS:
code ~/.profile
By default, WSL reads and executes commands from the file /etc/profile if that file exists. After reading that file, it looks for ~/.bash_profile, ~/.bash_login, and ~/.profile, in that order, and reads and executes commands from the first one that exists and is readable. It skips the other files if one is found.
-
Define keyboard aliases in a .bash_aliases file in the .bashrc file *
code ~/.bashrc
My list is in https://github.com/wilsonmar/git-utilities/master/aliases.sh
Zsh
See https://medium.com/@edwardbaeg9/using-homebrew-on-windows-10-with-windows-subsystem-for-linux-wsl-c7f1792f88b3
LinuxBrew vs. Homebrew for MacOS
-
Install the LinuxBrew fork of Homebrew for macOS*
“I found some apps that didn’t work well from apt-get worked flawlessly when installed with brew, like zplug. Inversely, I couldn’t get ranger to work with brew but got it working with apt-get. This very conveniently gives you multiple options for installing a package, potentially skipping the step of Googling vague errors.
To fix the patchelf error:
sudo apt-get update
sudo apt-get install build-essential
Linux commands
-
Get to know the built-in Linux commands: cat, cd, chmod, chown, curl, df, diff, echo, exit, find, finger, grep, groups, gzip, head, history, kill, less, ls, man, mkdir, mv, passwd, ping, ps, pwd, shutdown, ssh, sudo, tail, tar, top, uname, w, whoami. There’s also cp.
Rather than a translation layer built by the WSL 1 team, WSL 2 includes its own open-sourced Linux kernel with full system call compatibility with the LTS Linux kernel. WSL2 does not work under HyperV.
Sean Dearnaley points out that since macOS currently doesn’t have good GPU support, if Windows introduces GPU support for WSL, Windows machines could become a very powerful machine learning development platform when running Nvidia CUDA based apps.
pwd file storage mounts
-
To list drives mounted:
cd /mnt
The response is the drives:
c d f
-
For the purpose of this tutorial, create folder dev/project for use by both Windows and Linux tools:
cd /mnt/c/dev/
mkdir project
You can also make whatever directory name you want.
-
PROTIP: Use $HOME or ~ to reference your home folder:
cd ~
pwd
Unlike/users on macOS, the folder above user accounts is:
/home/me
-
Open Windows Explorer to view files from both Windows and from Bash:
explorer.exe .
-
Access files from both Windows and from Bash as:
/mnt/c/path
-
Run a Linux utility such as disk usage of the current folder (represented by a dot):
du -sh
The response is like 56K .
-
View the manual on the du command:
man du
-
PROTIP: Remember this move whenever you see that “:” in the lower-left corner:
type q to quit out.
VSCode Extensions
-
In VSCode, “Trust and install” extensions Docker (from Microsoft), “Dev Containers”, “Kubernetes”.
VIDEO: Run and debug your Linux-based applications from within VSCode in Windows. Edit files in WSL or the mounted Windows filesystem (/mnt/c) without worrying about pathing issues, binary compatibility, or other cross-OS challenges.
FAQ
-
Read the FAQ for known weirdness.
Bugs with WSL are reported to developers at https://github.com/microsoft/WSL
https://docs.microsoft.com/en-us/windows/wsl/troubleshooting
Kubespray (Ansible)
Video Tutorials
-
16 Nov 2021 “Getting Started with Docker on Windows” 5h41m by Wes Higbee
-
3 Feb 2021 “Managing Docker on Windows Servers” 1h17m by Piotr Gaczkowski referencing his github.com/DoomHammer/pluralsight-managing-docker-on-windows-servers for each tutorial module.
-
Create a new container:
docker run -v ${PWD}:C:\app --workdir /app mcr.microsoft.com/dotnet/core/sdk:3.1 dotnet new mvc --auth Individual -
The Dockerignore file contains names of files and folders that should not be in container images (because they are generated every time), such as:
bin
obj
-
The Dockerfile in each tutorial module defines the various base images from the Azure MCR.
Docker Enterprise Components
-
VIDEO: Enterprise licenses:
What was previously “Docker Engine” (and Docker’s 30% pentration into the Fortune 500) was purchased Nov, 2019 by Mirantis (the cloud consulting company with OpenStack roots). So it is now the Mirantis Container Runtime.
Docker’s “Universal Control Plane” is now Mirantis Kubenetes Engine (MKE), which provides RBAC & LDAP for centralized cluster management.
MCR
Docker’s “Trusted Registry” is now the Mirantis Secure Registry running MKE, hosting containers as a Linux server. It performs security scanning of image files.
-
To install MCR on Windows Server 2019, in PowerShell:
[Net.ServicePointManager]::SecrurityProtocol - [Net.SecurityProtocolType]::Tls12
[Install-Module DockerMsftProvider] -Force
https://github.com/Mirantis/cri-dockerd#build-and-install
Docker Edge (at Tech Preview)
-
TODO: Use brew to install Docker Desktop Edge, in Technical Preview as of this writing.

See https://docs.docker.com/docker-for-windows/edge-release-notes/
Sean Dearnaley provides pointers. It now supports Kubernetes, offers VPN-friendly networking, provides an updated Docker daemon, and many new features.
VHD size adjustment
WSL 2 stores Linux files inside of a VHD (Virtual Hard Disk) using the ext4 file system. VHD has an initial max size of 256GB. If your distro grows beyond that you will see errors stating that you’ve run out of disk space. To expand VHD size:
-
Terminate all WSL instances:
wsl --shutdown
-
Find your distro installation package name ‘PackageFamilyName’.
-
In a powershell prompt (where ‘distro’ is your distribution name) construct:
Get-AppxPackage -Name "*distro*" | Select PackageFamilyName
-
Locate the VHD file fullpath used by your WSL 2 installation, this will be your ‘pathToVHD’:
%LOCALAPPDATA%\Packages\PackageFamilyName\LocalState\disk.vhdx
Resize your WSL 2 VHD:
-
Open a command prompt Window with admin privileges and run the following commands:
diskpart
In the dialog:
Select vdisk file=”pathToVHD”
expand vdisk maximum=”sizeInMegaBytes”
-
Launch your WSL distro.
-
Make WSL is aware that it can expand its file system’s size by running these commands in your WSL distro:
sudo mount -t devtmpfs none /dev
mount | grep ext4
-
Copy the name of this entry, which will look like: /dev/sdXX (with the X representing any other character), making sure to use the value you copied earlier.
sudo resize2fs /dev/sdXX
-
You may need to use:
apt install resize2fs
Akash Network
All of the above is getting ready for preparing your machine to generate revenue as provider clusters used by others on the Akash.cloud network. Leases of Akash resources are deployed via Kubernetes pods.
The Praetor application from Akash builds an Akash Provider for small and medium sized environments.
On a Windows machine, Praetor runs after Kubespray (using RedHat Ansible) on an Ubuntu server within WSL2. References:
- https://github.com/kubernetes-sigs/kubespray
-
VIDEO: “Kube 65.1 ] Kubespray - Kubernetes cluster provisioning”
- https://www.techbeatly.com/2020/11/deploying-kubernetes-with-kubespray.html using Vagrant
- https://www.redhat.com/sysadmin/kubespray-deploy-kubernetes
- https://kubernetes.io/docs/setup/production-environment/tools/kubespray/
- https://www.densify.com/kubernetes-tools/kubespray
- https://adamtheautomator.com/kubespray/
- https://schoolofdevops.github.io/ultimate-kubernetes-bootcamp/cluster_setup_kubespray/
- https://slateci.io/docs/cluster/automated/install-kubernetes-with-kubespray.html including metalLB
VIDEO: “Deploying kubernetes using Kubespray” by Remko Deenik illustrating Steps to build the provider’s Kubernetes control plane and worker nodes:
-
Install Ansible on Ubuntu:
sudo apt-get update
sudo apt-get install ansible
-
Install Python: QUESTION: Virtualvenv?
sudo pip3 install --upgrade pip
sudo apt-get install ansible
- Navigate/create a folder the folder where you will be cloning into.
-
Clone the kubespray repository onto your server:
QUESTION: Fork this first?
git clone https://github.com/kubernetes-sigs/kubespray.git
-
Install (download) Python dependency packages:
sudo pip install -r requirements.txt
-
Create an Ansible inventory file in your kubespray directory:
cd kubespray
cp -rfp inventory/sample inventory/mycluster
-
Install the required dependencies:
sudo ansible-galaxy install -r requirements.yml
-
Specify the IP addresses of the servers of your cluster in a hosts.yml file:
declare -a IPS=(10.1.1.101 10.1.1.102 10.1.1.103 10.1.1.104 10.1.1.105 10.1.1.106)
edit inventory/mycluster/hosts.yml
An example of the hosts.yml:
hosts:
  node1:
 ansible_host: 10.1.1.101
 ip: 10.1.1.101
 access_ip: 10.1.1.101
...
-
Define the permissions in hosts.yml:
kube-node: hosts: node1: node2: node3: node4: node5: node6: etcd: hosts: node1: node2: node3: k8s-cluster: children: kube-master: kube-node: calico-rr: hosts: {} -
Specify the IP addresses of the servers of your cluster:
CONFIG_FILE=inventory/mycluster/hosts.yml python3 contrib/inventory_builder/inventory.py ${IPS[@]} -
Review Kubespray configuration settings:
vi inventory/mycluster/group_vars/all/all.yml
-
Review Kubernetes configuration settings:
vi inventory/mycluster/group_vars/k8s-cluster/k8s-cluster.yml
-
Deploy the cluster using the cluster.yml playbook and the mycluster inventory file:
ansible-playbook -i inventory/mycluster/hosts.yml cluster.yml \
--become --become-user=root cluster.yml
The above took an hour to spit out a lot.
-
Download latest kubectl:
curl -LO https://storage.googleapis.com/kubernetes-release/release/$(curl -s https://storage.googleapis.com/kubernetes-release/release/stable.txt)/bin/linux/amd64/kubectl
-
Use SSH to get files:
ssh 10.1.1.101 sudo cp /etc/kubernetes/admin.conf "/home/$USERNAME/config"
ssh 10.1.1.101 sudo chmod +4 ~/config
scp 10.1.1.101:~/config .
mkdir .kube
mv config .kube/
ssh 10.1.1.101 sudo rm ~/config
-
Verify access
kubectl version
kubectl get nodes
References
Links and issues for this:
https://github.com/Microsoft/BashOnWindows
https://msdn.microsoft.com/en-us/commandline/wsl/install_guide
https://blogs.msdn.microsoft.com/wsl/2016/06/15/wsl-file-system-support
published 15 June 2016 by Jack Hammons, who writes:
https://blogs.msdn.microsoft.com/wsl, the home page of WSL.
https://medium.com/better-programming/make-bash-on-ubuntu-on-windows-10-look-like-the-ubuntu-terminal-f7566008c5c2
https://medium.com/free-code-camp/how-to-set-up-docker-and-windows-subsystem-for-linux-a-love-story-35c856968991 “Yeah, it seemed to have uninstalled linuxbrew as soon as I closed the Ubuntu shell. Although my path references in .profile seemed to persist”
https://www.windowscentral.com/how-install-wsl2-windows-10
More on DevOps
This is one of a series on DevOps:
- DevOps_2.0
- ci-cd (Continuous Integration and Continuous Delivery)
- User Stories for DevOps
- Git and GitHub vs File Archival
- Git Commands and Statuses
- Git Commit, Tag, Push
- Git Utilities
- Data Security GitHub
- GitHub API
- Choices for DevOps Technologies
- Pulumi Infrastructure as Code (IaC)
- Java DevOps Workflow
- AWS DevOps (CodeCommit, CodePipeline, CodeDeploy)
- AWS server deployment options
- Cloud services comparisons (across vendors)
- Cloud regions (across vendors)
- Azure Cloud Onramp (Subscriptions, Portal GUI, CLI)
- Azure Certifications
- Azure Cloud Powershell
- Bash Windows using Microsoft’s WSL (Windows Subsystem for Linux)
- Azure Networking
- Azure Storage
- Azure Compute
- Digital Ocean
- Packer automation to build Vagrant images
- Terraform multi-cloud provisioning automation
-
Hashicorp Vault and Consul to generate and hold secrets
- Powershell Ecosystem
- Powershell on MacOS
- Jenkins Server Setup
- Jenkins Plug-ins
- Jenkins Freestyle jobs
- Docker (Glossary, Ecosystem, Certification)
- Make Makefile for Docker
- Docker Setup and run Bash shell script
- Bash coding
- Docker Setup
- Dockerize apps
- Ansible
- Kubernetes Operators
- Threat Modeling
- API Management Microsoft
- Scenarios for load
- Chaos Engineering