

Automate ML workflows in the Azure PaaS cloud, so you can get certified in AI-900, AI-102, and DP-100
![]()
![]()
![]()
![]()
![]()
![]()
![]()
![]()
![]()
![]()
![]()
![]()
![]()
Overview
- Industry Ratings
- Machine Learning Setup
- My Sample ML Code
- ML among AI Service Providers
- Azure Cognitive Search
- Microsoft DOCS
- Decision service = Azure Machine Learning
- Jupyter Notebooks on Azure
- ML Studio JupyterLab from local files
- ML Designer Pipelines
- Create data file
- Create ML Workspace resource
- Launch ML Studio
- New ML Pipeline
- Compute target
- ML Data Input
- Submit and Run Experiment
- Add pipeline steps to filter and process imported data
- Split data
- Training run
- Evaluate ML models
- Comparing multiple models
- Create a Real-Time Inference Pipeline and Deploy an Endpoint
- AutoML
- Install Visual Studio Code extensions
- Etc.
- HDInsight from 2017
- Data Science VM
- Resources
- Notes to be inserted
- More
This article presents my notes toward a guided tour to introduce use of Azure Machine Learning offerings running on Microsoft’s Azure cloud.
NOTE: Content here are my personal opinions, and not intended to represent any employer (past or present). “PROTIP:” here highlight information I haven’t seen elsewhere on the internet because it is hard-won, little-know but significant facts based on my personal research and experience.
My other articles about AI (Artificial Intelligence) at:
- https://wilsonmar.github.io/microsoft-ai
- https://wilsonmar.github.io/genai (Generative AI)
- https://wilsonmar.github.io/mlops (Machine Learning Ops)
NOTE: Content here are my personal opinions, and not intended to represent any employer (past or present). “PROTIP:” here highlight information I haven’t seen elsewhere on the internet because it is hard-won, little-know but significant facts based on my personal research and experience.
Industry Ratings
In PDF: 2021 Volume 24, among their “opininated” recommendations of what IT technologies their clients should Adopt, Trial, Assess, or Hold, Thoughtworks’ “Technology Radar” advised a “hold” for Azure Machine Learning, with this scathing comment:
“We’ve observed before that the cloud providers push more and more services onto the market. We’ve also documented our concerns that sometimes the services are made available when they’re not quite ready for prime time. Unfortunately, in our experience, Azure Machine Learning falls into the latter category. One of several recent entrants in the field of bounded low-code platforms, Azure ML promises more convenience for data scientists. Ultimately, however, it doesn’t live up to its promise; in fact, it still feels easier for our data scientists to work in Python. Despite significant efforts, we struggled to make it scale and lack of adequate documentation proved to be another issue which is why we moved it to the Hold ring.”
In PDF: 2023 Volume 28, Azure Machine Learning fell of their Radar completely, but Facebook/Meta’s “PyTorch” was added to the “Adopt” ring to Languages and Frameworks.
Machine Learning Setup
LEARN: Train models in Azure Machine Learning with the CLI (v2)
When “Real time” is specified, a batch process won’t do and an online endpoint is needed.
There is also LEARN: Run (reusable) component-based pipelines in Azure Machine Learning with CLI (v2)
The below is adapted from LEARN: “Deploy an Azure Machine Learning model to a managed endpoint with CLI (v2)” to create a managed online endpoint to make real-time predictions (inferencing).
In the LABS: https://microsoftlearning.github.io/mslearn-aml-cli/ it’s about whether a customer will churn, so marketing sends out the most productive offers. The predictions are defined in the “labels” sent back.
https://learn.microsoft.com/en-us/azure/machine-learning/how-to-deploy-managed-online-endpoints#understand-the-scoring-script
Preparations for Machine Learning
See https://learn.microsoft.com/en-us/azure/cloud-adoption-framework/ready/azure-best-practices/ai-machine-learning-mlops
See my instructions about:
- Get an account and roles:
-
Install the CLI:
az extension add -n ml -y
- Login the console:
-
Select the Azure subscription to use.
az account set -s "${AZURE_SUBSCRIPTION_ID}" -
Select the Azure Region.
AZURE_REGION="eastus"
-
TODO: Create a Resource Group for the Principal profile with the appropriate Scope and Role for tasks below.
AZURE_RESOURCE_GROUP="rg-myco-rnd-churn-dev-001"
# where "churn" is the project
az group create --name "${AZURE_RESOURCE_GROUP}" --location "${AZURE_REGION}"
az configure --defaults group="${AZURE_RESOURCE_GROUP}"
This would be the basis for the YAML specified within the file at the end of ML_ENPOINT_FILEPATH:
$schema: https://azuremlschemas.azureedge.net/latest/managedOnlineEndpoint.schema.json
name: mlflow-endpoint
traffic: 100
auth_mode: key
- Define a Key vault.
- Configure a Container registry.
-
Define naming conventions and best practices:
https://learn.microsoft.com/en-us/azure/cloud-adoption-framework/ready/azure-best-practices/ai-machine-learning-resource-organization
-
After Preparations for Machine Learning (above):
Create Workspace for ML
-
On Console, bring up “Azure Machine Learning”:
https://portal.azure.com/#view/HubsExtension/BrowseResource/resourceType/Microsoft.MachineLearningServices%2Fworkspaces
-
Create a new workspace:
See https://learn.microsoft.com/en-us/azure/cloud-adoption-framework/ready/azure-best-practices/ai-machine-learning-resource-organization
AZURE_ML_WORKSPACE="ws-myco-rnd-churn-dev-001"
az ml workspace create --name "${AZURE_ML_WORKSPACE}"
az configure --defaults workspace="${AZURE_ML_WORKSPACE}"
Based on https://learn.microsoft.com/en-us/azure/machine-learning/reference-yaml-workspace?view=azureml-api-2&tabs=json
{ "application_insights": "/subscriptions//resourcegroups/churn-dev-rg/providers/microsoft.insights/components/amlchurninsightsGUID", "description": "aml-churn-dev", "discovery_url": "https://eastus.api.azureml.ms/discovery", "friendly_name": "aml-churn-dev", "hbi_workspace": false, "key_vault": "/subscriptions/ /resourcegroups/churn-dev-rg/providers/microsoft.keyvault/vaults/amlchurnkeyvaultGUID", "location": "eastus", "mlflow_tracking_uri": "azureml://eastus.api.azureml.ms/mlflow/v1.0/subscriptions/ /resourceGroups/churn-dev-rg/providers/Microsoft.MachineLearningServices/workspaces/aml-churn-dev", "name": "aml-churn-dev", "storage_account": "/subscriptions/ /resourcegroups/churn-dev-rg/providers/microsoft.storage/storageaccounts/amlchurnstorageGUID", "tags": {} } </pre> Console GUI Basics: * Subscription and Resource Group Workspace details (specified in: * ML_ENDPOINT_NAME = Workspace Name: (unique name according to your organization's Naming Conventions) * Region: (select from dropdown) * Storage account: (select from dropdown) * Key vault: (select one already defined) * Application Insights: (select from dropdown) * Container registry: (select from dropdown)
Networking: * Connectivity method: (select from dropdown) * Identity type: (select from dropdown)
Data encryption: * Encryption type: (Microsoft-managed keys or Customer-managed keys at higher cost)
Identity: * Identity type: System assigned (not User assigned) * Storage account access: Credential-based access (not Identity-based access) * Data impact: HBI "High business impact workspace" unchecked.
Tags: * Billing to project, Management Group,
### Create compute https://learn.microsoft.com/en-us/training/modules/create-azure-machine-learning-resources-cli-v2/4-manage-workspace-assetsaz ml compute create --name "testdev-vm" \ --size STANDARD_DS11_V2 \ --type ComputeInstance
az ml compute create --name "aml-cluster" \ --size STANDARD_DS11_V2 \ --max-instances 2 \ --type AmlCompute
### Compute Environment https://github.com/Azure/azureml-examples/tree/main/cli/assets/environment -
Define the “basic-env.yaml” file:
name: basic-env-ml
channels:
         - conda-forge
dependencies:
         - python=3.12
         - pip
         - pip:
 - numpy
 - pandas
 - scikit-learn
 - matplotlib
 - azureml-mlflow
Alternative dependencies include seaborn instead of matplotlib.
$schema: https://azuremlschemas.azureedge.net/latest/environment.schema.json
name: basic-env-scikit
version: 1
image: mcr.microsoft.com/azureml/openmpi3.1.2-ubuntu18.04
conda_file: file:conda-envs/basic-env-ml.yml
az ml environment create --file basic-env.yml
az ml evironment list
Create Endpoint for ML
./doit.sh -azml -v
https://learnk8s.io/templating-yaml-with-code
-
Customize for your situation:
ML_ENPOINT_FILEPATH="./mslearn-aml-cli/Allfiles/Labs/05/mlflow-endpoint/create-endpoint.yml"
with contents such as:
$schema: https://azuremlschemas.azureedge.net/latest/managedOnlineEndpoint.schema.json
name: mlflow-endpoint
traffic: 100
auth_mode: key
- name: must be unique in the Azure region.
- traffic: (Optional) Percentage of traffic from the endpoint to divert to each deployment. Sum of traffic values must be 100.
- auth_mode: Use key for key-based authentication. Use aml_token for Azure Machine Learning token-based authentication.
-
Using az ml CLI commands:
az ml online-endpoint create --name "${ML_ENDPOINT_NAME}" \
   -f "${ML_ENPOINT_FILEPATH}" ./mslearn-aml-cli/Allfiles/Labs/05/mlflow-endpoint/create-endpoint.yml
Deploy ML Model
https://learn.microsoft.com/en-us/azure/machine-learning/how-to-deploy-managed-online-endpoints#understand-the-scoring-script
https://learn.microsoft.com/en-us/azure/machine-learning/how-to-deploy-mlflow-models-online-endpoints?tabs=endpoint%2Cstudio
-
Customize for your situation:
ML_ENPOINT_FILEPATH="./mslearn-aml-cli/Allfiles/Labs/05/mlflow-endpoint/mlflow-deployment.yaml"
-
Using az ml CLI commands:
az ml online-deployment create --name "${ML_DEPLOY_NAME}" \
   --endpoint "${ML_ENPOINT_FILEPATH}"\
   -f "${ML_DEPLOY_FILEPATH}" \
   --all-traffic
with contents such as:
$schema: https://azuremlschemas.azureedge.net/latest/managedOnlineDeployment.schema.json
name: mlflow-deployment
endpoint_name: churn-endpoint
model:
  name: mlflow-sklearn-model
  version: 1
  local_path: model
  model_format: mlflow
instance_type: Standard_F2s_v2
instance_count: 1
-
As for Model files stored on local path or registered model: pickle (.pkl) file which contains Python object serialization.
-
model_format: mlflow is an industry-standard format for packaging machine learning model files in different “flavors” for use in a variety of downstream tools (real-time serving through a REST API or batch inference on Apache Spark).
-
QUESTION: With a MLflow model, a registered model is loaded in the Azure Machine Learning workspace. So it isn’t necessary to include in the deployment the environment and scoring script which loads the pre-trained model.
- Environment refers to all the packages (Python prerequites) needed.
- Instance type and scaling capacity
- instance_type: VM SKU that will host your deployment instance.
- instance_count: Number of instances in the deployment.
REMEMBER: Although the underlying infrastructure of endpoints are “managed” by Azure, administrators do need to define (tune over time) the rate of requests each endpoint is expected to handle. This is tricky to adjust vertical versus horizontal scaling:
- instance_type is the Compute size (vertical scaling), which need to be adjusted over time as traffic increases or decreases. About the Fsv2 series with pricing different across regions
- instance_count is the number of compute instances (horizonal scaling).
Monitoring
-
-
TODO: Define monitoring and visualization to identify when to adjust:
Update endpoint
Multiple models (both green and blue) are deployed to an endpoint for blue/green deployments so transition to a new version of the model can be gradual percentage, without interrupting service for the client.
-
Using az ml CLI commands:
az ml online-endpoint update --name churn-endpoint --traffic "blue=0 green=100"
Delete endpoint
-
Using az ml CLI commands:
az ml online-endpoint delete --name churn-endpoint --yes --no-wait
My Sample ML Code
PROTIP: AI-102 is heavy on questions about coding.
So samples (unlike examples) are a more complete, best-practices solution for each of the snippets. They’re better for integrating into production code.
Unlike other classes, this describes the automation I’ve created instead of you clicking through web pages (portal.azure.com).
To start with, refer to my https://github.com/wilsonmar/azure-quickly.
Among Azure Machine Learning examples is a CLI at https://github.com/Azure/azureml-examples/tree/main/cli
docs.microsoft.com/en-us/samples/azure provides sample Python Code at https://docs.microsoft.com/en-us/samples/azure/azureml-examples/azure-machine-learning-examples/
https://docs.microsoft.com/en-us/samples/azure-samples/azure-sdk-for-go-samples/azure-sdk-for-go-samples/
A complete sample app is Microsoft’ Northwinds Traders consumer ecommerce store. install But where is it used in the course?
Although it’s from 2021, https://github.com/timothywarner/ai100 by Tim Warner includes Python and Powershell (ps1) scripts:
- ssh-to-aks.md - SSH into AKS cluster nodes
- keyvault-soft-delete-purge.ps1
- keyvault-storage-account.ps1
-
xiot-edge-windows.ps1
- python-keyvault.py
- autoprice.py
ML among AI Service Providers
Microsoft has three service “Providers”:
| Asset type | Resource provider namespace/Entity | Prefix |
|---|---|---|
| Azure Cognitive Services | Microsoft.CognitiveServices/accounts | cog- |
| Azure Machine Learning workspace | Microsoft.MachineLearningServices/workspaces | mlw- |
| Azure Cognitive Search | Microsoft.Search/searchServices | srch- |
Separte from the above are Azure IoT (Edge) and Azure IoT (Edge) Services
Azure Cognitive Search
Search (the “Bing” brand) has recently been separated out from the “Cognitive Services” to its own at https://docs.microsoft.com/en-us/azure/search, although it’s used in “Conversational AI” using an “agent” (Azure Bot Service) to participate in (natural) conversations. BTW: in 2019 Cortana decoupled from Windows 10 search.
Since October 31st, 2020, Bing Search APIs transitioned from Azure Cognitive Services Platform to Azure Marketplace. The Bing Search v7 API subscription covers several Bing Search services (Bing Image Search, Bing News Search, Bing Video Search, Bing Visual Search, and Bing Web Search),
Microsoft DOCS
Microsoft’s Azure Machine Learning documentation is at: docs.microsoft.com/en-us/azure/machine-learning/service
github.com/microsoftdocs/ml-basics
Readiness Quiz for DP-100 (AZ-900 and AI-900)
Decision service = Azure Machine Learning
By definition, “Machine Learning” involves creating programs without programmers coding logic in languages such as Python.
The work of Machine Learning (abbreviated to “ML”) is to recognize patterns in historical data to “train” a model which can be referenced by web applications and other user interfaces to make predictions from new, similar data.
In Azure, several “resources” need to be setup:
- A Machine Learning workspace
- A Storage account to hold the model
- A Key Vault to hold secrets
- An Application Insights account to hold logs and metrics
- A source of data (database)
- Ingestion and cleaning of data
The above can be setup by running a single command, but after you are setup to run it.
-
First, get skill at using Azure Portal Poart and CLI Bash by following my deep but concise tutorial at
https://wilsonmar.github.io/azure-onboarding
It covers creation of free Azure Subscription and Azure Storage accounts to hold files in a clouddrive folder.
Create Machine Learning Workspace using GUI
-
In portal.azure.com, press G+\ and in the Search box type enough of Machine Learning for a selection with that name to appear in the dropdown that appears so you can select it by pressing Enter.

(Don’t select “classic”).
“Machine learning is a subset of data science that deals with predictive modeling. In other words, using data to create models that can predict unknown values. It works by identifying relationships between data values that describe characteristics of something (its features) and the value we want to predict (the label), and encapsulating these relationships in a model through a training process.”
-
classification predicts categories or classes using unsupervised machine learning techniques to fit features into model and predict classification of the label. Labels are what we want to predict, such as a future value predicted or an action. The label is usually “Y” among mathimaticians.
-
regression predicts numeric values using supervised machine learning techniques on historical data.
-
Time Series forecasting is used for Anomaly Detection using regression with a time-series element, enabling you to predict numeric values at a future point in time.
-
Clustering identifies the nearest neighbor in multiple dimensions, such as the nearest color to an RGB color value.
-
-
VIDEO: BLOG: For Worspace Edition: choose “Basic” or “Enterprise” after considering feature and pricing differences at
azure.microsoft.com/en-us/pricing/details/machine-learning/
Create Machine Learning Workspace using CLI
-
Setup your CLI Bash environment by following my instructions at:
https://github.com/wilsonmar/azure-quickly#readme
That covers setting up folders, shortcuts, and external memory variables in the CLI environment.
-
Invoke a run to train a sample model by running:
./az-mlcli2.sh
This script I wrote to automate manual setup procedures from https://github.com/Azure/azureml-examples, described at .
The script invoke bash setup.sh to create Resource Group “azureml-examples-rg” in “East US” containing:
- main (Machine Learning)
- maininsights… (Application Insights)
- mainkeyvault… (Key vault)
- mainstorage… (Storage account)
My script also runs a GitHub Actions yml file using the “ml” subcommand from the Microsoft ML 2.0 CLI Preview announced May, 2021:
time az ml job create -f jobs/hello-world-env-var.yml --web --stream
The code at hello-world.yml, which has python print out “hello world” from within a Docker image downloaded from Docker Hub (docker.io):
command: echo $ENV_VAR
environment:
  docker:
 image: docker.io/python
environment_variables:
  ENV_VAR: "hello world"
compute:
 target: local
Information about it is at: https://github.com/Azure/azureml-examples/tree/main/python-sdk/tutorials/an-introduction
-
Run again, but use hello-world-env-var.yml
-
Run other yml files listed in https://github.com/Azure/azureml-examples/tree/main/cli, which scripts passed or failed in GitHub Actions.
CAUTION: Don’t run jobs marked “failing” (in red).
-
When done, stop billing by running:
bash cleanup.sh
Additionally, there are more sample ML code to create models,
Below are instructions to do the work manually in the Azure Portal:
…
- Click “Start now” under “Notebooks”.
-
Click “Terminal”.
Note that you are not in the Azure CLI but within a server instance (named “heavenlit” in the example below).

-
Change the prompt:
-
NOTE: There is no code (Visual Studio Code) by default but install it:
sudo snap install code --classic
-
You can click the red icon (to stop) or blue arrow (to restart) the server.
ml-basics Python Jupyter Notebooks
https://docs.microsoft.com/en-us/users/msftofficialcurriculum-4292/collections/kox0ig8qrgez2q ILT Pilot – DP-100: Designing and Implementing a Data Science Solution on Azure
-
TUTORIAL: Get the script:
git clone https://github.com/microsoftdocs/ml-basics.git --depth 1
-
Get the Python scripts referenced during the 3-day $1795 USD live online course by Microsoft DP-100T01-A: Designing and Implementing a Data Science Solution on Azure (for Data Scientists).
git clone https://github.com/MicrosoftLearning/mslearn-dp100.git --depth 1
NOTE: You don’t need to cd into the repo because it’s called from the directory list.
- Toggle from “Focus Mode” to “Standard Mode” to see the directory list.
- Expand “ml-basics”.
-
Double click one of the .ipynb files to open in a Jupyter Notebook at the right pane.
From mslearn-dp100, described at microsoftlearning.github.io/mslearn-dp100:
-
Create an Azure Machine Learning workspace (01 - Get started with Notebooks). Success is a output from a print statement from each frame performing a basic operation of Python in the Juypter Notebook (import, workspace loaded, compute resource loaded).
-
Use Automated Machine Learning (02 - Get AutoML prediction) to make a Diabetes Prediction. Before running, replace ENDPOINT and PRIMARY_KEY of the auto-predict-diabetes Automated ML service you setup.
-
Use Azure Machine Learning Designer (03 - Get Designer predictions) from the predict-diabetes service.
-
04 - Run experiments analyzing 1000 rows in mslearn-diabetes to yield pregnancy categories. Runs MLFlow with intermediate logged metrics.
- 05 - Train models
- 07- Work with compute [VMs]
- 09 - Create a real-time inference service
- 10 - Create a batch inference service [jobs]
- 11 - Tune hyperparameters
- 12 - Use automated machine learning from the SDK
Responsible AI/ML:
- 13 - Explore differential privacy using the SmartNoise toolkit from OpenDP.
- 14 - Interpret models
- 16 - Monitor a model
- 17 - Monitor data drift using the pip azureml-datadrift package.
From ml-basics:
- 01 - Data Exploration.ipynb
Additionally:
github.com/Azure/MachineLearningNotebooks has Notebooks.
-
-
Click the “»” double blue icon to run the script.
Watch each data frame and graphic get generated. The final frame’s output expected is:
Studying for 14 hours per week may result in a grade of 70
CONGRATULATIONS! At this point your DevOps job is done.
Study the code
The AI-102 and DP-100 both focus on coding.
-
QUIZ:
- What does NumPy.shape (2,20) tell you about the elements in the array?
A tuple whose elements give the lengths of the corresponding array dimensions. The array is two dimensional, with each dimension having 20 elements.
- What does NumPy.shape (2,20) tell you about the elements in the array?
-
To better study the Python coding, clone the repo to your local machine so you can use your editor’s Find features.
-
Make a change and run again to see the impact.
PROTIP: The “Ensemble Algorithm” is the current state of the art yielding the best ROC.
- https://madewithml.com/
Flights Challenge
-
Near the bottom of the file is this Challenge:
“If this notebook has inspired you to try exploring data for yourself, why not take on the challenge of a real-world dataset containing flight records from the US Department of Transportation? You’ll find the challenge in the /challenges/01 - Flights Challenge.ipynb notebook!
That notebook is under within “Files”, above “Users” are folders:

Clean up
To reclaim memory usage:
-
Click the “X” to dismiss the tab representing the Notebook you’re done with.
There are other *.ipynb (Python Notebook) files described in this webite primarily by Graeme Malcolm presents (no C#, R, Julia here) which call the Azure Machine Learning Python SDK in the azureml-core package in PyPi [used by]. However, links below are to github.com/MicrosoftLearning/mslearn-dp100 by Microsoft’s Graeme Malcolm. It contains iPython Notebook code rather than instructions for setting up the ML Workspace.
AI-100 and AI-102 both touch on Machine Learning as well.
DP-100
Earn the “Microsoft Certified: Azure Data Scientist Associate” certification by passing the one $165 exam answering 40-60 questions in 210 minutes: DP-100: Designing and Implementing a Data Science Solution on Azure. It has a strong focus on machine learning and Databricks.
- Manage Azure resources for machine learning (25–30%), which is a higher level than “Setting up an Azure Machine Learning workspace”, which require data and compute.
- Run experiments and train models (20–25%) using the ML Designer, SDK, and AutoML.
- Deploy and operationalize machine learning solutions (35–40%) previously “Optimizing and managing models” suing Hyperdrive and model explainers.
- Implement responsible machine learning (5–10%)
Microsoft’s Study Guide for DP-100 has specific links for each topic: query.prod.cms.rt.microsoft.com/cms/api/am/binary/RE4MHoo
The free text-only “learning paths” tutorials associated:
- Create machine learning models
- Create no-code predictive models with Azure Machine Learning
- Build and operate machine learning solutions with Azure Machine Learning
- Perform data science with Azure Databricks
https://docs.microsoft.com/en-us/learn/modules/explore-analyze-data-with-python/2-exercise-explore-data
10 hr. MS LEARN PATH: Build and operate machine learning solutions with Azure Machine Learning
MS LEARN LAB: Create machine learning models
Udacity offered those who complete their free “Intro to Machine Learning using Microsoft Azure” before July 30, 2021, 50% off on their paid “Machine Learning Engineer for Microsoft Azure Nanodegree Program”, which include access to real-world projects from industry experts, career services and guidance. Technical mentor support throughout the program review your hands-on projects:
- Optimizing an ML Pipeline In Azure - leveraging AutoML, hyperparameter tuning, etc. using scikit-learn, Hyperdrive, and AutoML.
- Operationalizing Machine Learning (into a production environment) using Application Insights, identifying problems in logs, and harnessing the power of Azure’s Pipelines.
- Capstone Project: using both the hyperdrive and automl API from azureml to build a model using external data of your choice. After training, compare their performance, deploy the best model as a webservice and test the model endpoint.
DP-100 Video courses:
The 11 hr. CloudAcademy.com course on DP-100 by Guy Hummel has github.com/cloudacademy/azureml-intro last updated Sep 2020, which is before changes to the exam May, 2021.
On Pluralsight, Jared Rhodes created:
-
this course which sets up a DSVM (Data Science Virtual Machine). It covers setup of PyCharm to import the iris sample dataset commonly used in the industry.
-
Using Continuous Integration and Continuous Deployment
At ACloudGuru.com by Brian Roehm:
-
DP-100 Part 1 - Preparation and Using the DP-100 Essentials Guide as part of Prep
-
DP-100 Part 2 - Modeling and Using the DP-100 Essentials Guide as part of Modeling
Data Ingestion
Alternatives to get data into ML:
- AdlCoy
- Azure CLI
- AzCopy
- Azure Cosmos DB Data Migration Tool
- bcp
- blobfuse
- Microsoft Data Management Gateway
ML classification examples
-
literature-map.com suggests other authors based on an author input. The input author is displayed in the middle of a map.
-
Product identification - performing visual searches for specific products in online searches or even, in-store using a mobile device.
-
Disaster investigation - evaluating key infrastructure for major disaster preparation efforts. For example, aerial surveillance images may show bridges and classify them as such. Anything classified as a bridge could then be marked for emergency preparation and investigation.
-
Medical diagnosis - evaluating images from X-ray or MRI devices could quickly classify specific issues found as cancerous tumors, or many other medical conditions related to medical imaging diagnosis.

Jupyter Notebooks on Azure
If you’re running a Chromebook laptop, there are several ways you can now run your Juypter Notebooks within the Azure cloud:
-
GitHub Codespaces, if you are part of the beta.
HISTORY: https://notebooks.azure.com is now redirecting users to other services.
References:
- https://towardsdatascience.com/running-jupyter-notebook-on-the-cloud-in-15-mins-azure-79b7797e4ef6
ML Studio JupyterLab from local files
DOCS: Run Jupyter Notebooks in a ML workspace
-
On an internet browser, view a .ipynb (Jupyter notebook) file GitHub.com. It may take several seconds to render. For example:
NOTE: That is adapted from https://github.com/MicrosoftLearning/mslearn-ai900/blob/main/01%20-%20Image%20Analysis%20with%20Computer%20Vision.ipynb then removing setup in Azure, so that the Notebook can be cross-platform (also work outside of Azure).
Currently, GitHub does not provide a “run” button when displaying Notebooks.
For that, you need to create a Cognitive Services instance on Azure, described below.
-
In a Terminal, load a GitHub repo containing notebooks and associated files:
cd ~/gmail_acct  # or whatever folder you use to hold repos to be clonned:
git clone https://github.com/MicrosoftLearning/mslearn-ai900 --depth=1
cd mslearn-ai900
- In portal.azure.com:
-
G+\ Machine Learning.
-
 Create Machine Learning Workspace: Follow my instructions to create a ML Workspace and run my ./az-mlworkspace-cli.sh.
 - The script creates these resources under the Resource Group:
- Machine learning
- Application Insights
- Key vault
- Storage account
- G+\ Machine Learning
- Click the Machine Learning name just created.
-
In Portal Machine Learning: “Launch studio” (formerly “Azure Studio”) to open a new browser tab “Microsoft Azure Machine Learning”.
- In the left-side navigation bar, select Author: Notebooks.
- Click “+ Create” to Upload files.
- Navigate thru folder “mslearn-ai900”, “01 - Image Analysis with Computer Vision.ipynb”. Select overwrite and “trust contents of this file”. Click “Upload”.
-
Copy to clipboard Key1 from running ./az-cog-cli.sh.
-
Highlight “YOUR_COG_KEY” and paste Key1 from the script run.
-
Do the same with “YOUR_COG_ENDPOINT”. ???
-
Click “Authenticate” if that appears.
- Delete the Resource Group and Compute so charges don’t accumulate.
References:
- The sample Python Notebook is adapted from https://github.com/MicrosoftLearning/mslearn-ai900/blob/main/01%20-%20Image%20Analysis%20with%20Computer%20Vision.ipynb
- https://jupyter-notebook.readthedocs.io/en/stable/security.html
NOTE: JypiterLab is more robust than classic Jupyper:
- Native Git and GitHub support - https://github.com/jupyterlab/jupyterlab
- Extensible with jupyter labextensions install jupyterlab-drawio
- Google Drive
- Dark themes
ML Designer Pipelines
Steps to deploy a machine learning model with the Designer:
- Create inference clusters
- Create and test inference pipeline
- Deploy inference pipeline
- Test the service (used by the user)
Alternately, Process (using a Python scipt):

FREE Sandbox (Concierge Subscription) Exercise: Call the Text Analytics API from the online testing console Feedback sorter Function app Text Analytics thru Queue, sort based on Sentiment.
https://scikit-learn.org/stable/tutorial/machine_learning_map/index.html
https://www.kaggle.com/fabiendaniel/predicting-flight-delays-tutorial
Create data file
The data used in the tutorial below is from Coursera: Machine Learning Pipeline Tutorial with Azure ML Studio. The tutorial provides a file on its GitHub, so skip this data preparation step (which normally is a large part of the total effort).
Another lab is: MSLEARN “predict-rentals” LAB following https://docs.microsoft.com/en-us/learn/modules/use-automated-machine-learning/use-auto-ml For that, download data file from https://aka.ms/bike-rentals
Generally:
- Select the Datasets page (under Assets)
-
” + Create”, “From web files”. Web URL: https://aka.ms/bike-rentals
Alternately, you can upload a file from your local machine.
- Dataset type: Tabular
- Next
Create ML Workspace resource
-
Go to G+\ Machine Learning
If you’re following cloudacademy.com/lab/introduction-azure-machine-learning-studio, select the workspace created and skip to the next section.
But if you’re not following that, follow steps below:
- Select your Directory and Subscription.
- Click the blue “Create machine learning workspace”. A new tab appears in portal.azure.com.
- Resource Group: PROTIP: just 3 letters are necessary, so use letters (such as “devml”) which does not have ascenders for making numbers to be appended to it more visible.
- Workspace Name: PROTIP: just 3 letters are necessary.
- Container Registry: To enesure uniqueness, append $RANDOM to your text (to make devml3232).
-
Container Registry SKU: Basic

-
“Review + create”.
CAUTION: The network is public by default. Choosing private would entail more configuration.
-
“Create”.
CAUTION: Charges now begin to accumulate. Delete your Resource Group ASAP. It’s cheaper if you recreate it if you need another workspace.
-
When created, click “Go to resource” blue button.
Launch ML Studio
-
Click “Launch Studio” blue button, which opens a new browser tab.
Alternately, click this URL or copy the URL and paste in the browser URL field to:
Notice the blue band instead at the top.
-
At “Welcome to the studio” pop-up, click the “X” dialog button to dismiss it.
Studio navigation tutorial
-
Click “+” on the left menu to reveal a list.
-
To reveal (or hide) left menu icon labels, click the “hamburger” icon at the upper left.

NOTE: The “Start now” items are also listed in the left menu.
Within the “Assets” category:
Datasets is where to manage data used in Machine Learning experiments. There, version datasets as well to explore different formats or data content.
Experiments tracks Machine Learning projects and experiment runs.
Pipelines manage Machine Learning pipelines to boost efficiency when building Machine Learning models.
Models manage the models built and shared.
Endpoints deploy Machine Learning models as REST endpoints on AKS or ACI infrastructure.
New ML Pipeline
-
PROTIP: Click “Pipelines”. Clicking “+ New”, then “Pipelines” is like clicking “Designer” and “+ New” Pipeline. Alternately, cursor up/down the left menu and press Enter to select.
Compute target
-
On the right-hand side under Settings, click “Select compute target”. Select the compute resource created earlier, then Save.
If one is already available, click on it and skip to the next section.
Alternately,
- “Compute” menu (under heading Manage).
- ”+ New” blue button.
- Virtual Machine type: CPU.
-
Virtual machine size: Select from all options.
- The cheapest is “Standard_F2s_v2” with “2 cores, 4GB RAM, 16GB storage” for Compute optimized at “$0.11/hr”
- Compute name: wow
- Minimum number of nodes: 0 (the default)
- Maximum number of nodes: 2 (from 1 the default)
- Idle seconds before scale down: 120 (from default 1800)
-
Compute name: PROTIP: 3-characters are the smallerst allowed, such as “ace”, “jim”, “opq”, “rsu”, “vwx”, “yza”, etc.
-
Enable SSH access: leave unchecked
-
Next and wait (5 minutes) for State to go from “Creating” to “Running”.
CAUTION: Charges now begin to accumulate. Delete your Resource Group ASAP. It’s cheaper if you recreate it if you need another compute instance.
ML Data Input
-
PROTIP: Instead of using your mouse to expand the assets menu hierarchy, which requires memorizing what is under each asset category:

get the titles of assets to drag-and-drop from this sample pipeline diagram:

-
Click in the field containing “Search by name, tags and description” and type:
Import Data
As you type, assets matching your search phrase appear. Stop typing when you see what you want.

NOTE: The date shown is the version of the asset.
-
Drag-and-drop the asset “Import Data” onto the top of the (blank) designer canvas.
- In the menu that appears on the right, open the “Data source” dropdown to select “URL via HTTP”.
-
Copy and paste the URL to created data (above), such as this:
https://raw.githubusercontent.com/cloudacademy/azure-lab-artifacts/master/intro-to-azure-ml/tweets.csv
-
Wait until “Validating” is done. The larger the file, the longer this will take.
Submit and Run Experiment
-
Preview schema to ensure data fields are defined correctly. Save.
-
In order for Column labels to populate, click “Submit” at the uppper-right to run the model.
-
In the “Set up pipeline run” dialog, select “Create new” and type experiment name:
PROTIP: Have a naming convention for models. Begin the Name with “dev” to denote its status. Name models with a suffix of a couple of zeros in front of number 1 in case there are several.
-
Click Submit on the dialog. Look to the upper-right for the “Running” status to “Finished”, which can be several minutes.
-
Look for the “Running” status to “Finished”, which can be several minutes.
Add pipeline steps to filter and process imported data
-
Search for asset “feature hashing” and drag it under “Import Data” as a new step in the canvas:
-
Connect two steps: click the circle under the top step (turning it green), then drag it to the circle above the second step (turning that green). An arrow should appear.
That action converts text data into a vector of features which makes the data more manageable and performant.
-
In the context menu at the right, click “Edit column name” and select “tweet_text”. Save.
Split data
-
Search for asset “split data” to drag-and-drop onto the designer canvas.
-
Click on it to input “0.8” in the “Fraction of rows in the first ouput dataset” field (replacing the default “0.5”), then Tab away.
80% - the “training set” is used to train the model.
20% - the “test set” is used to help score the model later. -
Connect the Feature Hashing step with the Split Data step.
-
Search for asset “Filter Based Feature Selection” and drag it onto the canvas under “Split Data”, then join them.
This teases out the data by irrelevant attributes or redundant columns. Each feature column is measured and scored then ranked, which improves accuracy when building a predictive model.
-
Search for asset “Train Model” and drag it onto the canvas.
-
In Target Column: click the Edit Column link to reveal the list of columns by clicking “Edit column name” to select “sentiment_label”. Save.
-
Number of desired features: 2000 (instead of default 1).
-
Feature scoring method: Select “ChiSquared” (instead of default “PearsonCorrelation”).
-
Search for Score Model
- Search for Evaluate Model, drag-and-drop.
-
PROTIP: Link from Score Model to the left port of Evaluate Model. Otherwise there will be an error.
https://docs.microsoft.com/en-us/azure/machine-learning/algorithm-module-reference/designer-error-codes
Training run
-
Verify that you’ve achieved the pipeline diagram (above).
-
Click “Submit” at the upper-right to run the whole pipeline to create a model.
It take several minutes to complete all the steps. The more data, the longer it takes.
Evaluate ML models
-
Right-click on the Evaluate Model step to expand “Visualize” before clicking “Evaluation results”:

BLOG:
-
Review:
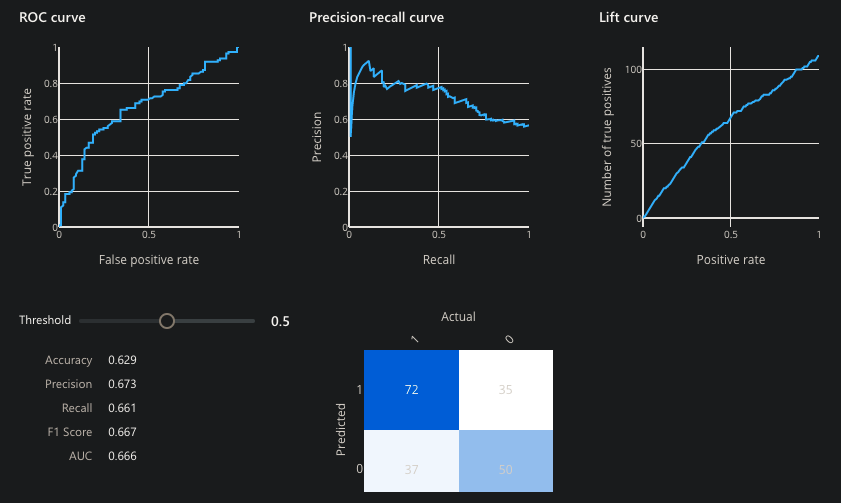
Azure does not present all the statistics, which we cover here.
Metrics of classification model performance
See My notes on evaulating Classification results.
Metrics of regression model performance
See My notes on evaulating Regression results.
Metrics for clustering model performance
-
Average Distance to Other Center is how close, on average, each point in the cluster is to the centroids of all other clusters.
-
Average Distance to Cluster Center is the closeness of all points in a cluster to the centroid of that cluster.
-
Number of Points is how many data points were assigned to each cluster, and the total overall number of data points in any cluster.
If the number of data points assigned to clusters is less than the total number of data points available, it means that the data points could not be assigned to a cluster.
-
Maximal Distance to Cluster Center is the max of the distances between each point and the centroid of that point’s cluster.
-
If this number is high, it can mean that the cluster is widely dispersed. This statistic together with the Average Distance to Cluster Center to determine the cluster’s spread.
-
Combined Evaluation score (at the bottom of the each section of results) lists the averaged scores for the clusters created in that particular model.
Comparing multiple models
To compare the performance among multiple models, in your pipeline, add an Evaluate Model module and connect the Scored dataset output of the Score Model or Result dataset output of the Assign Data to Clusters to the left input port of Evaluate Model.
Create a Real-Time Inference Pipeline and Deploy an Endpoint
Azure Machine Learning Designer allows models to be deployed as REST endpoint to be consumed by others or an application. This is great for developers that have minimal experience in Machine Learning and want to incorporate predictive models into their application.
The pipeline first has to be converted into an inference-pipeline and then deployed as an endpoint on either AKS (Azure Kubernetes Service) or an Azure Container Instance.
-
Click “Create inference pipeline” to select “Real-time inference pipeline”.
This adds “Web Service Input” and “Web Service Output” steps in the canvas.

- Click “Submit”. Select existing experiment name.
-
Click “Submit” on the dialog.
-
Click “Deploy” at the upper-right.
-
In the “Setup real time endpoint” dialog, with “Deploy new real-time endpoint” selected, type “tweet-analysis” into the Name field.
PROTIP: If you share a workspace with a team or other teams, make the name unique among all who you work with.
- Compute type drop-down: select “Azure Container Instance”.
-
Click “Deploy” in the dialog.
-
Wait while “Deploy: Waiting real-time endpoint creation”.
-
When “Deploy: Succeeded” appears, click “view real-time endpoint” to open another browser tab to show the web app.
- Click the Consume tab to review the consumption info.
NOTE: Error messages can be cryptic, such as this:
Deploy: Failed on Preparing to deploy. Details: Call MT PrepareCreateRealTimeEndpointRequest api failed. PipelineRunId is not a Guid-string.
AutoML
- Select “Automated ML” (under Author).
- ”+ New Automated ML run”.
- Click circle to select dataset (“bike-rentals”).
- Next for “Configure run” dialog.
-
“Data Statistics” to see stats for each column. Close.
- New experiment name: mslearn-bike-rental
- Target column: rentals (interger). This is the label the model will be trained to predict.
- Training compute target: the compute cluster you created previously
-
Select Virtual Machine.
- Task type and settings
- Task type: Regression (the model will predict a numeric value)
-
Finish
- “Refresh” to see when run gets to “Complete”.
- Look at the “Best model summary”
References to classic version:
- https://medium.com/data-science-reporter/a-simple-hands-on-tutorial-of-azure-machine-learning-studio-b6f05595dd73
azureml sdk package: https://azure.github.io/azureml-sdk-for-r/reference/index.html
-
“Endpoints” (under heading Assets).
NOTE: There are Real-time endpoints and Pipeline endpoints.
-
“Consume” tab
DOCS:
https://www.coursera.org/projects/automl-computer-vision-microsoft-custom-vision Guided Project: AutoML for Computer Vision with Microsoft Custom Vision by Mario Ferraro
https://www.coursera.org/programs/mckinsey-learning-program-uedvm/browse?currentTab=MY_COURSES&productId=7mGkLZGLEeup-AoS2h03mQ&productType=course&query=azure&showMiniModal=true Azure: Create a Virtual Machine and Deploy a Web Server
Install Visual Studio Code extensions
- Open Visual Studio Code on your laptop.
- Press Shift+Command+X for Extensions search.
- Search for “Azure Machine Learning”
-
Click “Install”.
Several extensions are installed (Azure account, AML - Remote).
-
Search for “Thunder client” for a REST API GUI like Postman.
- To invoke extensions, VS Code will apply the extension based on the file type opened (such as .py for Python, etc.)
Etc.
Pytorch https://github.com/Azure/azureml-examples
Configurations:
- Accuracy
- AUC weighted
- Norm macro recall
- Average precision score weighted
- Precision score weighted
- Compute instances
- Compute clusters
- Inference clusters
- Attached compute
Validation type:
- Auto
- k-fold cross validation
- Monte Carlo cross validation
- Train-validation split
“Create a machine learning workspace to manage machine learning solutions through the entire data science lifecycle.”
- Click “+ Add” or the blue “Create machine learning workspace”.
- Subscription
- Workspace name: see naming conventions
- Region (Location)
- Storage account
- Key vault
- Application insights
- Container registry
- Networking: connectivity CAUTION: public by default, or private: add endpoint.
- Advanced: Data encryption
- Advanced: Data impact (data privacy)
-
Tags
-
Wait for your workspace to be created (it can take a few minutes).
Microsoft Azure Machine Learning studio
Coursera Project Network: Predictive Modelling with Azure Machine Learning Studio
-
On the Overview page, launch Azure Machine Learning studio (or open a new browser tab and navigate to
- Sign into Azure Machine Learning studio using your Microsoft account. If prompted, select your Azure directory and subscription, and your Azure Machine Learning workspace.
- In Azure Machine Learning studio, toggle the ☰ icon at the top left to view the various pages in the interface. You can use these pages to manage the resources in your workspace.
-
Adjust
https://docs.microsoft.com/en-us/learn/modules/use-automated-machine-learning/create-compute
-
TODO: PROTIP: So you don’t pay for idle compute, programmatically start and stop clusters.
Create Compute Instance
- On the Compute Instances tab, add a new compute instance with the following settings. You’ll use this as a workstation from which to test your model:
- Virtual Machine type: CPU
- Virtual Machine size: Standard_DS11_v2 (Choose Select from all options to search for and select this machine size)
- Compute name: enter a unique name
- Enable SSH access: Unselected
- While the compute instance is being created, switch to the Compute Clusters tab, and add a new compute cluster with the following settings. You’ll use this to train a machine learning model:
- Virtual Machine priority: Dedicated
- Virtual Machine type: CPU
- Virtual Machine size: Standard_DS11_v2 (Choose Select from all options to search for and select this machine size)
- Compute name: enter a unique name
- Minimum number of nodes: 0
- Maximum number of nodes: 2
- Idle seconds before scale down: 120
- Enable SSH access: Unselected
PROTIP: At least 5 images are needed to train a Custom Vision model.
PROTIP: Tags can contain upper case, spaces, special characters.
Create dataset from Open Datasets
Datastore types:
- Azure Blob storage
- Azure file share
- Azure Data Lake Storage Gen1
- Azure Data Lake Storage Gen2
- Azure SQL database
- Azure PostgreSQL database
- Azure MySQL database
MS LEARN HANDS-ON LAB: Create no-code predictive models with Azure Machine Learning
Supervised: Regression & Classification
HDInsight from 2017
Fraud Detection with Azure HDInsight Spark Clusters
Loan Credit Risk with Azure HDInsight Spark Clusters
Loan ChargeOff Prediction with Azure HDInsight Spark Clusters
Data Science VM
https://docs.microsoft.com/en-us/azure/machine-learning/data-science-virtual-machine/overview#whats-included-in-the-data-science-vm
Resources
- Intro to Azure ML by Priyanka S. Shah: Part 1 of 4
Notes to be inserted
Steps for data transformation:
- Feature selection
- Finding and removing data outliers
- Impute missing values
- Normalize numeric features
- Label data
- Algorithm selection
- Data split
- Run model
More Complexity makes for better Intelligibility
- Linear regression
- Decision Trees
- K-nearest nighbors
- Random Forests
- Support Vector Machines
- Deep Neural Networks
Global features vs. local feature importance
https://www.twitch.tv/enceladosaurus
https://www.twitch.tv/thelivecoders An outgoing and enthusiastic group of friendly channels that write code, teach about technology, and promote the technical community. https://github.com/livecoders/home Wiki https://github.com/livecoders/Home/wiki
https://shap.readthedocs.io/en/latest/index.html
https://databricks.com/session_na20/the-importance-of-model-fairness-and-interpretability-in-ai-systems
https://docs.microsoft.com/en-us/azure/machine-learning/how-to-machine-learning-interpretability-aml
More
This is one of a series on AI, Machine Learning, Deep Learning, Robotics, and Analytics:
- AI Ecosystem
- Machine Learning
- Microsoft’s AI
- Microsoft’s Azure Machine Learning Algorithms
- Microsoft’s Azure Machine Learning tutorial
- Python installation
- Image Processing
- Tessaract OCR using OpenCV
- Multiple Regression calculation and visualization using Excel and Machine Learning
- Tableau Data Visualization