

Master the cloud that runs on fast Google Fiber and Big AI, from the folks who created Kubernetes, Gmail, Google Docs/Sheets, etc.
![]()
![]()
![]()
![]()
![]()
![]()
![]()
![]()
![]()
![]()
![]()
![]()
![]()
Overview
- Why Google?
- Personas & Job Titles
- Types of cloud services:
- Google Services Application Architecture
- Products for Developers
- Google Certified Professional (GCP) Certification Exams
- Digital Leader certification
- Associate Cloud Engineer certification
- Cloud Architect certification
- Data Engineer certification
- Cloud DevOps Engineer certification
- Cloud Developer certification
- Cloud Network Engineer certification
- Cloud Security Engineer certification
- Machine Learning Engineer certification
- Cloud Engineer certification
- Documentation
- Cloud Adoption Framework
- Maturity Assessement
- SLAs
- Google Support
- Social Community
- Hands-on training
- How to get free cloud time
- A. Free $300 account for 60 days
- Ways of interacting with Google Cloud
- CLI programs & commands on your Terminal
- Quotas
- Google Shell
- REST APIs
- Short-lived Credentials
- Workload Identity Federation (WIF)
- Google IaC (Infra as Code)
- New Project
- Principals
- Credentials for Authentication
- IAM
- Create sample Node server
- Source Code Repository
- REST APIs
- Google Networking
- Google COMPUTE Cloud Services
- GKE (Google Kubernetes Engine)
Here is a hands-on introduction to learning the Google Compute Platform (GCP) and getting certified as a Google Certified Professional (GCP).
NOTE: Content here are my personal opinions, and not intended to represent any employer (past or present). “PROTIP:” here highlight information I haven’t seen elsewhere on the internet because it is hard-won, little-know but significant facts based on my personal research and experience.
TLDR: My contributions (under construction):
- A Bash shell file (gcpinfo.sh) that installs what’s needed for
- A multi-cloud Python program interacting across GCP, Azure, AWS
- A Terraform repo (gcp-tf) containing HCL to create GCP resources safely within enterprises
- A Google Sheet providing metadata about APIs collected over several Google websites and commands
This article addresses only Google’s Cloud products.
In addition to Google Cloud are Google’s SaaS (Maps, etc.), Workspace (Gmail, Calendar, Sheets, Drive, etc.), Social (Contacts, etc.), YouTube, Mobile hardware line (Android, Pixel, etc.), and Search AdSense. Google’s parent company Alphabet owns the Waymo self-driving taxi service.
Why Google?
-
On being #3 among CSPs (Cloud Service Providers):
PROTIP: There are fewer GCP jobs than AWS & Azure jobs. However, due to fewer people working on GCP, individual professionals are likely to be paid better than AWS & Azure pros.
-
Visit Google Cloud’s marketing home page at:
Google is based in Mountain View, California (“Silicon Valley”). It became big since its search engine (appearing in 1996) and associated advertising catapulted them to be one of the most valuable companies in the world.
Google says it’s the first company to be carbon-free, running on 90% carbon-free energy.
Major named reference clients of the Google Cloud Platform (GCP) include HSBC, PayPal, 20th Century Fox, Bloomberg, Dominos, etc.
-
Click on Solutions to see that Google has software specific to industries such as Retail, Healthcare, Supply Chain, even Manufacturing. Those are industries where Amazon has also entered markets of its AWS cloud customers.
Google also supports “Modernization” initiatives such as Open Banking, SRE, DevOps, Day 2 Operations, Multicloud, etc.
Google was the first CSP to get an ISO 14001 certification.
-
On the left side of the Solutions page, » marks category names that are also in the Products menu (below):
- Application modernization (CI/CD » DevOps, API Management, Multicloud)
- Artificial Intelligence »
- APIs and applications
- Databases »
- Data cloud
- Digital transformation
- Infrastructure modernization
- Productivity and collaboration (Google Workspace, Chrome Enterprise, Cloud Identity, Cloud Search)
- Security »
- (Smart) Analytics » (previously “BIG DATA”)
- Startups and SMB (Web3, Startup Program)
- Featured partner solutions
- Google has innovated in its aggressive pricing among CSPs:
- first to have per-second vs. per-minute billing.
- discount applied automatically after an instance runs for more than 25% of a month.
- Google encrypts data automatically at no additional charge. However, AWS charges extra for the stronger encryption for security – an expensive hassle.
- Forrester rated GCP highest on “Strategy” in its “IaaS Platform Native Security” even though Microsoft got a 5 vs 3 for “Roadmap”, “Market approach”. Some may argue rating Google over Amazon on “Innovation”.
Pricing is especially important as more usage is made of AI and Machine Learning (Vertex), which use a voracious amount of compute power.
-
Google was the first cloud vendor to offer a VPC which spans several regions (until late 2018 when AWS offers the same). The global scope of a VPC in Google eliminates the cost and latency of VPN between regions (plus a router for each VPN for BGP). This also enables shareable configuration between projects.
-
My cloud vendor comparison article describes how Google’s fast fiber network of underground and undersea cables connects machines at high capacity and speed across the world.
Even if you don’t use Google Cloud, you can use Google’s fast DNS at 8.8.8.8. However, I recommend another approach.
-
As with AWS, Google has Preemptible VMs that run up to just 24 hours, with less features than Spot VMs. Both are priced the same. No “pre-warming” is required for load balancing.
- Largest servers? As of May 11, 2022, Google’s Cloud TPU (Tensor Processing Units) use 2048-chip and 1024-chip v4 Pods which combine for 9 exaflops of peak aggregate performance (equivalent to the computing power of 10 million laptops combined) – the largest publicly available. Google is also working on Quantum AI. to run ML hub.
CloudSkillsBoost: $299/year for $500 cloud credits, $200 cert voucher, and “Consultation with Google Cloud experts”.
As with other clouds
- It’s costly and difficult for individual companies to keep up with the pace of technology, especially around hardware
- “Pay as you go” rather than significant up-front purchase, which eats time
- No software to install (and go stale, requiring redo work)
- Google scale - 9 cloud regions in 27 zones. 90 Edge cache locations.
cloud.google.com/about/locations lists current number of regions, zones, network edge locations, countries served by the Google Front End (GFE) with DoS protection.
Personas & Job Titles
The major services associated with each major persona (job/profession category):

The above VIDEO by Ashutosh Mishra presents a common set of job titles.
PROTIP: But the most secure yet efficient approach to organizing who does what is to create a different email and GCP account for each work group this way:
PROTIP: Don’t use an individual’s email accounts (such as “John Doe”) for GCP use. Route all mail from role emails to to individual email accounts so it can be changed easier, without losing all prior history.
Systems Skill Specialties
Production systems such as Pokemon Go use a combination of several (Serverless) services:

QUESTION: How many different people are needed to cover the technical details of all these services?
Segration of Duties
All this enables faster and easier scaling for growth.
Try not to have many people who have multiple roles because that’s bad “segreation of duties” required by laws.
This approach takes a bit more time, but is more secure and thus less troublesome in the long run.
-
A Billing (Finance) email account managing credit card or invoice payments. This account needs frequent review by a recognized feduciary of the organization responsible for getting the bills paid every month. There needs to be an additional layer to verify that bills are indeed paid on time each month.
The GCP account managing the bills GCP calls the “Global Administrator”, which can do anything, so its credentials is a very dangerous secret to lose. So send a copy of emails sent to this to at least one other person.
Feduciaries need to obtain, from each spending account, forecasts of spend and reconciliation of actual spend. The larger the company, the more people do that.
They should approve the creation of accounts used for everyday work (the spend accounts). The definition of accounts needed can be done by HR.
Accurate billing is dependent upon every user consistently and accurately attribute budgeting info in their code, such as Operators ensuring that Git Hook scripts block update to GitHub. This makes it easier to spot rogue usage such a Bitcoin mining.
-
Operations accounts are used to operate automation code that are versioned (for audits later). Example of such IoC (Infrastructure as Code) include: shell scripts, spredsheets defining organization accounts to be created & used, Terraform to create cloud resources, Ansible to define servers, etc.
-
Archivists make sure backup are taken and media stored securely.
These people should be of a different reporting relationship than those who can delete their archives.
-
Archive removal accounts should only be used to permanently delete data. Executive approval should be involved after confirming that prior version backups can be restored. Not using this account often makes it more difficult for ransomware to cause damage.
Types of cloud services:
SaaS = Software (web apps) as a Service =>
- Google.com Search, YouTube.com, Google Workspaces: Gmail.com, Calendar, Tasks, Docs, Sheets, Drive, Google Apps.
PaaS = Platform (managed services) as a Service => - Cloud Functions, Cloud Run, API Gateway, Analytics
IaaS = Infra (resources) as a Service => - Compute, storage, databases, network.
Google Services Application Architecture
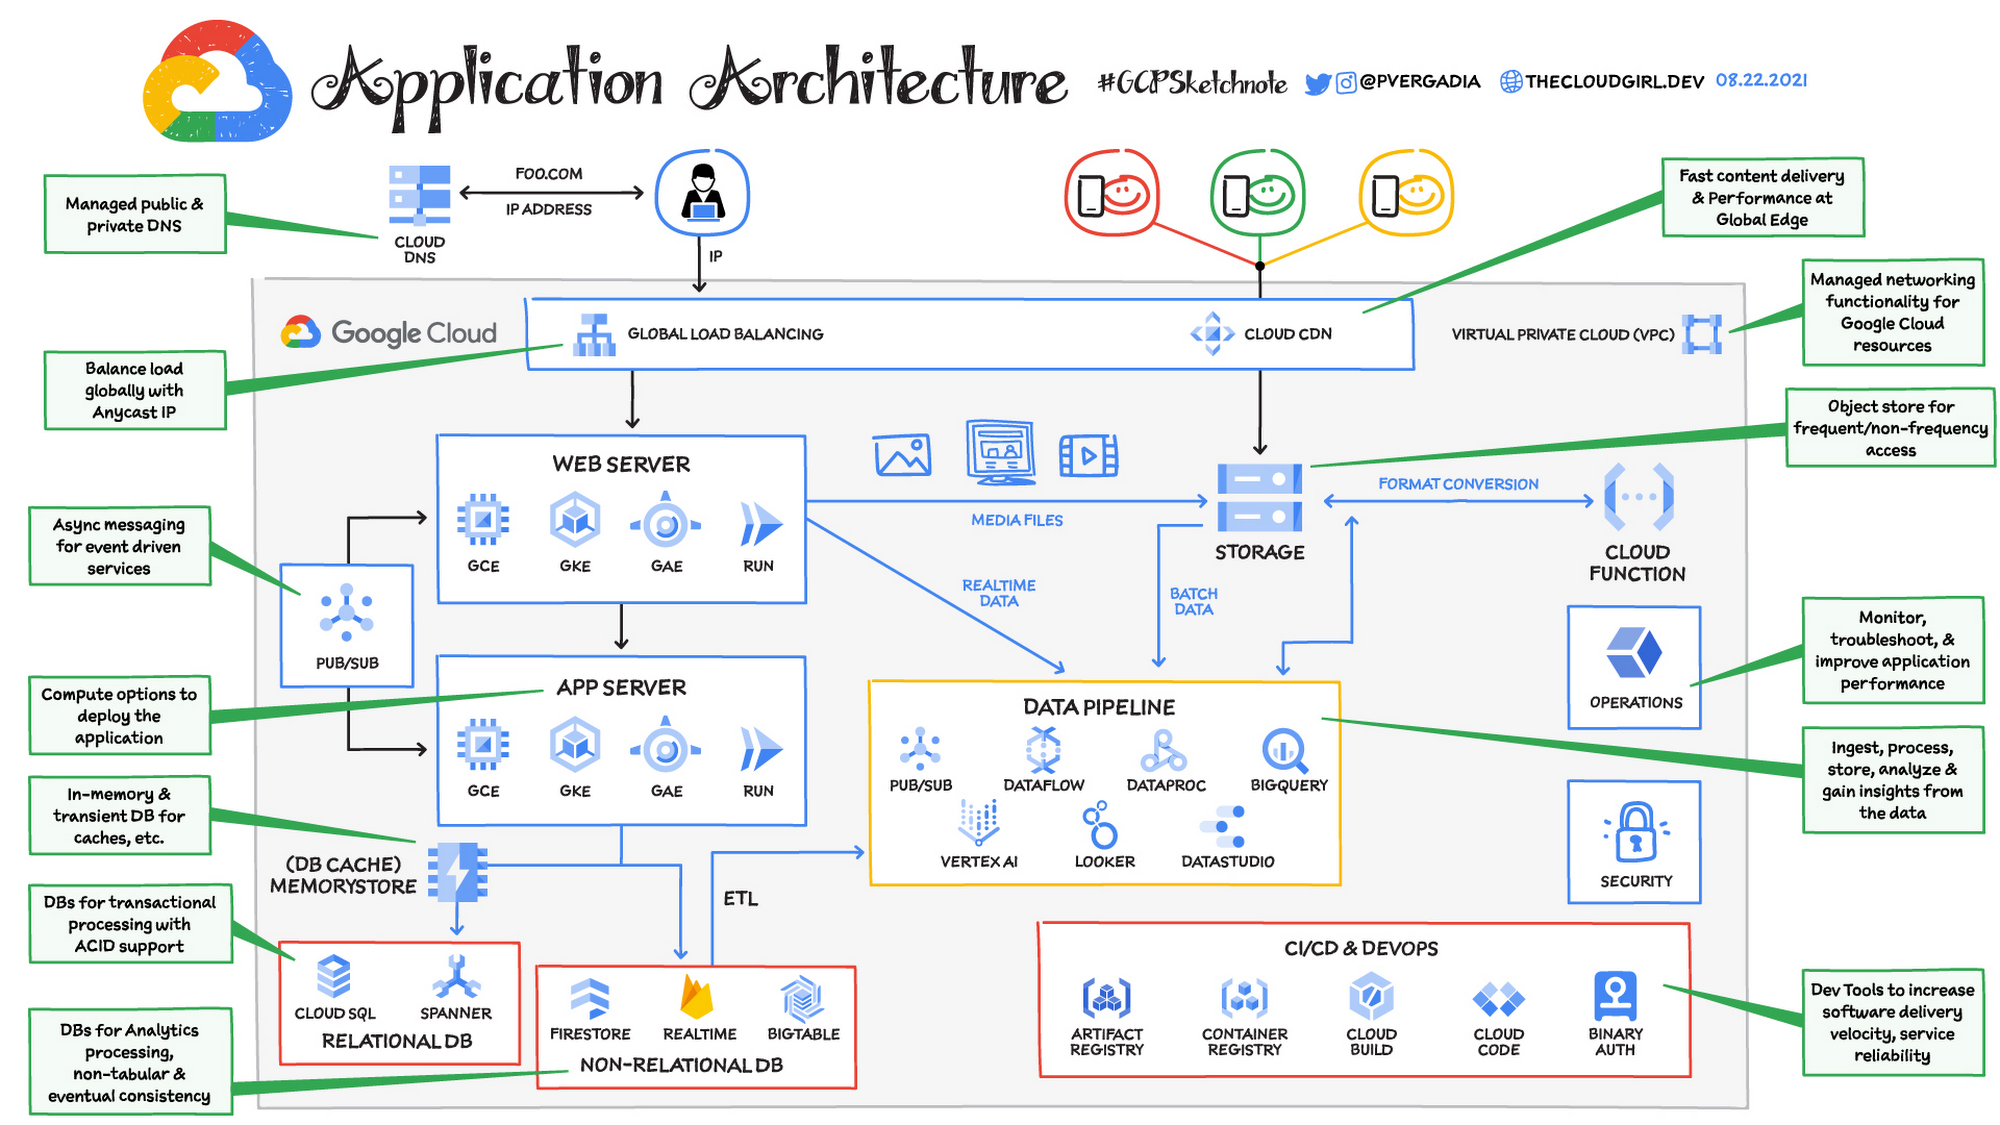
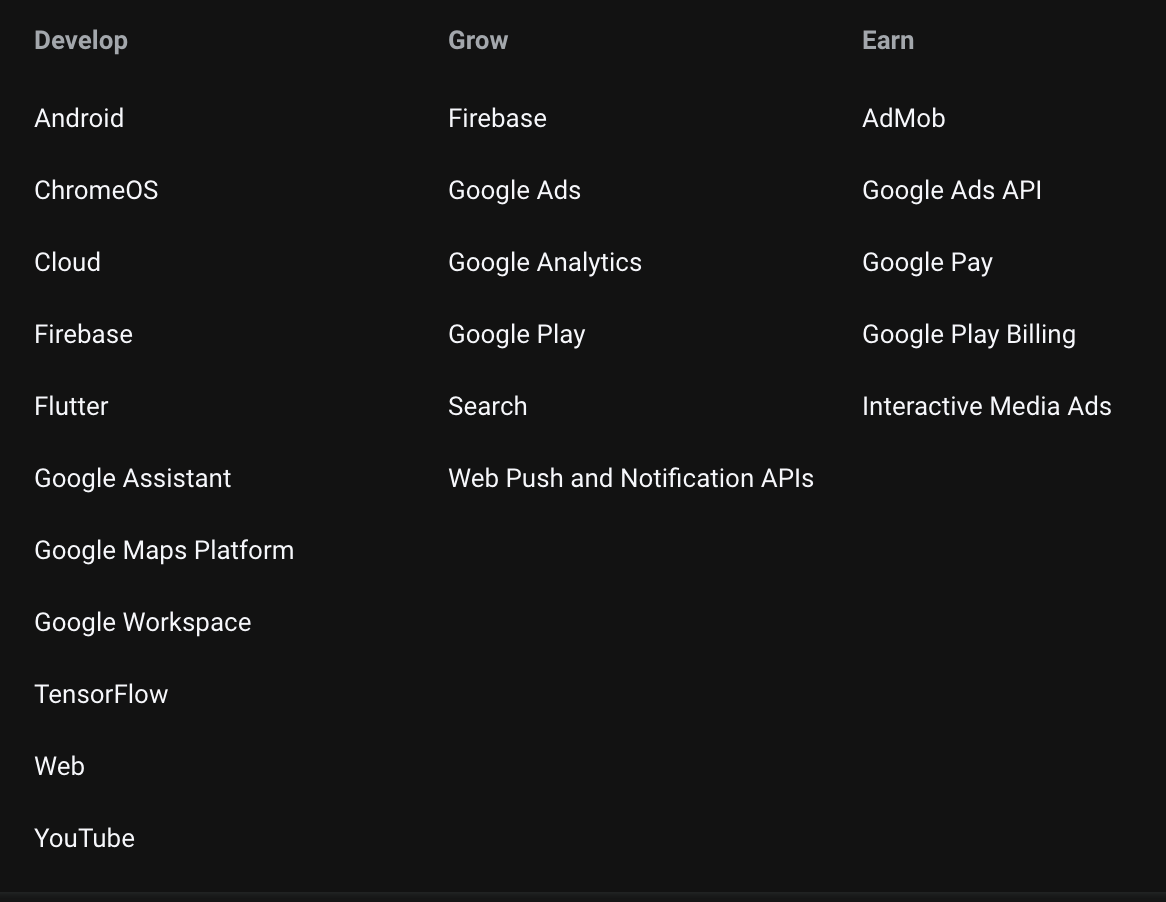
Products for Developers
Products offered by Google are listed at:
Although the webite hosting this diagram is no longer active, for those who have good visual memory:
Then click the icon for each service. Alternately, from Chrome within GCP, download Google SVG icons using the Chrome extension Amazing Icon Downloader.

Groups not in the Console’s menu (below) are: “API Platforms and Ecosystems”, “Identity and Security”, “Migration to Google Cloud”, “Developer Tools”.
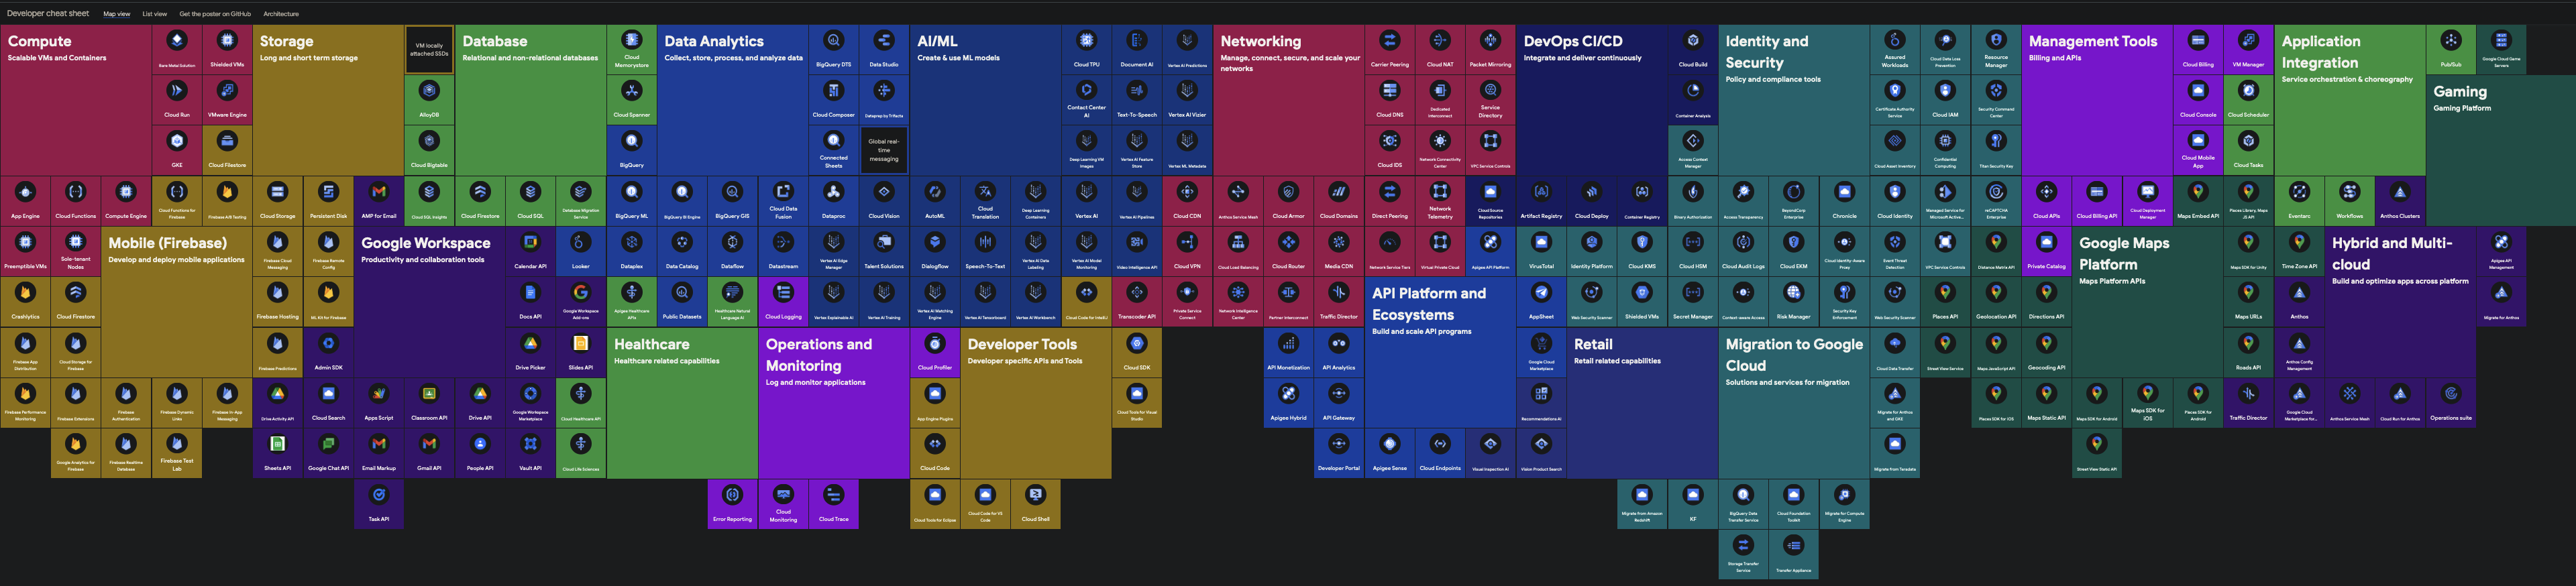
One-sentence per service at https://cloud.google.com/products and in the “Products & solutions” page at https://console.cloud.google.com/products, notice that items of each category are in order of popularity. My contribution is arranging the categories in alphabetical order instead:
-
Analytics (BigQuery, Pub/Sub, Dataflow, Composer, Dataproc, Dataprep, IoT Core, Data Fusion, Looker, Healthcare, Financial Services, Datastream, Life Sciences, Data Catalog, Elastic Cloud, Databricks, Dataplex)
-
AI/ML (Vertex AI (Machine Learning), Natural Language, Tables, Translation, Document AI, Recommendations AI, Retail, Talent Solution, DocAI Warehouse, Discovery Engine, Speech, Vertex AI Vision)
AI Platform (Unified), Data Labeling -
DevOps CI/CD (Cloud Build,
Container Registry, Source Repositories, Artifact Registry, Cloud Deploy)Cloud Scheduler, Deployment Manager, Endpoints, Workflows, Private Catalog -
Compute (Compute Engine, Kubernetes Engine, VMware Engine, Anthos, Batch)
Container Engine -
Database (SQL, Datastore, Filestore, Spanner, Bigtable, Memorystore, Database Migration, MongoDB Atlas, Neo4j Aura, Redis Ent., AlloyDB)
-
Distributed Cloud (Edge, Appliances)
-
Integration Services (Cloud Scheduler, Cloud Tasks, Workflow, Eventarc, Application Integration, Integration Connectors, Apigee)
-
Networking (VPC network, Network services, Hybrid Connectivity, Network Security, Network Intelligence, Network Service Tiers)
-
Operations (and Monitoring) (Logging, Monitoring, Error Reporting, Trace, Profiler, Capacity Planner)
Stackdriver -
Other Google products (Google Maps Platform, Immersive Stream, Google Workspace)
-
Storage (Google Storage, Filestore, Storage Transfer, Dell PowerScale)
-
Serverless (Cloud Run, Cloud Functions, App Engine, API Gateway, Endpoints)
-
Security (Security, Compliance)
-
Tools (Identity Platform, Deployment Manager, Service Catalog, Carbon Footprint, Apache Kafka on Confluence, Splunk Cloud, Cloud Workstations, (DB) Migration Center)
Previously, “BIG DATA” is now “Analytics”. “TOOLS” is now “CI/CD”. Apigee and API Gateway are now in separate categories. Debugger, Previous menu categories:
- IDENTITY & SECURITY (Identity, Access, Security) was reallocated.
- PARTNER SOLUTIONS (Redis Enterprise, Apache Kafka, DataStax Astra, Elasticsearch Service, MongoDB Atlas, Cloud Volumes)
PROTIP: Menu over a menu item to see the lower-lever menu. Escape from that by pressing Esc key.
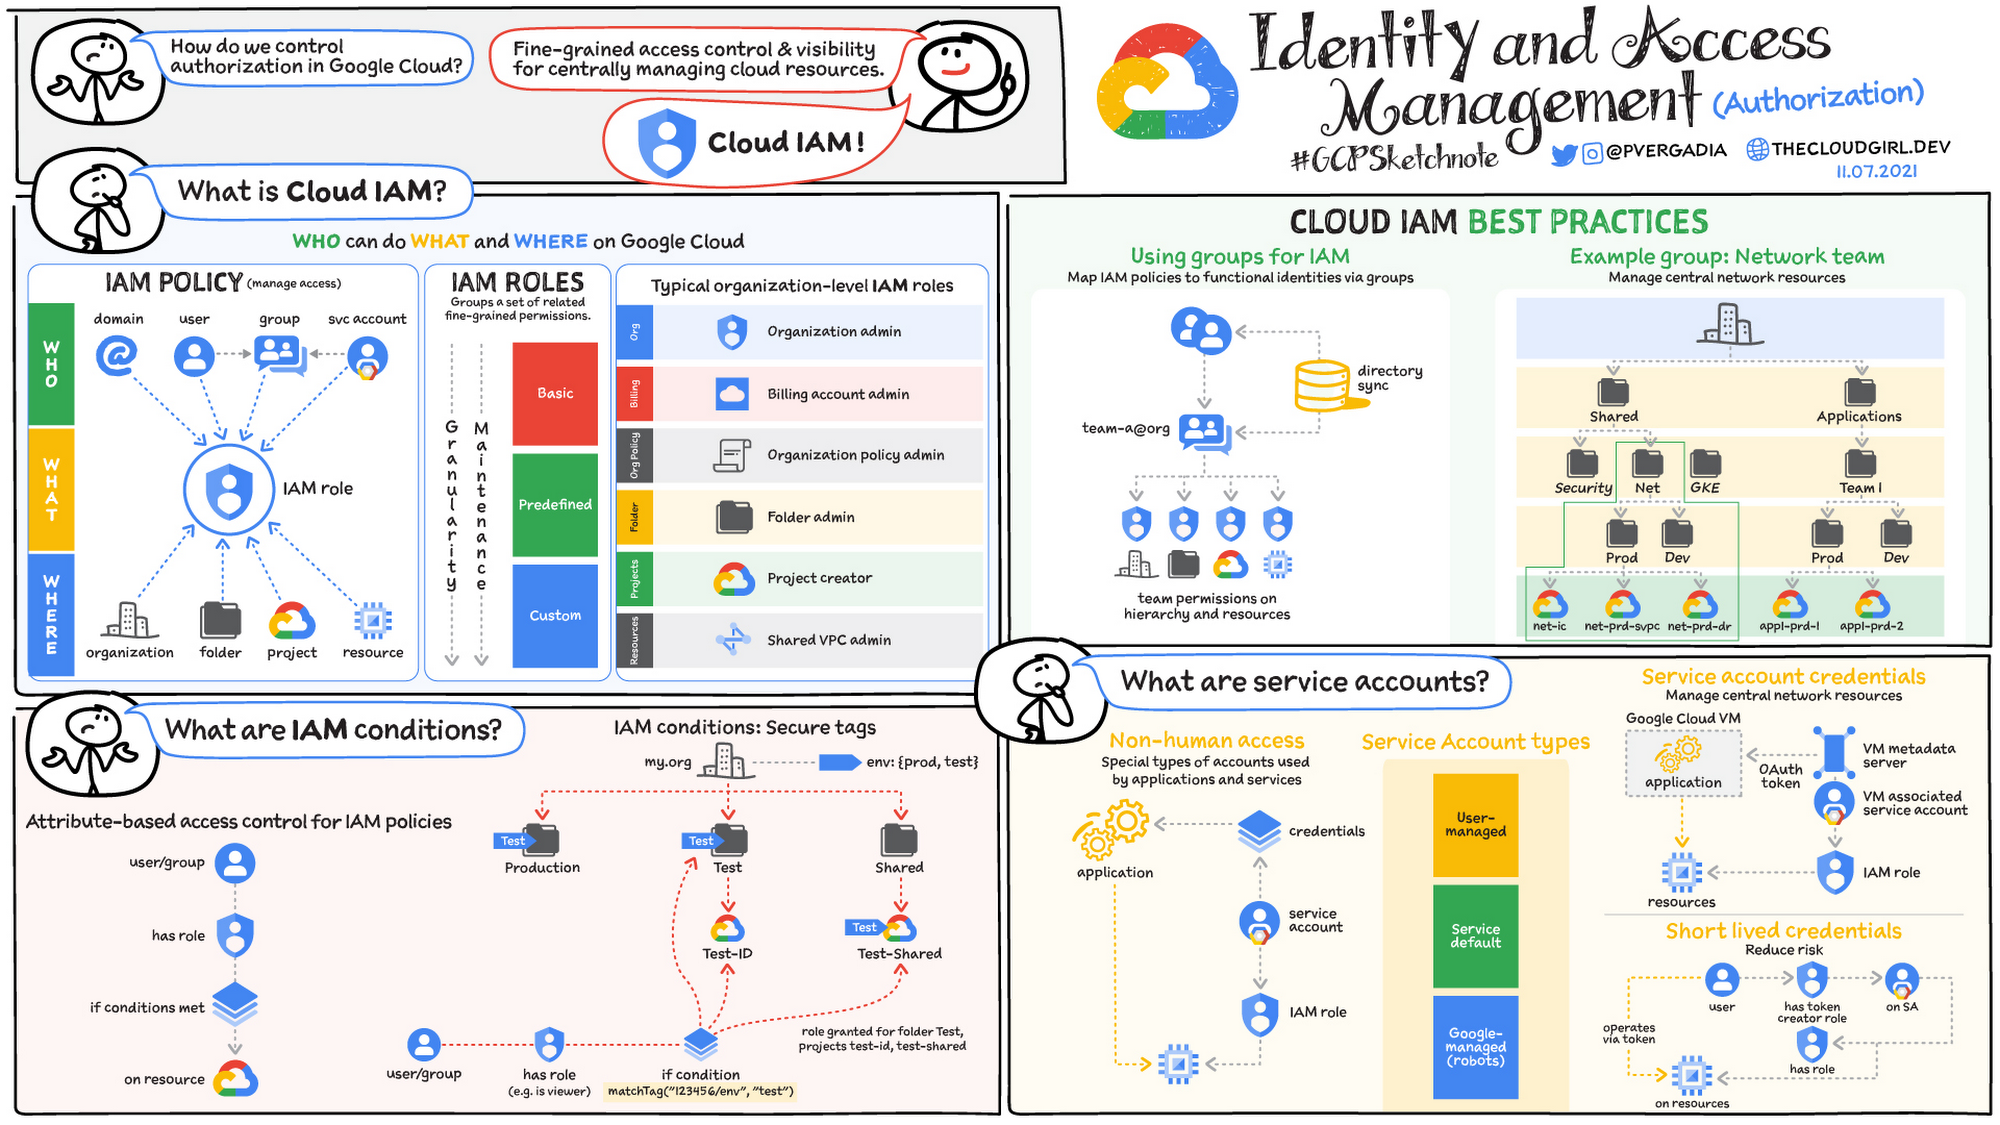
When desiging & implementing Identity and Access Management (IAM), consider the conditions, roles, service accounts thus:
gcloud commands by group
After you install the GCP gcloud command, run gcloud with no parameters to get this arrangement of products:
Available command groups for gcloud:

  AI and Machine Learning
      ai                      Manage entities in Vertex AI.
      ai-platform             Manage AI Platform jobs and models.
      colab                   Manage Colab Enterprise resources.
      gemini                  Manage code repository index resources.
      ml                      Use Google Cloud machine learning capabilities.
      ml-engine               Manage AI Platform jobs and models.
      notebooks               Notebooks Command Group.
      workbench               Workbench Command Group.

  API Platform and Ecosystems
      api-gateway             Manage Cloud API Gateway resources.
      apigee                  Manage Apigee resources.
      endpoints               Create, enable and manage API services.
      recommender             Manage Cloud recommendations and recommendation
                              rules.
      services                List, enable and disable APIs and services.

  Anthos CLI
      anthos                  Anthos command Group.

  Batch
      batch                   Manage Batch resources.

  Big Data
      bq                      Manage Bq resources.

  Billing
      billing                 Manage billing accounts and associate them with
                              projects.

  CI/CD
      artifacts               Manage Artifact Registry resources.
      builds                  Create and manage builds for Google Cloud Build.
      deploy                  Create and manage Cloud Deploy resources.
      scheduler               Manage Cloud Scheduler jobs and schedules.
      tasks                   Manage Cloud Tasks queues and tasks.

  Compute
      app                     Manage your App Engine deployments.
      bms                     Manage Bare Metal Solution resources.
      compute                 Create and manipulate Compute Engine resources.
      container               Deploy and manage clusters of machines for running
                              containers.
      edge-cloud              Manage edge-cloud resources.
      functions               Manage Google Cloud Functions.
      run                     Manage your Cloud Run applications.
      vmware                  Manage Google Cloud VMware Engine resources.

  Data Analytics
      composer                Create and manage Cloud Composer Environments.
      data-catalog            Manage Data Catalog resources.
      dataflow                Manage Google Cloud Dataflow resources.
      dataplex                Manage Dataplex resources.
      dataproc                Create and manage Google Cloud Dataproc clusters
                              and jobs.
      looker                  Manage Looker resources.
      managed-kafka           Administer Managed Service for Apache Kafka
                              clusters, topics, and consumer groups.
      metastore               Manage Dataproc Metastore resources.
      pubsub                  Manage Cloud Pub/Sub topics, subscriptions, and
                              snapshots.

  Databases
      alloydb                 Create and manage AlloyDB databases.
      bigtable                Manage your Cloud Bigtable storage.
      database-migration      Manage Database Migration Service resources.
      datastore               Manage your Cloud Datastore resources.
      datastream              Manage Cloud Datastream resources.
      firestore               Manage your Cloud Firestore resources.
      memcache                Manage Cloud Memorystore Memcached resources.
      redis                   Manage Cloud Memorystore Redis resources.
      spanner                 Command groups for Cloud Spanner.
      sql                     Create and manage Google Cloud SQL databases.

  Identity
      active-directory        Manage Managed Microsoft AD resources.
      identity                Manage Cloud Identity Groups and Memberships
                              resources.

  Identity and Security
      access-approval         Manage Access Approval requests and settings.
      access-context-manager  Manage Access Context Manager resources.
      auth                    Manage oauth2 credentials for the Google Cloud
                              CLI.
      iam                     Manage IAM service accounts and keys.
      iap                     Manage IAP policies.
      kms                     Manage cryptographic keys in the cloud.
      org-policies            Create and manage Organization Policies.
      pam                     Manage Privileged Access Manager (PAM)
                              entitlements and grants.
      policy-intelligence     A platform to help better understand, use, and
                              manage policies at scale.
      policy-troubleshoot     Troubleshoot Google Cloud Platform policies.
      privateca               Manage private Certificate Authorities on Google
                              Cloud.
      publicca                Manage accounts for Google Trust Services'
                              Certificate Authority.
      recaptcha               Manage reCAPTCHA Enterprise Keys.
      resource-manager        Manage Cloud Resources.
      resource-settings       Create and manage Resource Settings.
      secrets                 Manage secrets on Google Cloud.

  Internet of Things
      iot                     *(DEPRECATED)*  Manage Cloud IoT resources.

  Management Tools
      apphub                  Manage App Hub resources.
      cloud-shell             Manage Google Cloud Shell.
      deployment-manager      Manage deployments of cloud resources.
      essential-contacts      Manage Essential Contacts.
      infra-manager           Manage Infra Manager resources.
      logging                 Manage Cloud Logging.
      organizations           Create and manage Google Cloud Platform
                              Organizations.
      projects                Create and manage project access policies.

  Mobile
      firebase                Work with Google Firebase.

  Monitoring
      monitoring              Manage Cloud Monitoring dashboards.

  Network Security
      network-security        Manage Network Security resources.

  Networking
      certificate-manager     Manage SSL certificates for your Google Cloud
                              projects.
      dns                     Manage your Cloud DNS managed-zones and
                              record-sets.
      domains                 Manage domains for your Google Cloud projects.
      edge-cache              Manage Media CDN resources.
      ids                     Manage Cloud IDS.
      network-connectivity    Manage Network Connectivity Center resources.
      network-management      Manage Network Management resources.
      network-services        Manage Network Services resources.
      service-directory       Command groups for Service Directory.
      service-extensions      Manage Service Extensions resources.
      telco-automation        Manage Telco Automation resources.

  Other
      developer-connect       Manage Developer Connect resources.
      immersive-stream        Manage Immersive Stream resources.
      lustre                  Manage Lustre resources.
      memorystore             Manage Memorystore resources.
      model-armor             Model Armor is a service offering LLM-agnostic
                              security and AI safety measures to mitigate risks
                              associated with large language models (LLMs).
      observability           Manage Observability resources.
      oracle-database         Manage Oracle Database resources.
      parametermanager        Parameter Manager is a single source of truth to
                              store, access and manage the lifecycle of your
                              application parameters.
      workspace-add-ons       Manage Google Workspace Add-ons resources.

  SDK Tools
      components              List, install, update, or remove Google Cloud CLI
                              components.
      config                  View and edit Google Cloud CLI properties.
      emulators               Set up your local development environment using
                              emulators.
      source                  Cloud git repository commands.
      topic                   gcloud supplementary help.

  Security
      asset                   Manage the Cloud Asset Inventory.
      assured                 Read and manipulate Assured Workloads data
                              controls.
      audit-manager           Enroll resources, audit workloads and generate
                              reports.
      scc                     Manage Cloud SCC resources.

  Serverless
      eventarc                Manage Eventarc resources.

  Solutions
      healthcare              Manage Cloud Healthcare resources.
      migration               The root group for various Cloud Migration teams.
      transcoder              Manage Transcoder jobs and job templates.

  Storage
      backup-dr               Manage Backup and DR resources.
      filestore               Create and manipulate Filestore resources.
      netapp                  Create and manipulate Cloud NetApp Files
                              resources.
      storage                 Create and manage Cloud Storage buckets and
                              objects.

  Tools
      workflows               Manage your Cloud Workflows resources.
      workstations            Manage Cloud Workstations resources.

  Transfer
      transfer                Manage Transfer Service jobs, operations, and
                              agents.

Available commands for gcloud:

  Other
      cheat-sheet             Display gcloud cheat sheet.
      docker                  *(DEPRECATED)*  Enable Docker CLI access to Google
                              Container Registry.
      survey                  Invoke a customer satisfaction survey for Google
                              Cloud CLI.

  SDK Tools
      feedback                Provide feedback to the Google Cloud CLI team.
      help                    Search gcloud help text.
      info                    Display information about the current gcloud
                              environment.
      init                    Initialize or reinitialize gcloud.
      version                 Print version information for Google Cloud CLI
                              components.
Google Certified Professional (GCP) Certification Exams
Google lists its certifications at:
After certification, you are listed on the Google Cloud Certified Directory.
- https://www.coursera.org/collections/googlecloud-offer-expired
- https://support.google.com/cloud-certification/answer/9907748?hl=en
Their certs are good for two years.
$99 to answer 70% of 50-60 questions in 90 minutes:
$125 to answer 50-60 questions in 2 hours:
- Associate Cloud Engineer
- Google Workspace Administrator (Collaboration Engineer)
- Data Practitioner
$200 to answer 50-60 questions in 2-hours for professional-level cloud exams:
- Cloud Architect
- Cloud Database Engineer
- Data Engineer
- Cloud DevOps Engineer
- Cloud Security Engineer
- Cloud Network Engineer
BTW Google certifications on non-cloud Google products:
-
G Suite Administrator (Gmail, Google Drive, etc.)
- Associate Android Developer
-
Mobile Web Specialist
- Apigee (API Management) certification
PROTIP: Google uses Webaccessor (by Kryterion), which is also used by Salesforce, DevOpsInstitute, and Google. They consider addresses such as “johndoe+google@gmail.com” invalid.
Register for your exam through your Test Sponsor’s Webassessor portal. There you get a Test Taker Authorization Code needed to launch the test.
Tests can be taken via Kryterion’s online-proctoring (OLP) solution or in-person at a Kryterion Test Center. PROTIP: Call (602) 659-4660 in Phoenix, AZ because testing centers go in an out of business, or have limitations such as COVID, so call ahead to verify they’re open and to confirm parking instructions. Copy address and parking instructions to your Calendar entry.
Resources:
thecloudgirl.dev Priyanka Vergadia (coach/mentor) provides 101 sketchnotes (cartoon diagrams) BOOK and on YouTube.
Digital Leader certification
Foundational certification as a “Cloud Digital Leader”
- 8-hour Google Cloud Fundamentals: Core Infrastructure
- 7-hour Essential Google Cloud Infrastructure: Foundation
- 11-hour Essential Google Cloud Infrastructure: Core Services
- 7-hour Elastic Google Cloud Infrastructure: Scaling and Automation
- 8-hour Architecting with Google Kubernetes Engine: Foundations
- 3-hour Preparing for Your Associate Cloud Engineer Journey
- 6-hour FreeCodeCamp.org (GCP-CDL) by Andrew Brown of $60 exampro.co
- 6:43 hr video course “Google Cloud Platform Associate Cloud Engineer” on OReilly by Victor Dantas
Others:
Associate Cloud Engineer certification
Associate Cloud Engineer description • Deploys and secures applications and infrastructure • Monitors operations of multiple projects • Manages and maintains enterprise solutions. • Uses the console and CLI to perform common platform-based tasks.
Notice: Use of Python is not covered in this exam.
Tutorials:
Cloud Architect certification
Cloud Architect design, build and manage solutions on Google Cloud Platform.
PROTIP: The exam references case studies, so get to know them to avoid wasting time during the exam.
-
EHR Healthcare
-
Helicopter Racing League
-
Mountkirk (rev2) online multiplayer Games MySQL on Google Compute Engine for scaling globally. Rather than batch ETL.
-
TerramEarth (rev2) CASE mining vehicle field data collection from cellular network to reduce downtime and quicker data visibility SOLUTION
Each Case Study:
- Company overview
- Solution concept
- Existing technical environment
- Business requirements
- Technical requirements
- Executive statement
Prep courses:
-
O’Reilly course by Victor Dantas
-
Preparing for the Google Cloud Professional Cloud Architect Exam on Coursera is $49 if you want the quizzes and certificate. It covers these previous case studies:
-
JencoMart retailer migrating LAMP stacks to cloud (LAMP = Linux OS, Apache HTTP server, MySQL database, PHP)
-
Dress4Win (rev2) CASE clothing website with social network dev/test/DR with CI/CD lift and shift from Ubuntu MySQL Nginx, Hadoop. SOLUTION
-
Tutorials:
- Ashutosh Misra
- Coursera
- 10 week Google Cloud Fundamentals: Core Infrastructure
- Essential Google Cloud Infrastructure: Foundation
- Essential Google Cloud Infrastructure: Core Services
- Elastic Google Cloud Infrastructure: Scaling and Automation
- Reliable Google Cloud Infrastructure: Design and Process
- Architecting with Google Kubernetes Engine: Foundations
- Preparing for your Professional Cloud Architect Journey
-
https://medium.com/@earlg3/google-cloud-architect-exam-study-materials-5ab327b62bc8
- KC = Coursera “Architecting with Google Cloud Platform Specialization” (6 courses for $79 USD per month via qwiklabs):
https://www.coursera.org/specializations/gcp-architecture
Data Engineer certification
From Google: Data Engineer certification Guide for Analytics (big data)
https://cloud.google.com/training/courses/data-engineering is used within the Data Engineering on Google Cloud Platform Specialization on Coursera. It is a series of five one-week classes ($49 per month after 7 days). These have videos that syncs with transcript text, but no hints to quiz answers or live help.
-
Building Resilient Streaming Systems on Google Cloud Platform $99 USD
-
Leveraging Unstructured Data with Cloud Dataproc on Google Cloud Platform $59 USD
-
Google Cloud Platform Big Data and Machine Learning Fundamentals $59 USD by Google Professional Services Consulant Valliappa Lakshmanan (Lak) at https://medium.com/@lakshmanok, previously at NOAA weather predictions.
-
Serverless Data Analysis with Google BigQuery and Cloud Dataflow $99 USD
-
Serverless Machine Learning with Tensorflow on Google Cloud Platform $99 USD by Valliappa Lakshmanan uses Tensorflow Cloud ML service to learn a map of New York City by analyzing taxi cab locations.
- Vision image sentiment
- Speech recognizes 110 languages, dictating,
- Translate
- personalization
Cloud DevOps Engineer certification
From Google: Cloud DevOps Engineer certification</a>
5-course Coursera (Core Infra, SRE Culture, Design & Process, Logging, GKE):
- Google Cloud Platform Fundamentals: Core Infrastructure
- Developing a Google SRE Culture
- Reliable Google Cloud Infrastructure: Design and Process
- Logging, Monitoring and Observability in Google Cloud
- Getting Started with Google Kubernetes Engine
Coursera’s video Architecting with GKE Specialization course.
Previously:
-
Architecting with GKE: Foundations by Brian Rice (Curriculum Lead) provides hands-on Qwiklabs. Lab: Working with Cloud Build Quiz: Containers and Container Images, The Kubernetes Control Plane (master node), Kubernetes Object Management, Lab: Deploying to GKE, Migrate for Google Anthos
Coursera’s video courses toward a Prep Professional Cloud DevOps Engineer Professional Certificate
-
Google Cloud Platform Fundamentals: Core Infrastructure (1 “week”)
-
Developing a Google SRE Culture
In many IT organizations, incentives are not aligned between developers, who strive for agility, and operators, who focus on stability. Site reliability engineering, or SRE, is how Google aligns incentives between development and operations and does mission-critical production support. Adoption of SRE cultural and technical practices can help improve collaboration between the business and IT. This course introduces key practices of Google SRE and the important role IT and business leaders play in the success of SRE organizational adoption.
Primary audience: IT leaders and business leaders who are interested in embracing SRE philosophy. Roles include, but are not limited to CTO, IT director/manager, engineering VP/director/manager. Secondary audience: Other product and IT roles such as operations managers or engineers, software engineers, service managers, or product managers may also find this content useful as an introduction to SRE.
-
Reliable Google Cloud Infrastructure: Design and Process by Stephanie Wong (Developer Advocate) and Philipp Mair (Course Developer)
equips students to build highly reliable and efficient solutions on Google Cloud using proven design patterns. It is a continuation of the Architecting with Google Compute Engine or Architecting with GKE courses and assumes hands-on experience with the technologies covered in either of those courses. Through a combination of presentations, design activities, and hands-on labs, participants learn to define and balance business and technical requirements to design Google Cloud deployments that are highly reliable, highly available, secure, and cost-effective.
- Apply a tool set of questions, techniques, and design considerations
- Define application requirements and express them objectively as KPIs, SLOs and SLIs
- Decompose application requirements to find the right microservice boundaries
- Leverage Google Cloud developer tools to set up modern, automated deployment pipelines
- Choose the appropriate Cloud Storage services based on application requirements
- Architect cloud and hybrid networks * Implement reliable, scalable, resilient applications balancing key performance metrics with cost
- Choose the right Google Cloud deployment services for your applications
- Secure cloud applications, data, and infrastructure
- Monitor service level objectives and costs using Google Cloud tools Prerequisites * Completion of prior courses in the \
CERTIFICATE COMPLETION CHALLENGE to unlock benefits from Coursera and Google Cloud Enroll and complete Cloud Engineering with Google Cloud or Cloud Architecture with Google Cloud Professional Certificate or Data Engineering with Google Cloud Professional Certificate before November 8, 2020 to receive the following benefits; => Google Cloud t-shirt, for the first 1,000 eligible learners to complete. While supplies last. > Exclusive access to Big => Interview ($950 value) and career coaching => 30 days free access to Qwiklabs ($50 value) to earn Google Cloud recognized skill badges by completing challenge quests
-
Logging, Monitoring, and Observability in Google Cloud
teaches techniques for monitoring, troubleshooting, and improving infrastructure and application performance in Google Cloud. Guided by the principles of Site Reliability Engineering (SRE), and using a combination of presentations, demos, hands-on labs, and real-world case studies, attendees gain experience with full-stack monitoring, real-time log management, and analysis, debugging code in production, tracing application performance bottlenecks, and profiling CPU and memory usage.

Cloud Developer certification
- Google Cloud Fundamentals: Core Infrastructure
- Getting Started with Google Kubernetes Engine
- 7-week Getting Started with Application Development
- Securing and Integrating Components of your Application
- App Deployment, Debugging, and Performance
- Application Development with Cloud Run
Cloud Network Engineer certification
- Google Cloud Platform Fundamentals: Core Infrastructure
- Developing a Google SRE Culture
- Reliable Google Cloud Infrastructure: Design and Process
- Logging, Monitoring and Observability in Google Cloud
- Getting Started with Google Kubernetes Engine
Cloud Security Engineer certification
Pluralsight’s 2-hour course (highlights) was “prepared by Google”.
PROTIP: 8 courses on Coursera:
- Preparing for Your Professional Cloud Security Engineer Journey
- Google Cloud Platform Fundamentals: Core Infrastructure
- LAB: Getting Started with VPC Networking and Google Compute Engine (Routes, Firewalls)
- Networking in Google Cloud: Defining and Implementing Networks
- Google Cloud VPC Networking Fundamentals
- Controlling Access to VPC Networks
- Sharing Networks across Projects
- Load Balancing
- Networking in Google Cloud: Hybrid Connectivity and Network Management
- Hybrid Connectivity
- Networking Pricing and Billing
- Network Design and Deployment
- Network Monitoring and Troubleshooting
- Managing Security in Google Cloud
- Security Best Practices in Google Cloud
- Mitigating Security Vulnerabilities on Google Cloud
- Hands-on Labs in Google Cloud for Security Engineers
- IAM Custom Roles GSP190
- Lab: VPC Network Peering
- Lab: Setting up a Private Kubernetes Cluster
- Lab: How to Use a Network Policy on Google Kubernetes Engine
- Lab: Using Role-based Access Control in Kubernetes Engine
Features of particular interest:
- Cloud Shell
- Network Service Tiers
- VPC, Routes, Firewall, DNS
- Cloud Network
- Cloud Armor (perimeter and boundary)
- Cloud CDN
- Cloud Deployment Manager
- Cloud Interconnect
- Cloud Load Balancing
- Compliance requirements
https://www.cloudskillsboost.google/course_templates/382 Managing Security in Google Cloud
- https://drive.google.com/file/d/1ZRwbL_M33GMPFnBG2QQ5RSIvPUgxMqRl/view?pli=1
https://www.cloudskillsboost.google/quests/150 Ensure Access & Identity in Google Cloud
https://www.cloudskillsboost.google/course_templates/87 Security Best Practices in Google Cloud
- https://www.cloudskillsboost.google/course_sessions/3783064/documents/379433
Machine Learning Engineer certification
8-course Coursera (TensorFlow)
Cloud Engineer certification
- 8-hour Google Cloud Fundamentals: Core Infrastructure
- 7-hour Essential Google Cloud Infrastructure: Foundation
- 11-hour Essential Google Cloud Infrastructure: Core Services
- 7-hour Elastic Google Cloud Infrastructure: Scaling and Automation
- 8-hour Architecting with Google Kubernetes Engine: Foundations
- 3-hour Preparing for Your Associate Cloud Engineer Journey
Documentation
- https://cloud.google.com/architecture
- https://cloud.google.com/docs
- https://cloud.google.com/docs/samples (code samples)
- https://cloud.google.com/compute/docs/reference/rest/v1/instances/start
Cloud Adoption Framework
VIDEO: The Google Cloud Adoption Framework (GFAF) themes: white paper PDF
- https://dzone.com/articles/cli-for-rest-api
- https://medium.com/google-cloud = curated articles for developers
Google Cloud Deployment Manager vs Terraform vs. Pulumi vs. AWS Co-pilot (AWS CloudFormation) vs. Azure Resource Manager: You still ‘describe’ your desired state, but by having a programming language, you can use complex logic, factor out patterns, and package it up for easier consumption.
Maturity Assessement
VIDEO: Cloud Maturity Assessment along VIDEO Google’e Cloud Maturity Scale has 3 levels along themes: Learn, Lead, Scale, Secure:
- Tactical short-term is self-taught, heroic project manager, change is slow
- Strategic mid-term has change management, templates central identity, hybrid network
- Transformational long-term has peer learning, cross-functional feature teams, Changes are constant, low risk, and quickly fixed
https://cloud.google.com/docs/enterprise/setup-checklist
SLAs
Google offers these monthly uptime SLAs:
- 99.999% (5 minutes of downtime/year) on Spanner, Cloud BigQuery replicated instance with multi-cluster routing policy (3 or more regions)
- 99.99% on fewer than 3 regions; multi-zone services and load balancing BigQuery, App Engine + Dedicated Interconnect
- 99.95% on Cloud SQL, Cloud Formation
- 99.90% on Cloud BigQuery single cluster; Standard storage in a regional location of Cloud Storage: Nearline or Coldline in a multi-region or dual-region location of Cloud Storage
- 99.50% on a single instance
- 99.00% on Nearline or Coldline storage in a regional location of Cloud Storage: Durable Reduced Availability storage in any location of Cloud Storage
Google network peering is not covered by SLAs.
Google Support
- FREE (community only)
- $29/mo. + 3% of spend for Standard (4-hour email) Support
- $500/mo. + 3% of spend for Enhanced (1-hour phone) Support in additional languages. PROTIP: Higher than AWS!
- Those with paid Premium (15 min.) support get a TAM (Technical Account Manager) to provide tech previews, etc.
Social Community
- https://stackoverflow.com/collectives/google-cloud
- Join the Google Cloud Platform Community
- https://cloud.google.com/newsletters monthly emails.
- https://twitter.com/googlecloud = @googlecloud
- https://googlecloudplatform.blogspot.com
- Google on LinkedIn
- Google Developers on LinkedIn
- Google Developers Group on LinkedIn
- https://developers.google.com/community/gdg = Google Developer Groups (Chapters) local
- DevFest events
- Google Cloud Events on Youtube
- Google NEXT conference online.
-
GOTO conference online.
- https://www.facebook.com/GDGCloudHanoi
-
https://gdgcloudhanoi.dev/?fbclid=IwAR2aDQV2OvRwn9awLYQrmohHjhU1RnQqUX–lIwLfSF2jwJZlqz-wEBfdd8
- https://cloud.google.com/find-a-partner
Hands-on training
There are several ways to obtain hands-on experience, with cloud time.
- learndigital.withgoogle.com
- Qwiklabs (credits)
- Codelabs (not FREE)
- Coursera
- Pluralsight
- DigitalGarage
lists courses about Marketing, Career development as well as the full range of Google’s products,
from many providers:
- Futurelearn’s Agile and Design Thinking is $129 after a month or $27.99/month. They also have courses on Raspberry Pi.
- Simplilearn
Qwiklabs Training and Cloud Time
https://www.cloudskillsboost.google incorporates features of Qwiklabs, purchased by Google to provide a UX to cloud instance time (around an hour each class).
PROTIP: Videos of Qwiklabs being completed
https://github.com/quiccklabs/Labs_solutions
PROTIP: List of broken Qwiklabs
In a browser, when a green “Start Lab” appears:
-
PROTIP: To avoid wasting time during the timed lesson, before clicking “Start Lab”, read the Overview, Objectives, and all Task instructions.
-
To avoid corrupting your cookies, copy the URL. Open an Incognito (private) window. Notice the “Private Browsing” at the upper right? Click “Search or enter address”. Paste the URL. Sign in with Google.
- Click on the green “Start Lab” to start the clock ticking down.
- PROTIP: So that you can read instructions on one screen and perform the work on another screen without jumping between screens, right-click on “Open Google Cloud console” to select “Open Link in New Window”.
- Click the boxes icon next to the Password value to copy it into your invisible Clipboard.
- Drag the new window to another monitor, if you have one.
- Click the blue “Next” to Sign in.
- Click on “Enter your password” and press command+V to paste. Click Next.
- Click “I understand”.
- Click the checkbox to agree. Click “AGREE AND CONTINUE”.
- You should now be at the Google Cloud console.
-
The service navigation menu icon is at the upper-left corner. It’s a toggle to show or hide the left menu of products and services.
Also press Esc.
- A Tutorial pane that appears at the right side can be dismissed by clicking its “X”.
Get support by emailing support@qwiklabs.com, but replies are from
support@qwiklab.zendesk.com
because their website is at
https://qwiklab.zendesk.com/hc/en-us/requests/new
PROTIP: Create an email filter to star and mark as important emails from support@qwiklab.zendesk.com
sudo apt-get install iputils-ping
PROTIP: If you are not able to type in a box for entry, look at the top of the screen to see if there is a (usually blue) modal pop-up window hogging attention. Click the “X” to dismiss that window.
References:
Google Codelabs
Google Codelabs (at https://codelabs.developers.google.com) are interactive instructional tutorials, authored in Google Docs using Markdown formatting and the claat Go-based command line tool.
Codelabs are NOT FREE. You need to supply a real account associated with a credit card for billing.
Get $10 for hands-on practice using Google’s Codelabs: Doing a Google Cloud codelab? Start here
https://console.developers.google.com/freetrial
Some Codelabs:
- Cloud Spanner with Terraform on GCP
- Running Node.js on a Virtual Machine
-
https://codelabs.developers.google.com/codelabs/cloud-natural-language-python3#0
- https://pypi.org/project/pyhcl/ (from 2020) parses HCL
- HashiCorp maintains a https://github.com/hashicorp/terraform-config-inspect to extract top-level objects from a Terraform module file. See https://github.com/yutannihilation/go-parse-hcl-example/blob/master/main.go
- Extend an Android app to Google Assistant with App Actions
Coursera courses
Google developed classes on Coursera and at https://cloud.google.com/training
- https://www.coursera.org/learn/gcp-infrastructure-scaling-automation
Pluralsight videos
On Pluralsight, Lynn Langit created several video courses early in 2013/14 when Google Fiber was only available in Kansas City:
- Introduction to Google Cloud [52min] for Developers
- Introduction to Google Compute Engine
- https://firebase.google.com/docs/reference/rest/storage/rest/
Pluralsight redirects to Qwiklabs. It’s best to use a second monitor to display instructions.
Rock Stars on YouTube, etc.
Google’s program:
YouTube creators:
-
https://www.freecodecamp.org/news/google-cloud-platform-from-zero-to-hero/
-
https://www.youtube.com/@AwesomeGCP/videos
-
http://www.roitraining.com/google-cloud-platform-public-schedule/ in the US and UK. $599 per day
-
https://deis.com/blog/2016/first-kubernetes-cluster-gke/
-
https://hub.docker.com/r/lucasamorim/gcloud/
-
https://github.com/campoy/go-web-workshop
-
http://www.anengineersdiary.com/2017/04/google-cloud-platform-tutorial-series_71.html
-
https://bootcamps.ine.com/products/google-cloud-architect-exam-bootcamp $1,999 bootcamp
-
https://www.youtube.com/watch?v=jpno8FSqpc8&list=RDCMUC8butISFwT-Wl7EV0hUK0BQ&start_radio=1&rv=jpno8FSqpc8 by Antoni
How to get free cloud time
A. Free $300 account over first 60 days of each new account.
B. For individuals, in 2023 Google began offering a $299/year “Innovators Plus” subscription for $500 cloud credits and a $200 certification voucher.
C. For startups, Google has a https://cloud.google.com/startup program gives $200,000 cloud costs and $200 skills boost for the first 2 years of a startup.
D. For Google partners, Partner Certification Kickstart
A. Free $300 account for 60 days
In US regions, new accounts get $300 of overage for 12 months.
There are limitations to Google’s no charge low level usage:
- No more that 8 cores at once across all instances
- No more than 100 GB of solid state disk (SSD) space
- Max. 2TB (2,000 GB) total persistent standard disk space
PROTIP: Google bills in minute-level increments (with a 10-minute minimum charge), unlike AWS which charges by the hour (for Windows instances).
-
Read the fine print in the FAQ to decide what Google permits:
https://cloud.google.com/free/docs/frequently-asked-questions
-
Read Google’s Pricing Philosophy:
https://cloud.google.com/pricing/philosophy
Gmail accounts
PROTIP: Use a different password for your Gmail address than when registering for Google events such as Next conference Aug 29-31 (for $1,600).
-
NOTE: Create several Gmail accounts, each with a different identity (name, birthdate, credit card). You would need to use the same name for the credit card and the same phone number because they are expensive.
PROTIP: It can be exhausting, but write down all the details (including the date when you opened the account) in case you have to recover the password.
PROTIP: Use a different browser so you can flip quickly between identities.
- Use Chrome browser for Gmail account1 with an Amex card for project1
- Use Firefox browser for Gmail account2 with a Visa card for project2
- Use Brave browser for Gmail account3 with a Mastercard for project3
- Use Safari browser for Gmail account4 with a Discover card for project4
-
In the appropriate internet browser, apply for a Gmail address and use the same combination. in the free trial registration page and Console:
-
Click the Try It Free button. Complete the registration. Click Agree and continue. Start my new trial.
-
With the appropriate account and browser, configure at
-
PROTIP: Bookmark the project URL in your browser.
PROTIP: Google remembers your last project and its region, and gives them to you even if you do not specify them in the URL.
Configure Limits
-
CAUTION: Your bill can suddenly jump up to thousands of dollars a day, with no explanation. Configure to put limits.
Ways of interacting with Google Cloud
As with other CSPs, there are several ways to interact with Google Cloud:
-
Manual clicking and typing on the web-based Console GUI at https://console.cloud.google.com
-
Execution of CLI commands in the web-based Google Shell initiated from the web console GUI
-
Execution of CLI commands in the Qwiklabs training environment
-
Execution of CLI commands from a Terminal on your macOS laptop after installing gcloud and other utilities
-
Execute Terraform declarative HashiCorp Configuration Language (HCL) specifications to create Infrastructure as Code (IaC).
-
Execute a programmatic IaC such as Pulumi.
-
Calls to REST APIs from a custom application code you write in Python, Go, etc.
-
“Google Cloud” Console mobile app provides view-only access
In this article, we start with the web GUI, then on to Qwiklabs and other CLI, then Terraform, and API coding.
macOS utilities for Google Cloud
PROTIP: Even if you are not going to develop on macOS, it helps to be prepared to copy files from your laptop to Google Cloud.
Web GCP Console GUI (Dashboard)
-
https://console.cloud.google.com is the Welcome page for a specific project.
-
Select a project or create one.
-
https://console.cloud.google.com/home/dashboard
displays panes for your project from among the list obtained by clicking the “hamburger” menu icon at the upper left corner.
Alternately, create a new project:
gcloud projects create $MY_PROJECT_ID
Use GUI to create first project
All resources are created under a project (and Organization if one has been setup), so use the GUI to create the first project.
- In a browser, https://console.cloud.google.com
- At the upper-left, click the organization or project to the right of “Google Cloud” .
- Click “NEW PROJECT”.
- “My Project-12345” (or some other number) is automatically created.
- Change it to something more meaningful.
- Notice that the Project ID is auto-created with a number suffix.
Cloud Shell in the web GUI
The Cloud Shell provides command line access on a web browser, with nothing to install.
Sessions have a 1 hour timeout.
Language support for Java, Go, Python, Node, PHP, Ruby.
Not meant for high computation use.
- HANDS-ON: Getting Started with Cloud Shell and gcloud
- https://cloud.google.com/sdk/gcloud/reference - the SDK provides CLI utilities bq, gsutil, gcloud.
-
PROTIP: Instead of manually performing the commands below, invoke a script by copying this, pasting on the Cloud Shell:
sh -c "$(curl -fsSL https://raw.githubusercontent.com/wilsonmar/gcp-samples/main/gcpinfo.sh)" -v
-
TODO: Set alias “gshellinfo” to invoke above github.com/wilsonmar/???/gshellinfo.sh
-
Rerun using alias gcpinfo
Here are the steps you skip by invoking my script:
-
Set the prompt so the cursor returns to the sample location on the left, with an extra blank line and present working directory (pwd):
export PS1="\n \u/\w\[\033[33m\]\n$ "
PROTIP: I use the above command so often I have it as one of the buttons on my Stream Deck box.
-
Know what versions you are working with, for troubleshooting later:
gcloud version
Google Cloud SDK 431.0.0
alpha 2023.05.12
app-engine-go 1.9.75
app-engine-java 2.0.14
app-engine-python 1.9.104
app-engine-python-extras 1.9.100
beta 2023.05.12
bigtable
bq 2.0.92
bundled-python3-unix 3.9.16
cbt 0.15.0
cloud-datastore-emulator 2.3.0
cloud-run-proxy 0.3.0
core 2023.05.12
gcloud-crc32c 1.0.0
gke-gcloud-auth-plugin 0.5.3
gsutil 5.23
kpt 1.0.0-beta.31
local-extract 1.5.8
minikube 1.30.1
nomos 1.15.0-rc.6
pubsub-emulator 0.8.2
skaffold 2.3.0
-
Versions of pre-installed language support:
dotnet --info      # 6.0.408, Runtime: debian 11, etc.
go version              # go1.20.4 linux/amd64
java -version           # "17.0.6" 2023-01-17
node -v                 # v18.12.1
php -v                  #A 7.4.33 (cli) (built: Apr  9 2023 16:54:16) ( NTS )
python --version   # 3.9.2
ruby -v                 # 2.7.8p225 (2023-03-30 revision 1f4d455848) [x86_64-linux]
-
Know how much disk space Available (out of the 5GB Google gives each session):
df
Filesystem                        1K-blocks     Used Available Use% Mounted on
overlay                            62710164 48587684  14106096  78% /
tmpfs                                 65536        0     65536   0% /dev
/dev/sda1                          62710164 48587684  14106096  78% /root
/dev/disk/by-id/google-home-part1   5018272   253184   4486612   6% /home
/dev/root                           2003760  1029144    974616  52% /usr/lib/modules
shm                                   65536        0     65536   0% /dev/shm
tmpfs                               3278072     1236   3276836   1% /google/host/var/run
NOTE: Need more disk space? Google Cloud Workstations (go/cloud-workstations-external-deck) is an enterprise focused offering to enable custom disk size/VM type, VPC, and VPC-SC support.
-
List all zone Names and REGION codes Google offers:
gcloud compute zones list
Sample response:
NAME                    REGION                STATUS  NEXT_MAINTENANCE  TURNDOWN_DATE
asia-east1-c            asia-east1            UP
asia-east1-b            asia-east1            UP
asia-east1-a            asia-east1            UP
asia-northeast1-a       asia-northeast1       UP
asia-northeast1-c       asia-northeast1       UP
asia-northeast1-b       asia-northeast1       UP
asia-south1-c           asia-south1           UP
us-central1-c           us-central1           UP
asia-south1-a           asia-south1           UP
asia-south1-b           asia-south1           UP
asia-southeast1-a       asia-southeast1       UP
asia-southeast1-b       asia-southeast1       UP
australia-southeast1-c  australia-southeast1  UP
australia-southeast1-b  australia-southeast1  UP
australia-southeast1-a  australia-southeast1  UP
europe-west1-c          europe-west1          UP
europe-west1-b          europe-west1          UP
europe-west1-d          europe-west1          UP
europe-west2-b          europe-west2          UP
europe-west2-a          europe-west2          UP
europe-west2-c          europe-west2          UP
europe-west3-b          europe-west3          UP
europe-west3-a          europe-west3          UP
europe-west3-c          europe-west3          UP
southamerica-east1-c    southamerica-east1    UP
southamerica-east1-b    southamerica-east1    UP
southamerica-east1-a    southamerica-east1    UP
us-central1-a           us-central1           UP
us-central1-f           us-central1           UP
us-central1-c           us-central1           UP
us-central1-b           us-central1           UP
us-east1-b              us-east1              UP
us-east1-d              us-east1              UP
us-east1-c              us-east1              UP
us-east4-c              us-east4              UP
us-east4-a              us-east4              UP
us-east4-b              us-east4              UP
us-west1-c              us-west1              UP
us-west1-b              us-west1              UP
us-west1-a              us-west1              UP
REMEMBER: Region is a higher-order (more encompassing concept) than Zone.
Not shown is a list of the URI of each zone:
gcloud compute zones list --uri | wc -l
Remove the word count to return a list such as:
https://www.googleapis.com/compute/v1/projects/sdk83360/zones/us-east1-b
-
List projects for your account:
gcloud projects list --format="table[box](name:sort=1:reverse, createTime.date('%Y-%m-%d'))" -
View your Project ID from the $GOOGLE_CLOUD_PROJECT variable value inherited from the Google Cloud console, even though your Cloud Shell instance is not directly associated with or managed by the project:
echo $GOOGLE_CLOUD_PROJECT
-
View your current Project number and region, run the following command from a Cloud Shell session:
curl metadata/computeMetadata/v1/instance/zone
projects/project number/zones/us-west1-b
Alternately:
curl http://metadata.google.internal/computeMetadata/v1/instance/zone -H Metadata-Flavor:Google | cut '-d/' -f4
-
View the hostname of your Cloud Shell VM which you can use to make HTTPS requests to the environment.
echo $WEB_HOST
GUID.cs-us-west1-ijlt.cloudshell.dev
References:
- https://www.youtube.com/watch?v=RdDyF3jVbbE
CLI programs & commands on your Terminal
Google has several CLI shell programs:
-
gcloud CLI installed with google-cloud-sdk.
-
gsutil to access Cloud Storage
-
bq for Big Query tasks
-
kubectl for Kubernetes
-
anthos for multicloud using Kubernetes
-
gcpdiag to lint projects (for troubleshooting)
See the Google Cloud SDK for Windows (gcloud) for your programming pleasure.
BLOG: Graphical user interface (GUI) for Google Compute Engine instance
gcloud CLI commands
-
Documentation on the gcloud CLI command:
https://cloud.google.com/sdk/gcloud/reference
“GROUP” refers the name grouping services.
https://www.cloudskillsboost.google/focuses/563?parent=catalog
-
Click the icon in the Google Cloud Platform Console:

-
Click “START CLOUD SHELL” at the bottom of this pop-up:

When the CLI appears online:
-
See that your present working directory is
/home/as your account name:pwd
-
See the folder with your account name:
echo ${HOME} -
Just your account name:
echo ${USER} -
Read the welcome file:
nano README-cloudshell.txt
Your 5GB home directory will persist across sessions, but the VM is ephemeral and will be reset approximately 20 minutes after your session ends. System-wide changes will NOT persist beyond that.
-
Type “gcloud help” to get help on using Cloud SDK. For more examples, visit
https://cloud.google.com/shell/docs/quickstart and
https://cloud.google.com/shell/docs/examples -
Type “cloudshell help” to get help on using the “cloudshell” utility. Common functionality is aliased to short commands in your shell, for example, you can type “dl <filename>” at Bash prompt to download a file.
Type “cloudshell aliases” to see these commands.
-
Type “help” to see this message any time. Type “builtin help” to see Bash interpreter help.
Other resources:
Text Editor
-
Click the pencil icon for the built-in text editor.
-
Edit text using nano or vim built-in.
-
PROTIP: Boost mode to run Docker with more memory.
- Switch to your macOS local machine. Navigate to where you store your secret files.
-
Copy all content to your invisible Clipboard. On a mac:
cat ~/myvars.sh | pbcopy
-
Switch back to Google Cloud Shell. Since it’s a Linux machine, define these substitutes:
alias pbcopy=’xsel — clipboard — input’
alias pbpaste=’xsel — clipboard — output’
-
Use the aliases defined above to execute the contents of your Clipboard (containing export CLI commands):
pbpaste
If there are secrets, it’s better you don’t save them in a file on Google Cloud Shell.
- Define zone and region and location in .env file read by .sh script:
 CLOUDSDK_COMPUTE_ZONE="us-central1-f"
 CLOUDSDK_COMPUTE_REGION="us-central1"
Alternately, define them as environment variables which will disappear after reboot:
 export CLOUDSDK_COMPUTE_ZONE=us-central1-f
 export CLOUDSDK_COMPUTE_REGION=us-central1
 echo $CLOUDSDK_COMPUTE_ZONE
 echo $CLOUDSDK_COMPUTE_REGION
- Get your default region and zone according to Google:
curl "http://metadata.google.internal/computeMetadata/v1/instance/zone" -H "Metadata-Flavor: Google" -
TODO: Define the default region and zone into environment variables.
-
Set the zone (for example, us-east1-f defined above):
gcloud config set compute/zone ${CLOUDSDK_COMPUTE_ZONE}See https://cloud.google.com/compute/docs/storing-retrieving-metadata
List Projects, Set one
- Get list of Project IDs, with Creation DateTime and Lifecycle State, to which your account has access:
```
gcloud projects list –format=”table(projectId,Name,projectNumber,createTime,lifecycleState)”
‘’’
Response:
PROJECT_ID                      NAME                        PROJECT_NUMBER  CREATE_TIME                  LIFECYCLE_STATE
cp100-1094                      cp100                       660824504650    2015-10-10T16:20:48.462Z     ACTIVE
- Alternately, the same info is obtained vertically from:
gcloud projects describe 660824504650
Response:
createTime: '2022-09-14T14:30:01.540Z'
lifecycleState: ACTIVE
name: something
projectId: what-182518
projectNumber: '608556368368'
-
To get last date used and such, example code for apis/SDK involving the f1 micro instance
- https://github.internet2.edu/nyoung/gcp-gce-project-audit-bq
- https://github.internet2.edu/nyoung/gcp-project-audit-simple
-
PROTIP: Instead of manually constructing commands, use environment variable:
gcloud config set project "${DEVSHELL_PROJECT_ID}"Alternately, if you want your own:
gcloud config get-value project
project = qwiklabs-gcp-02-807529dcf2db
Your active configuration is: [cloudshell-1079]
PROJECT_ID=$(gcloud config get-value project)
MY_REGION=$(gcloud config get-value compute/region)
MY_ZONE=$(gcloud config get-value compute/zone)
-
PROTIP: The shell variable $DEVSHELL_PROJECT_ID defined by Google to refer to the project ID of the project used to start the Cloud Shell session.
echo $DEVSHELL_PROJECT_ID
-
List project name (aka “Friendly Name”) such as “cp100”.
gcloud config list project
A sample response if “(unset)”:
[core]
project = what-182518
Your active configuration is: [cloudshell-20786]
-
Print just the project name (suppressing other warnings/errors):
gcloud config get-value project 2> /dev/null
Alternately:
gcloud config list --format 'value(core.project)' 2>/dev/null
Quotas
-
PROTIP: Get COMPUTE information about a project using the project environment variable:
gcloud compute project-info describe --project ${DEVSHELL_PROJECT_ID}Project metadata includes these quotas:
quotas:
        - limit: 1000.0
  metric: SNAPSHOTS
  usage: 1.0
        - limit: 5.0
  metric: NETWORKS
  usage: 2.0
        - limit: 100.0
  metric: FIREWALLS
  usage: 13.0
        - limit: 100.0
  metric: IMAGES
  usage: 1.0
        - limit: 1.0
  metric: STATIC_ADDRESSES
  usage: 1.0
        - limit: 200.0
  metric: ROUTES
  usage: 31.0
        - limit: 15.0
  metric: FORWARDING_RULES
  usage: 2.0
        - limit: 50.0
  metric: TARGET_POOLS
  usage: 0.0
        - limit: 50.0
  metric: HEALTH_CHECKS
  usage: 2.0
        - limit: 8.0
  metric: IN_USE_ADDRESSES
  usage: 2.0
        - limit: 50.0
  metric: TARGET_INSTANCES
  usage: 0.0
        - limit: 10.0
  metric: TARGET_HTTP_PROXIES
  usage: 1.0
        - limit: 10.0
  metric: URL_MAPS
  usage: 1.0
        - limit: 5.0
  metric: BACKEND_SERVICES
  usage: 2.0
        - limit: 100.0
  metric: INSTANCE_TEMPLATES
  usage: 1.0
        - limit: 5.0
  metric: TARGET_VPN_GATEWAYS
  usage: 0.0
        - limit: 10.0
  metric: VPN_TUNNELS
  usage: 0.0
        - limit: 3.0
  metric: BACKEND_BUCKETS
  usage: 0.0
        - limit: 10.0
  metric: ROUTERS
  usage: 0.0
        - limit: 10.0
  metric: TARGET_SSL_PROXIES
  usage: 0.0
        - limit: 10.0
  metric: TARGET_HTTPS_PROXIES
  usage: 1.0
        - limit: 10.0
  metric: SSL_CERTIFICATES
  usage: 1.0
        - limit: 100.0
  metric: SUBNETWORKS
  usage: 26.0
        - limit: 10.0
  metric: TARGET_TCP_PROXIES
  usage: 0.0
        - limit: 24.0
  metric: CPUS_ALL_REGIONS
  usage: 3.0
        - limit: 10.0
  metric: SECURITY_POLICIES
  usage: 0.0
        - limit: 1000.0
  metric: SECURITY_POLICY_RULES
  usage: 0.0
        - limit: 6.0
  metric: INTERCONNECTS
  usage: 0.0
REMEMBER: Up to up 100 user-managed service accounts can be created in a project.
config list
-
List configuration information for the currently active project:
gcloud config list
Sample response:
[component_manager]
disable_update_check = True
[compute]
gce_metadata_read_timeout_sec = 5
[core]
account = johndoe@gmail.com
check_gce_metadata = False
disable_usage_reporting = False
project = what-182518
[metrics]
environment = devshell
Your active configuration is: [cloudshell-20786]
-
Confirm:
gcloud compute config-ssh
WARNING: The private SSH key file for gcloud does not exist.
WARNING: The public SSH key file for gcloud does not exist.
WARNING: You do not have an SSH key for gcloud.
WARNING: SSH keygen will be executed to generate a key.
Generating public/private rsa key pair.
Enter passphrase (empty for no passphrase): __
Google Shell
-
Set the default zone and project configuration:
gcloud config set compute/zone us-central1-f
Example:
export MY_ZONE="us-east1-c"
Local gcloud CLI usage
Get the CLI to run locally on your laptop:
-
Install. On macOS use Homebrew:
brew install --cask google-cloud-sdk
Alternately:
- In https://cloud.google.com/sdk/downloads
- Click the link for Mac OS X (x86_64) like “google-cloud-sdk-173.0.0-darwin-x86_64.tar.gz” to your Downloads folder.
- Double-click the file to unzip it (from 13.9 MB to a 100.6 MB folder). If you’re not seeing a folder in Finder, use another unzip utility.
- Move the folder to your home folder.
Either way, edit environment variables on Mac.
PROTIP: The installer creates folder ~/google-cloud-sdk
-
PROTIP: To quickly navigate to the folder with just 3 characters (gcs), add to macsetup/aliases.zsh
alias gcs='cd ~/google-cloud-sdk'
-
Add the path to that folder in the $PATH variable within your ~/.bash_profile or ~/.zshrc
export PATH="$PATH:$HOME/google-cloud-sdk/bin"
-
That’s where executables for gcloud, gsutil, bq are located as well as .py (Python scripts):
Also consider:
source "/opt/homebrew/Caskroom/google-cloud-sdk/latest/google-cloud-sdk/path.zsh.inc"
Authenticate using gcloud
-
Authenticate using the Google Cloud SDK:
gcloud auth application-default login
This pops up a browser page for you to select the Google (Gmail) account you want to use.
-
If “Updates are available for some Google Cloud CLI components”, install them:
gcloud components update
Account Login into Google Cloud
-
PROTIP: If you are juggling several GCP accounts, prepare a file containing variables such as these so that, in one action, ALL the various variables and values you’ll need:
export MY_GCP_ORG="???"
export MY_GCP_ACCOUNT="johndoe@gmail.com"
export MY_PROJECT_ID="123456789"
export MY_LOCATION="us-central1"
export MY_ZONE="us-central1-c"
The script would activate the values:
gcloud config set project "$MY_PROJECT_ID"
Updated property [core/project].
-
Some APIs (Maps, BigQuery) require Billing to be enabled for the project using them. See https://cloud.google.com/billing/docs/how-to/verify-billing-enabled
echo "MY_PROJECT_ID=$MY_PROJECT_ID"
yes | gcloud beta billing projects describe "$MY_PROJECT_ID"
This may require installation of additional glcoud components.
-
Check account:
echo "MY_GCP_ACCOUNT=$MY_GCP_ACCOUNT"
gcloud beta billing accounts describe "$MY_GCP_ACCOUNT"
-
PROTIP: Login to a specific Google account using gcloud auth login:
gcloud auth login "$MY_GCP_ACCOUNT"
Returned is:
https://cloud.google.com/sdk/auth_success -
Navigate to a project folder where you store your custom Python code:
-
Initialize the SDK:
gcloud init
Welcome! This command will take you through the configuration of gcloud.

Settings from your current configuration [default] are:
auth:
  service_account_use_self_signed_jwt: None
core:
  account: wilsonmar@gmail.com
  disable_usage_reporting: 'True'

Pick configuration to use:
 [1] Re-initialize this configuration [default] with new settings
 [2] Create a new configuration
Please enter your numeric choice: _
TODO:
-
Show Google’s variable for the Project ID:
echo "$GOOGLE_CLOUD_PROJECT"
-
Obtain the Project ID to authorize use of the gsutil CLI command:
gsutil mb -l $LOCATION gs://$DEVSHELL_PROJECT_ID
If prompted, click AUTHORIZE.
-
Install libraries (without the help argument):
On Linux or Mac OS X:
./install.sh --help
On Windows:
.\install.bat --help
-
Retrieve a banner image (png file) from a publicly accessible Cloud Storage location:
gsutil cp gs://cloud-training/gcpfci/my-excellent-blog.png my-excellent-blog.png
Copying gs://cloud-training/gcpfci/my-excellent-blog.png...
/ [1 files][  8.2 KiB/  8.2 KiB]
Operation completed over 1 objects/8.2 KiB.
-
Modify the Access Control List of the object you just created so that it is readable by everyone:
gsutil acl ch -u allUsers:R gs://$DEVSHELL_PROJECT_ID/my-excellent-blog.png
gcloud CLI commands
Regardless of whether the CLI is online or local:
-
Get syntax of commands
gcloud help
-
Be aware of the full set of parameters possible for GCP tasks at
https://cloud.google.com/sdk/gcloud/referenceThe general format of commands:
gcloud [GROUP] [GROUP] [COMMAND] – arguments
Has all Linux command tools and authentication pre-installed.
-
Run
dfto see that /dev/sdb1 has 5,082,480 KB = 5GB of persistent storage:Filesystem 1K-blocks Used Available Use% Mounted on none 25669948 16520376 7822572 68% // tmpfs 872656 0 872656 0% //dev tmpfs 872656 0 872656 0% //sys//fs//cgroup /dev/sdb1 5028480 10332 4739672 1% //home /dev/sda1 25669948 16520376 7822572 68% //etc//hosts shm 65536 0 65536 0% //dev//shm
-
Confirm the operating system version:
uname -a
Linux cs-206022718149-default 5.10.133+ #1 SMP Sat Sep 3 08:59:10 UTC 2022 x86_64 GNU/Linux
Previously:
Linux cs-6000-devshell-vm-5260d9c4-474a-47de-a143-ea05b695c057-5a 3.16.0-4-amd64 #1 SMP Debian 3.16.43-2+deb8u5 (2017-09-19) x86_64 GNU/Linux
-
PROTIP: It may seem like a small thing, but having the cursor prompt always in the first character saves you from hunting for it visually.
export PS1="\n \w\[\033[33m\]\n$ "
The “\n” adds a blank line above each prompt.
The current folder is displayed above the prompt.
PROTIP: Setup a keystroke program (such as Stream Deck) to issue that long command above. Aliases
Apps using API
https://docs.morpheusdata.com/en/latest/integration_guides/Clouds/google/google.html
REST APIs
PROTIP: Google’s public-facing APIs are listed among thousands of others on the internet at https://any-api.com
I was hoping to make a list to automate calling Google APIs using a single reference for each API. But nooooo…
PROTIP: References to each API are inconsistent. So I created a spreadsheet:
Column A “_#” shows the sequence number to the category name at ???
Column B “_api_name” is the common key across all lists.
Column C “_Cat” (Category) contains “Ent” (Enterprise) for each of the 186 Google Enterprise APIs.
Column D & E “_Desc_in_explorer” and “_explore_doc_url” lists 265 APIs at https://developers.google.com/apis-explorer - but different format of links go to different websites! For example:
- https://cloud.google.com/certificate-authority-service/docs/reference/rest/ is the most common
- https://cloud.google.com/deployment-manager/docs/reference/v2beta/
-
https://cloud.google.com/vpc/docs/reference/vpcaccess/rest/
-
https://developer.chrome.com/docs/versionhistory/reference/
- https://developers.google.com/chrome/management/reference/rest/ (http, not https)
- https://developers.google.com/analytics/devguides/reporting/data/v1/rest/
- https://developers.google.com/discovery/v1/reference/
-
https://developers.google.com/civic-information/docs/v2/
- https://firebase.google.com/docs/reference/appcheck/rest/
- NOTE: To extract the URL from underlined cells containing the URL, I had to create and store a VBA function in the Excel sheet and JavaScript Extension function (per atylerorobertson.com) in the equivalent Google Sheet, using function =GETLINK(CELL("Address",B2))
Column F “_googleapis.com” lists 452 of the unique service ID that replaces the “???” in https://???.googleapis.com. It’s obtained from command gcloud services list –available | grep googleapis.com which filters for only googleapis.com APIs (out of 3401 APIs)
- The key in this column is used to construct the URL to the "Product details" web page where you enable the "???" service for your current project, such as
https://console.cloud.google.com/apis/library/???.googleapis.com
Column G “_Python Cloud Client Library”
Column H “doc_samples” lists 83 https://github.com/GoogleCloudPlatform/python-docs-samples
Column I “_package” lists 100 packages in https://github.com/googleapis/google-cloud-python/tree/main/packages providing dependencies defined in Python program import coding. There is a similar repo for other programming languages.
Predefined scopes for each API version are shown at
https://developers.google.com/oauthplayground
For example, Google Storage API v1 has these scopes:
- https://www.googleapis.com/auth/devstorage.full_control
- https://www.googleapis.com/auth/devstorage.read_only
- https://www.googleapis.com/auth/devstorage.read_write
Most others (Apigee, Filestore, Text-to-Speech, etc.) have just:
- https://www.googleapis.com/auth/cloud-platform
-
https://console.cloud.google.com/apis/library/browse (for each project)
The file was created manually, but TODO: write a program to scrape the page to update the sheet.
- “Cloud Memorystore for Memcached API” in the Explorer is
“Memorystore for Memcached” - “Google Cloud Memorystore for Redis API” in the Explorer is
“Memorystore for Redis”
- “Cloud Memorystore for Memcached API” in the Explorer is
References:
- https://cloud.google.com/apis/docs/cloud-client-libraries
- https://cloud.google.com/sdk/cloud-client-libraries Go, Java, Node.js, Python, Ruby, PHP, C#, C++
https://cloud.google.com/code/docs/vscode/client-libraries https://cloud.google.com/code/docs/vscode/client-libraries#remote_development_with_permissions_enabled
https://medium.com/google-cloud/programatically-manage-gcp-resources-via-rest-apis-6b216e5efadf https://googleapis.dev/python/google-api-core/latest/auth.html https://codelabs.developers.google.com/codelabs/cloud-vision-api-python#0
https://cloud.google.com/web-risk/docs/reference/rest/ https://developers.google.com/drive/v3/reference/ https://developers.google.com/drive/activity/v2/reference/rest/
https://developers.google.com/apps-script/api/reference/rest/
https://cloud.google.com/secret-manager/docs/reference/rest/ https://developers.google.com/vault/reference/rest/
https://googleapis.github.io/google-api-python-client/docs/start.html
- https://medium.com/google-cloud/programatically-manage-gcp-resources-via-rest-apis-6b216e5efadf
Google Marketplace
Get someone else to do the work for you.
Get pre-configured infrastructure from various 3rd-party vendors:
- https://cloud.google.com/marketplace/
-
https://cloud.google.com/marketplace/docs/
- HANDS-ON: Google Cloud Fundamentals: Getting Started with Cloud Marketplace deploy a LAMP stack on a Compute Engine instance. The Bitnami LAMP Stack provides a complete web development environment for Linux and phpinfo.php
Short-lived Credentials
The above does not include more secure access using “ambient” credentials and Workload Identity Federation (WIF) authentication that are short-lived, so are less likely to be compromised than stored service account keys which stay active and thus vulnerable to theft.
The increasing speed of computers meansstatic secrets can’t be rotated frequently enough.
Ambient container credentials
Applications running within cloud environments (AWS, Azure, Google) can “assume” ambient credentials automatically based on its container. For example, and applications running within a Docker (or EC2) instance receive IAM roles from the instance metadata service. Within Kubernetes, EKS Pod Identity or IAM Roles for Service Accounts (IRSA) pods can get credentials via service account tokens or the EKS Auth API.
least-privilege
Automation in production requires scope permissions to be specific (tight) enough to minimize risk of misuse. Audits are needed to ensure only intended resources have access to sensitive ambient credentials.
Temporary credentials are preferred (over static ones) because they are less vulnerable to theft than static service account keys assuming that
Workload Identity Federation (WIF)
The “Federation” part of Google Cloud’s Workload Identity Federation (WIF) means an app can “trade in” ambient credentials from a provider (AWS, Azure, or GitHub Actions for short-lived Google access tokens), making cross-cloud authentication seamless (without manual login).
Workload Identity Federation is a security mechanism that allows workloads (applications, services, or processes) running outside of a cloud provider’s environment to securely access cloud resources without using long-lived service account keys.
Workload Identity Federation establishes a trust relationship between your external identity provider and the cloud provider.
| Cloud Provider | Ambient Credentials | How They're Provided |
|---|---|---|
| AWS | EC2 Instance Profile, EKS IRSA | Metadata service, Pod Identity |
| Azure | Managed Identity | Azure AD, managed identity endpoint |
| Attached Service Account, Federation | Metadata server, token exchange | |
| GitHub Actions | OIDC | - |
| GitLab | - | - |
| Kubernetes | - | - |
To automatically connect GitHub Actions, authentication can be restricted to specific repositories, usernames, branch names, or published claims. More complex and compound constraints can be combined using CEL (Common Expression Language).
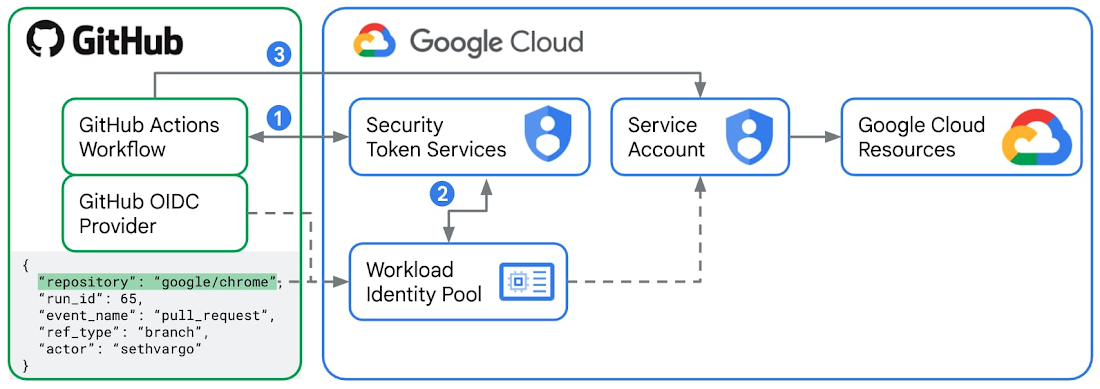
WIF is not limited to AWS, Azure, or GitHub Actions. It can be with any arbitrary OIDC (OpenID Connect) IdC providers (e.g., Okta, Keycloak, Kubernetes, etc.) to access Google Cloud Resources.
- The external workloads present a token from its trusted identity provider (IdP) to Google’s Security Token Service (STS).
- Workload presents this token to the cloud provider’s Security Token Service (STS).
- Cloud provider validates the token and issues a temporary access token.
- The Workload uses the temporary token to access cloud resources.
Setup for use of WIF include:
- Install PIP packages: bashpip install google-auth google-auth-oauthlib google-auth-httplib2 requests
-
Enable the Google STS API & API
- List Workload Identity Pools previously created
-
Create a Workload Identity Pool = Establish the wif = WorkloadIdentityFederation() object
- Create a Workload Identity Pool Provider
- Create a Workload Identity Pool Member
- Create a Workload Identity Pool Member Binding
https://cloud.google.com/identity
- Enable the STS API: Use my enable_gcp_api() function in my gcp-services.py to enable the STS API:
python3 gcp-services.py enable_gcp_api "serviceusage.googleapis.com"It returns:
{
   "name": "projects/248066739582/services/serviceusage.googleapis.com",
   "config": {
      "requirements": "serviceusage.googleapis.com/tos/cloud"
   },
   "state": "ENABLED"
}
Google’s Security Token Service (STS) API “exchanges Google or third-party credentials for a short-lived access token to Google Cloud resources.”
It’s a REST API posted using CLI like this:
curl -v -X POST -H "Content-Type: application/json; charset=utf-8" -d @request.json https://sts.googleapis.com/v1/token
In the REST API exchange example below, we are using an OIDC provider so the subjectToken is a JWT with the Google STS Server API: https://sts.googleapis.com/v1/token
The exchange request/response looks like this
with POST Payload request.json
{
  "audience": "//iam.googleapis.com/projects/248066739582/locations/global/workloadIdentityPools/oidc-pool-1/providers/oidc-provider-1",
  "grantType": "urn:ietf:params:oauth:grant-type:token-exchange",
  "requestedTokenType": "urn:ietf:params:oauth:token-type:access_token",
  "scope": "https://www.googleapis.com/auth/cloud-platform",
  "subjectTokenType": "urn:ietf:params:oauth:token-type:jwt",
  "subjectToken": "eyJhbGciOiJSUzI1NiIsImtpZCI6I...."
}
The STS API accepts a JSON structure defined in https://datatracker.ietf.org/doc/html/rfc8693 “rfc8693: OAuth 2.0 Token Exchange” where the parameters define which Workload Identity Federation configuration to use (audience) and and the actual ambient token 3rd party token to exchange (subjectToken).
A successful response.json looks like this:
{
  "accessToken": "eyJhbGciOiJSUzI1NiIsImtpZCI6I....",
  "tokenType": "urn:ietf:params:oauth:token-type:access_token",
  "expiresIn": 3599
}
GCP has a service that based on your administrators configuration for your domain, it will accept an arbitrary token from a 3rd party provider and then return back a federated token “google knows about”. The last part is critical: GCP (or any resource anywhere), should know something about the principal requesting access to a protected resource. With Workload identity federation and the STS server, your administrator defines what providers and identities GCP should ‘know about’.
Exchange generic OIDC credentials for GCP credentials using GCP STS service: https://github.com/salrashid123/gcpcompat-oidc
Exchange AWS credentials for GCP credentials using GCP STS service: https://github.com/salrashid123/gcpcompat-aws
GCP WIF using SAML credentials: https://github.com/salrashid123/gcpcompat-saml
References:
- https://cloud.google.com/iam/docs/workload-identity-federation
- https://blog.salrashid.dev/articles/2021/understanding_workload_identity_federation/
Google IaC (Infra as Code)
There are several ways to create resources in Google Cloud:
- Google Cloud Console GUI
- Google Cloud SDK (gcloud CLI commands)
-
Google Cloud Deployment Manager
- Google Cloud Terraform
- Google Cloud Cloud Foundation Toolkit (CFT)
Terraform and CFT are both Infrastructure as Code (IaC) tools, where resources are defined by coding like programming code (Java, Python, Go, etc.) stored in versioned GitHub repositories. The versioning also enables identification of who made each change, when, and why. Git commands can retrieve files at various points in the past.
PROTIP: I’ve been saying that the most useful part of Infrastructure as Code is not just the producitivity gains from resusability, etc. but that security vulnerabilities in resource can be tested before being exposed on the wild-west Internet</a>. That’s not just because infra code can deploy into test enviornments before being deployed into production.
Cloud Adoption Framework
All this is mentioned in the Google Cloud Adoption Framework at:
https://cloud.google.com/adoption-framework
and
https://cloud.google.com/architecture/security-foundations
Several “DevSecOps” tools have been created to scan Terraform code for vulnerabilities:
- Synopsys
- OPA (Open Policy Agent) Rego language
- Hashicorp Sentinel
Google CFT (Cloud Foundation Toolkit)
The Google CFT (Cloud Foundation Toolkit) – with marketing page at:
- https://cloud.google.com/foundation-toolkit
The CFT toolkit repo at:
https://github.com/GoogleCloudPlatform/cloud-foundation-toolkit
says it “provides GCP best practices as code” out of the box – “a comprehensive set of production-ready resource templates that follow Google’s best practices”.
CFT is more opininated (less flexible) than Terraform modules in the Cloud Foundation Fabric.
Rather than forking and modification when using Fabric, CFT aims to be “extensible via composition” from the Terraform Registry modified with .tfvars
https://github.com/GoogleCloudPlatform/cloud-foundation-toolkit/blob/master/dm/docs/userguide.md notes that the “cft” command line tool is needed as a wrapper around the “gcloud” command line tool because:
- GCP Deployment Manager service does not support cross-deployment references, and
- the gcloud utility does not support concurrent deployment of multiple inter-dependent configs.
https://github.com/GoogleCloudPlatform/cloud-foundation-toolkit/blob/master/dm/docs/tool_dev_guide.md
https://github.com/GoogleCloudPlatform/cloud-foundation-toolkit/blob/master/dm/docs/template_dev_guide.md
??? the Blueprint (integration) Test framework, each containing a resource.yaml test config with a resource.bats test harness. See the Template Development Guide.
- https://github.com/GoogleCloudPlatform/cloud-foundation-toolkit/tree/master/infra/blueprint-test
“CFT is designed to be modular and off the shelf, providing higher level abstractions to product groups which allows certain teams to adopt Terraform without maintenance burden while allowing others to follow existing practices.”
Rather than monolithically as with Fabric, the 64 modules within CFT are versioned and released individually:
- https://github.com/GoogleCloudPlatform/cloud-foundation-toolkit/tree/master/dm/templates
??? managed by Python 2.7 template file resource.py ???
- https://github.com/terraform-google-modules
Reports defined in the OPA Rego language (hence the .rego file extension):
- https://github.com/GoogleCloudPlatform/cloud-foundation-toolkit/tree/master/reports/sample
aims to provide “reference templates” that can be used off-the-shelf to quickly build a repeatable enterprise-ready baseline secure foundation environment in Google Cloud. The templates aim to reflect Google Cloud best practices.
The CFT expands on the Google Deployment Manager because it does not support cross-deployment references.
The CFT expands on Google’s gcloud CLI utility because it does not support concurrent deployment of multiple inter-dependent configs.
Hands-on “Cloud Foundation Toolkit 101” that adds (and test) a feature to a CF module in GitHub:
https://codelabs.developers.google.com/cft-onboarding#0
https://medium.com/datamindedbe/running-through-the-google-gcp-cloud-foundation-toolkit-setup-b4c5a912da56
modified from
CFT for various resources from the Cloud Deployment Manager:
https://cloud.google.com/deployment-manager/docs/reference/cloud-foundation-toolkit
https://github.com/GoogleCloudPlatform/cloud-foundation-toolkit/tree/master/dm/templates
It’s heavily opinionated so may break production environments.
https://morioh.com/a/fcb2c083df4e/using-the-cloud-foundation-toolkit-with-terraform Tutorial
See https://github.com/GoogleCloudPlatform/policy-library/blob/master/docs/user_guide.md

* 0-bootstrap
https://googlecoursera.qwiklabs.com/focuses/29801820?parent=lti_session Securing Google Cloud with CFT Scorecard
https://cloud.google.com/blog/products/devops-sre/using-the-cloud-foundation-toolkit-with-terraform/
CFT Scorecard to secure GCP CAI
The “CFT Scorecard” may be a bit of a misnomer. The technology doesn’t have a GUI. So it’s not like a Baseball scorecard or a business “Balanced Scorecard” that displays statistics.
The CFT Scorecard is a CLI program that outputs text to provide visibility into misconfigurations and violations of standards for Google Cloud resources, projects, folders, in entire organizations.
https://www.coursera.org/projects/googlecloud-securing-google-cloud-with-cft-scorecard-dwrbx 25 minute FREE project

https://github.com/wilsonmar/DevSecOps/blog/main/gcp/gcp-cft-cai.sh
https://github.com/GoogleCloudPlatform/cloud-foundation-toolkit/blob/master/cli/docs/scorecard.md
https://stackoverflow.com/questions/62499204/error-in-google-cloud-shell-commands-while-working-on-the-lab-securing-google-c
Forseti Config Validator at https://github.com/GoogleCloudPlatform/policy-library/blob/master/docs/user_guide.md
This repo contains several distinct Terraform projects each within their own directory that must be applied separately, but in sequence. Each of these Terraform projects are to be layered on top of each other, running in the following order.
- https://www.linkedin.com/in/sg-dchen/
BLOG: “Google Cloud CFT Scorecard” by Jorge Liauw Calo at Xebia
Cloud Foundation Toolkit CFT Training Instance Group | Qwiklabs
- https://www.youtube.com/watch?v=8TQYnxd_F00
- https://www.youtube.com/watch?v=NXKhW3quAzg
- https://www.youtube.com/watch?v=qvbyGhhqtrg
https://www.youtube.com/watch?v=DC4aY6RsUS4 Cloud Foundation Toolkit (CFT) Training: Instance Group || #qwiklabs || #GSP801 Quick Lab
Terraform
PROTIP: My notes/tutorial on using HashiCorp Terraform is at:
https://wilsonmar.github.io/terraform
https://github.com/terraform-google-modules/ https://github.com/terraform-google-modules/terraform-example-foundation
PROTIP: Use my shell file to install Terraform: It performs these commands for Linux and macOS:
sudo yum install -y zip unzip  # if not already installed
# (replace x with your version)
wget https://releases.hashicorp.com/terraform/0.X.X/terraform_0.X.X_linux_amd64.zip
unzip terraform_0.11.6_linux_amd64.zip
sudo mv terraform /usr/local/bin/
Confirm terraform binary is accessible: terraform — version
Import your Google Cloud resources into Terraform state;
https://cloud.google.com/docs/terraform/resource-management/import
https://www.cloudskillsboost.google/catalog
Resources:
- https://cloud.google.com/docs/terraform/blueprints/terraform-blueprints
Terraform blueprints and modules for Google Cloud - https://cloud.google.com/docs/terraform/get-started-with-terraform
Deploy a basic Flask web server on Compute Engine by using Terraform -
https://cloud.google.com/docs/terraform/resource-management/managing-infrastructure-as-code
Managing infrastructure as code with Cloud Build and GitOps https://cloud.google.com/build - HANDS-ON: Automating the Deployment of Infrastructure Using Terraform
- https://www.reddit.com/r/googlecloud/comments/yfv1zi/its_worth_apply_the_cft_cloud_foundation_toolkit/
https://developer.hashicorp.com/terraform/tutorials/gcp-get-started/google-cloud-platform-build
https://registry.terraform.io/providers/hashicorp/google/latest/docs/guides/getting_started using https://registry.terraform.io/providers/hashicorp/google/latest at https://registry.terraform.io/providers/hashicorp/google/latest/docs described at https://developer.hashicorp.com/terraform/tutorials/gcp-get-started and VIDEO: https://cloud.google.com/docs/terraform
Classes:
- https://www.cloudskillsboost.google/course_templates/443?utm_source=video&utm_medium=youtube&utm_campaign=youtube-video1 (FREE)
- https://acloudguru.com/course/deploying-resources-to-gcp-with-terraform (subscription)
- https://www.udemy.com/course/terraform-gcp/ by Rohit Abraham
Articles:
- A step by step guide to set up a Terraform to work with a GCP project using Cloud Storage as a backend by Edgar Ochoa
- https://tunzor.github.io/posts/terraform-docs-clarity/
- A complete GCP environment with Terraform by Zuhaib Raja
- https://docs.lacework.net/onboarding/gcp-compliance-and-audit-log-integration-terraform-using-google-cloud-shell
- https://learn.hashicorp.com/collections/terraform/gcp-get-started
- https://github.com/GoogleCloudPlatform/terraform-google-examples
New Project
All Google Cloud resources are associated with a project.
Project ID is unique among all other projects at Google and cannot be changed.
Project Names can be changed.
Principals
Service accounts are one type of principals, called “members” given permissions.
Service accounts are automatically created for each project:
project_number@cloudservices.gserviceaccount.com managed by Google. This service account runs internal Google processes and thus not listed among Service Accounts in the IAM section of the Cloud Console with the project editor role. It is deleted only when the project is deleted. Google services rely on the account having access to your project, so you should NOT remove or change the service account’s role on your project.
project_id@developer.gserviceaccount.com
project_id@developer.gserviceaccount.com
Principals can be these types:
-
@googlegroups.com members
- Individual @gmail.com free account
- Google Workspace (GSuite) account (corp_admin@abc.com)
-
Google Account (which are also accessed at gmail.com) for a paying host
- Cloud Identity domain
- my-sa-123@$DEVSHELL_PROJECT_ID.iam.gserviceaccount.com
-
user-created Google service account my-sa-123@$DEVSHELL_PROJECT_ID.iam.gserviceaccount.com
- All authenticated users
- All users
A Google Account represents a developer, an administrator, or any other person who interacts with Google Cloud. Any email address that’s associated with a Google Account can be an identity, including gmail.com or other domains.
Each project that contains an App Engine application gets a default App Engine service account such as:
PROJECT_ID@appspot.gserviceaccount.com.
   "members": [
        "user:ali@example.com",
        "serviceAccount:my-other-app@appspot.gserviceaccount.com",
        "group:admins@example.com",
        "domain:google.com"
      ]
WARNING: Service Agents have their own (very powerful) roles.
https://www.cloudskillsboost.google/course_sessions/3783064/labs/379382
-
To grant roles to a service account:
gcloud projects add-iam-policy-binding $DEVSHELL_PROJECT_ID \
 --member serviceAccount:my-sa-123@$DEVSHELL_PROJECT_ID.iam.gserviceaccount.com \
 --role roles/editor
Credentials for Authentication
- Select a project at console.cloud.google.com
- Click navigation “hamburger”, menu “APIs & Services”, Credentials.
-
Click CREATE CREDENTIALS
PROTIP: The types of credentials:
- API Keys identify your project using a simple API key to check quota and access (not to encrypt)
- OAuth2.0 Client IDs requests user consent to an app accessing the user’s data via Google’s OAuth servers. Create a separate client ID for each platform.
- Service accounts enables server-to-server, app-level authentication using robot (non-human) accounts.
Create OAuth2 accounts
References:
- VIDEO by the great Jie Jenn
- Click OAuth client ID,
- CONFIGURE CONSENT SCREEN, External (if you’re not a Workspace owner)
- Click Application type > Desktop app. PROTIP: The easiest for Google APIs among the types:
- Web application
- Android
- Chrome app
- iOS
- TVs and limited input devices
- Desktop app
- Universal Windows (UWP)
- In the Name field, type a name for the credential. This name is only shown in the Google Cloud console.
- Click Create. The OAuth client created screen appears, showing your new Client ID and Client secret.
- Click OK. The newly created credential appears under OAuth 2.0 Client IDs.
- Save the downloaded JSON file as credentials.json, and move the file to your $HOME directory.
- TODO: Store in HashiCorp Vault?
- TODO: Add code to retrieve JSON from Vault.
Create OAuth page
References:
- VIDEO by the great Jie Jenn
- https://developers.google.com/docs/api/quickstart/python
- Select your browser’s profile at the upper-right corner.
-
If the account you’re using is a Google Workspace account, that account’s Administrator must grant you permission by clicking her picture, then “Manage your account”.
- In the Google Cloud console for your project.
- Select the Google project at the top.
- Click the “hamburger” navigation menu “APIs & Services”, “OAuth consent screen”.
- Select External: “Because you’re not a Google Workspace user, you can only make your app available to external (general audience) users.”
- CREATE.
- Type App name, User support email. You don’t need to enter App domain info if your work isn’t commercial.
- TODO: App logo
- SAVE AND CONTINUE for the scopes page.
- SAVE AND CONTINUE for Test users page.
- PUBLISH APP.
- SAVE AND CONTINUE.
Service Accounts
References:
- Click the Google Cloud Program menu “hamberger” icon at the upper-right to expose the menu.
- Click “IAM & Admin”, “Service Account”.
- PROTIP: Owner Roles should not have excessive permissions when not being actively used.
- Click “CREATE SERVICE ACCOUNT”.
-
PROTIP: Follow a Naming Convention when creating service account name. The service account created is of the form:
whatever-123@{PROJECT_ID}.iam.gserviceaccount.com
-
Tab for Google to automatically add a dash and number to construct the service account ID from the name.
- PROTIP: For Service account description, add ??? (you’ll add Tags later).
-
Click “CREATE AND CONTINUE”.
Roles
- Click “Select a role”.
-
Mouse over “Basic”.
Basic/Primitive Roles
Primitive/Basic/broad IAM roles apply to all resources within a project:
- Owner has full access (all permissions). The only role able to change permissions of members.
- Editor - view, update, delete
-
Viewer - most GCP resources
-
Billing Administrator
- Browser - ?
gcloud iam roles describe roles/browser
includedPermissions:
- resourcemanager.folders.get
- resourcemanager.folders.list
- resourcemanager.organizations.get
- resourcemanager.projects.get
- resourcemanager.projects.getIamPolicy
- resourcemanager.projects.list

PROTIP: In production environments, for an app/function that is limited in scope, rather than granting basic roles, grant more limited actions predefined for each service, such as:
- compute.instances.delete
- compute.instances.get
- compute.instances.list
- compute.instances.setMachineType
- compute.instances.start
- compute.instances.stop
See https://cloud.google.com/iam/docs/choose-predefined.roles
A sample .json credentials file:
{
"type": "service_account",
"project_id": "{PROJECT_ID}",
"private_key_id": "12d324c00212ff6d69a0a3be23b505783c5c6f82",
"private_key": "-----BEGIN PRIVATE KEY-----\n...
...
...==\n-----END PRIVATE KEY-----\n",
"client_email": "wilson-svc-12342140232@{PROJECT_ID}.iam.gserviceaccount.com",
"client_id": "123415083338651301661",
"auth_uri": "https://accounts.google.com/o/oauth2/auth",
"token_uri": "https://oauth2.googleapis.com/token",
"auth_provider_x509_cert_url": "https://www.googleapis.com/oauth2/v1/certs",
"client_x509_cert_url": "https://www.googleapis.com/robot/v1/metadata/x509/wilson-svc-12342140232%40{PROJECT_ID}.iam.gserviceaccount.com",
"universe_domain": "googleapis.com"
}
Permissions in IAM Conditions
-
In a browser, go to the IAM page for your project:
https://console.cloud.google.com/iam-admin/iam
There are tabs for “VIEW BY PRINCIPALS” and “VIEW BY ROLES”.
TODO: Explanation!
- https://cloud.google.com/asset-inventory/docs/searching-iam-policies
- https://cloud.google.com/asset-inventory/docs/searching-iam-policies-samples
- https://cloud.google.com/asset-inventory/docs/supported-asset-types#searchable_asset_types
-
Who are granted a given permission in my org?
MY_GCP_ORG=616463121992
gcloud asset search-all-iam-policies \
  --scope=organizations/$MY_GCP_ORG \
  --query='policy.role.permissions:resourcemanager.projects.setIamPolicy'
TODO: Have permission?
-
Which policies grant a given role under my project?
gcloud asset search-all-iam-policies \
  --scope=projects/$DEVSHELL_PROJECT_ID \
  --query='policy:roles/owner'
Enabling service [cloudasset.googleapis.com]
-
Which policies under my folder contain a given user?
gcloud asset search-all-iam-policies \
  --scope=folders/9388141951 \
  --query='policy:foo@bar.com'
TODO: Have permission?
SSH Keys are auto-generated into your local $HOME/.ssh folder:
gcloud compute ssh web-server -zone us-central1-c
Block a specific VM from automatically getting the public key of other VMs created.
IAM Custom Roles
The finest grain permissions is to create custom roles at the project or organization-wide level. REMEMBER: custom roles cannot be defined to folders.
Custom roles can only be used to grant permissions in policies for the same project or organization that owns the roles or resources under them. You cannot grant custom roles from one project or organization on a resource owned by a different project or organization.
Permissions have the format:
<service>.<resource>.<verb>compute.instances.list permission allows a user to list the Compute Engine instances they own. To allow a user to stop a VM:
compute.instances.stopThe caller of topic.publish() needs the permission:
pubsub.topics.publishFor example, create an allow policy that grants a user the Subscriber role for a particular Pub/Sub topic.
-
Google had ~3460 services (including partners) listed like this:
time gcloud config set accessibility/screen_reader false
time gcloud services list --available | wc -l
-
Google had ~430 of their own googleapis.com services:
time gcloud config set accessibility/screen_reader false
time gcloud services list --available | grep ".googleapis.com"
Notice that some names are indented with spaces to denote a hierarchy.
-
Listing all permissions (~36036) takes a minute without filtering for (~4986) “status: GA”:
time gcloud iam list-testable-permissions //cloudresourcemanager.googleapis.com/projects/$DEVSHELL_PROJECT_ID | wc -l
The listing begins with these service names:
accessapproval
actions
aiplatform
alloydb
apigateway
apigee
apigeeregistry
apikeys
appengine
...
Some have “customRolesSupportLevel: TESTING”.
stage: GA means it’s Generally Available. “BETA” not so.
To inactivate a role:
gcloud iam roles update viewer –project …
–stage DISABLEDapiDisabled: false means it will respond.
-
List all possible permissions just for the “appengine” service:
gcloud iam list-testable-permissions //cloudresourcemanager.googleapis.com/projects/$DEVSHELL_PROJECT_ID | grep "name: appengine."
PROTIP: A simple approach is to assign all delete and other destructive actions only to managers and no others. Such an approach would require responsive managers so workers don’t need to wait.
-
To create a custom role, a caller must have the permission:
iam.roles.create -
Get the metadata for both predefined and custom roles. Role metadata includes the role ID and permissions contained in the role. You can view the metadata using the Cloud Console or the IAM API.
gcloud iam roles describe [ROLE_NAME]
https://stackoverflow.com/questions/47006116/how-do-i-list-and-view-users-permissions-with-gcloud
-
To list what roles (includedPermissions) a particular role contains:
gcloud iam roles describe roles/spanner.databaseAdmin
monitoring.timeSeries.list
resourcemanager.projects.get
resourcemanager.projects.list
spanner.databaseOperations.cancel
etc.
Google’s sample Python code
-
View https://github.com/GoogleCloudPlatform/python-docs-samples#readme
PROTIP: Only version 3.10 of Python is passing (at time of writing), so set your Python interpreter to that version.
README.rst
-
If you want to fork the repo:
git clone https://github.com/wilsonmar/python-docs-samples.git --depth 1
cd python-docs-samples
git remote add upstream https://github.com/GoogleCloudPlatform/python-docs-samples.git
   # https://docs.github.com/en/pull-requests/collaborating-with-pull-requests/working-with-forks/configuring-a-remote-repository-for-a-fork
git remote -v
ls
AUTHORING_GUIDE.md       cloud_tasks              endpoints                memorystore              securitycenter
CODE_OF_CONDUCT.md       cloudbuild               enterpriseknowledgegraph ml_engine                servicedirectory
CONTRIBUTING.md          composer                 error_reporting          monitoring               spanner
LICENSE                  compute                  eventarc                 notebooks                speech
MAC_SETUP.md             contact-center-insights  favicon.ico              noxfile-template.py      storage
README.md                container                firestore                noxfile_config.py        storagetransfer
SECURITY.md              containeranalysis        functions                opencensus               tables
appengine                contentwarehouse         generative_ai            optimization             talent
asset                    data-science-onramp      healthcare               people-and-planet-ai     testing
auth                     datacatalog              iam                      privateca                texttospeech
automl                   dataflow                 iap                      profiler                 trace
batch                    datalabeling             iot                      pubsub                   translate
bigquery                 dataproc                 jobs                     pubsublite               video
bigquery_storage         datastore                kms                      pytest.ini               vision
billing                  dialogflow               kubernetes_engine        recaptcha_enterprise     webrisk
blog                     dialogflow-cx            language                 renovate.json            workflows
cdn                      discoveryengine          logging                  retail
cloud-media-livestream   dlp                      media                    run
cloud-sql                dns                      media-translation        scripts
cloud_scheduler          documentai               media_cdn                secretmanager
The most popular are:
- auth
- billing
- compute
- container
- dns
- iam
- kms
- kubernetes_engine
- logging
- monitoring
- pubsub
- securitycenter
- storage
- testing
-
trace
- https://developers.google.com/tasks => https://fullscreen-for-googletasks.com/
-
Setup virtualenv with pyenv. See https://github.com/GoogleCloudPlatform/python-docs-samples/blob/main/MAC_SETUP.md
-
Activate env:
python3 -m venv env
source env/bin/activate
-
Navigate to the cloud-client folder under the service you want to run:
cd logging/cloud-client/
-
Run my ponit.sh on the PATH so it’s runnable in all folders:
# Install the dependencies needed to run the samples:
pip install -r requirements.txt --user
# Run the sample:
python snippets.py
Obtain https://github.com/GoogleCloudPlatform/python-docs-samples
https://cloud.google.com/python/docs/getting-started
| VIDEO: How to build a REST API with Python | Deploy to Google Cloud |
API Authentication & Authorization
-
Set the CREDENTIALS via an environmental variable and do a token refresh.
The CREDENTIALS is usually service account having the relevant GCP permissions to perform the API operation.
export GOOGLE_APPLICATION_CREDENTIALS=”KEY_PATH"
This also enables you to run the same code in different environments and CICD pipelines without any code changes.
-
Within Python code, obtain a token with a limited life time based on the CREDENTIALS set in your environment by using the google.auth.credentials api
Google exposes code snippets:
https://storage.googleapis.com/storage/v1/b?project=test-project-gcp&key=[YOUR_API_KEY
IAM
Google Cloud’s Identity and Access Management (IAM) service grants granular access to specific resources and helps prevent access to other resources. IAM adopts the security principle of least privilege, where nobody have more permissions than they actually need.

VIDEO: Allow & Deny rules together

Billing is at the project level. Projects provide a logical grouping for billing of resources consumed.
REMEMBER: Projects don’t have a sub-project hierarchy like folders.
Organizations in GCP
Create an Organization node when you want to centrally apply organization-wide policies. VIDEO: Dry them.
Labels are Key-value pairs containing resource metadata used to organize billing. VIDEO
Permissions applied to an Organization apply to ALL folders and projects assigned under it.
In the Google Admin console, use the Cloud Identity service to define policies and manage their users and groups.
PROTIP: Implement on each organization conformity rule setting “Restrict allowed Google Cloud APIs and services” organization policy to define cloud services and APIs NOT allowed for use by any principal within the GCP organization.
* compute.googleapis.com
* deploymentmanager.googleapis.com
* dns.googleapis.com
* doubleclicksearch.googleapis.com
* replicapool.googleapis.com
* replicapoolupdater.googleapis.com
* resourceviews.googleapis.com
Enforce Uniform Bucket-Level Access
Restrict Public IP Access for Cloud SQL Instances at Organization Level
Policy Troubleshooter accessed from API & CLI handles more complex issues than the GUI: How to use
IAM CLI commands
The gcloud CLI command:
gcloud iam list-grantable-roles
   gcloud iam list-testable-permissions
“GROUP” refers to policies, roles, service-accounts, simulators, workforce-pools, workload-identity-pools.
https://developers.google.com/apis-explorer lists 265 APIs (as of May 31, 2023). PROTIP: The Google APIs Explorer dynamically generates code samples (in curl) that can run locally.
Policy files submitted by setIamPolicy() are “additive”.
CAUTION: Centralize permissions setting so that conflicts cannot occur. GCP adds an etag at the bottom of each policy document it processes. Include that etag when that same file is submitted for update. A policy submitted without an ETag will always overwrite what is currently there.
CAUTION: Resubmit a complete policy file instead of submitting only changes. Submitting only changes with other permissions removed would remove previous permissions.
Best Practices for Privacy and Security in GCE (Cloud Next ‘19)
IAM Permissions
Permissions determine what operations (verbs) are allowed on a resource, in the form of:
service.resource.verb
The caller of each Google Cloud service REST API method needs to be granted permission for the verb associated with the method called. For example, the pubsub service:
pubsub.subscriptions.consume to call subscriptions.consume()
   pubsub.topics.publish to call topics.publish()
Permission to access a resource are NOT granted directly to an end user.
Permissions by role
Permissions are grouped into roles granted to authenticated principals.
Each role is specified in the form of:
roles/service.roleName
For example, roles defined for the Cloud Storage service include:
roles/storage.objectAdmin
roles/storage.objectCreator
roles/storage.objectViewer
Again, each role contains a collection of permissions.
When a role is granted to a principal, that user obtain all the permissions of that role.
Allow/IAM Policies by resource
When an authenticated principal attempts to access a resource, IAM determines whether the action is permitted based on the allow policies (aka IAM policy) attached to that resource to enforce what roles are granted to which principals.
Role Bindings
Each allow/IAM policy is a collection of role bindings that bind one or more member principals to an individual role. To define who (principal) has what type of access (role) on a resource, create an allow policy and attach it to the resource.
- VIDEO: GCP IAM Policies are defined as bindings to roles.
{
   "bindings" : {
      {
         "role" : "roles/storage.admin"
         "members" : [
            "user:alice@example.com",
            "group:admin@example.com"
         ],
      }
      "conditions": {
         "title": "temporary",
         "expression": "request.time < timestamp('2022-09-23T23:55Z')>"
      }
   }
   {
      "role": "roles/compute.admin"
      "members": [
         "user:bob@example.com"
      ],
   }
   "etag": "abcdef1234568=",
   "version": 3
}
Notice a time-limited temporary condition can be defined. v3 includes conditions as a separate section instead of “withcondition”:
REMEMBER: The IAM API is eventually consistent. Changes take time to affect access checks.
Policies in folders
Share policies among Google Cloud projects by placing projects into a folder, and define policies on that folder.
? IAM policies that are implemented higher in the resource hierarchy deny access that is granted by lower-level policies.
Resources:
- https://cloud.google.com/iam/docs/understanding-roles#predefined_roles
Granular Grants inherited within projects
Some services support granting IAM permissions at a granularity finer than the project level. For example, you can grant the Storage Admin role (roles/storage.admin) to a user for a particular Cloud Storage bucket, or you can grant the Compute Instance Admin role (roles/compute.instanceAdmin) to a user for a specific Compute Engine instance.
IAM permissions granted at the project level apply to ALL resources within that project. For example, to grant access to all Cloud Storage buckets in a project, grant access to the project instead of each individual bucket.
References:
- Google’s IT Security PDF
- Google’s Cloud Identity tool in the Admin console.
- Migrate from App Engine Users service to Cloud Identity Platform
Permissions need to be defined per project.
Permissions are inherited and additive (flow in one direction). Parent permissions don’t override child permissions. Permissions can’t be denied at lower levels once they’ve been granted at upper levels. There are no deny rules.
setIamPolicy to each resource:
POST https://cloudresourcemanager.googleapis.com/v1/projects/{resource}:setIamPolicy
POST https://pubsub.googleapis.com/v1/{resource}:setIamPolicy
Kubernetes RBAC (Role-based Access Control) extends IAM, at the cluster or namespace level, to define Roles – what operations verbs (get, list, watch, create, describe) can be executed over named objects (resource such as a pod, deployment, service, persistent volume). It’s common practice to allocate get, list, and watch together (as a read-only unit).
Roles (such as compute.instanceAdmin) are a collection of permissions to give access to a given resource, in the form:
service.resource.verb
List:
gcloud iam list-testable-permissions //cloudresourcemanager.googleapis.com/projects/$DEVSHELL_PROJECT_ID
Applying an example:compute.instances.delete
API groups are defined in the same way as when creating a Role.
Get and post actions for non-resource endpoints are uniquely defined by RBAC ClusterRoles, as the name implies, defined at the cluster level.
RoleBindings connect Roles to subjects (users/processes) who make requests to the Kubernetes API.
Resources can be cluster scopes such as nodes and storage classes, or they can be namespace resources such as pods and deployments.
On the top-left, is a basic assignment that specifies get, list, and watch operations on all pod resources.
On the bottom left, a sub-resource, log, is added to the resources list to specify access to pod/log.
On the top right, a resource name is specified to limit the scope to specific instances of a resource, and the verbs specified as patch and update.
Service accounts
Unlike an end-user account, no human authentication is involved from one service to another when a service account is associated with a VM or app.
Google-managed service accounts are of the format:
[PROJECT_NUMBER]@cloudservices.gserviceaccount.com
User-managed service accounts are of the format:
[PROJECT_NUMBER]-compute@developer.gserviceaccount.com
Service accounts have more stringent permissions and logging than user accounts.
GCDS (Google Cloud Directory Sync) syncs user identities from on-premises.
Compute Instances List
-
Zones are listed as metadata for each GCE instance:
gcloud compute instances list
Sample response:
NAME          ZONE           MACHINE_TYPE   PREEMPTIBLE  INTERNAL_IP  EXTERNAL_IP     STATUS
hygieia-1     us-central1-f  n1-standard-1               10.128.0.3   35.193.186.181  TERMINATED
PROTIP: Define what Zone and region your team should use.
-
Switch to see the Compute Engine Metadata UI for the project:
https://console.cloud.google.com/compute/metadata
- google-compute-default-zone
- google-compute-default-region
https://github.com/wilsonmar/Dockerfiles/blob/master/gcp-set-zone.sh
Create sample Node server
-
Download a file from GitHub:
curl -o https://raw.githubusercontent.com/wilsonmar/Dockerfiles/master/NodeJs/server.js
-o(lowercase o) saves the filename provided in the command line.See http://www.thegeekstuff.com/2012/04/curl-examples/?utm_source=feedburner
The sample Node program displays just text “Hello World!” (no fancy HTML/CSS).
-
Invoke Node to start server:
node server.js
-
View the program’s browser output online by clicking the Google Web View button, then “Preview on port 8080”:

The URL:
https://8080-dot-3050285-dot-devshell.appspot.com/?authuser=0 -
Press control+C to stop the Node server.
Deploy Python
-
Replace boilerplate “your-bucket-name” with your own project ID:
sed -i s/your-bucket-name/$DEVSHELL_PROJECT_ID/ config.py
-
View the list of dependencies needed by your custom Python program:
cat requirements.txt
-
Download the dependencies:
pip install -r requirements.txt -t lib
-
Deploy the current assembled folder:
gcloud app deploy -y
-
Exit the cloud:
exit
PowerShell Cloud Tools
https://cloud.google.com/powershell/
https://cloud.google.com/tools/powershell/docs/
-
In a PowerShell opened for Administrator:
Install-Module GoogleCloud
The response:
Untrusted repository
You are installing the modules from an untrusted repository. If you trust this
repository, change its InstallationPolicy value by running the Set-PSRepository
 cmdlet. Are you sure you want to install the modules from 'PSGallery'?
[Y] Yes  [A] Yes to All  [N] No  [L] No to All  [S] Suspend  [?] Help
(default is "N"):
-
Click A.
-
Get all buckets for the current project, for a specific project, or a specific bucket:
   $currentProjBuckets = Get-GcsBucket
$specificProjBuckets = Get-GcsBucket -Project my-project-1
$bucket = Get-GcsBucket -Name my-bucket-name
-
Navigate to Google Storage (like a drive):
cd gs:\
-
Show the available buckets (like directories):
ls
-
Create a new bucket
mkdir my-new-bucket
-
Help
Get-Help New-GcsBucket
Source Code Repository
https://console.cloud.google.com/code/develop/repo is
Google’s (Source) Code Repository Console.
served from: gcr.io
See docs at https://cloud.google.com/source-repositories
GCR is a full-featured Git repository hosted on GCP, free for up to 5 project-users per billing account, for up to 50GB free storage and 50GB free egress per month.
Mirror from GitHub
- PROTIP: On GitHub.com, login to the account you want to use (in the same browser).
- PROTIP: Highlight and copy the name of the repository you want to mirror on Goggle.
- Create another browser tab (so they share the credentials established in the steps above).
- https://console.cloud.google.com/code is the Google Code Console.
- Click “Get Started” if it appears.
-
PROTIP: For repository name, paste or type the same name as the repo you want to hold from GitHub.
BLAH: Repository names can only contain alphanumeric characters, underscores or dashes.
-
Click CREATE to confirm name.

- Click on “Automatically Mirror from GitHub”.
- Select GitHub or Bitbucket for a “Choose a Repository list”.
- Click Grant to the repo to be linked (if it appears). Then type your GitHub password.
- Click the green “Authorize Google-Cloud-Development” button.
-
Choose the repository. Click the consent box. CONNECT.
You should get an email “[GitHub] A new public key was added” about the Google Connected Repository.
- Commit a change to GitHub (push from your local copy or interactively on GitHub.com).
- Click the clock icon on Google Code Console to toggle commit history.
- Click the SHA hash to view changes.
- Click on the changed file path to see its text comparing two versions. Scroll down.
- Click “View source at this commit” to make a “git checkout” of the whole folder.
- Click the “Source code” menu for the default list of folders and files.
-
Select the master branch.
To disconnect a hosted repository:
- Click Repositories on the left menu.
- Click the settings icon (with the three vertical dots to the far right) on the same line of the repo you want disconnected.
-
Confirm Disconnect.
Create new repo in CLI
- Be at the project you want.
- Create a repository.
- Click the CLI icon.
-
Click the wrench to adjust backgroun color, etc.
-
Create a file using the source browser.
-
Make it a Git repository (a Git client is built-in):
gcloud init
-
Define, for example:
git config credential.helper gcloud.sh
-
Define the remote:
git remote add google \ https://source.developers.google.com/p/cp100-1094/r/helloworld
-
Define the remote:
git push --all google
-
To transfer a file within gcloud CLI:
gsutil cp *.txt gs://cp-100-demo
GCR Container Registry
https://console.cloud.google.com/gcr - Google’s Container Registry console
is used to control what is in
Google’s Container Registry (GCR).
It is a service apart from GKE.
It stores secure, private Docker images for deployments.
Like GitHub, it has build triggers.
Deployment Manager
Deployment Manager creates resources.
Cloud Launcher uses .yaml templates describing the environment makes for repeatability.
zzzz
REST APIs
REST API GUI
- On the Google Cloud menu, click the “hamburger” menu at the upper-left.
- select APIs & Services.
-
Click + ENABLE APIS AND SERVICES.
- On the Library page, click “Library” on the left menu.
- Click Private APIs”. Notice APIs are listed by category.
- Use the filter field to search by name.
- Click “Private” in the “Visibility” menu items.
- Find your API,
- If you don’t see your API listed, you were not granted access to enable the API.
- Click the API you want to enable.
- In the page that displays information about the API, click Enable.
REST API GCLOUD CLI
- Click the CLI icon at the top of the page to Activate the Cloud shell.
- Click AUTHORIZE to “Authorize Cloud Shell”.
REST API CLI
In a Terminal:
- The Google Cloud CLI requires Python (3.5 to 3.9).
- Install gcloud program.
REST API commands
-
Establish a project
export GCP_PROJECT_ID=”hc-13c8a9855cab4a4eac6640eb730” gcloud config set project “$GCP_PROJECT_ID”
The expected response:
Updated property [core/project].
-
Review Configuration:
gcloud config list
[core]
account = wilsonmar@gmail.com
disable_usage_reporting = false
project = wilsonmar-gcp-test
Your active configuration is: [default]
-
See https://cloud.google.com/sdk/gcloud/reference
To disable prompting, add option -q or –quiet
-
Disable usage reporting:
gcloud config set disable_usage_reporting true
Exploring APIs
-
A complete/long list of services returned 3401 items (on Jun 11, 2023):
gcloud services list --available | wc -l
artifactory-jfrog-app.cloudpartnerservices.goog => JFrog Artifactory
-
Filtering to just Google’s own yielded 432:
gcloud services list --available | grep googleapis.com | wc -l
-
Filter the list of services, both GCP and external.
both GCP and external. Each service has a NAME and TITLE line:
gcloud service-management list --available --page-size=10 --sort-by="NAME"
gcloud service-management list --available --filter='NAME:compute*'
-
PROTIP: Use –sync rather than waiting for the enable command to respond. Example:
gcloud services enable containerregistry.googleapis.com --sync
PROTIP: Several services can be specified, separated by a space.
The enable command is described at
https://cloud.google.com/sdk/gcloud/reference/services/enable -
For more on working with Google API Explorer to test RESTful API’s
https://developers.google.com/apis-explorer
PROTIP: Although APIs are in alphabetical order, some services are named starting with “Cloud” or “Google” or “Google Cloud”. Press Ctrl+F to search.
API Explorer site: GCEssentials_ConsoleTour
Endpoints (APIs)
Google Cloud Endpoints let you manage, control access, and monitor custom APIs that can be kept private.
Authenticaton
-
https://cloud.google.com/docs/authentication
Authentication using OAuth2 (JWT), JSON.
SQL Servers on GCE: (2012, 2014, 2016)
- SQL Server Standard
- SQL Server Web
- SQL Server Enterprise
Google Networking
References about Networking:
-
In the menu, “VPC networks”. Click the “default” link.
REMEMBER: Each VPC is global (all regions). Each subnet is a region.
By default, a VPC is created in automatic mode with a subnet for each Region.
At time of writing, there are 25 subnets/regions.
MTU 1460 is the largest MTU (Maximum Transmission Unit) protocol data unit (PDU) that can be communicated in a single network layer transaction. The MTU relates to, but is not identical to the maximum frame size that can be transported on the data link layer, e.g. Ethernet frame. QUESTION: Why change it to 1500 or 8896?
Each Subnet IP range (private RFC 1918 CIDR block) is defined across several zones within a particular region.
IPv6 must be configured in a dual-stack subnet that contain a IPv4 subnet. IPv6 addresses cannot be BYOIP.
REMEMBER: Subnet ranges cannot overlap in a region. Auto Mode automatically adds a subnet to each new region.
A VM instance cannot be created without a VPC network.
A VPC can be shared across several projects in the same organization. Subnets in the same VPCs communicate via internal IPs.
Subnets in different VPCs communicate via external IPs, for which there is a charge.Routes in VPC Network
Routes tell VM instances and the VPC network how to send traffic from an instance to a destination that’s inside or outside Google Cloud. Each VPC network comes with default routes to route traffic among its subnets.
Static routes are faster than dynamic routes (due to the overhead) but can’t point to VLAN attachements.
Automatic policy-based routes are created with a Class VPN tunnel or route-based VPN ???
-
In the list of routes by region, some regions have a green leaf for “Low CO2” and some do not.
-
In Route Management
Google Cloud Router supports dynamic routing between GCP and corporate networks using BGP (Border Gateway Protocol).
NOTE: A router is needed for each VPN for BGP.
NOTE:GCP Firewall Rules apply not just between external instances but also to individual instances within the same network.
-
Firewall.
The 4 Ingress rules to allow in default protocols:
- default-allow-icmp for ping at 22
- default-allow-rdp for Remote Desktop Protocol into Windows machines
- default-allow-ssh for Secure Shell into Linux command line terminal
- default-allow-internal
PROTIP: Define a standard naming convention for custom firewall rules:
{direction}-{allow/deny}-{service}-{to/from location}- ingress-allow-ssh-from-onprem
- egress-allow-all-to-gcevms
See Firewall Insights within the
Google creates all instances with a private (internal) IP address (such as 10.142.3.2).
These firewall rules allow ICMP, RDP, and SSH ingress traffic (through the internet gateway) from anywhere (0.0.0.0/0) and all TCP, UDP, and ICMP traffic within the network (10.128.0.0/9).
The Targets, Filters, Protocols/ports, and Action columns explain these rules.
Without a VPC network, there are no routes and no firewall rules!
One public IP (such as 35.185.115.31) is optionally created to a resource. The IP can be ephemeral (from a pool) or static (reserved). Unassigned static IPs cost $.01 per hour (24 cents per day).
Each VPC has implied allow egress and implied deny ingress (firewall rules) configured.
Custom Mode specify specific subnets, for use with VPC Peering and to connect via VPN using IPsec to encrypt traffic. VPC Peering share projects NOT in same organization. VPC Peering has multiple VPCs share resources.
VPN capacity is 1.5 - 3 Gbps
Google Cloud Interconnect can have SLA with internal IP addresses.
- two VPN (Cloud VPN software)
- Partner thru external provider 50Mbps to 10 Gbps
- Dedicated Interconnect 10 Gbps each link to colocation facility
- CDN Interconnect - CDN providers link with Google’s edge network
Peering via public IP addresses (no SLA) so can link multiple orgs
- Direct Peering - connect business directly to Google
- Carrier Peering - Enterprise-grade connections provided by carrier service providers
HTTP Load Balancing ensures only healthy instances handle traffic across regions.
- See https://www.ianlewis.org/en/google-cloud-platform-http-load-balancers-explaine
- https://medium.com/google-cloud/capacity-management-with-load-balancing-32bd22a716a7 Capacity Management with Load Balancing
Why still charges?
On a Google Cloud account which had nothing running, my bill at the end of the month was still $35 for “Compute Engine Network Load Balancing: Forwarding Rule Additional Service Charge”.
CAUTION Each exposed Kubernetes service (type == LoadBalancer) creates a forwarding rule. And Google’s shutdown script doesn’t remove the Forwarding rules created.
-
To fix it, per https://cloud.google.com/compute/docs/load-balancing/network/forwarding-rules
gcloud compute forwarding-rules list
For a list such as this (scroll to the right for more):
NAME                              REGION       IP_ADDRESS      IP_PROTOCOL  TARGET
a07fc7696d8f411e791c442010af0008  us-central1  35.188.102.120  TCP          us-central1/targetPools/a07fc7696d8f411e791c442010af0008
Iteratively:
-
Copy each item’s NAME listed to build command:
gcloud compute forwarding-rules delete [FORWARDING_RULE_NAME]
-
You’ll be prompted for a region each time. And for a yes.
TODO: automate this!
Load balance
Scale and Load Balance Instances and Apps
- Get a GCP account
- Define a project with billing enabled and the default network configured
- An admin account with at least project owner role.
- Create an instance template with a web app on it
- Create a managed instance group that uses the template to scale
- Create an HTTP load balancer that scales instances based on traffic and distributes load across availability zones
- Define a firewall rule for HTTP traffic.
- Test scaling and balancing under load.
Allow external traffic k8s
For security, k8s pods by default are accessible only by its internal IP within the cluster.
-
To make a container accessible from outside the Kubernetes virtual network, expose the pod as a Kubernetes service. Within a Cloud Shell:
kubectl expose deployment hello-node --type="LoadBalancer"
The –type=”LoadBalancer” flag specifies that we’ll be using the load-balancer provided by the underlying infrastructure (in this case the Compute Engine load balancer). To load balance traffic across all pods managed by the deployment.
Sample response:
service "hello-node" exposed
The Kubernetes master creates the load balancer and related Compute Engine forwarding rules, target pools, and firewall rules to make the service fully accessible from outside of Google Cloud Platform.
-
Find the publicly-accessible IP address of the service, request kubectl to list all the cluster services:
kubectl get services
Sample response listing internal CLUSTER-IP and EXTERNAL-IP:
NAME         CLUSTER-IP     EXTERNAL-IP      PORT(S)    AGE
hello-node   10.3.250.149   104.154.90.147   8080/TCP   1m
kubernetes   10.3.240.1     <none>           443/TCP    5m
Configure Cloud Armor Load Balancer IPs
Google Cloud Platform HTTP(S) load balancing is implemented at the edge of Google’s network in Google’s points of presence (POP) around the world. User traffic directed to an HTTP(S) load balancer enters the POP closest to the user and is then load balanced over Google’s global network to the closest backend that has sufficient capacity available.
Configure an HTTP Load Balancer with global backends. Then, stress test the Load Balancer and blocklist the stress test IP with Cloud Armor, which prevents malicious users or traffic from consuming resources or entering your virtual private cloud (VPC) networks. Blocks and allows access to your HTTP(S) load balancer at the edge of the Google Cloud, as close as possible to the user and to malicious traffic.
-
in Cloud Shell: create a firewall rule to allow port 80 traffic
gcloud compute firewall-rules create \
www-firewall-network-lb --target-tags network-lb-tag \
--allow tcp:80
Click Authothorize. Result:
NAME                     NETWORK  DIRECTION  PRIORITY  ALLOW   DENY  DISABLED
www-firewall-network-lb  default  INGRESS    1000      tcp:80        False
-
Create an instance template named web-template which specifies a startup script that will install Apache, and creates a home page to display the zone the server is running in:
gcloud compute instance-templates create web-template \
 --machine-type=n1-standard-4 \
 --image-family=debian-9 \
 --image-project=debian-cloud \
 --machine-type=n1-standard-1 \
 --tags=network-lb-tag \
 --metadata=startup-script=\#\!\ /bin/bash$'\n'apt-get\ update$'\n'apt-get\ install\ apache2\ -y$'\n'service\ apache2\ restart$'\n'ZONE=\$\(curl\ \"http://metadata.google.internal/computeMetadata/v1/instance/zone\"\ -H\ \"Metadata-Flavor:\ Google\"\)$'\n'echo\ \'\<\!doctype\ html\>\<html\>\<body\>\<h1\>Web\ server\</h1\>\<h2\>This\ server\ is\ in\ zone:\ ZONE_HERE\</h2\>\</body\>\</html\>\'\ \|\ tee\ /var/www/html/index.html$'\n'sed\ -i\ \"s\|ZONE_HERE\|\$ZONE\|\"\ /var/www/html/index.html
Commands to execute on the server on start-up are defined in Advanced options, Management, Automation Startup script:
apt-get update
apt-get install apache2 php php-mysql -y
service apache2 restart
PROTIP: apt-get is used to install packages into Debian operating systems.
-
create a basic http health check:
gcloud compute http-health-checks create basic-http-check
-
create a managed instance-groups of 3 instances. instance-groups use an instance template to create a group of identical instances so that if an instance in the group stops, crashes, or is deleted, the managed instance group automatically recreates the instance.
gcloud compute instance-groups managed create web-group \
--template web-template --size 3 --zones \
us-central1-a,us-central1-b,us-central1-c,us-central1-f
-
create the load balancing service:
gcloud compute instance-groups managed set-named-ports \
web-group --named-ports http:80 --region us-central1
gcloud compute backend-services create web-backend \
--global \
--port-name=http \
--protocol HTTP \
--http-health-checks basic-http-check \
--enable-logging
gcloud compute backend-services add-backend web-backend \
--instance-group web-group \
--global \
--instance-group-region us-central1
gcloud compute url-maps create web-lb \
--default-service web-backend
gcloud compute target-http-proxies create web-lb-proxy \
--url-map web-lb
gcloud compute forwarding-rules create web-rule \
--global \
--target-http-proxy web-lb-proxy \
--ports 80
-
It takes several minutes for the instances to register and the load balancer to be ready. Check in Navigation menu > Network services > Load balancing or
gcloud compute backend-services get-health web-backend --global
kind: compute#backendServiceGroupHealth
-
Retrieve the load balancer IP address:
gcloud compute forwarding-rules describe web-rule --global | grep IPAddress
IPAddress: 34.120.166.236
-
Access the load balancer:
curl -m1 34.120.166.236
The output should look like this (do not copy; this is example output):
<!doctype html><html><body><h1>Web server</h1><h2>This server is in zone: projects/921381138888/zones/us-central1-a</h2></body></html> - Open a new browser tab to keep trying that IP address:
while true; do curl -m1 34.120.166.236; doneCreate a VM to test access to the load balancer
gcloud compute instances create gcelab2 --machine-type e2-medium --zone $MY_ZONE - In Navigation menu > Compute Engine, Click CREATE INSTANCE.
- Name the instance access-test and set the Region to australia-southeast1 (Sydney).
- Leave everything else at the default and click Create.
-
Once launched, click the SSH button to connect to the instance
TODO: Commands instead of GUI for above.
-
Access the load balancer:
curl -m1 35.244.71.166
The output should look like this:
<!doctype html><html><body><h1>Web server</h1>
<h2>This server is in zone: projects/921381138888/zones/us-central1-a</h2>
</body></html>
Create Blocklist security policy with Cloud Armor
To block access from access-test VM (a malicious client),
To identify the external IP address of a client trying to access your HTTP Load Balancer, you could examine traffic captured by VPC Flow Logs in BigQuery to determine a high volume of incoming requests.
- Go to Navigation menu > Compute engine and copy the External IP of the access-test VM.
- Go to Navigation menu > Network Security > Cloud Armor.
- Click Create policy.
- Provide a name of blocklist-access-test and set the Default rule action to Allow.
-
Click Next step. Click Add rule.
TODO: Commands instead of GUI for above.
-
Set the following Property values:
Condition/match: Enter the IP of the access-test VM
Action: Deny
Deny status: 404 (Not Found)
Priority: 1000
- Click Done.
- Click Next step.
-
Click Add Target.
For Type, select Load balancer backend service.
For Target, select web-backend.
- Click Done.
-
Click Create policy.
Alternatively, you could set the default rule to Deny and only allowlist traffic from authorized users/IP addresses.
-
Wait for the policy to be created before moving to the next step.
-
Verifying the security policy in Cloud Shell: Return to the SSH session of the access-test VM.
-
Run the curl command again on the instance to access the load balancer:
curl -m1 35.244.71.166
The response should be a 404. It might take a couple of minutes for the security policy to take affect.
View Cloud Armor logs
- In the Console, navigate to Navigation menu > Network Security > Cloud Armor.
- Click blocklist-access-test.
- Click Logs.
- Click View policy logs and go to the latest logs. By default, the GCE Backend Service logs are shown.
-
Select Cloud HTTP Load Balancer. Next, you will filter the view of the log to show only 404 errors.
- Remove the contents of the Query builder box and replace with 404 - and press Run Query to start the search for 404 errors.
-
Locate a log with a 404 and expand the log entry.
-
Expand httpRequest.
The request should be from the access-test VM IP address.
Google COMPUTE Cloud Services

| Considerations | Compute Engine | Kubernetes Engine | App Engine Standard | App Engine Flexible | Cloud Run | Cloud Functions |
|---|---|---|---|---|---|---|
| Service model: | Iaas | Hybrid | Paas | Stateless containers | Serverless Logic | |
| Users manage: | One container per VM | K8s yaml | No-ops | Managed | No-ops | |
| Language support: | Any | Any | Java, Node, Python, Go, PHP | +Ruby, .NET | Knative | |
| Primary use case: | General computing | Containers | Web & Mobile apps | Docker container | - | - |

NOTE: “Google Container Engine” is no longer a product?
Google’s Compute Engines
-
Compute Engine (GCE) is a managed environment for deploying virtual machines (VMs), providing full control of VMs for Linux and Windows Server. The API controls addresses, autoscalars, backend, disks, firewalls, global Forwarding, health, images, instances, projects, region, snapshots, ssl, subnetworks, targets, vpn, zone, etc.
-
Kubernetes Engine (GKE) is a managed environment for deploying containerized applications, for container clustering
-
Cloud Run is like AWS Fargate. It enables stateless containers, based on KNative. Being in a container means any language can be used, even COBOL, Haskell, Perl. Each container listens for requests or events. Charges are only when running, in 100ms granularity.
-
Google Cloud Functions (previously called Firebase, like Amazon Lambda) is a managed serverless platform for deploying event-driven functions. It runs single-purpose microservices written in JavaScript executed in Node.js when triggered by events. Good for stateless computation which reacts to external events.
Google Compute Engine (GCE)
GCE offers the most control but also the most work (operational overhead). Use GCE where you need to select the size of disks, memory, CPU types
- use GPUs (Graphic Processing Units)
- custom OS kernels
- specifically licensed software
- protocols beyond HTTP/S
- orchestration of multiple containers
Preemptible instances are cheaper but can be taken anytime, like Amazon’s.
Google provides load balancers, VPNs, firewalls.
GCE is called a IaaS (Infrastructure as a Service) offering of instances, NOT using Kubernetes automatically like GKC. Use it to migrate on-premise solutions to cloud.
References:
- https://cloud.google.com/compute/docs/?hl=en_US&_ga=2.131668815.-1771618146.1506638659
- https://stackoverflow.com/questions/tagged/google-compute-engine
Google builds its own server hardware. Custom machine types are configurable from their Machine types series:
- 3rd gen C3 powered by Intel Sapphire Rapids CPU platform
- 2nd gen E2, N2 Intel Cascade Lake and Ice Lake CPU platforms, N2D, T2A, T2D AMD
- 1st gen N1 Intel Skylake CPU platform
Latency and throughput between regions over time was measured using the Perfkit Benchmarker Google built and maintains to measure and compare cloud offerings.
GCE SonarQube
There are several ways to instantiate a Sonar server.
GCE SonarQube BitNami
One alternative is to use Bitnami
- Browser at https://google.bitnami.com/vms/new?image_id=4FUcoGA
- Click Account for https://google.bitnami.com/services
- Add Project
- Setup a BitName Vault password.
- PROTIP: Use 1Password to generate a strong password and store it.
-
Agree to really open sharing with Bitnami:
- View and manage your Google Compute Engine resourcesMore info
- View and manage your data across Google Cloud Platform servicesMore info
- Manage your data in Google Cloud StorageMore info
CAUTION: This may be over-sharing for some.
- Click “Select an existing Project…” to select one in the list that appears. Continue.
- Click “Enable Deployment Manager (DM) API” to open another browser tab at https://console.developers.google.com/project/attiopinfosys/apiui/apiview/deploymentmanager
- If the blue “DISABLE” appears, then it’s enabled.
- Return to the Bitnami tab to click “CONTINUE”.
-
Click BROWSE for the Library at https://google.bitnami.com/
The above is done one time to setup your account.
- Type “SonarQube” in the search field and click SEARCH.
- Click on the icon that appears to LAUNCH.
- Click on the name to change it.
- NOTE “Debian 8” as the OS cannot be changed.
- Click “SHOW” to get the password into your Clipboard. wNTzYLkM1sGX
-
Wait for the orange “REBOOT / SHUTDOWN / DELETE” to appear at the bottom of the screen.
Look:
- Click “LAUNCH SSH CONSOLE”.
- Click to confirm the SSH pop-up.
-
Type
lsb_release -afor information about the operating system:No LSB modules are available. Distributor ID: Debian Description: Debian GNU/Linux 8.9 (jessie) Release: 8.9 Codename: jessie
PROTIP: This is not the very latest operating system version because it takes time to integrate.
- Type
pwdto note the user name (carried in from Google). -
Type
ls -alfor information about files:apps -> /opt/bitnami/apps .bash_logout .bashrc .first_login_bitnami htdocs -> /opt/bitnami/apache2/htdocs .profile .ssh stack -> /opt/bitnami
- Type
exitto switch back to the browser tab. -
Click the blue IP address (such as 35.202.3.232) for a SonarQube tab to appear.
- Type “Admin” for user. Click the Password field and press Ctrl+V to paste from Clipboard.
-
Click “Log in” for the Welcome screen.
TODO: Assign other users.
-
TODO: Associate the IP with a host name.
SonarQube app admin log in
-
At SonarQube server landing page (such as http://23.236.48.147)
You may need to add it as a security exception. VMxatH6wcr2g
-
Type a name of your choosing, then click Generate.
- Click the language (JS).
- Click the OS (Linux, Windows, Mac).
-
Highlight the sonar-scanner command to copy into your Clipboard.
-
Click Download for https://docs.sonarqube.org/display/SCAN/Analyzing+with+SonarQube+Scanner

On a Windows machine:
sonar-scanner-cli-3.0.3.778-windows.zip | 63.1 MBOn a Mac:
sonar-scanner-cli-3.0.3.778-macosx.zip | 53.9 MB -
Generate the token:

-
Click Finish to see the server page such as at http://35.202.3.232/projects
Do a scan
-
On your Mac, unzip to folder “sonar-scanner-3.0.3.778-macosx”.
Notice it has its own Java version in the jre folder.
- Open a Terminal and navigate to the bin folder containing
sonar-scanner. - Move it to a folder in your PATH.
-
Create or edit shell script file from the Bitnami screen:
./sonar-scanner \
  -Dsonar.projectKey=sonarqube-1-vm \
  -Dsonar.sources=. \
  -Dsonar.host.url=http://23.236.48.147 \
  -Dsonar.login=b0b030cd2d2cbcc664f7c708d3f136340fc4c064
NOTE: Your login token will be different from this example.
https://github.com/wilsonmar/git-utilities/…/sonar1.sh
-
Replace the . with the folder path such as
-Dsonar.sources=/Users/johndoe/gits/ng/angular4-docker-exampleDo this instead of editing
/conf/sonar-scanner.propertiesto change defaulthttp://localhost:9000 - chmod 555 sonar.sh
-
Run the sonar script.
- Wait for the downloading.
-
Look for a line such as:
INFO: ANALYSIS SUCCESSFUL, you can browse http://35.202.3.232/dashboard/index/Angular-35.202.3.232
-
Copy the URL and paste it in a browser.
- PROTIP: The example has no Version, Tags, etc. that a “production” environment would use.
GCE SonarQube
-
In the GCP web console, navigate to the screen where you can create an instance.
https://console.cloud.google.com/compute/instances
- Click Create (a new instance).
- Change the instance name from
instance-1tosonarqube-1(numbered in case you’ll have more than one). - Set the zone to your closest geographical location (
us-west1-a). - Set machine type to
f1-micro. -
Click Boot Disk to select
Ubuntu 16.04 LTSinstead of defaultDebian GNU/Linux 9 (stretch).PROTIP: GCE does not provide the lighter http://alpinelinux.org/
-
Type a larger Size (GB) than the default 10 GB.
WARNING: You have selected a disk size of under [200GB]. This may result in poor I/O performance. For more information, see: https://developers.google.com/compute/docs/disks#performance.
-
Set Firewall rules to allow Ingree and Egress through external access to ports:
9000:9000 -p 9092:9092 sonarqube
- Allow HTTP & HTPPS traffic.
- Click “Management, disks, networking, SSH keys”.
-
In the Startup script field, paste script you’ve tested interactively:
# Install Docker:
curl -fsSL https://get.docker.com/ | sh
sudo docker pull sonarqube
sudo docker run -d --name sonarqube -p 9000:9000 -p 9092:9092 sonarqube
- Click “command line” link for a pop-up of the equivalent command.
-
Copy and paste it in a text editor to save the command for troubleshooting later.
-
Click Create the instance. This cold-boot takes time:
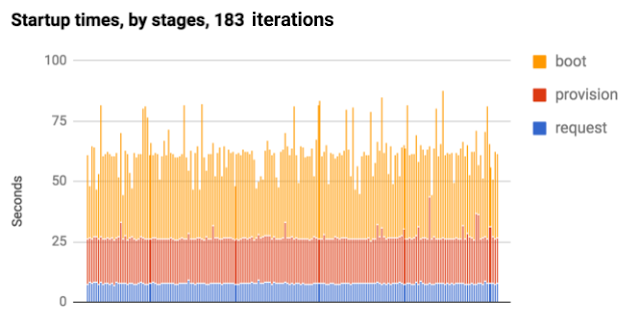
Boot time to execute startup scripts is the variation cold-boot performance.
- Click SSH to SSH into instance via the web console, using your Google credentials.
- In the new window,
pwdto see your account home folder. -
To see instance console history:
cat /var/log/syslogManual startup setup
https://cloud.google.com/solutions/mysql-remote-access
-
If there is a UI, highlight and copy the external IP address (such as https://35.203.158.223/) and switch to a browser to paste on a browser Address.
-
Add the port number to the address.
BLAH TODO: Port for UI?
TODO: Take a VM snapshot.
https://cloud.google.com/solutions/prep-container-engine-for-prod
Down the instance
- When done, close SSH windows.
- If you gave out and IP address, notify recipients about their imminent deletion.
-
In the Google Console, click on the three dots to delete the instance.
Colt McAnlis (@duhroach), Developer Advocate explains Google Cloud performance (enthusiastically) at https://goo.gl/RGsQlF
https://www.youtube.com/watch?v=ewHxl9A0VuI&index=2&list=PLIivdWyY5sqK5zce0-fd1Vam7oPY-s_8X
Windows
https://github.com/MicrosoftDocs/Virtualization-Documentation
On Windows, output from Start-up scripts are at C:\Program Files\Google\Compute Engine\sysprep\startup_script.ps1
GKE (Google Kubernetes Engine)

export MY_ZONE="us-east5-b"
time gcloud container clusters create webfrontend --zone $MY_ZONE --num-nodes 2
RESPONSE:
Default change: VPC-native is the default mode during cluster creation for versions greater than 1.21.0-gke.1500. To create advanced routes based clusters, please pass the `--no-enable-ip-alias` flag
Default change: During creation of nodepools or autoscaling configuration changes for cluster versions greater than 1.24.1-gke.800 a default location policy is applied. For Spot and PVM it defaults to ANY, and for all other VM kinds a BALANCED policy is used. To change the default values use the `--location-policy` flag.
Note: Your Pod address range (`--cluster-ipv4-cidr`) can accommodate at most 1008 node(s).
Creating cluster webfrontend in us-east5-b... Cluster is being deployed...working..
Created [https://container.googleapis.com/v1/projects/qwiklabs-gcp-04-8314ea0579bc/zones/us-east5-b/clusters/webfrontend].
To inspect the contents of your cluster, go to: https://console.cloud.google.com/kubernetes/workload_/gcloud/us-east5-b/webfrontend?project=qwiklabs-gcp-04-8314ea0579bc
kubeconfig entry generated for webfrontend.
NAME: webfrontend
LOCATION: us-east5-b
MASTER_VERSION: 1.26.5-gke.1200
MASTER_IP: 34.162.127.133
MACHINE_TYPE: e2-medium
NODE_VERSION: 1.26.5-gke.1200
NUM_NODES: 2
STATUS: RUNNING
kubectl version --short
kubectl create deploy nginx --image=nginx:1.17.10
kubectl get pods
Response:
NAME                    READY   STATUS    RESTARTS   AGE
nginx-9f47647b9-mqs69   1/1     Running   0          23s
# Expose the nginx container to the Internet:
kubectl expose deployment nginx --port 80 --type LoadBalancer
kubectl get services
Response:
NAME TYPE CLUSTER-IP EXTERNAL-IP PORT(S) AGE kubernetes ClusterIP 10.112.0.1443/TCP 5m36s nginx LoadBalancer 10.112.4.180 80:30757/TCP 20s </pre> # Scale up the number of pods running on your service: kubectl scale deployment nginx --replicas 3 kubectl get pods kubectl get servicesdeployment.apps/nginx scaled NAME READY STATUS RESTARTS AGE nginx-9f47647b9-26wkk 1/1 Running 0 2m22s nginx-9f47647b9-cr5sz 1/1 Running 0 2m22s nginx-9f47647b9-mqs69 1/1 Running 0 3m37s NAME TYPE CLUSTER-IP EXTERNAL-IP PORT(S) AGE kubernetes ClusterIP 10.112.0.1443/TCP 8m12s nginx LoadBalancer 10.112.4.180 34.162.192.22 80:30757/TCP 2m56s </pre> Kubernetes is Google's container orchestration manager, providing compute services using Google Compute Engine (GCE). VIDEO: CDL on Kubernetes. ### GKE using Terraform VIDEO: CDL on Kubernetes. Houssem Dellai has a whole set of resources for setting up Kubernetes using Terraform on GCP: * https://github.com/HoussemDellai/docker-kubernetes-course * https://www.youtube.com/watch?v=mwToMPpDHfg&list=PLpbcUe4chE79sB7Jg7B4z3HytqUUEwcNE&index=4
1. Go to the GKE Console: https://console.cloud.google.com/kubernetes A project is automatically selected. The "Kubernetes Engine API "Builds and manages container-based applications, powered by the open source Kubernetes technology." Packaging apps in containers as "microservices" make them modular for scaling independently across a cluster of host nodes. 2. Click "Documentation" for https://cloud.google.com/kubernetes-engine 3. Click "CONSOLE" to return. 4. Click "ENABLE". It takes a few minutes. ### Create GKE Cluster of Containers NOTE: Normally, use Terraform. Containers use a shared base operating system stored in a shared kernel layer. 1. Click "Create Cluster". Alternately, In CLI, create a new cluster defined in variable $KPROJ1.export KPROJ1="k1" gcloud container clusters create $KPROJ11. Verify:kubectl version1. Note the default is Container-Optimized OS (based on Chromium OS) and 3 minion nodes in the cluster, which does not include the master. Workload capacity is defined by the number of Compute Engine worker nodes. The cluster of nodes are controlled by a K8S master. 1. Define MY_ZONE:kubectl version1. PROTIP: Attach a permanent disk for persistence. 1. Click Create. Wait for the green checkmark to appear.export K8S_CLUSTER1="webrontend" gcloud container clusters create webfrontend --zone $MY_ZONE --num-nodes 2Default change: VPC-native is the default mode during cluster creation for versions greater than 1.21.0-gke.1500. To create advanced routes based clusters, please pass the `--no-enable-ip-alias` flag Default change: During creation of nodepools or autoscaling configuration changes for cluster versions greater than 1.24.1-gke.800 a default location policy is applied. For Spot and PVM it defaults to ANY, and for all other VM kinds a BALANCED policy is used. To change the default values use the `--location-policy` flag. Note: Your Pod address range (`--cluster-ipv4-cidr`) can accommodate at most 1008 node(s). Creating cluster webfrontend in us-east1-c... Cluster is being health-checked (master is healthy)...done. Created [https://container.googleapis.com/v1/projects/qwiklabs-gcp-01-3df0cb44ee5d/zones/us-east1-c/clusters/webfrontend]. To inspect the contents of your cluster, go to: https://console.cloud.google.com/kubernetes/workload_/gcloud/us-east1-c/webfrontend?project=qwiklabs-gcp-01-3df0cb44ee5d kubeconfig entry generated for webfrontend. NAME: webfrontend LOCATION: us-east1-c MASTER_VERSION: 1.25.8-gke.500 MASTER_IP: 104.196.198.207 MACHINE_TYPE: e2-medium NODE_VERSION: 1.25.8-gke.500 NUM_NODES: 2 STATUS: RUNNING1. On the Navigation menu (Navigation menu icon), click Compute Engine > VM Instances. 1. Launch an instance of the nginx web server in a containerkubectl create deploy nginx --image=nginx:1.17.101. Connect to the cluster. Click the cluster name to click CONNECT to Connect using Cloud Shell the CLI.kubectl get pods1. Create a cluster called "bootcamp":gcloud container clusters create bootcamp --scopes "https://www.googleapis.com/auth/projecthosting,storage-rw"gcloud container clusters get-credentials cluster-1 \ --zone us-central1-f \ --project ${DEVSHELL_PROJECT_ID}The response:Fetching cluster endpoint and auth data. kubeconfig entry generated for cluster-1.1. Invoke the command:kubectl get nodesIf the get the following message:The connection to the server localhost:8080 was refused - did you specify the right host or port?Sample valid response:NAME STATUS ROLES AGE VERSION gke-cluster-1-default-pool-8a05cb05-701j Ready <none> 11m v1.7.8-gke.0 gke-cluster-1-default-pool-8a05cb05-k4l3 Ready <none> 11m v1.7.8-gke.0 gke-cluster-1-default-pool-8a05cb05-w4fm Ready <none> 11m v1.7.8-gke.01. List and expand the width of the screen:gcloud container clusters listSample response:NAME ZONE MASTER_VERSION MASTER_IP MACHINE_TYPE NODE_VERSION NUM_NODES STATUS cluster-1 us-central1-f 1.7.8-gke.0 162.222.177.56 n1-standard-1 1.7.8-gke.0 3 RUNNINGIf no clusters were created, no response is returned. 1. Highlight the Endpoint IP address, copy, and paste to construct a browser URL such as: https://162.222.177.56/ui BLAH: User "system:anonymous" cannot get path "/".: "No policy matched.\nUnknown user \"system:anonymous\"" 1. Expose the nginx container to the internet: kubectl expose deployment nginx --port 80 --type LoadBalancer 1. View the new service: kubectl get servicesNAME TYPE CLUSTER-IP EXTERNAL-IP PORT(S) AGE kubernetes ClusterIP 10.64.0.1443/TCP 5m16s nginx LoadBalancer 10.64.10.49 34.75.114.177 80:30614/TCP 40s </pre> 1. Scale up: kubectl scale deployment nginx --replicas 3 kubectl get pods 1. In the Console, click Show Credentials. 1. Highlight and copy the password. 1. Start kubectl proxyThe response:Starting to serve on 127.0.0.1:8001WARNING: You are no longer able to issue commands while the proxy runs.
0. Create new pod named "hello-node":kubectl run hello-node \ --image=gcr.io/${DEVSHELL_PROJECT_ID}/hello-node:v1 \ --port=8080Sample response:deployment "hello-node" created0. View the pod just created:kubectl get podsSample response:NAME READY STATUS RESTARTS AGE hello-node-714049816-ztzrb 1/1 Running 0 6m0. Listkubectl get deploymentsSample response:NAME DESIRED CURRENT UP-TO-DATE AVAILABLE AGE hello-node 1 1 1 1 2m0. Troubleshoot: kubectl get events kubectl get services 0. Get logs: kubectl logs pod-name 0. Other commands: kubectl cluster-info kubectl config view ### Kubernetes Dashboard Kubernetes graphical dashboard (optional) 0. Configure access to the Kubernetes cluster dashboard:gcloud container clusters get-credentials hello-world \ --zone us-central1-f --project ${DEVSHELL_PROJECT_ID}Sample response:kubectl proxy --port 80860. Use the Cloud Shell Web preview feature to view a URL such as: https://8081-dot-3103388-dot-devshell.appspot.com/ui 0. Click the "Connect" button for the cluster to monitor. See http://kubernetes.io/docs/user-guide/ui/ References: * https://cloud.google.com/kubernetes-engine/docs/reference/rest/
## Anthos for multi-cloud via Kubernetes Anthos provides a single control plane for running Kubernetes Istio and GKE installed anywhere -- in private on-prem data center hardware, AWS, etc.Anthos clusters extend GKE for use on Google Cloud, on-prem, or multicloud. A Policy Repository stores policies. Anthos is also offered in Cloud Marketplace. References: * https://cloud.google.com/anthos/multicluster-management/reference/rest/ * A friendly introduction
### GCP APIs 1. Begin in "APIs & Services" because Services provide a single point of access (load balancer IP address and port) to specific pods. 0. Click ENABLE... 0. Search for Container Engine API and click it. 0. In the gshell: `gcloud compute zones list` #### Create container cluster 0. Select Zone 0. Set "Size" (vCPUs) from 3 to 2 -- the number of nodes in the cluster. Nodes are the primary resource that runs services on Google Container Engine. 0. Click More to expand. 0. Add a Label (up 60 64 per resource): Examples: env:prod/test, owner:, contact:, team:marketing, component:backend, state:inuse. The size of boot disk, memory, and storage requirements can be adjusted later. 0. Instead of clicking "Create", click the "command" link for the equivalent the gcloud CLI commands in the pop-up.gcloud beta container --project "mindful-marking-178415" clusters create "cluster-1" --zone "us-central1-a" --username="admin" --cluster-version "1.7.5-gke.1" --machine-type "n1-standard-1" --image-type "COS" --disk-size "100" --scopes "https://www.googleapis.com/auth/compute","https://www.googleapis.com/auth/devstorage.read_only","https://www.googleapis.com/auth/logging.write","https://www.googleapis.com/auth/monitoring.write","https://www.googleapis.com/auth/servicecontrol","https://www.googleapis.com/auth/service.management.readonly","https://www.googleapis.com/auth/trace.append" --num-nodes "2" --network "default" --no-enable-cloud-logging --no-enable-cloud-monitoring --subnetwork "default" --enable-legacy-authorizationPROTIP: Machine-types are listed and described at https://cloud.google.com/compute/docs/machine-types Alternately,gcloud container clusters create bookshelf \ --scopes "https://www.googleapis.com/auth/userinfo.email","cloud-platform" \ --num-nodes 2The response sample (widen window to see it all):Creating cluster cluster-1...done. Created [https://container.googleapis.com/v1/projects/mindful-marking-178415/zones/us-central1-a/clusters/cluster-1]. kubeconfig entry generated for cluster-1. NAME ZONE MASTER_VERSION MASTER_IP MACHINE_TYPE NODE_VERSION NUM_NODES STATUS cluster-1 us-central1-a 1.7.5-gke.1 35.184.10.233 n1-standard-1 1.7.5 2 RUNNING0. Push gcloud docker -- push gcr.io/$DEVSHELL_PROJECT_ID/bookshelf 0. Configure entry credentials gcloud container clusters get-credentials bookshelf 0. Use the kubectl command line tool. kubectl create -f bookshelf-frontend.yaml 0. Check status of pods kubectl get pods 0. Retrieve IP address: kubectl get services bookshelf-frontend #### Destroy cluster It may seem a bit premature at this point, but since Google charges by the minute, it's better you know how to do this earlier than later. Return to this later if you don't want to continue. 0. Using the key information from the previous command: gcloud container clusters delete cluster-1 --zone us-central1-a 2). View cloned source code for changes 0. Use a text editor (vim or nano) to define a .yml file to define what is in pods. 0. Build Docker docker build -t gcr.io/${DEVSHELL_PROJECT_ID}/hello-node:v1 . Sample response:v1: digest: sha256:6d7be8013acc422779d3de762e8094a3a2fb9db51adae4b8f34042939af259d8 size: 2002 ... Successfully tagged gcr.io/cicd-182518/hello-node:v10. Run:docker run -d -p 8080:8080 gcr.io/${DEVSHELL_PROJECT_ID}/hello-node:v1No news is good news in the response. 0. Web Preview on port 8080 specified above. 0. List Docker containers images built:docker psCONTAINER ID IMAGE COMMAND CREATED STATUS PORTS NAMES c938f3b42443 gcr.io/cicd-182518/hello-node:v1 "/bin/sh -c 'node ..." About a minute ago Up About a minute 0.0.0.0:8080->8080/tcp cocky_kilby0. Stop the container by using the ID provided in the results above:docker stop c938f3b42443The response is the CONTAINER_ID. https://cloud.google.com/sdk/docs/scripting-gcloud 0. Run the image:docker run -d -p 8080:8080 gcr.io/${DEVSHELL_PROJECT_ID}/hello-node:v1The response is a hash of the instance. 0. Push the image to grc.io repository:gcloud docker -- push gcr.io/${DEVSHELL_PROJECT_ID}/hello-node:v1v1: digest: sha256:98b5c4746feb7ea1c5deec44e6e61dfbaf553dab9e5df87480a6598730c6f973 size: 10025
gcloud config set container/cluster ...3). Cloud Shell instance - Remove code placeholds 4). Cloud Shell instance - package app into a Docker container 5). Cloud Shell instance - Upload the image to Container Registry 6). Deploy app to cluster See https://codelabs.developers.google.com/codelabs/cp100-container-engine/#0 Coursera
## Google App Engine (GAE) GAE is a managed platform for Google to deploy and host full app code at scale. Similar to Amanzon Beanstalk, GAE runs full Go, PHP, Java, Python, Node.js, .NET C#, Ruby, etc. coded with login forms and authentication logic. GAE Standard runs in a proprietary sandbox which starts faster than GAE Flexible running in Docker containers. Being proprietary, GAE Standard cannot access Compute Engine resources nor allow 3rd-party binaries. GAE Standard is good GAE is a "serverless" PaaS (Platform as a Service) platform where Google manages Docker containers containing web application that responds to HTTP requests (Jetty 8, Servlet 3.1, .Net Core, NodeJs, etc.). LANGUAGES: Develop server-side code in Java, Python, Go, PHP, NodeJs, .NET, Ruby. Google provides app versioning - split traffic between different application versions to perform A/B testing. CAUTION: Google requires use of their "Cloud Source Repositories" instead of GitHub for use with App Engine. It's undesirable to be locked into Google, which has been ruthless in cancelling services with short notice. So be ready to port your GAE app to another CSP quickly. Scaling can be basic (shut downs an instance automatically when idle), manual (specify a number continuously running), or automatic (instances created automatically based on request rate, response latencies, or other application metrics specified). * https://isdown.app/integrations/google-cloud/google-app-engine
Google Cloud Endpoints also provide HA, DoS protection, TLS 1.2 SSL certs for HTTPS. There are different costs for "Standard" and "Flexible Enviornment". Apps running in flexible VMs are deployed to virtual machine type selected, billed on a per-second basis with a 1-minute minimum usage cost. Only the Standard plan has free quotas where charges do not apply until: * 500MB persistent storage * 5 million monthly page views * 26 GB of traffic each month
Built-in services and APIs: * NoSQL datastores * Memcache * Load balancing * Health checks * Application logging * User Authentication API * Detect vulnerabilities in code * Scaling the app * Content Delivery Networks (CDNs) * SSH in Flexible enviornment with ephemeral disk
App Engine apps can access numerous additional Cloud or other Google services for use in their applications: * NoSQL database: Cloud Datastore, Cloud Firestore, Cloud BigTable * Relational database: Cloud SQL (GCS) or Cloud AlloyDB, Cloud Spanner * File/object storage: Cloud Storage, Cloud Filestore, Google Drive * Caching: Cloud Memorystore (Redis ormemcached)</li> * Task execution: Cloud Tasks, Cloud Pub/Sub, Cloud Scheduler, Cloud Workflows * User authentication: Cloud Identity Platform, Firebase Auth, Google Identity Services
### Google's Hello World app for App Engine 1. Specify your project. 2. Enable Google App Engine Admin API. Instead of GUI Navigation menu, click APIs & Services > Library to search "App Engine Admin API" https://console.cloud.google.com/apis/library/browse?q=app%20engine%20admin%20api 3. Click Enable or Manage. 4. Navigate to a folder and clone:git clone https://github.com/GoogleCloudPlatform/python-docs-samples.git --depth 1 cd python-docs-samples/appengine/standard_python3/hello_world ls5. Test run: TODO: There is no dev_appserver.py in the folder! https://www.linkedin.com/in/olivi-eh/ https://github.com/GoogleCloudPlatform/python-docs-samples/tree/main/appengine/standard_python3/hello_world dev_appserver.py app.yaml ### Cloud Run Tutorials: * Learn: Pathways * Codelab: Connecting to Fully Managed Databases from Cloud Run integrate serverless databases(Spanner and Firestore) with applications(Go and Node.js) running in Cloud Run. * Hello Cloud Run Qwiklab * Codelab: Build a Slack bot with Node.js on Cloud Run
Build a stateless HTTP container suitable for Cloud Run from code source and pushing it to Container Registry: * Developing Cloud Run services * Building Containers
* https://www.youtube.com/watch?v=70JiiTxezoY * Knative serverless automates scaling and revisions within Kubernetes. Universal subscription, delivery and management of events. Build modern apps by attaching compute to a data stream with declarative event connectivity and object models. Serving (Service, Revision, Route) work together with Eventing Sources, Brokers, Triggers.
About app development process: * https://users.ece.utexas.edu/~meberlein/ee461L/Tutorials/AppEngineTutorial.html * https://buildfire.com/how-to-create-a-mobile-app/ References: * https://cloud.google.com/appengine/docs * https://codelabs.developers.google.com/codelabs/cloud-app-engine-python3#0 using Python Django accessing BigTable using SQL. * https://code.google.com/archive/p/google-app-engine-samples/ * https://cloud.google.com/appengine/docs/admin-api/reference/rest/ * Customizable 3rd party binaries are supported with SSH access on GAE Flexible environment which also enables write to local disk. * https://stackoverflow.com/questions/tagged/google-app-engine * https://cloud.google.com/appengine/ * https://help.zscaler.com/zcspm/gcp-organization-onboarding-prerequisites-scripts Python: https://www.cloudskillsboost.google/focuses/1014?locale=en&parent=catalog * https://martinheinz.dev/blog/84 "Getting Started with Google APIs in Python" ## Google Cloud Functions Single-purpose lightweight single-purpose functions are executed asynchrounously in NodeJs when triggered by events occuring, such as a file upload. Functions can be coded in JavaScript (Node), Python, Go, Java, .Net Core, Ruby, PHP. But instead of managing a server or runtime enviornment, Google provides a "Serverless" environment for building and connecting cloud services on a web browser. Cloud Functions eliminates the need to use a separate service to trigger application events. Functions are billed to the nearest 100 milliseconds while running. Tutorials: * https://levelup.gitconnected.com/serverless-python-bot-using-google-cloud-platform-ee724f4a6b1f * HANDS-ON: Cloud Function to Automate CSV data import into Google Sheets * https://h-p.medium.com/google-cloud-csv-to-google-sheets-740243e04f3a * https://stackoverflow.com/questions/58802824/read-a-csv-from-google-cloud-storage-using-google-cloud-functions-in-python-scri ## Google Firebase API Handles HTTP requests on client-side mobile devices. Realtime database, crashlytics, perf. mgmt., messaging. https://medium.com/swlh/manage-serverless-apis-with-api-gateway-in-gcp-b7f906efec1a
## Google Data Storage Google Cloud’s core storage products: * Cloud Storage - stores versioned immutable binary accessed by URLs (such as images website content) * Cloud Bigtable * Cloud SQL (GCS) provides a cloud relational databases PostgreSQL, MySQL, MS SQL Server. * Cloud Spanner * Firestore provides a RESTful interface for NoSQL ACID transactions (by mobile devices)
Click to pop-up image
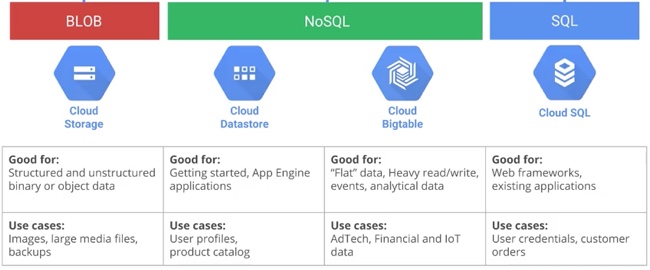
References: * HANDS-ON: Google Cloud Fundamentals: Getting Started with Cloud Storage and Cloud SQL * https://cloud.google.com/storage/docs/json_api/v1/ ## Google SQL Cloud Spanner Cloud Spanner is a distributed SQL database management and storage service developed by Google. It provides features such as global transactions, strongly consistent reads, and automatic multi-site replication and failover. Spanner is used in Google F1, the database for its advertising business (AdWords, GooglePlay). Technically, Cloud Spanner is a "globally distributed, ACID-compliant database that automatically handles replicas, sharding, transaction processing, and scaling." Spanner is Google's proprietary relational SQL database (like AWS Aurora DB) with strong transactionary consistency and seamless scaling up, spanning Petabytes across regions (globally). https://wilsonmar.github.io/graph-databases To access a bucket or object, a user only needs the relevant permission from EITHER IAM or ACLs. ### ACLs ACLs (Access Control Lists) controls access to individual buckets or objects within a bucket. Up to 100 ACLs can be set on a bucket or object. ACLs cannot be set on the overall project or other parent resources. When the entry scope is a group or domain, it counts as one ACL entry regardless of how many users are in the group or domain. A 403 Forbidden error is returned if the ACL does not grant permission for the requested operation. References: * Course: Cloud Spanner with Terraform on GCP * https://cloud.google.com/spanner/docs/reference/rest/ * https://firebase.google.com/docs/reference/rest/storage/rest/ * In the Google Cloud Tech YouTube channel, "Cloud Spanner: Database deep dive" by Derek Downey * Performance considerations → https://goo.gle/3P3PXIb * Cloud Spanner optimizer → https://goo.gle/3w1IUXu * Customer Managed Encryption Keys (CMEK) => https://goo.gle/3vz9ecu * Encrypt Cloud Functions using Customer-managed Encryption Keys (CMEK) * Global consistency at scale by Robert Kubis
Cloud Storage Firestore ( Datastore)Bigtable Cloud SQL (1stGen) Competitors: AWS S3, Azure Blob Storage - AWS DynamoDB, Azure Cosmos DB AWS RDS, Azure SQL Storage type BLOB store buckets NoSQL, document NoSQL wide column Relational SQL Use cases: Images, movies, backup zips User profiles, product catalog AdTech, Financial & IoT time series User credentials, customer orders Good for: Immutable structured and unstructured binary or object blobs > 10 MB Getting started, App Engine apps "Flat" data, heavy read/write, events, analytical data Web frameworks, existing apps Overall capacity Petabytes+ Terabytes+ Petabytes+ Up to 500 GB Unit size 5 TB/
object1 MB/
entity10 MB/
1 MB/entity10 MB p/cell 100 MB p/row up to 64 TB Transactions: No Yes No (OLAP) Yes Complex queries: No No on and offline Yes Tech: - - Proprietary Google - Scaling: - "Massive" Serverless autoscaling Instances
## Databases Google's AlloyDB adds AI features on top of PostgreSQL to make it run "100x faster" Google's Memorystore leverages Redis and MemcaheD for caching of sessions.gcloud sql instances patch mysql \ --authorized-networks "203.0.113.20/32"### Data Migration VIDEO * Database Migration Service (DMS) of open-source relational databases * BigQuery Data Transfer Service for import into BigQuery * Migrate for Compute Engine VMs & Anthos containers in GKE * Cloud Storage Transfer Service from AWS S3 * Transfer Appliance to ship 100 TB or 480 TB at a time using rackable NFS storage ### Google Cloud SQL (GCS) Google's Cloud SQL (https://cloud.google.com/sql) provides regional-scale apps with managed relational structured databases (MySQL, PostgreSQL, Microsoft SQL Server). Cloud SQL provides ACID support for cloud-based transactions interacting with traditional relational databases. Cloud SQL can store up to 30TB of storage on up to 64 processor cores and 400 GB RAM. A network firewall is included at no charge (which AWS users pay for). Cloud SQL includes up to 7 managed backups. Google provides automatic replicas for replication and patching. Google encrypts data when on Google's internal network and when stored in database tables, temporary files, and backups. For free when AWS users pay premium encryption. Workbench, Toad (from Quest), and other standard SQL apps can be used to administser Cloud SQL databases: * https://stackoverflow.com/questions/tagged/google-cloud-sql
Google App Engine accesses Cloud SQL databases using drivers Connector/J for Java and MySQLdb for Python. * git clone https://github.com/GoogleCloudPlatform/appengine-gcs-client.git * https://cloud.google.com/appengine/docs/python/googlecloudstorageclient/using-cloud-storage
### Google Cloud Storage (GCS) Buckets Standard storage for highest durability, availability, and performance with low latency, for web content distribution and video streaming. * (Standard) multi-regional to accessing media around the world. * (Standard) Regional to store data and run data analytics in a single part of the world. * Nearline strage for low-cost but durable data archiving, online backup, disaster recovery of data rarely accessed. * Coldline storage = DRA (Durable Reduced Availability Storage) at a lower cost for once per year access.
In gcloud on a project (scale to any data size, cheap, but no support for ACID properties): 0. Create a bucket in location ASIA, EU, or US, in this CLI example (instead of web console GUI): gsutil mb -l US gs://$DEVSHELL_PROJECT_ID 0. Grant Default ACL (Access Control List) to All users in Cloud Storage: gsutil defacl ch -u AllUsers:R gs://$DEVSHELL_PROJECT_ID The response:Updated default ACL on gs://cp100-1094/The above is a terrible example because ACLs are meant to control access for individual objects with sensitive info. https://stackoverflow.com/questions/tagged/google-cloud-storage ### Google Cloud Firestore Firestore deprecates DataStore. Firestore is a NoSQL (document) online database which charges for individual read, write, and deletes. Documents can be organized into collections. ACL: * 20,000 free Writes per day (with index and device replication sync across regions by default) * 20,000 free Deletes per day * 50,000 free Reads per day * Listen * Query can include multiple chained filters but charged for one read Atomic batch operations * First 1GB of data stored is free * First 10 GiB of egress per month is free between US regions. ### Google Spanner Firestore deprecates DataStore. ## CSEK Each chunk is distributed across Google's storage infra. All chunks (sub-files) within an object are encrypted at rest with their own unique Data Encryption Key (DEK). DEKs are wrapped by KEKs (Key Encryption Keys) stored in KMS. With Google-manged keys: The standard key rotation period is 90 days, storing 20 versions. Re-encryption after 5 years. Customer-managed keys: Keys are in a key ring. Customer-supplied keys are stored outside of GCP. LAB: Create an encryption key and wrap it with the Google Compute Engine RSA public key certificate 1. create a 256 bit (32 byte) random number to use as a key: openssl rand 32 > mykey.txt more mykey.txt Result: Qe7>hk=c} 1. Download the GCE RSA public cert: curl \ https://cloud-certs.storage.googleapis.com/google-cloud-csek-ingress.pem \ > gce-cert.pem Use a RSA public key to encrypt your data. After that data has been encrypted with the public key, it can only be decrypted by the respective private key. In this case, the private key is known only to Google Cloud Platform services. Wrapping your key using the RSA certificate ensures only Google Cloud Platform services can unwrap your key and use it to protect your data. 1. Extract the public key from the certificate:openssl x509 -pubkey -noout -in gce-cert.pem > pubkey.pem</[re> 1. RSA-wrap your key:openssl rsautl -oaep -encrypt -pubin -inkey pubkey.pem -in \ mykey.txt -out rsawrappedkey.txt1. Encode in base64 in base64:openssl enc -base64 -in rsawrappedkey.txt | tr -d '\n' | sed -e \ '$a\' > rsawrapencodedkey.txt1. View your encoded, wrapped key to verify it was created:cat rsawrapencodedkey.txt1. To avoid introducing newlines, use code editor to copy the contents rsawrapencodedkey.txtMBMCbcFk ... h4eiqQ==1. PROTIP: Click the "X" at the right to exit the Editor. ### Encrypt a new persistent disk with your own key 1. In the browser tab showing the GCP console, select Navigation menu > Compute Engine > Disks. Click the Create disk button. ### Attach the disk to a compute engine instance 1. In the browser tab showing the GCP console, select Navigation menu > Compute Engine > VM Instances. Click the Create button. Name the instance csek-demo and verify the region is us-central1 and the zone is us-central1-a. 1. Scroll down and expand Management, security disks, networking, sole tenancy. Click on Disks and under Additional disks, click Attach existing disk. For the Disk property, select the encrypted-disk-1. Paste the value of your wrapped, encoded key into the Enter Key field, and check the Wrapped key checkbox. (You should still have this value in your clipboard). Leave the Mode as Read/write and Deletion rule as keep disk. 1. Click the Create button to launch the new VM. The VM will be launched and have 2 disks attached. The boot disk and the encrypted disk. The encrypted disk still needs to be formatted and mounted to the instance operating system. Important. Notice the encryption key was needed to mount the disk to an instance. Google does not store your keys on its servers and cannot access your protected data unless you provide the key. This also means that if you forget or lose your key there is no way for Google to recover the key or to recover any data encrypted with the lost key. 1. Once the instance has been booted, click the SSH button to connect to the instance. 1. Issue the following commands on the instance to format and mount the encrypted volume:sudo mkfs.ext4 /dev/disk/by-id/google-encrypted-disk-1 mkdir encrypted sudo mount /dev/disk/by-id/google-encrypted-disk-1 encrypted/The disk is now mounted as the encrypted folder and can be used like any other disk. ### Create a snapshot from an encrypted disk 1. In the GCP console, select Navigation menu > Compute Engine > Snapshots. Click the Create snapshot button. Provide a name of encrypted-disk-1-snap1. For the Source disk, select the encrypted-disk-1. For the encryption key, paste in the wrapped, encoded key value you created earlier. Check the Wrapped key checkbox. Notice that the snapshot can be encrypted with a different key than the actual disk. Using the same key for the snapshot: Paste in the wrapped, encoded key value you created earlier again into the snapshot encryption key field. Check the Wrapped key checkbox. Click the Create button.
## BigQuery Data Services* BigQuery serverless data warehouse analytics database streams data at 100,000 rows per second. BigQuery Competes against Amazon Redshift. Storage costs are 2 cents per BigTable per month. > No charge for queries from cache! Google provides automatic discounts for long term data storage. (See Shine Technologies) * HBase - columnar data store, * Pig, * RDBMS, * indexing, * hashing
References: * https://stackoverflow.com/questions/tagged/google-bigquery * Masterclass * https://www.getcensus.com/blog/how-to-hack-it-extracting-data-from-google-bigquery-with-python-2
* Pub/Sub - large scale (enterprise) messaging for IoT. Scalable & flexible. Integrates with Dataflow. * Dataproc - a managed Hadoop, Spark, MapReduce, Hive service. NOTE: Even though Google published the paper on MapReduce in 2004, by about 2006 Google stopped creating new MapReduce programs due to Colossus, Dremel. and Flume externalized as BigQuery and Dataflow. * Dataflow - stream analytics & ETL batch processing - unified and simplified pipelines in Java and Python. Use reserved compute instances. Competitor in AWS Kinesis. * ML Engine (for Machine Learning) - * IoT Core * Genomics * Data Fusion VIDEO * Dataprep * Datalab is a Jupyter notebook server using matplotlib or Goolge Charts for visualization. It provides an interactive tool for large-scale data exploration, transformation, analysis. Getting Started with BigQuery via the Command Line ## .NET Dev Support https://www.coursera.org/learn/develop-windows-apps-gcp Develop and Deploy Windows Applications on Google Cloud Platform class on Coursera https://cloud.google.com/dotnet/ Windows and .NET support on Google Cloud Platform. We will build a simple ASP.NET app, deploy to Google Compute Engine and take a look at some of the tools and APIs available to .NET developers on Google Cloud Platform. https://cloud.google.com/sdk/docs/quickstart-windows Google Cloud SDK for Windows (gcloud) Installed with Cloud SDK for Windows is https://googlecloudplatform.github.io/google-cloud-powershell cmdlets for accessing and manipulating GCP resources https://googlecloudplatform.github.io/google-cloud-dotnet/ Google Cloud CLient Libraries for .NET (new) On NuGet for BigQuery, Datastore, Pub/Sub, Storage, Logging. https://developers.google.com/api-client/dotnet/ Google API Client Libraries for .NET https://github.com/GoogleCloudPlatform/dotnet-docs-samples https://cloud.google.com/tools/visual-studio/docs/ available on Visual Studio Gallery. Google Cloud Explorer accesses Compute Engine, Cloud Storage, Cloud SQL (GCS)
## Stackdriver for Logging In 2014, Google acquired Stackdriver from Izzy Azeri and Dan Belcher, who founded the company two years earlier. Stackdriver is GCP's SaaS-based tool for logging, monitoring, error reporting, trace, diagnostics that's integrated across GCP and AWS. In October 2020, it got renamed to "Google Cloud Operations after adding advanced observability, debugger, and profiler. Trace provides per-URL latency metrics. Open source agents Collaborations with PagerDuty, BMC, Spluk, etc. Integrate with auto-scaling. Integrations with Google Cloud Source Repositorie service, for debugging. ## Google Log Explorer Google's Log Explorer analyzes logs and export them to Splunk, etc. It retains data access logs for 30 days by default, or up to 3,650 days (10 years). Admin logs are stored 400 days by default. For extended retention, export logs to Cloud Storage or Big Query. Data stored in BigQuery can be examined using SQL queries. Custom code can analyze Pub/Sub streaming messages in real-time. Cloud Audit Logs helps answer the question, "Who did what, where, and when?" Admin activity tracks configuration changes. Data access tracks calls that read the configuration or metadata of resources and user-driven calls that create, modify, or read user-provided resource data. System events are non-human Google Cloud administrative actions that change the configuration of resources. Access Transparency provides logs capture actions Google personnel take when accessing your content. Agent logs use a Google-customized and packaged Fluentd agent installed on AWS or Google Cloud VM to ingest log data from Google Cloud instances. Network logs provide both network and security operations with in-depth network service telemetry. VPC Flow Logs records samples of VPC network flow and can be used for network monitoring, forensics, real-time security analysis, and expense optimization. Firewall Rules Logging allows you to audit, verify, and analyze the effects of firewall rules. NAT Gateway logs capture information on NAT network connections and errors. Service logs record developers deploying code to Google Cloud, such as building a container using Node.js and deploy it to Cloud Run, Standard Out or Standard Error are sent to Cloud Logging for centralized viewing. Error Reporting counts, analyzes, and aggregates the crashes in your running cloud services. Crashes in most modern languages are “Exceptions,” which aren’t caught and handled by the code itself. Its management interface displays the results with sorting and filtering capabilities. A dedicated view shows the error details: time chart, occurrences, affected user count, first- and last-seen dates, and a cleaned exception stack trace. You can also create alerts to receive notifications on new errors. Cloud Trace is based on the tools Google uses on its production services. It collects latency data from distributed applications and displays it in the Google Cloud console. Trace can capture traces from applications deployed on App Engine, Compute Engine VMs, and GKE containers. Performance insights are provided in near-real time, and Trace automatically analyzes all of your application's traces to generate in-depth latency reports to surface performance degradations. Trace continuously gathers and analyzes trace data to automatically identify recent changes to your application's performance. Cloud Profiler uses statistical techniques and extremely low-impact instrumentation that runs across all production application instances to provide a complete CPU and heap picture of an application without slowing it down. With broad platform support that includes Compute Engine VMs, App Engine, and Kubernetes, it allows developers to analyze applications running anywhere, including Google Cloud, other cloud platforms, or on-premises, with support for Java, Go, Python, and Node.js. Cloud Profiler presents the call hierarchy and resource consumption of the relevant function in an interactive flame graph that helps developers understand which paths consume the most resources and the different ways in which their code is actually called.
## Vertex AI VIDEO: Vertex is Google's ML (Machine Learning) service that runs Jupyter Notebooks. * https://cloud.google.com/vertex-ai/ * https://cloud.google.com/vertex-ai/docs/start/ai-platform-users#prediction * Ankit Mistry's class
Vertex makes use of BigQuery ML to store data up to the edge. Codelabs: * Codelab: Mental Health Prediction with Vertex AI AutoML * build a retail chatbot with Dialogflow CX, a conversational AI platform (CAIP) for building virtual agents * https://learndigital.withgoogle.com/digitalgarage/courses?partner=University%20of%20Helsinki References: * VIDEO: Setup * Ashoutosh * https://www.youtube.com/watch?v=lbnMra_VL2g * Intro to Vertex AI Model Garden and other Vertex * Prototype to Production Smart Analytics, Machine Learning, and AI on Google Cloud * https://www.classcentral.com/course/smart-analytics-machine-learning-and-ai-on-google-150764 Build and Deploy Machine Learning Solutions on Vertex AI * https://www.classcentral.com/course/qwiklabs-183-66171 Applied Data: Blockchain * https://www.classcentral.com/course/qwiklabs-101-66181 Explore Machine Learning Models with Explainable AI * https://www.classcentral.com/course/qwiklabs-126-66152 Intermediate ML: TensorFlow on Google Cloud * https://www.classcentral.com/course/qwiklabs-83-66202 Advanced ML: ML Infrastructure * https://www.classcentral.com/course/qwiklabs-84-66203 of Scikit-learn Model Serving with Vertex AI #qwiklab GSP1151 1hr 30m Generative AI with Vertex AI: Text Prompt Design across various Jupyter notebooks in a GCP Vertex AI Notebook Workbench * VIDEO * VIDEO * VIDEO with explanation of * https://cloud.google.com/vertex-ai/docs/generative-ai/text/text-overview * https://www.classcentral.com/course/generative-ai-with-vertex-ai-prompt-design-200309 * https://github.com/GoogleCloudPlatform/generative-ai/blob/main/language/examples/prompt-design/text_summarization.ipynb * https://cloud.google.com/vertex-ai/docs/generative-ai/learn/prompt-samples https://www.youtube.com/watch?v=Jl1S4ZcSY8k Build AI-powered apps on Google Cloud with pgvector, LangChain & LLMs Google Cloud Tech ### Generative AI (GenAI) Generative AI generates creates new content (natural language, images, audio, or video) based on a large set of training data. Output is not GenAI if the output is a discrete number, class, probability, or label from classification or regression based on supervised or unsupervised learning. https://cloud.google.com/generative-ai-studio https://www.youtube.com/watch?v=YGf6XvaLxnU Google Vertex AI Tutorial & Overview (Better Than ChatGPT?!) by James NoCode
## Cloud Secure Web Proxy (SWP) * Codelab ## PKI Certificate Authority Service Instead of Microsoft's AD traditional Policy CA, CAS converges certificates into a single management pane for central control and visibility. * Deploy Google-managed certificate with CAS → https://goo.gle/3HbIBAJ * Manage certificate issuance configs → https://goo.gle/3VEKdar * Access Context Manager → https://goo.gle/3cfBJ7V * Endpoint verification → https://goo.gle/3PdNsTa * VPC Service Controls→ https://goo.gle/3aKg5bu * Neos Walkthrough → https://goo.gle/3UX9ZGo * Policy controls for CAS * Using HashiCorp Vault with CAS * Policy Intelligence * Achieving better security in ASM with CAS * Certificate templates for CAS * Use CA Pools to safely reotate your CAs * How CAS can support hybrid environments 1. Create a workload ID pool and use Cloud IAM to teach CAS which part of the ID token should be reflected in the certificate. 2. Configure your workload with the workload cretificate requester IAM role. 3. Configure workloads to perform token-exchange with STS before requesting certificates from CAS. 4. Request a certificate from CAS using the "reflected SPIFFE subject" mode. 5. Let it run. Each workload that wants a certificate will be given a federated credential and allowed to be exchanged for a certificate. ### Config Controller (instead of Terraform) VIDEO: goo.gle/configcontr:
Config Connector is available with a Google Kubernetes Engine (GKE) Enterprise edition license to use Kubernetes GitOps workflow tools to create and manage Google Cloud resources, for $6/vCPU/month. Standard GKE without Config Connector is $0.10 per cluster per hour to include automated cluster lifecycle management, pod and cluster autoscaling, cost visibility, and automated infrastructure cost optimization. Like the Terraform it replaces, code in declarative config files stored in GitHub. * When using Google Cloud CLI, install kubectl: ``` gcloud components install kubectl ``` * Config Controller: ``` gcloud config set project $"{PROJECT_ID}" ``` * Enable the APIs that you require: ``` gcloud services enable krmapihosting.googleapis.com \ anthos.googleapis.com \ cloudresourcemanager.googleapis.com \ serviceusage.googleapis.com ``` * Roles & Permissions * Setup Config Connector. * Use Config Sync toroll out changes across multiple environments and identify/fix config drift. Tutorial * Its Policy Controller (for "shift left") uses OPA in Kubernetes Admission Controllers to catch and enforce policy violations before resources are created. * Cloud Build as a CI tool
## Glossary To sync with an Active Directory LDAP, a GCDS (Google Cloud Directory Sync) agent within an on-prem server sends SAML 2.0 to a Google Cloud Identity service. This is one-way auto-provisions and de-provisions. CIAM (Customer Identity and Accessment Management) for multi-tenant SaaS apps, mobile apps, APIs, games, ## More on cloud # This is one of a series on cloud computing: * [Cloud services comparisons](/cloud-services-comparisons/) * [Well-Architected cloud assessment](/well-architected-cloud/) * [Dockerize apps](/dockerize/) * [Kubernetes container engine](/kubernetes/) * [Hashicorp Vault and Consul for keeping secrets](/hashicorp-vault/) * [Hashicorp Terraform](/terraform/) * [Hashicorp Packer to create Vagrant VM images](/packer/) * [Ansible server configuration automation](/ansible/) * [Serverless software app development](/serverless/) * [SMACK = Spark, Mesos, Akka, Cassandra, Kafka](/smack-mesos/) * [Elastic Stack Ecosystem](/elastic-ecosystem/) * [Terraform (declarative IaC)](/hashicorp-terraform/) * [Pulumi (programmatic IaC)](/pulumi/) * [Build load-balanced servers in AWS EC2](/build-load-balanced-servers-in-AWS-EC2/) * [Cloud Performance testing/engineering](/cloud-perftest/) * [Mac & Windows RDP client to access servers](/rdp/) * [AWS On-boarding (CLI install)](/aws-onboarding/) * [AWS MacOS instances in the cloud)](/macos-aws/) * [AWS Certifications](/aws-certifications/) * [AWS IAM admin.](/aws-iam/) * [AWS Data Tools](/aws-data-tools/) * [AWS Security](/aws-security/) * [AWS VPC Networking](/aws-networking/) * [API Management by Amazon](/api-management-amazon/) * [AWS X-Ray tracing](/aws-xray/) * [Cloud JMeter in AWS](/cloud-jmeter/) * [AWS server deployment options](/aws-server-deploy-options/) * [AWS Lambda](/aws-lambda/) * [AWS Cloud Formation]()/cloud-formation/) * [AWS CDK (Cloud Development)](/aws-cdk/) * [AWS Lightsail](/lightsail/) * [AWS DevOps (CodeCommit, CodePipeline, CodeDeploy)](/aws-devops/) * [AWS Deeplens AI](/deeplens/) * [AWS IoT](/iot-aws/) * [AWS Load Balanced Servers using CloudFormation](/build-load-balanced-servers-in-AWS-EC2/) * [Microtrader (sample microservices CI/CD to production Docker within AWS)](/microtrader/) * [AWS Data Processing: Databases, Big Data, Data Warehouse, Data Lakehouse](/aws-data/) * [Google Cloud Platform](/gcp/) * [Google IDS (Intrusion Detection System)](/ids/) * [Bash Windows using Microsoft's WSL (Windows Subsystem for Linux)](/bash-windows/) * [Azure cloud introduction](/azure-cloud/) * [Azure Cloud Onramp (Subscriptions, Portal GUI, CLI)](/azure-quickly/) * [Azure cloud certifications](/azure-certifications/) * [Azure Cloud Powershell](/azure-cloud-powershell/) * [PowerShell GitHub API programming](/powershell-github/) * [PowerShell DSC (Desired State Configuration)](/powershell-dsc/) * [PowerShell Modules](/powershell-modules/) * [Microsoft PowerShell ecosystem](/powershell-ecosystem/) * [Microsoft AI in Azure cloud](/microsoft-ai/) * [Azure cloud DevOps](/azure-devops/) * [Azure KSQL (Kusto Query Language) for Azure Monitor, etc.](/kql/) * [Azure Networking](/azure-networking/) * [Azure Storage](/azure-storage/) * [Azure Compute](/azure-compute/) * [Azure Monitoring](/azure-monitoring/) * [Dynatrace cloud monitoring](/dynatrace/) * [AppDynamics cloud monitoring](/appdynamics/) * [Digital Ocean](/digital-ocean/) * [Cloud Foundry](/cloud-foundry/)