

How to setup Git clients like a pro
![]()
![]()
![]()
![]()
![]()
![]()
![]()
![]()
![]()
![]()
![]()
![]()
![]()
Overview
- Stages to install software and run
- Summary Diagram
- A. Establish a Terminal CLI environment
- B. Download sample repository containing setup files
- D. Install Editor app
- E. Install Git client apps
- G. Begin work on each GitHub organization/account
- H. Create global .gitconfig file with editor setting
- I. Make a folder for each GitHub account’s repositories
- J. Replace global .gitconfig user settings
- K. Populate a Git configuration file in each account folder
- L. Specify IncludeIf for each account
- Be in SSH folder
- Generate SSH keys for each GitHub account
- P. Configure other Git features
- Q. Repeat above steps for each additional account
- Ways to get a shell script
- Ways to get a Git repository
- A script types commands for you
- Remote bash command run
- index to git-basics.sh output
- 0.x Bash script start-up
- 1.x Client Install and Configuration
- 3.x Cloud repository setup
- 4.x Branch and edit locally
- 5.x Local config, add, commit
- 6.x Push and Push with tags
- 7.x Pull and Merge
- 8.x Update origin with upstream changes
- 9.x Update your origin repository
- GitHub API
- fetch –dry-run
- More
Here is a hands-on instructions and software to get those new to Git productive for professional usage using a local Git client.
PROTIP: This integrates (implements) actions that block possible leak of data in my “GitHub Data Security” blog article.
This is designed to offer maximum depth at minimum time because I’ve spent a lot of time on sequencing learning and on time-saving automation.
Stages to install software and run
This explains both the shell script and manual steps in the stages outlined below:
A. Establish a Terminal CLI environment
B. Download sample repository containing setup files
C. Install base utilities, if needed
D. Install Editor app
E. Install Git client apps
F. Define a file listing each GitHub organization/account
G. Begin work on each GitHub organization/account
H. Create global .gitconfig file with editor setting
I. Make a folder for each GitHub account’s repositories
J. Replace global .gitconfig user settings
K. Populate a Git configuration file in each account folder
L. Specify IncludeIf for account in Git config
M. Be in SSH folder
N. Generate SSH keys for each GitHub account
O. Test interaction with each GitHub repository
P. Configure other Git features
Q. Repeat above steps for each additional account
Summary Diagram
This tutorial is part of a video that explains my bash script as part of my Git Basics tutorial sequenced by this animated diagram about installation and configuration:
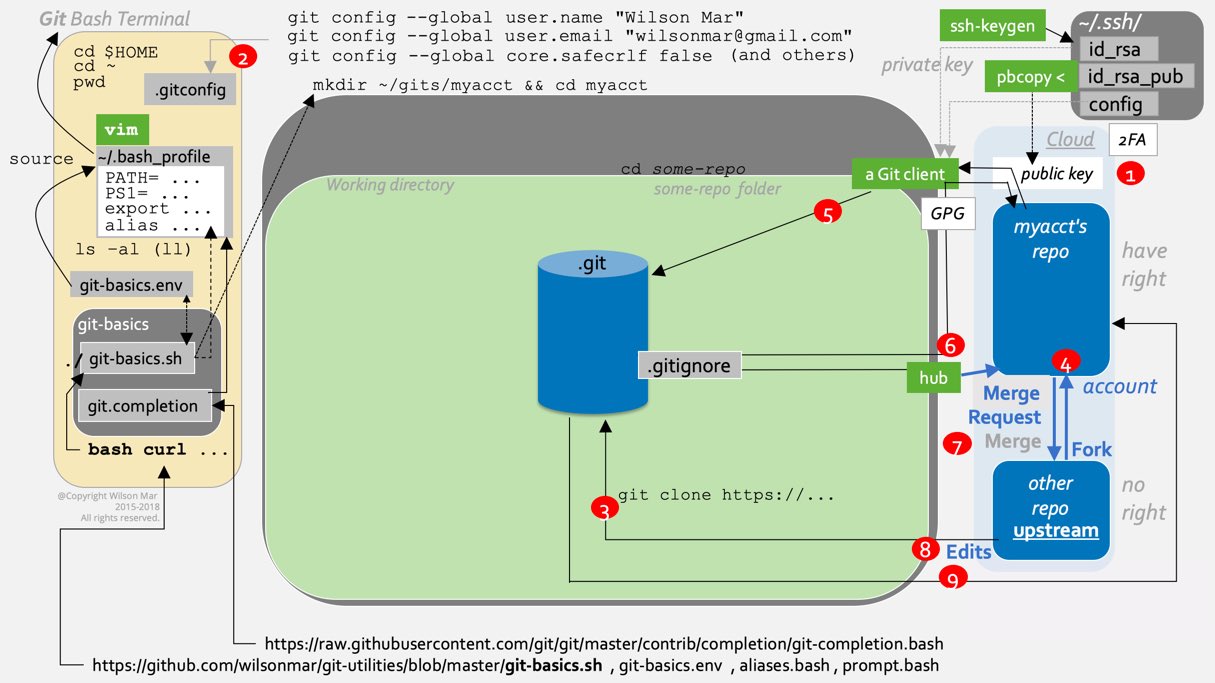
Click on the flowchart above to pop-up a full-screen (static) image
A. Establish a Terminal CLI environment
This tutorial is designed for someone with a Git command-line client installed.
To make use of it on your laptop, you need to open the Terminal program on a Mac or, if you’re on a Windows machine, the Git Bash program installed.
Terminal on macOS
-
Switch to your local IDE or Terminal (on Mac, press command+spacebar for the Spotlight Search, then type “Term” and press Enter to select “Terminal.app”). Enter your password if prompted.
-
Click anywhere on the Terminal window. Press command+N for the Basic session colors and other UI. Alternately, point your cursor beyond the top of the screen for the Terminal menu to appear and select Shell, New Window and select one of the themes.

- Grass is green
- Ocean is blue
- Pro is black
- Red Sands is earthy brown
Setup on Windows utilities
Since a Bash shell does not come built-in on Microsoft Windows machines, a bash terminal program called git bash needs to be install by the Windows Chocolatey installer installing the msysgit package. But you must have Administrator permissions to install them.
-
So that you can update versions automatically later, automate client installs on Windows, by first installing Chocolatey using a PowerShell command:
<@"%SystemRoot%\System32\WindowsPowerShell\v1.0\powershell.exe" -NoProfile -InputFormat None -ExecutionPolicy Bypass -Command "iex ((New-Object System.Net.WebClient).DownloadString('https://chocolatey.org/install.ps1'))" && SET "PATH=%PATH%;%ALLUSERSPROFILE%\chocolatey\bin" -
While you’re on a command window, have Chocolatey install a Git client:
choco install msysgit -y
-ytakes the place of clicking “OK” to submit to legalistic licenses. -
To open git bash, press the Micosoft icon on the keyboard. Type git. When “git bash” appears, click on it.

B. Download sample repository containing setup files
Since Git utilities may not be available on your laptop at this point, download sample files using a command.
-
Defines a variable to specify the path, then use the variable to create a folder, and cd into it.
GIT_FOLDER=”$HOME/git-utilities”
mkdir -p “$HOME/${GIT_FOLDER}”
cd “$HOME/${GIT_FOLDER}” </strong></tt>
The Terminal prompt should now be at ~/git-utilities or whatever you changed the path to.
Files in the folder relevant to this:
curl -O https://raw.githubusercontent.com/wilsonmar/git-utilities/master/my_github_accts.csv
curl -O https://raw.githubusercontent.com/wilsonmar/git-utilities/master/git-certs-setup.sh
- my_github_accts_vars.sh
### C. Install base utilities, if needed
-
If requested by a parameter, the automated script installs these:
- XCode
- Homebrew
- Git program
- GitHub CLI
Alternately, if you don’t run the script, you’ll need to manually install each one.
D. Install Editor app
-
Determine what text editor you want to load when Git needs one.
PROTIP: I personally like the Sublime Text editor because it loads up the fastest.
But subl needs to be installed and licensed (for $85 one time).
The nano editor comes with MacBbook macOS operating system.
-
Install the selected editor app (such as Sublime Text).
E. Install Git client apps
Due to the open-source availability to how Git works, there are many Git clients available.
But NOT clients include a git bash program so you can run commands like a Linux command line (shown by this tutorial).
Most IDEs and text editors today have incorporated commonly used Git client functionality into their software.
On IntelliJ, get its Git menu by right-clicking on the project in the left Solution pane to see this menu:
We will return to this after going through this course to see if you recognize what each GUI item does.

In Eclipse, right-click on the project in the left Solution pane, then select Team for the Git menu:

-
The “Switch To” in Eclipse is the equivalent of
git checkout. This avoids confusion with the “checkout” function in Subversion, which does something completely different than git checkout. Git does not isolate what is checked out nor lock portions of code like what Subversion does, which results in people waiting for others to finish. For this reason, many have migrated from Subversion to Git. We will soon show how Git enables every portion of code to be worked on at the same time. -
See VIDEO: Using Git within Eclipse May 21, 2013 by Dr. Brian Fraser
### F. Define a file listing each GitHub organization/account
PROTIP: Many developers switch among multiple GitHub organizations/accounts during a working day.
-
Download a sample file using the curl utility:
curl -O https://raw.githubusercontent.com/wilsonmar/git-utilities/master/my_github_accts.csv
-
Open a text editor to manually edit sample file named my_github_accts.csv.
It contains a line for each github organization/account, with associated fields:
_folder,      _Name,    _acct,    _email,            _note
gmail_acct,   John Doe, johndoe,  johndoe@gmail.com, Personal GitHub account created using personal Gmail or other email
client1_acct, John Doe, john-doe, john_doe@mck.com,  Customer/client organization account
job1_acct,    John Doe, john-doe, john_doe@mck.com,  Employer organization account
vendor1_acct, John Doe, johndoe1, john-doe@soft.ai,  vendor organization account
PROTIP: We recommend that, even if you only have your own personal account now, be prepared to use multiple GitHub accounts by doing the work of just the first account.
If you’re manually performing the steps below, create the file above as a checklist as you repeat commands for each organization/account folder and files.
G. Begin work on each GitHub organization/account
-
Switch back to the Terminal.
-
Download a sample script file:
curl -O https://raw.githubusercontent.com/wilsonmar/git-utilities/master/???script.sh
chmod +x ???script.sh
That script automatically performs all the steps described in the remainder of the steps below, for each GitHub organization/account listed in the file above.
-
If want to run the automated script, first run without any paramters to get a list of possible parameters to customize each run:
./???script.sh
-v specifies verbose output.
H. Create global .gitconfig file with editor setting
Since we are creating a git configuration file for each organization/account folder, we don’t need global user configurations.
-
In a Terminal, set the text editor command to be used by Git:
git config --global core.editor "subl"
Instead of subl for Sublime, use code for Visual Studio Code, nano for Nano, etc.
git config –global commands update the contents of the ~/.gitconfig file.
~ specifies the user’s home folder.
-
Open the editor using a git command:
git config --global --editor subl
That command is equivalent to, alternately :
subl ~/.gitconfig
Due to the previous command, you should see in your editor:
[core]
editor = 'subl'
-
List git global settings:
git config --list
Sample response:
credential.helper=osxkeychain
core.editor=subl
filter.lfs.clean=git-lfs clean -- %f
filter.lfs.smudge=git-lfs smudge -- %f
filter.lfs.process=git-lfs filter-process
filter.lfs.required=true
diff.external=/usr/local/bin/git-diff-cmd.sh
includeif.gitdir:~/gmail_acct/.path=~/gmail_acct/.gitconfig
PROTIP: If you see a : (colon) on the last line of the Terminal screen, press q to quit out of the listing.
-
There are possibly other git global configuration settings if your Git configuration is not new, such as:
[core]
repositoryformatversion = 0
filemode = true
bare = false
logallrefupdates = true
ignorecase = true
precomposeunicode = true
Configuring these is not within the scope of this document.
Later, from this file we will replace global configuration settings values for a single user such as:
[user]
 name = John Doe
 email = johndoe@gmail.com
(with “IncludeIf” and “path” statements)
That setting is the result of a command such as:
git config --global user.name "John Doe"
git config --global user.id "johndoe@gmail.com"
First…
I. Make a folder for each GitHub account’s repositories
-
Switch back to the Terminal.
-
Download a sample script file:
curl -O https://raw.githubusercontent.com/wilsonmar/git-utilities/master/my_github_accts_vars.sh
chmod +x my_github_accts_vars.sh
That script automatically performs all the steps described in the remainder of the steps below, for each GitHub organization/account listed in the file above.
-
To avoid manualtyping, run script:
chmod +x my_github_accts_vars.sh
./my_github_accts_vars.sh
The script creates variables based on values copied from the Github organizations/accounts defined above in flat file my_github_accts.csv:
export LOCAL_SSH_KEYFILE="gmail_acct"
export MY_EMAIL_ADDRESS="johndoe@gmail.com"
export MY_GITHUB_ACCTNAME="johndoe"
export MY_FULL_NAME="John Doe"
REMEMBER: In Bash script export commands allow no spaces around the equal (=) sign.
Use of variables helps ensure that several commands below will use values consistently.
-
Make a folder for the current GitHub organization/account based on the variable defined above:
mkdir ~/$LOCAL_SSH_KEYFILE
J. Replace global .gitconfig user settings
-
Use your default editor to edit Git’s global .gitconfig configuration file:
git config --global --edit
In 2019, at git version 1.23, “conditional include” (“IncludeIf”) was added to Git Core. That enables Git to automatically select the configuration file Git uses to be based on whatever folder is active.
References:
- https://git-scm.com/docs/git-config#_conditional_includes is the official documentation
- https://blog.thomasheartman.com/posts/modularizing-your-git-config-with-conditional-includes
- https://www.motowilliams.com/conditional-includes-for-git-config
K. Populate a Git configuration file in each account folder
-
Edit the ~/.gitconfig text file to confirm that the above commands created a git configuration file, using your favorite text editor:
Either way, you should see something like this (but with your name and email instead):
[user]
 name = John Doe
 email = johndoe@gmail.com
In a config file, we will replace the above values with IncludeIF statements.
The above staements will be in a config file, with name and email appropriate for each GitHub organization/account.
L. Specify IncludeIf for each account
-
Construct new lines in the account folder’s .gitconfig file based on the $LOCAL_SSH_KEYFIL variable name:
[includeIf "gitdir:~/gmail_acct/"]
 path = ~/gmail_acct/.gitconfig
PROTIP: We are using the name of the account folder the same name as the SSH keypair file name.
PROTIP: In the includeIf line, the trailing slash after the directory path makes it so that all subdirectories of the specified directory is matched.
Alternately, instead of using a text editor, use these commands to concatenate the lines to the bottom of the file:
echo "[includeIf "gitdir:~/$LOCAL_SSH_KEYFILE/"]" >>~/$LOCAL_SSH_KEYFILE/.gitconfig
 path = ~/$LOCAL_SSH_KEYFILE/.gitconfig  >>~/$LOCAL_SSH_KEYFILE/.gitconfig
Either way, put the includes at the bottom of your files to make sure the included config isn’t overridden later on in the source file.
~/.git/config
-
Verify:
git config list
TODO: If you get error: key does not contain a section: list …
Next, let’s create that folder referenced above.
Be in SSH folder
-
Be at the folder where SSH stores its key pairs file:
cd $HOME/.ssh
If it does not already exist, make the folder yourself.
Generate SSH keys for each GitHub account
References:
-
Within the ~/.ssh folder, generate a pair using defaults for the GitHub account:
ssh-keygen -t rsa -f "${LOCAL_SSH_KEYFILE}" -C "${MY_EMAIL_ADDRESS}" -N ""-N specifies that no Passphrase will be requested when the key is used. Specifying one would require it to be manually entered with every command – not something most would want to do.
-C provides an optional unique name within the Public key.
TODO: A “fingerprint” of the key is generated to uniquely identify each one.
-
The public key we copy into each server so we can
SSH -
with the private side of the pair (instead of a password).
Some use an encrypted USB Solid State Drive for sole physical posession. But if that’s lost or stolen, security can be compromised.
P. Configure other Git features
There are other lines in the .gitconfig file.
-
On a Windows machine, to mute annoying warnings about conversion of line endings in files saved on Mac machines:
git config --global core.safecrlf false
The command issues no response.
The command does not turn off conversion.
-
Configure Git Signing describes steps to enable the gpg program to establish GPG keys used to sign git commits, which would add lines such as these:
[core]
 editor = subl
signingkey = 62C414BA89BFBE52

[gpg]
 program = gpg

[tag]
 forceSignAnnotated = true
-
GitHub Enterprise users whitelist hostnames using:
git config --global --add hub.host my.example.org
-
Change default commit message editor program to Sublime Text (instead of vi):
git config core.editor "~/Sublime\ Text\ 3/sublime_text -w"
-
Allow all Git commands to use colored output, if possible:
git config color.ui auto
-
Get the size of what was transmitted on the current repo folder:
git count-objects -v
count: 1749
size: 12308
in-pack: 344
packs: 1
size-pack: 109
prune-packable: 0
garbage: 0
size-garbage: 0
git remote show origin
But I have a script that installs them and other apps on a Mac according to a specification file. It’s at https://github.com/wilsonmar/mac-setup/master/blog/mac-install-all.sh
Q. Repeat above steps for each additional account
zzzz
Ways to get a shell script
a. bash curl command to a script (see immediately below)
Ways to get a Git repository
PROTIP: There are several ways to obtain this file from GitHub, GitLab, BitBucket, or other host:
a. Download ZIP file
b. Open in Desktop client (using Git for GitHub)
c. git clone https or SSH url
d. hub command
e. bash curl command to a script (see immediately below)
A script types commands for you
An bash script was created to automatically type for you the various commands in this course. It’s to see whether what you are asked to type manually actually works. This is so we can see whether it was working before, so you don’t blame yourself for not typing commands correctly and waste time debugging.
-
Let’s look at the script by providing an internet browser (such as Brave) with this full URL:
https://github.com/wilsonmar/git-utilities/blob/master/git-basics.sh
Follow along with me on your own machine.
This file in GitHub.com is associated with an account named “wilsonmar”.
The file is in a repository (or “repo”) named “git-utilities”.
The “.sh” means it’s a shell script file.
The first line inside each shell script specifies the program which processes it. In this case it’s
#!/bin/bashwhich is the default shell program that comes with MacOS machines to process commands of the operating system.
A “blob” is the set of characters in the last revision identified by a “hash” calculated from the text changed plus some metadata such as the data of the change, the person making the change, etc. The 7 characters shown is the first 7 characters of the full hash string.
Bash curl command pasted in Terminal
To run the shell script without first downloading it:
- Open a Terminal or Git Bash dialog.
-
Run a Bash script is by pasting in a Terminal a bash curl copied from a web page. This places you at your account’s home directory such as, in my case:
/Users/wilsonmar
On your dialog, a different name would appear instead of “wilsonmar”.
-
PROTIP: You can return to this folder by several commands: cd (change directory) command by itself or cd ~ (the tilde character), which resolves to cd $HOME.
-
$HOME is a built-in variable for your account’s home directory.
Shell scripts make use of built-in variables such as $HOME.
-
There is also a built-in command pwd (present working directory), which is equivalent to the “dir” command on Windows machines.
./bash_profile
-
PROTIP: When a Terminal or Git Bash session is started, the operating system automatically (in the background) runs command:
source ~/.bash_profile
This places into memory definitions for the PATH of directories the operating system looks for the location of programs requested to run, for export of environment variables.
-
The dot character in the file name means that the file is normally hidden, so additional parameters need to be specicifed to see them, such as:
ls -al
PROTIP: Don’t type the “[ll]” shown in the flowchart because that defines a keyboard alias which the bash_profile also defines them.
git-basics.sh add aliases
-
PROTIP: A set of aliases is defined at:
https://github.com/wilsonmar/git-utilities/blob/master/aliases.txt
You can copy and paste the raw text into your ./bash_profile open in a text editor.
Or you can run a script to do that for you, described below.
What follows are the steps to get the aliases to be available in your laptop, among other tasks.
Remote bash command run
To get you started quickly:
-
Highlight this entire line (which may wrap around)
bash -c "$(curl -fsSL https://raw.githubusercontent.com/wilsonmar/git-utilities/master/git-basics.sh)"(Position your mouse at the beginning of the string, drage the mouse as you drag across the line, then relase at the end of the line. Press command+C to copy to your Clipboard.)
- Press command+C to copy into your operating system’s Clipboard.
- Open a (Git-capable) Terminal or Git Bash session.
- Click on the blank part and right-click to select Paste.
-
Press Enter to run it.
In the output displayed on the Terminal:
Lines prefixed by
>>>output by function echo_f() precede each section and step of the script:Lines prefixed by
$output by function echo_c() precede each command:
index to git-basics.sh output
Numbering of sections in the script:
0.x Script start-up
1.x Mac client Install and Configuration
2.x Git Setup and Configuration
3.x Cloud repository setup, forking, cloning
6.x Local edit, add, commit, push
7.x Pull and Merge
8.x Update origin with upstream changes
9.x Get changes in origin to local
In outputs on Terminals, “$” precede commands issued by the script, so you can type the exact commands.
0.x Bash script start-up
1.x Client Install and Configuration
On the Mac, the git-basics.sh script installs a Git client if needed.
-
The first thing the script does is figure out what operating system it is running on. That uses a command common to all operating systems:
uname -a
“Darwin” is the internal name of the operating system running on a Mac.
-
If the script is running on a Mac, the script installs Homebrew if needed.
-
A Git client is installed if the git command is not found.
brew install git
Its version is output so you know what you have.
-
For the script to automatically create a repository in GitHub and fork a repository from another account, it first installs the “hub” add-in to Git:
brew install hub
BTW: There is no “cask” in the brew command because it only works within the command line, not GUI.
PROTIP: Technically “Hub” is called a “wrapper” around Git’s CLI so you can do it all from the command line rather than switching to GitHub’s web page.
-
Also install jq to enable Git to process JSON:
brew install jq
environment variables & values
-
File git-basics.env is downloaded to your $HOME account folder (by a curl command):
curl -O "https://raw.githubusercontent.com/wilsonmar/git-utilities/master/git-basics.env"
The file provides values to environment variables controlling the script. It is loaded into memory using this command:
source git-basics.env
The variables and the values are displayed.
PROTIP: The git-basics.env file is placed in your $HOME folder, separate from any folder that can be pushed back to Git hosting because you may want to type your password in the file for more automatic functionality in the script, such as deleting repos, functions which even hub does not perform.
git-scripts folder in $HOME
-
The script looks for a persistent folder named git-scripts and creates it if it doesn’t exist there.
Files from GitHub load the folder with files containing default values. If the file is there already, don’t overlay the file.
-
git-basics.sh, the shell script, is copied into that “git-utilities” folder so you have the option of editing the files and re-running locally on your laptop.
-
To halt processing for customizations, press control+C on the Mac or Press any key to continue default processing.
This is so you can edit the files downloaded so you can run rerun locally (as described below).
If you do edit the file locally, comment out the read command line and its fancy_echo command by adding a # in front of them.
Edit and rerun locally
The script git-basics.sh is designed to both run without modification and to allow you to customize it. There are several reasons you want to customize files in the “~/git-utilities” folder the script added for you:
-
Edit the git-basics.env to place exit anywhere you want the script to stop.
-
Edit the git-basics.env file to replace “secret here” with your GitHub password so that the script can automatically delete repos locally, so that you don’t have to manually do it every time you run. PROTIP: The git-basics.env file is copied to a separate folder than the script so that you never upload it back to a Git hosting GitHub/GitLab.
-
Adopt the git-basics.sh to automate other activities using Git. PROTIP: Select a text editor. See my notes at https://wilsonmar.github.io/text-editors
chmod
PROTIP: To avoid error messages that says the file is not there, change premissions to enable the script file to be executed
chmod +x git-basics.sh
To run the file, type a “./” in front of the script file name:
./git-basics.sh
Continuing processing
-
-
aliases.txt containing keyboard shortcut definitions are copied in. Again, if the file is there already, it is not overlaid.
-
If a ~/.bash_profile is not found, the script creates it in your $HOME folder.
-
Whenever a Bash terminal session is opened, it automatically runs the ~/.bash_profile script file at the user home folder. The “~/” specifies that the file is in the user’s $HOME folder.
The file contains a definition of the PATH the operating system searches for executables.
The file can also contain custom keyboard commands defined by alias specifications. The alias.txt file.
The aliases.txt file is concatenated to the bottom of the ~/.bash_ profile
-
The script creates a volatile/non-persistent workspace folder which, when configured, the script deletes at the beginning of each run, and populates again with downloads.
The name of the volatile folder is based on the variable $WORKSPACE_FOLDER defined in file git-basics.env. Thus, if you may the value of the variable, a different workspace would be created on the next run.
This is what enables the script to be run over and over again.
-
Before invoking a Git command, load the default SSH public key file to make sure it is available for use with “hands-free” GitHub API calls:
export RSA_PUBLIC_KEY=$(cat ~/.ssh/id_rsa.pub)
### Local Git projects container folder
-
PROTIP: Optionally, create a folder with a name such as gits or “project” to hold anonymouse Git repositories from various GitHub/GitLab accounts. This would be immediately under your $HOME folder:
cd $HOME && mkdir gits && cd gits
-
PROTIP: Optionally, create an account container folder to hold repositories under each account on GitHub/GitLab or to group repositories relared to the same subject:
mkdir myacct && cd myacct
PROTIP CAUTION: Some repos have a 20 character limit on the prefix before the repo name. The character count includes slashes:
/gits/hotwilson/----+----1----+----2
Init repo
-
PROTIP: If you are creating a local repository, first create an account or project container folder to hold the various repositories.
mkdir local-init && cd local-init
-
The git init command creates a blank Git repository:
git init
The sample response:
Initialized empty Git repository in /Users/kevingrastorf/git-basics-workspace/gits/myacct/local-init/.git/
This creates in the current folder a folder always named .git into which Git stores and retrieves all change history.
-
Add contents:
git add --all
git commit -m "First commit"
-
Delete the “local-init” repo created by a previous run on GitHub. This requires use of the GitHub API because “hub delete” does no work.
BONUS: See the GitHub API description
-
Although GitHub docs say that you need to first create repos in the GUI. However, the Hub add-in enables it:
hub create -d "My new thing"
This is instead of
- git remote add origin remote repository URL
- git push -u origin master
- git remote -v
- Manually check on GitHub to make sure it’s really there.
3.x Cloud repository setup
Now let’s talk about working with repositories in cloud hosts such as Microsoft’s GitHub, GitLab, Atlassian’s BitBucket, etc.
Identify a public GitHub repository and something that you can contribute to, such as suggesting a typo fix. But you have no right to edit that repo. For example:
https://github.com/hotwilson/some-repo
An “open source” repository available to the “public” can be accessed using an URL using https protocol even if you are not a designated collaborator with a right to alter it.
Such a repository we call an upstream remote or some other name.
You can click the “Star”, but you would need to be signed in under your own account.
We assume here that you have already opened a personal email account and used it to create an account on GitHub.com.
PROTIP: I use email accounts on both Gmail.com and Outlook.com so I can test sending emails.
PROTIP: It helps if you pick a unique handle that is available throughout various social media (Twitter, Medium, Instagram, etc.)
Setup SSH manually
Before you can “Fork” another account’s repository, you need to enable your Git commands to have right to modify.
The right to alter a cloud repo is claimed by pasting the contents of your machine’s .pub (public key file) obtained by using pbcopy to put it in your Mac’s Clipboard, then pasted in the cloud GitHub/GitLab GUI.
The “rsa” in the default file name “id_rsa.pub” refers to the clever mathematicians who figured out how to encrypt and decrypt files without exchanging secret passwords. It works by generating two files – the public and private key file “id_rsa” – into your account’s ~/.ssh folder.
SSH (for secure shell) is the same mechanism the Linux team uses to secure its bash terminals. In fact, Git was designed by Linus Torvold and his team who developed the Linux kernel and its secure shell (SSH).
The ssh-keygen program that generates the rsa files comes with all Linux and Mac operating systems. First cd to the .ssh folder, then run the program. If you are using it for the first time, press Enter for all the defaults.
When there are multiple accounts, you can’t use default names and also must edit the config file to make sure the different accounts are specified correctly.
Windows users need to download the puttygen program.
When the Git client runs, it retrieves the private key in the id_rsa file to encrypt what it sends. The GitHub or GitLab cloud service decrypts using the public key.
-
When this script runs, one can optionally use the built-in command “cat” to retrieve the contents of the public key for later use by the GitHubAPI:
export RSA_PUBLIC_KEY=$(cat ~/.ssh/id_rsa.pub)
-
Alternately, list the files in folder .ssh to confirm the file size:
ls -a ~/.ssh
Two-factor authentication and repo URLs
Next, instead of git init creating a purely local repository and its need for being in a repository folder, we now look at use of git clone commands to bring in remote repositories from the Cloud to your local machine.
When pulling in a repository belonging to some other account you don’t have right to change, use the “HTTPS” URL format, such as:
https://github.com/hotwilson/some-repo
PROTIP: If we have setup two-factor authentication (2FA), we should use the “SSH” or “git@” form to specify URLs we have right to change, such as:
git@github.com:wilsonmar/some-repo
We should use two-factor because it is good security practice. The “two” means we use an alternate form of identification, in a number from an authentictor app (such as Google Authenticator) on that smart phone you’re always looking at.
PROTIP: –depth=1
BTW: When cloning another account’s repo, some add –depth=1 or –recursive
-
--depth=1says only clone the latest version, to save disk space locally by not having previous version history (nor branches) on your machine. -
--recursivesays to pull in sub-modules (repositories stored within the repository).
Fork from another repository
Since our objective is to work on open source repositories we don’t own, we now bring in a repository from another account we don’t own.
VIDEO: On the GitHub/GitLab website, we can manually click fork to bring it under our own account. We would then have a right to change the our own repository.
Fork using Hub add-in to Git
BLOG: Instead of doing that manually, we have a way to do that in a command-line script.
-
-
The forked repository created from a previous run needs to be first deleted from GitHub/GitLab, manually because there is no “hub delete repo”.
Click Settings tab. Scroll down to click “Delete this repository”. Type the repo name. Click the red “I understand…”.
[ Whoops ]
PROTIP: Click “Whoops” links for instructions on un-doing the commands immediately before the link. There is a “Return” link there to get back here and continue.
Un-comment the command to pause to read your response of pressing any key after doing the action stated.
-
Use hub to clone before forking.
cd && cd "$WORKSPACE_FOLDER"
PROTIP: Instructions at https://hub.github.com assume you added an alias with a command such as “alias git=hub”. So I say don’t do that because I only use Hub just for forking. So use “hub” instead of “git” in commands.
Hub expects the upstream remote to be named “origin”, so first clone the other repo:
hub clone hotwilson/some-repo
Hub creates the repo with remote of “origin”. That’s counter to how we’re using that remote name in this script. But hub requires it for its fork command:
hub fork hotwilson/some-repo
You may need to provide your cloud account credentials if they are not cached.
Hub’s fork command returns:
Updating wilsonmar
From git://github.com/hotwilson/some-repo
        * [new branch]      master     -> wilsonmar/master
new remote: wilsonmar
To make the remote names the way I want:
hub remote add myself
git remote rename myself origin
git pull --all
The git pull –all command returns this:
Fetching upstream
Fetching origin
Already up to date.
BONUS: Set default branch
-
Verify using a git remote -v to show it looks like this:
origin   git@github.com:wilsonmar/some-repo.git (fetch)
origin   git@github.com:wilsonmar/some-repo.git (push)
upstream git://github.com/hotwilson/some-repo.git (fetch)
upstream git://github.com/hotwilson/some-repo.git (push)
-
If you want, manually see the new fork on your cloud account at:
https://github.com/wilsonmar?tab=repositoriesYou may want to un-comment the command to pause to read your response of pressing any key after doing the action stated.
Clone
-
When a repository is cloned, Git automatically creates that repo’s folder and within it a folder named dot git to hold objects that track changes to the repository.
During cloning, Git automatically extracts files from objects in its history, such as README.md out to the repository’s Working Directory, as if you typed
git checkout master.[ Whoops ]
So remember to cd into the repository folder:
cd some-repo
PROTIP: Forgetting to cd into a newly cloned folder is a common mistake.
-
For a listing of repository files and folders in the Git working directory for the current git checkout, which is “master” when first initialized:
ls -al
-
List the remotes:
git remote -v
This information is also presented by the git branch command.
Branch list
-
A git branch command shows us the branches defined in the repository (in a read-only operation):
git branch -avv
The
-avvparameter provides more detail. Dash a specifies remote tracking branches to appear as well.gb
An example of the response:
* master 6110cb1 [origin/master] Update ... remotes/origin/master 6110cb1 Update ...-
The asterisk (*) marks the current branch – master, the default branch name.
-
6110cb1in this example is the SHA hash prefix of the last commit made. -
The default remote is origin with default branch master.
Alternatively, identify just the current remote and branch using this command:
git symbolic-ref --short HEAD
BTW: A Git alternative to the Bash “pwd” (present working directory) command is:
git rev-parse --show-toplevel
PROTIP: Git defaults to the master branch. But many organizations protect that name for production use, and instead create a “development” or “dev” branch for developers to work with.
-
4.x Branch and edit locally
Here’s where you add value to that Open-Source repository.
The git checkout command controls what Git extracts out from the repository database to the repository’s Working Directory.
- If you add a file after the git checkout command, Git will replace the file in the working folder with the version in
the committed repository.
[ Whoops ]
### New branch with commit
There are two ways to create a new branch.
-
The easiest way is to specify a new branch name after a dash b (-g) with as part of a git checkout such as “feat1” (feature1), to associate new changes:
git checkout -b feat1
PROTIP: Atlassian defines its branches* with a type (feature, bugfix, hotfix, etc.), a slash, an issue number, then a short description.

The advantage of creating a branch is that parallel development can occur without risking the master branch.
BTW: Unlike the Subversion client, which locks branches to all others, when a Git branch is created, all files are still available for change.
[ Whoops ]
-
List branches to compare with another git branch command:
git branch -avv
Notice the asterisk is now at the new branch “feat1”.
Concatenate to .gitignore
-
The script makes changes by using echo commands, such as:
echo "peace" >newfile.md
The single “>” clears out all contents and replaces it with that one word.
echo -e "\n.DS_Store" >>.gitignore
>>concatenates to the bottom of the file-eenables specification of escape characters\n` is an escape character for new lineAlternately, you can of course edit files manually, we can use vim or another text editor (such as nano, atom, etc.) to change contents inside files.
vim README.md
The md in the file name designates markdown format. The README.md file Git hosts can create with this specific name to describe each repository.
If you use vim, press the I key to begin insertion and press Esc to end insertion mode. When out of insertion mode, type : to enter command mode, then wq to write and quit the program or then q! to quit without changes.
PROTIP: Remember to save the file before switching.
-
Display the last 3 lines in the file to confirm:
tail -3 .ignore
This is better than using the cat program which displays all lines.
git status -s -b [gsl]
-
To detail the status of changes to the repo:
git status -s -b
Alternately, this command is used so often that Mac users create a shortcut in ~/.bash_profile:
gsl
The response is:
## feat1
 M .gitignore
##marks a branchMmarks a file Modified from Git??marks a file untracked by Git, one that has never been added to Git.Hide file from git status
EXTRA: PROTIP: To have git status not display a particular file:
git update-index .DS_Store
PROTIP: Changes to files that should not be pushed up, such as the secrets.sh file, should be marked:
git update-index --no-skip-worktree secrets.sh
NOTE: Pulls of changes upstream in GitHub updates the local file.
If both the local and upstream file are changed, Git outputs a conflict message.
Skipped files are flagged with a “S” in this list command:
git ls-files -v|grep '^S'
5.x Local config, add, commit
-
Before adding to git’s Staging for the current repository, you may want to configure the local attribution just for the current repository:
cat .git/config
The first part of the file are repository-specific configurations:
[core]
repositoryformatversion = 0
filemode = true
bare = false
logallrefupdates = true
ignorecase = true
precomposeunicode = true
The second part:
[remote "upstream"]
url = git://github.com/hotwilson/some-repo.git
fetch = +refs/heads/*:refs/remotes/upstream/*
[branch "master"]
remote = upstream
merge = refs/heads/master
[remote "origin"]
url = git@github.com:wilsonmar/some-repo.git
fetch = +refs/heads/*:refs/remotes/origin/*
Optionally, override the global attribution with this:
git config          user.name "Wilson Mar"
git config          user.id "wilsonmar+GitHub@gmail.com"
This is done by issuing a git config command without the “–global” parameter.
-
Before adding anything to the Git index file:
git diff --cached
--cachedis a synonym for--staged.There should be no response when nothing has been put in Git staging.
-
You can change several files, but only the files you add to Git’s staging area will be pushed to GitHub.
git add . -A
The dot selects all files changed, recursively inside sub-folders as well.
The dash capital A parameter specifies that deleted files be processed.
PROTIP: Many prefer to specifically add individual files to go into each particular commit, which works on all files added to staging. Instead of the dot, several files can be specified on the same command.
Alternately, to add all the files modified (not new files created and untracked):
git add -u
Git has a “two-phase commit” approach. Files are added to Git’s index file. Then all files staged in the index are committed together by the git commit command.
[ Whoops ]
-
Do another diff to see how git add changed:
git diff --cached
-
Do a git status again:
git status -s -b
Notice the green “M” and “A” showing it’s being tracked:
M  .gitignore
A  newfile.md
git commit
-
The commit supplies a message describing changes, which applies to all files added.
git commit -m"Add .DS_Store to .gitignore @hotwilson"
-
A space is not needed between the m and the left quote of the message.
-
If you don’t specify the dash m, Git will display a file containing comments as a prompt. In that file, any line beginning with the # comment character will be ignored and not be part of the message. Save and exit the text editor.
-
If a GitHub account user name prefixed by an at sign (such as “@wilsonmar”) is specified in the message, GitHub automatically sends an email.
A sample response:
[feat1 e2265f6] Update for show
 2 files changed, 3 insertions(+)
 create mode 100644 newfile.md
[ Whoops ]
Local Reflog
-
-
List history of actions that have occurred on the local machine.
git reflog -5
-5specifies only the most recent 5 lines.Example output:
9349be6 HEAD@{1}: commit: double quote removed for confusion
9eb57bc HEAD@{2}: commit: mention gs shortcut
Each commit is put at the head of the chain of all commits made throughout history. That 7-characters is the prefix to a much longer “hash code” that Git generates from each commit. Content within Git is very difficult to alter because any change would result in a different hash. And insertions would break the chain of commits.
- Locally, entries are pruned (removed) automatically after 90 days (by default).
Local Log
-
List commits that have occurred on the local machine:
git log --pretty=format:"%h %s %ad" --graph --since=1.days --date=relative;git log --show-signature -n 1 | tail -n 10
| tail -n 10limits the output to 10 linesRebase to squash locally
-
Before pushing to GitHub/GitLab, some prefer to squash some commits so that only one commit message appears for several commits made locally.
-
Rebasing cleans up intermediate commits that is unwanted noise to the rest of the team. The extra commits complicates the history, and makes back-out of code more difficult.
-
Yes, this changes history, which is why we do it. But it’s only on your local versions.
git rebase -i
-ifor interactiveSee my blog on this.
Study http://wilsonmar.github.io/git-rebase for step-by-step instructions. Then return here.
-
6.x Push and Push with tags
-
The git push command sends to a remote repo what has been committed for a specific branch. For the default origin remote and master branch:
git push
[ Whoops ]
Alternately, Bash users who have setup an alias can use this which includes a git add and commit:
This alias adds all changes and commits them all with a static “update” in message:
The two aliases above include a
git pushfor maximum convenience.GitHub Enterprise uses can push to multiple remotes with one command:
git push production,staging
If you see an error message like this, it means you don’t have permissions:
ERROR: Permission to hotwilson/some-repo.git denied to wilsonmar.
fatal: Could not read from remote repository.
Please make sure you have the correct access rights
and the repository exists.
Two-factor authentication
If you setup 2FA (two-factor authentication), Git will prompt you for a username and password. Because of 2FA, GitHub expects a personal access token. If you type in your account password, GitHub responds with “fatal: Authentication failed for https://github.com/…”.
So when using 2FA, in a Terminal session, cd into .git, then edit file config to change, for example:
url = https://github.com/wilsonmar/futures
to
url = git@github.com:wilsonmar/futures
Notice the git user name instead of “https://”. Behind the scenes, SSH protocol is used, but that doesn’t need to be specified here.
Also notice the colon character instead of the slash.
cd back up out of .git to the repo’s root folder before doing a git commit and push, or you’ll see error message “fatal: this operation must be run in a work tree”.
Push tags
-
When a commit is known good as the one to release, most organizations tag that specific commit with semantic versioning text.
git tag -a v1.2.3 -m\"New version\"
-aadds the tag permanently. Without this parameter, the tag remains local.The v1.2.3 format is called “semantic versioning” described at http://semver.org
PROTIP: This stores the tag within folder .git/refs/tags/.
-
Tags require an additional git push command to be pushed to GitHub.
git push origin --tags
[ Whoops ]
CAUTION: An additional push commands is needed for tags because it uses Git notes features. Since notes were not designed for many notes/tags, using them is known to slow commits.
Delete branch
-
Because branches are just markers within Git, once a feature branch is in GitHub, that branch can be deleted from the local repo:
git branch -d feat1
-
and from GitHub (by specifying that colon in front of the branch name).
git push origin :feat1
NOTE: The colon is the secret special sauce. There is no “delete” command with this.
7.x Pull and Merge
Unless you have been designated a committer in the upstream repository, you can’t directly push changes to it like you can with your own repo.
But you can send a request to committers of that upstream repo to pull and merge changes from your forked repo.
Each Git hosting service has their own GUI to make such requests.
GitHub calls them Pull Requests.
GitLab calls them Merge Requests.
That is why my script has “Press when ready” steps - for all three manual actions below:
### 1. Create a pull/merge request
-
To make a pull/merge request, log into your Git hosting GUI and navigate to your origin repo.
-
Click Compare. If there are differences, you’ll see a green “Create pull request”.
-
Type in a Title for the request, such as “For the class”.
-
Click the green “Create pull request”.
You can make more changes.
Alternately, there is a command to request the pull from the upstream repo. For example:
git request-pull v1.2.3 https://github.com/hotwilson/master master</em>
-
The URL must be specified (rather than a remote designator such as “upstream”).
-
This feature is described at: http://git-scm.com/docs/git-request-pull which says “this will produce a request to the upstream, summarizing the changes between the v1.0 release and your master, to pull it from your public repository.”
See https://about.gitlab.com/2016/12/01/how-to-keep-your-fork-up-to-date-with-its-origin/
2. Squash and merge
-
-
Next, on a different browser, login as the committer of that upstream repo.
If you don’t own the account, talk to the owner (class instructor).
-
Navigate to the repo that was forked, such as hotwilson.
-
Click the “Pull requests” tab.
-
Check the request that you added in the step above.
-
If there are no conflicts, click Squash and merge (or in other words, accept) the request.

-
Click “Confirm Squash and merge”.
A purple “Merged” appears at the top of the screen.
### 3. Add file to upstream
While still in the upstream repo (hotwilson), establish conditions for the next set of steps, in the upstream remote, make a change such as adding a file.
-
Click “Create new file” button.
-
Type in a new file name. I like a date and time such as
2018-09-30-8
-
Click under “Edit new file”.
-
Type in some text, such as “hello”.
-
Press Shift+down arrow to scroll to the bottom of the page.
-
Click the green “Commit new file”.
8.x Update origin with upstream changes
Next, let’s look at what happens if, over time, changes occur in the upstream repo.
See https://help.github.com/articles/syncing-a-fork/
-
Open a different browser (Firefox or Brave) to login and make a change. In the script there is a message:
Press any key after adding a file
-
To enable dowload by Git, we add the upstream remote.
git remote add upstream "https://github.com/$OTHER_ACCT/$OTHER_REPO"
which by default translates to:
git remote add upstream https://github.com/hotwilson/some-repo
It’s OK to see
fatal: remote upstream already exists.
Otherwise, expect no output returned from this command if ok.
[ Whoops ]
-
To verify whether the origin remote was created, as usual, with the repo.
git remote –v
-vis for verification.Expect to see both your origin and upstream remotes listed.
origin   git@github.com:wilsonmar/some-repo.git (fetch)
origin   git@github.com:wilsonmar/some-repo.git (push)
upstream git://github.com/hotwilson/some-repo.git (fetch)
upstream git://github.com/hotwilson/some-repo.git (push)
-
To obtain changes locally, many would rather NOT issue a git pull upstream command, which blindly fetches and automatically merges changes. Differences in the same line within the same file, Git is forced into automatic conflict resolution mode.
git fetch upstream master
Example output:
remote: Counting objects: 2, done. remote: Compressing objects: 100% (2/2), done. remote: Total 2 (delta 1), reused 0 (delta 0), pack-reused 0 Unpacking objects: 100% (2/2), done. From git://github.com/hotwilson/some-repo * branch master -> FETCH_HEAD 8843446..b33e370 master -> upstream/master -
git checkout master
Already on 'master'
Your branch is behind 'upstream/master' by 1 commit, and can be fast-forwarded.
  (use "git pull" to update your local branch)
-
List delta file names only
git diff HEAD @{u} --name-onlySample output:
newfile
git merge upstream
-
git merge upstream/master”
git merge upstream/master
Sample output:
Updating 8843446..b33e370
Fast-forward
 newfile | 1 -
 1 file changed, 1 deletion(-)
 delete mode 100644 newfile
Notice the slash separator between the upstream remote and the upstream branch (master).
CAUTION: Once you start a merge, nothing else can be done until you reconcile ALL conflicts. One cannot save a partially-resolved merge. There is no way yet of testing a partially merged tree. You can’t go back if you make a mistake.
-
git push origin master”
git push origin master
Sample output:
Counting objects: 2, done.
Delta compression using up to 8 threads.
Compressing objects: 100% (2/2), done.
Writing objects: 100% (2/2), 608 bytes | 608.00 KiB/s, done.
Total 2 (delta 1), reused 0 (delta 0)
remote: Resolving deltas: 100% (1/1), completed with 1 local object.
To github.com:wilsonmar/some-repo.git
8843446..b33e370  master -> master
-
To obtain changes locally, many would rather NOT issue a git pull upstream command, which blindly fetches and automatically merges changes. Differences in the same line within the same file, Git is forced into automatic conflict resolution mode.
- “Unintentional” merge commits are what some call “evil”:
git pull --rebase
PROTIP: To set it up so every branch you ever create on any repository is set to pull with rebase, set this global configuration:
git config --global pull.rebase true
Prior to version 1.7, it was:
git config --global branch.autosetuprebase always
9.x Update your origin repository
In this section we change something on GitHub/GitLab and then fetch it locally, see what changed, and merge it.
-
“Change something on the origin in GitHub wilsonmar/some-repo …”
Press any key after adding a file ...
-
Fetch (instead of pull)
git fetch origin master
Sample response:
remote: Counting objects: 2, done. remote: Compressing objects: 100% (2/2), done. remote: Total 2 (delta 1), reused 0 (delta 0), pack-reused 0 Unpacking objects: 100% (2/2), done. From github.com:wilsonmar/some-repo * branch master -> FETCH_HEAD 9c9468b..bbac92d master -> origin/master -
See what changed:
git diff master..origin/master
Sample response:
----------------------------------------------------------
renamed: me 2018-09-04b to 2018-09-04-a
----------------------------------------------------------
----------------------------------------------------------
added: smoky
----------------------------------------------------------
@@ -0,0 +1 @@
+bear
----------------------------------------------------------
added: xome
----------------------------------------------------------
@@ -0,0 +1 @@
+hello
-
Merge tracking branch:
git merge origin master -m"OK" --no-edit
Sample response:
GitHub API
- See https://gist.github.com/caspyin/2288960 about GitHub API
- From https://gist.github.com/robwierzbowski/5430952 on Windows
- From https://gist.github.com/jerrykrinock/6618003 on Mac
Set default branch
DEFAULT_BRANCH="develop"
git symbolic-ref HEAD refs/heads/$DEFAULT_BRANCH
cat .git/HEAD
git branch -avv
Viewing files
-
To see files changed vs. the tracking branch:
git diff HEAD @{u} --name-only -
To see files changed, including uncommited local modifications vs. the tracking branch:
git diff @{u} --name-only -
To see lines changed vs. the tracking branch:
git diff master origin/master
Compare tracking branch
-
Before you fetch/pull, display incoming changes from remote origin master branch :
git log ^master origin/master
Nothing is returned if no changes were found.
-
To see the difference introduced by fetch:
gitk origin/master..master
Alternately, some others prefer using 3rd-party merge utilities.
-
To display outgoing changes before you push:
git log master ^origin/master
-
then a
git checkout master
gitk for diff
Now we can use a utility such as gitk to see what changes came in.
-
Click the commit listed at the top of the list, which is the most recent commit.
-
Alternately, there is also utilities vimdiff, meld, difftool, etc.
-
For Linux: https://wiki.gnome.org/Apps/Gitg/
-
To see the difference between what is in last commit vs. what’s in the working folder:
git difftool
- To see the difference between what is in last commit vs. what’s added in the index cache:
git difftool --cached
- You can make a default command such as this to explicitly specify some file to compare:
git diff HEAD HEAD^ -- file1
git push origin master
-
-
git push to update origin master on our forked repository.
There are variations to these commands, but this is the typical workflow.
[ Whoops ]
Changes in my repo
-
In GitHub, on a repo you can change, create a new branch named “sample1”, create a new file, click the pencil to edit the file. Save it. For example, create a new file and change something.
Even if you are not working with a repo that others update, you yourself may update files on GitHub.
fetch –dry-run
-
Locally, when a team creates branches of the master, everything that the team is working on can be seen with one command:
git fetch --dry-run
A sample response is this from Scott Chacon:
remote: Counting objects: 3032, done.
remote: Compressing objects: 100% (947/947), done.
remote: Total 2672 (delta 1993), reused 2328 (delta 1689)
Receiving objects: 100% (2672/2672), 16.45 MiB | 1.04 MiB/s, done.
Resolving deltas: 100% (1993/1993), completed with 213 local objects.
From github.com:github/github
        * [new branch]      charlock-linguist -> origin/charlock-linguist
        * [new branch]      enterprise-non-config -> origin/enterprise-non-config
        * [new branch]      fi-signup  -> origin/fi-signup
2647a42..4d6d2c2  git-http-server -> origin/git-http-server
        * [new branch]      knyle-style-commits -> origin/knyle-style-commits
157d2b0..d33e00d  master     -> origin/master
        * [new branch]      menu-behavior-act-i -> origin/menu-behavior-act-i
ea1c5e2..dfd315a  no-inline-js-config -> origin/no-inline-js-config
        * [new branch]      svg-tests  -> origin/svg-tests
87bb870..9da23f3  view-modes -> origin/view-modes
        * [new branch]      wild-renaming -> origin/wild-renaming
PROTIP: Branches such as “origin/wild-renaming” in the sample above is a remote tracking branch. File in your working folders are not updated by git fetch, which is the reason why we use it rather than git pull. Local branches don’t have the remote prefix and slash.
[ Whoops ]
Pull rebase with git up alias
Use the Git utlity which resolves conflicts: It tries to find out which commits are really your local ones, and which had come from upstream in an earlier fetch.
git pull --rebase --autostash
As noted here, this finds the starting point for rebase by looking at the reflog of the remote tracking branch (the tips of successive git fetch operations on origin).
- https://coderwall.com/p/7aymfa/please-oh-please-use-git-pull-rebase
--autostash
(introduced in git 2.9 of June 2016) automatically performs stash commands
before the pull so that pull works even on “dirty” trees.
The automatic commands are git stash save before the pull,
and then when done git stash pop. This added logic which solved a trap in
automation via aliases such as:
git stash && git pull --rebase && git stash pop
If there’s nothing to stash, the first command will do nothing, but then stash pop will unstash some random stuff from before.
CAUTION: There still may be changes introduced which cause a conflict when the stash pops after a successful rebase. An example:
Created autostash: 094ad5c
HEAD is now at d39c25c repo1 - readme
First, rewinding head to replay your work on top of it...
Fast-forwarded master to 6b6e1d4262fd5bc8d2b974f81222003a6c67fea6.
Applying autostash resulted in conflicts.
Your changes are safe in the stash.
You can run "git stash pop" or "git stash drop" at any time.
-
If you like the above approach enough to use it a lot, create a Mac or Git alias.
On a Mac, you can type only 3 letters (
gup) by defining in your ~/.bash_profile:alias gup='git -c rebase.autoStash=true pull --rebase'
Alternately, on any system, define this command:
git config --global alias.up '!git pull --rebase --autostash'
or
git config --global alias.up '!git fetch && git rebase --autostash FETCH_HEAD'
This would enable you to type only this (reminescant of Subversion):
git up
The above alias definitions obsoletes git-up and the Python port on Windows as well as previous suggestion to define a global default (saved in the global .gitconfig file) which automatically inserts
--rebaseparameter ontogit pullcommands:git config branch.autosetuprebase always
[ Whoops ]
Trunk-based Development in MS Release Flow
Thoughtworks advocates for their Trunk-Based Development instead of using different branches, so every commit keeps the repository production ready.
VIDEO: Git patterns and anti-patterns for successful developers [20:25] at Microsoft Build conference May 7-9, 2018 by Edward Thomson (@ethomson) about Visual Studio Team Services says Microsoft now recommends Trunk-based Development, where coding is based on the trunk, which is a synoym for the master branch. Make Small, simple changes and integrate into the master branch. easier to code review small chunks fewer merge conflicts encourages pull requests simpler to ship, faster velocity
Keeping code isolated from other developers is Technical Debt. So code in feature toggle codes which allows features to be turned on or off in production.
[8:51] GitHub Flow adds an additional step
- Master is locked temporarily
- Merge master into the branch to deploy
- Build and run test suite on the branch to deploy
- Deploy the branch to canary servers; monitor for problems
- Deploy the branch to production servers; monitor for problems
- Merge the pull request into master; unlock the master branch
[15:20] Microsoft does “Release Flow” releases to production at the end of 3-week sprints.
Like GitHub, Microsoft fixes bugs in master first so that they can’t be forgotten and create the same error in the future. The changes are cherry-picked into the release branch.
See https://aka.ms/releaseflow dated April 19, 2018
Other videos and articles
-
Syncing Your GitHub Fork [4:26] May 3, 2014 by Data School at jackiekazil using justmarkham
-
GitHub Fork and Sync repository by Prem Aseem Jain at premaseem.wordpress.com
More Videos
YOUTUBE: from GitHub Education Professional Guides: Workflow Strategies has video illustrations
https://github.com/zacksiri @zacksiri
- Git Flow Introduction
- Git Flow Feature Branch and Pushing to GitHub [11:16] 6 Dec 2015
- Git Flow and Github Pull Request [6:53] 1 Jan 2016
git-basics software is described by this video and blog from 2013 by @KBasarab and at:
- https://blog.axosoft.com/gitflow/
- https://leanpub.com/git-basics/read
- https://www.git-tower.com/learn/git/ebook/en/desktop-gui/advanced-topics/git-basics
References
-
https://danielmiessler.com/study/git/ Daniel Miessler’s Git Tutorial from 2014 is a masterful explanation.
-
Introduction to GitLab Workflow [49:14] Mar 11, 2016
-
GitFlow how to get it right Apr 24, 2014 [25:15] by Basil Abbas
-
http://tiny.cc/learngit provides a webpage to memorize Git concepts.
-
http://get.gitlab.com/getting-started-with-git/
-
https://neoteric.eu/automate-your-work-with-gitlab-ci-cd-tool
-
Git Flow for Daily Use by Mediacurrent Drupal, Apr 11, 2013
-
Git Workflow Strategies for Technical Debt Management May 17, 2017 by Raquel Pau Fernández
More
This is one of a series on Git and GitHub:
- Why Git? (file-based backups vs Git clone)
- Git basics (script)
- Git whoops (correct mistakes)
- Git command shortcuts
- Git interactive merge (imerge)
- Git patch
- Git utilities
- Git hooks
- GitHub data security
- GitHub actions for automation JavaScript
- GitHub REST API
- GitHub GraphQL API
- GitHub PowerShell API Programming
- GitHub GraphQL PowerShell Module