

How to keep secrets out of GitHub
![]()
![]()
![]()
![]()
![]()
![]()
![]()
![]()
![]()
![]()
![]()
![]()
![]()
Overview
- Diagram
- PROBLEM 1. Your GitHub account password can be stolen
- SOLUTION 1. Enable 2FA with an Authenticator app
- PROBLEM 2. Hackers are doing “Dorking” scans looking for secrets in GitHub
- SOLUTION 2. Automate “Dorking” scans of you code
- PROBLEM 3. You may forget to add .gitignore or remove local secrets
- SOLUTION 3: Automate so you don’t have to remember
- PROBLEM 4. Secrets remain in prior commit history
- SOLUTION 4. Remove secrets in prior commit history on GitHub
- PROBLEM 5. Static passwords and keys can be cracked
- SOLUTION 5. Rotate keys to encrypted files
- PROBLEM 6. You can lose secrets when your laptop crashes or is lost
- SOLUTION 6. Save secret keys in the cloud
- SOLUTION 7. Rotate Personal Access Tokens every month/quarter/year
- SOLUTION 8. Rotate SSH keys automatically daily as certificates generated by a client referencing a CA
- PROBLEM 9. Other processes can see environment variables in memory
- SOLUTION 9. Obtain secrets from a running secrets manager app
- MacOS TouchID
- Resources
- More
Conditions enabling leak of secrets from GitHub and other source repositories:
PROBLEM 1. Your GitHub account password can be stolen
PROBLEM 2. Hackers are doing “Dorking” scans looking for secrets in GitHub
PROBLEM 3. You may forget to add .gitignore or remove local secrets
PROBLEM 4. Secrets remain in prior commit history
PROBLEM 5. Static passwords can be cracked eventually
PROBLEM 6. You can lose secrets when your laptop crashes or is lost
PROBLEM 7. PAT (Personal Access Tokens) are static, subject to theft
PROBLEM 8. SSH keys to access GitHub are static, subject to theft
PROBLEM 9. Other processes can see environment variables in memory
NOTE: Content here are my personal opinions, and not intended to represent any employer (past or present). “PROTIP:” here highlight information I haven’t seen elsewhere on the internet because it is hard-won, little-know but significant facts based on my personal research and experience.
Recommendations offered in this article:
SOLUTION 1. Setup 2FA with an authenticator to physically confirm GitHub access
SOLUTION 2. Automate scans to look for secrets locally before/after pushing to GitHub
SOLUTION 3. Automate so you don’t have to remember
SOLUTION 4. Remove secrets in prior commit history on GitHub
SOLUTION 5. Rotate keys to encrypted files
SOLUTION 6. Save secret keys in the cloud
SOLUTION 7. Rotate Personal Access Tokens every month/quarter/year
SOLUTION 8. Rotate SSH keys automatically daily as certificates generated by a client referencing a CA
SOLUTION 9. Obtain secrets from a running secrets manager app
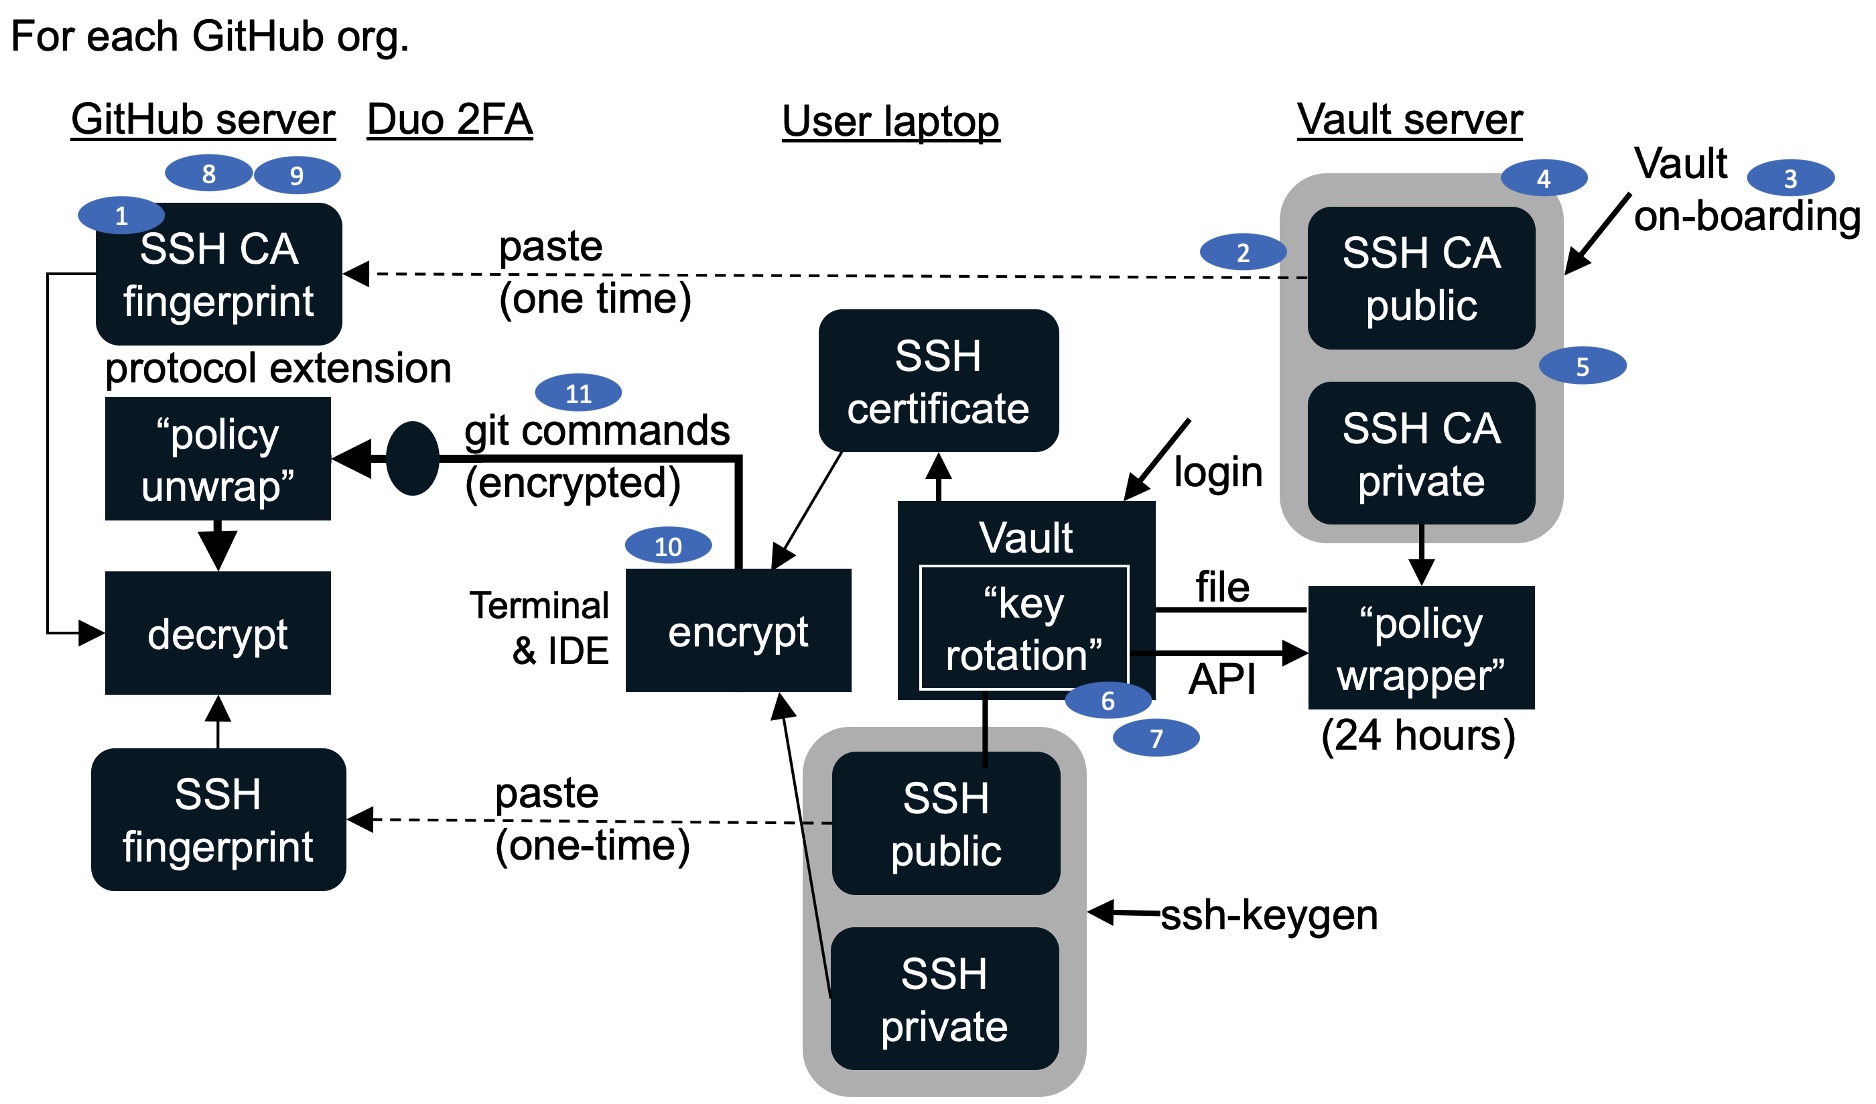
Diagram
Here is a draft diagram describing how the various techniques above working together:
As we write functions within application source files, we put them within a Git folder, and commit changes (which Git stores in its .git folder containing history).
The private API keys and crypto certificates from Certificate Authorities we collectively call secrets for accessing web services can be conveninently just copied into the Git folder.
When files are pushed up to GitHub or other repository, .gitignore settings should prevent the certificate from being uploaded and thus risk exposure.
PROTIP: Many say it’s NOT a good idea to keep secrets such as passwords and other private data in a GitHub repository. Murphy’s Law applies here too.
PROTIP: Organizations should do their own scans to find issues before others do.
CAUTION: But even after data is removed from the current repository, like the Padora’s Box legend, whatever was exposed can nevertheless live on in any forks, clones, or zip files others have taken of the repository.
Private file in them can be referenced in profile scripts that load files and environment variables within memory accessible by application programs.
PROBLEM 1. Your GitHub account password can be stolen
Someone watching over your shoulder can see your password being typed in.
A key-logger program (“spyware”) installed on your laptop can capture what you type on your keyboard.
SOLUTION 1. Enable 2FA with an Authenticator app
Most enterprise GitHub instances route login to their GitHub organization automatically through their Duo or other multi-factor authentication process on each user’s own smart mobile phone.
If you use an employer-provided smartphone, your employer GitHub account would be protected via SSO through Duo, Okta, etc. But your personal GitHub account is still exposed.
One-time 2FA setup
PROTIP: To protect GitHub accounts opened using a Gmail or other private email address (not a corporate email), we recommended that you enable GitHub’s 2FA (Two-factor Authentication).
There are many tutorials on how to do this on YouTube.
-
Use an internet browser (Chrome) to go to:
https://github.com/settings/security
You can reach this by clicking the avatar picture on the top right on the black band for the drop-down menu to select “Settings”, then in the left sidebar, click Account security.
-
Click the green “Enable two-factor authentication”.

Alternately, an “Enabled” button appears if you’re already enabled. In that case, click “Edit” to “Authenticator App” under “Two-factor methods”.
PROTIP: 2FA requires you to obtain a TOTP (Time-based One-time Password) number in addition to your password.
- Provide your password again.
-
On the Two-factor authentication page, click the green “Set up using an app” button for a list of recovery codes.

CAUTION: Recovery codes are the only way to access your account again if you lose your 2FA device. GitHub Support will not be able to restore access to your account, forcing you to lose all repos and history created under that account.
-
PROTIP: Print and save your recovery codes in a safe place. You get a list of recovery codes because each can only be used once instead of your static Password to get back into your account.
- Don’t save the recovery codes in your password manager (1Password, etc.) since those codes are what you use as a backup when you can’t access your normal password manager.
- Have at the ready an editor program opened to a file for saving your recovery codes.
- Get the codes into your machine’s invisible Clipboard, by clicking “Copy” in the GUI or highlighting the codes and pressing Command-C on Mac or Control-C on Windows.
- Switch to your editor program and paste the codes in the file (Command-V on Mac, Control-V on Windows).
- Click Print to save a hard copy of your recovery codes. Put that paper in a fire-safe box you keep your other valuables you will carry off in case of an evacuation.
- Don’t click “Download” to save the recovery codes (in clear text) on your device for hackers to steal.
-
Click “Next” for a QR code for your Authenticator app to read.
-
If you already have Duo, open that app. Alternately, go to the Store app on your smartphone and install one:
-
Duo on iPhone or Google Play on Android
-
Google Authenticator on iPhones or Google Play on Android
-
Microsoft Authenticator on iPhones or Google Play for Android.
-
- In your chosen authenticator app, click “+” for the camera to appear.
- Hold your camera to position the QR code to take up the screen to scan it.
-
After scanning, the last item on the app displays a six-digit code that you can enter on GitHub.
PROTIP: Ignore the space between the numbers. Enter just the 6 numbers.
- Click “Enable”.
- Click your avatar and select “Sign out”.
-
Sign in again.
Responding to a 2FA challenge
-
When you see a “Two-factor authentication” challenge on a web page:

- On your smart phone, open your authentication app (Duo, etc.).
-
Click the arrow on the right edge of the “GITHUB” entry listing your account name, so that you see six numbers.
- On your laptop’s browser, type those numbers in the Authentication Code field entry.
- Success means you see your landing page at “github.com”.
References:
PROBLEM 2. Hackers are doing “Dorking” scans looking for secrets in GitHub
A “dork” is American slang for someone who is both academically inclined and also silly and clumsy.*
Rogue “dorking” scanners are looking through every public repository, every commit made, every day, looking for secrets.
Examples below have triggers in bold:
In a PowerShell file to define a new VM in Azure:
$username = 'demoadmin'
$password = ConvertTo-Secure-String 'pa$$word1234' -AsPlainText -Force
$WindowsCred = New-Object System.Management.Automation.PSCredential ($username, $password)
New-AzVM -ResourceGroupName 'psdemo-rg' `
   -Name 'psdemo-win-az' `
   -Image 'Win2019Datacenter' `
   -Credential $WindowsCred `
   -OpenPorts 3389
In a CLI shell file to define a new VM in Azure:
az vm create --resource-group "$myRG" --name "$myVMName" \
   --image "$myWinOSImage" \
   --admin-username "$adminUsername" \
   --admin-password "$adminPassword"
References:
- http://www.securityweek.com/github-search-makes-easy-discovery-encryption-keys-passwords-source-code
- http://www.itworld.com/article/2921135/security/add-github-dorking-to-list-of-security-concerns.html
SOLUTION 2. Automate “Dorking” scans of you code
There are two places scanning should occur: locally on laptops and in the GitHub cloud.
GitHub itself has a “GitHub Advanced Security (GHAS)” offering for Enterprise users. Its advantage is that it scans without any developer effort.
It’s a “premium” service ($36.69 per committer with 90 days free) because regular expressions needs to be written to detect secrets applicable to each circumstance, such as AWS credentials, etc.
Coverage of tools is important, so are several competing 3rd-party utilities which detect secrets in GitHub repositories:
- Nightfall with SSO
On the laptop locally, it takes effort to install Git hooks to fire upon git commit commands.
The options:
git-secrets at github.com/awslabs/git-secrets is from AWS Labs, so does not scan secrets for other clouds. However, there is less concern about malware in the utility. Procedures to install it is detailed at git-secret.io.
secret-bridge by Duo sends Slack messages (PROTIP: Slack messages can have significantly better response than emails). It automates execution of several secret detection tools based on repository events.

GitHub Advanced Security, a licensed SaaS service from GitHub itself, sends emails about secrets found within Enterprise GitHub instances. Its advantage is that its simple analysis reports are available along with code, which no other vendors can provide.
AWS Macie (described at docs.aws.amazon.com/macie) is a SaaS cloud service from Amazon that uses machine learning and pattern matching to discover and protect your sensitive data in AWS S3 buckets, at scale. Macie’s alerts, or findings, can be searched and filtered in the AWS Management Console and sent to Amazon EventBridge (CloudWatch Events), for integration with existing workflow or event management systems, or to be used in combination to take automated remediation actions using AWS Step Functions. It can be invoked from commands in AWS CLI.
Git Guardian (at gitguardian.com) is an automated monitoring cloud utility to detect API keys and other credentials and secrets exposed in source code on public SaaS or private (internal/on-prem) GitHub. Free on public repos. Its documentation is published at https://docs.gitguardian.com/internal-repositories-monitoring/home.
GuardRails.io (@guardrailsio) on GitHub’s Marketplace uses proprietary code. It produces reports and provides login security, which are important to keep knowledge of internal vulnerabilities isolated to only those who need to know. Its free plan scans only PRs and retains data for a day. It claims use of machine learning to automatically identifies the programming languages and frameworks for each file and the appropriate security tools.
- Documentation. VIDEO: “The Future of DevSecOps” by CEO Stefan Streichsbier.
- Guardrail’s “Fixing Hard-Coded Secrets”
If you would rather not have others look through your code, consider programs you run locally:
GitLeaks is a post-commit utility that runs locally or as a local GitHub Action (Gitleak’s author, Zachary Rice, currently works at GitLab). Written in Go, it is open-sourced at https://github.com/zricethezav/gitleaks/blob/master/config/default.go which are RegEx. Please contribute a search string if you know of potential strings leak (such as for accessing Azure). It scans git repos (or files) for known patterns of strings using regex and Shannon entropy. Josphat Mutai’s blog describes it’s cool features.
“GittyLeaks” open-source code.
“Detect Secrets” open-source code.
TruffleHog is open-source code.
VIDEO: course “Securing the Application Lifecycle in Microsoft Azure” by Reza Salehi describes use of Microsoft DevLabs-created CredScan (Credential Scanner) for use within licensed Visual Studio IDE clients and within the Azure cloud run as a task in Microsoft Security Code Analysis Extension.
PROBLEM 3. You may forget to add .gitignore or remove local secrets
Some devs write code (in shell scripts, etc.) to read “.env” files containing secrets.
When a repository is created on Github.com, you have an option of creating a .gitignore file to travel with content in the repository.
Folder and file names specified in that file Git ignores when pushing up to GitHub.
So some devs over-depend on this mechanism and save secrets.
The problem with this approach is we sometimes forget to add that line in .gitignore before pushing to GitHub.
The other problem with this approach is what happens when your laptop crashes?
Your passwords and encryption keys can be lost forever if they are not backed up.
Ignore change
-
Tell Git to ignore changes to a file in the future by constructing this command by replacing file with your own file’s name:
git update-index --assume-unchanged file
However, this works only on a single branch.
On a change of branch, Git detects changes in the config file, and you’ll have to either undo them, or check them in.
-
To track changes again, construct this command by replacing file with your own file’s name:
git update-index --no-assume-unchanged file
References:
-
http://www.codeproject.com/Articles/602146/Keeping-sensitive-config-settings-secret-with-Azur
-
http://gitready.com/intermediate/2009/02/18/temporarily-ignoring-files.html
Another option is to use pre and post-commit hooks to automatically add/remove secret config values when checking in and out, using a Python program.
SOLUTION 3: Automate so you don’t have to remember
Automatic Encryption

Automation scripts running on the desktop often need to provide passwords to various web services. It’s inconvenient to type the credentials in every time the script runs, especially when it’s run overnight on a schedule. Some make the credentials available in a secrets file on their laptop, with contents in clear text so they can be changed.
When git add, commit, and push commands are issued to a folder initialized for git, files specified in .gitignore are blocked from being uploaded to GitHub or other online repository.
The problem with this approach is that if the local secrets file is ever deleted, or the whole laptop is destroyed or stolen, the secrets are gone too.
What we want to consider here is an encrypted secrets file resting, encrypted, within the GitHub cloud and brought down locally by a git fetch or pull. This means that changes would be versioned. But what the changes are would not be evident due to the encrytion.
Mechanisms for encryption and decryption is provided by a utility GitHub repository installed on Mac laptops using Homebrew from:
The repository from sobolevn in Moscow, Russia, who specializes in Elixir. His library provides for initalization of a .gitsecrets folder to hold public keys created using the GPG utility. Its “tell” program emails the private keys it creates so it’s off the machine.
Encrypted files do not need to be automatically decrypted into clear text file until secrets need to be edited to change the behavior desired in shell scripts when they are run.
The secreate file can be encrypted automatically on git commit when a git hook program recognizes the need for encryption so the file can be safely pushed into GitHub again.
If the script has code to decrypt the secret files itself based on the public key generated, the clear text file can be removed locally after editing. There is then no need for the clear text file to be referenced.
When someone is out - just delete their public key, re-encrypt the files, and they won’t be able to decrypt secrets anymore.
PROTIP: This is not a totally secure approach for extremely sensitive production data because, any encryption can be hacked given enough time using on supercomputers now commonly available to hackers. This is dealt with in the next section.
PROBLEM 4. Secrets remain in prior commit history
PROTIP: If a file is deleted using git rm and a commit is made,
a vestige of that data still exist in the repository’s history (.git folder).
SOLUTION 4. Remove secrets in prior commit history on GitHub
See https://microsoft.github.io/AzureTipsAndTricks/blog/tip115.html
Git has a
git-filter-branch command which
rebuilds a repo one commit at a time without the offending
content. The Git Real 2 course covers this.
-
Make commits and push so there is nothing in your local staging area.
-
Zip up the repo so you have a fall-back.
-
Make a copy of the “poodles” repo locally as backup:
git clone poodles burning-poodles -
Rebuild the repo one commit at a time after applying the shell script rm function to remove the secrets.txt file from –all commit files: (change secrets.txt to your file’s name)
git filter-branch --tree-filter 'rm -f secrets.txt -- --all'Note .gitignore rules are not applied here.
This is a very I/O intensive operation and will take a long time on larger repos.
-
There are options that change other information:
--env-filterrewrites author/committer name/email/time environment variables--msg-filterrewrites commit message text. -
Remove (prune) commits which are now empty because the offending file they reference have been removed:
git filter-branch -f --prune-empty -
Notify all those who may have forked or cloned or downloaded the repo.
BFG Java Utility
Utility program BFG Repo-Cleaner (bfg.jar) is faster due to it being written in Scala (a varient of Java). This webpage explains commands such as replacing such as this to find known passwords and replace them with ***REMOVED***.
java -jar bfg.jar --replace-text passwords.txt my-repo.git
PROBLEM 5. Static passwords and keys can be cracked
Some devs make use of programs that encrypt files stored in GitHub.
Storing encrypted data in GitHub
“Aside from an initial unlock command that needs to be used after cloning the repository, git-crypt encryption and decryption operations happen transparently. I find this workflow to be superior to git-secret and BlackBox.” says blackbox, git-secret bash script, and git-crypt.
git-gpg stores encrypted git repositories on third-party / potentially insecure servers, but stores all changes to source files as compressible textual deltas (a key reason for using git in the first place). The repository is encrypted remotely but the local version has no encrypted blobs inside.
Other benefits include architectural simplicity and low footprint: it consists of a single Python script added to your executable path.
CAUTION: Their achilles heel is that old versions of keys are stored in Git history.
Cracking
CAUTION: The problem is that recent advances in computing hardware enable passwords and keys to be cracked.
Thieves can now direct thousands of computers to guess encryption keys quickly.
SOLUTION 5. Rotate keys to encrypted files
The down-side of storing encrypted files is that GitHub, being designed to work with text, can no longer compare and version encrypted files.
As binary files, entire files are versioned using Git LFS (Large File Store) capabilities.
But diff of individual lines within encrypted files are not currently conviently available.
LFS for binary files
NOTE: The Git smudge filter is what converts the LFS pointer stored in Git with the actual large file from the LFS server. If your local repository does not have the LFS object, the smudge filter will have to download it. Network issues can affect downloading and thus smudge filter operation.
PROBLEM 6. You can lose secrets when your laptop crashes or is lost
Some devs code their programs to read “.env” files in a folder outside Git repository folder, such as the user’s root foler.
But mechanisms to backup those secrets can be problematic.
Many enterprises block USB drives from being plugged in (to avoid STUXNET vulnerability).
The application 1Password takes a compromise approach of allowing password crypts to be transferred among multiple local devices, but not over a public network.
SOLUTION 6. Save secret keys in the cloud
Cloud vendors have the money to hire top professionals figuring out how to keep data safe for a lot of others.
If you do still store secrets in .env files, store a backup of them in a cloud vendor’s key store:
GitHub Secrets
In 2020 GitHub introduced the Secrets page within the Settings tab of each repository for use with GitHub Actions pipelines.
-
BLAH: The “Manage organization secrets” to define secrets for the whole organization (which can include other repos) is there for convenience.

-
Typically, “New repository secret” would be clicked to define secrets applicable to only the current repository.
NOTE: “YOUR_SECRET_NAME” is in all caps because that’s the convention for naming static variables programs/pipeline code use to obtain secret values.
Secrets are environment variables that are encrypted.
PROTIP: In the name add a word for the type of secret, such as “API_ACCESS_TOKEN”, etc.
Environment secrets
Repository secrets
-
Type plain text secrets in the form so GitHub can hide the secret for reference within GitHub Actions pipelines.
Secrets entered are encrypted before they reach GitHub because GitHub uses a “libsodium sealed box” which encrypts each message using an ephemeral key pair (using a secret part destroyed right after encryption processing). So the sender cannot decrypt its own message later. The recipient decrypts messages using its private key.*
Secrets are not passed to workflows that are triggered by a pull request from a fork.
CAUTION: Anyone with collaborator access to this repository can use these secrets for Actions. So some prefer to store their secrets elsewhere, such as HashiCorp Vault or cloud key store.
Some utilities (such as SOP) reference your AWS credentials stored in folder $HOME/.aws to authenticate against KMS so you can encrypt and decrypt without a password.
VIDEO: Keeping secrets in your infrastructure pipeline at GitHub Universe 2020 [deck]
Rosemary Wang (@rosemarywang), Developer Advocate, HashiCorp code
Offline capable?
CAUTION: Programming reference to a cloud key store may slow progress to those who work offline, and need a cache of secrets on their laptop.
AWS CLI Configuration
-
AWS provides a command to define your credentials to access its cloud:
aws configure
BLAH: Although AWS in 2015 enabled users to switch roles in the Console, switching roles in the CLI is not available at time of writing.
-
List the location on a Mac or Linux machine:
ls ~/.aws
-
List the location on Windows:
dir %UserProfile%\.aws
Insidie the .aws folder is a credentials file containing, for example:
[default]
aws_access_key_id = ABCDEFGVSYNHR5G2VNGQ
aws_secret_access_key = 123456nVqH3AWz5pGQcZ/+JDHB4dBM2BDNtzUsnK

[user2]
aws_access_key_id=AKIAI44QH8DHBEXAMPLE
aws_secret_access_key=je7MtGbClwBF/2Zp9Utk/h3yCo8nvbEXAMPLEKEY
-
On a Mac, store:
export AWS_ACCESS_KEY_ID='YOUR_AWS_API_KEY'
export AWS_SECRET_ACCESS_KEY='YOUR_AWS_API_SECRET_KEY'
- https://aws.amazon.com/blogs/apn/getting-started-with-ansible-and-dynamic-amazon-ec2-inventory-management/
-
Insidie the .aws folder is a config file containing, for example:
[default]
region=us-west-2
output=json

[profile e1]
region=us-east-1
output=text
PROTIP: Define profile names with the region.
aws s3 ls \-\-profile default
See http://docs.aws.amazon.com/cli/latest/userguide/cli-chap-getting-started.html#cli-config-files
-
Configuration includes enabling auto completion for AWS CLI, edit file /etc/bashrc to add:
complete -C aws_completer aws
KMS utilities on AWS
Zemanta’s https://github.com/Zemanta/py-secretcrypt and https://github.com/Zemanta/go-secretcrypt keeps secrets encrypted with Amazon KMS (Key Management Service) in repos, which are decrypted on the fly by the application. Access control is managed through AWS KMS key policies, with EC2 instances running the applications having permissions to decrypt the secrets.
https://github.com/fugue/credstash uses AWS KMS for key wrapping and master-key storage, and DynamoDB for credential storage and sharing. Works in several flavors of Linux, in a variety of programming languages.
Google Cloud secret keeping
After setting up Google Cloud CLI, adapt this shell script to establish a key, encrypt, and decrpt:
KEY_NAME="talk-key"
KEYRING_FILE="my-sample-keyring"
CLEAR_TEXT_FILE_PATH="/tmp/the-secret-of-cloud.txt"

gcloud kms keys create "${KEY_NAME}" --location global --keyring "${KEYRING_FILE}" --purpose encryption
echo "clear text contents to be encrypted" > "${CLEAR_TEXT_FILE_PATH}"

gcloud kms encrypt --location global --keyring "${KEYRING_FILE}" --key "${KEY_NAME}" \
   --plaintext-file "${CLEAR_TEXT_FILE_PATH}"
cat "${CLEAR_TEXT_FILE_PATH}".encrypted

gcloud kms decrypt --location global --keyring "${KEYRING_FILE}" --key "${KEY_NAME}" \
   --ciphertext-file \
   --plaintext-file=-
SOPS decrypt to RAM for editing
To avoid forgetting to re-encrypt files decrypted on your laptop, https://github.com/mozilla/sops (SOP = Secrets OPerationS), written by Mozilla (the alternative browser) to decrypt files in RAM where you can edit and the utility re-encrypts files automatically before saving them to disk.
An example using GCP KMS:
CLEAR_TEXT_FILE_PATH="/tmp/myfile.enc.yaml"
sops --encrypt --gcp-kms "${KEY_NAME}"   "${CLEAR_TEXT_FILE_PATH}" > "${CLEAR_TEXT_FILE_PATH}"
sops --decrypt "${CLEAR_TEXT_FILE_PATH}"
sops "${CLEAR_TEXT_FILE_PATH}"  # to edit then save using default vim editor
sops --decrypt "${CLEAR_TEXT_FILE_PATH}"
Note that sops automatically decrypts to use Git diff commands to identify between two files differences in specific lines.
References about this topic:
- Securing DevOps Show & Tell: Mozilla Sops Mar 2, 2019 video of blog article.
- VIDEO: Avoid committing your secrets with Kustomize and SOPS (with Agilicus add-on to Kustomize) May 31, 2019 [17:40]
- lists Ideal Secrets Management Solution Requirements
Azure Key Vault
References:
- Azure Key Vault
- Keeping-sensitive-config-settings-secret-with-Azur”>Keeping sensitive config settings secrete with Azure
PROBLEM 7. PAT (Personal Access Tokens) are static, subject to theft
Github allows for several ways to authenticate and authorize access to repositories. In addition to passwords, Github enables users to create a Personal Access Token (PAT) to authenticate instead of a password.
The concern is that any static key is subject to cracking and theft. Anyeone who knows a password/PAT can access all data of that user on GitHub, include deletion.
SOLUTION 7. Rotate Personal Access Tokens every month/quarter/year
PROTIP: In your Calendar (such as Outlook), create an appointment for each Private Access Token created.
PROBLEM 8. SSH keys to access GitHub are static, subject to theft
-
When at a repository on GitHub, in the Code section, you want to clone a repository to your laptop, click the green ”Code” button:

-
You are presented with a choice of “HTTP”, “SSH”, and (new) “GitHub CLI”:

If you choose “Download ZIP”, it would include only the most recent version of files and won’t include the history of changes (“commits”) made.
Underlined in red is SSH (Secure Shell), used for a more secure connection than HTTPS. The SSH protocol is used extensively by Linux operating systems to secure transmission between servers and laptop clients. (Linus Torvolds, who created Linux, also created Git)
Instead of passwords, using SSH means that we won’t have to input a password each time a Git command is issued.
TMI: The public key file and private key file generated use what is called “asymmetric cryptography” algorithms. Instead of exchanging a single mutually known (“symmetric”) password, smart mathematics is used such that the public key is manually pasted in GitHub GUI to be used to decrypt data which was encrypted using the other part of the key pair.
However, to make user of SSH involves each user (developer) generating SSH keys locally on a laptop, obtaining the contents of the public key, and pasting that in a GitHub GUI. Explained below:
-
Open a Terminal window.
-
Navigate to the (hidden) folder which programs go to (by default) to find SSH key files. On a Mac:
cd $HOME/.ssh
If the folder doesn’t exist, create it.
SSH makes use of a pair of files generated together by the ssh-keygen utility program used by Linux users.
-
PROTIP: To avoid typing mistakes, construct commands to define variables substituted with your information:
export GITHUB_ORG="gmail_acct"
export MY_EMAIL_ADDRESS="john-doe@gmail.com"
{GITHUB_ORG} is a variable which defines the file name and also the folder where you store repositories under your account.
-
Create a pair of SSH key files by copying the line below and pasting in your Terminal:
ssh-keygen -t rsa -f "${GITHUB_ORG}" -C "${MY_EMAIL_ADDRESS}" -N ""-N “” specifies that no Passphrase will be requested when the key is used. Otherwise, you’ll have to type your password in when executing every git command.
NOTE: If -f “${GITHUB_ORG}” is omitted, you will be prompted for it. Pressing Enter at the prompt will result in a default name of “id_rsa”.
The response is something like this:
Generating public/private rsa key pair.
Your identification has been saved in mck_acct.
Your public key has been saved in mck_acct.pub.
The key fingerprint is:
SHA256:o3um68DCgu29uREm2Di6tgGrSCTUaHZdhOS4Aj6nHnc wilson_mar@NYC-192850-C02Z70CMLVDT
The key's randomart image is:
+---[RSA 3072]----+
|    ..oo         |
|  o +..          |
|.= + o           |
|*+. .            |
|*=ooo   S        |
|*==+ . . .       |
|==+.+E.          |
|==+o.+ .o        |
|=oo =+==         |
+----[SHA256]-----+
-
Make sure the ssh agent program used to register key identities is running:
eval "$(ssh-agent -s)"
A sample response is:
Agent pid 21631 -
Register the newly created key identities:
ssh-add "$HOME/.ssh/${GITHUB_ORG}"Example response on a laptop configured with “johndoe” as the machine user name:
Identity added: /Users/johndoe/.ssh/gmail_acct (john-doe@gmail.com)
-
Copy the contents of the public key file to your machine’s Clipboard. On a Mac:
pbcopy < "$HOME/.ssh/${GITHUB_ORG}.pub"On Windows:
clip < "$HOME/.ssh/${GITHUB_ORG}.pub"Add the newly created public key to your GitHub account
-
Switch to an internet browser.
-
Construct your GitHub.com by substituting the example with your GitHub.com account name, for example:
https://github.com/wilson-mar
-
Login using your password and 2FA challenge.
-
Click on the drop-down arrow icon beside the icon (avatar) at the top right of GitHub’s navigation bar.
-
Select “Settings” in the drop-down.
-
Click on “SSH and GPG keys” link on the navigation menu at the left.
-
Click on the green “New SSH key” button by the top right.
-
Click inside the “Title” field and type your machine and file name you are about to paste. Example:
Windows 10 laptop file id_rsa.pub
-
Click inside the “Key” data entry field which says “Begins with”…
-
To paste from Clipboard: On macOS, press command+V. On Windows, press ctrl+V.
“ssh-rsa” should be the first line, followed by something humans cannot read.
-
Click “Add SSH key”.
-
Enter your GitHub password again when prompted to confirm.
-
You should receive an email with subject:
[EXT][GitHub] A new public key was added to your account
Make use of SSH protocol
-
Switch back to view your repository view on GitHub.com at the Code pop-up as shown above.
Notice that “git@github.com:username” appears instead of “https://github.com/username”.
References about this topics:
- https://docs.github.com/en/github/authenticating-to-github/generating-a-new-ssh-key-and-adding-it-to-the-ssh-agent
- A 10-minute video course at https://mckinsey.udemy.com/course/github-ultimate/learn/lecture/4731854#overview
The above steps are rather cumbersome for the user and can be dangerous for security because the SSH keys generated remain stored locally and possibly over a long period of time.
Someone else can copy an SSH key and access your account on a rogue computer.
SOLUTION 8. Rotate SSH keys automatically daily as certificates generated by a client referencing a CA
A more modern way that automatically generates SSH keys every day, each user of GitHub doesn’t have ssh-keygen to run and copying and pasting to a GitHub form.
The solution makes use of an new extension to the SSH protocol implemented by GitHub for its GitHub Enterprise Cloud license users (not individual users).
References:
- https://github.blog/2019-08-14-ssh-certificate-authentication-for-github-enterprise-cloud announces “SSH certificate authentication for GitHub Enterprise Cloud” August 14, 2019 by Ben Toews
- https://github.blog/changelog/2019-08-15-ssh-certificate-authentication-for-github-enterprise-cloud/
- SSH 2FA
The SSH protocol extension involves an additional SSH certificate file added to Git requests.
The SSH certificate file is created by what is called a policy “wrapper” program because it wraps policies around the public key, such as limiting the life span of the key wrapped to 24 hours.
The Policy Wrapper program is a HashiCorp Vault server maintained by an enterprise.
To ensure the authenticity of certificates, GitHub references another public key – the Certificate Authority public key generated on the Vault server and pasted into GitHub by the administrator.
When GitHub receives and unwraps the request, it enforces the policy.
Having the 24 hour key rotation policy in place means new certificate are created every day, by what we call a “key rotation” program/script running on laptops. It makes an API call to the Vault server and receives the SSH certificate file.
Here is a static flowchart of the process described above:
Steps to make this happen include:
-
As the Organization’s Owner, enable SSH Certificate processing for GitHub organization.
-
Create a Vault API CA (Certificate Authority) service.
-
Enroll users to the Vault API service.
-
Perform penetration tests of the Vault API server.
-
Ensure the Vault API service has the capacity needed (SSH load testing using PureLoad or https://github.com/shazow/ssh-hammer).
-
Create/Test a “key rotation” program which calls the Vault CA API to obtain a SSH certificate to send to GitHub:
- On macOS, this would be programmed in SwiftUI as a Menu bar app/icon at the top of every macOS screen.
- On macOS, this would be programmed in SwiftUI as a Menu bar app/icon at the top of every macOS screen.
-
Install “key rotation” client program (with associated dependencies) on all laptops.
The program would also need to create/edit .git/config files.
-
Require SSH Certificate processing for all access to GitHub organization.
-
Each user within an Enterprise GitHub Organization, enable “Single sign-on organizations” in the SSH keys section, click “Enable SSO”, then “Authorize”.
-
To troubleshoot:
ssh -Tv git@github.com
or if it’s a GitHub Organization, for example:
ssh -Tv g-12345678@github.com
-
Performance testing SSH connections using Neoload’s Terminal add-on
PROBLEM 9. Other processes can see environment variables in memory
CAUTION: There is a security flaw in the “12 Factor App” 12factor.net) which summarizes the basic design principles of modern web apps. In Factor 3: Config:
The twelve-factor app stores config in environment variables (often shortened to env vars or env). Env vars are easy to change between deploys without changing any code; unlike config files, there is little chance of them being checked into the code repo accidentally; and unlike custom config files, or other config mechanisms such as Java System Properties, they are a language- and OS-agnostic standard.
Apps sometimes store config as constants in the code. This is a violation of twelve-factor, which requires strict separation of config from code. Config varies substantially across deploys, code does not.
A litmus test for whether an app has all config correctly factored out of the code is whether the codebase could be made open source at any moment, without compromising any credentials.
Examples of code to retrieve an environment variable “SECRET_PASS” into the program:
Python coding
Python programs reference process.env.SECRET_PASS.
PHP coding
PHP programs use getenv('SECRET_PASS');.
C# coding
System.Environment.GetEnvironmentVariable("SECRET_PASS", _ EnvironmentVariableTarget.Process)
JavaScript (NodeJs) coding
JavaScript is restricted from accessing operating system environment variables by Internet browser sandboxing. So setup a REST API endpoint on a server you control to call with your app’s JavaScript. For example, to get MailChimp to send email from your web app, create a MailChimp API on your server using this Wordpress middleware API which stores your credentials securely on the server, and makes the real API call on your request. It then sends back the data, optionally filtering out any data you don’t want exposed publicly first. Test that the Same Origin Policy prevents rogue “leaching” sites from calling your API endpoint (cross-site request forgery (CSRF), one of the OWASP Top 10 Vulnerabilities) by adding X-CSRF-CHECK: 1 onto your application’s AJAX calls and having the backend check for $_SERVER[‘HTTP_X_CSRF_CHECK’] or generate and exchange a custom session key:
- Client embeds client_key in request for API library.
- Server determines host that has access to the API, if any.
- Server picks “salt” for a session key and sends it to the client with the library [or as part of another pre-auth exchange].
- Client calculates a session_key using hash(document.location.host + session_salt).
- Client uses session_key + client_key for an API call.
- Server validates the call by looking up the client_key’s host and “salt” in the session, computing the hash, and comparing to the provided client_key.
- Server validates SameSite Cookie Attribute.
Some GitHub contains sample values in a file
CAUTION: The problem is that some simply save the .env file in the same folder, which is then subject to being pushed to a GitHub repository.
Azure PowerShell to Login unattended
-
On Windows:
(Get-Credential).password | ConvertFrom-SecureString | set-content “$HOME\AzurePassword.txt”
-
On MacOS/Linux home folder:
(Get-Credential).password | ConvertFrom-SecureString | set-content “~/AzurePassword.txt”
-
Both:
$UserName = “JohnDoe@evilcorp.com”
$Password = Get-Content $file | ConvertTo-SecureString
$credential = New-Object System.Management.Automation.PsCredential($UserName, $Password)
# Login to the Azure console:
Login-AzAccount -Credential $credential
An extention of this concept is to reference a file name that is actually reached via a symlink to a folder outside of the Git repository, such as on the user’s $HOME folder.
Symlink Configuration
-
On a Mac, this sample command is used to create a symlink. For example:
ln -s ~/.aws/credentials  credentials
ln -s ~/.aws/config  config
-
On Windows, to create a “Shortcut” file, right-click the folder icon you want to make a shortcut of, and select “Create shortcut” from the right-click menu that appears.
Alternatively, you can right-click and hover your mouse over the “Send to” option and select “Desktop”.
GitLab
By contrast, https://docs.gitlab.com/ee/ci/secrets/index.html
Sync from Dropbox
This on-line tool generates a direct link from a share link into Dropbox, Google Drive, and Microsoft OneDrive.
Certificate from file
In Bash, an export command is used to bring in the public key generated by ssh-gen into the user’s home hidden .ssh folder:
export RSA_PUBLIC_KEY=$(cat ~/.ssh/id_rsa.pub)
But PowerShell’s equivalent reads certificate files created using putty-gen or Mysysgit (the Git client for Windows):
$RSA_PUBLIC_KEY = Get-Content "~/.ssh/id_rsa.pub"
   # echo "RSA_PUBLIC_KEY=$RSA_PUBLIC_KEY"
$RSA_PUBLIC_KEY = [IO.File]::ReadAllText("~/.ssh/id_rsa.pub").split("`n")
The split method using the back-tick adds a trailing empty line at the bottom of the file.
In shell file: Secrets file to Hash Table
On my Mac I used a text editor to create a text file containing these (fake) secrets:
GITHUB_PASSWORD = '234sdsdvs32'
GITHUB_TOKEN = '1234567890123456789012345678901234567890'
Notice there are no dollar signs in front of the key names.
PROTIP: I prefre to not store the user name along with its password.
The file is stored in a .secrets file (no extension) in my Mac user home folder, so they can be invoked as a Bash script:
source ~/.secrets
NOTE: The dot command is equivalent to the source command.
BLAH: The Bash “source” function is not recognized by PowerShell and variables need to have dollar signs. So rather than creating a password file containing:
$GITHUB_PASSWORD = '234sdsdvs32'
$GITHUB_TOKEN = '1234567890123456789012345678901234567890'
I can also create a .ps1 file which defines a hashtable (a collection of key/value pairs, also called “associative arrays”):
[ordered]@{Key1=Value1;Key2=Value2}
However, I prefer to read the text file previously read by Bash so I end up with a hash table named $SECRETS in PowerShell, from which it retireves a specific property:
   $SECRETS = Get-Content "$home/.secrets" | ConvertFrom-StringData
   # don't echo $SECRETS.GITHUB_PASSWORD
   # don't echo $SECRETS.GITHUB_TOKEN
Although GitHub has private repos, its content is not encrypted. Anyone with the permissions at GitHub can read the contents.
SOLUTION 9. Obtain secrets from a running secrets manager app
This part was added to this article on September 2023.
A secrets manager running alongside your Terminal program is the subject of this section, and the one I recommend as the most secure.
The CONS: Installing and updating an additional program adds an additional dependency to manage. That external program can become malware. It can become a single point of failure to block you.
The PROS: People are working on it, looking out for new threats emerging. They are working to make it secure.
You are not.
So a separate program is a good solution for a team of developers who prefer not to become security experts.
Thus, I prefer paid apps which have a long history of regular updates (such as 1Password and Keybase). Not so strategic are open-source apps from a company that aims to make money from it somehow (such as the case of HashiCorp Vault limiting features in open source versions to entice users to pay enterprise fees for cloud editions).
Additionally, I belive that there is danger with open-source apps because that source code is available for hackers to study and find vulnerabilities.
There are several secrets manager apps which provide both a CLI and GUI app on maCOS and Windows.
- Apple Keychain/Keyring (built into macOS and iOS)
- 1Password (paid app)
- Ansible Vault from RedHat
- BitWarden
- gcrypt is a GnuPG extension to encrypt specific files in a Git repository.
- Keybase (see below) a free app funded by Zoom
- KeepassXC (see below) an open-source app
- LastPass
- Dashlane
- HashiCorp Vault (closed source)
- AKeyless (SaaS closed source)
Apple Keychain/Keyring
Apple’s Keychain is a password management system that Apple has provided with its macOS and iOS operating systems since Mac OS 8.6. BLOG:
-
Press command+Spacebar for the Search dialog and type enough of Keychain Access.app to select it, then press Enter.
Alternately, in the Finder app, click on the Go menu, then select “Utilities” in folder /Applications/Utilities/.
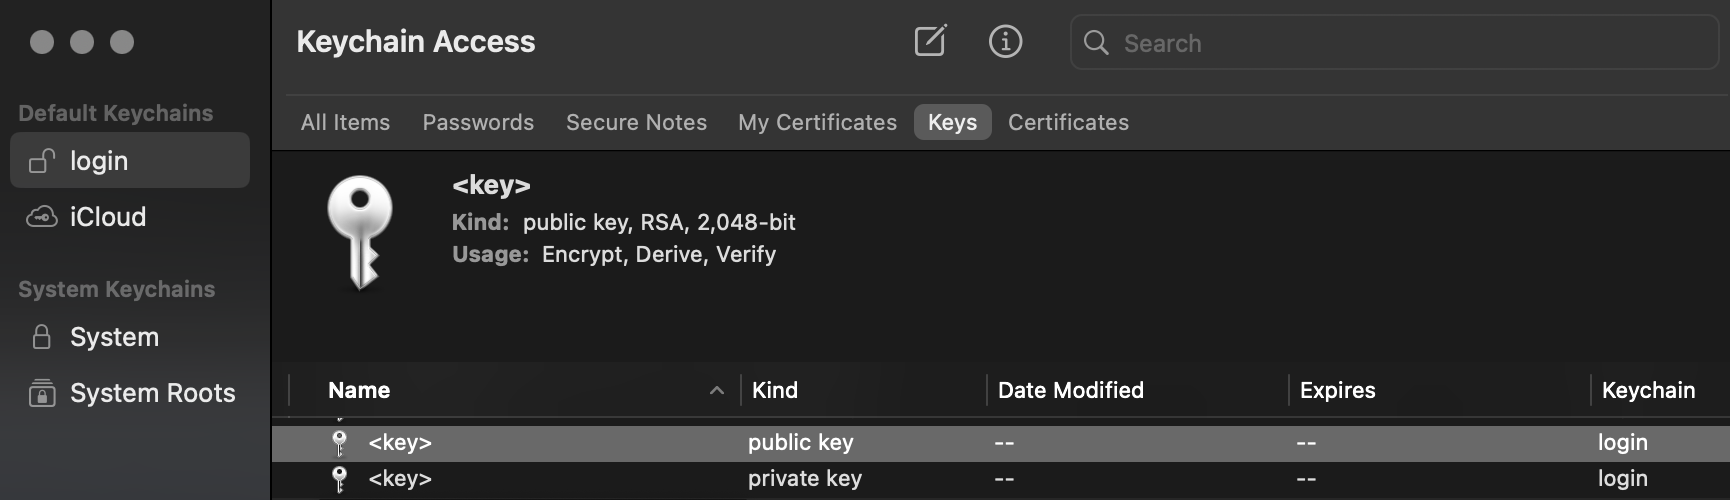
On the left menu, the “login” Default Keychain is selected by default. These are the passwords you use to login to your Mac. Keychain’s file(s) are stored in folder ~/Library/Keychains/.
The “iCloud” Default Keychain is used to store your iCloud passwords. Store passwords there to sync them across all your Apple devices.
Apple’s Keychain Access.app can house various types of secrets: passwords (for websites, FTP servers, SSH accounts, network shares, wireless networks, groupware applications, encrypted disk images), private keys, certificates, and secure notes.
-
Configure your passwords to sync with iCloud so that if your laptop gets lost or stolen, you would still have access to passwords.
- Click the “Create New” button at the top of the Keychain Access dialog.
- For “Keychain Item Name:” type “root password”.
- For “Account Name:” type “root”.
- For “Password:” type your password.
- Click and unclick “Show Password” to confirm your typing.
- Click the “Add” button. Close the Keychain Access dialog.
-
Use this bash script to retrieve the root password using Apple’s security utility.
#!/bin/bash
PASS=$(security find-generic-password -l "root password" -a root -w|tr -d '\n')
if [ -z "$PASS" ]; then
echo "root password not found in the local keychain."
exit 1
else
echo "$PASS" | sudo -S tmutil disable
unset PASS  # remove from memory
tmutil stopbackup
fi
-w specifies return of just the password string.
|tr -d ‘\n’ trims off the trailing newline character.
The password is provided to the Apple backup app tmutil without echoing the value to the Terminal log.
If the password is not found, the script returns an error message:
security: SecKeychainSearchCopyNext: The specified item could not be found in the keychain.
-S specifies read password from STDIN (the result of the pipe).
Chezmoi CLI
Within a CLI script, chezmoi retrieves secrets from several of the above.
It has many issues.
KeepassXC
KeepassXC is a fork of Keepass2 and KeepassX which have not been updated since 2016.
-
On macOS get the app and keepassc = keepassxc-cli:
brew install --cask KeepassXC
brew install keepassc
On Linux:
sudo add-apt-repository ppa:phoerious/keepassxc
sudo apt-get update
sudo apt-get install keepassxc
Notice the “kInstalling keepassc dependency: python@3.12
-
Get the keepassc CLI command help:
keepassc -h
usage: keepassc [-h] [--asroot] [-d DATABASE] [-k KEYFILE] [-c] [-as ADDRESS_SERVER] [-ps PORT_SERVER] [-pa PORT_AGENT] [-a] [-dc] [-s] [-e ENTRY] [-l] options: -h, --help show this help message and exit --asroot parse option to execute keepassc as root user -d DATABASE, --database DATABASE Path to database file. -k KEYFILE, --keyfile KEYFILE Path to keyfile. -c, --curses Use curses interface while using a remote connection. -as ADDRESS_SERVER, --address_server ADDRESS_SERVER Server address (not required if using agent) -ps PORT_SERVER, --port_server PORT_SERVER Server port (not required if using agent) -pa PORT_AGENT, --port_agent PORT_AGENT Agent port -a, --agent Use agent for remote connection -dc, --direct_conn Connect directly to server -s, --ssl Use SSL/TLS -e ENTRY, --entry ENTRY Print entry with parsed title You will see a password prompt; leave it blank if you only want to use a key-file Just type a part of the entry title lower-case, it's case-insensitive and will search for matching string parts WARNING: Your passwords will be displayed directly on your command line! -l, --log_level Set logging level for network use. Default is ERROR but for analyzing network flow INFO could be useful. Set it with keepassc [...] -l [...] to INFO -
Create a KeeppassXC databases (with extention .kdbx) in your $HOME folder by running KeepassXC.app or keepassc :
Open existing database (1)
Create new database (2)
Connect to a remote database(3)
Configuration (4)
Quit (5)

Type 'F1' for help inside the editor, file or database browser.
Type 'F5' to return to the previous dialog at any time.
-
Configure the database by setting keepassxc.database in the configuration file.
-
Run
You are prompted for the database password the first time keepassxc-cli is run, and the password is cached, in plain text, in memory until chezmoi terminates.
-
Get chezmoi to make use of KeepassXC:
The command used can by changed by setting the keepassxc.command configuration variable, and extra arguments can be added by setting keepassxc.args.
Also, you can disable the password prompt by setting keepassxc.prompt to false.
https://www.chezmoi.io/reference/templates/keepassxc-functions/
https://github.com/twpayne/chezmoi/issues/new/choose
username = {{ (keepassxc "example.com").UserName }} password = {❴ (keepassxc "example.com").Password }}- https://www.toptal.com/designers/htmlarrows/symbols/medium-left-curly-bracket-ornament/
- https://www.toptal.com/designers/htmlarrows/symbols/medium-right-curly-bracket-ornament/
Calling keepassxc multiple times with the same entry only invokes keepassxc-cli once.
Keybase
At time of this writing, Keybase is a free macOS app funded as a community service by the video communications company Zoom, which is profitable.
https://keybase.io/team/commandline encrypts the entire repo, but it does it in a convenient way [docs]
Every account on Keybase has a public history. “Sigchains” let Keybase clients reconstruct the present without trusting Keybase’s servers. And when you “follow” someone on Keybase, you sign a snapshot of your view of the claims in their sigchain.
https://book.keybase.io/git says Keybase supports free, encrypted, authenticated, and private Git repositories on GitHub.com. Encryption in these repositories mean they are viewed using the Keybase app. Repos are encrypted using Git remote helpers. This allows Git itself to interface with datastores other than the local filesystem. Keybase has created an open source remote helper that facilitates this interaction, keeping the data in your repository within your control via your local Keybase GUI app.
On every push or pull (or clone), all writes are verified by your private keys which never leaves your device.
At time of this writing, Keybase offers 250 GB of secure storage for free, and you can pay for more.
Keybase knows to lock a repository when necessary to prevent two people (or two devices controlled by the same person) from overwriting each others’ changes and thus causing conflicts.
To create a new repo encrypted using Keybase on GitHub.com:
- Using a browser at keybase.io, create an account. Keybase also has a mobile app.
- Install the Keybase GUI app onto the /Applications/ folder of your laptop. This is done using my mac-setup.zsh script.
-
Define devices. For example, “My Mac 2017”.
- Use the app to create a new team (press command+5 or click on the Teams tab, then “Create a team”).
- Select a “What do you need a team for?” option. For example, “Friends, family, or squad”.
- Enter a team name unique among all users. For example, “faculty230915”. Underlies and dashes are not allowed.
- Drag and drop a team avatar images avatar on top the photo box. Continue.
- Add or invite people.
- Click to accept access to files on your laptop.
- Press command+7 to open the Keybase Git repositories GUI.
- Click “New repository” and select “New personal repository” or “New team repository”.
- Pick a team.
-
Name your repository. For example, if your account name is “johndoe” and “secrets”. The result:
Clone: keybase://team/johndoe/encrypted
Clone: keybase://private/johndoe/encrypted
- Click the blue copy button.
-
Notice the device name “My Mac 2017” is shown. Click command+8 to add another device.
-
Switch to a Terminal window and navigate to the folder where you want to store the repository. For example:
cd ~/Projects
mkdir -p ~/Projects/Keybase001
-
Edit your shell script file to define a variable to hold the path to your Keybase repository:
MY_KEYBASE_PATH="team/johndoe/encrypted"
-
Clone to create a new folder containing the repository.
git clone "${MY_KEYBASE_PATH}"Response:
Cloning into 'encrypted'...
Initializing Keybase... done.
Syncing with Keybase... done.
Syncing encrypted data to Keybase: (100.00%) 1.97/1.97 KB... done.
warning: You appear to have cloned an empty repository.
Alternately, use your Git UI tool of choice (GitHub Desktop works, for example).
From here, you can use it as you would any other Git repository:
- Add base files in the repo. For example, README.md, .gitignore, etc.
-
Use the private Keybase repository alongside an existing repository by adding it as an additional git remote:
git remote add private "keybase://$MY_KEYBASE_PATH"
git remote -v
git pull private master
Response:
Initializing Keybase... done. Syncing with Keybase... done. From keybase://team/faculty_secrets/secrets * branch master -> FETCH_HEAD * [new branch] master -> private/master Already up to date. -
To manage a private config repository:
git pull private main
QUESTION: Does the Keybase remote’s HEAD points to the remote’s master? If you don’t have a remote master branch – as is likely to be the case if you are using a different “trunk” branch name like main – you’ll get the message:
warning: remote HEAD refers to nonexistent ref, unable to checkout.
-
To use the Keybase CLI:
keybase git
NAME: keybase git - Manage git repos USAGE: keybase git
[arguments...] COMMANDS: create Create a personal or team git repository. delete Delete a personal or team git repository. gc Run garbage collection on a personal or team git repository. lfs-config Configures a keybase git checkout to use LFS list List the personal and team git repositories you have access to. settings View and change team repo settings help, h Shows a list of commands or help for one command -
To manage a private config repository:
keybase git create config
Repo created! You can clone it with:
  git clone keybase://private/scoates/config
Or add it as a remote to an existing repo with:
  git remote add origin keybase://private/scoates/config
References:
- https://delitescere.medium.com/combining-an-existing-git-repo-with-keybase-encrypted-git-2841609166f0
- VIDEO: https://github.com/pstadler/keybase-gpg-github
- https://www.youtube.com/watch?v=uN0nXdBQxMQ
- VIDEO: Encrypted Git Repositories Using Keybase
- https://www.youtube.com/watch?v=KhROpuxHyH8
- https://www.garrickadenbuie.com/blog/signed-verified-git-commits-keybase-rstudio/
- https://www.alwaysrightinstitute.com/keybase-git/
- https://stephenreescarter.net/signing-git-commits-with-a-keybase-gpg-key/
- https://www.ahmadnassri.com/blog/github-gpg-keybase-pgp/ from 2015 when Keybase was new.
gcrypt
The Gcrypt Library is a low-level cryptographic library that provides support for many ciphers and message authentication codes, such as DES, 3DES, AES, Blowfish, SHA-1, SHA-256, and others.
gcrypt is a GnuPG extension to encrypt files in a Git repository.
https://directory.fsf.org/wiki/Libgcrypt
https://www.youtube.com/watch?v=XdoTca3EQGU
MacOS TouchID
Rather than typing in a password to authenticate sudo commands on CLI, it’s more convenient to use the biometric TouchID hardware on Mac laptops.
To enable that, add auth sufficient pam_tid.so to Apple’s /etc/pam.d/sudo file:
# sudo: auth account password session
auth       sufficient     pam_tid.so
auth       sufficient     pam_smartcard.so
auth       required       pam_opendirectory.so
account    required       pam_permit.so
password   required       pam_deny.so
session    required       pam_permit.so
However, each update of macOS replaces that file. So a shell script needs to be run after each OS update to add that line to the file and restart the computer. Its logic:
- View file /etc/pam.d/sudo to see if the line is in there already
- If yes, break out of the script. If no, add it to the file by:
- Creating a temp file,
- adding the line to the temp file
- adding the rest of the original file to the temp file
- setting the correct permissions of the temp file
- setting the correct ownership of the temp file
- replace the original file with the temp file (which requires sudo because… well, you’d hope so, right?)
Such logic should be placed among other commands to run after each OS update. Then you would only have one script to forget to run. Thus, I’ve incorporated it into my mac-setup.zsh script.
Resources
-
http://stackoverflow.com/questions/1396617/committing-machine-specific-configuration-files/1397180#1397180
-
http://stackoverflow.com/questions/1974886/how-to-version-control-config-files-pragmatically
-
http://programmers.stackexchange.com/questions/205606/strategy-for-keeping-secret-info-such-as-api-keys-out-of-source-control
https://dev.to/himadriganguly/configure-ssh-server-with-key-based-and-two-factor-authentication-3oc2
https://github.com/mozilla/sops sops is an editor of encrypted files that supports YAML, JSON, ENV, INI and BINARY formats and encrypts with AWS KMS, GCP KMS, Azure Key Vault, age, and PGP.
More
This is one of a series on Git and GitHub:
- Why Git? (file-based backups vs Git clone)
- Git basics (script)
- Git whoops (correct mistakes)
- Git command shortcuts
- Git interactive merge (imerge)
- Git patch
- Git utilities
- Git hooks
- GitHub data security
- GitHub actions for automation JavaScript
- GitHub REST API
- GitHub GraphQL API
- GitHub PowerShell API Programming
- GitHub GraphQL PowerShell Module