

Homebrew, Python, and other development tools require utilities included in Apple’s Xcode IDE or in Command-Line utilities installed separately. Thus the conflicts.
![]()
![]()
![]()
![]()
![]()
![]()
![]()
![]()
![]()
![]()
![]()
![]()
![]()
Overview
NOTE: Content here are my personal opinions, and not intended to represent any employer (past or present). “PROTIP:” here highlight information I haven’t seen elsewhere on the internet because it is hard-won, little-know but significant facts based on my personal research and experience.
XCode on Mac Deskbooks are used to develop and test apps running iPhones and iPad.
Overlapping utilities installers!
PROTIP: Apple’s XCode is installed with several utilities:
These are needed by developers running HomeBrew, Python, and other programs on Macs.
CAUTION: The confusion is that these utilities needed (above) can be installed two different ways into two different folders:
-
If utilities were installed using Apple’s Xcode IDE (GUI):
$HOME/Applications/Xcode.app
-
Developers NOT developing apps to run on an Apple platform (macOS, iOS, etc.) don’t need the XCode IDE GUI, so can install just the CommandLineTools into:
/Library/Developer/CommandLineTools
Install steps
Apple provides a command that either installs CLI tools or show the path of the CLI installed.
- Open a Terminal (by pressing command+spacebar and typing “T” to select Terminal).
-
In the Terminal Shell Window, type:
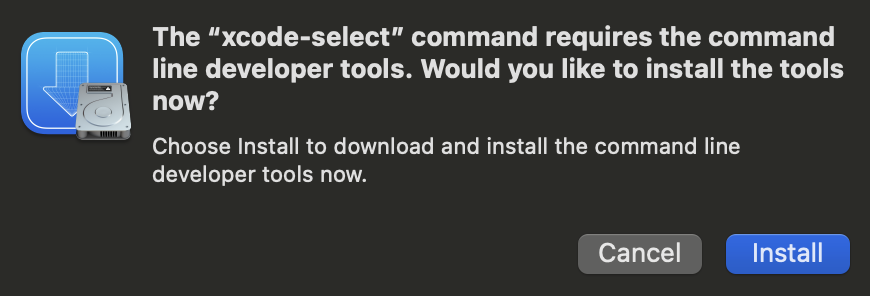
xcode-select --install
Alternately, copy and paste this Apple’s osascript:
xcode-select --install > /dev/null 2>&1 if [ 0 == $? ]; then sleep 1 osascript <<EOD tell application "System Events" tell process "Install Command Line Developer Tools" keystroke return click button "Agree" of window "License Agreement" end tell end tell EOD else echo "Command Line Developer Tools are already installed!" fi -
If already installed you would see one of the two paths above.
If NOT installed, you’ll see:
xcode-select: note: No developer tools were found, requesting install.
If developer tools are located at a non-default location on disk,
use `sudo xcode-select --switch path/to/Xcode.app` to specify
the Xcode that you wish to use for command line developer tools,
and cancel the installation dialog.
See `man xcode-select` for more details.
-
Press command+Tab as many times as needed to select the utility icon. This dialog should appear:
-
Click “Install” for “Downloading”.
-
If “Stop” is clicked, the install would resume where it was interrupted.
-
Click “Done” when “The software was installed.” appears.
-
Repeat the command above
- If XCode CLI was installed, you should see:
/Library/Developer/CommandLineTools
- If XCode.app was installed, you should instead see:
/Applications/Xcode.app/Contents/Developer
Path of gcc
- If XCode CLI was installed, you should see:
-
To identify the path to one of the utilities listed above, such as gcc, use the xcrun utility that comes with macOS:
xcrun --find gcc
If Command Line Utilities are installed, the response would be:
/Library/Developer/CommandLineTools/usr/bin/gcc
If Xcode.app is installed, the response would be:
/Applications/Xcode.app/Contents/Developer/usr/bin/gcc
If neither is installed:
xcrun: error: active developer path ("/Library/Developer/CommandLineTools") does not exist
Use `sudo Xcode-select --switch path/to/Xcode.app` to specify the Xcode that you wish to use for command line developer tools, or use `Xcode-select --install` to install the standalone command line developer tools.
See `man Xcode-select` for more details.
The same for make and other utilities.
Again, if “Command not found” appears, either install CommandLineTools or install XCode.app, then return here.
Which version has been installed?
-
Verify the version of GCC installed:
gcc --version
If the response is “command not found”, it’s not installed.
If the program is running on an Apple Silicon ARM chip and using CommandLineTools, you would see (at time of this writing):
Apple clang version 15.0.0 (clang-1500.1.0.2.5)
Target: arm64-apple-darwin23.3.0
Thread model: posix
InstalledDir: /Library/Developer/CommandLineTools/usr/bin
If the program is running on an Intel x86_64 and using CommandLineTools, you would see (at time of writing):
Apple clang version 15.0.0 (clang-1500.1.0.2.5)
Target: x86_64-apple-darwin22.6.0
Thread model: posix
InstalledDir: /Library/Developer/CommandLineTools/usr/bin
Note that Intel hardware are stuck on Ventura.
Only ARM hardware can run on Sonoma, the latest macOS version.In previous OS versions, it was instead:
Configured with: --prefix=/Library/Developer/CommandLineTools/usr --with-gxx-include-dir=/Library/Developer/CommandLineTools/SDKs/MacOSX.sdk/usr/include/c++/4.2.1
Apple clang version 13.0.0 (clang-1300.0.29.3)
Target: x86_64-apple-darwin21.1.0
Thread model: posix
InstalledDir: /Library/Developer/CommandLineTools/usr/bin
Configured with: --prefix=/Library/Developer/CommandLineTools/usr --with-gxx-include-dir=/Library/Developer/CommandLineTools/SDKs/MacOSX.sdk/usr/include/c++/4.2.1
Apple clang version 11.0.3 (clang-1103.0.32.62)
Target: x86_64-apple-darwin19.4.0
Thread model: posix
InstalledDir: /Library/Developer/CommandLineTools/usr/bin
Apple LLVM version 10.0.1 (clang-1001.0.46.4)
InstalledDir: /Applications/Xcode.app/Contents/Developer/Toolchains/XcodeDefault.xctoolchain/usr/bin
If Xcode.app was installed, you would see (at time of writing):
Apple clang version 14.0.3 (clang-1403.0.22.14.1)
Target: x86_64-apple-darwin22.5.0
Thread model: posix
InstalledDir: /Applications/Xcode.app/Contents/Developer/Toolchains/XcodeDefault.xctoolchain/usr/bin
Files and Folders
Let’s see what is in those folders:
-
If CommandLineTools was installed:
ls -al /Library/Developer/CommandLineTools
The response would be:
Library SDKs usr
-
If Xcode.app was installed:
ls -al /Applications/Xcode.app/Contents/Developer/
The response would have more than what’s in CommandLineTools:
Applications Library Makefiles Platforms Toolchains Tools usr
How many folders and files were installed?
-
If you have the tree utility installed:
tree /Library/Developer/CommandLineTools | tail -1
Would yield (at time of writing):
16143 directories, 72910 files
-
See the link’s location using a Linux utility:
which gcc
On an Intel Mac, the response is a path to the file at:
/usr/bin/gcc
-
See it’s a binary executable if you view the file:
cat /usr/bin/gcc
Press q to exit from the multi-page viewer.
Xcode.app Version
-
Identify, from within a Terminal:
/usr/bin/Xcodebuild -version
If Command Line Tools was installed, you would see:
This message means that it’s not installed:
Xcode-select: error: tool ‘Xcodebuild’ requires Xcode, but active developer directory ‘/Library/Developer/CommandLineTools’ is a command line tools instance
If Xcode is installed, you would get a version code that should match up with the Build Number on Apple’s web page:
Xcode 14.3.1
Build version 14E300c
-
For a more precise version number and other info (macOS Mavericks version and up):
pkgutil --pkg-info=com.apple.pkg.CLTools_Executables
A sample response, at time of writing:
package-id: com.apple.pkg.CLTools_Executables
version: 14.3.1.0.1.1683849156
volume: /
location: /
install-time: 1686936570
Previously:
package-id: com.apple.pkg.CLTools_Executables
version: 13.1.0.0.1.1633545042
volume: /
location: /
install-time: 1637303193
groups: com.apple.FindSystemFiles.pkg-group
BTW The previous command was constructed based on a search of tools package names:
pkgutil --pkgs | grep -i tools
The response:
com.apple.pkg.CLTools_Executables
com.apple.pkg.CLTools_SDK_macOS1015
com.apple.pkg.CLTools_SDK_macOS1014
com.apple.pkg.CLTools_macOS_SDK
...
Specifying the XCode utility to use
PROTIP: Xcode.app cannot be installed if Command Utilities has already been installed. So the installation program needs to first check whether XCode.app or CommandLineTools is installed.
Choose which one you want to use:
-
Reset:
sudo xcode-select -r
The command provides no response.
-
To specify the use of Xcode.app (IDE):
sudo xcode-select --switch /Applications/Xcode.app
Enter Password for the sudo.
-
To specify the use of CommandLineTools:
sudo xcode-select --switch /Applications/Xcode.app/Contents/Developer
Enter Password.
UnInstall Command Line Tools
PROTIP: Deleting the “Command Line Tools” folder is also how to uninstall and reinstall.
-
Open a new window or tab shell in your Terminal app.
-
Go to the parent folder where Command Line Tools is installed:
cd /Library/Developer/CommandLineTools
-
Remove all files in that folder, provide a password for elevated permissions to get all the files:
sudo rm -rf /Library/Developer/CommandLineTools
Input your password when prompted.
The response is a lot of files removed (to the Trash).
Now install CommandLineTools (or install the full Xcode IDE).
CAUTION: On a Mac M1 (Apple Silicon chip, macOS 12.0 Monterey), after installed the Command Line Tools then uninstalled them by deleting /Library/Developer/CommandLineTools and running sudo xcode-select -r, I was still getting updates to the tools in System Preferences > Software Update.
The files below are protected by SIP: to delete them, I had to disable SIP first (ie disable SIP, delete the files, re-enable SIP).
Indeed, the receipts are at /Library/Apple/System/Library/Receipts, in the form of files:
- com.apple.pkg.CLTools_Executables.{bom,plist}
- com.apple.pkg.CLTools_SDK_macOS*.{bom,plist}
- com.apple.pkg.CLTools_macOS_SDK.{bom,plist}
Software Update
To get to “Software Update”:
- Click the Apple icon or press command+, (comma).
-
Click Settings. Click General. Click Software Update.
A shell script uses these commands to not require manual clicking on the dialog that pops up (below):
#!/bin/sh
# Create placeholder file checked by CLI updates' .dist code in Apple's SUS catalog:
touch /tmp/.com.apple.dt.CommandLineTools.installondemand.in-progress;
# Find the CLI Tools update:
PROD=$(softwareupdate -l |
  grep "\*.*Command Line" |
  head -n 1 | awk -F"*" '{print $2}' |
  sed -e 's/^ *//' |
  tr -d '\n')
# Unless "No new software available.", install it:
softwareupdate -i "$PROD" -v;
-
If you see this pop up, manually click “Install”, “Agree”, then “Install”. It says “Finding software”, then “Downloading software”. Finally, “Updates Available” appears.
CAUTION: The large number of files means this can a long time. It took 13 minutes on my 10mbps line.
-
When you see “The software was installed.”, click “Done” to dismiss the pop-up.
Set license
-
If you try to confirm the versions installed, you’ll see:
You have not agreed to the Xcode license agreements. You must agree to both license agreements below in order to use Xcode. Press the ‘return’ key to view the license agreements at ‘/Applications/Xcode.app/Contents/Resources/en.lproj/License.rtf’
- Press q, then type “agree”.
-
Press spacebar several times until it says:
Agreeing to the Xcode/iOS license requires admin privileges, please run “sudo xcodebuild -license” and then retry this command.
-
Run the command suggested to set Apple’s licensing agreement bit:
sudo xcodebuild -license
Enter your password for the sudo.
- Confirm the versions installed.
About Xcode.app
Xcode is Apple’s free IDE developers use to create custom programs for an Apple platform.
There is no Windows PC version of XCode. XCode only works on macOS. This limitation has served to increase the need for MacBooks.
Increasingly, Machine Learning developers are using Apple’s Swift language.
-
Visit Apple’s Xcode marketing page at
https://developer.apple.com/Xcode
Xcode “includes everything you need to create amazing apps for all Apple platforms. Now Xcode and Instruments look great in the new Dark Mode on macOS Mojave. The source code editor lets you transform or refactor code more easily, see source control changes alongside the related line, and quickly get details on upstream code differences. You can build your own instrument with custom visualization and data analysis. Swift compiles software more quickly, helps you deliver faster apps, and generates even smaller binaries. Test suites complete many times faster, working with a team is simpler and more secure, and much more.”.
PROTIP: Newer versions of Xcode installer also installs a Git client.
How big is the XCode installer?
-
To see how big the XCode installer is, visit Apple’s fancy “downloads” web page:
https://developer.apple.com/download/applications
Scroll down to a version that doesn’t say “beta”.

Notice the size, such as “(7.01 GB)”.
Because XCode.app is several Gigabytes large, developers who do not create Apple programs can save disk space and time to install it by not installing it.
Also, installer size is also why Xcode does not come with macOS.
Since the Apple Store only handles individual .app files, other mechanisms are needed to install additional programs needed as a pre-requisite by Homebrew, Python, and other development programs.
-
Make sure you have at least 13GB free on your hard-drive before attempting installation.
- Click the Apple icon to select “About this Mac”.
- Click “Storage” tab.
There are other IDEs used by developers (such as Visual Studio, Eclipse, IntelliJ, PyCharm, etc.).
Xcode IDE install
There are two ways to install XCode:
-
Install from Apple Store - the simplest way
Update XCode from Terminal CLI
- Open a Terminal.app console window.
-
At any directory, invoke Apple’s Software Update Tool”:
softwareupdate --install -a
If you see this:
Finding available software
No updates are available.
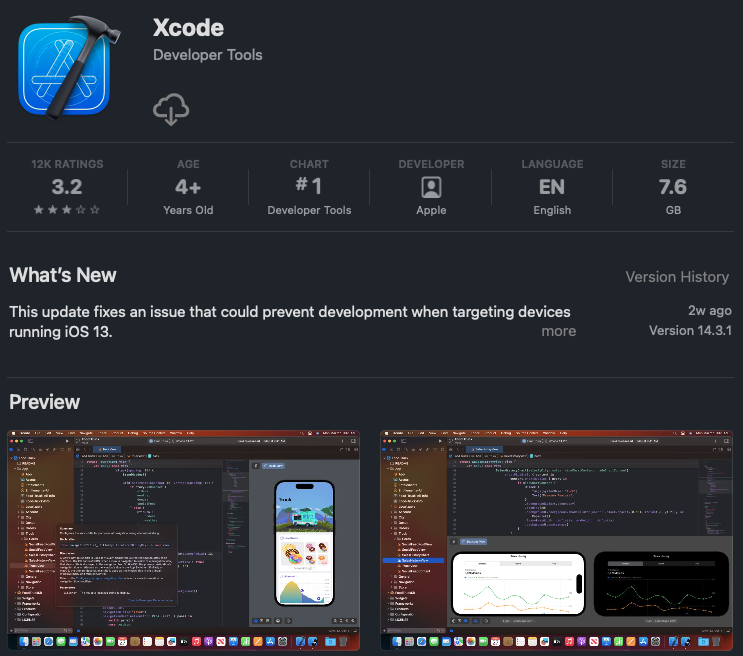
Install XCode from Apple’s web App Store
-
In an internet browser, go to:
-
Sign in to Apple Developer with your email address, then click the arrow icon.
-
Enter your password, then click the arrow icon.
Below is the “Software Update” approach:
You’ll need to establish an Apple ID if you haven’t already.
-
Click the cloud icon Download and provide your Apple ID.
-
Go through Apple’s location verification if prompted.

-
Confirm your account.
-
Click “Allow” to the pop-up “Do you want to download?”.
-
CAUTION: Make sure that your machine has enough free space available.
These are massive files that may take a while to download if you don’t have a fast internet connection.
NOTE: Each version of Xcode is related to a specific version of the Apple OS Mac operating system.
File Date Download Unpacked Xcode_12.1 2020-10-01 10.5 GB 11.5 GB Xcode_11.5 2020-06-01 7.5 GB ? GB Xcode_10.2.1 2019-04-17 ? GB 6.1 GB Xcode_9.0 2017-09-19 . ? GB ? GB Xcode_8.2.1 8C1002 2016-12-19 ? GB ? GB Xcode_8_beta_2.xip 2016-07-05 5.9 GB 12.32 GB Xcode_7.31 2016-05-03 3.8 GB ? Xcode_4.1 2014- 2.9 GB ? Xcode_3.2.4 2014- 2.? GB ? -
Switch to Finder Downloads folder to watch progress on the file name ending with “Download”. The one with a clock icon which signifies downloading.
-
Return to the versions instructions above to view the updated version.
-
Delete the installer after you’re done, to reclaim disk space.
-
In an internet browser, get to the “Mac App Store Preview” for Xcode at
https://apps.apple.com/us/app/Xcode/id497799835?mt=12

-
Click View in Mac App Store, then “Open App Store.app” in the pop-up.
-
Click the download icon at the upper-left corner.
-
Provide your Apple ID and password. Get one if you don’t already have one.
PROTIP: DO NOT install a beta version of Xcode.
The blue “OPEN” icon appears at the upper-right when the app is installed. But don’t click it because we are done.
-
In Finder, look for Xcode.app in the /Applications folder.
Alternately, on the Touchpad pinch 4 fingers together to click the App Store. Type enough of “Xcode” to filter out others.
-
To view the version, cursor to the top of the screen and click the program name next to the Apple icon to select “About Xcode”:

Xcode IDE Upgrade
Over time, Apple updates Xcode and its command line utilities.
-
Click the Apple icon, then click System Settings. Click “Continue” it that’s shown. Here is an example notification:

- Search for “Software Updates” or click the icon.
- Click “Update Now” if that appears. (but first do a backup.)
- Click “Agree” to the EULA.
- When done, view the version numbers installed.
Swift version
Regardless of whether Command Line Utilities or Xcode.app is installed:
-
Get the version of the Swift program used to develop iOS mobile apps:
swift -version
If you are on an ARM (M1/M2/M3) CPU, a sample response at time of this writing:
Apple Swift version 5.9.2 (swiftlang-5.9.2.2.56 clang-1500.1.0.2.5)
Target: arm64-apple-darwin23.3.0
Previously:
swift-driver version: 1.75.2 Apple Swift version 5.8.1 (swiftlang-5.8.0.124.5 clang-1403.0.22.11.100) Target: x86_64-apple-macosx13.0
Previously:
swift-driver version: 1.45.2 Apple Swift version 5.6 (swiftlang-5.6.0.323.62 clang-1316.0.20.8)
Target: arm64-apple-macosx12.0
Alternately, if you are on an older Intel CPU, a sample response (at time of this writing):
Apple Swift version 5.9 (swiftlang-5.9.0.114.6 clang-1500.0.27.1)
Target: x86_64-apple-darwin22.5.0
Previously:
Apple Swift version 5.6 (swiftlang-5.6.0.323.62 clang-1316.0.20.8)
Target: x86_64-apple-darwin21.4.0
If jamf installed Xcode, you’ll also see:
[1]+ Done sudo rm -rf /Library/Developer/CommandLineToolsjamfselfservice://content?entity=policy
Xcode FileMerge tool
Xcode graphically compares files and directories.
-
Open Xcode. This takes a few seconds.
-
Right-click on Xcode icon. Select “Open Developer Tool”. Select “FileMerge”.
-
Specify one file to compare.
-
Specify the other file to compare.
-
Click “Compare”.
Apple Platforms
-
Use an internet browser (such as Safari) to view Apple’s page for developers at:
Apple’s products and operating systems include:
- macOS on MacBook laptops
- iOS to run iPhone mobile phones
- iPadOS to run iPad tablets
- watchOS to run Apple Watch wearable products
- tvOS to run Apple TV devices
- visionOS to run vision visors introduced in 2023
XCode UI Tricks
https://augmentedcode.io/xcode-tips/
Testing apps
References:
- https://developer.apple.com/documentation/xctest/defining_test_cases_and_test_methods
- https://www.youtube.com/watch?v=_wLdNSvGPB8&list=PLvUWi5tdh92zaJIMa65f8G2aWTytY3rN3&index=1
More on MacOS
This is one of a series on macOS:
- MacOS Setup step-by-step, with automation
- MacOS Hardware and accessories
- MacOS dotfiles for System Preferences setup automation
- MacOS Boot-up
- MacOS Keyboard tricks
- MacOS Terminal Tips and Tricks
- Text editors and IDEs on MacOS
- MacOS Xcode.app and CommandTools (gcc)
- MacOS Command-line utilities
- Applications on MacOS
- 1password on MacOS
- Manage Disk Space on MacOS
- Screen capture on MacOS
- MacOS iPhone integration
- Linux and Windows on Apple MacOS
- Packer create Vagrant Windows image
- Python on MacOS
- Maven on MacOS
- Ruby on MacOS
- Node on MacOS installation
- Java on MacOS
- Scala ecosystem