

Do things faster with Keyboard Shortcuts, HotKeys, Steno chords, and StreamDeck buttons
![]()
![]()
![]()
![]()
![]()
![]()
![]()
![]()
![]()
![]()
![]()
![]()
![]()
Overview
- TL;DR Summary
- Swap Command and Control?
- Special (Modifier) Key Names and Symbols
- Basic Keyboard Shortcuts
- Touch Typing Aids
- Avoid reaching for the mouse
- symbol to go to a word in the current file
- Automator shortcut to mute
- Remap Modifier Keys
- Caps Lock to Escape
- Add Keyboard Shortcut to Sleep
- Apple components from any active app
- Programmatic keyboard mapping
- Clean borders without icons
- Microsoft Windows navigation
- Cross machine
- Full Screen Finger Gymnastics
- Voice Recognition
- Process Navigation
- Trackpad Remapping Tool
- Keyboard Mapping
- App-specific keys
- Chrome Browser Tabs
- Microsoft Outlook (Email and Calendar)
- Text Editor Special Characters
- Keyboard Symbols
- Robot typists
- Resources
- Bash-it
- Tmux
- Comprehensive
- Stream Deck button keyboard
- Mute/Unmute
- Ergonomic Keyboards
- Stenography
- References
- More on macOS
This topic is about how you, a Mac user, can stay focused so you can do things faster with less effort by configuring your keyboard to automate common actions.
Those who do stuff without taking their eyes off the screen ARE more productive than those who constantly look away to reach for the mouse.
You’ll feel less stress when you can get things done like a pro. Eventually, people will be watching how you use your keyboard and NOT use your mouse. It’s not fair, but they will evaluate your overall “value” by how much you use your keyboard.
Those who figured out ways to save time demonstrate that they are “resourceful” and thus be able to help others save time. So they are seen as more “valuable” to the organization.
TL;DR Summary
So develop the habit of pros by making a habit of following these tips:
- Know the names and icons for “Modifier Keys” on Apple keyboards.
- Learn to touch-type.
- Avoid reaching for the mouse.
- Use the basic Keyboard Shortcuts for macOS.
- Customize defaults for speed (like the pros)
- Use more Hotkey app
- Get a Stream Deck for one-touch automated action
- Learn Stenography using a special keyboard for 240 WPM typing.
PROTIP: Optimize for keys we use most, and avoid common mistakes with keys we accidentally press.
Swap Command and Control?
PROTIP: Some who are used to Windows and need to go back and forth prefer to switch the Mac’s control and command keys in order to get to all such keys using thumbs.
This would also allow you to press two keys at once by pressing between the keys, thus able to perform most combinations using your hands.
- Click the entry for “Control (^) Key:” and select “⌘ Command”.
- Click the entry for “Command (⌘) Key:” and select “^ Control”.
- Click OK.
- Press control+Q or click the red x to dismiss the System Preferences dialog.
VIDEO: “History of Apple’s Command Key” by Apple Explained note that Apple’s unique Command key is called “FEATURE” in a library of symbols, used in nordic countries to highlight places of interest. [6:58] It also resembles a casle with turrents. It was added to the keyboard in 1984. In 2007 Apple replaced the Apple logo with the word “command”, sometimes abbreviated to “cmd”.
Special (Modifier) Key Names and Symbols
REMEMBER: “Special” keys on a Mac’s keyboard are represented by both symbols and names:
Basic Keyboard Shortcuts
PROTIP: Save time (and look like a pro) by using the most common keyboard shortcuts for macOS:
The most common shortcuts I use all day long:
- ⌘+Tab to switch among programs open.
Within a browser such as Safari or Chrome:
- ⌘+~ (backtick) to switch among open windows.
- ⌘+W to close a tab when I’m done with it.
- ⌘+Shift+B to hide/unhide the Bookmarks bar.
Touch Typing Aids
PROTIP: Although most keyboards have a bump on “F” and “H” (“Home”) keys, I and some others put tiny drops from a glue gun on strategic keys so I can orient my finger to reach strange keys in the dark without looking:
- 2, 5, 8, 0
- }
- control
- .
PROTIP: I find (RGB) keyboards that light up keys in different colors distracting when I don’t want to look at the keyboard at all.
Avoid reaching for the mouse
This may be a generalization. But many top coders like the vi text editor because it doesn’t demand use of difficult-to-reach keys or mouse which require users to take their eyes off the screen. DevSecOps coders have no choice because some operating systems provide only vi (such as during Kubernetes exams).
VSCode (Visual Studio Code) is what most people use now. It has a keyboard shortcut for everything.
- Within VSCode, press command + shift + P to open the Command Palette. It lists the most recently used commands you can select by cursor then Return key. Or type the first few letters of a command to narrow the list:
-
Type “keyboard shortcuts” to select “Help: Keyboard shortcuts reference” to open a web page with a PDF cheat sheet listing keyboard shortcuts:
https://code.visualstudio.com/shortcuts/keyboard-shortcuts-macos.pdf
-
Alternately, type “keyboard shortcuts” to select “Preferences: Open Keyboard Shortcuts” to open a new file listing all keyboard keybindings (aka shortcuts).
PROTIP: Experiment with each one on a throwaway file.
- ⌘+B to hide/unhide the left Explorer pane. Instead, use …
- ⌘+P for the Quick Open dialog, which provides a search box:
- Go to File… (Ctrl+P on Windows/Linux)
- @ symbol to go to a symbol in the current file
- : symbol to go to a line number in the current file
-
symbol to go to a word in the current file
- @# symbol to go to a word in a file
- @file symbol to go to a file
- ⌘+~ (backtick) to toggle the Terminal pane at the bottom. I usually have it closed and …
- ⌘+Tab to switch to a Terminal program with a full set of lines and history.
Scrolling: - ⌘+up or down arrow to get to the very top or bottom.
-
⌘+shift+up or down arrow to move the current line up or down.
- ⌘+\ splits the editor window (but 1Password hijacks this key)
Automator shortcut to mute
It’s annoying and rude to impose the clicky-clack of your keyboard. In video recordings, it’s disruptive to hear background conversations and other noise.
-
Apple’s default way to mute the microphone is to click the Apple icon, open Settings, Sound, click the Input volume slider.
Keep this open as we continue the steps below.
That’s a lot of clicks when quick action is needed during a Zoom call.
Zoom and Microsoft Teams provide a mute button, but it’s also too slow to find.
-
The $4.99 MicDrop.app which provides a mute button icon on the Apple Menu Bar at the top of screens. For those who don’t want to fiddle with a mouse to find it or hide their menu menu when Zoom is in full-screen mode, it can be invoked by a customizable keyboard shortcut to mute and unmute the microphone.

For those loath to install a 3rd-party app in fear of getting potentially infected by it, this article describes how to create a keyboard shortcut to mute the microphone using a script run by a utility that comes with macOS: Automator.app. Coding Automator scripts is a useful skill to learn.
The above approach of installing an app avoids the disadvantage of opening up a potential vector for hackers when ANY and ALL AppleScript scripts are allowed to run on your computer.
Apple really needs to provide a way to allow only specific scripts to run.
Anyway, below are those ways.
-
 </a>Click on the “Get Shortcut” blue icon to install Apple’s Mute/Unmute Mic shortcut using the Shortcuts.app that comes with macOS.
Alternatively, you can create your own shortcut script using the instructions below.
- Press command + spacebar to open the Spotlight search box.
- Type “automator.app” and press Enter to select it among options. Automator’s Finder window opens.
- Ignore the Finder dialog that Automator.app opens to. (The folder is within your iCloud.)
- Press Command + Shift + \ for the Automator app menu at the top of the scren.
- Press Command + N to click on the Quick Action cog icon for the Quick Action wizard.
- For “Worflow receive current”, click “Automatic” for the drop-down menu. Select “no input”.
- For “Variables”, click inside the search box type “Run” to select “Run Applescript”.
- Click inside the script window opened and delete all the default text.
-
Highlight this code, copy and paste into the script window:
on getMicrophoneVolume()
  input volume of (get volume settings)
end getMicrophoneVolume
on disableMicrophone()
  set volume input volume 0
  display notification "Microphone OFF" with title "Sound input" subtitle "Disabled" sound name "Submarine"
  say "Microphone Off"
end disableMicrophone
on enableMicrophone()
  set volume input volume 100
  display notification "Microphone ON" with title "Sound input" subtitle "Enabled" sound name "Ping"
  say "Microphone ON"
end enableMicrophone
if getMicrophoneVolume() is greater than 0 then
  disableMicrophone()
else
  enableMicrophone()
end if
https://www.youtube.com/watch?v=ys5uM2wO_T8
- Click the arrow button under the script to run the script for the first time.
- Click “OK” to allow the pop-up “Automator.app” would like to access the microphone.
-
Say something. The “Input level” in the Settings Sound dialog should not respond to your speaking.
- Confirm that the Input volume is now 0 (zero) on the Settings Sound dialog.
- Run again and the Input volume should be 100.
- See if that is too loud. Adjust the number in the script.
- Press command+S to save the script as a file named “mic-toggle”.
-
Press command+Q to quit Automator.
-
Enable Automator to control your computer. VIDEO:
Add keyboard shortcut
- In Apple System Preferences, click Keyboard on the left menu, then “Keyboard Shortcuts…”.
- Click “Services” on the left menu.
- Click “General” on the right menu to expand it.
-
Click to check “mic-toggle” if it’s not already checked.
TODO: Shows fn+command+shift+F12 or shift+option+command+M or command+Shift+M for MicDrop.app
- Click “Done”.
Remap Modifier Keys
You can change them using this dialog:

Caps Lock to Escape
BLAH: The Esc (Escape) key is too far North on the keyboard and forces some to look down on the keyboard. And the Caps Lock key is too close to keys, causing problems with accidental password entry and lockouts.
BLAH: It’s annoying when all of a sudden everything I type is in caps. That happens because I accidentally had my hand too far to the left when I intended to press the A key.
Anyway I’ve gotten used to typing all caps by holding down the shift key with my left or right hand.
PROTIP: Make the caps lock key work like the Esc key:
-
To open System Preferences, click the Apple icon at the upper-right corner to select it

or get that dialog directly from anywhere by pressing (at the same time) control + command + comma. A reminder of that is to the right of “System Preferences” menu item.
- Type K to reveal a list (without clicking the search box).
- Cursor down to highlight Keyboard.
-
Press return (Enter) to open it.
- Click “Modifier Keys” at the lower-right corner.
-
Click the entry for “Caps Lock ⇪ Key:” and select ⎋ Escape.
NOTE: If you have more than one keyboard, repeat for each keyboard.
Add Keyboard Shortcut to Sleep
PROTIP: Putting your laptop to sleep is an important privacy procedure according to HIPAA and other regulations. Also, sleeping lets your laptop rest, which makes it last longer and consumes less electricity.
So make it easier to put your laptop to sleep.*
-
In the screen above, notice “Sleep” has no reminder of its Keyboard Shortcut, but there is:
Command ⌘ + Option ⌥ + Eject ⏏
-
If there is a Terminal instance open, the machine does not go into sleep until you manually respond to this pop-up dialog:

- Return to the Keyboard Shortcuts following instructions above, but this time
-
Click “Shortcuts”

- Click “App Shortcuts” in the left menu.
- Hit the “+” button to add an item.
- Leave Application default at “All Applications”.
- For Main Title: type “Sleep” (the exact name of the menu command).
- Click in the Keyboard Shortcut: field
- Press Command + Option + Eject
- Click Add button.
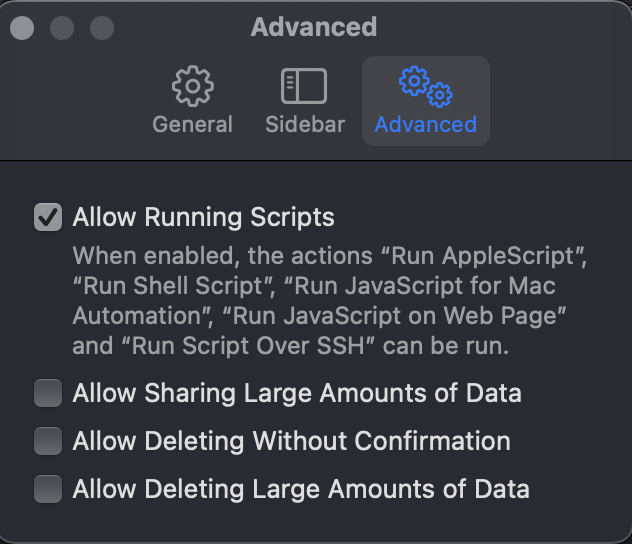
Select File | New Shortcut from the menu. Shortcuts keyboard shortcut: You can also press Command N, of course. Drag and drop the Run Shell Script action to the shortcut area. Find Run Shell Script: You can find Run Shell Script under Terminal app or search for shell script. If scripting is disabled: – Select Shortcuts | Preferences… from the menu. – Go to the Advanced tab. – Enable Allow Running Scripts. Type pmset sleepnow under Run Shell Script. Now type a name for the new action over Run Shell Script in the title bar. Example: Use something like Put Mac to Sleep.
There is a difference between Sleep and Hibernate https://ladedu.com/how-to-understand-sleep-vs-hibernate-on-a-mac/
On a Terminal, the command is “pmset sleepnow”.
Magic Keyboard
A Bluetooth-connected wireless Apple Magic Keyboard solves several deficiencies of the keyboard that comes with MacBook Pro laptops:
- Adds the control key on the right side, missing on the standard keyboard
- Adds keys like on Windows keyboards: delete (so you don’t need to press fn+delete to backspace), Home, End, Page Up, Page Down
-
Adds function keys f13 thru f19 to map one-key input of your most frequent URLs or passwords
- It’s quieter
- One keyboard that works with iPads as well
- Frees you from the screen for more ergonomic sitting positions, especially if you have an additional screen
However, every week or so you would need to charge it by plugging in a Thunderbolt cable (same one as iPhone and Magic Mouse).
Awkward fn Keys need eyes
However, on the 2017 Mac without a visible Function keys, key combinations to reveal those button are so awkard to use that it’s faster and easier to use a mouse or trackpad.
Since the fn and control keys are only on the left side of a MacBook keyboard, using them requires a Carpel-tunnel Syndrome-inducing moves of the left two fingers:
-
fn + control + F3 to highlight the Dock icons, which are by default at the bottom of the screen, but which I prefer to be at the right.
-
fn + control + F2 to highlight the Apple menu icon at the upper-left corner. Press down for its menu:

-
fn + control + F8 to highlight the Apple Top-right Menu.
On 2020+ keyboards (after Apple came to their senses):
-
control+F2 to highlight the Apple Top menu.
-
control+F3 to highlight the Dock at the bottom of the screen.
PROTIP: The fn key is easy to find without looking because it’s at a corner. But use a companion key on the right side of the keyboard.
Apple components from any active app
| Purpose | Name | Mouse | Hot corner | Key | Hide |
|---|---|---|---|---|---|
| Active apps thumbnails | Mission Control (formerly Expose) | 3 finger swipe up | - | control + up fn + F3 | Esc |
| Active apps dashboard | Application Windows | - | Upper left | control + F3 | Esc |
| - | Desktop | Thumb and 3 finger spread | - | F11 | toggle |
| Calculator, other Accessories | Dashboard | 3 finger swipe right | Lower left | ? | - |
| Apps icons customized | Dock bar (bottom of screen) | Mouse beyond bottom of screen | - | - | Esc |
| Active app selection | Active apps | - | - | ⌘ + Tab Repeat | - |
| Installed apps | Launchpad | Thumb and 3 finger pinch | Upper right | fn + F4 | - |
| Files and folders | Finder | - | - | ⌘ + option + T | - |
| Put display to sleep | Start screen saver | - | Lower right | control + Shift + Power button | - |
| omni-search | Spotlight | - | - | command + spacebar | Esc |
| mute | Speaker volume | - | - | fn + F11 | - |
| Softer | - | - | fn + F12 | - | |
| Louder | - | - | fn + F12 | - | |
| Alerts | Notification Center | - | - | - | - |
[1] = PROTIP: This command does not work when the active program is in an extended screen.
Programmatic keyboard mapping
You can do the above automatically when installing this Python script.
## Karabiner Elements
Use Homebrew or Downloading Karabiner-Elements, a free utility somce OSX Sierra when Apple remapped key commands.
It’s free but note the package has many lingering issues.
VIDEO: Part 1 and Part 2 of Jesse Skelton’s tutorial.
- https://www.youtube.com/watch?v=_47kJvS8nhk by Gary of macos.com
- https://www.youtube.com/watch?v=8AeZkSJz28A
- https://www.youtube.com/watch?v=lyJOYgP-Ihc
Clean borders without icons
I like to have a clean “full screen” without the distraction of all the Apple Mac icons at the top, bottom, etc.
Microsoft Windows navigation
| Purpose | Menu | Mouse | Key |
|---|---|---|---|
| New window | File | New Window | - | ⌘ + N |
| New window Incongnito | - | ⌘ + shift + N | |
| Cycle through windows in app | Window | - | ⌘ + ` (at upper left corner of keyboard) |
| Maximize window (no menu bar) | - | Click green icon at the top left corner of window | ⌘ + shift + F toggle |
| Un-Maximize window | - | Cursor to top left corner. Click on green icon. | |
| Minimize window | - | Click yellow ball. | ⌘ + M |
| Close current window | - | Click red ball. | ⌘ + shift + W |
| Close all windows | - | - | ⌘ + option + W |
| Preferences | app name | Preferences | - | ⌘ + , |
| Quit app completely | app name | Quit | - | ⌘ + Q |
Cross machine
For a $19 one-time purchase from symless.com, the Synergy app on Mac, Windows, and Linux enables you to use a single keyboard and mouse for use on all machines, copying and pasting from a Mac to a Windows machine to a Linux machine.
It does not support iPads, which Apple’s Universal Control does supports.
Microsoft vs. Mac Keyboards
Needing to change habits learned typing is difficult and takes time. It’s literally taking physical therapy. This is perhaps the most frustrating aspect of changing from Windows to a Mac.
Here are the most problematic among Keyboard mappings using a PC keyboard on a Macintosh on Microsoft’s website:*
| Microsoft Windows | Apple Macintosh | issue |
|---|---|---|
| Right-click (Alt) | Holding down control during mouse click | - |
| Ctrl + mouse click multiple items | control + option + mouse click | Two keys on Mac |
| Delete (right of cursor) | fn + delete control + D | swapped |
| Backspace (left of cursor) | delete control + H | |
| Function key | fn + F1 ... F12 | |
| Windows Start orb | control+F2, then enter/return | awkard |
| Num lock | Virtual Machine > Send Key | |
| Home (top of doc) | fn + left | |
| End (bottom of doc) | fn + right | |
| Insert toggle | Requires mapping | |
Delete and Backspace keys swapped
The Delete key on an Apple keyboard (⌫ on older keyboards) is actually the backspace key to all other operating systems. To press the equivalent of the Windows backspace that removes to the left of the cursor:
- On a Macintosh notebook keyboard, press fn + Delete.
- On older full-sized Macintosh keyboards, press ⌦ (called "Forward Delete") below the Help key.
The ALT key on Windows is OPTION on Mac keyboards.
To send key commands from a Mac into a Windows instance inside VMWare Fusion.
Insert key requires mapping
Sending the equivalent of Windows keyboard Insert on a Mac is problematic, especially within a virtual Windows machine.
- On older Macintosh keyboards, press the Help key.
- On older Macintosh notebook keyboards, press fn+M.
- Newer Macintosh notebooks do not support fn+M. So map Alt+F1 within VMware Fusion > Preferences > Keyboard & Mouse > Key Mappings.
Full Screen Finger Gymnastics

PROTIP: To evaluate Mac developers, some interviewers ask “show me how you enter and exit Full Screen”. This is because they assume that the most productive developers work with their hands always on the keyboard.
Windows has its F12 key. Apple has Mac users do the equivalent of a double Summersault with your fingers. How do you type, at the same time:
- control + command + F
PROTIP: To toggle Full Screen view using the default configuration from Apple: while keeping your left forefinger on the F “home” key, reach with your left thumb to hold down the control key. This may hurt at first (until you get used to it). Try raising your hand
Now, while keeping your right forefinger on the J “home” key, reach with your right thumb to hold down the command key on the right side of the Space Bar. Then you’re in position to press F with your left forefinger.
Voice Recognition
PROTIP: A big benefit of working from home is that I don’t have people sitting nearby. So now I can enable voice recognition to automatically type some (not all) keys.
This has been available since the OSX Yosemite version: https://support.apple.com/en-us/HT203085
See this video to give it a try:
-
CAUTION: Enabling “Use Enhanced Dictation” (In Apple System Preferences > Dictation & Speech > Turn on Dictation) causes an approximately 800MB file to be downloaded to your Mac.
- Choose Accessibility. Scroll to Dictation. Scroll to see which commands.
- Check Enable Advanced Commands. Scroll to see which commands.
- Get into Automator.
Process Navigation
Press command + Tab to cycle through programs (apps) running.
Press shift plus the above reverses the cycling direction.
Stop on the icon of the app you want to make active.
Trackpad Remapping Tool
The trackpad on OSX recognizes multiple touch points (fingers) at once.
- One finger to move the mouse cursor.
- Two fingers to scroll up or down.
- Three fingers to move among applications active.
BetterTouchTool (BTT) $6.50 app remaps what Apple input devices (keyboard, Magic Mouse, Touchpad, Trackpad) recognize, and also adds more gestures.
Use my installer for Mac to setup this program along with all others by running repeatable Ansible declarations.
There are several dimensions:
| Fingers | Motion | Direction | Repeats | Pressure |
|---|---|---|---|---|
| 1 2 3 4 | tap swipe pinch in/out (zoom) | up down left right | tap TipTap | light medium heavy |
Combos: single finger tap left, single finger tap right, single finger tap, two finger tap, two finger click, two finger swipe (up/down/left/right), three finger tap, three finger click, three finger swipe (up/down/left/right) and ‘TipTap’ left/right.
- https://www.youtube.com/watch?v=A1xFhreDR_k
- https://www.youtube.com/watch?v=7mr2IiJ0Y0E
- https://www.youtube.com/watch?v=qeocxFO5yWA
- https://www.youtube.com/watch?v=aFmB3XCva_Y
Programs can be invoked several different ways:
- Click the magnifying glass and type the program name
- Click on the apple menu
- the Dock
- or from the Applications folder on your hard drive.
To reset during open, in the Application folder, hold down all keys SHIFT OPTION COMMAND then click the app’s icon.
Keyboard Mapping
NOTE: MacOS defines most of its keybindings for editing text in:
- /System/Library/Frameworks/AppKit.framework/Resources/StandardKeyBinding.dict
PROTIP: Remap home and end key by creating folder ~/Library/KeyBindings/ and in it file DefaultKeyBinding.dict containing a property list like this:
{
    "\UF729"  = moveToBeginningOfLine:; // home
    "\UF72B"  = moveToEndOfLine:; // end
    "$\UF729" = moveToBeginningOfLineAndModifySelection:; // shift-home
    "$\UF72B" = moveToEndOfLineAndModifySelection:; // shift-end
}
This change requires a reboot.
App-specific keys
Finder

I probably click the Finder Favorites more than anything else. So I’ve memorized the keyboard keys.
-
For the Downloads folder: Option + ⌘ + L
-
For the Desktop folder where screen captures are stored (by default): Shift + ⌘ + D
-
For the Applications folder where apps are stored: Shift + ⌘ + A
This enables me to remove default items in the Favorites list (by right-clicking on it) so I can instead list my own folders I use most often.
-
To go a level up or down in the Finder, press ⌘ + up arrow or down arrow.
-
Open parent folder and close current window: Option-Command-Up Arrow
-
To open folders and files by clicking on it and pressing ⌘ + O (instead of Enter as you would on Windows).

- ⌘ + 1 = Icon view
- ⌘ + 2 = List view
- ⌘ + 3 = Column view
-
⌘ + 4 = Cover flow view
QUESTION: Is there a key to expand width of columns?
-
control + ⌘ + number to control Arrange sorting.
- ⌘ + F to Search text.
Hide and Unhide Folders
Under Favorites, click on your user name (next to the house icon). If the Library folder does not appear:
sudo chflags nohidden /Library/ ~/Library/
To hide Library again:
sudo chflags hidden /Library/ ~/Library/
System Preferences keyboard shortcut
Apple’s System Preferences is a dialog I go to often. But it doesn’t have a default universal keyboard shortcut.
So let’s make one, using control+command+comma. (I use my middle finger to reach the comma).
-
Click the Apple icon. Notice whether there is a shortcut for System Preferences. Below is what it looks like after going through the steps below.

- Select System Preferences.
- Click the Keyboard panel.
- Click “Shortcuts” tab.
- Select “Application Shortcuts” from the list.
- Click the [+] plus button for the pulldown menu.
- Choose “All Applications”, then in the field labeled “Menu Title” enter “System Preferences…”.
- Click in the field labeled “Keyboard Shortcut”.
- Press the hotkey you want to use. For me use Control+Command+,. You should see the icons appear.
- Click “Add” to close out of System Preferences.
- Exit System Preferences by clicking the red dot.
- Try it: Hit the shortcut you just created.
Chrome Browser Tabs
| Purpose | Firefox | Chrome |
|---|---|---|
| New blank tab | ⌘ + shift + H | |
| Home tab | ⌘ + T | |
| Open Settings / Preferences tab | ⌘ + , (comma) | |
| Close current tab | ⌘ + W | |
| Re-open tab | ⌘ + shift + T | |
| Cycle through tabs | control + Tab | |
| Bookmarks manager tab | - | option + ⌘ + B |
| History tab | - | option + ⌘ + H |
| Downloads tab | - | shift + ⌘ + J |
| Browser Console | shift + ⌘ + B | |
See https://support.google.com/chrome/answer/165450?hl=en
- Firefox keyboard shortcuts can be re-mapped using the Manu Wizard plug-in.
Page operations within Chrome Tab
| Purpose | Mouse | Key |
|---|---|---|
| History | - | shift + ⌘ + H |
| Search web | - | option + ⌘ + F |
| Find bar (to text on page) | - | ⌘ + F |
| Find next match | - | ⌘ + G |
| Find previous match | - | shift + ⌘ + G or shift + Enter |
| Enter highlighted text to Find | - | ⌘ + E |
| Page Down | - | fn + down arrow |
| Page Up | - | fn + up arrow |
| Page top (home) | - | fn + left arrow |
| End of page | - | fn + right arrow |
| Previous page | - | ⌘ + [ |
| Next page | - | ⌘ + ] |
| Refresh | - | ⌘ + R |
| Bookmark current page | - | ⌘ + D |
| JavaScript Console | - | option + ⌘ + J |
| Source HTML | - | option + ⌘ + U |
Common special characters: Option+…
| 1 | 2 | 3 | 4 | 5 | 6 | 7 | 8 | 9 | 0 | - | = | |
| ¡ | ™ | £ | ¢ | ∞ | § | ¶ | • | ª | º | – | ≠ | |
| Spanish | Trademark | British pound | 4 | infinity | paragraph | paragraph | a | o | em | Not equal |
Text string operations
| Purpose | Mouse | Key |
|---|---|---|
| Cut highlighted text | - | ⌘ + X |
| Copy highlighted text to clipboard | - | ⌘ + C |
| Paste highlighted text from clipboard | - | ⌘ + V |
| Copy URL of current page to the clipboard. | - | option + ⌘ + C |
| Paste content without formatting | - | shift + option + ⌘ + V |
Chrome iMacros
To use macros, add to Chrome browser the iMacros for Chrome.
This auto-opens http://imacros.net/browser/cr/welcome.
To use macros on Firefox, open in Firefox iMacros for Firefox. Click Add to Firefox. Click Install. Click Restart Now.
Microsoft Word for Mac 2011
-
- Save = command + S
- Save As = Shift + command + S
Microsoft Outlook (Email and Calendar)
Among the Keyboard Shortcuts for Outlook on macOS:
Minimize or expand the ribbon = Options + COMMAND + R
Hide the reading pane or show it on the right = COMMAND + Backslash ()
Hide the reading pane or show it below = Shift+ COMMAND + Backslash ()
Text Editor Special Characters
In a text editor, press either Shift + Option + 8 or Option + 0.
For autocomplete in TextEdit, press Tab + Esc. Unfortunately, this is the same key to toggle the Mac’s text-to-speech.
For the ©Copyright symbol, press the “alt” key (or “option”) and hold it down while typing “g” on the keyboard.
Keyboard Symbols
This website and others make use of special coding to represent Apple icons and keyboard icons.
Below is modified from Joe Weaks
| Icon | Name | Unicode | Font |
|---|---|---|---|
| ⌽ | Power 3 | U+233D | |
| | Apple symbol 1 | U+F8FF | Lucida Grande |
| ⌘ | Command (Open Apple) 2 | U+2318 | |
| ⌃ | Control | U+2303 | |
| ⌥ | Option (Alt, Alternative) | U+2325 | |
| ⇧ | Shift | U+21E7 | Apple Symbols |
| ⇪ | Capslock | U+21EA | |
| ⎋ | Escape | U+238B | |
| ⇥ | Tab forward | U+21E5 | |
| ⇤ | Tab back | U+21E4 | |
| ␣ | Space | U+2423 | |
| ⏎ ↩ | Return | U+23CE U+21A9 | |
| ⌫ | Delete back | U+232B | |
| ⌦ | Delete forward | U+2326 | |
| ﹖ ⃝ | Help | U+003F & U+20DD | |
| ⇱ ↖ ↸ | Home | U+21F1 U+2196 U+21B8 | |
| ⇲ ↘ | End | U+21F2 U+2198 | |
| ⇞ | Pageup | U+21DE | |
| ⇟ | Pagedown | U+21DF | |
| ↑ ⇡ | Up arrow | U+2191 U+21E1 | |
| ↓ ⇣ | Down arrow | U+2193 U+21E3 | |
| ← ⇠ | Left arrow | U+2190 U+21E0 | |
| → ⇢ | Right arrow | U+2192 U+21E2 | |
| ⌧ | Clear | U+2327 | |
| ⇭ | Numberlock | U+21ED | Apple Symbols |
| ⌤ | Enter | U+2324 | |
| ⏏ | Eject | U+23CF |
Robot typists
For making videos:
https://github.com/pofallon/sublime-phantypist
Slowly output the contents of the clipboard into the currently active tab,
one character at a time. Map to CTRL-SHIFT-V for a slow paste command.
https://github.com/aholub/type
Applescript “robot” typist inserts characters into XCode or other application
https://gist.github.com/xaviershay/6656216
Creates a mapping that will type out the given text into vim.
Resources
Instead of the built-in command+Tab to switch among active programs, follow Daniel Szpisjak’s How to become a modern magician? - productivity tips for devs on macOS describes setup and use of Hammerspoon Lua language which uses a complex combination such as Shift+Control+Option to be a “Hyper” key such as the CapsLock. Karabiner+Elements
Assign Hyper+X to a specific program, and the pop-up shown by command+Tab will not come up.
Bash-it
https://github.com/Bash-it/bash-it community Bash framework of autocompletion, themes, aliases, custom functions based on https://github.com/robbyrussell/oh-my-zsh
Tmux
Tmux is a contraction of “Terminal Multiplexer”. The “multi” refers to multiple sub-windows like multiple tabs on a browser window.
Comprehensive
Tyler.io show the keys he defined using Magnet (https://magnet.crowdcafe.com/) and KeyboardMaestro (https://www.keyboardmaestro.com/main/). Tyler Hall’s code is at https://github.com/tylerhall/
Stream Deck button keyboard
Video creators especially appreciate being able to, so they can concentrate on talking, push a button and have a sequence of keys to do what they need, such as share screen 2, leave zoom, etc.
The Stream Deck has programmable buttons, with each button like a little LCD screen.
VIDEO: Unlike a regular keyboard, each button on the Stream Deck can display different images. It provides a visual button you don’t have to remember.
References:
- https://www.wired.com/story/elgato-stream-deck-productivity-tips/
- https://www.youtube.com/watch?v=6VyVCddCk-Q&t=95s
-
Since 2017, there are several editions of Stream Deck. The $150 MK.2 has 6 keys. The $80 “Mini” has 4 keys. The $250 “XL” has 32 keys.
Stream Deck Pedal provides three buttons for your feet to click.
-
Download and install StreamDeck software from
https://www.elgato.com/en/downloads
PROTIP: This installs to the /Applications folder.
Alternately, Elgato published several utilities in Homebrew on Mac:
brew search elgato
==> Casks
homebrew/cask-drivers/elgato-camera-hub
homebrew/cask-drivers/elgato-control-center
homebrew/cask-drivers/elgato-game-capture-hd
homebrew/cask-drivers/elgato-stream-deck
homebrew/cask-drivers/elgato-thunderbolt-dock
homebrew/cask-drivers/elgato-video-capture
homebrew/cask-drivers/elgato-wave-link
- PROTIP: If you need to differentiate the USB end of the StreamDeck cable, label it.
- PROTIP: If you’re using a later-model Mac, you’ll need a USB-A to USB-C adapter.
-
Plug in your deck to a USB-2 port.
-
Press the blue “WELCOME” button to open the Elgato webpage on your default browser.
Preferences configuration
NOTE: I like to have a clean “full sreen” without the distraction of all the Apple Mac icons at the top, bottom, etc. But for those times they need to be seen …
- Hold down fn+control+F8 or cursor all the way to the top of your whole screen and on the Apple Top Menu bar, click
 the StreamDeck.app icon to select Configure Stream Deck, which makes the GUI appear.
 -
PROTIP: Press Command+Tab to notice that the app does not appear.
- Press Command+, (comma) or click the () cog icon for the app’s Preferences dialog.
-
Select “Sleep After” for 5 minutes or whatever time you prefer.
PROTIP: You can “Set Screensaver…” for a background image. But why?
Profiles Backup
- Click the “Profile” tab to define different Profiles.
-
DOTHIS: click the down-arrow to select “Backup All”, “Create Backup…” which goes in your Documents folder as a file such as:
Stream Deck - 12-02-2022 - 11-59.streamDeckProfilesBackup
-
Exit Preferences.
Pages and Levels
- Click the “+” next to “Pages” (on the middle of the GUI) to add a second page. Notice a right (>) cursor now in the device.
-
Click on that and the left cursor appears.
PROTIP: Use the top (home) page as a menu and for buttons you’ll want to most often reach quickly during live calls, such as sound effects. Use another page of icons for websites.
-
Click the () “Control Center” menu item to expand/contract its items.
PROTIP: I don’t use the brightness settings button because they are buttons on my Mac keyboard Control Board for that.
PROTIP: I don’t use the Battery button because I set my Mac to display its percentage on my Mac’s top-of-screen menu (set in System Preferences, Dock & Menu Bar, Battery).
Pages, Websites and icons
- Highlight and copy the URL path of the page you want to go to (starting with “https://”).
- Create your own Webpage button by expanding the System menu and dragging the “Website” to drop it on the button you want to use.
- PROTIP: You can drag a gif (animated) image file from Finder and drop on the default icon.
- Type a Title such as “Gmail”.
- Click on the URL field and paste.
- Click the “+” on the upper-left of the button icon to pop-up Stream Deck’s Icon Library.
-
Click the icon at the lower-left to open a selection of icons, plugins, music, sound effects.
Single-button website
-
To obtain an icon, replace “linkedin.com” with the website you want:
https://www.linkedin.com/favicon.ico
That’s always 20x20 pixels, so use a photo editor (such as Sketch) to expand it to 144x144 shown as 72x72.
https://www.startpage.com/sp/search
NOTE: Stream Deck allows you to define two states for every key (e.g. on and off).
Hardware upgrade
ifixit.com has a $84.99 Stream Deck Upgrade Kit takes the 64GB to 512GB with a faster Micron processor.
Icons
-
Among icons, I like the Icon collection “Material Icons” (from Google) because of their white on black.
PROTIP: It’s best to use a black background to avoid annoying glare and reflections on your glasses.
-
If you’re a Figma user, install their icon library.
Stream Deck is the darling of gamers and streamers who use OBS Studio, Twitter, Twitch.
-
Control OBS
OBS Studio Ultimate Stream Deck Guide
VIDEO: Noobs Commander OBS scripts.
-
Among sound effects, “Cell Phone ring simple” and “Cell Phone Smart Phone Vibrate” can be a good excuse to end meetings.
“Crowd Aww”, “Crowd Cheer Clap Scream”, “Large Crowd Medium Ovation”, “Crowd Disgusted Aww”, “Crowd cheers and whistles”.
-
Download “rim shot” and comedy laugh track sounds.
-
MUSIC track for use during short breaks: Among the longest: “Inspiring Uplifting Motivational” is 4:34; “Come Dine with Me” is 5:32.
I especially like “Upbeat Corporate Success” and “Ultimate Inspiration”, which are about 120 BPM (Beats Per Minute).
Plugin to control lights
-
Among PLUGINS, “Philips Hue” to turn lights on and off without saying “Alexa” or “Hey Google” by connecting to Phillips, etc.
YouTube
-
“Zoom Plugin”
https://lostdomain.org/stream-deck-plugin-for-zoom/
-
Use IFTTT.com to create special web links.
switch your phone to Do Not Disturb,
-
PowerPoint integration
-
Visual Studio Code Mac or XCode
-
DevOps for StreamDeck to control GitHub Actions, GitLab, Netlify, etc.
https://github.com/SantiMA10/devops-streamdeck
-
PLUGIN “Time”
-
PLUGIN “OSA Script” to put your Mac laptop to sleep with one button.
https://vninja.net/2021/04/15/elgato-stream-deck-sleep-button/ https://www.reddit.com/r/StreamDeckSDK/comments/jsn7re/setting_up_a_1_button_sleep_mode/
Apple’s own scripting tool, Shortcuts, is not only powerful, but it’s built right into MacOS. That can be a huge benefit on its own, but an unofficial plugin lets you activate Shortcuts right from a button on your Stream Deck.
https://github.com/SENTINELITE/StreamDeck-Shortcuts This integration is made by GitHub user Sentinelelite and not associated with Apple, which is worth keeping in mind. However, you can find the code here. In my testing, it worked pretty well, launching the couple of existing Shortcuts I had without needing a keyboard shortcut that’s not already in use or taking up space in my status bar.
-
PLUGIN: https://www.youtube.com/watch?v=ny9z6rgJAC4
Mute/Unmute
PROTIP: Most conveniently, Stream Deck buttons don’t depend on you being at a specific app.
-
https://demitasse.co.nz/2020/04/zoom-mute-unmute-using-stream-deck/
-
Control Notion app
https://www.youtube.com/watch?v=nrWRzYYC1rE
-
Use “Mixer” to mute/unmute microphone in Twitch, Mixer, Discord, etc.
-
Nested folders.
-
“MultiAction” invokes a sequence of actions programmed to open and position several window by one button.
-
Instant Replay of the last 15 seconds on YouTube, if you also bought an Elgato capture card hardware.
-
VIDEO: Control the OBS streaming app.
- Post to Twitter, YouTube,
References:
-
https://www.youtube.com/watch?v=_WwnM2VgYHU Plug-ins Magic Vegas
-
You Need A Stream Deck! The Secret To My Productivity Working From Home by BetterCreating.com has a custom workpad for StreamDeck controlling Notion.
Foot pedels
The Kinesis Advantage keyboard has a phone plug to connect to a foot peddle to press the “Enter” key.
Ergonomic Keyboards
QWERTYUIOP. That was the contents of the first email ever sent, back in 1971, by Ray Tomlinson.” – Centre For Computing History. Accessed June 19, 2019. http://www.computinghistory.org.uk/det/6116/First-e-mail-sent-by-Ray-Tomlinson/.
VIDEO: “Among fastest competitive typists, only two use Dvorick key layout”.
Although pricey at $340 from Amazon (perhaps the most expensive keyboard available), the “Advantage2” keyboard from Kinesis-ergo.com (at Bethel, Washington state) makes it easier and faster for your fingers to reach keys due to its unique contoured key wells. Its keys in the middle transfer more work to thumbs than conventional square keyboards.

A Ergonomics shop TheHumanSolution.com note the slant of keys enables natural (rather than bent) wrist placement that prevents repetitive motion injury causing career-ending pain in wrists and shoulders.
However, the keyboard does take some “learning time” as its keys are in a different location than on conventional keyboards. The manufacturer has a 7 day return and 3 year warranty policy.
Desiring quieter operation, I chose Cherry 45g MX Red (quiet linear-force, not “clicky”) mechanical key switches (instead of Brown keys which provide tactile feedback on each keypress). Cherry Red key switches are also used in the iKDC KD104 MX silent keyboards.
But I don’t think the Red keys arenot much quieter than other keyboards. (Razor Opto-mechanical Red or Ornata v2 membrane keyboards seem the quietest to me. They are also have short 1mm travel to activate and quickest debounce delay).
Further quiet may be achieved by lubrication or replacing key switches with rubbery Zilent keys.
(I don’t know how the keyboard responds to “rollover” of several keys almost simultaneously, which other keyboards call “anti-ghosting”).
For even faster operation, use the keyboard’s 2MB of memory on-board to store SmartSet Programming Engine macros.
Videos:
- https://www.youtube.com/watch?v=8WwuusfB0QA Aug 20, 2016 is the most detailed
- https://www.youtube.com/watch?v=ILItPWuirAk Mirabai Knight
- https://www.youtube.com/watch?v=PhQlZvUzT7w Aug 3, 2016 from Kinesis
Stenography
VIDEO: The average typing speed is 40 WPM (words per minute) on a standard QWERTY keyboard. Pros type 80-95 WPM. Test your speed using
- speedtypingonline.com
- monkeytype
VIDEO: Invented in 1911, Stenography machines enable Courtroom reporters to record testimony at 99.9% accuracy at 280 WPM using a stenograph machine. Court reporters note in the paper tape from the steno machines notes about the enviornment such as who is speaking, whether someone pointed at something, etc.
In 2025 Stenographers are still needed but are in short supply.
Stenographers use machines implement the phonetic (sound) Pitman method.
The reason why so much faster than using QWERTY keyboards sold with computers:
-
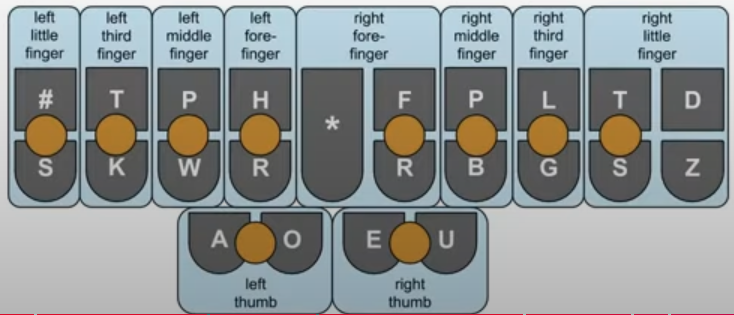
fingers do not move much, since Steno keyboards only have 23-26 keys:
23 keys operated with 10 fingers simultaneously can have 8,388,607 combinations (called chords or strokes).
There is no N key and 2 R’s and 2 P’s
With QWERTY keyboards, reaching for Esc, arrows, Delete, Return, special characters, etc. require taking your hand off the keyboard and needing to look at the keyboard, which adds speed and mistakes.
Each “outline” Consists of chords (strokes) of keys pressed at the same time.
Standard QWERTY keyboards only recognize two keys pressed at the same time. Some gamer keyboards have a n-rollover of more than 2. But few can recognize 26 keys pressed at the same time like Steno machines.
The “paper tape” displays each chord of steno keys pressed on a line:
#STKPWHRAO*EUFRPBLGTSDZ
-
Unlike QWARTY keyboards where all letters of words and pressed in sequence, only keys needed for phonetic and “orthographic” spelling are pressed:
A “theory” translates what is typed into full English words: VIDEO
There is a lookup app to present what steno keypresses for English words.
“KOEF” is “coffee” spelled in steno Plover theory.
Phrasings lets you write entire phrases such as “we don’t really want to” in one stroke.
A steno theory refers to the set of rules that govern how words are broken down.
Base theories defined in textbooks you buy:
- $169 Phoenix theory is based off of a comprehensive set of rules that make it easy to break down complicated words.
- $99 Magnum theory places more emphasis on learning words themselves through rote memorization.
- Josiah
Free theories:
- PlatinumFramework.org (if you are more of a auditory learner)
- defined in the main.json file within Plover, but has some inconsistent words/rules.
- Lapwing theory from 2022 VIDEO: uses the # key for proper nouns. by Aerick in 2022.
-
Dictionaries of “briefs” – “abbreviated stokes” are memorized to type faster – can number in the hundreds of thousands.
50% of users can surpass their typing speed in 3-6 months of practice.
Many take up steno as an intellectual challenge, like learning a new musical instrument.
steno for coding using Georgi keyboard and Plover stenography software with custom steno-dictionaries.
-
Steno keys are closer together.
There are steno caps that can be 3D-printed to fit standard keyboards.
-
Steno machines have a much lighter touch - 35 g (grams) compared to 100 g for standard QWERTY keyboards.
Professional steno machines have tension mechanisms that bottom out at as low as 10 grams regardless of how many keys are pressed.
All the above are why standard keyboards are not often used for Steno. However, can be used to type on a standard keyboard by “arpeggiate” (pressing keys one at a time before releasing a word by pressing the * key)
Steno keyboards
A spreadsheet comparing Steno keyboards:
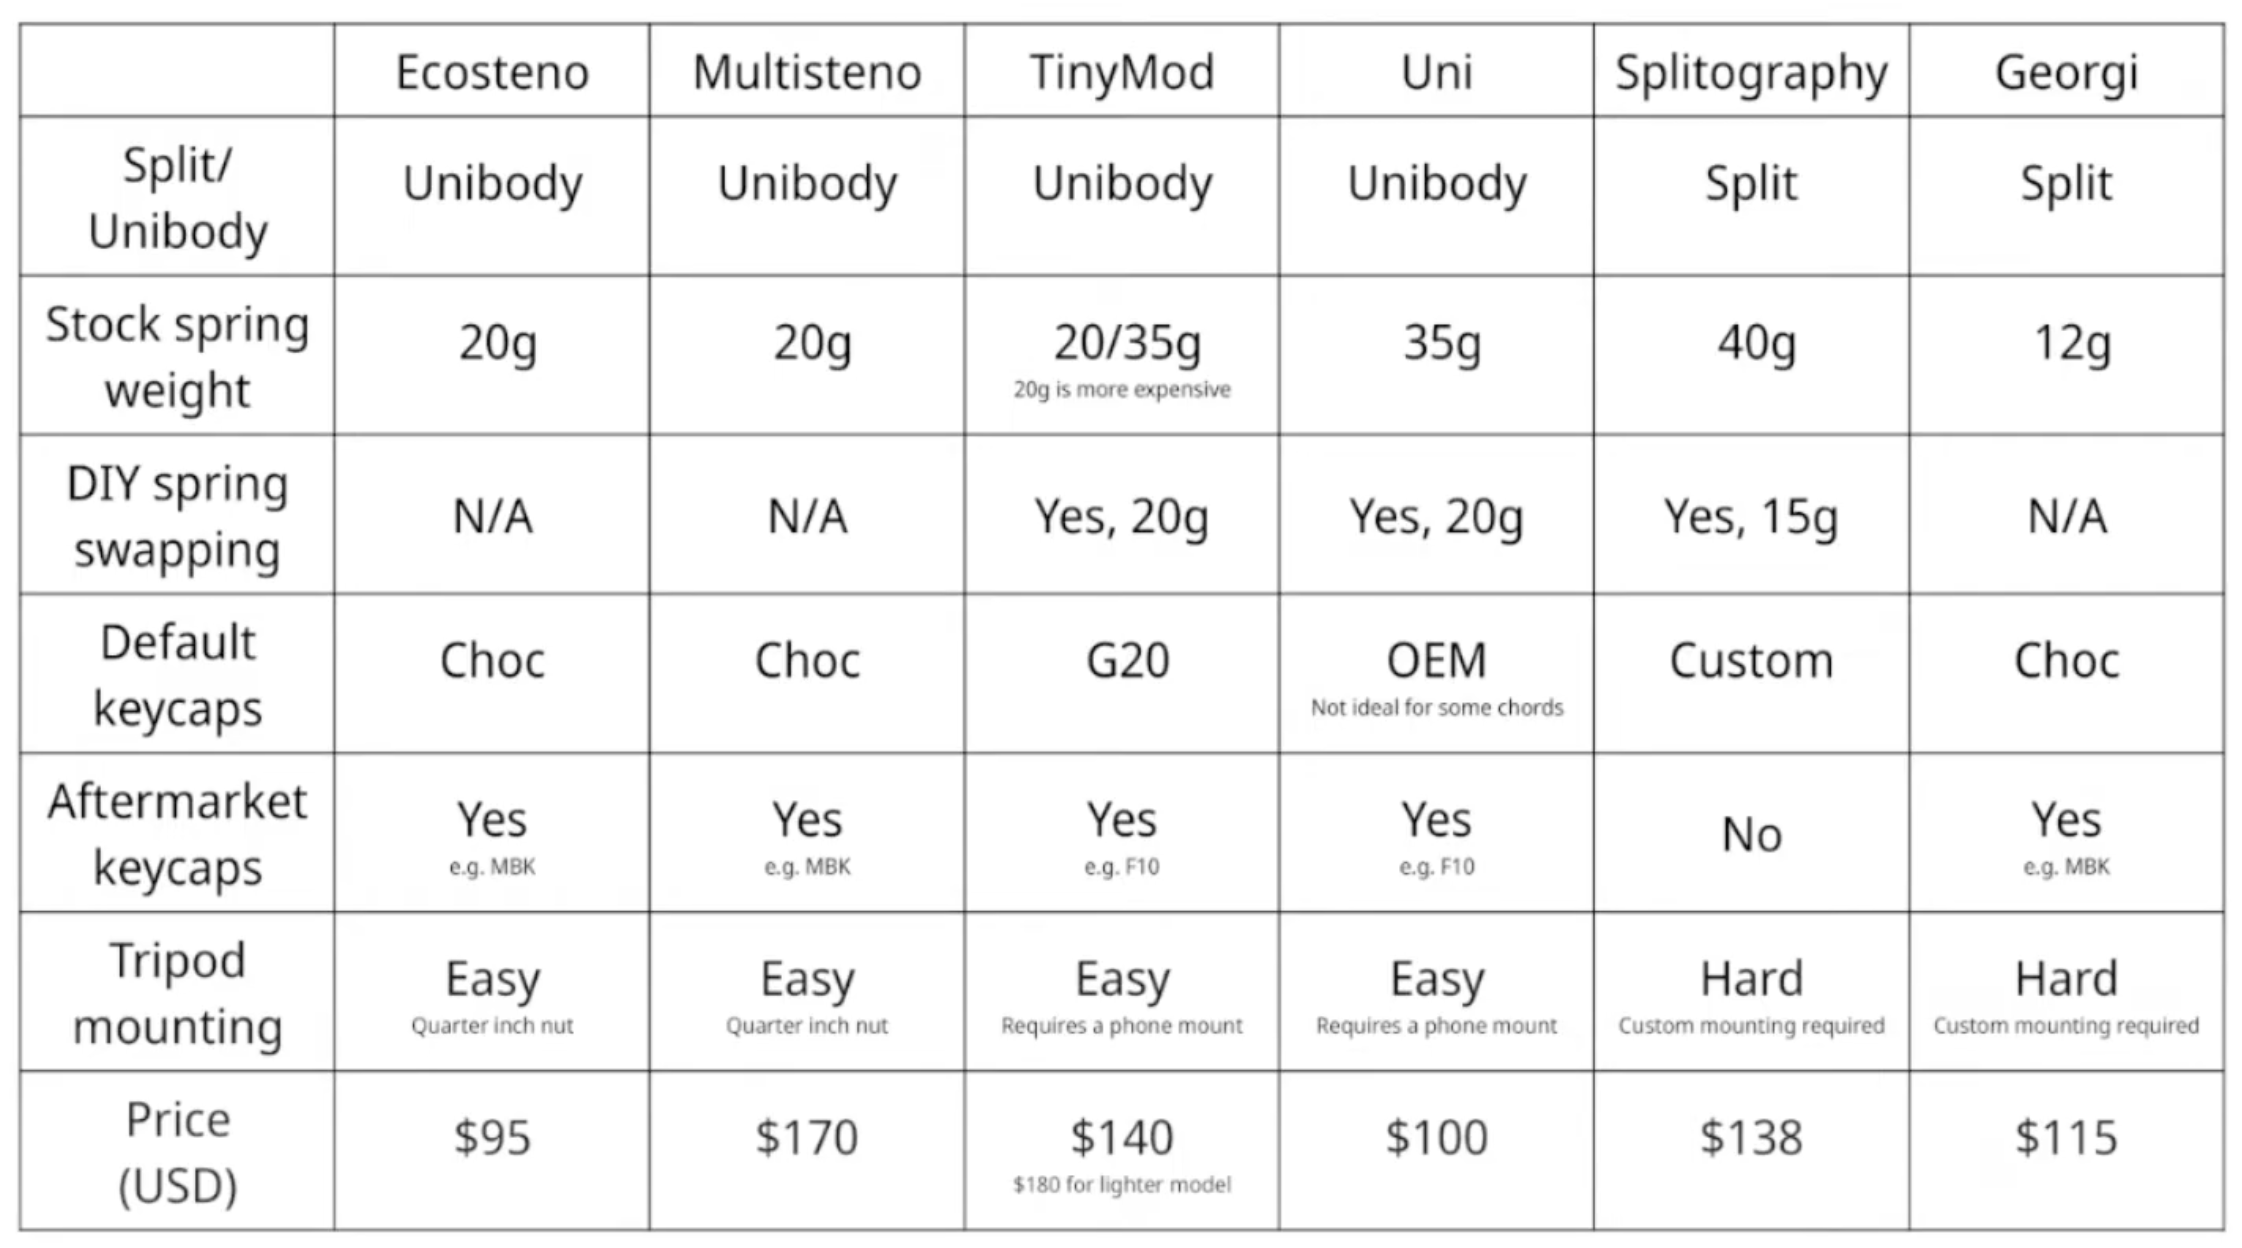
From stenokeyboards.com (videos) are 35g springs which can be replaced with 20g springs without desoldering:
-
The $50 Asterisk keyboard is flat prone to accidental touches but it’s the cheapest.
-
The $100 Uni VIDEO
-
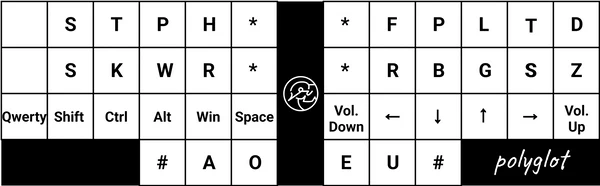
The $125 Polyglot has 42 keys in ortholinear arrangement for use as a QWERTY keyboard as well, convenient for those who are just starting out and need to switch between steno and QWERTY.

Computers recognize Stenokeyboards using the Gemini serial protocol as a Gemini writer. So CAT software that officially support Gemini writers should support them: https://www.youtube.com/watch?v=pYmxpTCvOLQ&t=187s
from nolltronics.com feature 20g springs: https://nolltronics.com/?v=3e8d115eb4b3
From Stenomod.com:
- TinyMod has a “very quiet” version with 20g springs for $200 https://stenomod.blogspot.com/2021/01/new-options-for-tinymod.html
- Photo & http://plover.stenoknight.com/2019/12/tinymod-review.html
From softhruf.love:
- Splitography, although having 40g springs, has a cable connect two sides of the keyboard for a more relaxed placement of hands. However, it is difficult to mount on a tripod. VIDEO
From other sources:
- The Georgi is not being updated. It has 12g “ultrlight” springs. Connects to a computer using a TRRS cable. Keyboard case: https://www.thingiverse.com/thing:3622551 and 1/8” 4-Pole 3.5mm TRRS Plug
From Stenovations
-
$125 Polyglot allow hands to rest on keys without accidentally activating them. digitalCAT by
-
Overlay
Machine selections:
- GeminiPR hobbyist steno keyboard
- Keyboard
- Passport
- ProCAT
- Stentura
- TX Bolt
- Treal
Plover.app install on macOS
- https://github.com/openstenoproject/awesome-plover/blob/main/readme.md
-
https://github.com/openstenoproject/
VIDEO: Plover stenography software (VIDEO) was started on Kickstarter in 201?.
VIDEO: To install Plover stenography software:
https://github.com/openstenoproject/plover
First of all, Plover was built for Intel macOS (before ARM Macs today) and so requires Rosetta 2 to be installed.
-
Do a full backup. Note the time and date.
PROTIP: It is very difficult to remove Rosetta 2 once it is installed.
- Open Spotlight by pressing Command + Space bar.
- Type in your Terminal name (Terminal or Warp) and hit Return.
-
If you are using a CLI such as Warp, ensure it can modify your system in Apple Settings > Privacy & Security > App Management.
- PROTIP: Install Apple’s Rosetta 2 emulator, if needed: https://www.makeuseof.com/what-is-rosetta-2-mac/
echo "$(uname -v)"
    # Darwin Kernel Version 23.6.0: Thu Apr 24 20:29:29 PDT 2025; root:xnu-10063.141.1.705.2~1/RELEASE_ARM64_T6020
if [[ "$(uname -m)" == "i386" ]]; then  # not "arm4"
   # First, backup It is very difficult to remove Rosetta 2 once it is installed.
   softwareupdate --install-rosetta --agree-to-license
fi
Type A when it asks if you agree to the terms and conditions and hit Return.
Sample Response:
By using the agreetolicense option, you are agreeing that you have run this tool with the license only option and have read and agreed to the terms. If you do not agree, press CTRL-C and cancel this process immediately. 2025-07-02 04:27:52.208 softwareupdate[57892:5884883] Package Authoring Error: 082-42380: Package reference com.apple.pkg.RosettaUpdateAuto is missing installKBytes attribute Install of Rosetta 2 finished successfully - Confirm install: In Finder, navigate to Applications to hold down Control to click the app icon. Select Get Info. Under the General section, next to Kind, you’ll see what application category it is: (Universal or Intel).
Kind: Application (Intel) - Instead of downloading, install Plover using Homebrew to save a few manual steps now and during future updates:
brew install --cask ploverThe result is the plover.app file in Applications folder.
- Using Finder to navigate to Applications
-
Scroll to the Plover.app file to hold down the control key and right-click on it.
If you right-click without the control, you’ll see pop-up “Plover.app” cannot be openend.
-
Select “Open” from the context menu.
- Click Plover.app again to open it.
- When you see the pop-up “Accessibility Access (Events)” pop-up, click “Open System Settings”.
- Click to enable Plover in “Privacy & Security” > “Security” > “Privacy” > “Accessibility”.
- Press command+Q to quit System Settings.
- Click Plover.app again to open it.
Plover configuration
github.com/panathea by Thea Morin of Ottawa
Steno tutorials
Aerick:
- Hobbyist’s Guide to Stenography | How to Learn Steno
- https://lapwing.aerick.ca for hobbyists
Tutorials:
- VIDEO: Learning the fastest way to type - Goodbye QWERTY
- typeracer game
- https://www.openstenoproject.org/learn-plover/home.html - Mirabai Knight’s theory for stenocaptioning
- https://www.practiceplover.com is the textbook
- ArtOfChording.com
-
https://ploversteno.org
- didoesdigital.com/typey-type/lessons
- Plover wiki
- Plover discord server https://discord.gg/DJGb9CRsTj
- https://groups.google.com/g/ploversteno?pli=1
-
https://github.com/nvdaes/plover_spanish_mqd
-
The @Platinum Steno YouTube channel for speedbuilding by court reporters.
-
Chloe Salazar’s Intro, machine, working freelance
- Use steno for everything
- Learning Stenography
References
STAR: https://www.wired.com/story/do-everything-faster-keyboard-shortcuts-tricks-tips/
More on macOS
This is one of a series on macOS:
- MacOS Setup step-by-step, with automation
- MacOS Hardware and accessories
- MacOS dotfiles for System Preferences setup automation
- MacOS Boot-up
- MacOS Keyboard tricks
- MacOS Terminal Tips and Tricks
- Text editors and IDEs on MacOS
- MacOS Xcode.app and CommandTools (gcc)
- MacOS Command-line utilities
- Applications on MacOS
- 1password on MacOS
- Manage Disk Space on MacOS
- Screen capture on MacOS
- MacOS iPhone integration
- Linux and Windows on Apple MacOS
- Packer create Vagrant Windows image
- Python on MacOS
- Maven on MacOS
- Ruby on MacOS
- Node on MacOS installation
- Java on MacOS
- Scala ecosystem