

Mac Mini instances without buying hardware within AWS EC2 (and MacStadium): step-by-step and in one command using Terraform
![]()
![]()
![]()
![]()
![]()
![]()
![]()
![]()
![]()
![]()
![]()
![]()
![]()
Overview
- Intel mac1 & ARM M1 mac2 within AWS cloud
- Cost of Mac minis
- MacStadium cheaper
- Get one now
- Option A: Use AWS GUI Manually
- Instance Type in Availability Zone
- Dedicated Hosts
- Your Dedicated Hosts Quota
- Dedicated Host selection
- Calendar deletion
- Config Launch Instance
- Create or select key pair
- Network settings - Security Group
- TODO: Configure Extra Storage
- Advanced Details
- Advanced: User data Boot-up commands
- Launch Instance
- Connection Instructions
- Option B: Use CLI to create instance
- Option C: Run within HCP Vault with Terraform
- Option D: Run locally using Terraform
- Access AWS MacOS
- Storage
- Backups and Restore
- macOS Jenkins & Kubernetes
- Alerts about continued usage
- Monitoring
- Python Fabric
- SSH with OPA policies
- Clean-up
- Remove Security Groups no longer used
- Remove EC2 Key Pairs
- Remove
- Videos:
- References
- SSH
- More on MacOS
- More on Amazon
- More on Cloud Computing
UNDER CONSTRUCTION: TODO: Each line and box in the busy flowchart above will be converted to a video with gradual reveal.
This is a deep dive with commentary and warnings. NOTE: Content here are my personal opinions, and not intended to represent any employer (past or present). “PROTIP:” here highlight information I haven’t seen elsewhere on the internet because it is hard-won, little-know but significant facts based on my personal research and experience.
https://aws.amazon.com/mac redirecting to https://aws.amazon.com/ec2/instance-types/mac says a pool of macOS Mini machine throughout the world can be setup (with your own brews installed) for nomads and testers. Get a Mac Mini temporarily to:
- Run XCode iPhone mobile development builds
- Not lug your macbook everywhere
- Test a new version of macOS (such as Ventura)
- Use shared development environments
Having a mac in the AWS cloud has these advantages:
- Devs can pass an instance to others anywhere else in the world (which otherwise require being in the same room with physical machines).
- The number of instances are scalable – many macs can be created the same way.
- Each mac can have a massive data storage with access to (AWS S3, EBS IOPS, etc.).
- Backup and transfer of data snapshots is easier/faster.
PROTIP: With macs in the cloud, you’re paying for convenience and scalability.
You don’t have to wait for physical machines to be shipped to you.
Intel mac1 & ARM M1 mac2 within AWS cloud
In 2022 AWS announced availability of Apple Mac mini machines within the AWS EC2 cloud as EC2 instance types. This AWS service is made possible by the AWS Nitro System virtualization infrastructure enabling new *.metal EC2 Server Types:
-
mac1.metal are Mac Mini’s with Intel’s 8th generation (Coffee Lake) 3.2 GHz (4.6 GHz turbo) Core i7 x86 processors
-
mac2.metal has Apple’s M1 ARM (16-core Neural Engine) processors made by Apple – using TSMC’s 5nm (N5) process
| Type | Processor | vCPU cores | GiB memory | Gbps Network | Gbps EBS Bandwidth |
|---|---|---|---|---|---|
| mac1.metal | Intel x86 | 12 | 32 | 10 | 8 |
| mac2.metal | arm64 | 8 | 16 | 10 | 8 |
BLAH: As of this writing, AWS doesn’t yet support M2 processors, which is about 18% faster than M1. PROTIP: M2 can go up to 24GB or 32GB of RAM.
Cost of Mac minis
PROTIP: If it’s only about the money, you might as well buy physical mac minis from Apple.
Mac minis from Apple are cheaper than MacBook laptops which have monitors and keyboards:
- $699 for M1 8-core CPU & GPU with 256GB storage
- $699 for M1 8-core CPU & GPU with 512GB storage
- $1099 for i5 6-core CPU & GPU with 512GB storage, 3GHz RAM
AWS has a mechanism they call EC2 Dedicated Hosts for providing a whole physical server fully dedicated for a single user. This was originally used to associate EC2 instances with licenses traditionally sold by Microsoft, Oracle, etc. But for Apple machines, AWS holds licenses to machines.
PROTIP: AWS’ minimum billing (“required by Apple”) is one day, even if you use a few minutes.
That’s why AWS requires the additional mechanism of a dedicated host and unit of billing:
- mac1 US per hour $0.650 x 24 = $15.6/day = $468 per 30-day month
- mac2 US per hour $1.083 x 24 = $25.992/day = $779.76 per 30-day month
PROTIP: Prices are higher in some regions outside the US.
-
mac1 Mumbai per hour $1.14 = $27.36/day = $820.80/month (75% more than US price)
-
mac2 Frankfurt per hour $1.298 = $31.15/day = $934.56/month (20% more than US price)
NOTE: AWS Fargate does not currently adjust madOS server types automatically like it does with Linux machines.
AWS discounts
AWS offers savings up to 44% off On-Demand pricing for a 3-year commitment.
See AWS Documentation at https://docs.aws.amazon.com/AWSEC2/latest/UserGuide/ec2-mac-instances.html.
MacStadium cheaper
Compare AWS against MacStadium.com, who have machines only in Atlanta, Dublin, Las Vegas (as of this writing).
Their prices for bare-metal macOS, billed monthly, are a fraction of what AWS charges:
CPU RAM STORAGE MONTHLY HOURLY
- Gen 4 Mac mini (G4B/G4D) Intel i7 3.2GHz 6C 32 GB 512 GB SSD $239/mo = $0.33/hour
-
Gen 4 Mac mini (G4C/G4E) Intel i7 3.2GHz 6C 64 GB 1 TB SSD $299/mo = $0.41/hour
- Gen 5 Mac mini (G5A/G5I) Apple Silicon M1 8 GB 256 GB SSD $132/mo = $0.18/hour
- Gen 5 Mac mini (G5G/G5K) Apple Silicon M1 16 GB 1 TB SSD $171/mo = $0.23/hour
Get one now
The ways to get a mac*.metal instance:
Option A: Use AWS Management Console GUI manually (not preferred as it’s not repeatable, but good for learning)
Option B: Use CLI commands locally on your laptop (programmatic commands that require testing adequacy of conditions and verification of results)
Option C: Use Terraform (declarative JSON that’s simpler and repeatable)
Option A: Use AWS GUI Manually
Resources:
- https://medium.com/aws-architech/how-to-run-macos-using-amazon-ec2-mac-instances-cur-d918094f9b65
Instance Type in Availability Zone
When provisioning an instance, you’ll need to specify an Availability Zone.
REMEMBER: Each Instance Type (mac1.metal or mac2.metal) may not be in your desired Availability Zones within a Region.
If you select an Instance Type that’s not in your chosen Availability Zone, you’ll get an ERROR such as:
- Your requested instance type (mac2.metal) is not supported in your requested Availability Zone (us-east-1b). Please retry your request by not specifying an availability zone or choosing us-east-1a, us-east-1c, us-east-1d
PROTIP: I recommend that you first identify specifically what Machine Type is available from each Availability Zone you wish to use. Run this AWS shell script I created, adapted from this blog and this Amazon article referencing AWS CLI describe-instance-type-offerings command, rotated through a list of AWS Regions permitted for the AWS account I was given:
- Open a Terminal.
-
Install awscli, perhaps using my comprehensive mac-setup shell.
- Create a folder and navigate to it.
-
Ensure that credentials to access a valid AWS account are in your ~/.aws/credentials file. Otherwise, the command below will encounter this error message:
An error occurred (RequestExpired) when calling the DescribeRegions operation: Request has expired.
-
Remotely retrieve and immediately run my shell script to list the mac*.metal instances by copying and pasting this command on your Terminal:
bash -c "$(curl -fsSL https://raw.githubusercontent.com/wilsonmar/mac-setup/master/aws-info.sh)" -v -ec2info
The above runs this set of commands in my script:
export AWS_INSTANCE_TYPE="mac*.metal" function aws_list_macs { export AWS_PAGER="" for i in `aws ec2 describe-regions --query "Regions[].{Name:RegionName}" --output text | sort -r` do export AWS_REGION="${i}" if [ `echo "$@"|grep -i '\-\-region'|wc -l` -eq 1 ]; then echo "ERROR: -–region flag cannot be used while using this function" break fi echo -e "${AWS_REGION} -------" aws ec2 describe-instance-type-offerings \ --region "${AWS_REGION}" \ --location-type "availability-zone" \ --query "InstanceTypeOfferings[*].[Location, InstanceType]" \ --filters "Name=instance-type,Values=${AWS_INSTANCE_TYPE}" \ --output text | sort done trap "break" INT TERM } aws_list_macsPROTIP: In the for loop which retrieves the list of region in the above script, notice that double-ticks are used instead of sub $(…) because output to a variable are recognized as a single string rather than thel lines needed for iteration.
Sample output of the “mac*.metal” (macOS) server type/Availability Zones combinations available at time of run, world-wide within AWS:
us-west-2  -------
us-west-2a	mac1.metal
us-west-2a	mac2.metal
us-west-2b	mac1.metal
us-west-2b	mac2.metal
us-west-2c	mac1.metal
us-west-2c	mac2.metal
us-west-2d	mac1.metal
us-west-2d	mac2.metal
us-west-1  -------
us-east-2  -------
us-east-2b	mac1.metal
us-east-2b	mac2.metal
us-east-2c	mac1.metal
us-east-2c	mac2.metal
us-east-1  -------
us-east-1b	mac1.metal
us-east-1b	mac2.metal
us-east-1c	mac1.metal
us-east-1c	mac2.metal
us-east-1d	mac2.metal
sa-east-1  -------
eu-west-3  -------
eu-west-2  -------
eu-west-2a	mac1.metal
eu-west-2c	mac1.metal
eu-west-1  -------
eu-west-1b	mac1.metal
eu-west-1b	mac2.metal
eu-west-1c	mac1.metal
eu-west-1c	mac2.metal
eu-north-1  -------
eu-north-1a	mac1.metal
eu-north-1b	mac1.metal
eu-central-1  -------
eu-central-1a	mac1.metal
eu-central-1c	mac1.metal
ca-central-1  -------
ap-southeast-2  -------
ap-southeast-2a	mac1.metal
ap-southeast-2b	mac1.metal
ap-southeast-1  -------
ap-southeast-1a	mac1.metal
ap-southeast-1a	mac2.metal
ap-southeast-1b	mac1.metal
ap-southeast-1b	mac2.metal
ap-south-1  -------
ap-south-1a	mac1.metal
ap-south-1c	mac1.metal
ap-northeast-3  -------
ap-northeast-2  -------
ap-northeast-2a	mac1.metal
ap-northeast-2d	mac1.metal
ap-northeast-1  -------
ap-northeast-1a	mac1.metal
ap-northeast-1c	mac1.metal
Notice the AWS regions which do NOT have “mac*.metal” instances (at time of this writing Jan 2023):
- us-west-1 (Oregon)
- sa-east-1 (Sao Paolo, Brazil)
- eu-west-3 (Paris, France)
- ca-central-1 (Central Canada)
- ap-northeast-3 (Osaka, Japan)
-
Write down the Availability Zone you’ve chosen in a note file so you can copy the values later.
NOTE: There is a possibility that between the time when the above is run and when you allocate it below, someone else grabs it.
Dedicated Hosts
- https://www.trek10.com/blog/dedicated-hosts-and-dedicated-instances
- AWS Dedicated Instances were first released March 2011 to meet compliance regulations, such as the Health Insurance Portability and Accountability Act (HIPAA), which requires completely dedicated infrastructure for any instances that process Protected Health Information (PHI).
- AWS Dedicated Hosts were first released November 2015 for additional visibility and control over how instances are placed on a physical server, so you can consistently deploy instances to the same physical server over time.
Your Dedicated Hosts Quota
PROTIP: Verify that the AWS account you’re using has the quota set to use mac2/mac1 Dedicated Hosts:
-
In the AWS Console Home, select a region such as “Oregon” (us-west-2) because a different region changes the Quata Code within the destination URL after following steps below:
-
Type limits over the Search prompt at the top of every AWS Console GUI.
AWS “Limits” applies to all AWS services.
- Click “Service Quotas”.
- Click “AWS Services” on the left menu.
- Type “EC2” over the Find services search prompt.
- Click “Amazon Elastic Compute Cloud (Amazon EC2)”.
-
Type “mac” over the Find quotas search prompt for the list of Quotas:
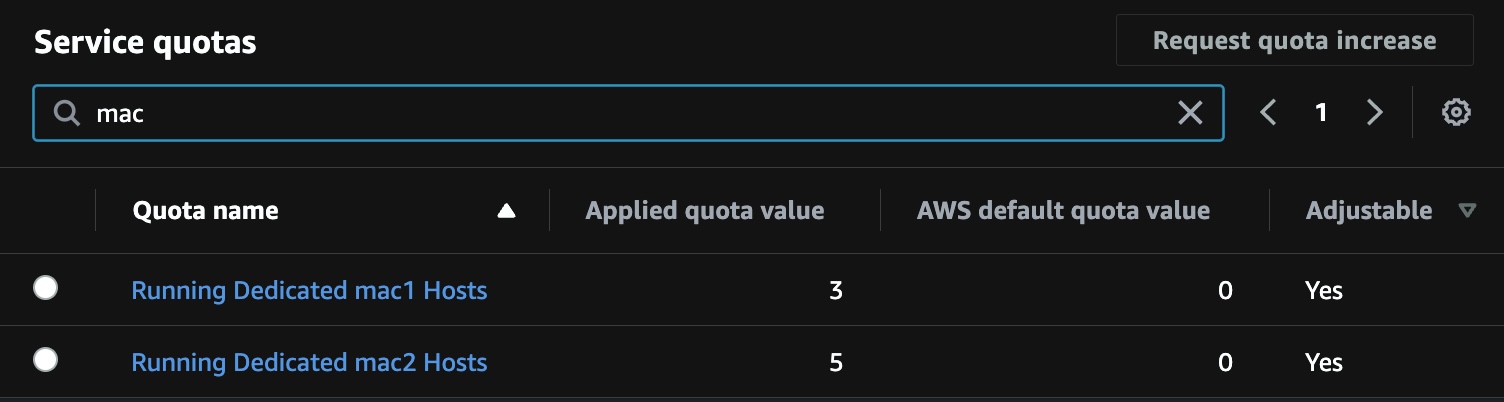
The “Applied quota value” needs to be non-zero in order to enable creation of EC2 Dedicated Hosts.
CLI for Dedicated Hosts Quota
There is a different Quota code associated with mac1 vs mac2 in the URL, such as:
-
Click “Running dedicated mac1 hosts”. Note the code at the end of the URL:
https://us-west-2.console.aws.amazon.com/servicequotas/home/services/ec2/quotas/L-A8448DC5
-
Click “Running dedicated mac2 hosts”. Note the code at the end of the URL:
https://us-west-2.console.aws.amazon.com/servicequotas/home/services/ec2/quotas/L-5D8DADF5
Highlight and copy the Quota code to paste in the CLI command:
AWS_REGION="us-west-2"
AWS_QUOTA_CODE=L-5D8DADF5
aws service-quotas get-service-quota \
--service-code ec2 \
--quota-code "$AWS_QUOTA_CODE" \
--region "${AWS_REGION}" \
--output json
A sample response:
    "Quota": {
    "ServiceCode": "ec2",
    "ServiceName": "Amazon Elastic Compute Cloud (Amazon EC2)",
    "QuotaArn": "arn:aws:servicequotas:us-west-2:849506427193:ec2/L-5D8DADF5",
    "QuotaCode": "L-5D8DADF5",
    "QuotaName": "Running Dedicated mac2 Hosts",
    "Value": 0.0,
    "Unit": "None",
    "Adjustable": true,
    "GlobalQuota": false
Request Quota change
If the quota Value is zero, talk to whoever supports your account or click the help icon at the top of the AWS UI for the Support Center to file a case to request service quota with a desired-value of 3 for each region and Server Type you use.
Unless you have a quota, you’ll see this error message when you attempt to allocate a Dedicated Host:
The number of Dedicated hosts you’ve requested (1) would bring your total up to 1 for the specified group of instance types (mac2). This exceeds your current limit of 0. If you’ve recently released Dedicated hosts, it may take some time for them to stop counting towards your limit. Try allocating your hosts again after a few minutes. Please visit http://aws.amazon.com/contact-us/ec2-request to request an adjustment to this limit.
PROTIP: Before you submit your case, type your email in the Additional contacts field so you are notified when a response is created by AWS.
Dedicated Host selection
- Select an AWS Region such as “Oregon” (us-west-2).
- Type EC2 over the Search search prompt at the top of each AWS Console GUI (after you press Option+S) for the EC2 features left menu.
- Select Dedicated Hosts among EC2 features (under the Instances category).
-
Click the orange “Allocate Dedicated Host” at the right.
-
PROTIP: Construct a Name tag containing your email (so people know how to find you) and the Availability Zone you select above. Example:
johndoe-us-west-2d-mac2-01
NOTE: Each AWS Dedicated Host is actually a physical Mac Mini machine purchased from Apple.
-
Click Choose instance family and type mac2 (even though there is no feedback) to select “mac2”.
-
IMPORTANT: Uncheck Enable default “Support multiple instance types” to avoid getting this cryptic error message:
The instance family ‘mac2’ is not supported.
- Click “Choose Instance type” and select “mac1.metal” or “mac2.metal”.
- Click “Choose Availability Zone” and select the AZ in your Name tag (above), such as “us-west-2d”.
-
For “Outpost ARN”, leave alone.
- Leave “Instance auto-placement” unhecked, the default, which preserves the Dedicated Host for targeted launch requests. Enabling auto-placement will allow untargeted (no host ID specified) launch requests to succeed.
- Leave “Host recovery” unchecked, the default. It restarts your instances on to a new replacement host if failures are detected on your Dedicated Host.
-
Leave “Quantity” to 1.
-
Click “> CLI commands” to add what you want executed upon on the instance’s Terminal after boot-up:
-
Specify a Tag for accounting and budgeting, etc.
PROTIP: So that others know how to contact you, create a tag with Key “creator” and your email address as the value.
Notice that the Name is automatically created as Key tags.
-
Click the orange “Allocate”.
PROTIP: If you get this message, read this (above) to uncheck a default:
The instance family ‘mac2’ is not supported.
Calendar deletion
-
PROTIP: Switch to your calendar to create a reminder 24 hours from now, with a subject mentionig the name of the host, such as:
Release Dedicated Host johndoe-us-west-2d-mac2-01
You can’t delete Dedicated Hosts manually until 24 hours after its creation.
WARNING: The value of Allocation time is when charges began accumulating.
Example “T05:48:03” is a 24-hour UTC (previously Greenwich Mean Time near London) but with never a Summertime/Dayight Savings change.
-
PROTIP: Convert to your local time visually using the widely used
- Click the Host ID in blue for its “Dedicated Hosts details” page.
-
Highlight and copy the URL and paste it in your calendar entry so you can quickly return to that URL. Example:
https://us-west-2.console.aws.amazon.com/ec2/home?region=us-west-2#Host:hostId=h-080b8780c5c9f9c02
-
PROTIP: If you are not going to immediately Configure Launch Instance (make use of) the Dedicated Host within the hour, please release it so it’s not eating up money unproductively.
Proceed to create an EC2 instance to use the Dedicated Host you just created.
Config Launch Instance
-
If you are at the EC2 list of Dedicated Hosts such as:
https://us-west-2.console.aws.amazon.com/ec2/home?region=us-west-2#Hosts:
click the checkbox associated with the (Dedicated) Host ID you recently created.
Alternately, if you’re at the “Dedicated Hosts details” page of a particular Host:
-
Pull down the Actions list to select Launch instance(s) onto host for the “Launch an instance” form.
-
Construct a Name with your own name, Availability Zone, mac1/2, etc.
johndoe-us-west-2d-mac2-01a
-001 is if you’re bringing up several instances for a multi-machine test.
-
Select the “macOS” icon for a list of instance types for the region. Example for Oregon:
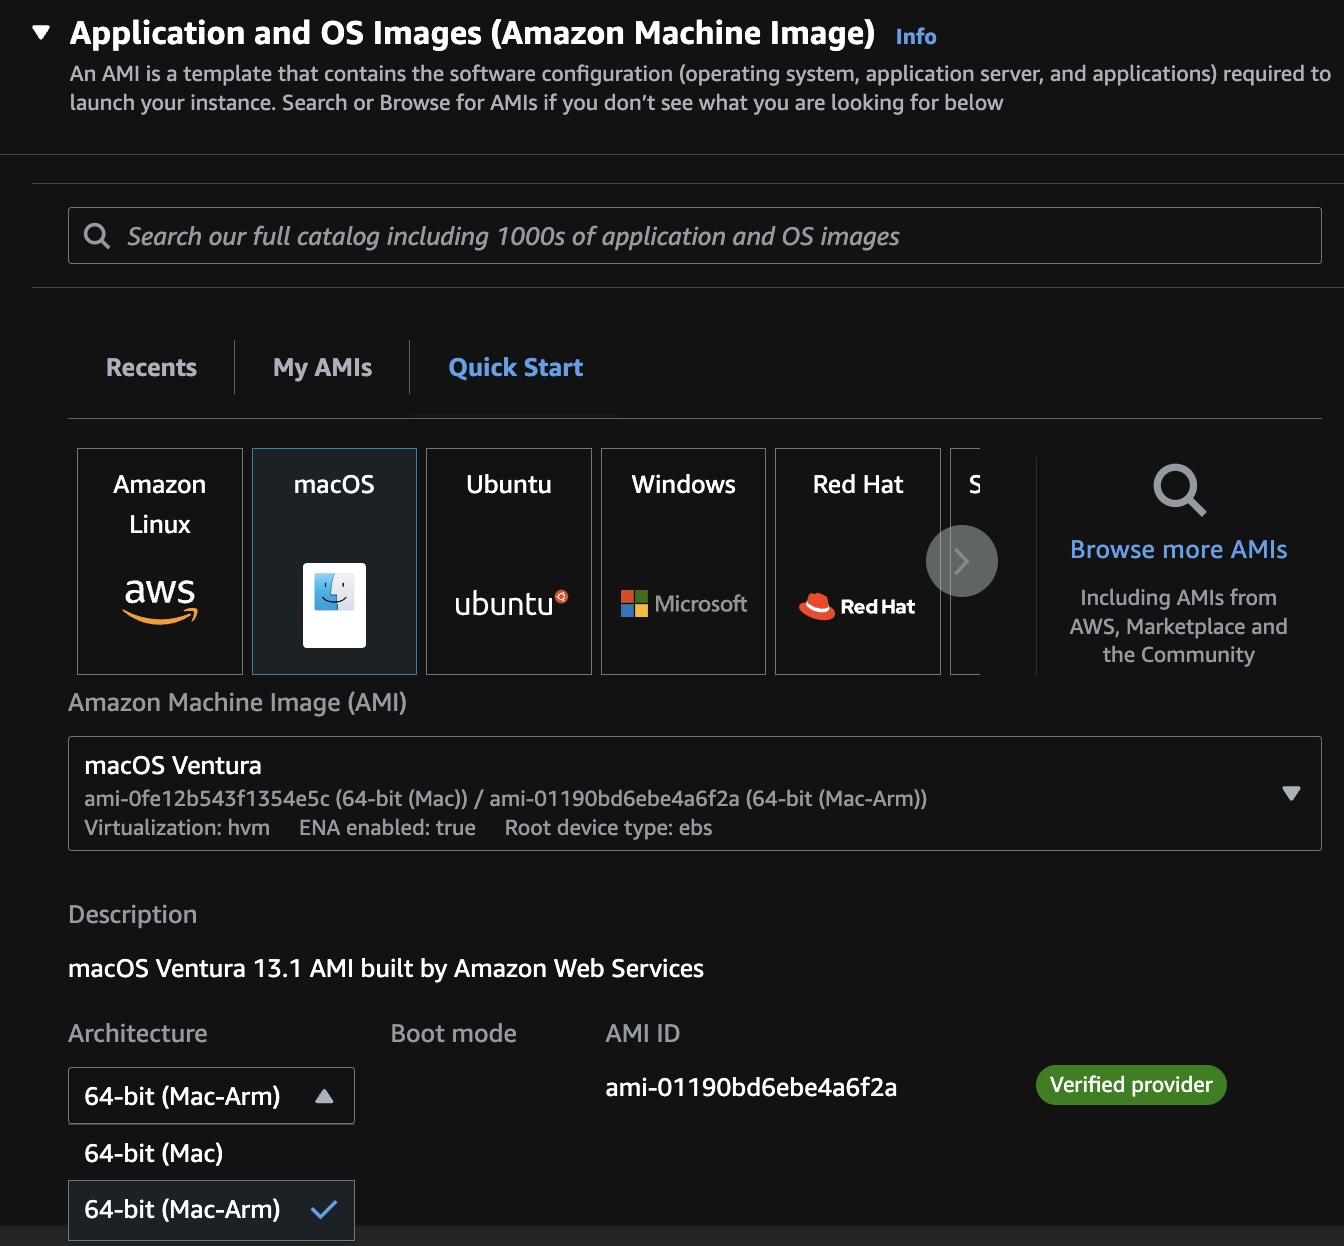
CAUTION: The version of macOS (currently Ventura 13.1), along with the AMI-ID will change over time.
The “macOS” icon would NOT appear if the region chosen does not carry the server type requested.
-
If you don’t want the latest MacOS operating system (Ventura at time of this writing), click the down arrow icon to select the previus macOS release (such as Monterey).
-
Click the selection under “Architecture” and select “64-bit (Mac-Arm)” to override the default which is incorrect for mac2.
Create or select key pair
-
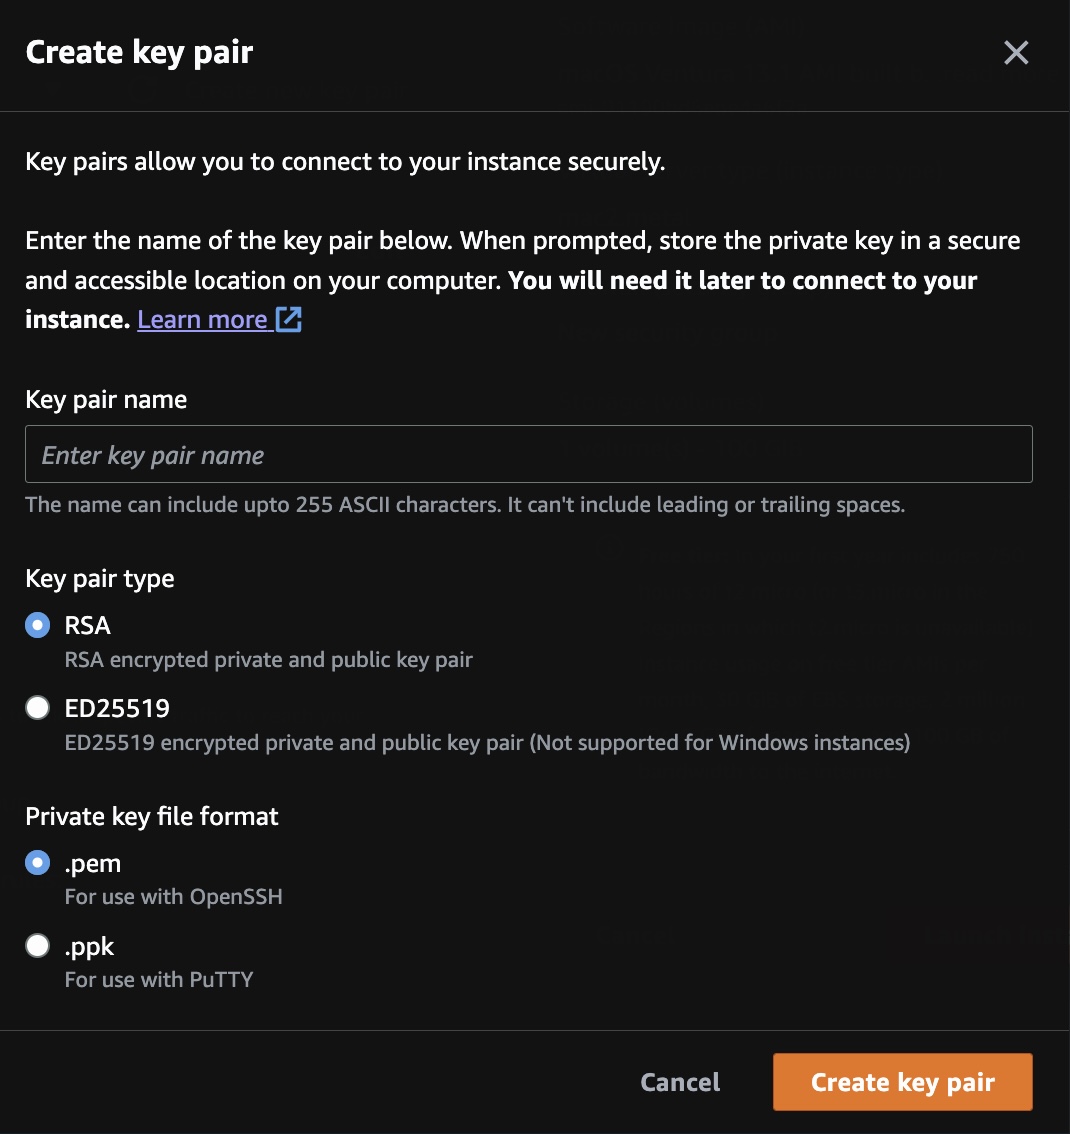
For Key pair name, click “Create new key pair”.
-
Construct a Key pair name that distinguishes it from other key pairs, such as this, to enable you to reuse it:
johndoe-rsa-pem-231231
Replace “johndoe” with your name, from your email, so people know who to reach about the instance.
221231 indicates the key was created in 2022 December 31, so you can tell whether it needs to be rotated to meet policies.
- PROTIP: Highlight and copy (using Command+C) the value to your computer’s hidden Clipboard to paste in your work notes file.
- For key pair type, keep RSA the default (not ED25519).
- For Private key file format, click “.pem” for macOS.
-
Click the orange “Create key pair” for the private key to be downloaded to your Downloads folder.
WARNING: Do not move the .pem secret file to a folder (away from your $HOME folder) where it may be uploaded publicly.
Network settings - Security Group
NOTE: A security group acts as a virtual firewall for your ENIs to control inbound and outbound traffic. Security groups act at the ENI level, not the subnet level.
REMEMBER: By default, AWS creates a new Security Group with a prefix of launch-wizard-???.

-
If you have already created a Security Group for your IP address, select “Select existing security group” and scroll to pick it.
Alternately:
- Select “Create security group”
- Edit Inbound rules.
- Under the “Type” column select “Custom ICMP Rule - IPv4”.
- Under the “Protocol” column select “Echo Request”.
- Check Allow SSH traffic from
- Select “My IP” for better security of restricting traffic to only the IP you use.
WARNING: Your IP address will change when you switch internet providers, such as when you go from home to office.
-
Write down the name of the Security Group created (such as “launch-wizard-23”) because they are not deleted automatically. Thus, a process is needed to identify and remove abandoned Security Groups no longer used.
TODO: Configure Extra Storage
- VIDEO: How to Use Block and File Storage
- VIDEO: How to Use Block and File Storage
- Click the arrow in “> Configure storage”.
-
Notice that, by default, the instance get 100 GiB of “gp2” (General Purpose SSD) for its Root volume used for boot-up.
Free tier eligible customers can get up to 30 GB of EBS General Purpose (SSD) or Magnetic storage
NOTE: The largest volume size for a gp2 volume is 16384 GiB.
PROTIP: If you’re exploring for the first time, keep things simple and proceed to Launch Instance and come back later here to configure more space.
- Click “Advanced” at the right to configure EBS Volumes.
- increase the size of the Root Volume from a default of 60 to 300 GiB (or whatever your capacity analysis runs reveal).
-
Select Volume Type:
- Magnetic (Standard)
- General Purpose SSD (gp2)
-
General Purpose SSD (gp3)
- Provisional IOPS SSD (io1)
- Provisional IOPS SSD (io2) on new Nitro-based Amazon EC2 instances using the Scalable Reliable Datagram (SRD) networking protocol
Provisioned IOPS (Input-Output Per Second) SSD volumes are designed for time-sensitive sustained I/O for sub-millisecond latency in database retrieval speed. Latency is a measurement of time it takes for individual packet to be transferred.
An example of pricing for 100 GB for a month at 1000 IOPS is the total of:
- Cost of EBS-optimized EC2 instance
- Number of 100 GB allocated
- Fixed charge for the IOPS level selected during that month (rather than the variable millions of I/O requests for standard volumes).
Throughput is a measurement of how much (Megabytes of) sequential data (such as a video file) can be transferred per second.
Up to 6 TiB (Terrabytes) can be selected for mac instance types.
PROTIP: Mac server types can obtain a maximum throughput of up to 1,000 MiB/s (Megabytes per second) by specifying Provisioned IOPS SSD (Solid State Drive) volumes of up to 64,000 IOPS (using I/O in 16 KiB blocks). This is illustrated by the orange line reaching the upper-right:

The graph illustrates the impact of both IOPS selection and the size of I/O blocks.
PROTIP: The blue line illustrates the “worst case” maximum throughut of 500 MiB/s when 2,000 IOPs is specified and using larger 256 KiB blocks.
BTW: Mac instances are not among EC2 instance types C7g, R5b, X2idn, and X2iedn which can use io2 Block Express volumes which provide the maximum throughput from any instance at 4,000 MiB/s (using smaller 16 KiB I/O blocks) when 256,000 IOPS is selected. See https://docs.aws.amazon.com/AWSEC2/latest/UserGuide/provisioned-iops.html
PROTIP: Analysis of actual and simulated peak usage is done to reveal the IOPS level needed. Specifying higher IOPS for increased capacity in many cases does not improve latency. Selection of IOPS and instance type sets a fixed expenditure per month regardless of how much was actually used.
-
Add tags per your administrator’s guidelines and examples.
Usage reports do not distinguish between io2 Block Express volumes and io2 volumes. So add tags to identify the volume used is a io2 Block Express volume.
Advanced Details
-
Click the arrow in front of “Advanced Details”.
Most these settings are left to their default.
-
For “Shutdown behavior”, leave it “Stop” unless you want to select “Terminate” so you are experimenting and want a fresh start every time.
-
Under “Tenancy”, select “Dedicated host - launch this instance on a dedicated Host”.
“The selected instance type must be launched onto a Dedicated Host. To continue, choose a Dedicated Host that has been allocated for this instance type.
- For “Target host by”, select “Host ID”.
-
For “Target host ID”, select the ID of the Dedicated Host you created (above).
This is where you verify the ID based on that list you maintain manually.
Advanced: User data Boot-up commands
- Scroll to the bottom among Advanced details to expand options.
-
If you have commands to be executed upon on the instance’s Terminal after boot-up:
echo "Hello world"
VIDEO: Consider using my mac-setup repo to install all the utilities you want, including .zshrc and aliases, by a single command:
bash -c "$(curl -fsSL https://raw.githubusercontent.com/wilsonmar/mac-setup/main/mac-setup.zsh)" -v
Launch Instance
-
Click the orange “Launch instance” for a message such as:
Success! Successfully initiated launch of instance (i-1234567890abcdef)
-
Click that instance ID (such as “i-1234567890abcdef”) instead of clicking the orange “View all instances” so that you only see that instance in the list of instances presented.
-
Press command+R to refresh until “Status check: Initializing” changes to green “Running”.
-
PROTIP: Highlight and copy the instance URL to paste into that calendar entry created above, such as:
https://us-west-2.console.aws.amazon.com/ec2/home?region=us-west-2#InstanceDetails:instanceId=i-1234567890abcdef
PROTIP: EC2 instances need to be terminated before its Dedicated Host can be released.
-
Click the “Actions” box if you’re at the Instance Summary or if you’ve check the box asociated with your mac?.metal instance.
Connection Instructions
-
Click Connect within the Actions pull-down.
REMEMBER: Connecting to the macOS instance is based on the AWS Public IPv4 DNS name, such as:
ec2-44-234-9-188.us-west-2.compute.amazonaws.com
NOTE: A ping of the above DNS name will always time out because, by default, AWS blocks all ICMP requests on its servers.
That resolves to the Private IPv4 address, such as 172.31.55.215 shown on the prompt when connected.
Both will be different when another instance is created.
-
REMEMBER: The “User name” is ec2-user which is used by the SSH utility used to log into the macOS instance.
CAUTION: Do not click the orange “Connect” with the default “EC2 Instance Connect” selected. That creates a new browser window. You will see this in red:
Failed to connect to your instance
EC2 Instance Connect is unable to connect to your instance. Ensure your instance network settings are configured correctly for EC2 Instance Connect. For more information, see Set up EC2 Instance Connect at https://docs.aws.amazon.com/AWSEC2/latest/UserGuide/ec2-instance-connect-set-up.html. -
Click “SSH client” for instructions to appear.
-
Copy the command associated with the icon under Example by clicking it, such as:
ssh -i "johndoe-rsa-pem-231231.pem" ec2-user@ec2-52-88-58-184.us-west-2.compute.amazonaws.com
-
PROTIP: Instead of using what AWS presents above, use a Terminal based on my (enhanced) instructions (below) on how to connect to macOS using SSH.
PROTIP: During development work, terminate instance (and associate Volumes and Dedicated Host) to minimize charges.
Option B: Use CLI to create instance
References:
- https://aws.amazon.com/blogs/aws/use-amazon-ec2-m1-mac-instances-to-build-test-macos-ios-ipados-tvos-and-watchos-apps/
TODO: Daniel and I are working to get you a macOS desktop on AWS, by running a single script command: Here’s what it does:
- Install awscli and other utilities needed.
- Identify an available “mac*.metal” server type within a desired Availability Zone.
- Invoke Terraform commands to automatically:
- Create a Dedicated Host instance in AWS
- Create EC2 instance
- Install XCode command utilities, brew; use brew to install utilities, run dotfiles to configure macOS; define aliases, etc.
- Create EC2 images for each region (if requested)
- Remove files that don’t need to be left over.
Here are the steps to invoke the script:
- Open a Terminal window.
-
Define your AWS Region, such as:
export AWS_REGION="us-west-2"
Using Terraform Dedicated Host Module
The easiest way to create an instance (repeatedly) is using automation based on Terraform.
To create for yourself:
- A dedicated_host_id
- A mac_ami_id for the region and Architecture, such as “64-bit (Mac-Arm)” for Mac2.
In a Terminal:
-
Fork to your GitHub account the “dedicated-host” Terraform module created by Daniel Dias (of Berlin, Germany):
https://github.com/DanielRDias/terraform-aws-dedicated-host
This repo makes use of a module. But originally
git clone it and cd into the download.
It references here
-
View the .gitignore file.
Notice it has “stage.auto.tfvars.example” and “stage.auto.tfvars” along with other specifications of files and folders not to upload to GitHub.
-
Rename the stage.auto.tfvars.example file to stage.auto.tfvars.
mv stage.auto.tfvars.example stage.auto.tfvars
-
Edit file stage.auto.tfvars to your preference, such as:
instance_type     = "mac2.metal"
availability_zone = "us-east-1a"
REMEMBER: Some instance_type values are not available in some Availability Zones world-wide.
TODO: Logic to switch if not available? CDK for this? Reserved instance?
What mac you already have?
If you want to replicate a specific physical macOS laptop you have:
-
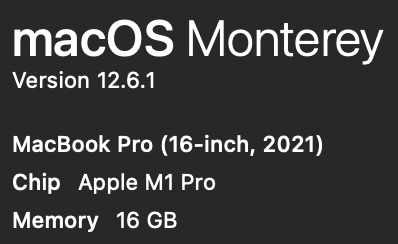
Press Shift+Command+/ for the Apple menu. Click on the Apple logo, then “About This Mac”

-
In the pop-up, notice whether it says “M1” or “M2”, and the amount of memory (16 GB?):
-
Navigate to (after creating) the folder where you add GitHub repos.
-
Obtain the repo (only the main branch at –depth 1):
git clone git@github.com:DanielRDias/terraform-aws-mac.git --depth 1
cd terraform-aws-mac
-
Navigate to one of the folders under examples folder:
cd examples
cd Monterey_M2
Config for your AWS
In a Terminal program
-
Obtain the subnet-id value for the region you have been set to use.
aws ec2 describe-subnets --output json
{
    "Subnets": [
        {
            "AvailabilityZone": "us-west-2d",
            "AvailabilityZoneId": "usw2-az4",
            "AvailableIpAddressCount": 4091,
            "CidrBlock": "172.31.48.0/20",
            "DefaultForAz": true,
            "MapPublicIpOnLaunch": true,
            "MapCustomerOwnedIpOnLaunch": false,
            "State": "available",
            "SubnetId": "subnet-0872bb332f1aab798",
            ,,,
-
Highlight the value for “SubnetId:”, such as subnet-0872bb332f1aab798.
-
Edit file main.tf to paste the value:
subnet_id = "subnet-0872bb332f1aab798"
- In main.tf, make sure that the AWS Region specified is the same as the Subnet’s AvailabilityZone
provider "aws" {
  region = "us-east-1"
}
-
Also in maint.tf, adjust AWS tags to satisfy your company’s standards, such as project code, etc.
-
Consider other specifications that should be specified in the Inputs section of the README:
- host_recovery (disabled by default)
- Security Group (to enable only your IP address to access)
-
PROTIP: In your .bash_profile or .zshrc, define quick keys such as:
alias tfp="terraform plan"
alias tfv="tfsec"
alias tfa="terraform apply -auto-approve"
alias tfs="terraform show"
alias tfd="terraform destroy"
Explanations of TFSec warnings are at pages such as this: https://aquasecurity.github.io/tfsec/v1.28.0/checks/aws/ec2/enable-at-rest-encryption/
Option C: Run within HCP Vault with Terraform
NOTE: Michael Meidlinger wrote a 2021 blog and created a repo containing Cloud Formation code.
TODO: To automate creation of resources in AWS using Terraform, see my https://wilsonmar.github.io/hashicorp-vault
Option D: Run locally using Terraform
-
Make sure you’re connected to AWS (file ~/.aws/credentials).
-
Initialize Terraform folder:
terraform init
Example expected response:
Initializing the backend... Initializing provider plugins... - Finding latest version of hashicorp/aws... - Installing hashicorp/aws v4.37.0... - Installed hashicorp/aws v4.37.0 (signed by HashiCorp) Terraform has created a lock file .terraform.lock.hcl to record the provider selections it made above. Include this file in your version control repository so that Terraform can guarantee to make the same selections by default when you run "terraform init" in the future. Terraform has been successfully initialized! You may now begin working with Terraform. Try running "terraform plan" to see any changes that are required for your infrastructure. All Terraform commands should now work. If you ever set or change modules or backend configuration for Terraform, rerun this command to reinitialize your working directory. If you forget, other commands will detect it and remind you to do so if necessary. -
Create a run plan file:
terraform plan
-
Verify for vulnerabilities (after installing tfsec), such as:
tfsec
TODO: I’m looking into why these messages are appearing.
Result #1 HIGH Instance does not require IMDS access to require a token ─────────────────────────────────────────────────────────────────────────────────────────────────── terraform-aws-modules/ec2-instance/aws/Users/wilsonmar/github-wilsonmar/terraform-aws-mac/examples/Monterey_M2/.terraform/modules/mac.ec2_instance/main.tf:106 via main.tf:5-16 (module.mac) ─────────────────────────────────────────────────────────────────────────────────────────────────── 19 resource "aws_instance" "this" { .. 106 [ http_tokens = lookup(metadata_options.value, "http_tokens", "optional") ("optional") ... 154 } ─────────────────────────────────────────────────────────────────────────────────────────────────── ID aws-ec2-enforce-http-token-imds Impact Instance metadata service can be interacted with freely Resolution Enable HTTP token requirement for IMDS More Information - https://aquasecurity.github.io/tfsec/v1.28.0/checks/aws/ec2/enforce-http-token-imds/ - https://registry.terraform.io/providers/hashicorp/aws/latest/docs/resources/instance#metadata-options ─────────────────────────────────────────────────────────────────────────────────────────────────── Result #2 HIGH Root block device is not encrypted. ─────────────────────────────────────────────────────────────────────────────────────────────────── terraform-aws-modules/ec2-instance/aws/Users/wilsonmar/github-wilsonmar/terraform-aws-mac/examples/Monterey_M2/.terraform/modules/mac.ec2_instance/main.tf:19-154 via main.tf:5-16 (module.mac) ─────────────────────────────────────────────────────────────────────────────────────────────────── 19 ┌ resource "aws_instance" "this" { 20 │ count = local.create && !var.create_spot_instance ? 1 : 0 21 │ 22 │ ami = try(coalesce(var.ami, data.aws_ssm_parameter.this[0].value), null) 23 │ instance_type = var.instance_type 24 │ cpu_core_count = var.cpu_core_count 25 │ cpu_threads_per_core = var.cpu_threads_per_core 26 │ hibernation = var.hibernation 27 └ .. ─────────────────────────────────────────────────────────────────────────────────────────────────── ID aws-ec2-enable-at-rest-encryption Impact The block device could be compromised and read from Resolution Turn on encryption for all block devices More Information - https://aquasecurity.github.io/tfsec/v1.28.0/checks/aws/ec2/enable-at-rest-encryption/ - https://registry.terraform.io/providers/hashicorp/aws/latest/docs/resources/instance#ebs-ephemeral-and-root-block-devices ─────────────────────────────────────────────────────────────────────────────────────────────────── -
Apply the plan file created:
terraform apply -auto-approve
-
If it ran well, you should see something like:
instance_type     = "mac2.metal"
availability_zone = "us-east-1a"
If you instead see a message like this:
module.mac.module.host.aws_ec2_host.this: Creating...
╷
│ Error: allocating EC2 Host: HostLimitExceeded: Your request for accessing resources in this region is being validated, and you will not be able to launch additional resources in this region until the validation is complete. We will notify you by email once your request has been validated. While normally resolved within minutes, please allow up to 4 hours for this process to complete. If the issue still persists, please let us know by writing to aws-verification@amazon.com for further assistance.
│ 	status code: 400, request id: cf24ceed-6ef5-4f04-be1a-8aaebae6e374
│
│   with module.mac.module.host.aws_ec2_host.this,
│   on .terraform/modules/mac.host/main.tf line 5, in resource "aws_ec2_host" "this":
│    5: resource "aws_ec2_host" "this" {
TODO: I’m looking into the reason for the above message.
-
Allocate hosts:
aws ec2 allocate-hosts --instance-type="mac1.metal" \
--quantity=1 \
--region "${AWS_REGION}" \
--availability-zone="us-west-2b" \
--auto-placement="on" --host-recovery="off"
Auto-placment = on preserves the Dedicated Host for targeted launch requests, allow untargeted (no host ID specified) requests to succeed.
When Host recovery = on, it automatically restarts instances to a new replacement host if failures are detected on the Dedicated Host.
Response:
{ "hostIds": [ "h-043de1b44a0374973" ] } -
View file mapping.json for –block-device-mappings
[ { "DeviceName": "/dev/sda1", "Ebs": { "VolumeSize": 300, "VolumeType": "gp3" } } ] -
Run the instance using the image-id associated with the region selected:
aws ec2 run-instances --region="${AWS_REGION}" \
--image-id="ami-04fdffdf922f4de8e" \
--key-name="malx-us-west-2" \
--block-device-mappings file://mapping.json \
--associate-public-ip-address \
--placement="Tenancy"="host"
Access AWS MacOS
References:
- https://docs.aws.amazon.com/AWSEC2/latest/UserGuide/AccessingInstancesLinux.html
- https://asf.alaska.edu/how-to/data-recipes/connect-to-ec2-with-ssh-mac-os-x/
- https://www.ateam-oracle.com/post/simplify-your-day-with-ssh-config-file-entries-and-self-closing-tunnels
SSH to AWS MacOS
-
As with other instance types, use SSH to connect to your Mac instance.
If you are using macOS, open your macOS Terminal.
-
Set permissions needed:
chmod 600 "$KEY_PAIR"
There are several ways to use SSH to connect to macOS.
Rather than defining variables each time, such as this:
KEY_PAIR="$HOME/Downloads/wilsonmar-rsa-pem-231231.pem"
SSH_TARGET="ec2-user@ec2-44-234-9-188.us-west-2.compute.amazonaws.com"
yes | ssh -v "$KEY_PAIR" -l "$SSH_TARGET"
yes | is to automatically answer
Are you sure you want to continue connecting (yes/no)?
PROTIP: The approach below makes it easily
-
Edit the SSH configuration file:
code $HOME/.ssh/config
SSH Config documentation is at
https://man7.org/linux/man-pages/man5/ssh_config.5.html -
Replace the HostName and IdentityFile if you changed it. For example:
Host awsmaccli1
 HostName ec2-35-80-9-25.us-west-2.compute.amazonaws.com
 User ec2-user
 Port 22
 IdentityFile ~/Downloads/wilsonmar-rsa-pem-230126.pem
   Host awsmacvnc1
 HostName ec2-35-80-9-25.us-west-2.compute.amazonaws.com
 User ec2-user
 Port 22
 LocalForward 5900 localhost:5900
 IdentityFile ~/Downloads/wilsonmar-rsa-pem-230126.pem
The 1 in awsmaccli1 is if you have several instances.
REMEMBER: With SSH, generic configurations should be at the bottom of the config file.
-
Save the file.
-
Use the same command each time:
ssh awsmacvnc1
Verify the config file if you get this back:
ssh: Could not resolve hostname awsmaccli1: nodename nor servname provided, or not known
-
It may take a few seconds to connect. Success looks something like this (with a different IP address):
┌───┬──┐   __|  __|_  )
│ ╷╭╯╷ │   _|  (     /
│  └╮  │  ___|\___|___|
│ ╰─┼╯ │  Amazon EC2
└───┴──┘  macOS Ventura 13.1

ec2-user@ip-172-31-55-215 ~ %
Notice the sample “@ip-172-31-55-215” above is the Private IPv4 address for the instance within AWS.
That IP address will time out when ICMP ping unless the Security Group used is configured for it (which it’s not by default).
-
Define an environment variable for use by commands to follow:
export EC2_USER_IP=172.31.55.215
-
If you are idle too long and it times out, execute the ssh command again if you see:
client_loop: send disconnect: Broken pipe
### Commands on AWS macOS CLI
-
Edit my shell script which installs all that I want on my macOS development laptops:
TODO: See …
-
Run that script:
VIDEO: Consider using my mac-setup repo to install all the utilities you want, including .zshrc and aliases, by a single command:
bash -c "$(curl -fsSL https://raw.githubusercontent.com/wilsonmar/mac-setup/main/mac-setup.zsh)" -v
It all worked if you see (if you used my settings as the default) the prompt: TODO
-
To verify, obtain a list of folders and files:
ls -al
Normally you should see something like:
total 8
   drwxr-xr-x   5 ec2-user  staff   160 Jan 26 14:03 .
   drwxr-xr-x   5 root      admin   160 Dec 28 09:29 ..
   drwx------   3 ec2-user  staff    96 Jan 26 14:03 .ssh
   -rw-r--r--   1 ec2-user  staff  1258 Nov  1 02:09 .zshrc
   drwx------  11 ec2-user  staff   352 Jan 26 14:12 Library
As you probably know, the “Library” folder is where macOS stores its operating system files.
ls Library
Application Scripts ContainerManager    Mail
Audio               Containers          Preferences
Caches              Keychains           Staging
-
Obtain a password to set for ec2-user. From Vault KV UI?
-
Set a password for ec2-user:
sudo /usr/bin/dscl . -passwd /Users/ec2-user
The response:
Changing password for ec2-user.
New password: _
Retype new password: _

################################### WARNING ###################################
# This tool does not update the login keychain password.                      #
# To update it, run `security set-keychain-password` as the user in question, #
# or as root providing a path to such user's login keychain.                  #
###############################################################################
-
Obtain the latest Network Map utility using the brew utility Apple added into the OS image:
brew install nmap
-
See what:
nmap -P0 localhost
Response:
Starting Nmap 7.93 ( https://nmap.org ) at 2023-02-02 21:09 GMT
Nmap scan report for localhost (127.0.0.1)
Host is up (0.000041s latency).
Other addresses for localhost (not scanned): ::1
Not shown: 996 closed tcp ports (conn-refused)
PORT     STATE SERVICE
22/tcp   open  ssh
88/tcp   open  kerberos-sec
3283/tcp open  netassistant
5900/tcp open  vnc
VNC
Several packages provide graphical desktop sharing on macOS through Virtual Network Computing (VNC), originally developed by the Olivetti & Oracle Research Lab, which spun off RealVNC.
CAUTION: VNC in itself is not a secure protocol. Researchers found 37 memory corruption vulnerabilities in client and server software: 22 of which were found in UltraVNC, 10 in LibVNC, 4 in TightVNC, just 1 in TurboVNC.
-
At https://support.apple.com/guide/remote-desktop/welcome/mac, click “Table of Contents”.
VNC on mac
Apple’s macOS comes with “Screen Sharing” built-in.
But to remotely control/manage Mac computers (such as restart, securely transferring files, installing and configuring apps, etc.), Apple makes available for purchase from Apple’s App Store its $79.99 Apple Remote Desktop app.
See https://www.helpwire.app/blog/apple-remote-desktop/
That makes use of Apple’s Remote Management service (ARMS)listening on UDP/3283 that’s disabled by default. That’s important because ARMS is a vector for reflection/amplification DDoS attacks.
NetScout urges “administrators of ARMS-enabled Macs to shield UDP/3283 from the public Internet, and instead make use of VPN technologies in order to forward remote administration traffic between administration systems and managed Macs.”
-
To activate Remote Management using the command line (using administrator privileges on the client computer):
sudo /System/Library/CoreServices/RemoteManagement/ARDAgent.app/Contents/Resources/kickstart -activate
Starting...
Screen recording might be disabled. Screen Sharing or Remote Management must be enabled from System Preferences or via MDM.
Screen control might be disabled. Screen Sharing or Remote Management must be enabled from System Preferences or via MDM.
Activated Remote Management.
Done.
-
To deactivate Remote Management using the command line (using administrator privileges on the client computer):
sudo /System/Library/CoreServices/RemoteManagement/ARDAgent.app/Contents/Resources/kickstart -deactivate
Client Option C: AWS VPN client
Thus, we follow https://docs.aws.amazon.com/vpn/latest/clientvpn-user/client-vpn-connect-macos.html which requires:
-
AWS administrators to create a Client VPN endpoint on the AWS account you use. A VPN Configuration File should be provided for each AWS region.
-
Instead of downloading the pkg file, install this formula using Homebrew so you can more easily upgrade:
brew install aws-vpn-client
(This is included among installs using my mac-setup.sh).
The response (at time of writing):
==> Downloading https://d20adtppz83p9s.cloudfront.net/OSX/3.2.0/AWS_VPN_Client.pkg
######################################################################## 100.0%
==> Installing Cask aws-vpn-client
==> Running installer for aws-vpn-client; your password may be necessary.
Package installers may write to any location; options such as `--appdir` are ignored.
Password:
installer: Package name is AWS VPN Client
installer: Installing at base path /
installer: The install was successful.
🍺  aws-vpn-client was successfully installed!
The client reserves TCP port 8096 on your computer.
-
Invoke the app:
open "/Applications/AWS VPN Client/AWS VPN Client.app"
Alternately, establish a VPN connection using the Tunnelblick or OpenVPN Access client application on a macOS computer. See https://github.com/samm-git/aws-vpn-client
-
Add a profile for each AWS region.
https://docs.aws.amazon.com/vpn/latest/clientvpn-user/macos.html
In macOS, remote control of other computer makes use of the Remote Frame Buffer protocol (RFB) to relay graphical-screen updates and transmit keyboard and mouse input from one computer to another over the network.
RFB is different than Microsofts’ Remote Desktop Protocol (RDP), which is “semantic” (it’s aware of controls, fonts, etc. such that controls are drawn by the client application), thus sending a minimal amount data to the client application and a much cleaner display of the controlled computer.
VNC Server config
-
Create a password of sufficient complexity. 8 characters is all that Apple allows. TODO: Store that password in a secrets Vault. Use code to retrieve it so that the password doesn’t end up in the command history. So we want the equivalent of:
VNC_PASSWORD="239$Vacx"
Alternately, within AWS:
VNC_PASSWORD=$(aws secretsmanager get-secret-value --secret-id vnc-secret-id \
--region "${AWS_REGION}" \
| jq .SecretString -r)
WARNING: Please make up another password than the above.
-
Issue a CLI command (via SSH) to enable Sharing after defining VNC_PASSWORD:
sudo /System/Library/CoreServices/RemoteManagement/ARDAgent.app/Contents/Resources/kickstart \
-activate -configure -access -on \
-restart -agent -privs -all \
-clientopts -setvnclegacy -vnclegacy yes \
-clientopts -setvncpw -vncpw "$VNC_PASSWORD"
-
When Password: appears because of the sudo, type in your macOS password (not the VNC password).
The normal response:
Starting...
Screen recording might be disabled. Screen Sharing or Remote Management must be enabled from System Settings or via MDM.
Screen control might be disabled. Screen Sharing or Remote Management must be enabled from System Settings or via MDM.
Activated Remote Management.
Stopped ARD Agent.
ec2-user: Set user remote control privileges.
ec2-user: Set user remote access.
Set the client options.
Done.
Alternately, instead of using a single VNC password, to share access with any and all (which is less secure and not recommended), replace the last two lines above with:
-configure -allowAccessFor -allUsers
-
Create an SSH tunnel
ssh -i wilsonmar-rsa-pem-230126.pem -L 5900:localhost:5900 ec2-user@ec2-18-246-17-23.us-west-2.compute.amazonaws.com
- On the client computer, choose Apple menu > System Preferences, then click Sharing.
- If prompted, enter the user name and password.
- Select Remote Management in the list at the left, then click Computer Settings.
- Select “VNC viewers may control screen with password,” enter a VNC password, then click OK.
- Highlight the
-
Hit Command+Spacebar to bring up Spotlight, then type enough of “Screen Sharing” to select “Screen Sharing.app”.
NOTE: That app comes with MacOS, “hidden” at:
/System/Library/CoreServices/Applications/Screen Sharing.app/
-
In “Connect to” type the IP address.
The Screen Sharing.app is simply a client. To connect to a Mac remotely and control it’s screen from other Macs, Linux, Windows, even an iPhone or iPad, set up remote Screen Sharing through Mac OS X System Preferences to enable the VNC server on a Mac.
Remote Desktop App
On Linux, use Remmina. TightVNC running on Windows don’t work with this resolution.
bash -c "$(curl -fsSL https://raw.githubusercontent.com/wilsonmar/mac-setup/main/mac-ec2-client.zsh)"
https://aws.amazon.com/premiumsupport/knowledge-center/ec2-mac-instance-gui-access/
Change password
Alternately, to change password:
echo "$VNC_PASSWORD" | \
perl -we ‘BEGIN { @k = unpack “C*”, pack "H*", “1734516E8BA8C5E2FF1C39567390ADCA”}; \
$_ = <>; \
chomp; \
s/^(.{8}).*/$1/; @p = unpack “C*”, $_;
foreach (@k) { printf "%02X", $_ ^ (shift @p || 0) }; \
print "\n"’ | \
sudo tee /Library/Preferences/com.apple.VNCSettings.txt
To turn off screen-sharing via SSH:
sudo /System/Library/CoreServices/RemoteManagement/ARDAgent.app/Contents/Resources/kickstart \
-deactivate -configure -access -off
If the above commands are not done, the RealVNC client will return this message:
“VNC Server is not currently listening for Cloud connections.”
Exit the ssh session.
Client Option B: VNC Client install
MacOS X has built in a VNC server in its “Sharing”.
BTW, on a regular macOS, to enable the VNC server:
- Enter the macOS “System Preferences” by clicking the Apple icon in the upper left corner.
-
Click the blue “Sharing” icon or type enough of “Sharing” in the Search box at the upper-right to choose it.

- Click “Computer Settings…”
- Check “VNC viewers may control screen with password:”
-
On the client computer that controls the VNC server computer remotely, install the Real VNC viewer:
brew install --cask vnc-viewer
open "$HOME/Applications/VNC Viewer.app"
- Click “Open” to the pop-up download alert.
- Check to accept its terms, then click OK.
-
Provide your email and Password “that you used to create your RealVNC account”.
-
PROTIP: To connect:
ssh -f awsmacvnc1 sleep 10
You should now be seeing the mac screen.
Disconnect
-
To disconnect and reconnect to enable the GUI, define :
echo "KEY_PAIR=$KEY_PAIR"
echo "SSH_TARGET=$SSH_TARGET"
ssh -L 5900:localhost:5900 \
-i "$KEY_PAIR" -l "$SSH_TARGET"
Client Option C: SSH within VSCode
https://marketplace.visualstudio.com/items?itemName=ms-vscode-remote.remote-ssh
Client Option D: Tiger VNC
Alternately, PROTIP recommends that (free) Tiger VNC be installed from SourceForge, which many no longer trust.
Client Option C: Microsoft Remote Desktop
https://learn.microsoft.com/en-us/windows-server/remote/remote-desktop-services/clients/remote-desktop-clients
### Actions inside macOS GUI
-
Press command+spacebar for Spotlight to search for the screen-sharing app.
-
Login using your password.
Storage
-
If you selected a larger volume (above), VIDEO:
PDISK=$(diskutil list physical external | head -n1 | cut -d' ' -f1 )
sudo diskutil repairDisk $PDISK
Resize disk
-
Resize (which takes a few minutes):
APFSCONT=$(dikutil list physical external | grepApple_APFS | tr -s ' ' | cut -d ' ' -f8 )
sudo diskutil apfs resizeContainer $APFSCONT 0
Backups and Restore
-
Consider using my mac-setup repo to install all your utilities you want on a new Mac with a single command:
bash -c "$(curl -fsSL https://raw.githubusercontent.com/wilsonmar/mac-setup/main/mac-setup.zsh)" -v
-
Take a snapshot backup at volume or instance level to copy across regions or accounts to create new AMI machine images.
macOS Jenkins & Kubernetes
-
VIDEO: macOS Workers with Kubernetes and Jenkins
Orka orchestrates macOS in a cloud environment using Kubernetes technology on genuine Apple hardware.
Anka is designed specifically for Mac-based CI workflows and easily integrates with existing container-based DevOps CI pipelines.
Alerts about continued usage
PROTIP: So that instances are not forgeten and left to accumulate charges needlessly, do one/all of these options:
-
Setup email/Slack of reminders to be sent automatically about instances that stay alive –
-
Send calendar appointment to review the instance, with a link to manually shut down the instance. (To send a calendar invite from a CLI command line shell script: https://github.com/insanum/gcalcli)
Release Dedicated Host
Setup automatic shut down of billed instance after a set time.
https://docs.aws.amazon.com/cli/latest/reference/ec2/release-hosts.html
-
Capture the Host ID (such as “h-098a7654b1234clep”)
export HOST_ID=”h-098a7654b1234clep”
-
Run:
aws release-hosts –host-ids “$HOST_ID”
Monitoring
See https://catalog.us-east-1.prod.workshops.aws/workshops/5ced3c00-8e8a-4c4d-82fa-ca1b7804ea4d/en-US/advanced-use-cases/monitoring
Obtain EC2 metadata
NOTE: Beginning on January 6, 2022, AWS added a new option to include your instance’s tags as part of the instance’s metadata when the instance is launched.
https://aws.amazon.com/about-aws/whats-new/2022/01/instance-tags-amazon-ec2-instance-metadata-service/
According to https://github.com/aws/amazon-ec2-metadata-mock Amazon EC2 Metadata Mock (AEMM) is a tool to simulate Amazon EC2 instance metadata service for local testing:
-
Install on macOS using Homebrew:
brew tap aws/tap
brew install ec2-metadata-mock
aws ec2 allocate-hosts –availability-zone “us-west-2a” –auto-placement “on” –host-recovery “off” –host-maintenance “on” –quantity 1 –instance-family “mac2”
Python Fabric
Fabric is a Python library and command-line tool for executing shell commands remotely over SSH. It simplifies the process of executing commands on multiple servers and can be used for tasks such as deployment, management, and monitoring. Use case: Automating the deployment of a web application on multiple servers. Example:
from fabric.api import run, env
# Set the environment
env.hosts = ['server1', 'server2']
env.user = 'deploy'
env.key_filename = '~/.ssh/id_rsa'

def deploy():
    run('git pull')
    run('sudo service apache2 restart')
SSH with OPA policies
TODO: Extend policy-based access control to SSH and sudo: https://www.openpolicyagent.org/docs/latest/ssh-and-sudo-authorization/
Clean-up
TODO: An automated way to shut down the Remote port, instance, and Dedicated Host; Also to remove uneeded Security Groups and key pairs.
REMEMBER: The Dedicated Host can’t be killed until after the day that it’s up.
Release Dedicated Host
- https://docs.aws.amazon.com/cli/latest/reference/ec2/release-hosts.html
-
Be at the “Dedicated Hosts” menu item at the left under EC2.
https://us-west-2.console.aws.amazon.com/ec2/home?region=us-west-2#Hosts:
See https://docs.aws.amazon.com/cli/latest/reference/ec2/describe-hosts.html
The states of a Dedicated Host are: available, under-assessment,
released, permanent-failure,
released-permanent-failure - Check the checkbox to the right of the Host ID you want to release.
- Click “Actions” to pull down the menu to select “Release host”.
- Click the orange “Release” to confirm.
-
REMEMBER: AWS does not let users manually release DURING the first day. So you may get this error:

The Z in the time stamp T05:48:03.141Z denotes 24-hour UTC (previously Greenwich Mean Time near London). UTC/GMT never has a Dayight Savings (aka Summertime) offset.
PROTIP: Convert to your local time visually using the widely used Meeting Planner at timeanddate.com.
-
TODO: Manually create an entry in your calendar (calendar.google.com for Gmail, Apple iCalendar, etc.).
TODO: Amazon EC2 License Manager can now allocate and manage Dedicated Hosts on your behalf to simplify the management experience The simplified management experience includes the ability to launch different instance sizes on a host, share hosts across accounts, automatically recover hosts, and more.
Note that Dedicated Hosts in “Released” state continue to appear in the list.
- Start over by following the Dedicated Hosts steps above.
Terminate EC2 Instance in GUI
* https://docs.aws.amazon.com/AWSEC2/latest/UserGuide/terminating-instances.html
<br /><br />
-
VIDEO: Use a browser to the EC2 Instances page for your region.
https://us-west-2.console.aws.amazon.com/ec2/home?region=us-west-2#Instances
- Select the checkbox associated with the “mac2.metal” instance you created.
- Pull down the “Instance state” box to select “Terminate instance”.
- Click the orange “Terminate” button for “Successfully terminated” appears at the top.
-
Wait a few minutes and press Command+R or the browser’s refresh button to see “Terminated” for your instance.
-
REMEMBER: Go to release the Dedicated Host to stop charges for accumulting for the current hour.
NOTE: To do this in CLI, stop and Terminate EC2 instance or VIDEO: Generate the CLI commands by using the interactive AWSSupport-ListEC2Resources document.
PROTIP: The toil of instance termination and Host release is a good reason to automate the entire process of instance creation, shown below. The automation script can contain a notification sound when the instance is ready for use.
Remove Security Groups no longer used
The challenge is to determine whether or not each security group is being used, perhaps by other Security Groups Inbound/Outbound rules.
-
Open the Amazon EC2 console at https://console.aws.amazon.com/ec2/.
-
In the navigation pane, choose Security Groups.
-
PROTIP: Delete the inbound rules first
-
Press the “apply rule changes” button
-
Delete all referenced rules to
-
Select the security group to delete and choose Actions, Delete security group, Delete.
- https://docs.aws.amazon.com/cli/latest/userguide/cli-services-ec2-sg.html
- https://docs.aws.amazon.com/AWSEC2/latest/UserGuide/working-with-security-groups.html#deleting-security-group
- https://docs.aws.amazon.com/cli/latest/reference/ec2/delete-security-group.html
Remove EC2 Key Pairs
- at https://console.aws.amazon.com/ec2/
- Select your Region.
-
At the Amazon EC2 console left menu, select “Key Pairs” under “Network & Security”
https://us-west-2.console.aws.amazon.com/ec2/home?region=us-west-2#KeyPairs:
- Identify your Key pair based on its name and Created date.
- Check the box to the left of the Key pair you want to delete.
- Click “Actions” to select “Delete”.
- Type “Delete” to confirm.
Remove
an automated way to shut down the Remote port, instance, and Dedicated Host. The Dedicated Host can’t be killed until after the day that it’s up.
Videos:
- Origin story: Dan Brown of AWS coming up with the idea and taking delivery of a truckload of mac minis on Feb 10, 2020.
- Part 1 - Getting Started by Scott Malkie who wrote this blog about CLI commands using Anka from Veertun.com for the Apple Hypervisor to create and manage macOS virtual machines running on top of macOS, in the same manner as other native macOS applications.
- Part 2: How to Use Block and File Storage
- Part 3: macOS Workers with Kubernetes and Jenkins
Videos from others:
- https://www.youtube.com/watch?v=UexCJtF5bA8 Tiny Technical Tutorials
- https://www.youtube.com/watch?v=OjeW33eahWM by Udit Chugh has distracting background music
References
AWS EC2 Mac Workshop: https://catalog.us-east-1.prod.workshops.aws/workshops/5ced3c00-8e8a-4c4d-82fa-ca1b7804ea4d/en-US/instance-setup/connect-to-ec2-mac/screen-sharing
https://arstechnica.com/gadgets/2020/12/amazon-web-services-adds-macos-on-bare-metal-to-ec2/
<a target="_blank" href="https://www.youtube.com/watch?v=UexCJtF5bA8&t=5m27s">VIDEO</a>:
SSH
https://therootcompany.com/blog/ssh-defaults-config-and-priorities/
More on MacOS
This is one of a series on MacOS:
- MacOS Setup step-by-step, with automation
- MacOS Hardware and accessories
- MacOS dotfiles for System Preferences setup automation
- MacOS Boot-up
- MacOS Keyboard tricks
- MacOS Terminal Tips and Tricks
- Text editors and IDEs on MacOS
- MacOS Xcode.app and CommandTools (gcc)
- MacOS Command-line utilities
- Applications on MacOS
- 1password on MacOS
- Manage Disk Space on MacOS
- Screen capture on MacOS
- MacOS iPhone integration
- Linux and Windows on Apple MacOS
- Packer create Vagrant Windows image
- Python on MacOS
- Maven on MacOS
- Ruby on MacOS
- Node on MacOS installation
- Java on MacOS
- Scala ecosystem
More on Amazon
This is one of a series on Amazon:
- AWS Cloud Services Comparisons
- AWS Well-Architected Cloud
- AWS Cloud Services
- AWS IAM
- AWS CLI
- AWS On-boarding (GUI, CLI, API)
- AWS Security
- AWS Data Tools
- AWS DevOps (CodeCommit, CodePipeline, CodeDeploy)
- AWS server deployment options
- AWS CDK
- Build load-balanced servers in AWS EC2
- AWS Networking
- AWS Xray
- IoT on AWS
- AWS Lambda
- AWS Lambda
More on Cloud Computing
This is one of a series on cloud computing:
- Dockerize apps
- Kubernetes container engine
- Hashicorp Vault and Consul for keeping secrets
- Hashicorp Terraform
- Ansible server configuration automation
- Serverless software app development
- Terraform (declarative IaC)
- Build load-balanced servers in AWS EC2
- AWS On-boarding (CLI install)
- AWS MacOS instances in the cloud)
- AWS Certifications
- AWS IAM admin.
- AWS Data Tools
- AWS Security
- AWS VPC Networking
- AWS X-Ray tracing
- AWS server deployment options
- AWS Lambda
- AWS Cloud Formation/cloud-formation/)
- AWS Lightsail
- AWS Deeplens AI
- AWS Load Balanced Servers using CloudFormation
-
Microtrader (sample microservices CI/CD to production Docker within AWS)
-
AWS Data Processing: Databases, Big Data, Data Warehouse, Data Lakehouse
- Google Cloud Platform
-
Bash Windows using Microsoft’s WSL (Windows Subsystem for Linux)
- Azure cloud introduction
- Azure Cloud Onramp (Subscriptions, Portal GUI, CLI)
- Azure Cloud Powershell
- PowerShell GitHub API programming
- PowerShell DSC (Desired State Configuration)
- PowerShell Modules
- Microsoft AI in Azure cloud
- Azure cloud DevOps
- Azure Networking
- Azure Storage
- Azure Compute
- Dynatrace cloud monitoring
- Digital Ocean
- Cloud Foundry