

How to keep secrets secret (in a central place), but still shared and refreshed.
![]()
![]()
![]()
![]()
![]()
![]()
![]()
![]()
![]()
![]()
![]()
![]()
![]()
Overview
- This is serious, folks
- It takes a village
- Why is a system needed for secrets?
- Why Vault’s Popular
- Ways to get a Vault service
- Option A. The easiest way to Vault: HCP
- Get in HCP first time
- HCP Regions/Locations
- Sign in HCP
- New Vault Cluster
- HCP Tier Pricing
- HCP Cluster Size Pricing
- HCP Per-User Pricing
- HashiCorp Virtual Network
- Sign-In HCP Vault for Access
- HCP Vault Admin User Sign-In
- HCP GUI Menu
- Upper-right GUI menu
- Sign Out
- Setup HCP Vault Access from CLI
- Get VAULT_TOKEN
- Secrets List on CLI & GUI
- Option B: Vault Agent on laptops
- API calls
- Types of secrets engines
- Vault client install
- Secrets handling best practices
- RBAC Tasks
- Roles/Tasks by Persona
- Vault fundamentals certification
- Vault Operations Professional exam
- Vault Enterprise Licensed Classes
- Auth Methods for people
- Backend
- Within App Programming Code
- Replication and DR
- Install Consul server
- Nomad
- Instruqt Basic Course
- Using Vaultenv with GitHub
- Option D: Install Server binaries
- Option C: Docker Compose of Vault server
- HashiCups
- Health check
- AppRole Auth Method
- Configure Vault
- Manage secrets within Vault
- Vault secret engine commands
- Consul
- Re-Sealing Vault server
- Vault Principals
- Vault on AWS
- Option E: Install Vault within AWS EKS cluster
- Jenkins plug-in
- Handling secrets in CLI
- Store and access secrets within a program
- CA for SSH
- References
- Database
- Chrome/ Browser Extension
- Monitoring/Observability
- Learning Resources
- Use VAULT GUI
- Resources
- References
- More on DevOps
- More on Security
HashiCorp’s Vault is used by enterprises to centrally secure all manner of secrets in a way that spans multiple clouds.
Many of the “Forbes Global 2000” largest companies in the world license Vault’s Enterprise capabilities to centralize management of secrets for both faster response to changes to personnel and systems.
NOTE: Content here are my personal opinions, and not intended to represent any employer (past or present). “PROTIP:” here highlight information I haven’t seen elsewhere on the internet because it is hard-won, little-know but significant facts based on my personal research and experience.
This is serious, folks
PROTIP: HashiCorp Vault is useful not because it provides convenience to developers (although it does). The product is imposed (top down) on developers to enhance the ability of the organization to survive.
Mechanisms to maintain secrets in production is the beating heart of a data center. If that goes down, the data center dies. Loss of secrets makes it impossible to recover from a disaster. So production Vault instances must stay up, despite disasters occuring.
Executives, auditors, and customers ask this question to judge the maturity of your organization:
- How long have you regularly proved the resilience of your Vault instance?
Unless regular Chaos Engineering “War Games” are conducted to prove that a Vault instance is resilient to imposed failure modes, it should not be relied upon for productive use.
PROTIP: Gradual implementation of security features is like closing a wide-open bank vault door at 1 inch per day.
It takes a village
Traditionally, enterprises establish several teams to provide “adult supervision” of systems that must stay up. Several teams are needed to make Vault (and other production systems) bullet-proof:
-
There is a Business Owner responsible for the organization’s success (including compliance with regulations and standards). This person defines the budgets and who is granted permissions. This person gives approval before each backup is destroyed. Good security practice is that this person is NOT given WRITE or DELETE access used by operational roles, in case the owner account is compromised.
-
There is a Financials team to provide people accounts that will stay active. This team proactively makes sure to switch to a new credit card BEFORE it expires. This team makes sure that the credit card used remains paid. This is the team that dispenses accounts with fine-grained budgets and makes sure that overspending alerts are resolved quickly. They define tags and include scanners to ensure their use. To ensure that things don’t “fall through the cracks”, they provide operational teams with group emails that are sent to multiple people.
-
There is an Access team who ensures “Least Privileges” by defining what permissions are granted to access the assets to each department and project. This team obtains from HR metadata about workers – to ensure that joiners are equipped to become productive quickly with all the permissions they need, and none that they don’t. This team also ensures that leavers are quickly removed from all accounts and permissions. This team doesn’t have access to app secrets.
-
There is an Internal Audit team that reports on the organization’s performance against SLAs – after setting up and maintaining observability systems to collect and process metrics (including availability, performance, accuracy, etc.). This team has read-only access to ensure that the organization is compliant with all relevant regulations and standards. This team includes the SOC (Security Operations Center) which operates around the clock to detect and respond to alerts and incidents.
-
There is a Platform team that installs, configures, and updates Vault technologies. This team creates the automation and training assets to ensure developers work efficiently and securely. This team has read-only access to logs (but limited access to app data values).
PROTIP: Most training about Vault is focused on the technical skills needed by this team. This article is focused on the skills needed by the other teams.
-
There are Developers who create and maintain utilities and libraries that other developers use to develop their applications – providing a consistent way yet quickly updatable way to access secrets and perform other tasks. Common utilities are encouraged to quickly respond when a new vulnerability is discovered. This team has full access to logs until their app enters production, then they may get temporary read-only access so someone using their account can’t “cover their tracks”.
The above implements the principle of “separation of concerns” with “checks and balances”.
The typical arrangement is a differentiation between Service Owners vs. Security Owners:
Service Owners are responsible for:
- Operational Access
- Authentication Methods
- Reliability of Vault (Availability reporting)
Security Owners are responsible for:
- Authorization Methods
- Secrets Policy
- Rotation Strategy
- Data, Application, and Systems Access
Centralization policy
PROTIP: Set up your Vault instance based on an organizational structure with consideration of the above. Executives need to clarify (in a formal statement) the corporate policy regarding centralization – should each project/department/division have its own set of teams to manage separate Vault instances (dev, test, prod) – to limit the blast radius in case of a compromise? Or should there be a single central team to manage the entire organization?
Centralization enables a common set of policies to be enforced globally, with a consistent set of secrets and keys are exposed to applications so they can interoperate.
PROTIP: Policies and procedures that clarify rotation of people through various roles enhance employee development and innovation.
Installation and maintenance of Vault requires some configuration and tuning along with changes in workflows.
So it is assumed that Vault server and SaaS offerings provide a central group of people to provide a concerted approach to guarding their employer’s secrets handling by employees.
Pre-requisite systems
Implementing Vault isn’t like installing a copying machine or a Coke vending machine.
PROTIP: To be successful at implementing Vault within an enterprise, you need to understand that a transformation in culture is often necessary. That means installation of Vault is dependent on effective installation of subsidiary systems such as:
- An employee survey system to obtain the feedback needed to get an unfiltered understanding of how people really feel
-
An anonymous “Suggestion Box” for individuals to communicate around gatekeepers to Executives
- A system (such as GitHub) to share and collaborate on generating code and documentation, to ensure that everyone is on the same page
- A system (such as Jenkins) to automate workflows so security checks are performed automatically, to minimize disruption
- A system (such as Slack) for individual employees and vendors to communicate with each other, to ensure that everyone is on the same page
- A system (such as Jira) to request individual employees’ actions (such as completing security updates), to ensure timely completion by every employee
-
A system (such as PagerDuty) to escalate alerts automatically whenever response is delayed, to ensure rapid response to events
- An employee evaluation system that exposes what managers need to improve as well as what employees need to improve
- A metrics collection and visualization system used to identify improvements rather than to isolate punishments, because improvements need to be team efforts
Why is a system needed for secrets?
Successful installation of HashiCorp Vault enables organizations to confidently answer questions for secrets management for CAIQ, SOC2/ISO270xx, and other audits:
- How do applications get secrets?
- How do humans acquire secrets?
- How are secrets updated? (rotated)
- How is a secret revoked?
-
When were secrets used? (lookup in usage logs)
- How would you know when a compromise has occurred?
- What occurs in the event of compromise? (an unauthorized third-party, such as hackers, make use of the secret)
Why Vault’s Popular
HashiCorp’s Vault is popular because it solves the secrets sprawl problem – where secrets sit too long on unsecure locations such as laptops and in publicly accessible files.
Ineffective secrets handling has resulted in billions lost to ransoms and the loss of reputation, reducing the value of companies and jobs – a situation that Vault helps to avoid.
Within enterprises, Vault has a major role in achieving “Zero Trust”, which include ensuring that all transactions are authenticated and authorized. Vault provides clever and secure ways to encrypt and decrypt data in transit and at rest.
Multi-Platform Legacy
HashiCorp continues to support the largest set of operating systems (Windows, macOS, Red Hat and Ubuntu Linux, within Docker, etc.). So enterprises are assured of support for legacy systems.
Vendor-agnostic identities
Vault provides mechanisms to authenticate users and applications separate from cloud vendors’ identity management systems
- AWS IAM
- GCP IAM
- Azure Entra (formerly Active Directory)
- etc.
This also avoids vendor lock-in and provides a consistent way to handle identities across clouds.
Multi-Cloud secrets store
Enterprises deploy Vault to avoid disruption when working with different clouds.
HashiCorp provides a single consistent way to handle secrets across clouds.
HashiCorp Vault adds the distinct advantage of being able to work either inside and outside each of several clouds:
-
AWS Secrets Manager is a service (managed by AWS) to rotate, manage, and retrieve any credentials, API keys, or secrets to encrypt EBS volumes, Dynamo DB, S3 objects. I
-
AWS KMS (Key Management Server) is used by AWS Secrets Manager and other services to generate new keys using various encryption algorithms based onn imported key material. See https://github.com/awsdocs/aws-kms-developer-guide/tree/master/doc_source
-
AWS External Key Store (XKS)
-
NOTE: Azure has higher “Premium” prices for use of it HSM (Hardware Security Module), which stores up to 5,000 key vault keys and the ability to access their keys from any device. The subscription price for Azure key vault is $5 per user per month. First 250 keys are $5 per month. For more keys, it costs $2.50 per month, and then 90 cents per month.
-
Azure Key Vault
PROTIP: With HashiCorp Vault, a particular secret can be added within AWS and then retrieved from within an Azure cloud. This is a requirement for true enterprise capability, due to needs imposed by corporate mergers and acquisitions.
Dynamic secrets
Vault collaborates with many other technologies (especially Enterprise ones) to create temporary credentials (username and password) so that users do not have their static credentials sitting around waiting to be stolen.
Unique abilities of Vault are that it can:
-
Generate dynamic secrets in databases and applications which are alive too short a time to steal. Vault can replace static long-running secrets (to be stolen) with dynamic secrets with a Time to Live (TTL) of a few hours. The system max TTL default is 32 days. The bulk of work by Vault is renewing tokens and rotating secret keys. All so that risk of unauthorized access can be minimized.
- https://www.hashicorp.com/blog/dynamic-database-credentials-with-vault-and-kubernetes
- https://www.hashicorp.com/blog/dynamic-database-credentials-with-vault-and-kubernetes
-
Rotate keys without rebooting. This is a competitive strong point with Vault.
- https://github.com/scarolan/painless-password-rotation
- Auto-Renew tokens before its TTL expires
This is the strong point with Vault.
https://github.com/scarolan/painless-password-rotation
Centralized Administration of Secrets
But what HashiCorp Vault offers is centralizing secrets handling across organizations by automating replacement of long-lived secrets with dynamically generated secrets (X.509 certificates) which have a controlled lease period. Vault forces a mandatory lease contract with clients. All secrets read from Vault have an associated lease to enable key usage auditing, perform key rolling, and ensure automatic revocation. Vault provides multiple revocation mechanisms to give operators a clear “break glass” procedure after a potential compromise.
-
Vault provides high-level policy management, secret leasing, audit logging, and automatic revocation.
-
Vault provides a unified interface to secrets while providing tight access control plus recording a detailed audit log.
-
Vault is installed in sealed mode (provides no access)
Only the storage backend (which durably stores encrypted data) and the HTTP API are outside the barrier which is sealed and unsealed.
Enterprise-worthy features
There is also various levels of paid “Enterprise” edition which companies install themselves in a cloud or on-prem. In large companies, Vault is usually installed, configured, and maintained by a Platform Team (formerly “Administrators” or “SysAdmins”).
HashiCorp provides a fully enterprise-level 24/7 support worldwide. HashiCorp began as a remote workforce and today HashiCorp people are in 47 countries. Just 15% of the 2,000 employees work in HashiCorp’s San Francisco headquarters (next to the Salesforce Transit Center).
Vault supports PKI (Private Key Infrastructure) used to handle certificates.
All HashiCorp’s products provide a detailed audit logs needed for forensics.
Enterprises send logs to a central repository (such as Splunk) where their SOC team monitors and responds to security events.
Multi-cloud support in HCP started in 2022 with AWS, and moving to AZure. https://developer.hashicorp.com/vault/tutorials/adp/key-management-secrets-engine-azure-key-vault
Also, HashiCorp supports its enterprise services partners via a team specializing in partner technical support worldwide.
Vault is FIPS-certified, so it does not require any special/proprietary hardware such as physical HSMs (Hardware Security Modules).
Open Source Origins
HashiCorp first released Vault as open-source software in 2015 at:
https://github.com/hashicorp/vault
Documentation:
- https://www.vaultproject.io/api-docs/ and https://learn.hashicorp.com/vault/ now redirects to
- https://developer.hashicorp.com/vault
HashiCorp continues to provide Vault free under open-source licensing, with community support.
To install the open-source edition of Vault, use Homebrew on macOS, etc.
PROTIP: HashiCorp does not offer support contracts (in addition to community support) on its open-source software.
Enterprise Capabilities
Most enterprises prefer to pay for quicker corporate support and features needed by enterprises.
- https://developer.hashicorp.com/hcp/docs/vault summarizes the differences between “Self-managed” and HCP-managed Vault clusters.
- https://github.com/hashicorp/vault-guides provides the technical content to support the Vault learn site.
- https://hashicorp-education.s3-us-west-2.amazonaws.com/courses/vault-101/Vault-101_LabBook.html
Enterprise capabilities add:
- Quicker “Premium” customer support in multiple time zones and languages (English, German, Japanese, etc.)
- MFA (Multi-Factor Authentication) for human users
- Disaster Recovery
-
Replication (for faster read performance across regions) Performance Read Replicas is available with “HCP Vault Plus” licensing.
- Policy-as-code to define insecure or other custom conditions to detect (“Sentinel” product like AWS Config Rules)
- Advanced Data Protection (ADP) “Transform Secrets Engine” generates tokens in place of sensitive data such as credit card numbers.
- Use of KMIP - the OASIS-defined industry-standard Key Management Interoperability Protocol to secure transfer (delegation) of secrets among different systems.
-
Namespaces (to segment data between teams to limit lateral movement by hackers)
- High-security HSM (Hardware Security Module) Auto-unseal
- FIPS 140-2/3 PDF by US government computer security standard (for testing/certifying cryptographic modules as being secure)
Enterprise features
HashiCorp makes money from licensing and supporting its
- on-prem (self-managed) enterprise software installed by customers, and
- the same enterprise software installed by HashiCorp SREs in HashiCorp’s cloud Vault HCP (HashiCorp Cloud Platform).
Either way, licensed editions provide a GUI (Graphic User Interface of web pages) to ensure user self-service. That enables organizations to get up and running quickly.
Each “organization” hosted within Enterprise Vault is isolated and segmented into different workspaces for different teams and projects. This limits the exposure of “lateral movement” possible with stolen credentials.
Announced Oct. 14, 2020, HashiCorp began to offer HCP Vault in a hosted SaaS (Software as a Service like Salesforce) operated by HashiCorp SREs, using an enhancements edition of the binary as self-hosted Vault Enterprise.
HCP Vault enables organizations to scale, without the complexity and overhead of self-managed instances.
Several ways to interact
HashiCorp supports several technologies that developers and operations people need to interact with systems:
-
GUI on a website (operated as SaaS or on-prem/cloud server)
-
CLI on a Terminal used by developers accessing a web service when dealing with files. The CLI is a wrapper performing API calls.
-
<a href=”#API+calls>API calls</a> by application programs (including the Vault CLI agent program installed)
-
Declarative JSON code for Infrastructure as Code (IaC) using Terraform, Ansible, etc. to install and configure Vault
HashiCorp’s Vault provides tools to work with each of the above.
VIDEO: Introduction to HashiCorp Vault Mar 23, 2018
by Armon Dadgar, HashiCorp’s CTO,
is a whiteboard talk about avoiding “secret sprawl” living in clear text with
empheral (temporary) passwords and cryptographic offload to a central service:

-
Machine authentication and authorization focuses on proving a machine’s identity and authorizing what a machine is enabled to do.
-
Machine-to-machine access is about controlling which machines are allowed to speak to one another.
-
Human-to-machine access concerns how we control which humans are allowed to speak to which machines.
-
Human authentication and authorization uses third-party identity tools to enable single sign-on.
NOTE: HashiCorp doesn’t currently offer mobile apps.
Ways to get a Vault service
Option A: The easiest way: use just your internet browser to access Vault SaaS environments in the public cloud, setup by HCP (HashiCorp Cloud Platform) SREs.
Option B: Free:
install a free dev-mode Vault server on your laptop
to provide Vault services and data running in memory only for demos and training purposes.
Option C: Free:
Install Docker Compose on your laptop, also
to provide Vault services and data running in memory only for demos and training purposes.
Option D: Install (for on-prem. use) a “self-managed” single-node OSS Vault server using Packer to create a Docker image you install in your laptop/local machine for developer learning, based on “Provision a Best Practices Vault & Consul Cluster on AWS with Terraform”.
Option E: Install a “self-managed” multi-node OSS Vault server you install in your cloud environment (AWS, Azure, GCP, etc.). For HA (High Availability), the “Vault with Integrated Storage Reference Architecture” document recommends a Consul cluster with 5 Vault nodes over 3 availability zones (within a single Region). AWS EKS cluster. Each node would use a TLS certificate for HTTPS protocol use.
Option F: Install in a cloud a production, licensed, “self-managed” Enterprise Vault instance. Various example configurations make use of various “feature flags” and defaults to compose a particular combination consisting of, for example:
- AWS, Azure, GCP cloud
- Number of nodes in Kubernetes (EKS, AKS, GKE)
- inclusion of HashiCups fictional sample app with a database
- etc.
Let’s start with the easiest way:
Option A. The easiest way to Vault: HCP
In 2021, Vault SaaS on AWS became available from HashiCorp so that companies can now obtain the benefit of multi-region stand-by disaster recovery and other enterprise capabilities without the need to employ people to keep that running 24/7.
Documentation on HCP Vault in the cloud:
- BLOG: Start iteracting with a Vault instance, even on a Chromebook, by getting a Vault cloud instance:
- https://cloud.hashicorp.com/docs/vault
- https://developer.hashicorp.com/vault/tutorials/cloud
- https://cloud.hashicorp.com/products/vault
- https://developer.hashicorp.com/hcp/docs/hcp#how-does-hcp-work
- https://developer.hashicorp.com/hcp/docs/vault
- https://developer.hashicorp.com/hcp/docs/vault/security-overview
- https://developer.hashicorp.com/vault/tutorials/cloud/vault-introduction
- https://developer.hashicorp.com/vault/tutorials/cloud
- https://cloud.hashicorp.com/products/vault/pricing
- https://portal.cloud.hashicorp.com/sign-in
Get in HCP first time
-
At https://portal.cloud.hashicorp.com/sign-up?product_intent=vault or, alternately, https://www.vaultproject.io click Try Cloud.
- Click “Create an account” using your email and password.
- Define an Organization for $50 of Trial credits until you have to provide your credit card.
-
PROTIP: On your iPhone install the Authy app to generate auth tokens for MFA.
HCP Regions/Locations
Providers: AWS regions and Azure locations:
- https://docs.aws.amazon.com/AmazonRDS/latest/UserGuide/Concepts.RegionsAndAvailabilityZones.html
- https://dgtlinfra.com/microsoft-azure-data-center-locations/
-
Check HCP Cloud provider region(s) for regions/locations supported.
PROTIP: As of this writing, HCP addresses not all countries’ GDPR data residency requirements.
Theater 7 AWS Regions 14 Azure Locations Americas us-east-1 (Virginia) eastus (Richmond, Virginia) - eastus2 (Richmond, Virginia) - centralus (Des Moines, Iowa) us-west-2 (Oregon) westus2 (Moses Lake, Washington) - canadacentral (Toronto) EMEA eu-west-1 (Ireland) northeurope (Dublin, Ireland) eu-west-2 (London) uksouth (London, UK) - westeurope (Amsterdam, Netherlands) eu-central-1 (Frankfurt) - - francecentral (Paris, France) Asia
Pacificap-southeast-1 (Singapore) southeastasia (Singapore) ap-southeast-2 (Sydney, Australia) australiasoutheast (Victoria) - japaneast (Tokyo, Saitama) - centralindia (Pune) After you have signed up…
Sign in HCP
- Sign-in.
-
Above the “Overview” page title, notice the name of the “organization” you’re using. On the left menu notice there is a different HVN, IAM, Billing, and Settings specific to your organization.
New Vault Cluster
- Click “View Vault”.
- After projects are setup in a Provider (such as AWS), they appear in this page of Vault Clusters.
-
Click the ID name (even though it isn’t underlined) for that project’s Overview page. PROTIP: Save this among your browser’s bookmarks, within a Projects folder:
https://portal.cloud.hashicorp.com/services/vault/bonkers?project_id=211f5f56-93a1-42de-8db6-9bebcec81cc6
- Create a Vault Cluster ID (named “vault-cluster” by default).
- Note the Network region (such as “Oregon us-west-2”)
-
Select “Allow public connections from outside your selected network” since you’re in dev. mode this time.
HCP Tier Pricing
Vault
Tier
$/hr* 24 =
$/day* 30 =
$/mo.* 12 =
$/yearDevelopment $0.30 $7.20 $216.00 $2,592.00 Starter $0.50 $12.00 $360.00 $4,320.00 Standard $1.578 $37.87 $1,136.16 $13,633.92 Plus $1.844 $44.26 $1,327.68 $15,932.00 REMEMBER: With “Development” at $7.20/day, that $50 trial credit gets you about 7 days of continuous run time.
PROTIP: Instead of letting instances sit idle accumulating cost, during development, delete the cluster and build it all again using Terraform.
Vault tier: “Development” is automatically associated with an “Extra Small” Cluster Size.
HCP Cluster Size Pricing
This compares increases in charges versus in capability for each level of Cluster Size, with “Small” level as the baseline “1X”.
Cluster Size Per User Cost Server Cost vCPUs RAM GiB Storage GB Comparison Extra-Small $0.158/hr $0.03/hr 2 1 1 - Small $0.158/hr $1.578/hr 2 8 15 1X Medium $0.127/hr $3.163/hr 4 16 30 2X 2X 2X 2X Large $0.075/hr $7.849/hr 8 32 50 5X 4X 4X 3.3X The jump from Small to Medium had the price go up the same (2X) as the capabilities (vCPUs, RAM, Storage), all 2X.
However, the jump from Medium to Large costs 5X more but resulted in just 4X more vCPU and 3.3X more storage. That provides less value as the jump from Small to Medium, making more Medium servers a better value than going to a Large, if that were an available option.
REMEMBER: HCP Vault allows you to change your clusters in place while maintaining the current configurations. But currently, no production-grade clusters can be scaled down to the Development tier, so you must have enough resources to scale down or delete them accordingly.
HCP Per-User Pricing
REMEMBER: How much is charged per-user depends on the cluster size used by the organization.
Vault HCP SaaS is also billed by the count of active unique “clients” which has authenticated to Vault to do something anytime during a month. That includes people who login into the cluster to manage policies, set up dynamic secret rotation, etc. and every application, service, or any other machine-based system that authenticates to Vault.
HashiCorp Virtual Network
-
Confirm Network settings (such as CIDR block 172.25.16/20, a “non-routable” address space).
About CIDR, see my https://wilsonmar.github.io/aws-networking
DEFINITION: A HVN (HashiCorp Virtual Network) defines the CIDR subnet range which scopes the range of private IP addresses to be created in your cloud’s network (VPC within AWS or VNet within Azure).
VIDEO: Think of HVN as a “secure holding area where your Vault instance is totally isolated from anyone else. Then as you provision new instances they can appear within the network. For example, a single-node developer instance or a multi-node cluster. HVN then gives you the option of how you want to connect.
References about CIDR VPC:
- https://www.linkedin.com/pulse/aws-ip-ranges-your-amazon-vpc-neal-davis/
- https://virtualizationreview.com/articles/2021/03/26/aws-subnetting.aspx
-
Click “Create cluster” to see at https://portal.cloud.hashicorp.com show “Cluster initializing” turn (in 5-10 minutes).
You should now have your Vault cluster. Congratulations!
Sign-In HCP Vault for Access
This is done every day or after expiration of temporary access credentials.
-
Click “Access Vault” on the HCP Vault Overview page, at the upper-right.

That lists the 3 ways to access secrets within HCP Vault described below:
- Web UI
- Command-line (CLI) Linux Terminal commands within Bash scripts
- API (REST calls invoked by the CLI and by application programs written in Python, Go, etc.)
We show each in sequence below, starting from the Web UI, then CLI and API.
WebUI by people
-
“Web UI” under “Access Vault”.
That is equivalent to clicking “Access web UI” Public link. Both open a new tab at URL such as:
https://bonkers-public-vault-c6443333.9d787275.z1.hashicorp.cloud:8200/
HCP Vault Admin User Sign-In

The “Method” is also called the “Auth” (Authentication) Method.
Details about other default Auth Methods in a section below.
- At the HCP Vault cluster Overview page for your project:
- Click “Generate token” (Under “New admin token”) and wait a few seconds for “Fetching”.
- Click “Copy” for “Copied” (when the VAULT_TOKEN is copied into your Clipboard).
-
Switch to the “Sign in to Vault” browser page. Select Method “Token” and paste in the Token field. Click “Sign In”. You should now see a list of Secrets Engines with this top menu:
HCP GUI Menu

Vault administrators use this menu to master all aspects of Vault on behalf of users:
-
Click Access to manage Authentication Methods, MFA, Entities, Groups, Leases, Namespaces, OIDC Proivder
-
Click Secrets, then “Enable new engine +” to manage different Secrets Engines.
-
Click Policies to manage ACLs (Access Control Lists) Vault uses to each particular user only pages that they were granted access to.
-
Click Tools to transform secrets data (Wrap, Lookup, Unwrap, Rewrap, Random, Hash)
Upper-right GUI menu
- Click Client count at the right to view and manage HCP usage
Sign Out
-
-
PROTIP: Don’t keep sessions open when you don’t need it.
Click on the head icon at the upper-right corner and select “Sign Out”:

Setup HCP Vault Access from CLI
This is for after clicking “Command-line (CLI)” from the HCP “Access Vault”:
Access to a Vault client from a CLI Terminal requires these environment variables:
- VAULT_ADDR (the URL to the Vault cluster)
- VAULT_NAMESPACE
- VAULT_TOKEN (equivalent to a password)
-
Click the icon for “Telling Vault where to find this cluster”

That gets you the VAULT_ADDR into your Clipboard:
-
Switch to your Terminal and press command+V to paste it. Press Enter.
export VAULT_ADDR="https://bonkers-private-vault-c6443333.9d787275.z1.hashicorp.cloud:8200";
export VAULT_NAMESPACE="admin"
Port 8200 is the default for Vault.
NOTE: In HCP, “admin” is equivalent to “root” as the Top-level Namespace.
Get VAULT_TOKEN
- Switch back to your browser.
-
Click the icon for “Authenticating to Vault” to get into your Clipboard:
export VAULT_TOKEN=[ENTER_TOKEN_HERE]
- Switch to your Terminal and press command+V to paste it. Don’t press Enter yet.
-
Highlight “[ENTER_TOKEN_HERE]” so pressing command+V replace it to end up with a command such as:
export VAULT_TOKEN=hvs.123456789abcdefGS1zvuec7XupRBChRWHvQbjOmEwzM_AxsGicKImh2cy4xT1NoR3Q5UnpSckRBZjBzNVJyc3M5UGIuY1VzZ3kQ8y0
-
Press Enter to invoke it.
REMEMBER: By default, the token is enabled only for 6 hours.
Secrets List on CLI & GUI
-
After you sign into the Vault GUI, you are presented with a list of paths.
-
Switch to the CLI to get that list:
vault secrets list
TODO: If you get a response such as this:
Error listing secrets engines: Get “https://127.0.0.1:8200/v1/sys/mounts”: dial tcp 127.0.0.1:8200: connect: connection refused
TODO: If you get a response such as this:
Error listing secrets engines: Error making API request.

URL: GET https://bonkers-public-vault-c6443333.9d787275.z1.hashicorp.cloud:8200/v1/sys/mounts
Code: 403. Errors:

* 1 error occurred:
    * permission denied
Option B: Vault Agent on laptops
REMEMBER: There are different executable editions of the Vault program for open source vs. Enterprise (licensed/more secure) versions of Vault.
With all Enterprise options, you would also install the Enterprise edition of Vault on clients accessing Vault servers with a paid license file from HashiCorp. This install involves use of GPG to verify signatures of the installer.
REMEMBER: The Vault program can act as both a server and a client.
Installed as a client, the Vault program acts as a cache (like Redis) to a central Vault server, responding to requests that can be served locally when secrets have not expired.
The Vault Agent is a client daemon that provides:
-
Caching of client-side responses containing newly created tokens and responses containing leased secrets generated off of these newly created tokens.
-
Automatic authentication to Vault – manage the token renewal process for locally-retrieved dynamic secrets.
-
Templating – rendering of user-supplied template “moustache” markdown , using the token generated by the Auto-Auth step. To dynamically renew destination file. Example at: https://banzaicloud.com/docs/bank-vaults/mutating-webhook/vault-agent-templating/
-
Secure delivery/storage of tokens (using mTLS communications in-transit).
-
Lifecycle management (renewal and re-authentication) of tokens.
API calls
Computers talk to each other using API calls. Vault provides to application programs client service tokens needed to access databases and other services. Here are the steps for that:
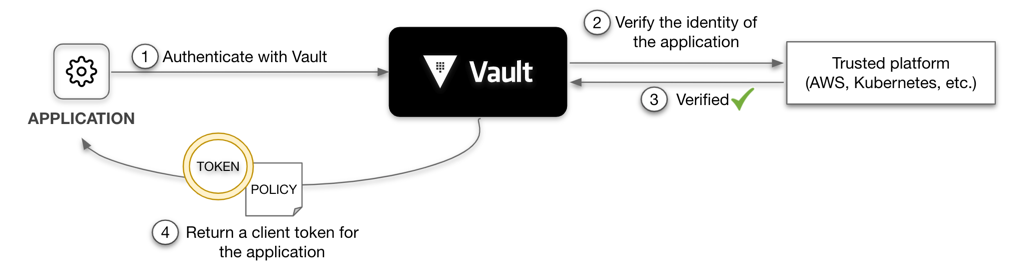
-
Application Authenticate with Vault (which coordinates with enterprise email, SMIL, and LDAP systems)
-
Vault verifies the identity of the application with a Trusted Platform (AWS, etc.)
-
Verification is obtained
-
Return a client token for the application. The token has an attached policy, which is mapped at authentication time, as the policy is deny all capabilities by default.
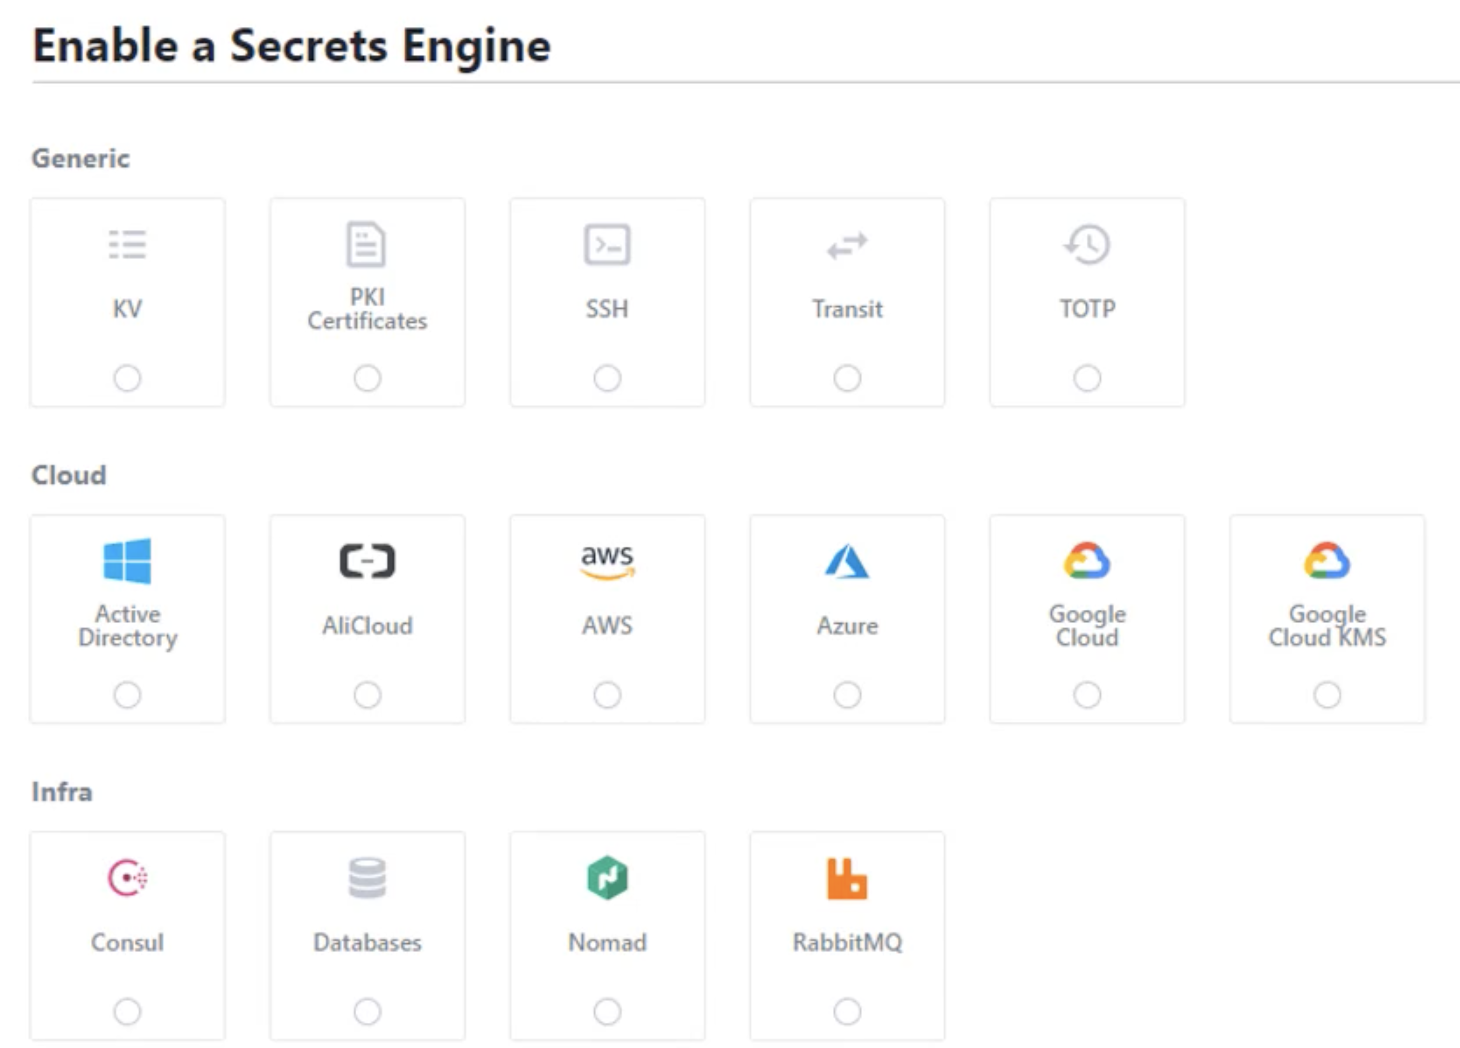
Types of secrets engines
Vault provides secrets engines to work with each type of secret, each a “use case” for the Vault product:
Types of secrets
Behind its “cryptographic barrier”, the KV Secrets Engine stores secrets such as these :
-
Passwords associated with userids (such as email address) typed in to log in to web applications.
-
Tokens - a sensitive value created for an unrelated value, such as enterprise software license keys
-
X.509 certificates for SSL/TLS (traceabile to public root CAs) to encrypt and decrypt data in transit, but generated without going through the manual process of generating a private key and CSR submitted to a root CA. (The public key is a DER-encoded X.509 SubjectPublicKeyInfo, as define in RFC 5280. The private key is a DER-encoded PKCS 8 PrivateKeyInfo, as specified in RFC 5958)
-
Asymmetric Keys to encrypt and decrypt data stored (at-rest)
-
API Keys provided by programs to obtain data from servers
-
database credentials
Secrets engines listed alphabetically:
-
Active Directory (AD)
- AliCloud
- AWS
- Azure (cloud from Microsoft)
- Consul (from HashiCorp)
- GoogleCloud
-
GoogleCloud KMS (Key Managerment Service)
-
KMIP is the OASIS-defined industry-standard KMIP (Key Management Interoperability Protocol) to secure transfer (delegation) of secrets among different systems.
- kv (Key/Value), the most basic to store password (like 1Password)
- nomad (from HashiCorp)
- RabbitMQ messagging
- pki (Public Key Infrastructure used by Microsoft, etc.)
- ssh (Secure Shell used by Linux)
- sys is the default system engine
- totp (Time-based One-time Password, as defined by RFC 6238)
- transit (from HashiCorp)
PROTIP: Some secrets engines, such as Microsoft AD (Active Directory) and KMIP, are managed using only CLI/API rather than GUI.
PROTIP: Within Vault, key material and metadata about Secret Engines are stored as a root folder.
Cost of Keys in Cloud
Each KMS key stored costs $1/month. The first 20,000 decrypt requests each month are free, then $0.03 per 10,000. An additional $1/month for each key being automatically rotated.
Requests to the GenerateDataKeyPair API and GenerateDataKeyPairWithoutPlaintext API operations and requests to API operations such as Sign, Verify, Encrypt, Decrypt, and GetPublicKey that reference asymmetric KMS keys (such as RSA) are excluded from the free tier. For AWS KMS: requests of some encryption algorithms cost more than others:
$00.03 per 10,000 GenerateDataKeyPairWithoutPlaintext API involving RSA 2048 keys
$00.10 per 10,000 Elliptic Curve (ECC) GenerateDataKeyPair (for signing)
$00.15 per 10,000 asymmetric (SM2) requests except RSA 2048
$12.00 per 10,000 RSA GenerateDataKeyPair API requests
Other alternatives
-
CyberArk.com, also a container-compatible secrets solution.
-
France-based Thales in Feb 2017 acquired Vormetrix Data Security Platform with IBM
-
Chapter III. of the “twelve-factor app” recommends storing config in environment variables. The usual mechanism has been in a clear-text file loaded into operating system variables, such as:
docker run -e VARNAME=mysecret ...
PROTIP: However, this is NOT cool anymore because the value of variables (secrets) can end up in logs. All processes have access to secrets (no RBAC). And this mechanism makes periodic key rotation manually cumbersome.
-
Docker Secrets was NOT designed for unlicensed (free) standalone containers*, but for Enterprise licensed (paid) Docker Swarm services in commands such as:
docker service create --secret db_pass --name secret-test alpine bash
db_pass is a file (with .txt extension) encrypted by a command such as:
echo "mysecret" | docker secret create db_pass -
 docker secret ls
Secrets are stored in Docker’s logging infra within its “Raft” distributed leader consensus mechanism shared with Swarm managers. So encryption needs to be locked in Swarm.
Secrets can be added to a running service, but key rotation requires container restart.
When the service is created (or updated), the secret is mounted onto the container in the /run/secrets directory which custom program can retrieve*
def get_secret(secret_name): try: with open('/run/secrets/{0}'.format(secret_name), 'r') as secret_file: return secret_file.read() except IOError: return None database_password = get_secret('db_pass') -
Kubernetes secrets are stored in its etcd process.
--experimental-encryption-provider-config
https://github.com/Boostport/kubernetes-vault
Within Kubernetes:
- https://developer.hashicorp.com/vault/docs/platform/k8s/injector
- https://developer.hashicorp.com/vault/tutorials/kubernetes/kubernetes-sidecar
RBAC (Role-based Access Control) has to be enabled in Kubernetes:
--authorization-mode=RBAC
-
The Aqua utility provides secrets management to orchestrators so that:
docker run -it --rm -e SECRET={dev-vault.secret/password} \
 --name ubuntu ubuntu /bin/bash
docker inspect ubuntu -f ""
returns:
["SECRET={dev.vault-secret/password}","PATH=/usr/local/sbin:..."]References:
- https://www.saasworthy.com/product/aws-secrets-manager/pricing
- https://www.saasworthy.com/product/hashicorp-vault/pricing
- https://www.saasworthy.com/product/cyberark-pas/pricing
- https://www.saasworthy.com/product/box-keysafe/pricing
- https://www.saasworthy.com/product/manageengine-key-manager-plus/pricing
- https://www.saasworthy.com/product/equinix-smartkey/pricing
- https://www.saasworthy.com/product/akeyless-vault
Vault client install
Secrets handling best practices
VIDEO: Security Posture
SURVEY: How much do you agree whether each of these should be implemented?
-
Storing plain-text secrets hard-coded in program code within GitHub is like leaving packages sitting in front of your door for a long time. Don’t wait until “production” to use secure mechanisms.
We have sample code you can incorporate into your code right away.
-
Enable MFA multi-factor authentication to block use of stolen passwords.
-
Limit exposure if auth secrets disclosed. Use Least Privilege approach to restrict access to encrypted data, based on a need-to-know basis. RBAC (Role-based Access Control) provides each user only the rights for his/her specific job role.
-
Distribute authentication secrets securely, using different channels.
Vault’s “AppRole” distributes the equivalent of userid and password, but for machine authentication.
-
Don’t let secrets live forever. Use single-use token with short TTL (Time To Live). Even if secrets are encrypted (using GPG), machines are powerful enough and hackers have enough time to figure out how to crack encryption algorithms, given enough time.
- Centralize management of secrets.
- Comprehensively log activities for audit and forensics.
- Forward logs to a central SOC (Security Operations Center) for continuous, quick detection of and resonse to security incidents
-
Stream each transaction to an event hub to trigger immediate alerting and actions
- Encrypt data in transit with Mutual authentication (mTLS).
- Encrypt data at rest.
- Rotate static secrets frequently. PROTIP: One can’t simply remove a file in GitHub because old versions hidden in history may be decrypted using old keys.
- Detect unauthorized access to auth secrets. App alert if secret is absent or not good.
- Have a “break glass” procedure if auth secrets are stolen. Revocation.
Capabilities that Vault does not address (for Zero-Trust), but other HashiCorp products do:
- Consul: Replace perimeter-based security referencing static IP addresses with dynamic identity-based security
- Simulated phising: Avoid being a victim of phishing. Don’t respond to email links, unknown calls & text without verification.
RBAC Tasks
Enhancements to HashiCorp’s definition of tasks used to grant RBAC permissions:
- List, View audit logs - Recovery Admin only
- Remove backup snapshots, audit logs, clusters - Recovery Admin only
-
Seal/unseal clusters - Recovery Admin only
- Create, list, view clusters - Platform Admin only
- Generate admin tokens - Platform Admin only
- Setup performance replication - Platform Admin only
- Cluster scaling - Platform Admin only
- View snapshots - Platform Admin only
- Expose resources publicly (edit visibility rules) - Platform Admin only
PROTIP: Strategies include:
-
A. Define limited permissions to app developers (read and write but not delete data).
B. Define separate admin accounts to delete audit logs and other data needed for forensics and disaster recovery.
C. Define less restrictive permissions to enable creation of clusters
D. Define separate permssions to accounts used to do scaling
E. Separate Platform admin accounts, to limit impact of stolen credentials
Roles/Tasks by Persona
Here are various roles used to define RBAC permissions, as defined by some:
Subscription: an identifier used for billing of Azure resources.
Tenant: An organization that owns and administers a specific instance of Microsoft cloud services (Azure and Microsoft 365 services) within an Azure subscription.
Azure Active Directory: an Azure service managing subscriptions for a single tenant, which can contain one or more domains.
Subscription Admin: have financial fudiciary responsiblity for spending billed to specific subscriptions.
Resource: A resource is an entity that may be managed in Azure cloud.
Resource Group: a Azure solution container of connected resources managed as a group.
Security Principal: User-created apps, services, and automation tools permitted to access specific Azure resources.
Managed Identities: an automatically managed identity pre-defined in Azure AD to access Azure services.
Vault Owner: the roles which can build a key vault and have complete lifecycle control and access to it, including auditing logs to keep track of who has access to the secrets and keys. The Vault Owner can restore the key to a new version, back it up, and perform other operations.
Vault Consumer: the one who, after being granted access permissions, acts on the assets stored in key vaults.
Managed HSM Administrators: A Managed HSM pool is completely under the control of users who have been assigned its Administrator.
Managed HSM Crypto Service Encryption User: Built-in roles are typically assigned to users or service principals who will use keys in Managed HSM to perform cryptographic activities. Crypto users can generate new keys but not delete existing ones.
Vault fundamentals certification
Since 2020 HashiCorp offers (for just $70.50 USD) an on-line certification exam for Vault.
- https://www.hashicorp.com/certification/vault-associate
- https://developer.hashicorp.com/vault/tutorials/associate-cert/associate-study
- https://developer.hashicorp.com/vault/tutorials/associate-cert/associate-review
- https://developer.hashicorp.com/vault/tutorials/associate-cert/associate-questions
Answer 57 questions (closed book) in 60 minutes. The passing percentage is not published. Good for 2 years. You must wait 7 days between exam attempts. You can only attempt an exam 4 times total in a one year period. If you fail 3 exams, you must wait 365 days after your last exam to retake it again.
- Compare authentication methods
- Describe authentication methods
- Choose an authentication method based on use case
- Differentiate human vs. system auth methods
- Create Vault policies
- Illustrate the value of Vault policy
- Describe Vault policy syntax: path
- Describe Vault policy syntax: capabilities
- Craft a Vault policy based on requirements
- Assess Vault tokens
- Describe Vault token
- Differentiate between service and batch tokens
- Describe root token uses and lifecycle
- Define token accessors
- Explain time-to-live
- Explain orphaned tokens
- Create tokens based on need
- Manage Vault leases
- Explain the purpose of a lease ID
- Renew leases
- Revoke leases
- Compare and configure Vault secrets engines
- Choose a secret method based on use case
- Contrast dynamic secrets vs. static secrets and their use cases
- Define transit engine
- Define secrets engines
- Utilize Vault CLI
- Authenticate to Vault
- Configure authentication methods
- Configure Vault policies
- Access Vault secrets
- Enable Secret engines
- Configure environment variables
- Utilize Vault UI
- Authenticate to Vault
- Configure authentication methods
- Configure Vault policies
- Access Vault secrets
- Enable Secret engines
- Be aware of the Vault API
- Authenticate to Vault via Curl
- Access Vault secrets via Curl
- Explain Vault architecture
- Describe the encryption of data stored by Vault
- Describe cluster strategy
- Describe storage backends
- Describe the Vault agent
- Describe secrets caching
- Be aware of identities and groups
- Describe Shamir secret sharing and unsealing
- Be aware of replication
- Describe seal/unseal
- Explain response wrapping
- Explain the value of short-lived, dynamically generated secrets
- Explain encryption as a service [app access Vault server directly]
- Configure transit secret engine
- Encrypt and decrypt secrets
- Rotate the encryption key
Prep:
- https://www.whizlabs.com/blog/hashicorp-vault-certification/
- https://medium.com/bb-tutorials-and-thoughts/how-to-pass-hashicorp-vault-associate-certification-c882892d2f2b
- STAR: https://medium.com/bb-tutorials-and-thoughts/200-practice-questions-for-hashicorp-vault-associate-certification-ebd7f7d27bc0
- https://www.linkedin.com/pulse/how-pass-hashicorp-vault-associate-certification-yassine-n-/
- https://github.com/bmuschko/cva-crash-course for “Practical Amazon Elastic Kubernetes Service (EKS) for the Real World” video class on OReilly.com
Vault Operations Professional exam
HashiCorp’s Vault Operations Pro Certification is a $295 4-hour hands-on lab-based as well as multiple-choice. The $295 exam fee includes a free retake after 7 days but within 3 months.
-
Create a working Vault server configuration given a scenario
1a. Enable and configure secret engines
1b. Practice production hardening
1c. Auto unseal Vault
1d. Implement integrated storage for open source and Enterprise Vault
1e. Enable and configure authentication methods
1f. Practice secure Vault initialization
1g. Regenerate a root token
1h. Rekey Vault and rotate encryption keys -
Monitor a Vault environment
2a. Monitor and understand Vault telemetry
2b. Monitor and understand Vault audit logs
2c. Monitor and understand Vault operational logs -
Employ the Vault security model
3a. Describe secure introduction of Vault clients
3b. Describe the security implications of running Vault in Kubernetes -
Build fault-tolerant Vault environments
4a. Configure a highly available (HA) cluster
4b. [Vault Enterprise] Enable and configure disaster recovery (DR) replication
4c. [Vault Enterprise] Promote a secondary cluster -
Understand the hardware security module (HSM) integration
5a. [Vault Enterprise] Describe the benefits of auto unsealing with HSM
5b. [Vault Enterprise] Describe the benefits and use cases of seal wrap (PKCS#11) -
Scale Vault for performance
6a. Use batch tokens
6b. [Vault Enterprise] Describe the use cases of performance standby nodes
6c. [Vault Enterprise] Enable and configure performance replication
6d. [Vault Enterprise] Create a paths filter -
Configure access control
7a. Interpret Vault identity entities and groups
7b. Write, deploy, and troubleshoot ACL policies
7c. [Vault Enterprise] Understand Sentinel policies
7d. [Vault Enterprise] Define control groups and describe their basic workflow
7e. [Vault Enterprise] Describe and interpret multi-tenancy with namespaces -
Configure Vault Agent
8a. Securely configure auto-auth using a token sink (referencing a file written by a method)
8b. Configure templating (formerly Consul-template)
Vault Enterprise Licensed Classes
These Enterprise Academy courses are instructor-led, and primarily address the needs of Platform Operators using Enterprise Vault features. Individuals are signed up for these group classes using education credits as part of Enterprise Vault licensing.
-
AppRole Authentication Method - configure and use Vault’s AppRole authentication method. See https://developer.hashicorp.com/vault/docs/concepts/response-wrapping
-
AWS Authentication Method - configure and use Vault’s AWS authentication method, which uses AWS IAM credentials to authenticate EC2 instances, Lambda functions, etc.
-
AWS Secrets Engine - dynamically generate short-lived AWS credentials for public cloud platforms (like AWS, Azure, Google Cloud, etc.) instead of long-lived, static credentials minimizes the risk of unauthorized access to your cloud accounts.
-
Database Secrets Engine - Migrate a Python web application from using static database credentials to ones generated dynamically by Vault’s MySQL Database secrets engine.
-
Deploy a Consul Cluster - Deploy and configure a Consul cluster for use behind a Vault Enterprise cluster.
-
Deploy a Vault Cluster with Consul Storage - Deploy and configure a Vault Enterprise cluster.
-
Deploy Vault with Raft Storage - Deploy and configure a Vault Enterprise cluster - important for making your Vault Enterprise cluster production quality.
-
Google Cloud Secrets Engine - dynamically generate short-lived GCP credentials with Vault.
-
Kubernetes Authentication Methods - configure and use Vault’s Kubernetes authentication method using JWT.
-
LDAP Authentication Method - configure and use Vault’s LDAP authentication method.
-
PKI Secrets Engine - setup a vault server as a intermediate certificate authority to generate dynamic PKI leaf certificates.
-
Vault Agent - configure and use Vault agent as a way of injecting secrets. The Vault agent and web application are running in separate containers inside of a pod in a Kubernetes environment.
-
Vault Disaster Recovery Replication between Vault clusters in different cloud regions.
-
Vault Operations - audit logs, root token management, and rekeying and rotating of Vault’s keys. Migrate a Vault cluster to the GCP Auto-Unseal option.
-
Vault Performance Replication - Configure Performance Replication between Vault Clusters for constant availability of Vault. A mount filter limits what data is shared between NA-1 and EU-1 regions for General Data Protection Regulation (GDPR) compliance.
-
Vault Tokens and Policies - configure and use Vault Tokens and Policies.
-
Versioned Secrets - use and manage versioned secrets stored in Vault’s Key/Value Version 2 (KVv2) secrets engine.
Auth Methods for people
Auth (authorization) methods perform authentication to verify the user or machine-supplied information.
-
On a GUI, click inside the Authentication Method value for a drop-down of what Vault supports, out of the box:

The default method is “Token”, such as the one issued to the Administrator when the Vault server was created.
Auth methods are also named by the protocol used to communicate (such as LDAP, OIDC, JWT), the software (such as “RADIUS”), and the name of companies offering software (such as “Okta” and “GitHub”).
- Token (Vault’s default Auth Method)
-
Username (such as an email address used on many legacy websites)
- LDAP auth method enables user authentication using an existing LDAP server while
- Okta (third-party identity provider)
- JWT
-
OIDC
- RADIUS (legacy Windows Active Directory)
- GitHub (coordinated using OIDC protocol)
REMEMBER: An Auth Methods shown to users in a drop-down may be enabled on the Vault server.
In addition the above, Vault supports the “AppRole” Auth Method used between computer-to-computer APIs.
-
The list above is also shown on the Admin’s Terminal from this command:
vault auth list
Sample output:
Path    Type   Accessor             Description              Version
 ----    ----   --------             -----------              -------
 token/  token  auth_token_c635dfe4  token based credentials  n/a
- AppRole auth method is recommended for server machines or apps handling automated workflows
- AppRole auth method is recommended for server machines or apps handling automated workflows
Login with Default Auth Token
-
Log into Vault using the vault CLI:
vault login -method=github token="${VAULT_TOKEN}Adding Auth Method
-
On developer machines, the GitHub auth method (auth/github) is easiest to use.
vault auth enable github
Cubbyhole
To ensure that no secret value is transmitted across the wire, Vault’s cubbyhole response wrapping is used where the initial token is stored in the cubbyhole secrets engines. A reference to the secret within a cubbyhole. The wrapped secret can be unwrapped using the single-use wrapping token. Even the user or the system created the initial token won’t see the original value.
The Vault “cubbyhole” is each user’s private “locker” which a specific Token accesses.
This mechanism provides malfeasance detection by ensuring that only a single party can ever unwrap the token and see what’s inside (given a limited time).
All secrets are namespaced under a token. When that token expires or is revoked, all the secrets in its cubbyhole are revoked with it. Even the root user cannot reach into a cubbyhole.
However, secrets in the key/value secrets engine are accessible to other tokens if its policy allows it.
-
Configure GitHub engineering team authentication to be granted the default and application policies:
vault write auth/github/map/teams/engineering value=default,applications
Auth Methods
Auth methods perform authentication to verify the user or machine-supplied information.
- LDAP auth method enables user authentication using an existing LDAP server
- AppRole auth method for server machines or apps handling automated workflows
AppRole Auth Method
- https://developer.hashicorp.com/vault/docs/auth/approle
- https://developer.hashicorp.com/vault/tutorials/auth-methods/approle
The approle auth method allows machines or apps to authenticate with Vault-defined roles.
AppRole uses role_id and secret_id for login. It’s like a user_id and password. So it’s safer when each is delivered separately using two different tools (email and texting).
The AppRole API is a set of Vault policies and login constraints that must be met to receive a token under those policies. An AppRole can be created for a particular machine, or even a particular user on that machine, or a service spread across machines.
AppRole has an open design to enable a varied set of workflows and configurations to handle large numbers of apps.
- If the SecretID used for login is fetched from an AppRole, that Pull mode.
- If a “custom” SecretID is set against an AppRole by the client, that’s Push mode.
-
Log in with AppRole:
curl --request POST --data @payload.json \
http://127.0.0.1:8200/v1/auth/approle/login
Credentials required for successful login depend upon the constraints set on the AppRole associated with the credentials. The scope can be as narrow or broad as desired.
https://github.com/hashicorp/vault-action
-
Enable a secrets path for kv engine:
vault secrets enable -path=secret kv
Version 1 of the KV secrets engine uses write and read commands. Version 2 uses kv put and kv get commands.
-
Write a Secret to the KV Secrets Engine
vault write secret/app-1 username=”app-1-user” password=”my-long-password”
Success! Data written to: secret/app-1
Tokens with attached policies
Within Vault, tokens map to information. The information mapped to each token is a set of one or more attached policies. Policies control what is allowed to be done with that information.
-
Service tokens support common features such as renewal, revocation, creating child tokens, and more. They are tracked and thus replicated, so are considered “heavyweight”.
-
Batch tokens can’t be renewed (can’t have an explicit max TTL), so requires no storage on disk to track and replicate, so are “lightweight” and scalable. Batch tokens can’t be root tokens and can’t be used to create tokens.
-
The admin who manages secrets engines needs to be given a policy with capabilities on mounts (of secrets engines):
path "sys/mounts/*" {
  capabilities = ["create", "read", "update", "delete", "list", "sudo"]
}
sudo capabilities allows access to paths that are root-protected. Root tokens have the root policy attached to them. They are created at vault operator init so they can do anything in Vault, and never expire (without any renewal needed). As a result, it is purposefully hard to create root tokens. It is good security practice for there to be multiple eyes on a terminal whenever a root token is used and then revoked immediately after tasks are completed.
This path sys/rotate requires a root token or sudo capability in the policy.
-
Each policy defines a list of paths. Each path expresses the capabilites that are allowed.
path "secret/data//*" { capabilities = ["create", "update", "read", "delete"] required_parameters = ["bar", "baz"] } path "secret/metadata//*" { capabilities = ["list"] } -
Permissions to configure Transit Secrets Engine:
# Enable transit secrets engine path "sys/mounts/transit" { capabilities = [ "create", "read", "update", "delete", "list" ] } # To read enabled secrets engines path "sys/mounts" { capabilities = [ "read" ] } # Manage the transit secrets engine path "transit/*" { capabilities = [ "create", "read", "update", "delete", "list" ] } -
To configure configure Transit Secrets Engine via CLI:
vault secrets enable transit
Alternately, to enable transit via API call using Curl:
curl --header "X-Vault-Token: TOKEN" \
    --request POST \
    --data PARAMETERS \
    VAULT_ADDRESS/v1/sys/mounts/PATH
Alternately, via UI at http://127.0.0.1:8200/ui/vault/auth?with=token see https://learn.hashicorp.com/tutorials/vault/eaas-transit
-
To be able to list existing policies:
path "sys/policies/acl" {
  capabilities = ["list"]
}
-
List all the registered policies:
vault read sys/policy
-
Encrypt plaintext in Base64 using Transit Engine in key_ring_name “orders” (example from Bhargav):
vault write transit/encrypt/orders plaintext=$(base64 <<< "1234 4564 2221 5562")
The ciphertext returned is prefixed with vault:v1: so that when you decrypt this ciphertext, you now to use Vault and v1 (version 1) of the encryption key.
-
Rotate the encryption key version:
vault write transit/keys/orders/rotate
-
Decrypt the cyphertext:
vault write transit/decrypt/orders ciphertext="vault:v2:XdEG7SKvaTFOwgi4bdrAy1ftxNw6QYR2Y82vWnOoMnvIkQLZeU419qWVCXuABCD"
Backend
From https://www.vaultproject.io/docs/internals/architecture
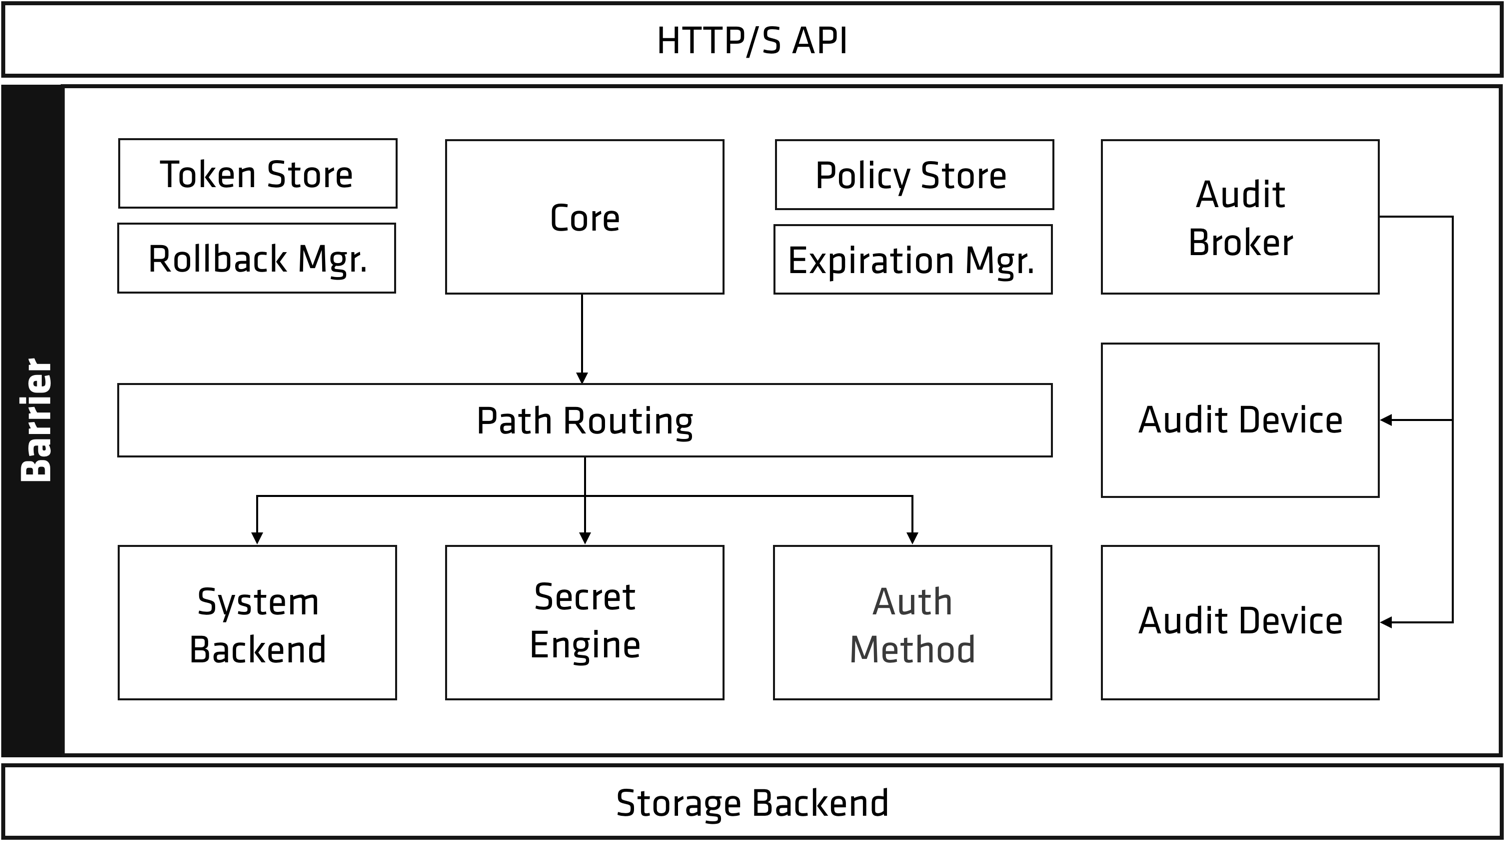
When the Vault server is started, it must be provided with a storage backend so that data is available across restarts. Similarly, the HTTP API service must be started by the Vault server on start so that clients can interact with it.
https://hashicorp.github.io/field-workshops-vault/slides/multi-cloud/vault-oss
https://hashicorp.github.io/field-workshops-vault/slides/multi-cloud/vault-oss/index.html is the slidedeck HashiCorp Sales Engineers use for a high-level presentation.
Secrets engines are Vault plugins that store, generate, or encrypt data. Secrets engines are incredibly flexible, so it is easiest to think about them in terms of their function.
TODO: Backup cluster data
PROTIP: TODO: Before the cluster is deleted or destroyed, make it possible to restore the current state of data: automate the periodic capture of snapshots of data to a safe place. Then practice Disaster Recovery.
PROTIP: TODO: To ensure that hackers can’t delete the backups so they can demand ransoms, set permissions so the account to create backups cannot be also used to delete them.
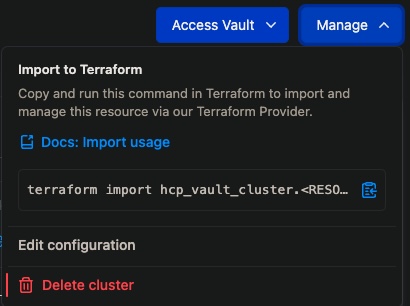
Delete cluster
PROTIP: Rather than letting the cluster sit idle racking up charges, delete it after taking a snapshot so that it can be used to restore the cluster the way it was.
Restore cluster data
TODO: To bring data from a previous instance …
Configure for Authentication
-
Configure at least one audit device to write log (before completing the request):
vault audit enable file file_path=/var/log/vault_audit.log
AWS
A prerequisite are AWS Credentials to an AWS account.
Tutorial: Deploy HCP Vault with Terraform example scenario automatically deploys an AWS VPC, and peers it with your HashiCorp Virtual Network (HVN).
-
To learn Vault configuration, view VIDEO: A Quickstart Guide
Connection between AWS VPC and HCP HVN is using VPC Peering.
-
Click “Manage” to Import to Terraform:
terraform import hcp_vault_cluster.<RESOURCE_NAME> vault-cluster
- Click “Access Vault” for “Command-line (CLI)”.
-
Click “Use public URL” and click the copy icon to save to your Clipboard, for example:
export VAULT_ADDR="https://vault-cluster.vault.a17838e5-60d2-4e49-a43b-cef519b694a5.aws.hashicorp.cloud:8200";
export VAULT_NAMESPACE="admin"
- Paste the value ???
Within App Programming Code
Even though the “12 Factor App” advocates for app programming code to obtain secret data from environment variables (rather than hard-coding them in code stored within GitHub). So, populating environment variables with clear-text secrets would occur outside the app, in the run-time environment. Seveal utilities have been created for that:
- https://github.com/jamhed/govaultenv includes access to Kubernetes (but not clouds AWS, GCP, etc.).
- The Daytona Golang CLI client from Cruise (the autonomous car company) at https://github.com/cruise-automation/daytona is written in Golang to be a “lighter, alternative, implementation” Vault client CLI services and containers. It automates authentication, fetching of secrets, and token renewal to Kubernetes, AWS, and GCP. Daytona is performant because it pre-fetches secrets upon launch and store them either in environment variables, as JSON in a specified file, or as singular or plural secrets in a specified file.
API to access HCP Vault
- https://developer.hashicorp.com/vault/tutorials/getting-started/getting-started-apis
- https://learn.hashicorp.com/tutorials/vault/getting-started-apis
- https://github.com/hashicorp/hcp-sdk-go
Most HCP Go SDK make API calls based on environment variables:
- HCP_PROJECT_ID
-
HCP_ORGANIZATION_ID
-
Define what other origins (domain, scheme, or port) from which a browser should permit loading of resources with the /sys/config/cors Vault API endpoint. This impacts Cross-Origin Resource Sharing (CORS) HTTP-headers.
- Define custom UI headers for security using the API (which provides version controls not tracked by the HCP portal).
Replication and DR
- https://www.vaultproject.io/docs/enterprise/replication
- https://www.youtube.com/watch?v=0K1b1mT6t8E
- https://www.somerfordassociates.com/blog/hashicorp-vault-enterprise-blog/
The objective of this particular presentation is objection handling – to have listeners accept the need to bring up a minimum of 32 servers for multi-region HA and scalability. That seems like a lot. So we bring up the recommendations of others, KPI metrics, analogies, with security and technical justifications.
We talked earlier about a datacenter where if a whole Availability Zone goes down, another can take its place. To make that work, each datacenter has 3 Availability Zones, with 5 servers total.
Most enterprises have traffic worldwide, in different regions. For security, each region should be in a different subnet, using different accounts. So the usual enterprise strategy involves adding complete datacenters in different cloud regions around the world.
For large global organizations with a production infrastructure that must stay up, duplicate datacenters (called “secondaries”) are added around the world, in different regions.

Many of the Global 2000 enterprises duplicate a set of datacenters across 3 regions – one primary region and two secondaries. So when eventually the primary region fails completely, another region can take its place.
This architecture enables achievement of minimal RPO and RTO when a failure occurs:
-
RPO stands for the Recovery Point Objective, which measures the time frame within which transactions are lost during an outage.
-
RTO stands for the Recovery Time Objective, which measures the time users go without service during an outage.
These production metrics are kept low by adopting an architecture that ensures it.
Within the AWS cloud, for minimal recovery time, AWS recommends a complete secondary set of servers to be running continuously, to minimize the time it takes to switch from primary to secondary servers.
Like a group of reserve soliders in an army, secondaries for DR do not handle client requests, but are on stand-by.
So each region has two datacenters: one for performance and one for Disaster Recovery.
This allows more servers to be added when needed. The more suddenly that additional load might come online, the more reserve capacity needs to be running for quick upgrade. The additional capacity absorbs burts of traffic while additional servers are being onboarded.
All server configuration changes and encryption keys are replicated to all servers all the time.
Vault doesn’t use the legacy approach of a “load balancer” where all servers run all the time, using a back-end to store data. Such approaches are now known to be single points of failure in the add-on load balancer or single database.
Instead, the way to minimize the chance of data corruption today is this: within each performance cluster, only the primary server modifies underlying data. Secondary servers are called “read replicas” because they respond only to read requests, and transparently forward (using gPRC protocol) requests to the primary. This works because, in practice, there are many more read requests than write requests.
Thus, each read replica secondary keeps track of tokens and leases in its own region. For better security, when a primary fails and a secondary is promoted, applications reauthenticate and obtain new leases from the newly-promoted primary.
This is how modern system such as Vault Enterprise are made bullet-proof today.
Now let’s look at the mechanics:
-
https://medium.com/@bernardo.gza83/hashicorp-vault-performance-replication-7ff8b8d08f04
-
VIDEO: “HashiCorp Vault Enterprise and Open Source High-Availability Demo” by Sam Gabrial
-
https://banzaicloud.com/blog/vault-multi-datacenter/
Enterprise edition licenses also enable “Replication Filters” (aka “mount filters”) to enforce data sovereignty requirements through fine-grained allow and deny policies around data replication.
Install Consul server
To provision a Quick Start Vault & Consul Cluster on AWS with Terraform
Consul coordinates several instances of Vault server software.
Using HashiCorp’s Consul as a backend to Vault provides durable storage of encrypted data at rest necessary for fault tolerance, availability, and scalability.

-
Consul Cluster server configurtion sample file /etc/consul.d/server/consul-node.json, replacing all caps with your own values:
{ "server": true "node_name": "NODENAME", "datacenter": "DATACENTERNAME", "data_dir": "/var/consul/data", "bind_addr": "0.0.0.0", "client_addr": "0.0.0.0", "domain": "HOSTAME.com", "advertise_addr": "IPADDR", "bootstrap_expect": 5, "retry_join": ["provider=aws tag_key=consul tag_value=true"], "ui": true, "log_level": "DEBUG", "enable_syslog": true, "primary_datacenter": "DATACENTERNAME", "acl": { "enabled": true, "default_policy": "allow", "down_policy": "extend-cache" }, "node_meta": { "zone": "AVAILABILITYZONE" } "autopilot":{ # Enterprise feature "redundancy_zone_tag": "zone" } } -
To see log entries:
sudo tail -F /var/log/messages
-
Take a snapshot used to restore:
consul snapshot save yymmdd-svr1.snap
Response:
Saved and verified snapshot to index 123
-
Inspect the snapshot:
consul snapshot inspect yymmdd-svr1.snap
Response is an ID, Size, Index, Term, Version.
Nomad
HashiCorp Nomad passes secrets as files.
It polls for changed values. Tasks get tokens so they can retrieve values.
Using Envconsul with GitHub
- envconsul, at https://github.com/hashicorp/envconsul (from Hashcorp) populates values in environment variables referenced within programming code (12-factor applications which get their configuration via the environment).
Envconsul is launched as a subprocess (daemon) which retrieves secrets using REST API calls of KV (Key Value) pairs in Vault/Consul based on “configuration files” specified in the HashiCorp Configuration Language.
It works on many major operating systems with no runtime requirements. On MacOS:
brew install envconsul
   envconsul -v
v0.9.2 ()
For the full list of command-line options:
envconsul -h
Envconsul is also available via a Docker container for scheduled environments.
Secrets are requested based on a specification of secrets to be fetched from HashiCorp Vault based on a configuration file. A sample of its contents is this, which requests the api-key field of the secret at secret/production/third-party:
production/third-party#api-key
Credentials authorizing retrieval requests are defined …
Instruqt Basic Course
HashiCorp provides hands-on courses at https://play.instruqt.com/login.
After given 30-day access to the Vault Basics course, its lessons are for running in dev mode:
NOTE: Labs timeout every 2 hours.
- The Vault CLI - Run the Vault Command Line Interface (CLI).
-
Your First Secret - Run a Vault dev server and write your first secret.
-
The Vault API - Use the Vault HTTP API
curl http://localhost:8200/v1/sys/health | jq
Response includes “cluster” only if Vault was setup as a cluster:
% Total    % Received % Xferd  Average Speed   Time    Time     Time  Current
                               Dload  Upload   Total   Spent    Left  Speed
0     0    0     0    0     0      0      0 --:--:-- --:--:-- --:--:--     0{
"initialized": true,
"sealed": false,
"standby": false,
"performance_standby": false,
"replication_performance_mode": "disabled",
"replication_dr_mode": "disabled",
"server_time_utc": 1591126861,
"version": "1.2.3",
"cluster_name": "vault-cluster-2a4c0e97",
"cluster_id": "0b74ccb6-8cee-83b8-faa6-dc7355481e4b"
}
100   294  100   294    0     0  49000      0 --:--:-- --:--:-- --:--:-- 58800
curl --header "X-Vault-Token: root" http://localhost:8200/v1/secret/data/my-first-secret | jq
Response:
% Total % Received % Xferd Average Speed Time Time Time Current Dload Upload Total Spent Left Speed 100 289 100 289 0 0 32111 0 --:--:-- --:--:-- --:--:-- 32111 { "request_id": "1fbb67f5-04a2-5db1-06b4-8210a6959565", "lease_id": "", "renewable": false, "lease_duration": 0, "data": { "data": { "age": "100" }, "metadata": { "created_time": "2020-06-02T19:36:39.21280375Z", "deletion_time": "", "destroyed": false, "version": 1 } }, "wrap_info": null, "warnings": null, "auth": null } - Run a Production Server - Configure, run, initialize, and unseal a production mode Vault server.
Vault Initialization
- https://www.vaultproject.io/docs/concepts/seal/
-
Production servers are configured by a vault-config.hcl file (in folder /vault/config) read by server init command
vault server -config=/vault/config/vault-config.hcl
vault operator init -key-shares=1 -key-threshold=1
REMEMBER: Vault command parameters have a single dash, not a double-dash.
Vault init generates (using Shamir algorithm) 5 Unseal -key-shares, of which a -key-threshold quorum of 3 different employees are needed to Unseal the server to generate a Master encryption key, which is used to protect (encrypt) Data Encryption keys stored with data encrypted.
Each shard can be encrypted with a different PGP key for each person with a shard.
-
Repeat vault operator unseal to input each shard key.
The Root Token is used to initialize Vault, then thrown away.
The server is unsealed until it’s restarted or if Vault’s backend storage layer encounters an unrecoverable error.
-
Initialize the “vault” cluster the first time:
vault operator init
Auto Unseal using Transit Secret Engine
-
VIDEO: Alternately, use Cloud Auto Unseal by using the “Transit Secret Engine” to of a different Vault cluster to retrieve a Master Key configured in a Namespace.
By supplying a Key ID stored in a HSM within a cloud (AWS KMS, Google Cloud KMS, Azure Key Vault, etc.). For example, in the Vault config file:
seal "awskms" {
  region = "us-east-1"
  # access_key = "AKIA..."  # use IAM Service Role instead
  # secret_key = "..."
  kms_key_id = "abcd123-abcd123-abcd123-abcd123-abcd123"
  endpoint = "vpc endpoint"
}
PROTIP: Vault configuration files are at /etc/vault.d/vault.hcl
NOTE: The Master Key remains memory-resident in Vault Node memory and not stored.
“disable_renewal” means Transit Unseal supports key rotation.
-
Enable the Transit Secret Engine:
vault secrets enable transit
Success! Enabled the transit secrets engine at: transit/
-
Write:
vault write -f transit/keys/unseal-key ; vault list transit/key
Success! Data written to: transit/keys/unseal-key
-
Create policy.hcl file:
path "transit/encrypt/unseal-key" {
  capabilities = ["update"]
  }
path "transit/decrypt/unseal-key" {
capabilities = ["update"]
}
vault policy write unseal policy.hcl ; vault policy list
Success! Upload policy: unseal
-
TODO: Configure the token_duration default.
-
Capture the token value created for policy:
vault token create -policy=unseal
Key Value
token s.v9dkc24rbFGargHd034droGGG </pre>
-
Switch to vault1 to sudo vi /etc/vault.d/vault.hcl
seal "transit" { address = "https://vault2.example.com:8200" token = "s.v9dkc24rbFGargHd034droGGG" disable_renewal = "false" # key config: key_name = "unseal-key" mount_path = "transit/" namespace = "ns1/" # TLS config: tls_ca_cert = "/etc/vault/ca_cert.pem" tls_client_cert = "/etc/vault/client_cert.pem" tls_client_key = "/etc/vault/ca_cert.pem" tls_server_name = "vault" tls_skip_verify = "false" } } -
Restart Vault1 (with auto unseal):
sudo systemctl restart vault
vault status
vault operator init >null/void
Key Value
Recovery Seal Type transit </pre>
-
Initialize Vault1 without sending Recovery keys to console:
vault operator init >null/void
-
Write a secret into vault to confirm.
-
Take a snapshot to establish a restore point.
Encryption in Transit with VTS
- https://www.vaultproject.io/docs/secrets/transit/
- https://learn.hashicorp.com/tutorials/vault/eaas-transit = advantages at customer sites provides all steps.
- Instruqt course: “Vault Encryption as a Service” enabling a Python app to talk to a MySQL database.
Secrets are encrypted outside of Vault using Vault’s Transit Secrets engine “encryption as a service” (EaaS). To be secure, Vault performs cryptographic fuvtsnctions on data-in-transit and doesn’t store data sent to it.

-
Define the path, such as:
VTS_PATH="lob_a/workshop/transit"
-
Enable (mount) the secret transit engine (a Vault plugin) to a custom path different than the default “transit” mount:
vault secrets enable -path="${VTS_PATH}" transit -
Create a key ring:
VTS_KEY_RING="orders" vault write -f "${VTS_PATH}/keys/${VTS_KEY_RING}" -
A HA central Core Vault Cluster is referenced (leveraged by) this Vault Transit Unseal configuration:
seal "transit" {
  address = "https://vault:8200"
  token = "s.QsGo2dfFGqIIOCLFWFE"
  disable_renewal = "false"
  // Key configuration:
  key_name = "transit_key_name"
  mount_path = "transit/"
  namespace = "nsl/"
  // TLS Configuration:
  tls_ca_cert = "/etc/vault/ca_cert.pem"
  tls_client_cert = "/etc/vault/client_cert.pem"
  tls_client_key = "/etc/vault/ca_cert.pem"
  tls_server_name = "vault"
  tls_skip_verify = "false"
}
PROTIP: Encryption uses by default AES-GCM with a 256-bit AES or other key type defined at https://www.vaultproject.io/docs/secrets/transit#key-types
-
Other configuration stanzas:
listener "tcp" { address = "0.0.0.0:8200" # all machines cluster_address = "0.0.0.8:8201" tls_disable = "true" # only in dev (not in PROD) # tls_cert_key & tls_cert_file } // backend: storage "consul" { address = "127.0.0.1:8500" # locally path = "vault/" } // Where to publish metrics to upstream systems: telemetry { ... } log_level = "info" api_addr = "https://IPADDRESS:8200" ui = true cluster_name = "my_cluster" -
After Vault is running, use the UI to configure:
- Secrets Engine
- Authentication Methods
- Audit Devices
- Policies
- Entities & Groups
VAULT_TOKEN from unseal
Save the unseal key response and an initial root token to set the “VAULT_TOKEN” environment variable, using the initial root token that the “init” command returned:
export VAULT_TOKEN="$root_token"
-
Unseal Vault server, providing the unseal key that the “init” command returned:
vault operator unseal
This returns the status of the server as “Initialized = true” and that “Sealed = false”.
-
Check the status of the Vault server:
vault status
If the response is “Sealed = true”, re-run the “vault operator unseal” command.
-
Log into the Vault UI with your root token. If you have problems, double-check that you ran all of the above commands.
-
Enable and use an instance of HashiCorp’s KV v2 Secrets engine (the default when running in dev mode): https://www.vaultproject.io/docs/secrets/kv/kv-v2/
vault secrets enable -version=2 kv
Alternately:
vault secrets enable kv-v2
-
Use the Userpass Auth Method - Enable and use the userpass authentication method.
-
Use Vault Policies - Use Vault policies to grant different users access to different secrets. “Least privilege” correspond to HTTP verbs:
path "secret/dev/team-1/*" {
capabilities = ["create", "read", "list", "update", "delete"]
}
Using Vaultenv with GitHub
https://github.com/channable/vaultenv populates values in OS environment variables referenced within programming code by making a syscall from the exec family. Vaultenv replaces its own process with your app. After your service has started, vaultenv does not run anymore.
Vaultenv retrieves secrets using REST API calls of KV (Key Value) pairs based on “behavior configuration files” specified in the following files traveling with the programming code:
- $CWD/.env (as popularized by Ruby gems)
- /etc/vaultenv.conf
- $HOME/.config/vaultenv/vaultenv.conf
CAUTION: When secrets in Vault change, Vaultenv does not automatically restart services. By comparison, envconsul from HashiCorp (also describe here), daemonizes and spawns child processes to manage the lifecycle of the process it provides secrets.
Within its configuration file, secrets are requested based on a specification of secrets to be fetched from HashiCorp Vault, such as this requesting the api-key field of the secret at secret/production/third-party.
production/third-party#api-key
The utility is written in the Haskell language under a 3-clause BSD license and releases run on Linux (has not been tested on any other platform, such as macOS).
Option D: Install Server binaries
Precompiled Vault binaries are available at https://releases.hashicorp.com/vault
PROTIP: Enterprise and free versions have different binaries. Paid Enterprise editions include Read Replicas and Replication for DR, plus MFA, Sentinel, and HSM Auto-Unseal with FIPS 140-2 & Seal Wrap. A system service file is needed for prod instances.
PROTIP: Vault has a single program file for server and client.
There are several ways to obtain a running instance of HashiCorp Vault, listed from easiest to most difficult:
CAUTION: If you are in a large enterprise, confer with your security team before installing. They often have a repository such as Artifactory or Nexus where installers are available after being vetted and perhaps patched for security vulnerabilities.
See https://github.com/hashicorp/vault-guides and https://devopstales.github.io/linux/hashicorp-vault/
- Azure Vault (https://jpvelasco.com/test-driving-the-azure-key-vault-client-samples/)
B. Install the Vault client locally on MacOS using a license and GPG.
C. Pull an image from Docker Hub
D. Download from HashiCorp to install locally.
E. Use a Dockerfile to build your own Docker image. if you’re not using vault frequently, and want to get the latest when you do.
A. Vault Cloud service
Vault is an open source tool that can be deployed to any environment. It is well suited for cloud environments where HSMs are either not available or are cost prohibitive.
-
Create within your internal cloud, Google Cloud, Amazon EC2, Microsoft Azure, etc. a VM instance of an Ubuntu server. 4 GB RAM and 10 GB drive is the minimum.
A sample command to create a Google Cloud instance:
THIS_PROJECT_NAME="woohoo1"
THIS_INSTANCE_NAME="wildone"
GCP_ACCT="mememe"
gcloud beta compute --project "${THIS_PROJECT_NAME}" instances create "${THIS_INSTANCE_NAME}" --zone "us-central1-f" --machine-type "n1-standard-1" --subnet "default" --maintenance-policy "MIGRATE" --service-account "{$GCP_ACCT}@developer.gserviceaccount.com" --scopes "https://www.googleapis.com/auth/devstorage.read_only","https://www.googleapis.com/auth/logging.write","https://www.googleapis.com/auth/monitoring.write","https://www.googleapis.com/auth/servicecontrol","https://www.googleapis.com/auth/service.management.readonly","https://www.googleapis.com/auth/trace.append" --min-cpu-platform "Automatic" --tags "http","https","web","http-server","https-server" --image "ubuntu-1604-xenial-v20171026a" --image-project "ubuntu-os-cloud" --boot-disk-size "10" --boot-disk-type "pd-standard" --boot-disk-device-name "${THIS_INSTANCE_NAME}"
Option C: Docker Compose of Vault server
brew install docker
brew install docker-compose  # now a plug-in to docker
cd; mkdir -p projects/vault; cd ~/projects/vault
git clone https://github.com/ryanhartje/containers.git
cd containers/consul-vault/
docker-compose up -d
HashiCups
Here I have for you an experience of how we, as a DevOps engineer, can improve the secrets management posture of a fictitious company called “HashiCups, Inc.”.
manages secrets while moving to the cloud. by adopting HashiCorp Vault to centralize secrets to access data in git repos, shared mounts, and spreadsheets. Following this hands-on Instruqt class:
-
Start by using vault login (as root token), list secrets. Among the types of secrets is “kv” (for KeyValue), so read a path:
vault read kv/db/postgres/product-db-creds
https://www.vaultproject.io/docs/auth/kubernetes/
-
Migrate a shared secret (to access a database) from a shared NFS mount to Vault within Kubernetes:
vault kv put kv/db/postgres/product-db-creds \
  username="postgres" \
  password="password"
https://www.vaultproject.io/docs/platform/k8s/injector/
-
Use ACLs to restrict Access to only specific identities accessing the kv/database path. Each policy is in a different file:
products-api has read-only:
path "kv/db/postgres/product-db-creds" {
  capabilities = ["read"]
}
dba-operator of customer Profile database:
path "kv/db/*" {
  capabilities = ["list", "read", "create", "update"]
}
Run:
vault policy write dba-operator policies/dba-operator-policy.hcl
-
Enable and create static username with password:
vault auth enable userpass
vault write auth/userpass/users/dba-dan password=dba-dan policies=dba-operator
Login as that user:
unset VAULT_TOKEN
vault login -method=userpass username=dba-dan password=dba-dan
-
Generate dynamic secrets to a database instead of shared passwords.
vault secrets enable database
vault read kv/db/postgres/product-db-creds
export PG_HOST=$(kubectl get svc -l app=postgres -o=json | jq -r '.items[0].spec.clusterIP')
export PG_USER=postgres
export PG_PASS=password
vault write database/config/hashicups-pgsql \
 plugin_name=postgresql-database-plugin \
 allowed_roles="products-api" \
 connection_url="postgresql://:@$PG_HOST:5432/?sslmode=disable" \
 username=$PG_USER \
 password=$PG_PASS
vault write database/roles/products-api \
 db_name=hashicups-pgsql \
 creation_statements="CREATE ROLE \"\" WITH LOGIN PASSWORD '' VALID UNTIL '' SUPERUSER; \
 GRANT SELECT ON ALL TABLES IN SCHEMA public TO \"\";" \
 default_ttl="30m" \
 max_ttl="1h"
-
Verify by using username and password copied from response above:
vault read database/creds/products-api
psql -U GENERATED_USERNAME -h $PG_HOST products
Password for user ...
\q
-
Rotate root credentials:
vault write -force database/rotate-root/hashicups-pgsql
# Confirm can't access:
psql -U postgres -h $PG_HOST
# Delete old path:
vault kv delete kv/db/postgres/product-db-creds
kubectl delete deployment products-api-deployment
kubectl get deployment
-
Modify the “products-api.yml” Kubernetes deployment file to leverage the vault-k8s agent to inject secrets. It leverages the Kubernetes Mutating Admission Webhook to intercept and augment specifically annotated pod configuration for secret injection using Init and Sidecar containers.
That enables applications to not need to manage tokens, connect to an external API, or other mechanisms for direct interaction with Vault. App code only need to be concerned with specifying a path to find a secret.
sed -i 's/kv\/db\/postgres\/product-db-creds/database\/creds\/products-api/g' /root/k8s/products-api.yml
kubectl apply -f k8s/products-api.yml
yyy
B.a. Open Sourced Vault Install
-
Vault is open-sourced at
https://github.com/hashicorp/vault
with a marketing home page at
https://vaultproject.io. - In a Terminal…
-
See that there are several packages with the name “vault”:
brew search vault
Note there are several:
==> Formulae
==> Formulae
argocd-vault-plugin        ssh-vault                  vaulted
aws-vault                  vault ✔                    vultr
hashicorp/tap/vault ✔      vault-cli

==> Casks
aws-vault                  btcpayserver-vault         gmvault

If you meant "vault" specifically:
It was migrated from homebrew/cask to homebrew/core.
-
Verify the source:
brew info vault
At time of this writing:
vault: stable 1.9.4 (bottled), HEAD
Secures, stores, and tightly controls access to secrets
https://vaultproject.io/
/usr/local/Cellar/vault/1.9.2 (8 files, 178.7MB) *
  Poured from bottle on 2021-12-23 at 23:17:56
From: https://github.com/Homebrew/homebrew-core/blob/HEAD/Formula/vault.rb
License: MPL-2.0
==> Dependencies
Build: go ✘, gox ✘, node@14 ✘, yarn ✔
==> Options
--HEAD
 Install HEAD version
==> Caveats
To restart vault after an upgrade:
  brew services restart vault
Or, if you don't want/need a background service you can just run:
  /usr/local/opt/vault/bin/vault server -dev
==> Analytics
install: 11,140 (30 days), 32,117 (90 days), 122,131 (365 days)
install-on-request: 10,818 (30 days), 31,203 (90 days), 118,906 (365 days)
build-error: 2 (30 days)
Compare growth from a previous version:
vault: stable 1.9.2 (bottled), HEAD
...
install: 9,528 (30 days), 29,343 (90 days), 116,531 (365 days)
install-on-request: 9,273 (30 days), 28,580 (90 days), 113,456 (365 days)
build-error: 6 (30 days)
Notice from above that “Go” is a pre-requisite. So…
-
Install Vault client on MacOS using Homebrew:
brew install vault
vault 1.9.2 is already installed but outdated (so it will be upgraded).
==> Downloading https://ghcr.io/v2/homebrew/core/vault/manifests/1.9.4
######################################################################## 100.0%
==> Downloading https://ghcr.io/v2/homebrew/core/vault/blobs/sha256:0e71de8e8d51
==> Downloading from https://pkg-containers.githubusercontent.com/ghcr1/blobs/sh
######################################################################## 100.0%
==> Upgrading vault
  1.9.2 -> 1.9.4

==> Pouring vault--1.9.4.monterey.bottle.tar.gz
==> Caveats
To restart vault after an upgrade:
  brew services restart vault
Or, if you don't want/need a background service you can just run:
  /usr/local/opt/vault/bin/vault server -dev
==> Summary
🍺  /usr/local/Cellar/vault/1.9.4: 8 files, 179.4MB
==> Running `brew cleanup vault`...
Disable this behaviour by setting HOMEBREW_NO_INSTALL_CLEANUP.
Hide these hints with HOMEBREW_NO_ENV_HINTS (see `man brew`).
Removing: /usr/local/Cellar/vault/1.9.2... (8 files, 178.7MB)
Compare historically:
🍺  /usr/local/Cellar/vault/1.9.2: 8 files, 178.7MB
...
🍺  /usr/local/Cellar/vault/1.3.2: 6 files, 124.2MB
  Built from source on 2019-11-18 at 05:05:44
-
The great thing with Homebrew is you can upgrade and uninstall easily.
brew upgrade vault
- Verify install of Vault client.
B.b. Vault Enterprise client install
-
HashiCorp’s steps for installing Vault are at
-
Installers for a large number of operating systems are downloaded from HashiCorp’s website:
https://www.vaultproject.io/downloads.html
- vault_0.7.3_darwin_amd64.zip for Mac 64 expands to a vault app of 59.6 MB.
- vault_0.7.3_darwin_amd64.zip for Mac 64 expands to a vault app of 59.6 MB.
-
Verify the SHA256 hash to ensure that not a single bit was lost during download.
-
On a Mac, drag and drop the Vault.app file to your root Applications folder.
-
Set the PATH to Vault.
-
Double-click on the vault app.
If you get an error that the binary could not be found, then your PATH environment variable was not setup properly.
This automated script should install vault at version 0.1.2 into folder:
/opt/vault_0.1.2
(the current version for you will likely be different that 0.1.2).
The installer configures itself by default to listen on localhost port 8200, and registers it as a service called vault-server.
NOTE: Also found vault in chefdk/embedded/lib/ruby/gems/2.5.0/gems/train-1.5.6/lib/train/transports/clients/azure/vault.rb
-
To uninstall, move that folder to trash.
Verify Vault client install
No matter how it was installed:
-
Verify version
vault --version
At time of writing, the response now includes a date built:
Vault v1.12.0 (558abfa75702b5dab4c98e86b802fb9aef43b0eb), built 2022-10-10T18:14:33Z
Previously:
Vault v1.11.3 (17250b25303c6418c283c95b1d5a9c9f16174fe8), built 2022-08-26T10:27:10Z Vault v1.9.4 ('fcbe948b2542a13ee8036ad07dd8ebf8554f56cb+CHANGES') -
Is that really the latest release? View details on the History of releases on GitHub:
open https://github.com/hashicorp/vault/releases
-
Persist the version of Vault (such as “v1.12.0”) for use in commands by editing ~/.bash_profile or .zshrc:
export VAULT_VERSION="$( vault --version | awk '{print $2}' )" -
Verify location of the vault executable:
which vault
Result on ARM (Apple macOS):
/opt/homebrew/bin//vault
Result on Intel (Windows):
/usr/local/bin/vault
Run Vault in dev mode
-
vault server -dev
Sample response:
WARNING! dev mode is enabled! In this mode, Vault runs entirely in-memory
and starts unsealed with a single unseal key. The root token is already
authenticated to the CLI, so you can immediately begin using Vault.

You may need to set the following environment variable:

 $ export VAULT_ADDR='http://127.0.0.1:8200'

The unseal key and root token are displayed below in case you want to
seal/unseal the Vault or re-authenticate.

Unseal Key: qvAfCZEkFHS1dYYba8adz5wXHSQe1I9LjoHUbxCrEo4=
Root Token: s.dqqznrQAJNiLrU9mX3eT8q2p

Development mode should NOT be used in production installations!
REMEMBER: Like other programs run from a Terminal command, the session runs until you press control+C to stop it.
Alternately, if you want to configure the port used (instead of the default 8200):
vault server -dev -dev-listen-address=0.0.0.0:8300 \
-dev-root-token-id=root
Alternately, define complex parameters in a hcl file in the current folder:
vault server -config=config-file.hcl
Check Vault Seal Status
TODO: Run ps
-
Open a new Terminal session to verify whether Vault is sealed (from usage) or unsealed (default Sealed = false):
vault status
If the Vault service is not running, you’ll see:
Error checking seal status: Get "https://127.0.0.1:8200/v1/sys/seal-status": dial tcp 127.0.0.1:8200: connect: connection refused
If the Vault service is unsealed, the expected response is:
Key               Value
---                    -----
Recovery Seal Type     shamir
Initialized            true
S
/aled                  false
Total Recovery Shares  5
Threshold              3
Version                  1.9.4+ent
Storage Type             raft
Cluster Name             vault-cluster-ac95e06f
Cluster ID               30255f02-0dd4-cc7e-9bad-616790463be9
HA Enabled               true
HA Cluster               https://vault-server:8201
HA Mode                  active
Active Since             2022-06-19T16:49:41.486917632Z
Raft Committed Index     149
Raft Applied Index       149
Last WAL                 21
Shell scripts capture the above using:
RESPONSE=$( vault status )
-
In a browser, open the Vault UI:
http://127.0.0.1:8200
TODO: Show photo of UI here.
-
In a browser, open the web page URL:
http://127.0.0.1:8200/vault/init
If the server has not been unsealed (see below), the expected response is JSON: errors: []
-
In a browser, check Vault seal status:
https://127.0.0.1:8200/v1/sys/seal-status
Once you have Vault program installed:
Install Autocompletes
-
complete -C $( which vault )
vault -autocomplete-install
No message is returned. Otherwise, if already installed once (on a Mac):
Error executing CLI: 2 errors occurred:
 * already installed in /Users/wilsonmar/.bash_profile
 * already installed in /Users/wilsonmar/.zshrc
-
Use autocomplete by typing
vault kAuto-complete is working if you can press tab to complete:
vault kv
Basic Vault commands
-
See menu of commands by running the command without parameters:
vault
Response:
Usage: vault <command> [args]

Common commands:
 read        Read data and retrieves secrets
 write       Write data, configuration, and secrets
 delete      Delete secrets and configuration
 list        List data or secrets
 login       Authenticate locally
 agent       Start a Vault agent
 server      Start a Vault server
 status      Print seal and HA status
 unwrap      Unwrap a wrapped secret

Other commands:
 audit          Interact with audit devices
 auth           Interact with auth methods
 debug          Runs the debug command
 kv             Interact with Vault's Key-Value storage
 lease          Interact with leases
 monitor        Stream log messages from a Vault server
 namespace      Interact with namespaces
 operator       Perform operator-specific tasks
 path-help      Retrieve API help for paths
 plugin         Interact with Vault plugins and catalog
 policy         Interact with policies
 print          Prints runtime configurations
 secrets        Interact with secrets engines
 ssh            Initiate an SSH session
 token          Interact with tokens
NOTE: monitor was added recently.
Vault commands are described here online.
-
For documentation about subcommands:
vault secrets -h
Usage: vault secrets <subcommand> [options] [args]

  This command groups subcommands for interacting with Vault's secrets engines.
  Each secret engine behaves differently. Please see the documentation for
  more information.

  List all enabled secrets engines:

   $ vault secrets list

  Enable a new secrets engine:

   $ vault secrets enable database

  Please see the individual subcommand help for detailed usage information.

Subcommands:
 disable    Disable a secret engine
 enable     Enable a secrets engine
 list       List enabled secrets engines
 move       Move a secrets engine to a new path
 tune       Tune a secrets engine configuration
-
For documentation about subcommands:
vault read -h
-
Restart your Terminal.app (and provide password):
exec $SHELL
Stockyard
-
Using K3s from Rancher.com and Shipyard, VIDEO: Nic Jackson (HashiCorp Developer Evangelist) creates a Kubernetes cluster with Service Mesh and Consul within Docker on laptops:
curl https://shipyard.demo.gs/install.sh | bash
The above creates folder $HOME/.shipyard and put its binary file in /usr/local/bin, which you should have among values within your $PATH environment variable.
-
Bring up the Docker Decktop app and try again if you see:
docker: Cannot connect to the Docker daemon at unix:///var/run/docker.sock. Is the docker daemon running?.
See 'docker run --help'.
-
According to the docs at https://shipyard.demo.gs/, success is the creation of:
$HOME/.shipyard/shipyard/kubeconfig.yml
-
Alternately, to bring it up without Consul:
yard up --enable-consul false
BLAH: On my M1 Mac I get this, which keeps me from going further:
WARNING: The requested image's platform (linux/amd64) does not match the detected host platform (linux/arm64/v8) and no specific platform was requested
### Creating Kubernetes cluster, this process will take approximately 2 minutes
#### Create Kubernetes cluster in Docker using K3s
Otherwise:
     _______. __    __   __  .______   ____    ____  ___      .______       _______
 /       ||  |  |  | |  | |   _  \  \   \  /   / /   \     |   _  \     |       \
|   (----`|  |__|  | |  | |  |_)  |  \   \/   / /  ^  \    |  |_)  |    |  .--.  |
 \   \    |   __   | |  | |   ___/    \_    _/ /  /_\  \   |      /     |  |  |  |
.----)   |   |  |  |  | |  | |  |          |  |  /  _____  \  |  |\  \----.|  .--.  |
|_______/    |__|  |__| |__| | _|          |__| /__/     \__\ | _| `._____||_______/

Version: 0.7.0

## Creating K8s cluster in Docker and installing Consul
-
Tell the local kubectl to look for a Kubernetes cluster based on configurations in the file created by Shipyard:
export KUBECONFIG=$HOME/.shipyard/shipyard/kubeconfig.yml
-
VIDEO: Perform Kubernetes commands:
kubectl get pods
You should see two pods: vault-0 and vault-agent-injector.
-
When done, remove the Shipyard-created K8s cluster:
yard down
Enable Kubernetes Auth Method
- https://kubernetes.io/docs/reference/access-authn-authz/rbac/#default-roles-and-role-bindings
- https://developer.hashicorp.com/vault/tutorials/kubernetes/agent-kubernetes
-
On the Vault client, create the “vault-auth” service account to connect to the kubernetes cluster when validating JWT tokens:
kubectl create sa vault-auth
-
On the Vault client, apply ClusterRoleBinding :
kubectl apply -f vault/lab_k8s/k8s/vault-auth-cluster-role-binding.yml
--- apiVersion: rbac.authorization.k8s.io/v1beta1 kind: ClusterRoleBinding metadata: name: role-tokenreview-binding namespace: default roleRef: apiGroup: rbac.authorization.k8s.io kind: ClusterRole name: system:auth-delegator subjects: - kind: ServiceAccount name: vault-auth namespace: default -
Extract service account (sa):
export VAULT_SA_SECRET_NAME=$(kubectl get sa vault-auth -o jsonpath=”{.secrets[0][‘name’]}”) echo $VAULT_SA_SECRET_NAME
-
Extract SA_JWT_TOKEN
export SA_JWT_TOKEN=$(kubectl get secret $VAULT_SA_SECRET_NAME -o jsonpath=”{.data.token}” | base64 –decode; echo) echo $SA_JWT_TOKEN
-
Extract SA_CA_CRT
export SA_CA_CRT=$(kubectl get secret $VAULT_SA_SECRET_NAME -o jsonpath=”{.data[‘ca.crt’]}” | base64 –decode; echo) echo $SA_CA_CRT
-
Enable the authentication method:
vault auth enable kubernetes
-
Configure the method by writing to the config/ endpoint for the kubernetes method:
vault write auth/kubernetes/config
kubernetes_host=”$K8S_HOST”
token_reviewer_jwt=”$SA_JWT_TOKEN”
kubernetes_ca_cert=”$SA_CA_CRT”echo $K8S_HOST # (such as https://10.5.0.65:6443) setup as a part of the environment.
-
List https://kubernetes.io/docs/concepts/overview/working-with-objects/namespaces/
kubectl get namespaces
For example: ar-app and ap-app
-
List Kubernetes service accounts:
kubectl -n finance get sa kubectl -n it get sa
-
setup and configure a read and list only policy and role apps:
vault policy write finance-ar-app-read vault/lab_k8s/policy/finance/ar-app-vault-policy.hcl
path "k8s-secret/data/finance/ar-app/*" { capabilities = ["read", "list"] } -
Write/configure a role to link the policy to the SA in kubernetes:
vault write auth/kubernetes/role/finance-ar-app
bound_service_account_names=ar-app
bound_service_account_namespaces=finance
policies=finance-ar-app-read
ttl=24h -
Run scipt “vault/lab_k8s/scripts/k8s-vault-it.sh”
-
Push secrets to Vault:
echo "Enabling KV secret engine"
vault secrets enable -path k8s-secret kv-v2

echo "Pushing secrets to vault"
vault kv put k8s-secret/it/operations/config \
 ttl='30s' \
 username='operations' \
 password='operations-suP3rsec(et!'
-
Enable K8s ConfigMap to establish context:
kubectl -n it create configmap vault-agent-configs –from-file=vault/lab_k8s/k8s/k8sconfig/ kubectl -n finance create configmap vault-agent-configs –from-file=vault/lab_k8s/k8s/k8sconfig/
ConfigMaps
-
To define the context configuration for each application components within each Namespace:
kubectl -n "$THIS_NAMESPACE" create configmap vault-agent-configs \
--from-file=vault/lab_k8s/k8s/k8sconfig/
-
Use this pod template to create context with each namespace’s app entries:
#!/bin/bash cat > vault/lab_k8s/deployment/${NAMESPACE}/${APP}.yaml << EOL --- apiVersion: v1 kind: Pod metadata: name: vault-agent-${NAMESPACE}-${APP} spec: serviceAccountName: ${APP} restartPolicy: Never hostAliases: - ip: $VAULT_IP hostnames: - "vault-server" volumes: - name: vault-token emptyDir: medium: Memory - name: config configMap: name: vault-agent-configs items: - key: ${NAMESPACE}-${APP}-agent-config.hcl path: vault-agent-config.hcl - name: ca-pemstore configMap: name: ca-pemstore - name: shared-data emptyDir: {} containers: # Generic container run in the context of vault agent - name: vault-agent image: gcr.io/is-enablement/vault-agent:latest volumeMounts: - name: vault-token mountPath: /home/vault - name: config mountPath: /etc/vault - name: shared-data mountPath: /etc/secrets - name: ca-pemstore mountPath: /etc/ssl/certs/vault-client.pem subPath: vault-client.pem readOnly: false # This assumes Vault running on local host and K8s running in Minikube using VirtualBox env: - name: VAULT_ADDR value: ${VAULT_ADDR} - name: VAULT_K8S_AUTH_MOUNT value: kubernetes - name: VAULT_K8S_AUTH_ROLE value: ${NAMESPACE}-${APP} - name: LOG_LEVEL value: info - name: VAULT_CACERT value: /etc/ssl/certs/vault-client.pem # Run the Vault agent command: ["/bin/vault"] args: [ "agent", "-config=/etc/vault/vault-agent-config.hcl", "-log-level=debug", ] # Nginx container - name: nginx-container image: nginx ports: - containerPort: 80 volumeMounts: - name: shared-data mountPath: /usr/share/nginx/html EOL -
Get into the shell:
kubectl -n “${NAMESPACE}” exec -it vault-agent-finance-ar-app
–container nginx-container – bash -
Once in, see the updated password inserted in the file:
cat /usr/share/nginx/html/index.html
Health check
Vault servers have a health check API using port 8200, which is the default port for all Vault instances.
-
curl http://localhost:8200/v1/sys/health | jq
Example response for a dev cluster:
% Total % Received % Xferd Average Speed Time Time Time Current Dload Upload Total Spent Left Speed 100 294 100 294 0 0 113k 0 --:--:-- --:--:-- --:--:-- 143k { "initialized": true, "sealed": false, "standby": false, "performance_standby": false, "replication_performance_mode": "disabled", "replication_dr_mode": "disabled", "server_time_utc": 1665596227, "version": "1.9.2", "cluster_name": "vault-cluster-65afdb12", "cluster_id": "8a06df9e-17c3-3f30-9c5f-b3b0be95067e" } -
To convert Linux UTC Epoch server time stamp number to your local time, try this website:
https://www.epochconverter.com
ssh into Vault
ssh -i vault.pem ubuntu@$vault_server_ip
-
Initialize server:
curl --silent \
--request PUT \
--data '{"secret_shares": 1, "secret_threshold": 1}' \
${VAULT_ADDR}/v1/sys/init | tee \
>(jq -r .root_token > /home/ubuntu/vault-chef-approle-demo/root-token) \
>(jq -r .keys[0] > /home/ubuntu/vault-chef-approle-demo/unseal-key)
Unseal
-
Unseal:
vault operator unseal $(cat /home/ubuntu/vault-chef-approle-demo/unseal-key)
-
Export vault token:
export VAULT_TOKEN=$(cat /home/ubuntu/vault-chef-approle-demo/root-token) echo “export VAULT_TOKEN=$(cat /home/ubuntu/vault-chef-approle-demo/root-token)” » /home/ubuntu/.bashrc
AppRole Auth Method
- Within the Vault server
- At the /home/ubuntu directory from which Vault commands are run.
-
File app-1-secret-read.hcl gives any Vault token assigned this policy the ability to read the secret/app-1 secret from Vault’s KV secrets engine:
path "secret/app-1" { capabilities = ["read", "list"] } -
Register policy with Vault:
vault policy write app-1-secret-read app-1-secret-read.hcl
Success! Uploaded policy: app-1-secret-read
-
Enable and Configure the AppRole Auth Method
vault auth enable -description=”AppRole auth method” approle
Success! Enabled approle auth method at: approle/
-
configure a role for the AppRole auth method:
vault write auth/approle/role/app-1 policies=”app-1-secret-read” token_ttl=”10m” token_max_ttl=”30m”
Success! Data written to: auth/approle/role/app-1
REMEMBER: Vault tokens obtained by the app after authenticating are initially be valid for 10 minutes but can be renewed for a total life of 30 minutes.
Configure Vault
- VIDEO: HashiCorp Vault on Azure [13:24] by Yoko Hyakuna.
- https://github.com/Voronenko/hashi_vault_utils
provides command scripts and commentary.
A sample config-file.hcl contains:
ui = true
   disable_mlock = true

   # use the file backend
   storage "file {
      path = "data"
   }
   listener "tcp" {
      address = "0.0.0.0:8200"
      tls_disable = 1
   }
VIDEO: How does Vault encrypt data?
Manage secrets within Vault
-
List a secret
curl --header "X-Vault-Token: root" \
http://localhost:8200/v1/secret/data/my-first-secret | jq
Vault kv store commands
PROTIP: https://www.vaultproject.io/docs/commands/index.html
VIDEO: HashiCorp Vault Http API - Create and get secrets with curl (aweful drawings)
If a Vault server is operational:
-
Add a key:
vault kv put hello/api username=john
If Vault is not running, you’ll see a response such as this:
Error making API request.

URL: GET https://vault.whatever-engine.com:8200/v1/sys/internal/ui/mounts/hello/api
Code: 503. Raw Message:

<html>
<head><title>503 Service Temporarily Unavailable</title></head>
<body>
<center><h1>503 Service Temporarily Unavailable</h1></center>
</body>
</html>
-
List keys and values:
vault kv list hello
-
Retrieve a keys and values:
vault kv get hello/api
-
Delete a key’s metadata:
vault kv metadata delete hello/api
-
Delete a key:
vault kv delete hello/api
Vault secret engine commands
-
Enable the AWS secrets engine:
vault secrets enable aws
The expected response:
Success! Enabled the aws secrets engine at: aws/
See https://www.vaultproject.io/docs/secrets/kv/kv-v2/
-
Enable for writing the root account within the AWS secrets engine in the CLI:
vault write aws/config/root \
 access_key=1234567890abcdefg \
 secret_key=... \
 region=us-east-1
-
List secrets stored:
vault secrets list
Consul
BLOG: To use Consul as the storage backend, download and install it on each node in the cluster, along with these different stanzas:
storage "consul" {
   address = "127.0.0.1:8500"
   path = "vault/"
}
listener "tcp" {
   address = "0.0.0.0:8200"
   cluster_address = "0.0.0.:8201"
   tls_cert_file = "/etc/certs/"
   tls_cert_key = "/etc/certs/vaultkey"
}
seal "awskms" {
   region = "us-east-1"
   kms_key_id = "f3459282-439a-b233-e210-3487b77c7e2"
}
api_addr = "https://10.0.0.10:8200"
ui = true
cluster_name = "my_cluster"
log_level = "info"
Build Docker image using Dockerfile
Create Vault within a Docker image from scratch:
https://computingforgeeks.com/install-and-configure-vault-server-linux/
-
Install Git in the Linux server:
apt-get update && apt-get install -y \
  git
https://www.linuxuprising.com/2021/01/apt-key-is-deprecated-how-to-add.html
-
Use Git to obtain the Dockerfile based on the Spring Cloud Vault sample app
git clone https://github.com/???/vault.git --depth=1
cd vault
-
Create a docker image locally:
sudo docker build -f Dockerfile -t demo:vault .
This would run Maven, and a test job.
If you get a message: “unable to prepare context: unable to evaluate symlinks in Dockerfile path: lstat /Users/…/projects/vault/Dockerfile: no such file or directory
-
Run the Dockerfile at:
https://raw.githubusercontent.com/???/Vault/master/Dockerfile
Its contains:
FROM ubuntu:16.04
RUN apt-get update
RUN apt-get update && apt-get install -y \
  default-jre \
  default-jdk \
  git \
  maven

RUN mvn -version
RUN git clone https://github.com/hashicorp/vault???.git --depth=1
The above provides commands to install Vault within a blank Docker container.
Vault-jvm/examples/sample-appis a simple sample app, which is replaced with a real app in the real world.
C. Use Docker image
From https://www.vaultproject.io/docs/concepts/pgp-gpg-keybase Since Vault 0.3, Vault can be initialized using PGP keys. In this mode, Vault will generate the unseal keys and then immediately encrypt them using the given users’ public PGP keys. Only the owner of the corresponding private key is then able to decrypt the value, revealing the plain-text unseal key.
First, create, acquire, or import the appropriate key(s) onto the local machine from which you are initializing Vault.
On a macOS:
-
Add Docker’s public GPG key for the Trusty version:
sudo apt-get install -y \
xserver-xorg-lts-trusty libgl1-mesa-glx-lts-trusty
On a Linux server instance’s Terminal CLI:
-
Add Docker’s public GPG key for the Trusty version:
curl -fsSL https://download.docker.com/linux/ubuntu/gpg | sudo apt-key add -
</strong>
OK is the expected response.
-
View the Linux version code referenced in a later command:
lsb_release -cs
This returns stretch for Debinan and xenial for Ubuntu.
-
Install Docker for Ubuntu (not Debian):
sudo add-apt-repository "deb [arch=amd64] https://download.docker.com/linux/ubuntu $(lsb_release -cs) stable"
-
Update repository:
sudo apt-get update
-
List policies:
apt-cache policy docker-ce
The response:
docker-ce: Installed: (none) Candidate: 17.09.0~ce-0~ubuntu Version table: 17.09.0~ce-0~ubuntu 500 500 https://download.docker.com/linux/ubuntu xenial/stable amd64 Packages 17.06.2~ce-0~ubuntu 500 500 https://download.docker.com/linux/ubuntu xenial/stable amd64 Packages 17.06.1~ce-0~ubuntu 500 500 https://download.docker.com/linux/ubuntu xenial/stable amd64 Packages 17.06.0~ce-0~ubuntu 500 500 https://download.docker.com/linux/ubuntu xenial/stable amd64 Packages 17.03.2~ce-0~ubuntu-xenial 500 500 https://download.docker.com/linux/ubuntu xenial/stable amd64 Packages 17.03.1~ce-0~ubuntu-xenial 500 500 https://download.docker.com/linux/ubuntu xenial/stable amd64 Packages 17.03.0~ce-0~ubuntu-xenial 500 500 https://download.docker.com/linux/ubuntu xenial/stable amd64 Packages -
Install Docker Community Edition:
sudo apt-get install -y docker-ce
Sample response:
Reading package lists... Done
Building dependency tree
Reading state information... Done
The following additional packages will be installed:
  aufs-tools cgroupfs-mount libltdl7
Suggested packages:
  mountall
The following NEW packages will be installed:
  aufs-tools cgroupfs-mount docker-ce libltdl7
0 upgraded, 4 newly installed, 0 to remove and 17 not upgraded.
Need to get 21.2 MB of archives.
After this operation, 100 MB of additional disk space will be used.
Get:1 http://us-central1.gce.archive.ubuntu.com/ubuntu xenial/universe amd64 aufs-tools amd64 1:3.2+20130722-1.1ubuntu1 [92.9 kB]
Get:2 http://us-central1.gce.archive.ubuntu.com/ubuntu xenial/universe amd64 cgroupfs-mount all 1.2 [4,970 B]
Get:3 http://us-central1.gce.archive.ubuntu.com/ubuntu xenial/main amd64 libltdl7 amd64 2.4.6-0.1 [38.3 kB]
Get:4 https://download.docker.com/linux/ubuntu xenial/stable amd64 docker-ce amd64 17.09.0~ce-0~ubuntu [21.0 MB]
Fetched 21.2 MB in 0s (22.7 MB/s)
Selecting previously unselected package aufs-tools.
(Reading database ... 66551 files and directories currently installed.)
Preparing to unpack .../aufs-tools_1%3a3.2+20130722-1.1ubuntu1_amd64.deb ...
Unpacking aufs-tools (1:3.2+20130722-1.1ubuntu1) ...
Selecting previously unselected package cgroupfs-mount.
Preparing to unpack .../cgroupfs-mount_1.2_all.deb ...
Unpacking cgroupfs-mount (1.2) ...
Selecting previously unselected package libltdl7:amd64.
Preparing to unpack .../libltdl7_2.4.6-0.1_amd64.deb ...
Unpacking libltdl7:amd64 (2.4.6-0.1) ...
Selecting previously unselected package docker-ce.
Preparing to unpack .../docker-ce_17.09.0~ce-0~ubuntu_amd64.deb ...
Unpacking docker-ce (17.09.0~ce-0~ubuntu) ...
Processing triggers for libc-bin (2.23-0ubuntu9) ...
Processing triggers for man-db (2.7.5-1) ...
Processing triggers for ureadahead (0.100.0-19) ...
Processing triggers for systemd (229-4ubuntu20) ...
Setting up aufs-tools (1:3.2+20130722-1.1ubuntu1) ...
Setting up cgroupfs-mount (1.2) ...
Setting up libltdl7:amd64 (2.4.6-0.1) ...
Setting up docker-ce (17.09.0~ce-0~ubuntu) ...
Processing triggers for libc-bin (2.23-0ubuntu9) ...
Processing triggers for systemd (229-4ubuntu20) ...
Processing triggers for ureadahead (0.100.0-19) ...
-
List Docker container status:
sudo systemctl status docker
The response:
● docker.service - Docker Application Container Engine Loaded: loaded (/lib/systemd/system/docker.service; enabled; vendor preset: enabled) Active: active (running) since Sat 2017-11-04 22:00:35 UTC; 1min 28s ago Docs: https://docs.docker.com Main PID: 13524 (dockerd) CGroup: /system.slice/docker.service ├─13524 /usr/bin/dockerd -H fd:// └─13544 docker-containerd -l unix:///var/run/docker/libcontainerd/docker-containerd.sock --metrics-interval=0 --start-timeout Nov 04 22:00:34 vault-1 dockerd[13524]: time="2017-11-04T22:00:34.552925012Z" level=warning msg="Your kernel does not support swap me Nov 04 22:00:34 vault-1 dockerd[13524]: time="2017-11-04T22:00:34.553123462Z" level=warning msg="Your kernel does not support cgroup Nov 04 22:00:34 vault-1 dockerd[13524]: time="2017-11-04T22:00:34.553267498Z" level=warning msg="Your kernel does not support cgroup Nov 04 22:00:34 vault-1 dockerd[13524]: time="2017-11-04T22:00:34.554662024Z" level=info msg="Loading containers: start." Nov 04 22:00:34 vault-1 dockerd[13524]: time="2017-11-04T22:00:34.973517284Z" level=info msg="Default bridge (docker0) is assigned wi Nov 04 22:00:35 vault-1 dockerd[13524]: time="2017-11-04T22:00:35.019418706Z" level=info msg="Loading containers: done." Nov 04 22:00:35 vault-1 dockerd[13524]: time="2017-11-04T22:00:35.029599857Z" level=info msg="Docker daemon" commit=afdb6d4 graphdriv Nov 04 22:00:35 vault-1 dockerd[13524]: time="2017-11-04T22:00:35.029962340Z" level=info msg="Daemon has completed initialization" Nov 04 22:00:35 vault-1 systemd[1]: Started Docker Application Container Engine. Nov 04 22:00:35 vault-1 dockerd[13524]: time="2017-11-04T22:00:35.054191848Z" level=info msg="API listen on /var/run/docker.sock" log files: -
Verify Docker version in case you need to troubleshoot:
docker --version
The response at time of writing:
Docker version 20.10.11, build dea9396
-
Start the Docker daemon
-
Download the Docker image maintained by HashiCorp at https://hub.docker.com/_/vault
docker pull vault
NOTE: If you see “Cannot connect to the Docker daemon at unix:///var/run/docker.sock. Is the docker daemon running?” start the Docker daemon, then try again.
Alternate Docker images
https://hub.docker.com/r/sjourdan/vault has HashiCorp Vault on a minimal Alpine Linux box
https://hub.docker.com/r/kintoandar/hashicorp-vault has HashiCorp Vault on a tiny busybox
-
Set environment variables so IP addresses used for the redirect and cluster addresses in Vault’s configuration is the address of the named interface inside the container (e.g. eth0):
VAULT_REDIRECT_INTERFACE
VAULT_CLUSTER_INTERFACE
-
Run the image using the file storage backend at path /vault/file, with a default secret lease duration of one week and a maximum of (720h/24) 30 days:
docker run --cap-add=IPC_LOCK -e 'VAULT_LOCAL_CONFIG={"backend": {"file": {"path": "/vault/file"}}, "default_lease_ttl": "168h", "max_lease_ttl": "720h"}' vault server--cap-add=IPC_LOCK:locks memory, which prevents it from being swapped to disk (and thus exposing keys).See https://www.vaultproject.io/docs/config/index.html
NOTE: At startup, the server reads .hcl and .json configuration files from the /vault/config folder. Information passed into VAULT_LOCAL_CONFIG is written into local.json in this directory and read as part of reading the directory for configuration files.
-
Start Consul container with web ui on default port 8500:
docker run -p 8400:8400 -p 8500:8500 -p 8600:53/udp \
 --hostname consul \
 --name consul progrium/consul \
 -server -bootstrap -ui-dir /ui
Journaling
Show that secrets are not displayed when using Azure Keyvault:
sudo journalctl -u
Restart Vault on Linux
-
Restart Vault (provide password):
sudo systemctl restart vault
Unsealing
When a Vault server is started, it starts in a sealed state.
No operations are possible with a Vault that is sealed.
Unsealing is the process of constructing the master key needed to read encryption key to encrypt data and decryption key used to decrypt data.
PROTIP: Decryption keys are stored with data, in a form encrypted by a master key.
[3:36] Vault splits the master key into 5 to 10 chars for that many different trusted people to see a different portion. This is so that all those same people would provide their portion when the master is needed again. CAUTION: The master key should not be stored anywhere but in memory.
Alternately, sealing can be done by auto-unseal by using a cloud key from Azure Key Vault, such as this example stanza:
seal "azurekeyvault" {
      tenant_id     = "12345678-1234-1234-1234-1234567890"
      client_id     = "12345678-1234-1234-1234-1234567890"
      client_secret = "DDOU..."
      vault_name    = "hc-vault"
      key_name      = "vault_key"
   }
./vault_ unseal af29615803fc23334c3a93f8ad58353b587f50eb0399d23a6950721cbae94948
The response confirms:
Sealed: false
Key Shares: 1
Key Threshold: 1
Unseal Progress: 0
Shamir refers to the Shamir secret sharing algorithm defined at: https://en.wikipedia.org/wiki/Shamir%27s_Secret_Sharing
Higher Key Threshold values would require more key holders to perform unseal with their parts of the key. This provides an additional level of security for accessing data.
Re-Sealing Vault server
In case of an emergency, such as:
-
If a secret stored in Vault is leaked - a new secret should be generated and replaced in Vault, with a key rotation following.
-
If vault user credentials are leaked - the user credentials should be revoked and a key rotation should be performed.
-
If vault unseal keys are leaked - a rekey should be performed.
To prevent any actions or requests to be performed against the Vault server, it should be sealed immediately.
To seal the Vault server:
vault seal
This buys time to investigate the cause of the issue and to find an appropriate solution.
Vault Principals
Generate principal
-
Using Azure to obtain a lease:
vault read azure/cred/reader-role
Notice “lease_duration”.
The lease can be renewed by running the command again.
PROTIP: This should be in a script that incorporates other revocations when someone leaves an organization.
Revoke a lease
To revoke a lease on Azure:
vault lease revoke -prefix azure/creds/reader-role
Vault on AWS
There are several options for hosting Vault within the Amazon cloud.
https://aws.amazon.com/quickstart/architecture/vault describes “A unified interface to manage and encrypt secrets on the AWS Cloud”.

Option E: Install Vault within AWS EKS cluster
HashiCorp’s Helm chart to setup Vault in Kubernetes
https://www.vaultproject.io/docs/platform/k8s/helm
$HOME/Library/Python/3.7/lib/python/site-packages/ansible/modules/cloud/amazon contains templates to add monitoring/Observability, SIEM, etc.
Authorization
To continue working with Vault:
-
Identify yourself by providing the initial root token using the auth command, such as:
./vault_ auth 98df443c-65ee-d843-7f4b-9af8c426128a
The expected successful response:
Successfully authenticated! The policies that are associated
with this token are listed below:

root
The Access Control policy named “root” policy gives “superuser” level access to everything in Vault.
As we plan to store secrets for multiple projects, we should be able to clearly separate access to secrets that belong to different projects. And this is where policies do their job.
Policies in Vault are formatted with HCL, a human-readable configuration format. It is also JSON-compatible. An example policy is shown below:
path "secret/project/name" {
  policy = "read"
}
Jenkins plug-in
https://github.com/jenkinsci/hashicorp-vault-plugin is a Jenkins plug-in to establish a build wrapper to populate environment variables from secrets stored in HashiCorp’s Vault. It uses the “App Role” authentication backend which HashiCorp explicitly recommends for machine-to-machine authentication.
The plug-in allows use of a GitHub/GitLab personal access token Github Access Token (https://github.com/blog/1509-personal-api-tokens)
Alternately, a Vault Token - either configured directly in Jenkins or read from an arbitrary file on the Jenkins Machine.
An example in Java is with Java
??? Vault Token Credential, just that the token is read from a file on your Jenkins Machine. You can use this in combination with a script that periodically refreshes your token.
See https://github.com/amarruedo/hashicorp-vault-jenkins
GitHub Token
vault auth -method=github token=GITHUB_ACCESS_TOKEN
Upon success, a Vault token will be stored at $HOME/.vault-token.
vault list secret/path/to/bucket
This uses the token at $HOME/.vault-token if it exists.
See http://chairnerd.seatgeek.com/practical-vault-usage/
https://www.vaultproject.io/intro/getting-started/deploy.html
Handling secrets in CLI
-
As a demonstration, store the secret value “Pa$$word321” named “donttell”:
vault write secret/donttell value=Pa$$word321 excited=yes
REMEMBER: secret/ prefix to a secret value is necessary, and without double-quotes.
Because commands are stored in shell history, it’s preferred to use files when handling secrets.
-
Retrieve the secret just added:
vault read secrets/apps/web/username
vault read secrets/apps/portal/username
vault read secrets/common/api_key
vault read secret/donttell
The response, for example:
Key                 Value
---                 -----
refresh_interval    768h0m0s
excited             yes
value               Pa$$word321
-
Output a secret into a JSON file:
vault read -format=json secret/donttel
{ "request_id": "68315073-6658-e3ff-2da7-67939fb91bbd", "lease_id": "", "lease_duration": 2764800, "renewable": false, "data": { "excited": "yes", "value": "Pa$$word321" }, "warnings": null } -
Delete a secret:
vault delete secret/donttel
Success! Deleted 'secret/donttel' if it existed.
Rekey
Vault’s rekey command allows for the recreation of unseal keys as well as changing the number of key shares and key threshold. This is useful for adding or removing Vault admins.
Vault’s rotate command is used to change the encryption key used by Vault. This does not require anything other than a root token. Vault will continue to stay online and responsive during a rotate operation.
Store and access secrets within a program
Use libraries for:
- Python
- C#
- Java
- Node JavaScript
- Golang
Several Vault clients have been written.
Vault
https://holdmybeersecurity.com/2020/11/24/integrating-vault-secrets-into-jupyter-notebooks-for-incident-response-and-threat-hunting/
Vault CLI Katakoda hands-on lab
Migrated to Killercoda? The hands-on Katakoda lab Store Secrets using HashiCorp Vault makes use of a vault.hcl file:
backend "consul" {
  address = "consul:8500"
  advertise_addr = "consul:8300"
  scheme = "http"
}
listener "tcp" {
  address = "0.0.0.0:8200"
  tls_disable = 1
}
disable_mlock = true
It specifies Consul as the backend to store secrets. Consul runs in HA mode. scheme = “http” should be set to scheme = “https” (use TLS) in production. 0.0.0.0 binds Vault to listen on all IP addresses.
-
The vault.hcl file is processed by:
docker create -v /config --name config busybox; docker cp vault.hcl config:/config/;bc973810b4bb77788b37d269b669ba9559a001c5dab7da557c887f7de024d2f0
-
Launch a single Consul agent:
docker run -d --name consul \
  -p 8500:8500 \
  consul:v0.6.4 \
  agent -dev -client=0.0.0.0 \
  9b21b47f350931081232d4730341c1221bc086d5bb581bdf06992a334a0c51bf
In production, we’d want to have a cluster of 3 or 5 agents as a single node can lead to data loss.
-
Launch a single vault-dev container:
docker run -d --name vault-dev \
--link consul:consul \
-p 8200:8200 \
--volumes-from config \
cgswong/vault:0.5.3 server -config=/config/vault.hcl
71f518bb3165313a1e8e8d809e44b0a251dd7c138c5f045d634bae34439d1af7
PROTIP: Volumes are used to hold data.
-
Create an alias “vault” to proxy commands to vault to the Docker container.
alias vault='docker exec -it vault-dev vault "$@"'
export VAULT_ADDR=http://127.0.0.1:8200
-
Initialise the vault so keys go into file keys.txt:
vault init -address=${VAULT_ADDR} > keys.txt
cat keys.txt
Golang
https://github.com/Omar-Khawaja/vault-example/blob/master/main.go
package main

import (
	"fmt"
	"github.com/hashicorp/vault/api"
	"os"
)

var token = os.Getenv("TOKEN")
var vault_addr = os.Getenv("VAULT_ADDR")

func main() {
	config := &api.Config{
		Address: vault_addr,
	}
	client, err := api.NewClient(config)
	if err != nil {
		fmt.Println(err)
		return
	}
	client.SetToken(token)
	c := client.Logical()
	secret, err := c.Read("secret/data/foo")
	if err != nil {
		fmt.Println(err)
		return
	}
	m := secret.Data["data"].(map[string]interface{})
	fmt.Println(m["hello"])
}
CA for SSH
Vault can serve as a Root or Intermediate Certificate Authority.
References
“How to Install Vault” on CodeMentor
github.com/dandb/jenkins-provining
VIDEO by Damien Roche at Dun & Bradstreet on 30 April 2017
Kubernetes: Up & Integrated — Secrets & Configuration
by Tristan Colgate-McFarlane

https://www.joyent.com/blog/secrets-management-in-the-autopilotpattern Vault provides encryption at rest for secrets, encrypted communication of those secrets to clients, and role-based access control and auditability for secrets. And it does so while allowing for high-availability configuration with a straightforward single-binary deployment. See the Vault documentation for details on their security and threat model. – See https://www.vaultproject.io/docs/internals/security.html
Vault uses Shamir’s Secret Sharing to control access to the “first secret” that we use as the root of all other secrets. A master key is generated automatically and broken into multiple shards. A configurable threshold of k shards is required to unseal a Vault with n shards in total.
namic Credentials and Encryption as a data service, and “Policy as Code” vs “Secrets as Code.”
VIDEO COURSE: Getting Started with HashiCorp Vault by Bryan Krausen (@btkrausen)
Database
https://play.instruqt.com/hashicorp/tracks/vault-dynamic-database-credentials
https://www.vaultproject.io/docs/secrets/databases/
https://www.vaultproject.io/docs/secrets/databases/mysql-maria/
-
See whether “Type” of secrets engines “database” are enabled:
vault secrets list
-
Enable the Database secrets engine on the Vault server.
vault secrets enable -path=lob_a/workshop/database database
The expected response include “Success! Enabled the database secrets engine at: lob_a/workshop/database/
Vault’s Database secrets engine dynamically generates credentials (username and password) for many databases.
Configure the database secrets engine you enabled (above) on the path lob_a/workshop/database to work with the local instance of the MySQL database. Use a specific path rather than the default “database” to illustrate that multiple instances of the database secrets engine could be configured for different lines of business that might each have multiple databases.
-
Configure the Database Secrets Engine on the Vault server.
All secrets engines must be configured before they can be used.
We first need to configure the database secrets engine to use the MySQL database plugin and valid connection information. We are configuring a database connection called “wsmysqldatabase” that is allowed to use two roles that we will create below.
vault write lob_a/workshop/database/config/wsmysqldatabase \
  plugin_name=mysql-database-plugin \
  connection_url=":@tcp(localhost:3306)/" \
  allowed_roles="workshop-app","workshop-app-long" \
  username="hashicorp" \
  password="Password123"
This will not return anything if successful.
Note that the username and password are templated in the “connection_url” string, getting their values from the “username” and “password” fields. We do this so that reading the path “lob_a/workshop/database/config/wsmysqldatabase” will not show them.
To test this, try running this command:
vault read lob_a/workshop/database/config/wsmysqldatabase
ey                                   Value
---                                   -----
allowed_roles                         [workshop-app workshop-app-long]
connection_details                    map[connection_url::@tcp(localhost:3306)/ username:hashicorp]
plugin_name                           mysql-database-plugin
root_credentials_rotate_statements    []
You will not see the username and password.
We used the initial MySQL username “hashicorp” and password “Password123” above. Validate that you can login to the MySQL server with this command:
mysql -u hashicorp -pPassword123
You should be given a mysql> prompt.
Logout of the MySQL server by typing \q at the mysql> prompt. This should return you to the root@vault-mysql-server:~# prompt.
We can make the configuration of the database secrets engine even more secure by rotating the root credentials (actually just the password) that we passed into the configuration. We do this by running this command:
vault write -force lob_a/workshop/database/rotate-root/wsmysqldatabase
This should return “Success! Data written to: lob_a/workshop/database/rotate-root/wsmysqldatabase”.
Now, if you try to login to the MySQL server with the same command given above, it should fail and give you the message “ERROR 1045 (28000): Access denied for user ‘hashicorp’@’localhost’ (using password: YES)”. Please verify that:
mysql -u hashicorp -pPassword123
Note: You should not use the actual root user of the MySQL database (despite the reference to “root credentials”); instead, create a separate user with sufficient privileges to create users and to change its own password.
Now, you should create the first of the two roles we will be using, “workshop-app-long”, which generates credentials with an initial lease of 1 hour that can be renewed for up to 24 hours.
vault write lob_a/workshop/database/roles/workshop-app-long \
  db_name=wsmysqldatabase \
  creation_statements="CREATE USER ''@'%' IDENTIFIED BY '';GRANT ALL ON my_app.* TO ''@'%';" \
  default_ttl="1h" \
  max_ttl="24h"
This should return “Success! Data written to: lob_a/workshop/database/roles/workshop-app-long”.
And then create the second role, “workshop-app” which has shorter default and max leases of 3 minutes and 6 minutes. (These are intentionally set long enough so that you can use the credentials generated for the role to connect to the database but also see them expire in the next challenge.)
vault write lob_a/workshop/database/roles/workshop-app \
  db_name=wsmysqldatabase \
  creation_statements="CREATE USER ''@'%' IDENTIFIED BY '';GRANT ALL ON my_app.* TO ''@'%';" \
  default_ttl="3m" \
  max_ttl="6m"
This should return “Success! Data written to: lob_a/workshop/database/roles/workshop-app”.
The database secrets engine is now configured to talk to the MySQL server and is allowed to create users with two different roles. In the next challenge, you’ll generate credentials (username and password) for these roles.
-
Generate and use dynamic database credentials for the MySQL database.
-
Renew and revoke database credentials for the MySQL database.
https://www.vaultproject.io/docs/secrets/databases/mysql-maria/ https://www.vaultproject.io/docs/secrets/databases/#usage https://www.vaultproject.io/api/secret/databases/#generate-credentials
Dynamic Secrets
- https://developer.hashicorp.com/vault/docs/secrets/databases
- https://developer.hashicorp.com/vault/docs/secrets/databases/mysql-maria
-
https://developer.hashicorp.com/vault/api-docs/secret/databases#generate-credentials
- https://play.instruqt.com/hashicorp/tracks/vault-dynamic-database-credentials
- https://github.com/hashicorp/field-workshops-vault/tree/main/instruqt-tracks/vault-dynamic-database-credentials
The Vault Database Secrets Engine generates dynamic, time-bound credentials for many different databases (MySQL, Maria, PostgreSQL, etc.).
- Instruqt course “Vault Dynamic Database Credentials” (by ex-HashiCorp Roger Berlind) walks you through the generation of dynamic credentials for a MySQL database that runs on the same server program as the Vault server itself.
- “HashiCorp Vault Dynamic Secrets Demo” by TeKanAid
- https://github.com/ArunNadda/vault_kmip_setup
-
Define variables used in subsequent commands, with values such as:
VaultDB_PATH=”lob_a/workshop/database/creds/workshop-app-long”
db_name=”wsmysqldatabase”
VAULT_ROLE1=”workshop-app”
VAULT_ROLE2=”workshop-app-long”REMEMBER: Bash does not like spaces around =
-
Enable the Database secrets engine on the Vault server:
vault secrets enable -path=???/workshop/database database
-
To configure the Database Secrets Engine, use a template:
vault write  \
  plugin_name=mysql-database-plugin \
  connection_url=":@tcp(localhost:3306)/" \
  allowed_roles="workshop-app","workshop-app-long" \
  username="hashicorp" \
  password="Password123"
-
Confirm:
vault read "${VaultDB_PATH}"
- Rotate root credentials (the password):
vault write -force "${VaultDB_PATH}"
-
Validate that you can login to the MySQL server:
mysql -u hashicorp -pPassword123
vault write -force “${VaultDB_PATH}”
-
Generate and Use Dynamic Database Credentials:
-
Create a role:
vault write  \
  db_name=wsmysqldatabase \
  creation_statements="CREATE USER ''@'%' IDENTIFIED BY '';GRANT ALL ON my_app.* TO ''@'%';" \
  default_ttl="1h" \
  max_ttl="24h"
vault write  \
  db_name=wsmysqldatabase \
  creation_statements="CREATE USER ''@'%' IDENTIFIED BY '';GRANT ALL ON my_app.* TO ''@'%';" \
  default_ttl="3m" \
  max_ttl="6m"
-
Download the JSON:
curl --header "X-Vault-Token: root" "http://localhost:8200/v1/${VaultDB_PATH}" | jq
% Total % Received % Xferd Average Speed Time Time Time Current Dload Upload Total Spent Left Speed 100 313 100 313 0 0 28962 0 –:–:– –:–:– –:–:– 31300 { “request_id”: “ca942ad6-e8a2-c97f-b4d8-e492c9e6aa3a”, “lease_id”: “lob_a/workshop/database/creds/workshop-app-long/njLCNZvyXbMbU1cP7fVA1rKP”, “renewable”: true, “lease_duration”: 3600, “data”: { “password”: “Y0R3sw0g-c8amBCr5k34”, “username”: “v-token-workshop-a-No6c9RKuXDMG6” }, “wrap_info”: null, “warnings”: null, “auth”: null } </pre>
-
Output a table to capture lease_id=”${LEASE_ID}, ${USERNAME}, ${PASSWORD} :
vault read "${VaultDB_PATH}"Key Value --- ----- lease_id lob_a/workshop/database/creds/workshop-app-long/k4yNJ4YvLYxp3OwYedRNE7BM lease_duration 1h lease_renewable true password -dt7pJ1NpgQ0rkEiUjgi username v-token-workshop-a-yYZVxgfpj9s9C
-
Highlight the lease_id value to craft a command to extend a lease by an increment of seconds:
vault write sys/leases/renew lease_id=”${LEASE_ID}” increment=”120”
-
Checkout:
vault write sys/leases/lookup lease_id=”${LEASE_ID}”
Login
-
Login the database:
mysql -u "${USERNAME}" -p -
Paste the password before pressing Enter.
mysql> appears when you’re in the database.
-
Do something:
show databases;
TODO: See that credentials were automatically deleted.
-
Log out of MySQL:
\q
-
Renew and Revoke Database Credentials:
- https://www.vaultproject.io/api/system/leases/#renew-lease https://www.vaultproject.io/api/system/leases/#revoke-lease
Using the variable value captured:
vault write sys/leases/revoke lease_id="${LEASE_ID}" - https://www.vaultproject.io/api/system/leases/#renew-lease https://www.vaultproject.io/api/system/leases/#revoke-lease
-
Verify by trying to login using credentials revoked.
Alternative: Environment variables
https://www.youtube.com/watch?v=IolxqkL7cD8 Hiding passwords in environment variables on Windows
import os

db_user = os.environ.get('DB_USER')
db_password = os.environ.get('DB_PASS')

print(db_user)
print(db_password)
Alternative: Google Secret Manager
https://cloud.google.com/community/tutorials/secrets-manager-python
https://cloud.google.com/secret-manager/docs
Alternative: JupyterLab Credential Store
https://towardsdatascience.com/the-jupyterlab-credential-store-9cc3a0b9356
Alternative: python-dotenv
Vicki Boykis blogged about the alternatives, which includes this for Jupyter notebook coders:
%load_ext dotenv
%dotenv
import os
os.environ.get("API_TOKEN")
“dotenv” is from python-dotenv at
https://github.com/theskumar/python-dotenv
It retrieves an .env file created to define your project’s secret environment variables,
using the package’s command line tool) at
https://github.com/theskumar/python-dotenv#command-line-interface
That .env file name is specified in the .gitignore so it is ignored when pushing to github. But files already in GitHub remains visible.
Chrome/ Browser Extension
PROTIP: Here is a tool to test access to a Vault instance (locally and publicly)as well.
VaultPass Chrome/Firefox Browser Extension (installed from GitHub) explained at VIDEO: “Enabling Teams to Share Secrets Confidentially”
(rather than using Git, which exposes all teams/users having access to all secrets and each password rotate taking up more space in history. Use of GPG is cumbersome)
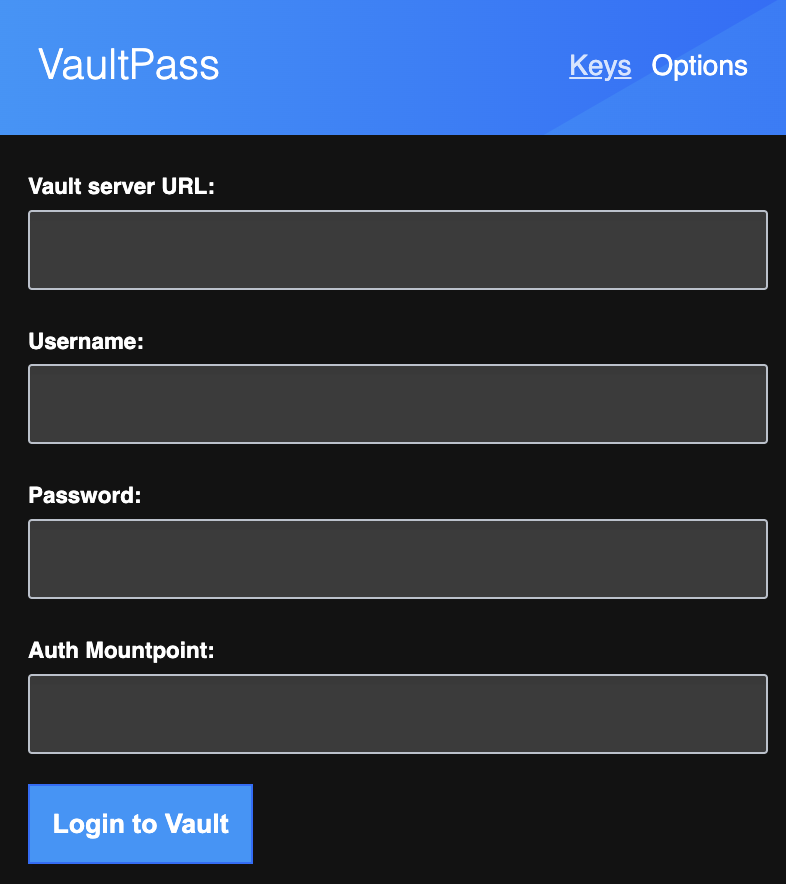
In “Developer-First Application Security and DevSecOps” by Kevin Alwell (@alwell-kevin at GitHub)
Monitoring/Observability
https://www.consul.io/docs/agent/options https://www.consul.io/docs/agent/options#_log_file
Configure logging in ExecStart of the service created using the yum installation for Consul. To direct logs from consul to say /var/log/, add -log-file=some-path at the end of:
[Unit]
Description="HashiCorp Consul - A service mesh solution"
Documentation=https://www.consul.io/
Requires=network-online.target
After=network-online.target
ConditionFileNotEmpty=/etc/consul.d/consul.hcl

[Service]
User=consul
Group=consul
ExecStart=/usr/bin/consul agent -config-dir=/etc/consul.d/ -log-file=/var/log/consul/
ExecReload=/bin/kill --signal HUP $MAINPID
KillMode=process
KillSignal=SIGTERM
Restart=on-failure
LimitNOFILE=65536

[Install]
WantedBy=multi-user.target
-
To retrieve system logs in -reverse order (the most recent first):
sudo journalctl -u consul.service -r
Learning Resources
https://learn.hashicorp.com/vault
On HashiCorp’s YouTube channel:
-
“Multi-region Replication with HCP Vault” HCP Vault Plus
Katacode’s “Store Secrets using HashiCorp Vault” provides a web-based interactive bash terminal.
ACloudGuru.com’s HashiCorp Vault 18 hour video course by Ermin Kreponic (a resident of Sarajevo).
At Oreilly.com, “Getting Started with HashiCorp Vault” December 2019 by Bryan Krausen (of Skylines academy, HashiTimes newsletter, and BOOK: “Running HashiCorp Vault in Production Paperback” with Dan McTeer
https://www.vaultproject.io/docs/internals/security/ Security Model
https://www.youtube.com/watch?v=5-RMu9M_Anc How to Integrate HashiCorp Vault With Jenkins CloudBeesTV
https://docs.dapr.io/reference/components-reference/supported-secret-stores/hashicorp-vault/
VIDEO: “HashiCorp Vault Tutorial for Beginners | FULL COURSE in 1 Hour | HashiCorp Vault Fundamentals” by Sam Gabrail
https://gist.github.com/davidmintz/d1e71331751e6477082c920e01668121 Vault TLS authentication, policies, and tokens with named roles
https://github.com/nicholasjackson/vault-application-secrets https://www.youtube.com/watch?v=c3SLWu3BoQo
Use VAULT GUI
-
Perform a token lookup based on variables defined in steps above:
curl --header "X-Vault-Token: $VAULT_TOKEN" \
   --header "X-Vault-Namespace: $VAULT_NAMESPACE" \
   $VAULT_ADDR/v1/auth/token/lookup-self | jq -r ".data"
{ "accessor": "CDeirnF8ijVMtkckQozs4hdk.J9q4g", "creation_time": 1658343950, "creation_ttl": 21600, "display_name": "token-hcp-root", "entity_id": "cebf4e89-8f68-36c1-3325-68060d0e5cf1", "expire_time": "2023-07-21T01:05:50.84419125Z", "explicit_max_ttl": 0, "id": "hvs.123456789abcdefGS1zvuec7XupRBChRWHvQbjOmEwzM_AxsGicKImh2cy4xT1NoR3Q5UnpSckRBZjBzNVJyc3M5UGIuY1VzZ3kQ8y0", "issue_time": "2022-07-20T19:05:50.84421504Z", "meta": null, "namespace_path": "admin/", "num_uses": 0, "orphan": true, "path": "auth/token/create/hcp-root", "policies": [ "default", "hcp-root" ], "renewable": false, "role": "hcp-root", "ttl": 19083, "type": "service" } -
Switch back to your browser.
Seal the cluster
NOTE: Auto-unseal is configured. A unique Key Management Service (KMS) key is created for each cluster.
Resources
https://www.g2.com/categories/certificate-lifecycle-management-clm
https://www.appvia.io/blog/managing-kubernetes-secrets-with-hashicorp-vault-vs-azure-key-vault
At Pluralsight.com
“HashiCorp Certified: Vault Associate CERTIFICATION EXAM PREP 6h 43m by Ned Bellavance (@ned1313, nedinthecloud.com)
- 21-03-03 “Hashicorp Certified Vault Associate: Getting Started”
- 21-04-11 “HashiCorp Certified Vault Associate: Vault Management”
PATH: “Implementing and Managing HashiCorp Vault” consists of 4 video courses:
- 21-08-26 “Installing and Configuring HashiCorp Vault” 4h 28m by Ned Bellavance
- 21-10-11 “Managing Access and Secrets in HashiCorp Vault” 4h 28m by George Smith
- 21-11-23 “Integrating HashiCorp Vault in DevOps Workflows” 4h 28m by Chris Green
- 21-09-05 “Installing and Configuring HashiCorp Vault” 4h 28m by S Panda
References
https://shadow-soft.com/blog/tech/custom-vault-integrations-python
More on DevOps
This is one of a series on DevOps:
- DevOps_2.0
- ci-cd (Continuous Integration and Continuous Delivery)
- User Stories for DevOps
- Git and GitHub vs File Archival
- Git Commands and Statuses
- Git Commit, Tag, Push
- Git Utilities
- Data Security GitHub
- GitHub API
- Choices for DevOps Technologies
- Pulumi Infrastructure as Code (IaC)
- Java DevOps Workflow
- AWS DevOps (CodeCommit, CodePipeline, CodeDeploy)
- AWS server deployment options
- Cloud services comparisons (across vendors)
- Cloud regions (across vendors)
- Azure Cloud Onramp (Subscriptions, Portal GUI, CLI)
- Azure Certifications
- Azure Cloud Powershell
- Bash Windows using Microsoft’s WSL (Windows Subsystem for Linux)
- Azure Networking
- Azure Storage
- Azure Compute
- Digital Ocean
- Packer automation to build Vagrant images
- Terraform multi-cloud provisioning automation
-
Hashicorp Vault and Consul to generate and hold secrets
- Powershell Ecosystem
- Powershell on MacOS
- Jenkins Server Setup
- Jenkins Plug-ins
- Jenkins Freestyle jobs
- Docker (Glossary, Ecosystem, Certification)
- Make Makefile for Docker
- Docker Setup and run Bash shell script
- Bash coding
- Docker Setup
- Dockerize apps
- Ansible
- Kubernetes Operators
- Threat Modeling
- API Management Microsoft
- Scenarios for load
- Chaos Engineering
More on Security
This is one of a series on Security:
- Security actions for teamwork and SLSA
- Code Signing on macOS
- Git Signing
- GitHub Data Security
- Azure Security-focus Cloud Onramp
- AWS Onboarding
- AWS Security (certification exam)
- AWS IAM (Identity and Access Management)
- SIEM (Security Information and Event Management)
- Intrusion Detection Systems (Goolge/Palo Alto)
- SOC2
- FedRAMP
-
CAIQ (Consensus Assessment Initiative Questionnaire) by cloud vendors
- AKeyless cloud vault
- Hashicorp Vault
- Hashicorp Terraform
- SonarQube
- WebGoat known insecure PHP app and vulnerability scanners
- Security certifications
- Quantum Supremecy can break encryption in minutes
- Pen Testing
- Threat Modeling
- WebGoat (deliberately insecure Java app)