

Files, Disks, Blobs, Tables, Queues, SQL, CosmoDB, Synapse, LRS, ZRS, GRS, RA-GRS
![]()
![]()
![]()
![]()
![]()
![]()
![]()
![]()
![]()
![]()
![]()
![]()
![]()
Overview
- Why?
- Types of Data Storage
- Create Storage account
- Storage Pricing
- Storage accounts
- Storage Containers
- Blob Lifecycle Management
- File Shares
- Authorization
- Introductions
- Upload a blob
- Azure FileStorage (File Shares)
- SAS (Shared Account Signature)
- Secure Storage
- Queues
- Disk Storage in Azure
- Backup and Recovery
- VM Site Recovery
- Methods to Store Blobs
- Microsoft Azure Storage Explorer
- Azure Storage Export/Import
- Upload media files to Blog Storage
- Microsoft Data Box Disk
- Azure Table Service
- SQL (Structured Query Language)
- Cosmos DB (NoSQL)
- TDE (Transparent Data Encryption)
- Azure Synapse
- Store Keys in Key Vault
- Azure Container Registry (ACR)
- Azure Tables
- Redis Cache
- References
- More about Azure

Why?
Azure Storage competes with AWS S3 (Simple Storage Service) and Google Storage in their clouds.
Unlike other tutorials about Azure storage, this article is a deep yet concise presentation, using HTML tables to organize complex information to make them easier to visualize and remember. I created this while studying for Azure certification exams.
NOTE: Content here are my personal opinions, and not intended to represent any employer (past or present). “PROTIP:” here highlight information I haven’t seen elsewhere on the internet because it is hard-won, little-know but significant facts based on my personal research and experience.
Types of Data Storage
If available in your choice of region:
| Type | Data | Service |
|---|---|---|
| Unstructured: | Media files (photos, videos, audio files), Office files (Word documents, PowerPoint slides, Excel Spreadsheets), Text files, Log files, Product catalog data | Blobs, Queues, Data Lake Store |
| Semi-structured: | XML, JSON, YAML, NoSQL files | FileStorage in
Disks, Tables, CosmoDB |
| Structured: | traditional SQL databases (containing tables organized, categorized, normalized) | Azure (NoSQL) Tables, Azure SQL Database |
azure.microsoft.com/en-us/product-categories/storage
Create Storage account
- VIDEO
- VIDEO: Azure Storage Account Types, Performance and Cost by John Savill.
Storage Accounts can be created several ways:
-
Use my Bash shell CLI scripts file az-storage-init.sh within github.com/wilsonmar/azure-quickly
Storage Pricing
Pricing for Storage varies by several dimensions (explained below):
A. Region (which have different costs). REMEMBER: A different storage account is needed for each Azure Region.
B. Region’s support of Availability Zones - white dots on this world map of regions
C. Type of Storage) [see below]
D. Replication/Redundancy region pair high availability
E. Whether reservations were pre-allocated (1 to 3 years ahead)
F. Hot/cold/Archive
G. Amount of storage used each month (first 50 TB, next 450 TB, over 500 TB).
Storage accounts
REMEMBER: Storage account name: LIMIT of 24 chracters or numbers with no underlines or dashes, so we need to be concise:
My example in a URL such as:
https://2505uswest2.blob.core.windows.net/blobdata1
- “2505” is the year and month.
- “uswest2” is the region. PROTIP: At time of writing, the longest region code was “germanywestcentral” which takes 19 characters. So that leaves 24 - 19 = 5 characters for the year and month.
PROTIP: Add the region code for reference when defining replication rules used to copy storage items automatically.
- “blobdata1” is the container name within the Storage Account.
My Python program (below) creates storage account names such as (for example):
Storage Containers
REMEMBER: There are different kinds of Azure Blob storage objects:
- Containers contain physical BLOBs (binary large objects) that store files served to browsers
- File shares - Serverless SMB and NFS Network file shares
- Queues - asychronous processing to scale apps according to traffic
- Tables - Tabular NoSQL data storage (that doesn’t require RDBMS structure)
Performance Types
“Performance” is the choice between the default “Standard” or Premium affects what can be selected in other fields:
If Standard is selected, Redundancy has these choices:

- “Standard_LRS” (Locally redundant storage) copies data synchronously three times within a single physical location in the primary region. LRS is the least expensive replication option. LRS provides at least 99.999999999% (11 nines) durability of objects over a given year. But is not recommended for applications requiring high availability because disasters at a zone. PROTIP: Use this for dev testing when storage can be recreated easily and speed is not important.
- "Lowest-cost option with basic protection against server rack and drive faiures. Recommended for non-critical scenarios."
-
Premium_LRS
-
Premium_ZRS
- “Standard_ZRS” ZRS (Zone-redundant storage) copies your data synchronously across three Azure availability zones in the primary region (12 nines). REMEMBER: (General Purpose v2 Storage Account Type only). For applications requiring high availability, Microsoft recommends using ZRS in the primary region, and also replicating to a secondary region.
- "Intermediate option with protection against datacenter-level failures."
- “Standard_RAGRS” RA-GRS (Read-Access Geo-Redundant Storage) aka RA-GZRS (Read-Access Geo-Zone-Redundant Storage) provides geo-redundant storage with the additional benefit of read access to the secondary endpoint (16 nines). It’s the default. If an outage occurs in the primary endpoint, applications configured for read access to the secondary and designed for high availability can continue to read from the secondary endpoint.
- Not selected in storage account setup dialog
- “Standard_GRS” (Geo-redundant storage) copies data asynchronously in two geographic regions that are at least hundreds of miles apart (16 nines). Data to second region is asychronous. If the primary region suffers an outage, the secondary region serves as a redundant source for data, Microsoft controlled, with RPO of less than 15 minutes.
- "Intermediate option with failover capabilities in a secondary region. Recommended for backup scenarios"
- “Standard_GZRS (geo-zone-redundant storage) copies data asynchronously in three geographic regions
- "Optimal data protection solution that includes the offerings of both GRS and ZRS. Recommended for critical data scenarios."
Create Storage account using Portal UI
-
Get to blade one of several ways:
-
Since “Storage accounts” is a popular resource, select it on the Home menu at the left. If you don’t see the menu, click on the icon at the upper-left corner on every screen.
-
Press G+\ and type Storage accounts in the main menu or Search at the top of the Portal.
-
Click “+ Create a resource”. Search for “Storage account”. Click on the Marketplace item. Create.
-
- Click “+ Create” for “Create a Storage account”.
- Select the Subscription for billing.
- Resource Group: Create new
-
Resource Group Name:
-
For Storage account name:
- Region = Location.
Python program
- Create client object.
The program references Region global variable.
Azure-managed replication

|
Replication Strategy |
|||||
|
Number of copies of data maintained |
3 |
3 |
6 |
6 |
6 |
|
Data is replicated across multiple availability zones (data centers) |
|
Y |
Y |
Y |
Y |
|
Data is replicated across multiple regions |
|
|
Y |
Y |
Y |
|
Data can be read in the secondary region |
|
|
|
|
Y |
|
Storage account types | GPV1, GPV2, Blob | Standard, GPV2 | GPV1, GPV2, Blob | GPV1, GPV2, Blob | GPV1, GPV2, Blob |
|
Failure coverage: | server rack | avail. zone | region | ||
-
If Standard was selected with “Redundancy” of “GRS” or “ZGRS”, “Make read access to data available in the event of regional unavailability.” appears.
This option is called “RA-GRS”, with “RA” = Read Access.
-
If Premium is selected, the choice of “Premium account types” affects

-
Block blobs (“Best for high transaction rates or low storage latency”)
-
File shares (“Best for enterprise or high-performance applications that need to scale”)
Storage Account Kinds
-
-
The choice of “Premium account types” affects the Redundancy which can be chosen:
Account type
Standard
Yes
Yes
Yes
Yes
Yes
Premium Block blobs
Yes
Yes
-
-
-
Premium File shares
Yes
Yes
-
-
-
Premium Page blogs
Yes
-
-
-
-
-
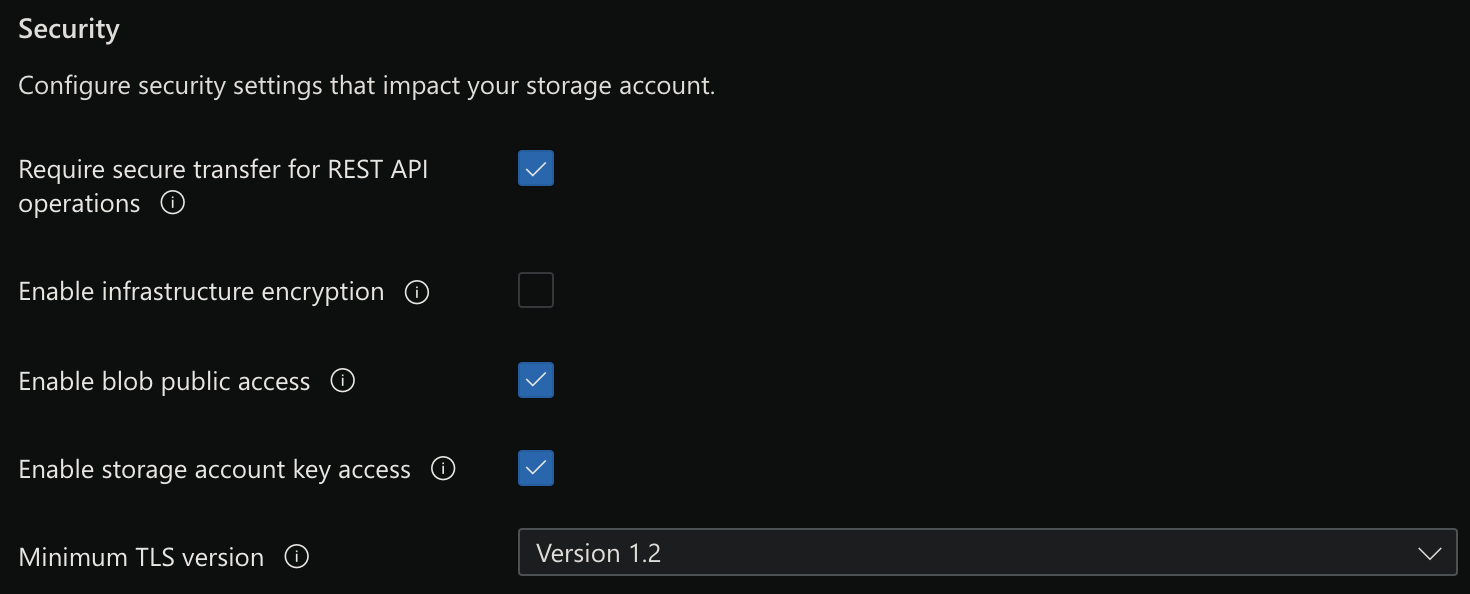
Next: Advanced: Security
TODO:
Blob Access Tiers
-
Next: Advanced tab: Blob Storage VIDEO
- Hot: Frequently accessed data and day-to-day usage scenarios
- Cool: Infrequently accessed data and backup scenarios
NOTE: See Blob Lifecycle Management (below)
-
Next: Networking tab:


-
Next: Data Protection tab: Recovery:

-
Next: Data Protection: Tracking:

-
Click “Create”.
Blob REST Access Keys
-
In the Access Keys blade of your newly created storage account, click “Show keys”
- Triple-Click in the key1 Key field to highlight the contents.
- Copy to Clipboard by Ctrl+C.
-
Switch to a document. Click on where to paste. Ctrl+V to Paste.
- Triple-Click in the key1 Connection string field to highlight the contents.
- Copy to Clipboard by Ctrl+V.
- Switch to a document. Click on where to paste. Ctrl+V to Paste.

Blob Storage sizes
Blobs Binary Large OBject data store unstructured data (images, videos, documents, zip files, backup files, etc.).
VIDEO: Types of blobs in Azure blob storage:
| Blob Type | Each Block | Max. size | Max. # Blocks |
|---|---|---|---|
| Block Blobs | <= 1000 MB | 4.7 TB | 50,000 |
| Premium Page Blobs | 512 byte in 4 MB | 8 TB | N/A |
| Append Blobs | 4 MB | 195 TB | N/A |
QUESTION: Where do we select use of Append Blobs?
Block Blobs
-
Block blobs are divided into blocks of up to 100 MB each x 50,000 so up to 4.75 TB (terabytes) can be stored per block blob. [Pricing]
Thus, block blobs are optimized for streaming and storing cloud objects.
Each block can be edited.
REMEMBER: Block blob storage has its own Storage Account Type for LRS replication only and Premium performance tier only.
Page Blobs
The word “Premium” is in front of “Page Blobs” because it’s only available when Premium Storage is selected?
Premium Page blobs are 512-byte pages optimized for random read/write operations. Page blobs are collections of individual pages of up to 4MB each. The name “page” comes from operating systems organizing memory into pages of relatively small sizes that can be easily managed – used for storing virtual machine disks in Azure.
The Pricing page lists page blob types: P10, P20, P30, P40, P50, P60.
Premium Page Blobs are high-performance solid-state drive (SSD)-based storage, designed to support I/O-intensive workloads with significantly high throughput and low latency. Premium Page Blobs provide provisioned disk performance up to 7,500 IOPS and 250MBps per blob.
Append Blobs
Append blobs are optimized for appending new blocks at the end of the blob – useful for storing log data (and audit files) where new lines are added at the end and the data never needs to be modified after it is written.
[Pricing]
Blob Lifecycle Management
This is for transient temporary files, NOT for images on websites of “evergreen” content.
- VIDEO: “Rules to containers or subset of blobs (using prefixes as filters)”
Examples: 30 days after blog is created, take a snapshot.
__ Days after last modification:
| 30 days | 180 days | 365 days |
|---|---|---|
| To cool storage | To archive storage | Delete blob |
Cool is stored for at least 30 days.
“Archive” - Rarely accessed, stored for at least 180 days. Requires “rehydration” to be accessible.
“at least” means early deletion charge applies.
DOCS: mechanism for rehydraring from cold/archive
NOTE: Compare against backup tiers.
File Shares
-
Click the blue “Go to resource”. In the Overview section, if File Shares was selected, click on the blue “File shares”.
Notice the “Soft delete” days.
-
Cick “File shares” menu on left menu.
-
Click “+ File share”.
File Storage

Notice you pay ahead for what is provisioned, not what was actually used. This is the opposite of what is generally advertised about cloud charges.
The default is 1024 GiB (1 TiB). But can be set to 100 GiB minimum.
LIMIT: Click Maximum for 100x more (102,400 GiB).
- Click “Create”.
- Click the name of the “SMB File Share” (v3.0).
- Click “+ Add directory”. Type name.
-
Click “Upload” (from your local machine) if you have files ready.
- Create Z drive file share and connect using code
Azure File Sync
- Get File Sync Service from Marketplace.
- Select Subscription, Resource Group, Location.
- Go to Resource.
- ”+ Sync group”
-
Select storage account.
- VIDEO: Install agent on VM server.
Managed Disk Account Type
VIDEO: Azure disks can be attached and detached to a different VM. They will maintain their data but the data are only usable when a disk is attached to a VM.
-
Ultra SSDs provide the best throughput and I/O operations per second (IOPS) performance characteristics but at the highest prices. Use for mission-critical I/O intense applications such as running databases.
-
Premium_LRS (SSDs) are the next best performing and are well-suited to production workloads.
-
Standard SSDs are the least expensive SSD option, suitable for production workloads with low I/O performance requirements such as web servers and lightly used applications.
-
Standard HDDs use older magnetic spinning disk technology, so they also provide the lowest performance. It is the least expensive option. Use them for backups and infrequently accessed applications.
- Standard_LRS = Locally Redundant Storage
- Standard_GRS = Geographically Redundant Storage
- Standard_RAGRS = Read Access Geographically Redundant Storage
Authorization
DOCS: Auth. Methods by Storage Type:
| Storage Type | Shared Access signatures | AAD/Entra | AD (preview) | Anon. public read |
|---|---|---|---|---|
| Azure Blobs | Supported | Supported | - | Supported |
| SMB Azure Files | - | Supported with AAD/Entra Domain Svcs | Supported, creds sync'd to AAD/Entra | - |
| REST FileStorage | Supported | - | NOT! | - |
| Azure Queues | Supported | Supported | Supported | - |
| Azure Tables | Supported | Supported | - | - |
REMEMBER:
-
Only Azure Blobs can have anonymous public read access.
-
All Storage Types support Shared Key (storage account key).
-
SAS does not support SMB Azure files authorization.
-
AAD/Entra does not support authorization of REST-accessed Azure Files (use OAuth0 by API Management).
-
AAD/Entra does not support authorization of Azure Tables.
How is your data used?
Does your data require transactions (ACID properties)? If yes, use SQL.
Database Activity Monitoring (DAM)
Introductions
- Enable blob public access: CAUTION: default is enabled!
Upload a blob
-
Go to a storage account.
-
In the Data service section, select the Containers link.
-
Click “+ Container” to create a new storage container with the following settings:
Name: images
Public access level: “Blob (anonymous read access for blobs only)”
- Click “Create”.
- Click the storage container you created (“images”).
- Click “Upload”.
-
Click the file icon and select an image file. If you had downloaded or cloned to your laptop the repo for Microsoft’s AZ-204 class, navigate to select the “grilledcheese.jpg” file.
- Enable “Overwrite if files already exist option.”
- Click “Upload”
Storage Domain names
Each storage type provides a unique namespace accessible over HTTPS:
| Service | Storage Endpoint |
|---|---|
| Container service: | https://my_account.blob.core.windows.net |
| Blobs | https://my_account.blob.core.windows.net |
| FileStorage | https://my_account.file.core.windows.net |
| Queues | https://my_account.queue.core.windows.net |
| Azure Tables | https://my_account.table.core.windows.net |
The full URI:
https://my_account/blob.core.windows.net/Container_name/file_object_1234a.png
PROTIP: Add a unique suffix (hash) to version each file so HTML pages know to retrieve the new file name.
Two ways to map custom domain name:
-
Create CNAME record pointing to storage account. This results in brief downtime while domain is registered with Azure.
-
To eliminate downtime: Prepend asverify to CNAME record for Azure to recognize, then modify the DNS record.
Azure FileStorage (File Shares)
[Pricing]: When Performance Tier: “Premium” is selected, FileStorage is allocated a default 100 TiB (rather than the 5 TiB for General Purpose). FileStorage does not support Hot/Cool Access Tiers. FileStorage replication is LRS and ZRS with a small subset of regions.
VIDEO: Azure file Shares enable sharing of files across Windows, macOS, and Linux machines because it uses the industry-standard Server Message Block (SMB) file transfer protocol or REST API. See https://github.com/Azure-Samples/azure-files-samples
Premium = SSD (Solid State Disks) faster, for 99.99% SLA outside Availability Set. PROTIP: Premium SSD disks are paid a fixed maximum cost each month, regardless of usage. That’s in addition to any Egress charges.
| Type | Standard HHD | Standard SSD | Premium SSD | Ultra SSD |
|---|---|---|---|---|
| Size | 250 | 250 | 250 | 250 |
| Size TiB | 32 | 32 | 32 | 64 |
| IOPS Limit expected | 2,000 | 6,000 | 20,000 Burst 30,000 | 160,000 |
| Thruput limit MB/s | 60 | ? | 125 | - |
| Bandwidth MBps | 500 | 750 | 900 Burst 1,000 | 2,000 |
| Single Instance SLA | 95% | 99.9% | 99.9% | 99.9% |
| Usage: | test & dev, backups | Big-data entry-level web servers | prod. databases, container volumes | SAN, Tier-1 workloads (SAP HANA) |
- General-purpose v1 can contain blobs (more expensive than v2)
- General-purpose v2 supports Access tiers: hot, cool, archive with Lifecycle Policies; upgrade from blob storage???
LAB: Reviewing File Storage in Azure:
Note: There is a second storage account that stores diagnostic data for the Lab’s virtual machine that you should not use for this Lab Step.
- On the Overview blade, notice the Properties specific to storage accounts:
-
Status indicates that the Primary storage location is Available. In the event of an outage in Azure, you may see a different value here. This storage account has no secondary storage location, but you can create storage accounts with primary and secondary storage locations. The Replication property of a storage account determines this.
-
Performance can be standard or premium. When you need guaranteed latency you should use premium storage. Premium storage has much higher storage costs because they use solid-state drives (SSDs) whereas standard storage uses magnetic spinning hard disk drives (HDDs).
-
Access tier optimizes the storage and cost based on how frequently data is accessed. The Hot tier is for frequently accessed data and carries the highest cost for storage but the lowest cost for accessing the data. The cool and archive tiers reduce are suited for less frequently accessed data with archive offering the lowest cost for storage but the highest cost for accessing data. The archive tier actually stores the data offline and the data needs to be “rehydrated” to the hot or cool storage before it can be read. Cool and archive tiers also include a penalty if you delete the blob within 30 days and 180 days, respectively, of when they are first moved into these tiers.
-
Replication sets the durability and availability of the storage. VIDEO:
-
In the Upload blob blade that appears, expand the Advanced section to view more options:
Notice you can configure the Blob type, Access tier, and Upload to folder to organize your container. Although a storage account also has an access tier, it only sets the default value for each blob. You can override the default value for each blob and this is the only possible to set the archive access tier since it cannot be set at the storage account level.
-
Set the following values leaving the rest at their default values:
Files: Click the folder icon alt and browse to the ca-square.png image you downloaded earlier. Upload to folder: images
-
Click Upload.
Once the upload is complete a success notification appears in the blade:
-
Close the Upload blob blade and click the images folder that was created by the upload:
The ca-square.png blob is displayed:
-
Click the ellipsis (…) at the end of the ca-square.png row to view all the options available for the blob:
Amongst the options, you can Download the blob, and Change tier to change the blob’s access tier,
CDN for Files
PROTIP: Example of CDN endpoint URL:
https://Container_name/azureedge.net/imgs/filex.png
-
New Resource: CDN
Content Delivery Networks are used by websites and mobile apps, IoT to reduce load times, save bandwidth, speed responsiveness.
-
Create CDN Profiles to provide a logical container for endpoints.
-
Pricing tier options: “Compare Azure CDN product features”
- Standard Microsoft
- Standard Verizon
- Standard Akamai
- Premium Verizon for rules engine, Token authentication, alerts, compression (deflate, bzip2, brotli)
Acceleration Data Transfers, also called Dynamic Site Acceleration (DSA), accelerates web content that is not cacheable.
SAS (Shared Account Signature)
https://docs.microsoft.com/en-us/rest/api/storageservices/define-stored-access-policy
VIDEO DOCS: Generate a SAS to grant other clients access to storage objects without exposing your own account key. CAUTION: Whoever has the key can use it to retrieve the file without user authentication.
For service level or account level.
Define granular control over type of access granted:
- Validity interval Start and Expiry Time (in UTC/Local Time)
- Permissions: Read, Write, Delete, List, Add, Create, Update, Process
- Service Type: Blob, File, Share, Queque, Table
- Resource Type: Service, Container, Object
- IP addresses
- Protocol: HTTPS/HTTP
PowerShell commands are by specific Service Type:
- New-AzStorageAccountSASToken
- New-AzStorageContainerSASToken PowerShell commands are by specific Service Type:
- New-AzStorageBlobSASToken
- …
Secure Storage
- Select storage account.
- Menu “Firwalls and virtual networks”.
- Select “Selected networks” (rather than All Networks, the default). This is for all protocols.
- Add a Firewall to (LIMIT: up to 100) client IP address.
Azure Storage Emulator works on local storage.
Attach to external storage.
Connect to a Cosmos DB account.
Storage Account Templates
https://docs.microsoft.com/en-us/azure/storage/common/storage-quickstart-create-account?tabs=template
For PowerShell, CLI, GUI
Queues
[Pricing]
The product name “Azure Queue Storage” was change from “Azure Storage Queues”.
Disk Storage in Azure
Azure virtual machines (VMs) use Azure disks as their attached disk storage. Azure disks are built on top of page blobs optimized for random access. When you create Azure disks you can choose to manage the storage account yourself or to use managed disks where Azure manages the storage account for you.
LAB: inspect a VM with two disks attached
$dataDiskName = "mynewDataDisk"
$location = "WestUS"
$myRescGroup = "TestGroup"
$diskConfig = New-AzDiskConfig -SkuName Premium_LRS -Location = $location `
   -CreateOption Empty -DiskSizeGB -200
$dataDisk1 = New-AzDisk -DiskName $dataDiskName -Disk $diskConfig -ResourceGroupName $myRescGroup
$vm = Get-AzVM -Name WinSrv19-1 -ResourceGroupName $myRescGroup
$vm = Add-AzVMDataDisk -VM $vm -Name $dataDiskName -CreateOption Attach -ManageDiskID
- Click the upper-left accordion icon alt to open the portal menu and click Virtual machines:
-
Click ca-lab-vm to view the overview of the VM created by the Cloud Academy Lab environment.
The VM is an ordinary Azure VM that is running the Windows Server operating system. You will focus on the VM’s disks.
- In the left menu bar, click Disks under the Settings heading:
-
Observe the Azure disks that are attached to the VM:
Each VM has one OS disk which contains the operating system and is used to boot the VM. The OS disk is a Standard SSD in this case. In addition to the OS disk, VMs can have zero or more Data disks attached. This VM has one data disk that is a 4 GiB Standard HDD.
PROTIP: All disks are encrypted at rest by default. So if someone were to steal a physical disk from an Azure data center the physical disk would be unusable. This is true for all data in Azure storage accounts.
RECOMMENDED: [_] For production workloads, also encrypt Azure disks at the operating system level. This is referred to as Azure Disk Encryption (ADE) which protects against Azure disks being copied and attached to another Azure VM.
-
Click the name of the OS disk to view its overview.
You can see the disk is Attached to the lab VM (Managed by: ca-lab-vm) and the Operating system is Windows.
There are also visualizations showing how heavily utilized the disk is:
Disk level metrics:
- Disk Bytes/sec (Throughput) read and write
- Disk Operations/sec (IOPS) read and write
- Disk QD (Queue Depth)
PROTIP: If you noticed a disk that reached the max throughput or IOPS you should consider upgrading to a higher performance disk type.
-
Observe the following screenshot that shows the Windows Explorer view of available disks from inside the Windows VM (Note: You don’t need to access the VM in this step. The following screenshot is here just as a reference and to make a point):
Azure automatically provides a Temporary Storage disk that will be lost forever once the VM is deleted, while Azure disks can be attached and detached from VMs and persist their data. The data disk the VM has attached to it is not automatically formatted and does not appear in the list. Each operating system provides tools to format the data disks, but that is outside of the scope of this Lab.
The Azure Portal provides a lot of useful information about storage if you know where to look. This Lab Step illustrates how you can use the Portal to better understand topics, with a focus on storage accounts in this Lab Step.
-
Enter storage account in the portal’s search bar and click on the Storage accounts service:
-
Click + Add to start creating a storage account:
-
In the Create storage account blade you can see all the available options for configuring storage accounts:
There are also useful descriptions in the text as well as when you hover your mouse over an infotip icon alt :
With Azure Files services, can use Azure File Sync agent which uses a Windows server cluster Stored Sync server.
Backup and Recovery
Saving data in another location is fundamental to recovery from failure. Backups are taken for recovery from accidental data loss, data corruption, or ransomware attacks. It addresses your company’s Business continuity and disaster recovery (BCDR) plan.
### Recovery Services Vault (RSV)
-
G+/ service Recovery Services Vault (RSV) to create a place to hold snapshot files.
PROTIP: Name the location/region because one RSV is needed for each region/location.
-
Click “+ Create” or the blue “Create recovery services vault” button.
-
For Resource group, don’t select “cloud-shell-storage”.
PROTIP: BLOG: Consider ASR auto-naming rules and other naming conventions.
myvault-westus
-
Add Tags according to your organization’s needs.
NOTE: Default Backup configuration for Storage Replication Type is set to Geo-redundant (GRS). Default Security settings for Soft Delete is enabled. After creating vault, it is highly recommended that you review default vault properties before protecting items. See DOCS.
PROTIP: The Recovery Services Vault has encryption enabled via Server-Side Encryption (SSE), so the backup is encrypted at rest and in transit. When data is secured via Azure Disk Encryption, you are given the Key Encryption Key (KEK) and BitLocker Encryption Key (BEK) stored in an Azure Key Vault, and also backed up via Azure Backup.
During data recovery, keys are restored from Key Vault.
Azure Backup Service (ABS)
- Backups can be initiated on the Portal GUI RSV blade or the VM blade.
Microsoft Azure Backup Service combines to provide a seamless backup and recovery experience to a local disk, or to the cloud:
- the familiar Windows Server Backup utility in Windows Server,
- the Data Protection Manager component in System Center, and
- Windows Server Essentials

PROTIP: Azure creates every VM with an extension to do backups.
-
When you configure Backup, it communicates with the Azure Backup Service and associates itself to a policy. STEPS
It identifies itself to the Azure Backup Service as a VM, and that the service should back it up accordingly.
-
When it’s time for backup per the backup policy, Microsoft sends a command to the Azure Backup extension and then Azure Backup orchestrates a VSS snapshot.
NOTE: Cannot back up Oracle workloads.
The backup policy supports two access tiers - snapshot tier and the vault tier:
For “Instant Restore”: a snapshot tier is a point-in-time backup of all disks on the virtual machine. Snapshots are stored on your local VM storage as an “instant recovery snapshot” so you can quickly recover, for a maximum period of five days.
- On Windows the VMSnapshot extension works with Volume Shadow Copy Service (VSS) to take a copy of the data on disk and in memory.
- On Linux, the VMSnapshotLinux extension takes a snapshot that is a copy of the disk. You need to write custom pre or post scripts per app to capture the application state.
For recovery point type “snapshot and vault”, Vault tier snapshots are additionally transferred to a vault for additional security and longer retention.
- In the background, the snapshot is compared to a snapshot of a previous recovery point and only incremental blocks are moved via HTTPs into the Recovery Services vault. (Efficient use of bandwidth!)
PowerShell:
-
Connect & Sign In:
Connect-AzAccount
-
List services:
Get-Command *azrecoveryservices*
-
Register:
Register-AzResourceProvider -ProviderNamespace *Microsoft
-
List services:
New-AzResourceGroup -Name $myRescName -Location $myLocation
New-AzResourceServicesVault -Name $myVaultName ` -ResourceGroupName $myRescGroup ` -Location $myLocation
az backup vault create –name $myVaultName
-resourcegroup “$myRescGroup”
-location “$myLocation”
Alternately:
- From Home, Create a resource.
- In New, “Backup and Site Recovery”. Note it’s for Azure Files, Windows Servers, and VMs.
- Create
- Subscription, Resource Group,
- Tags
-
Download a template for automation.
See https://azure.microsoft.com/en-us/pricing/details/backup/
VIDEO Backup of Virtual Machines:
b) At an indiviaul machine: Create
From a machine:
When backup up a VM, it’s encrypted at rest using Storage Service Encryption (SSE) Azure Disk Encryption. See https://docs.microsoft.com/azure/backup/backup-azure-vms-encryption
DPM (Data Protection Manager)
VM Site Recovery
VIDEO The VM Site Recovery product, aka DRaaS (Disaster Recovery as a Service) for BCDR (Business Continuity and Recovery) includes replication, failover, and recovery.

Site-recovery replicates the data in almost real time for failover.
Methods to Store Blobs
Several methods are available to upload data to blob storage:
-
AzCopy is an easy-to-use command-line tool for Windows and Linux that copies data to and from Blob storage, across containers, or across storage accounts.
-
The Azure Storage Data Movement library is a .NET library for moving data between Azure Storage services. The AzCopy utility is built with the Data Movement library.
-
Azure Data Factory supports copying data to and from Blob storage by using the account key, shared access signature, service principal, or managed identities for Azure resources authentications.
-
Blobfuse is a virtual file system driver for Azure Blob storage. You can use blobfuse to access your existing block blob data in your Storage account through the Linux file system.
-
Azure Data Box Disk is a service for transferring on-premises data to Blob storage when large datasets or network constraints make uploading data over the wire unrealistic. You can use Azure Data Box Disk to request solid-state disks (SSDs) from Microsoft. You can then copy your data to those disks and ship them back to Microsoft to be uploaded into Blob storage.
-
The Azure Import/Export service provides a way to export large amounts of data from your storage account to hard drives that you provide and that Microsoft then ships back to you with your data.
AZCopy and Microsoft Storage Explorer
- In a Browser at AZCopy webpage, click to download for macOS.
- In Terminal: Unzip to folder such as “azcopy_darwin_amd64_10.9.0”.
- QUESTION: How to determine whether azcopy contains vulnerabilities?
-
Move file “azcopy” to folder “/usr/local/bin” so that it is in the PATH to be called from any folder.
mv azcopy /usr/local/bin/
- Move the folder to Trash.
- Choose Apple menu > System Preferences, click Security & Privacy, then click General tab.
- Click the lock icon to unlock it, then enter an administrator name and password.
- Click “Allow Anyway” to message: If “azcopy” was blocked from use because it is not from an identified developer.
-
Click the lock icon.
-
Verify (for output azcopy version 10.9.0):
azcopy --version
-
For all but File storage (which uses SAS token):
azcopy login
- Copy
NOTE: Microsoft Storage Explorer makes use of AZCopy to perform data transfers.
Microsoft Azure Storage Explorer
Get started: Azure Storage Explorer for data across subscriptions. It is a free GUI tool to manage Azure cloud storage resources on Windows, macOS, or Linux laptops
-
PROTIP: To Install, rather than download from
https://azure.microsoft.com/en-us/features/storage-explorer/Alternately, use Homebrew:
brew install --cask microsoft-azure-storage-explorer
==> Downloading https://github.com/microsoft/AzureStorageExplorer/releases/download/v1.18.1/MaC_StorageExplorer.zip
==> Downloading from https://github-releases.githubusercontent.com/124597291/802cc880-7cdc-11eb-934f-f5189780785b?X-Amz-Algorithm=AWS4-HMAC-SHA256&X-Amz-Credential=AKIAIWNJYAX4CSVEH53A%2F2
######################################################################## 100.0%
==> Installing Cask microsoft-azure-storage-explorer
==> Moving App 'Microsoft Azure Storage Explorer.app' to '/Applications/Microsoft Azure Storage Explorer.app'
🍺  microsoft-azure-storage-explorer was successfully installed!
-
On a Mac, pinch 4 fingers together or use Finder to navigat to the Applications folder.
-
Using Homebrew means you can:
brew upgrade --cask microsoft-azure-storage-explorer
-
Create Blobs and Blob containers
-
Run AZCopy CLI on Windows, for example:
azcopy copy 'D:\data' 'https://mystore1.blob.core.windows.net/blobdata' --recursive
–recursive reaches inside sub-folders for more files.
Storage Access Keys
For each storage account two (primary and secondary) keys (aka connection strings) are used to authenticate app requests with unlimited access. Two keys are created for key rolling</storg> so one key still runs when the other is being regenerated.
az storage account keys renew
<a ## Create a Key Vault
Azure Disk Encryption-PowerShell:
New-AzKeyVault -Name 'demokv' -ResourceGroupName 'ps-course-rg’ `
   -Location 'northcentralus' -EnabledForDiskEncryption
   $KeyVault = Get-AzKeyVault -VaultName 'demokv' -ResourceGroupName 'ps-course-rg’

   Set-AzVMDiskEncryptionExtension -ResourceGroupName 'ps-course-rg' -VMName 'linux-1’ `
   -DiskEncryptionKeyVaultUrl $KeyVault.VaultUri `
   -DiskEncryptionKeyVaultId $KeyVault.ResourceId
In the Key Vault, Access Policies, check “Azure Disk Encryption for volume encryption”.
The “Permission model” would be “Vault access policy” or “Azure role-based access control (preview)”.
Azure Storage Export/Import
DOCS: Move resource group and subscription
- G/ of “import/export jobs”.
- Click blue “Create import/export job”.
-
Basics: Resource group, Name, Type (Import or Export).
-
To prepare drives Azure Jobs write/read on Windows only:
.\WAImportExport.exe PrepImport
/j:<JournalFile>
/id:<SessionId>
[/logdir:<LogDirectory>]
[/sk:<StorageAccountKey>]
[/InitialDriveSet:<driveset.csv>]
/DataSet:<dataset.csv>
Includes BitLocker encryption/decryption
-
Create import/export Azure Job -Resource group -Location
Upload journal (.jrn*) files
REMEMBER: Type:
- Import from Azure Blobstorage and Azure Files
- Export to Azure Blobstorage only
Upload media files to Blog Storage
-
Install:
pip install pyyaml
pip install azure-storage-blob
-
Edit az-upload-blob.py
Microsoft Data Box Disk
When large datasets or network constraints make uploading blob data over the wire unrealistic:
-
In the Azure portal, Microsoft Data Box Disk order 40 TB (usable ~ 35 TB) in up to five 8-TB solid-state disks (SSDs) shipped to your shipping address, for your data. Designate the destination Azure Storage account targeted.
-
If disks are available, Azure encrypts, prepares, and ships the disks with a shipment tracking ID. Disks are mailed in a UPS Express Box.
-
When empty disks are delivered, unpacked, and connected, unlock the disks.
-
Use a client to drag and drop the data on the disks, using standard NAS protocols (SMB/CIFs and NFS) with AES encryption. Data transfer rates are up to 430 MBps, depending on file size. Non-Azure service providers can load a Data Box:
-
Commvault migrates large volumes of data to Microsoft Azure using the Azure Data Box.
-
Veeam can backup and replicate large amounts of data from a Hyper-V machine to a Data Box.
-
-
Prepare and ship the disks back to Azure datacenter Within 10 days to avoid the $15 fee on top of the $250 service fee and $95 round-trip shipping fee. There is also a per-disk cost of $10 per day on top of a $50 order processing fee and $30 shipping fee (for the bubble wrap). That’s in the U.S. Pricing varies by region.
-
Microsoft uploades the disk into Blob storage within their private network.
-
The disks are securely erased as per the National Institute of Standards and Technology (NIST) guidelines.
The “Azure Data Box Gateway” is a virtual appliance for moving data in and out of Azure, a subscription of $125.00/month.
https://docs.microsoft.com/en-us/azure/databox/data-box-disk-quickstart-portal?tabs=azure-portal
Azure Table Service
VIDEO: Azure Table service have tables (uniquely) under an account:
https://my_account.table.core.windows.net
Table names are case-ensitive up to 63 characters and cannot beging with a number.
Within each table are entitites (like rows) and properties.
- An entity can have up to 255 properties (3 system properties)
- A PartitionKey serves as the basis for table partioning
- A Timestamp is last modified (used for merging)
-
A RowKey is a unique identiifes for an entity within a given partition
- An entity are C# structures
- A property is a name, typed-value pair (similar to a column)
DOCS: For access authentication, create a Shared Key because Azure AD is not supported.
SQL (Structured Query Language)
Three deployment models:
-
Single database in a VM
- Standalone Azure SQL Database (Logical Server)
- Single
- Elastic pool
-
DaaS: Azure SQL Managed instance (for “frictionless” lift-and-shift migration to PaaS of SQL apps with 99.99% SLA, with Microsoft doing patching and upgrade to latest stable version, backups, monitoring) But no SSIS in Azure Data Factory, no SSAS, SSRS.
- Azure SQL Data Warehouse, Parallel Data Warehouse
https://connectionstrings.com lists database connection strings
PRICING: Pre-provisioned billed by DTU (Data Transaction Units) https://docs.microsoft.com/en-us/azure/azure-sql/database/service-tiers-dtu
BLAH: You can’t make manual backups on SQL.
Automatic point-in-time backups every 5 minutes.
Export.
PRICING:
VIDEO DEMO: PROTIP: Check “Allow Azure services to access server”.
-
In the SQL Server hosting the database, click in the Overview page “Show firewall settings” to specify the Local Machine IP address. Alternately, use Active Directory admin to Set Admin a user. Use tenancy User Name “…onmicrosoft.com”.
-
To use SQL Server, On your laptop, use a program such as SQL Server Management Studio or Visual Studio. In Visual Studio Server Explorer, add a database connection, Authentication: Active Directory Password Authentication.
In Visual Studio:
Create Table Test(
   TestID int identity(1,1) PRIMARY KEY,
   TestValue varchar(50)
)
In VS Object Explorer, expand the database, right-click on the Table just created “dbo.Test” for “Encrypt Columns”. In Column Selection, check the field to be encrypted. The types of encryption: Deterministic or Randomized.
MySQL
READ: How to Automate Azure MySQL Deployment Using Azure CLI
CLI at https://github.com/fouldsy/azure-mol-samples-2nd-ed/blob/master/15/install_mysql_server.sh
Data Lake Store Big data services
VIDEO: Data Lake Store
- gen 1 to support big data
- gen 2 adds hierarchial storage based on keys
Azure HDInsight is Hadoop (Big Data) storage.
Data Bricks is Spark storage + analytics
- https://datathirst.net/blog/2019/1/18/powershell-for-azure-databricks
Cosmos DB (NoSQL)
Cosmos DB is a globally distributed and elastically scalable document database supporting MongoDB and graph database Gremlin. Its previous name was “Document DB”.
According to Wikipedia, Cosmos DB’s consistency levels are based on “P+A and E+L” theorem, similar to AWS DynamoDB and Cassandra.
“Cosmos DB supports the choice of five tunable consistency levels that define tradeoffs between C/A during P, and L/C during E. Cosmos DB never violates the specified consistency level, so it’s formally CP.”
- Strong (write and read immediately, like SQL). Before a write operation is acknowledged to the client, data is durably committed by a quorum or replicas within the region that accepts the write operations. But that takes time.
- “Bounded-staleness”
- “Session” [the –default-consistency-level] = Strong sync for the same session key
- “Consistent prefix” ensures that changes are read in the order that matches the sequence of the corresponding writes. But read operations against a replica can return stale data.
- Eventual (like DNS propagation) ensures the database operates at peak effiency and speed. But read operations against a replica can return stale data.
SLAs:
| Operation | Single-region writes | Multi-region writes | |
|---|---|---|---|
| Write | 99.99 | 99.99 | 99.999 |
| Read | 99.99 | 99.99 | 99.999 |
A “conflict feed” makes data available not replicated when a write region fails.
LAB:
- Search for “cosmo” for the Azure Cosmos DB blade.
- ”+ Add” to “Create Azure Cosmos DB account”.
- API: [document (NoSQL) databases]
- Core (SQL) [Formerly DocumentDB]
- Azure Cosmos DB for MongoDB API
- Cassandra
- Azure Table
- Gremlin (graph) [Graph database]
- [Future: etcd, Apache HBase, ANSI SQL]
-
Location:
Capacity mode:
- Provisioned throughput [the default, for reserved capacity paid monthly]
- Serverless (preview) [consumption based pricing]
Apply Free Tier Discount: Apply (the default)
-
Next: Global Distribution:
- Geo-Redundancy: Disable is the default
- Multi-Region Writes: Disable is the default
- Next: Networking
-
Connectivity method: All networks is default.
-
Next: Backup Policy: Periodic is default.
- Next: Encryption: Data Encryption: Service-managed key is default
- Next: Tags
- “Review + creat”, “Create”.
-
–max-interval “300” \ is 300 seconds (5 minutes) to sync with all instances
-
–max-staleness-prefix “10000” \ is max. 10,000 updates before forcing sync
–default-consistency-level
References:
- https://docs.microsoft.com/en-us/azure/cosmos-db/partitioning-overview#choose-partitionkey
- https://azure.microsoft.com/en-us/blog/azure-cosmos-db-and-multi-tenant-systems/
CosmoDB Backup Policy
Internally, Partition Sets span several regions. Physical Partitions have a leader and follower.
PRICING: Cost of storage is $0.25/month per GB.
-
Add Container: for Autoscale or Manual
RU’s are provisioned (reserved) ahead of time. VIDEO: Billing (for KB’s of memory, CPU, IOPS) “RU” (Request Units), multiplied by the number of regions. See this Pricing

Select the appropriate API and SDK for a solution:
- https://docs.microsoft.com/en-us/learn/modules/choose-api-for-cosmos-db/
- https://docs.microsoft.com/en-us/azure/cosmos-db/introduction
- https://docs.microsoft.com/en-us/azure/cosmos-db/relational-nosql
- https://docs.microsoft.com/en-us/azure/cosmos-db/create-sql-api-dotnet
- https://docs.microsoft.com/en-us/azure/cosmos-db/create-mongodb-nodejs
- https://docs.microsoft.com/en-us/azure/cosmos-db/create-cassandra-dotnet
- https://docs.microsoft.com/en-us/azure/cosmos-db/create-graph-dotnet
- https://docs.microsoft.com/en-us/azure/cosmos-db/create-table-dotnet
- https://docs.microsoft.com/en-us/azure/cosmos-db/sql-api-sdk-dotnet
- https://docs.microsoft.com/en-us/azure/cosmos-db/change-feed
Implement partitioning schemes and partition keys:
- https://docs.microsoft.com/en-us/azure/cosmos-db/partitioning-overview
- https://docs.microsoft.com/en-us/azure/cosmos-db/partitioning-overview#choose-partitionkey
Perform operations on data and Cosmos DB containers:
- https://docs.microsoft.com/en-us/azure/cosmos-db/account-databases-containers-items
- https://docs.microsoft.com/en-us/azure/cosmos-db/sql-api-get-started
Set the appropriate consistency level for operations:
- https://docs.microsoft.com/en-us/azure/cosmos-db/consistency-levels
Manage change feed notifications:
- https://docs.microsoft.com/en-us/azure/cosmos-db/change-feed
CosmoDB can’t use “USE” command which changes the current database.
Deborah Chen is Microsoft’s Senior Program Manager on Data-CosmosDB
DB Containers
Databases manage the throughput (performance)
Containers are where Partition keys to group databases.
Documents are grouped by Partition Key. There is no limit on the number of logical partitions.
PRICING is by Request Units (RUs). The cost to read a 1 KB item is 1 RU. 5 RUs are spent to write 1 KB.
A minimum of 10 RS/s is required to store each 1 GB of data. Each Physical Partition provides 10K request units/second. There are Read Capacity Units and Write Capacity Units.
Logical Partitions have a max. size of 20 GB.
When RU exceeded, Azure will automatically add another physical partition and re-allocate logical partitions.
A Change Feed provides an ordered list of documents modified in a container.
Migration
REMEMBER: To migrate SQL data in, create a .bacpac file.
TDE (Transparent Data Encryption)
DEMO VIDEO: In SQL Server blade, in the Security section, Transparent data encryption, It’s on by default.
TDE encrypts databases, backups, logs at rest.
To bring your own key, be at the server’s TDE section, “Use your own key”. Select Key Vault.
Azure Synapse
Synapse is Azure’s next generation of database technology. It combines retrieval and analytics functionality in one comprehensive product.
VIDEO by Pragmatic Works.
Microsoft Cloud Workshop: Azure Synapse Analytics and AI (whiteboard design session)
https://docs.microsoft.com/en-us/azure/synapse-analytics/
https://azure.microsoft.com/en-us/services/synapse-analytics/ https://azure.microsoft.com/en-us/services/synapse-analytics/resources/
https://github.com/Azure-Samples/Synapse
https://www.pulumi.com/blog/get-up-and-running-with-azure-synapse-and-pulumi/
Store Keys in Key Vault
Azure Container Registry (ACR)
Container retrieved by Kubernetes.
Azure Tables
https://docs.microsoft.com/en-us/samples/azure/azure-sdk-for-net/azure-tables-client-sdk-samples/ Azure Tables samples for .NET Azure.Data.Tables client library
Redis Cache
Redis is an in-memory database. LIMIT: It caches values up to 100KB. It supports longer values with low latency.
From a client, connect with a host name, port, access key. Reference access from Key Vault.
References
-
https://www.c-sharpcorner.com/article/azure-storage-account-using-azure-cli/
-
https://docs.microsoft.com/en-us/samples/azure/azure-sdk-for-java/storage-file-share-samples/
-
How to automatically manage Azure Blobs lifecycles | Azure Tips and Tricks
More about Azure
This is one of a series about Azure cloud:
- Azure cloud introduction
- Azure Cloud Onramp (Subscriptions, Portal GUI, CLI)
- RDP client to access servers
- Bash Windows using Microsoft’s WSL (Windows Subsystem for Linux)
- Microsoft PowerShell ecosystem
- Azure Cloud Powershell
- PowerShell DSC (Desired State Configuration)
- PowerShell Modules
- Azure Networking
- Azure Storage
- Azure Compute
- Azure cloud DevOps
- Dockerize apps
- Kubernetes container engine
- Hashicorp Vault and Consul for keeping secrets
- Hashicorp Terraform
- Ansible
- Microsoft AI in Azure cloud
- Azure Monitoring
- Azure KSQL (Kusto Query Language) for Azure Monitor, etc.
- Dynatrace cloud monitoring
- Cloud Performance testing/engineering
- Cloud JMeter