

Setting up VPC (Virtual Private Cloud), IPv6, IMDSv2, IPAM, DNS, Security Groups, WAF, BGP, etc. using CLI, GUI, Terraform, Cloud Formation
![]()
![]()
![]()
![]()
![]()
![]()
![]()
![]()
![]()
![]()
![]()
![]()
![]()
Overview
- VPCs (Virtual Private Cloud)
- TL;DR Si,,aru
- Infrastructure a Code (IaC)
- Create VPCs using Management Console
- Routing Rules
- Static Elastic IPs
- DNS Route 53
- ELB vs. ALB
- AWS NAT
- VPN
- VPC Peering
- IP DHCP
- Transit Gateway
- ACLs
- NACLs
- Direct Connect (DX)
- Are You Dead Yet?
- Incidious
- Monitoring needed
- Metrics
- Apache Server Configuration
- Increasing capacity may not help
- Mitigation: Upgrade the Tech
- But we have an IPS
- Reverse Proxies
- Web Application Firewall
- Distinguish Friend from Foe
- More than HTTP/IP traffic
- Other vidoes about AWS WAF:
- Manual GUI Console forbidden
- IaC Automation
- Terraform for AWS WAF
- Security Automations for AWS WAF
- Other Cloud Vendors
- References:
- AWS Networking Certification
- More on Amazon
- More on DevOps
This tutorial covers how to manage Security Groups and other AWS network security features to access servers and other resources within AWS.
NOTE: Content here are my personal opinions, and not intended to represent any employer (past or present). “PROTIP:” here highlight information I haven’t seen elsewhere on the internet because it is hard-won, little-know but significant facts based on my personal research and experience.
This article describes use of Terraform and CDK as well as Cloud Formation to create network-related resources within AWS.
VPCs (Virtual Private Cloud)
- https://aws.amazon.com/vpc/faqs/
- TUTORIAL
REMEMBER: There is one VPC per Availability Zone.
A single IGW (Internet GateWay) serves all VPCs because that is the address the public DNS resolves corporate host names to.
Types of architectures: Subnets vs. VPCs and VPC peering
TODO: Add WAF. Make above diagram into a video.
TL;DR Si,,aru
To create a VPC:
- Use Infrastructure as Code (IaC)
- Use Terraform for multi-cloud
- AWS CloudFormation
- Avoid “Management Console” GUI - it creates “drift” in IaC Learnings:
- IPv4 vs. IPv6
Infrastructure a Code (IaC)
To define resources, enterprise teams use Infrastructure as Code (IaC) that is versioned in GitHub and thus available for team review. More importantly, IaC makes resource creation repeatable to create, which reduces human error on a GUI.
Terraform for VPC
The most popular IaC is Terraform (HCL coding defined by HashiCorp) due to its multi-cloud format. See my https://wilsonmar.github.io/terraform about how to run Terraform IaC.
IaC code is grouped into modules, such as the module for VPC at:
https://www.terraform.io/docs/providers/aws/r/vpc.html
Here is an extract to highlight concepts:
resource "aws_vpc" "main" {
  cidr_block       = "10.0.0.0/16"
  instance_tenancy = "dedicated"

  tags {
    Name = "main"
  }
}
https://wpengine.linuxacademy.com/amazon-web-services-2/learn-how-to-master-aws-vpc-inside-and-out/ Basic usage with tags:
CloudFormation to create VPC
VPCs are really software-defined networks (SDN).
     "Resources" : {
        "VPC" : {
         "Type" : "AWS::EC2::VPC",
         "Properties" : {
           "CidrBlock" : "10.0.0.0/16"
         }
       },

       "InternetGateway" : {
         "Type" : "AWS::EC2::InternetGateway",
         "Properties" : {
         }
       },

       "AttachGateway" : {
          "Type" : "AWS::EC2::VPCGatewayAttachment",
          "Properties" : {
            "VpcId" : { "Ref" : "VPC" },
            "InternetGatewayId" : { "Ref" : "InternetGateway" }
          }
       },
In the CF JSON to define a VPC, CF automatically populates the “VpcId” : { “Ref” : “VPC” },
Create VPCs using Management Console
This chapter condenses Amazon’s docs on this topic and adds additional PROTIPs and NOTEs.
-
A default VPC is a pre-requisite for setting up an EC2 server instance.
-
At https://console.aws.amazon.com/vpc/
-
Select “Your VPC”.
-
Click the “Create VPC” blue button.
-
PROTIP: For Name tag, consider a naming convention that specifies the decisions associated with each VPC, such as:
dev-public-v6-ipam1
The above example consists of these components:
a. “public” or “private” network access scope.
b. “prod”, “DR”, “non-prod”, “dev”, “qa”, etc. pool
c. “v4” or “v6”
d. “ipam or “manu” (manual management) of IP Addresses
The name reflects decisions selected on these fields:
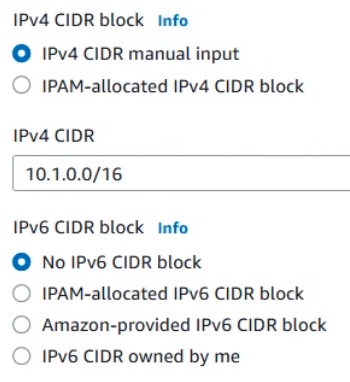
IPv4 or IPv6 CIDR block?
Data packets are routed across the internet between devices addressed (sorta like telephone numbers):
- IPv4 (Internet Protocol version 4) addresses are in the form of 99.48.227.227
- IPv6 (Internet Protocol version 6) addresses are in the form of ABCD:0000:3238:DFE1:0063:0000:0000:FEFB
In an IPv4 address, the 4 sets of decimal numbers (between 4 dots) called an octet (of four). Together they total 32 binary bits (2^32) which can have 4.29 billion variations, each a specific IP address. All the IP addresses have now been assigned, leading to the address shortage issues we face today.
IPv6 addresses are represented by 8 double hexadecimal numbers (such as ABCD) between colons totaling 128-bits (2^128) or 340,282,366,920,938,463,463,374,607,431,768,211,456 addresses – 1,028 times more than IPv4.
IPv4 has not been completely deprecated because not all devices and software have been upgraded to use IPv6 enhancements:
- SNMP does not support IPv6
- IBM implementation of QoS (Quality of Service) to request packet priority and bandwidth for TCP/IP applications does not support IPv6, which uses “flow labeling”
- IPv6 no longer supports VLSM (Variable Length Subnet Mask) jumbogram
- Simpler header format (fixed 40 bytes vs. 20-60 bytes) for less bandwidth usage
- Faster performance from less overhead processing: Instead of IPv4 options placed in the header, IPv6 options are put into a separate and extended header which are not be processed until a router is specified.
- Flexible options and extensions: IPv6 (up to 40 bytes for IPv4 options) and new options can be introduced, such as support for IP layer security (IPSEC), jumbogram, mobile IP, etc.
-
Built-in IPSEC in the protocol for privacy
- The large address space allows every device to have its own IP address rather than be hidden behind a NAT (Network Address Translation) router.
- DHCPv6 (RFC 8415) with auto renumber address configuration using DHCP servers/relays ff02::1:2.
- IP to MAC resolution using Multicast Neighbor Solicitation NDP (Neighbour Discovery Protocol) instead of Broadcast ARP
- Built-in authentication support to make end-to-end connection integrity achievable
- Multicast and anycast message transmission scheme is available (instead of broadcast)
- No more private address collisions
Nitro for IPv6
Within AWS, IPv6 addresses are only accessible on AWS EC2 instances built on its Nitro System (rather than Xen hypervisor/dom0). Such instances run on hardware with a Nitro card and security chip which reference a Nitro hypervisor managing memory and CPU allocation with access to low-level hardware features that are not available or fully supported in previous virtualized environments (for example, Intel VT).
For IPv6, EC2 instances must have IMDSv2 required.
IMDS
AWS atttaches locally to every EC2 instance a “link local” static IPv4 address of 169.254.169.254 (IPv6: fd00:ec2::254) which only software running within the instance can access for introspection about its execution environment (host name, events, Security Group, storage, etc.).
It’s also called by the AWS IMDS (Instance Metadata Service) service to obtain metadata about each instance, including dynamic data inserted into user data (of up to 16KB after base64-decoding) specified during creation of the instance.
DEMO, PDF: EC2 instance metadata is vulnerable to SSRF (Server-Side Request Forgery) attacks because when IMDSv1 was created in a less hostile world 10 years ago, it used insecure HTTP GET requests such as this (from CLI inside an EC2 instance) to list metadata keys:
http://169.254.169.254/latest/meta-data/ && echo
http://169.254.169.254/latest/dynamic/
Threat modeling: Among AWS vulnerabilities, in June 2019, attacks at CapitalOne and 30 others (by an ex-AWS employee). Recreation of the attack VIDEO involves exposure of metadata that led to leak of credentials used to download S3 buckets or perform queries on DynamoDB or RDS databases from outside the AWS environment, starting with this call:
http://169.254.169.254/latest/meta-data/iam/security-credentials/$IAM_USER_ROLE
Within Terraform, the metadata lookup HCL is:
resource "aws_instance" "this" {
   http_tokens = lookup(metadata_options.value, "http_tokens", "optional") ("optional")
}
RhinoSecurity describes the service: “when your application wants to access assets, it can query the metadata service to get a set of temporary access credentials. The temporary credentials can then be used to access your S3 assets and other services. Another purpose of this metadata service is to store the user data supplied when launching your instance, in-turn configuring your application as it launches.”
Since 2015, Andres Riancho has demonstrated the potential vulnerability to obtain credentials with his “nimbostratus” tool.
In June 2021, Mandiant identified attacks by threat group “UNC2903” which leveraged a vulnerability in the Adminer program. CVE-2021-21311 returns cloud metadata access keys in an error message.
IMDSv2
- https://aquasecurity.github.io/tfsec/v1.28.1/checks/aws/ec2/enforce-http-token-imds/
- VIDEO by Cloudnaut
100 days after the attack, AWS released IMDSv2, which uses a multi-step session-oriented handshake that starts with a PUT request to retrieve a cryptographic token x-aws-ec2-metadata-token:
TOKEN=`curl -X PUT "http://169.254.169.254/latest/api/token" \
-H "X-aws-ec2-metadata-token-ttl-seconds: 21600"`
21600 seconds (6 hours) is the maxiumum number of seconds which AWS allows a sessions to last, but a shorter duration can be specified (such as 600 for 10 minutes). Use of an expired token would result in a “HTTP/1.1 401 Unauthorized” response.
The token is specific to an instance and is not stored by IMDSv2.
The secret token returned is used like a password to make subsequent PUT/POST/PATCH requests to IMDSv2 to obtain the list of metadata:
curl -H "X-aws-ec2-metadata-token: $TOKEN" \
-v http://169.254.169.254/latest/dynamic/instance-identity/
The AWS CLI command associated with IMDSv2 is ec2_instance_metadata, which does not retrieve temporary security credentials.
Notice that protocol HTTP (not HTTPS) is used in the above, which WAFs (Web Application Firewall) rarely support. So the IMDSv2 service requires a PUT request at the beginning of a session to prevent open WAFs from being abused to access IMDS.
Also, reverse proxies (such as Apache httpd or Squid) can be misconfigured to allow external requests to reach internal resources by sending X-Forwarded-For HTTP headers to pass the IP address of the original caller. So to block unauthorized access, IMDSv2 returns “HTTP/1.1 403 Forbidden” to calls with an X-Forwarded-For header.
To obtain InstanceMetadataOptions for an Instance ID (obtained from a describe-instances CLI call) :
aws ec2 describe-instances \
--region us-east-1 \
--instance-ids i-01234abcd1234abcd \
--query 'Reservations[*].Instances[*].MetadataOptions.HttpTokens[]'
Alternately:
aws ec2 modify-instance-metadata-options --instance "$IID"
The response JSON contains metrics (available in Amazon CloudWatch instance-level metric “EC2:MetadataNoToken”):
“InstanceMetadataOptions”: { “State”: “pending”, “HttpEndpoint”: “enabled”, “HttpTokens”: “optional”, “HttpPutResponseHopLimit: 1 }
To ensure that only requests from the EC2 instance itself will work, and prevent transport to external attackers, IMDSv2 requests have a built-in hop count (TTL) of 1 (rather than the default 255):
To insist on using the more secure IMDSv2 after creation, use this AWS CLI command:
aws ec2 modify-instance-metadata-options --instance "$IID" \
--http-endpoint enabled --http-tokens required
To use IMDSv2 during EC2 instance creation using aws CLI:
aws ec2 run-instances \
--image-id ami-0abcdef1234567890 \
--instance-type t3.large \
...
--metadata-options "HttpEndpoint=enabled,HttpProtocolIpv6=enabled"
Preferrably, set IMDSv2 when creating EC2 instance using Terraform:
resource "aws_instance" "good_example" {
 ami           = "ami-0abcdef1234567890"
 instance_type = "t3.large"
 metadata_options {
   http_endpoint = "enabled"
   http_tokens = "required"
   }
}
If not defined as “required”, TFSec issues its “aws_instance should activate session tokens for Instance Metadata Service.” error. Similar errors are also issued by Trend Micro and Checkpoint scanners.
PROTIP: The Terraform module defaults to http_tokens = optional, so the setting must be explicitly specified in your main.tf file.
PROTIP: The “required” setting is also required for use by Nitro instances which process IPv6 addresses. So set these AWS IAM and Organizational SCP (Service Control Policies) condition keys:
"stringEquals": {"ec2:MetadataHttpEndpoint": "enabled"}
"stringEquals": {"ec2:MetadataHttpTokens": "required"}
"NumericLessThan": {"ec2:MetadataHttpPutResponseHopLimit": "1-64"}
AWS EC2 instances can perform AWS actions based on the instance profile IAM role permissions.
IMDS makes the AWS credentials available to any IAM role attached to the instance. So IAM roles and local firewall rules are needed to restrict access to IMDS.
Lock Down IMDS to be accessed only to the root user with root privileges:
ip-lockdown 169.254.169.254 root
VIDEO: AWS credentials provided by IMDSv2 contain “2.0” in the ec2:RoleDelivery IAM context key. So policies can look for that when delivering EC2 Role credentials:
“NumericGreaterThan”: {ec2:RoleDelivery”: “1.0 [ | 2.0]”}
CAUTION: This “required” setting can cause breaking changes in apps. So test! The aws-sdk-js was fixed on Dec 17, 2020
References:
- https://www.sans.org/blog/cloud-instance-metadata-services-imds-/
- https://www.mandiant.com/resources/blog/cloud-metadata-abuse-unc2903
- https://medium.com/sai-ops/upgrading-from-aws-ec2-imdsv1-to-imdsv2-d96bbf4a2031
- https://www.cloudyali.io/blogs/understanding-instance-metadata-service-imds
- https://docs.databricks.com/administration-guide/cloud-configurations/aws/imdsv2.html
- https://www.element7.io/2023/01/shift-left-security-why-you-should-use-aws-imdsv2-explained-in-detail/
- https://aws.amazon.com/blogs/security/defense-in-depth-open-firewalls-reverse-proxies-ssrf-vulnerabilities-ec2-instance-metadata-service/
BTW, GCP has also has an instance metadata service.
CIDR for VPC
DOC: To enable dual-stack operation for your VPC, associate up to five IPv6 CIDR block ranges per VPC:

IPAM
IPAM (IP Address Manager) is an AWS VPC feature that automatically allocate CIDRs to VPCs from pools of CIDRs it has provisioned into public and private scopes – to make it easier to plan, track, and monitor IP addresses for AWS workloads, without causing IP address overlap or conflict.
Before individuals can specify that IP addresses be allocated automatically by selecting:
IPAM-allocated CIDR block
-
The enterprise needs to be willing to pay for IPAM costs charged for each active IP under its management, at $0.1944 per month ($0.00027 an hour x 24 x 30). Charges go to the $AWS_IPAM_ACCT specified because IP allocation can cross multiple accounts and VPCs based on configurable business rules. Thus the need for central administration.
-
VIDEO: Form a central asset management team with IPAM delegated administrators named within AWS. DOCS: The centralization of CIDR management enables allocation requests to be centrally monitored and audited – alerts about IP address overlap, IP address depletion, etc. can be received by a designated team email. IPAM automatically retains IP address monitoring data for up to three years. The team performs the above on the IPAM dashboard at
https://console.aws.amazon.com/ipam routes to a region-specific site such as:
https://us-west-2.console.aws.amazon.com/ipam/home?region=us-west-2#HomeIPAM enables Administrators to reuse/reallocate IP addresses across multiple unconnected networks.
-
For cross-account access, define IAM roles using Terraform iam_assumable_role or iam_assumable_roles submodules in “resource AWS accounts (prod, staging, dev)” and IAM groups and users using iam-group-with-assumable-roles-policy submodule in “IAM AWS Account” to setup access controls between accounts. See https://docs.aws.amazon.com/vpc/latest/ipam/choose-single-user-or-orgs-ipam.html
-
IPAM Delegated Administrators define a profile containing the business rules for allocating CIDRs among the two scopes from pools.
-
To create a public and a private scope for a single VPC network within a particular operating Region, instead of using the Console GUI, use this CLI command:
AWS_REGION=us-west-2
AWS_OPERATING_REGIONS=us-west-2
AWS_IPAM_POOL="prd-ipam"
AWS_IPAM_ACCT="projA-ipam-acct"

aws ec2 create-ipam --description "$AWS_IPAM_POOL" \
--region "$AWS_REGION" \
--operating-regions RegionName="$AWS_OPERATING_REGIONS" \
--profile "$AWS_IPAM_ACCT"
Alternately, use the IPAM API from a custom program.
For easy repeatability, use the Terraform Registry
https://registry.terraform.io/modules/terraform-aws-modules/iam/aws/latest -
Define CIDRs within each top-level pools under the 2 IPAM scopes (public and private).
An “allocation” can be a CIDR assignment from an IPAM pool to another resource or another IPAM pool.
See https://docs.aws.amazon.com/vpc/latest/ipam/manually-allocate-ipam.html
- IPv4 (Internet Protocol version 4) addresses are in the form of 99.48.227.227
-
If you don’t have IPAM setup, you can choose
Amazon-provided IPv6 CIDR block
Announced in January 2023, IPv6 CIDR owned by me is Bring your own IP addresses (BYOIP) range which a customer organization has purchase from a Regional Internet Registry (RIR).
Routing Rules
AWS VPC Routing Rules are what makes subnets public or private.
PROTIP: AWS creates a default subnet for each region.
-
Delete the default VPC. It doesn’t cost anything.
BLAH: At time of writing, AWS auto-assigns public IPv4 address.
-
“Create VPC”.
- Type Security Groups over “Search” at the top of every AWS Console GUI page.
-
Click “Security groups” among “Features of EC2”, which means you see “Security Groups” on the left menu under EC2.
What makes a subnet public is a route table associated with each subnet created.
- View Route Table feature.
There is a Main route table designated as Yes. -
Rename the Main “Public-IGW”.
Subnets: Outbound rules: NACL (Network ACL) :
-
The rule which Allow/Deny Source 0.0.0.0/0 - Rename it “AllowEverything”
Manual CIDR assigment
-
If you don’t have IPAM setup, choose IPv4 For CIDR manual input
REMEMBER: CIDRs are called Masks. The larger number after the slash, the more IP addresses it specfies. 16 is the largest mask allowed.
When dealing with networks, a CIDR is always requested.
Each CIDR defines a contiguous range of IP address.
CIDR specs are what keeps each IP address within a single subnet. Manual allocations can result in misconfigurations. So many teams follow the same plan for allocating CIDRs.
Public vs. Private Scope
There are separate scopes of IP addresses for public vs. private use.
Public Routed Address Private Non-Routed Address Connected with the Internet network Connected with a LAN Publicly registered with Network Information Center Is not registered with Network Information Center Requires a Modem to connect to a network Requires a network switch to connect to a network Assigned by the ISP to identify a home or business network from the outside Allotted by the client and are given by the client’s switch such as a Gigabit Ethernet switch NAT Gateway
A NAT Gateway is used for private subnets to reach the public internet.
An AWS NAT Gateway SaaS supports bursts of up to 10Gbps. NAT Gateways are managed by AWS, so they don’t have traffic metrics nor CloudWatch alarms, plus there is a per-hour charge for AWS to operate the NAT Gateway.
A NAT instance can be configured for port forwarding, bastion hosts.
Bastion host
NOTE: Bastion Hosts
PROTIP: Instead of the expense of standing up Bastion Hosts, consider HashiCorp Boundary.
-
Consider private non-routed addresses ranges.
PROTIP: Carefully predict how many nodes each subnet might need. Once assigned, AWS VPC subnet blocks can’t be modified. If you find an established VPC is too small, you’ll need to terminate all of the instances of the VPC, delete it, and then create a new, larger VPC, then instantiate again.
Subnet Calculators
- subnet-calculator.com [has pop-up ads]
- https://www.site24x7.com/tools/ipv4-subnetcalculator.html
- https://calculator.net/ip-subnet-calculator.html

Private Non-Routed IPv4 Classes
Address ranges for private (non-routed) use (per RFC 1918) first octet addresses:
- 10.0.0.0 -> 10.255.255.255 within “Class A” addresses 1 -> 126
- 172.16.0.0 -> 172.31.255.255 within “Class B” addresses 127 -> 191
- 192.168.0.0 -> 192.168.255.255 within “Class C” addresses 192 -> 223
- D 224 -> 239
- E 240 -> 255
Private IPv4 address reach public networks via a NAT.
All IPv6 addressess are publicly addressible.
IP Ranges commonly used
- 127.0.0.0 is reserved for loopback and IPC on the local host
- 224.0.0.0 -> 239.255.255.255 is reserved for multicast addresses
PROTIP: Ranges used by specific cloud vendors:
- 10.0.0.0/16 or 2001:db8:1234:1a00::/56 by AWS (see diagram)
- 10.128.0.0./9 Google
- 172.31.0.0/16 Azure
REMEMBER: The CIDR block for a default AWS VPC is always 172.31.0.0/16???
-
Allocate ranges by geographical regions:
- 10.16 for US1
- 10.32 for US2
- 10.48 for US3
- 10.64 for EU
- 10.80 Australia
Ranges used by specific geographies:
- 192.168.10.0/24
- 192.168.15.0/24 London
- 192.168.20.0/24 New York
- 192.168.25.0/24 Seattle
-
Allocate ranges for production vs. DR vs. testing:
PROTIP: Consider this convention:
- Use Class A VPC CIDR 10.0.0.0/16 for production regions
- Use Class B VPC CIDR 172.16.0.0/16 for DR (Disaster Recovery) regions
NetMask Nodes
The Default Mask is different for each class.
VIDEO: This table of nodes for each netmask Amazon allows:
Hosts/
SubnetNetmask # IPs # Nodes Subnet
SizeSubnet Mask Note - /28 14 - /31 255.255.255.240 Minimum - /27 30 - /30 255.255.255.224 - - /26 62 - /29 255.255.255.192 - - /25 126 - /28 255.255.255.128 - - /24 254 - /27 255.255.255.0 Small - /23 510 ? /26 255.255.254.0 - - /22 1,022 ? /25 255.255.252.0 - - /21 2,046 2,008 /24 255.255.248.0 Small - /20 4,094 4,091 /23 255.255.240.0 - - /19 8,190 8,152 /22 255.255.224.0 Medium - /18 16,382 16,344 /21 255.255.192.0 Large - /17 32,766 - /21 255.255.128.0 - - /16 65,534 65,456 /20 255.255.0.0 Maximum: Extra Large REMEMBER: The larger the CIDR netmask, the less hosts in the subnet.
REMEMBER: 16 is the largest CIDR range allowed by AWS.
REMEMBER: If all you’ll need are 14 nodes, specify
/28. That actually allocates 16 addresses, but the first and last address are reserved.- subnet+1 are for default GW via DHCP Option Set
- the last subnet is for broadcasts.
PROTIP: 24 is a common one:
- private 10.1.0.0/24 (< 129)
- public 10.129.0.0/24 (> 128)
PROTIP: To avoid naming conflicts, use a standard naming convention:
Of the 255 possibilities in /24:
allocate the top half to private addresses:
allocate the bottom half to public addresses:- https://www.cisco.com/c/en/us/support/docs/ip/routing-information-protocol-rip/13790-8.html
- https://www.dnsstuff.com/subnet-ip-subnetting-guide
IP Subnets
PROTIP: In the subnet for each Availability Zone, replace the “??” in the IP address with a pre-defined set of numbers associated with each separate environment and architectural tier. For example, if the VPC is assigned this CIDR:
10.1.??.0/20
The ?? is replaced with one of the numbers within an (Availability) Zone column:
Env Tier IPv6 Zone a Zone b Zone c Future Routes Prd ELB-? 00 1 11 21 31 Public Prd WEB-? 01 2 12 22 32 Private Prd APP-? 02 3 13 23 33 Private Prd Cache-? 03 4 14 24 34 Private Prd DB-? 04 5 15 25 35 Private Prd Res-? 05 6 16 26 36 Private Prd Res-? 06 7 17 27 37 Private Dev ELB-? 41 51 61 71 81 Public Dev WEB-? 42 52 62 72 82 Private Dev APP-? 43 53 63 73 83 Private Dev Cache-? 44 54 64 74 84 Private Dev DB-? 45 55 65 75 85 Private Dev Res-? 46 56 56 76 86 Private Dev Res-? 47 57 57 77 87 Private Expanded, each ELB (Elastic Load Balancer) is naturally on a Public subnet:
10.16.1.0/20 in Production Availability Zone a
10.16.8.0/20 in Production Availability Zone b
10.16.15.0/20 in Production Availability Zone c10.16.22.0/20 in Dev Availability Zone a
10.16.29.0/20 in Dev Availability Zone b
10.16.36.0/20 in Dev Availability Zone c
The “IPv6” column is entered in the ___ below in the VPC GUI “IPv6 CIDR block” field such as:
2600:1f18:10e8:73___;;/64
VPC Subnets
- In the AWS Console GUI VPC Subnets, select each subnet defined above.
- Click “Actions” menu to select “Edit subnet settings”.
- Check “Enable auto-assign IPv6 addresses”.
-
Scroll to click the orange Save.
PROTIP: If the VPC is defined using Terraform instead of the GUI, the above can be coded one time for subsequent repeated use.
Bucket of Candies Analogy
If you must know why, here is my analogy (best for kinesthetic learners): When we say someone makes a “7 figure salary”, we figure out what that means with a table like this:
Figure: 7 6 5 4 3 2 1 # Values: 1,000,000 100,000 10,000 1,000 100 10 1 Now imagine a bucket for each figure level, a different size bucket containing candies of various colors and patterns, unique one for each possible value. People earning 7 figures can choose from the bucket holding a million possible values.
If we add up the values (colors) possible in the right-most 3 buckets, we would have 100 + 10 + 1 = 111 possibilities.
Counting in Base 2
Instead of the way bankers do arithmetic where ten $1 bills is equivalent to a 10 dollar bill (called “base 10” or decimal calculation), computers count using “base 2” or binary arithmetic using 0’s and 1’s. So each of their “buckets” have a different number of possibility values:
Position: 8 7 6 5 4 3 2 1 # Values: 254 128 64 32 16 8 4 2 Cumulative possible addresses: 510 254 126 62 30 14 6 2 If we add up the possible addresses just from the right-most 3 buckets (from right to left), we would have 2 + 4 + 8 = 14 possibilities.
Look back above at the table of nodes, we see 14 possibilities can be obtained from a specification of 28 bits.
This is all one needs to know to use AWS VPC.
But if you would like to know how we get 3 buckets from the 28 bit specification, read on.
IP address octets
IPV4 subnet addresses such as “127.10.138.128” are 4 sets of there are 32 “buckets” separated by dots into four 8 bit “octets”:
The 127 in the figure above is obtained by adding the base 10 value of each bit “bucket”. Looking at a single octet of 8 bits:
“Bucket” position: 8 7 6 5 4 3 2 1 Base 10 value of each bucket: 128 64 32 16 8 4 2 1 Cumulative base 10 (left to right) 255 127 63 31 15 7 3 1 Base 2 for 127 in base 10 1 1 0 1 1 0 0 1 Cumulative base 10 (left to right) 217 89 25 25 9 1 1 1 To translate a base 2 number of all 1’s (“1111111”) to a base 10 value of 255 we accumulate base 10 values for each “bucket”, left to right.
To translate the Base 2 set of 1’s and 0’s to a base 10 number of 217, we accumulate the equivalent base 10 number at each position where there is a 1.
Now let’s look at the relationship between /28 and the “255.255.255.240” subnet mask associated with the /28 in the table of nodes above.
The “240” base 10 number in the right-most quartet is equivalent to “11110000” in base 2.
“Bucket” position: 8 7 6 5 4 3 2 1 Base 10 value of bucket: 128 64 32 16 8 4 2 1 Base 2 for 240 in base 10 1 1 1 1 0 0 0 0 Cumulative base 10 (left to right) 240 122 48 16 0 0 0 0 Putting the three 255 and 240 together we get a continuous set of 1’s followed by four 0’s:
11111111.11111111.1111111.11110000
-
The 1’s “buckets” on the left side are used to address subnets managed by Amazon.
-
The 0’s buckets on the right side are used to address your individual nodes.
REMEMBER: Although there are four 0’s buckets, only 3 are used to specify node addresses because one digit (two values) are reserved for network broadcast use (addresses containing all 0’s and all 1’s).
More on CIDR (Classless Inter-Domain Routing), aka “supernetting”:
-
VIDEO: IP Subnetting from CIDR Notations (getting network and broadcast addresses).
-
http://docs.aws.amazon.com/AmazonVPC/latest/UserGuide/VPC_Scenario2.html
-
VLSM (Variable Length Subnet Mask)
-
https://cloudacademy.com/amazon-web-services/amazon-vpc-networking-course/build-and-configure-a-nat-instance.html
Do you really know the above? Take Pearson’s IP Subnetting exam on OReilly.com [subscription required]
-
Static Elastic IPs
NOTE: The use of static IP addresses in configurations in EC2 can be an annoyance to some and a comfort to others.
Historically, working on a physical servers involves use of specific static IPs associated with a particular purpose. External monitoring servers were manually configured with the IP assigned to each machine. This also creates time pressure (panic) to get specific servers up and running, which led to pressure for servers to be patched rather than risking losing configurations during rebuilds.
SECURITY PROTIP: Static IPs needed to be protected as secrets because of their long-lived nature in traditional server environments.
A “paradigm shift” in thinking is necessary when moving to the “cloud” because there IP address assignments can be transitory/ephemeral and thus more difficult to hack. When a server dies in a “12 factor app” environment, additional servers can be brought up automatically by auto-scaling from a common public pool.
AWS provides static IPs in their Elastic IP service, albeit for a charge of $1 per month for each reserved static IP not assigned to a running EC2 instance.
PROTIP: Long-lived elastic static IPs are useful to avoid shared IPs that may have been black-listed due to abuse by others.
Resources on this topic: * https://launchbylunch.com/posts/2014/Jan/29/aws-tips/ * https://wblinks.com/notes/aws-tips-i-wish-id-known-before-i-started/
DNS Route 53
DNS servers maintain a database to translate host names to IP addresses.
Amazon’s public DNS service is called Route 53 because the default part for DNS servers is TCP 53 / UDP 53.
Its competitors include Dyn.com, GoDaddy, etc.
DIAGRAM: Advanced Demo - Hybrid DNS between AWS and Simulated On-Premises
ELB vs. ALB
AWS NAT
Only one NACL can be associated with a subnet, to deny specific IP addresses. Separate rules are for inbound and outbound.
PROTIP: NACL rules are numbered to sepcify sequence. To allow for insertion, leave gaps in the numbers. For example, create the first two with 100, 200, etc. so you can later add 150 between 100 and 200.
PROTIP: Remember that EC2 instances by default have Networking > Change Source/Dest. Check ON. But NAT instances require OFF or they wont’ show up on VPC Route Tables.
-
Launch an EC2 instance of a Community AMI built for NATting. Search for “NAT”.
NAT provides IP address assignment and DNS Proxy name resolution services to internal network clients.
A NAT server allows outbound traffic to the external internet. By default, a NAT server allows inbound traffic only through connections already established by an internet host (typically port 80/443).
To access traffic from a special port from an external host:
-
If the public interface of the NAT server is configured with a single IP address, add a Special Port (for Windows, in the Routing and Remote Assess MMC console).
-
If the public interface of the NAT server is configured with multiple IP addresses, make address reservations to map specific external addresses to specific internal addresses.
Selection of 006 DNS Servers option at the scope level overrides the selection at the server level.
For security, define some servers to only make outbound calls to the internet (through the NAT server).
-
-
PROTIP: A NAT instance provide whatever capacity a single AMI provides, so it should be configured with CloudWatch alarms and traffic metrics.
-
Prepare before need a script to manually to manage Subnet failover to another NAT in this Amazon article.
VPN
PROTIP: When an enterprise development team first begins working with an external vendor or customer, it would likely begin by using a private VPN while the project operates in “stealth mode”.
Configure Site to Site VPN to securely transfer data among Amazon VPCs in different regions or between Amazon VPC to your on-premise data center.
NOTE: Dual ports are usually configured on VPN hardware.
https://app.pluralsight.com/player?course=aws-certified-sysops-admin-associate&author=elias-khnaser&name=aws-certified-sysops-admin-associate-m5&clip=3&mode=live Customer Gateway.
It’s attached to a VPN.
VPC Peering
VPC peering enables organizations to link two distinct VPCs together, allowing assets in one network to talk to assets in another.
Peering connections were introduced to route traffic between two VPCs (AZs) in the same region using private (rather than public) IP addresses. This makes it like they are communicating as if they are within the same network.
Nodes in the same region can reference each other logically using the same peer SG (Security Group), which improves performance.
VPC peering is not transitive —- it must be specifically allowed for each VPC peered together.
Nevertheless, IP addresses must not overlap among VPCs.
Peering is neither a gateway nor a VPN connection, so doesn’t invoke separate physical hardware and the “single point of failure” nor bandwidth bottlenecks.
One useful use case is for more secure interconnection among Active Directory, Exchange, and other common business services:
- more secure communication among business units/teams
- stronger integration of CRM, HRMS, file sharing
- tighter integrated access of core suppliers systems
- provide monitoring and management of customer AWS resources
-
Setup Peering in VPC
-
Accept the Peering request on the target VPC.
IP DHCP
VIDEO: The Dynamic Host Configuration Protocol is used for auto-configuration of network resources.
When a VPC is created, AWS automatically create a set of DHCP options and associates them with the VPC. The options include configuration parameters, including the domain name, domain name server, and the netbios-node-type. Configure your own DHCP options set for your VPC.
- IP address, Subnet Mask, Default Gateway
- DNS servers & AmazonProvidedDNS or Custom DNS domain
- NTP services, NetBios Name servers & Node type
DHCP Option Sets for each AZ are immutable.
Associating a new option set is immediate, but changes require a DHCP Renew (which takes time).
A DHCP server is setup to listen for L2 broadcasts to get info from the DHCP server.
- VPC Router (Subnet+1)
- R53 Resolver (Subnet+2)
Transit Gateway
A transit gateway can simplify multi-VPC architectures significantly.
ACLs
Access Control Lists
- Create Internet outbound allow and deny network ACL in your VPC. First network ACL: Allow all the HTTP and HTTPS outbound traffic on public internet facing subnet. Second network ACL: Deny all the HTTP/HTTPS traffic. Allow all the traffic to Squid proxy server or any virtual appliance. http://techlib.barracuda.com/display/BNGv54/How+to+Deploy+the+Barracuda+NG+Firewall+in+an+Amazon+Virtual+Private+Cloud
NACLs
Negative ACLS.
Block all the inbound and outbound ports. Only allow application request ports.
These are stateless traffic filters that apply to all traffic inbound or outbound from a Subnet within VPC. AWS recommended Outbound rules
REMEMBER:
| Security Group | NACLs |
|---|---|
| Applicable to instances | Operate on VPC subnets |
| Only supports Allow rules (layered on a default Deny) | Support both allow and deny rules |
| Are stateful | Are NOT stateful |
| Are considered in their entirety before traffic is allowed | Are processed in numerical order |
| Must be associated with an instance to apply | Apply automatically to all instances in a subnet |
REMEMBER: Up to 5 different Security Groups can be applied to a single AWS resource.
References:
- http://docs.aws.amazon.com/AmazonVPC/latest/UserGuide/VPC_Appendix_NACLs.html
- https://www.cidr-report.org/ reports nearly a million routes in 2023
Direct Connect (DX)
- https://aws.amazon.com/directconnect/sla/
- VIDEO: BGP summary by F5
- VIDEO: BGP Deep Dive by Kevin Wallace
On-premises locations reach AWS using the BGP (Border Gateway Protocol) though a DX (Direct Connect) router onsite.
In each DX Location, there is a port on a DX Router which is charged per hour of use. The price is the same globally except for a few regions. Outgoing data transfer charges apply, too, but cheaper than going through the public internet.
There are 1GB, 10GB, and 100GB wide pipes.
For redundancy and higher capacity, many deploy two or more DX connections.
If the DX Location is in a different region, a DX Gateway is needed.
BGP peering is configured between opposite ends of AWS Virtual Interfaces.
https://docs.aws.amazon.com/directconnect/latest/UserGuide/WorkingWithConnections.html
Common patterns involve using a combination of Virtual Interfaces (VIF):
- Private Virtual Interfaces (PrivateVIF) and Direct Connect Gateway (DXGW) or
- Transit attaches to Direct Connect Gateway
- Public VIF attaches to an Account Construct with AS_Path BGP PA support
BGP peering is configured between opposite ends of AWS Virtual Interfaces.
AS & IGP
Each AS (Autonomous System) – such as AT&T, Verizon, CenturyLink, etc. – is identified by a special 16 bit or 32 bit number such as 65500.
Sub-AS can be formed inside each AS.
Running within an AS (for a company) are Interior Gateway routing Protocols (IGP) – RIP, OSPF, EIGRP, IS-IS – concern themselves with link-states or interface costs.
BGP EGP
https://aws.amazon.com/blogs/networking-and-content-delivery/creating-active-passive-bgp-connections-over-aws-direct-connect/
There is an iBGP (internal Border Gateway Protocol) that is a full mesh, but doesn’t scale.
BGP is sometimes called a Path Vector Routing protocol.
BGP routers form neighborships by explicit configuration that point to each other. A TCP session over port 179 is established with neighbors to exchange network status. Handshake: Open Sent, Open Confirm, Established. BGP has default Keepalive of 60 seconds with 160 second hold time.
VIDEO: Border Gateway Protocol (BGP) typically runs as an Exterior Gateway Routing protocol (EGP) connecting inter-domain ISP (Internet Service Providers).
The “believability” (the lower the better):
| Routing Source | Administrative Distance |
|---|---|
| Connected | 0 |
| Static | 1 |
| eBGP | 20 |
| EIGRP (internal) | 90 |
| OSPF | 110 |
| IS-IS | 115 |
| RIP | 120 |
| EIGRP (external) | 190 |
| iBGP | 200 |
An EGP is concerned with advertising address information between Autonomous Systems (AS) – responsible for the address space within. EGPs focus on the paths to destination.
When BGP speakers, or peers, advertise to each other Address Prefix and Length, called NLRI (Network Layer Reachability Information).
They also advertise a series of constructs called Path Attributes (PA) for Path Selection, sent in a BGP Update message.
Active-passive Border Gateway Protocol (BGP) connections are created based on RFC 4271.
The best-path algorithm that runs as part of BGP considers all routes it receives and tries to select the best ones. It uses configured policies and received path attributes when stepping through the logic until an appropriate route (or routes) are found.
BGP path attributes can materially affect routing behavior, in both directions, over a DX connection.
VIDEO:
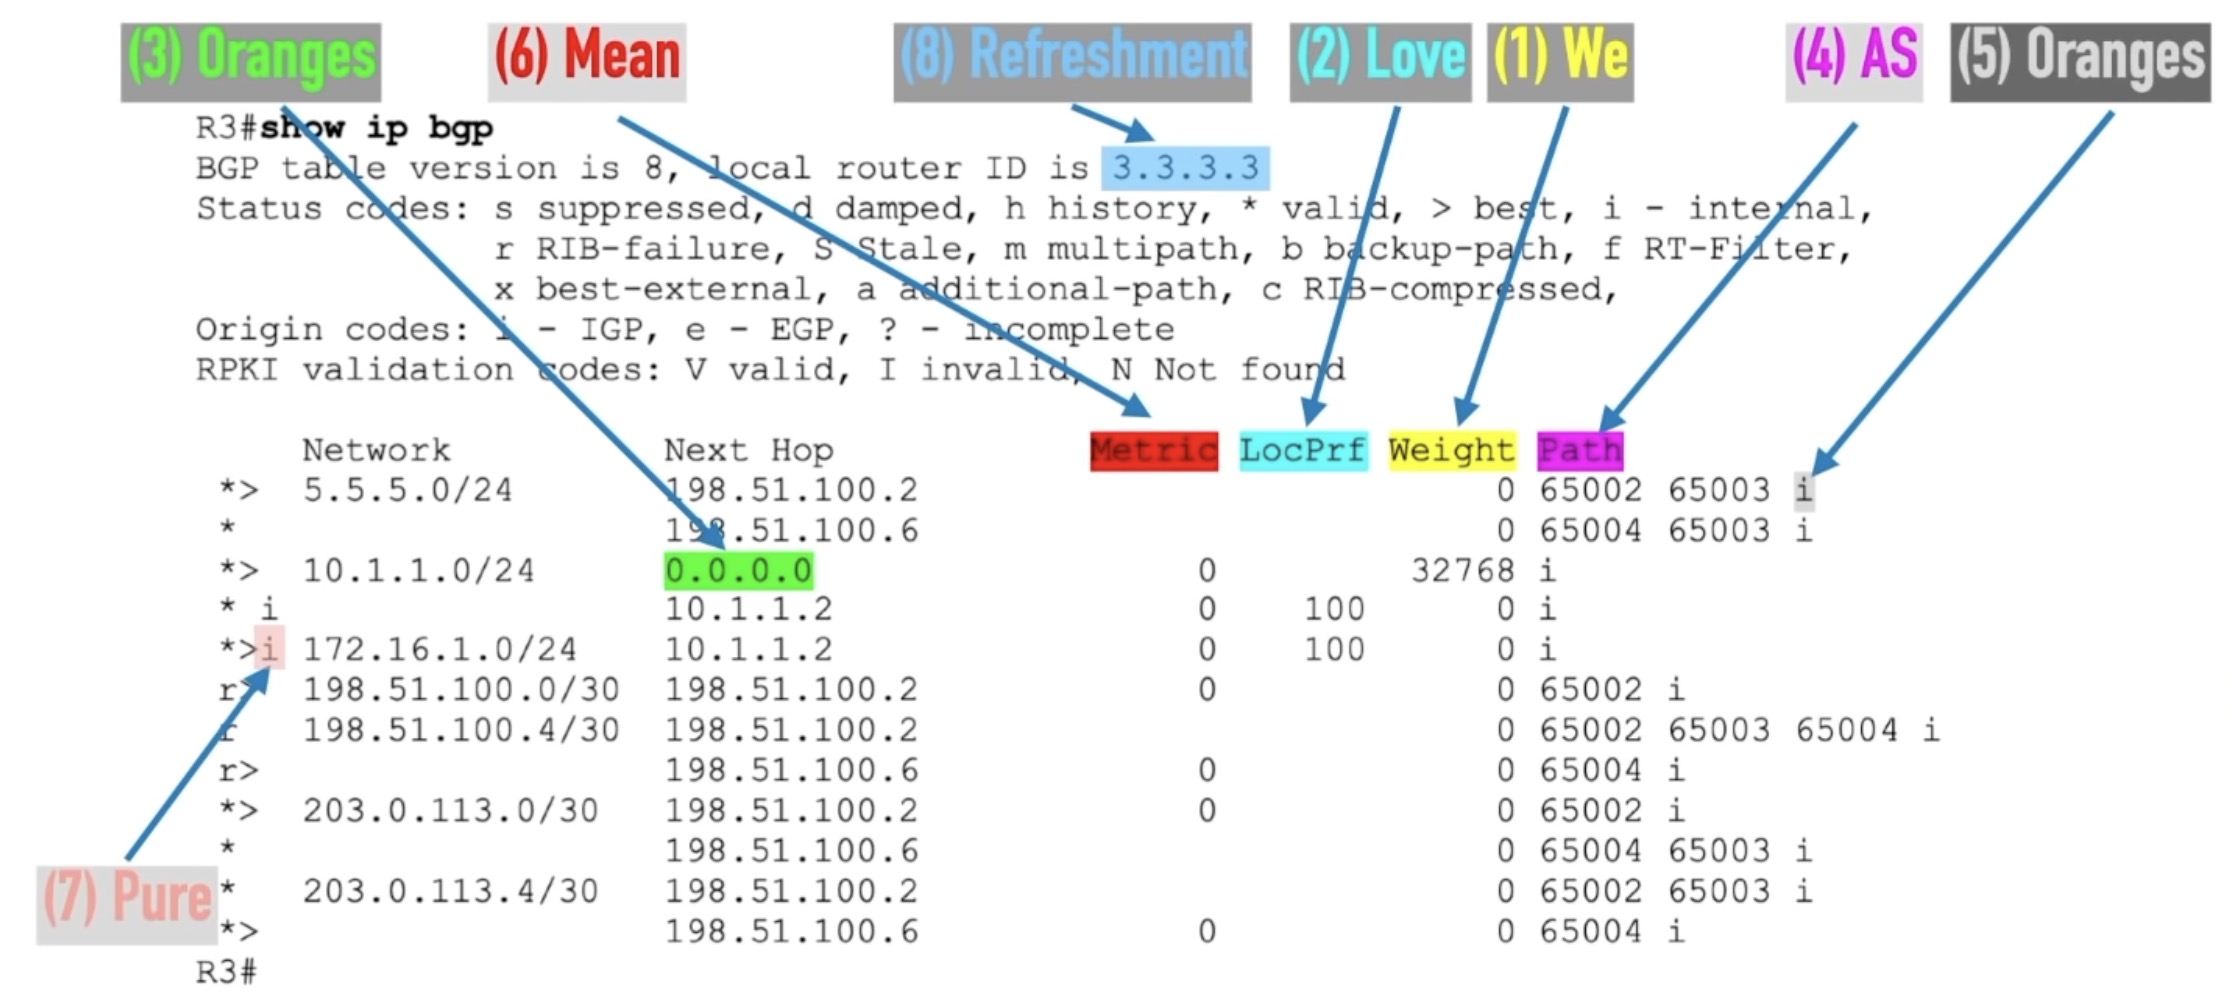
REMEMBER: A commonly-used mnemonic about the
- We Love Oranges As Oranges Mean Pure Refreshment
which translates to path attributes:
- Weight, Local Pref, Originate, AS_Path length, Origin type, MED, Paths, RouterID
-
We: Weight is a locally significant parameter that a Cisco-specific router can set when receiving updates. Commonly used to influence outbound routing decisions (based on bandwidth). A higher weight is preferred.
-
Love: Local Preference is considered right at the start of the best-path algorithm, and as such, is an optimal tuning parameter. It’s considered throughout a single AS. This is used for both Inbound and Outbound tuning. Higher values are preferred.
-
Oranges: Originate specifies paths sourced locally are preferred.
-
As: AS_Path Length (like a hop count) is the number of AS in the AS_PATH attribute – a concatenation of all the AS numbers the advertisement has passed through. It’s used as a loop avoidance mechanism and as an indication of distance on the other. Prepending influences incoming. This is used for both Inbound and Outbound tuning. Shorter AS_Path lengths are preferred.
-
Oranges: Origin Type indicates how the route was injected into BGP i (network command) is preferred to e (EGP) is preferred to ? (redistributed).
-
Mean: MED (Multi-Exit Discriminator) uses a metric as well. MED is typically used by an AS which is multi-homed to instruct an external AS it is peered with). That makes for a preferred entry point for a particular network address block. MED can be used for inbound tuning. Lower metric values are preferred.
-
Pure: Paths - prefer eBGP over iBGP path.
-
Refreshment: Router ID - a tie breaker. The lowest router ID is preferred.
mrrobot.md
The idea for this article came to me while re-watching the TV series Mr. Robot (from 2015) now streaming on Amazon Prime.
I think a big reason for the popularity of the show (rated 8.5/10) is due to its technical advisor – cybersecurity superstar Michael Bazzell, whose https://inteltechniques.com – my most useful and thorough resource on defending privacy.
At the end of this deep-dive article, the key takeaway from this article should be about how Developers, Security, Network Engineers, Performance Engineers, Operations, Customer Support, and others must go out of their way to help each other rather than being isolated cogs who don’t feel a need to actively collaborate with others.
This article identifies where that collaboration can occur.
PROTIP: The root cause of vulnerabilities within enterprises is complacency – a lack of the collaboration needed to be proactive toward preparing for war, manifested as DoS (Denial of Service) attacks.
The most malicious adversaries hit during the worst period of the year [black friday / cyber monday]).
Are You Dead Yet?
Minutes into the psycho-technical series’ first episode, one character mentions a “R.U.D.Y. attack”.
So below is how I would “mansplain” what that means (to excruiciating detail) instead of watching the damn show. ;)
RUDY is an acronymn for “aRe yoU Dead Yet” – the name of a tool hackers use to create Denial of Service attacks. (An example is at https://github.com/darkweak/rudy, written in the Go language).
A similar tool is at https://github.com/gkbrk/slowloris, written in the Python language. The program is named after slow lorises, a group of primates known for their slow movement. It’s exhausting watching them.
Incidious
Unlike other DoS (Denial of Service) attacks which flood target servers with traffic from many malicious clients, “low and slow” attack aims to exhaust server resources through long-running, incomplete requests.
The low traffic volume and slow rate (“low-and-slow” type) of RUDY attacks make them difficult to detect using conventional DDoS detection mechanisms which expect a high volume and fast rate of traffic.
The exploit “sends long HTTP POST requests to the target server, but breaks the request body into small packets sent at a very slow rate (e.g. one byte every 10 seconds). This slow rate of sending the request body prevents the server from closing the connection, forcing it to keep the connection open and wait for the full request.”
Apache web servers have a finite pool of processing threads available to handle connections with the clients it serves. When the maximum number of possible connections that a server can handle is reached, additional connections cannot be established. And thus a denial-of-service attack is successful.
Thus, the havoc that they cause is difficult to detect and mitigate.
A single hacker machine can use the tools to take down even a large targeted Apache web server because the attack requires minimal bandwidth.
That’s why I have a feeling we’ll see state-sponsored actors use such tools for cyber warfare - to shut down websites of value to society.
Monitoring needed
On the road to collapse, low-level attacks run up a large server bill for those attacked.
PROTIP: Track monthly spend by service within each region to identify trends and anomalies using AWS Cost Explorer against a budget. Investigate the root cause of upward trends and sudden spikes: are they due to higher rates? Are costs consistent with the amount of work processed?
PROTIP: Security Red Teams: you would be wise to see what impact the “low and slow” attack mechanisms might have and whether (and how fast) defensive mechanisms perform against them.
Pair up with Performance Engineers who know how to setup large-scale systems running with insightful metrics and visualizations.
This would be the case even after the organization upgrades to newer technologies, to verify whether the changes really can block the attacks.
Within AWS, a CloudWatch metric name is specified when creating Web ACL (Access Control List) rules.
Metrics
QUESTION: How do you know whether a low-level attack is not already at work on your system?
One sign of such an attack are connection log entries containing HTTP 408 error codes in the server log (“-“ 408 156 “-“ “-“).
PROTIP: The circumstances when a server becomes exhausted can be predicted by watching the relationship between three metrics captured about each system:
L = the average number of connections being used by the system
λ (lambda) = the average arrival rate of new requests arriving
W - the average dwell time a customer spends in the system
Knowing two enables the third to be calculated using the formula L = λ * W (called “Little’s Law”).
The longer each customer spends in a system, the less connections are possible.
QUESTION: Are such metrics obtained for your servers?
PROTIP: Automatically sound an alarm when a spike occurs in connections, rates, dwell time, and spend.
SIEM tool New Relic has a “application response time” metric that includes “Request Queue”. To collect “request queuing time”, each HTTP request must be marked with a timestamp when queuing starts by adding an HTTP header by configuring the Apache httpd.conf file:
RequestHeader set X-Request-Start "%t"
Apache Server Configuration
Several vendors and commenters offer ways to reduce the effectiveness of “low and slow” attacks:
-
Limit the maximum number of connections each IP address is allowed to make
-
Limit the maximum time a client is allowed to stay connected
-
Restrict connections with slow transfer speeds
Notice that this assumes that each individual client connection is analyzed and managed. And there can be thousands of them at once.
Individual servers can be configured, but hackers have gotten wise to them:
-
Apache module “mod_antiloris” rejects a same IP that creates more than, by default, 10/20+ connections.
“But the IP in the attack here are only creating 3-4 connections max.”
-
From Apache version 2.2.15, Apache module “mod_reqtimeout” is enabled with default:
RequestReadTimeout header=20-40,minrate=500 body=10,minrate=500
Rather than being held open indefinitely, servers can be configured to timeout connections automatically based on a threshold.
-
QUESTION: What can be done to restrict connections with slow transfer speeds?
This would require a program that can track and analyze the behavior of each IP address, which is a daunting task explained below.
Increasing capacity may not help
Administrators can buy some time by adding additional servers and, on each Apache server, increase the number of MaxRequestWorkers in the mpm_prefork.conf configuration file.
However the number of attackers can also increase. In a DDoS (Distributed Denial of Service) attack, hackers use thousands of devices that have been compromised to direct traffic toward a single site.
Mitigation: Upgrade the Tech
Articles by reverse proxy vendors Cloudflare and Wallarm do not mention tech upgrades to more advanced technologies to stop such attacks:
-
Upgrade from Apache to NGINX and lightpd web servers which are not designed to have maximum connections. Instead, they use worker threads which has no limit on the number of connections they can handle. Monitors of Apache connections show that the majority of the active connections are ‘Sending’ or ‘Receiving’ data from the client.
Unlike with Apache, NGINX/Lighttpd ignore incomplete requests by letting them run in the background, which does not use up system resources.
-
Upgrade from use of HTTP protocol 1.1 to HTTP 2, which does not hold long sessions.
PROTIP: The above advances have been available for several years. So essentially, “low and slow” attacks on an organization take advantage of that organization’s inability to modernize quickly enough. Implementing the above involves changes to application programming code. The job of a CISO is to recognize this and rally the organization from the top down.
The rest of this article examines what can be done technically with legacy Apache web server software.
But we have an IPS
An Intrusion Protection System (IPS) does not detect and mitigate against “low and slow” attacks because IPS works on ISO network layer 3 and 4 (switching, routing, and transport), which differentiate the “signatures” among different sessions and users.
Reverse Proxies
A Reverse Proxy provides broader functionality beyond just security, such as load balancing, caching, SSL termination, and routing requests to different backend servers.
Proxying servers and caching accelerators such as Varnish, nginx, and Squid mitigate this particular kind of attack.
Cloudflare is a cloud-based service that functions as a “reverse proxy” protecting the origin server. When all traffic goes first to their 248 Tbps network, working servers would receive traffic only from Cloudflare’s IP-ranges. The working network can then disallow all access EXCEPT those that belong to CloudFlare.
A similar service is Corero’s SmartWall ONE™ appliance which slots “behind” edge routers to sample and inspect traffic. If DDoS is detected, it orchestrates mitigation directly on the routers.
Many organizations use both Reverse Proxies also use a WAF as part of a layered security approach for their web infrastructure.
Web Application Firewall
A WAF (Web Application Firewall) works at the “Application” level of the network (at what is called Level 7) where they can examine various protocols.
A WAF typically operates in front of a load balancer which allocates traffic among several physical servers, analyzing all communications before they reach the app or the end-user.

HANDS-ON: Let’s create the above within the AWS cloud so we have a practical understanding.
Using your default browser:
- Create a Root AWS account using your email.
- Lock down the root account and configure an IAM user to login with.
-
Setup AWS Route 53 for DNS of a custom host name.
-
View This video by Rahul Wagh on how to, step-by-step, manually to setup a VPC, Internet gateway, Subent, Route table. Launch an Ubuntu t2.micro EC2 Instances with an Apache web server invoking these commands on start:
```#!/bin/bash yes | sudo apt update yes | sudo apt install apache2 echo “<h1>Server Details</h1><p>Hostname: ${hostname}
</p><p>IP Address: $(hostname -l | cut -d’ ‘ -f1)</p>” > /var/www/html/index.html sudo systemctl restart apache2 ```
WARNING: This is the simplest verification of the simplest mitigation. See the section about enterprise-level Mitigation Testing below.
- 10:50 - Implement EC2 Target Group (using HTTP 1.1)
-
Create internet-facing IPv4 Application Load Balancer with a Security Group for unencrypted HTTP traffic through port 80 and SSH for TCP 22 remote Terminal access.
WARNING: Production environments need to always use HTTPS with a TLS certificate.
- Copy and paste the DNS Name as the URL to reach the test environment.
-
PROTIP: In the Amazon Console GUI, VIDEO: instead of searching for WAF, bring up the “WAF & Shield” AWS service with this URL:
https://console.aws.amazon.com/wafv2/homev2/web-acls
NOTE: AWS automatically adds the default AWS Region of your account to the URL.
If the region appearing is not your default region, change it on the upper-right of the screen. REMEMBER: When fronting Amazon CloudFront applications, you must use the API endpoint listed for us-east-1 = US East (N. Virginia).
AWS WAF, Shield, Firewall Manager
Within the AWS (Amazon Web Services) cloud are several security services which work together:
-
AWS WAF - see https://aws.amazon.com/waf
-
AWS Shield Advanced (subscription for additional cost) is an AWS-managed service that comes with dedicated support from the Shield Response Team (SRT) to enhance WAF with advanced event visibility for high visibility websites using Amazon EC2 instances, Elastic Load Balancing load balancers, CloudFront distributions, Route 53 hosted zones, and AWS Global Accelerator standard accelerators.
-
AWS Firewall Manager applies a central configuration across several accounts and resources. For a $100 per month per region per policy ($110 in UAE, $120 in Jakarta and Zurich).
-
-
 AWS has a “classic” WAF. But we use “WAF” on the top of the menu, which is referenced in AWS documentation as WAFv2 (version 2).
 -
Although Web ACLs are global, the region where resources the WAF acts on needs to be specified.
-
REMEMBER: The Web ACL Name and Metric Name cannot be changed after creation.
PROTIP: Include in the Name the date, such as “241231” for December 31, 2024.
-
Click “Add AWS resources” to attach the downline service. Notice there are two categories:
- AWS CloudFront CDN distribution
- “Regional resources” (does not work with AWS Outposts)
In the sample video, select “Regional resources” for the Application Load Balancer defined earlier. Next.
NOTE: The WAF can handle HTTP protocol Requests going into several other AWS services not applicable to this example:
- Amazon API Gateway REST API (to mobile apps)
- AWS App Runner service
- AWS AppSync GraphQL API
- Amazon Cognito user pool
- AWS Verified Access instances

Rule Groups
-
Click “Add rules and rule groups”, then within Rules: Add Rules pull-down, select “Add managed rule groups”: VIDEO:
BLOG: By default, AWS WAF doesn’t provide rules.
Rule groups is the “beating heart” of any WAF. Rule Group s are reusable collections of rules that can be used within WAF ACLs.
PROTIP: Selection of rule groups is not a trivial decision because it involves complex triangulation among several tradeoffs: affordability, vendor trust, what vulnerabilities to mitigate.
-
Click “AWS managed rule group”. Don’t click “Add to web ACL” yet. We’ll come back to these:

QUESTION: How does “Account takeover prevention” work and why is is necessary when there are Role-based permissions? This mitigates adversaires who VIDEO: use the Burp Suite FoxyProxy browser extension to inject passwords from the list of popular passwords.
QUESTION: What is the difference between “Common” and “Targeted”?
-
If you are experimenting, scroll down to “Free role groups”. By “free” AWS means no additional vendor charges.

-
Toggle the “Add to web ACL” associated with each Rule set applicable to your environment.
-
Amazon IP reputation list provides a minimal protection against known bot networks. “Amazon Threat Intelligence” is one of several groups that constantly monitor the internet for them.
-
Core rule set for what OWASP has identified among Top 10 vulnerabilities in web applications. Notice that the 700 units make it among the most compute intensive of choices.
-
Know bad inputs - QUESTION: how does that work?
-
Activate one for the operating system (POSIX, Windows).
-
Activate one for the language you use (PHP, WordPress, etc.).
-
-
Consider capacity limits.
Among many Quotas related to WAF, there is a limit of up to 100 Web ACLs, 100 Rule Groups, and IP Sets each for each region.
WARNING: 100 Web ACLs is not very many.
One million requests divided by 30 days in the month is 33,333 per day.
Divided by the 100 rule limit, that’s 333 requests per rule per day with a region. That’s not many.
QUESTION: Please correct me if I’m wrong with this.
-
Consider costs. PROTIP: Please refer to the spreadsheet I created, available on Gumroad.
AWS charges for each ACL processed within each hour at the equivalent of $5 per month per region, or $0.0925925925926 (about 1 cent) per hour, assuming processing occuring 18 hours each of 30 days (540 hours). At the maximum of 100 WAF ACLs, that’s $50/month for each region.
Additionally,
AWS charges each Rule processed at $1 per month. Assuming 100 rules firing for 540 hours during the month, that’s $540 per month per region.
On top of that, published charges by Rule vendors are, for example:
-
Charge per month in each available region (pro-rated by the hour) $25 / unit
-
Charge per million requests in each available region $1 / unit
The “unit” refers to WCUs (WAF Capacity Units) unique to AWS.
-
-
Calculate WCUs.
WAF ACL Capacity Unit (WCU) Control
This sentence caused my brow to wrinkle and my head to spin:
“The WCUs used by the web ACL will be less than or equal to the sum of the capacities for all of the rules in the web ACL.”
What that means to me is that each rule is assigned a WAF Capacity Units (WCUs) used to manage capacity. The more complex a rule, the higher the WCU for that rule. For example, a simple size constraint rule statement uses fewer WCUs than a statement that inspects requests using a regex pattern set</a> at: https://console.aws.amazon.com/wafv2/homev2/regex-pattern-sets/new
QUESTION: I’m baffled as to how many WCUs to assign each rule.
-
Consider overage charges.
When more than 1,500 WCUs are incurred, instead of charging customers
$0.60 per million requests per month, customers are charged
$0.80 per million requests per month.WARNING: The AWS Price Calculator does not consider such overage costs.
On April 11, 2023 AWS upped the limit eligible for overage charges at 5,000 WCUs per web ACL. But customers can request a limit increase. QUESTION: What is the error message when that happens?
IP Sets
>IP Sets refer to a simple list of (up to 10,000) IP addresses to be allowed or blocked.
Bogon IP addresses
The WAF should ignore (filter out) “Bogon” or bogus IP addresses which should not be used over the public internet. But they are used in denial-of-service attacks.
There are now no more unallocated IP addresses, so Bogon now refers to use of addresses which RFC 5735 reserved for special use and “Martian” packets received by the kernel on a specific interface, while routing tables indicate that the source IP is expected on another interface (according to RFC 1812 routing rules).
VIDEO: Netgate documentation.
Other vendors
-
to click the toggle icon for each rule group you want to add to your Web ACL.
PROTIP: I’ve added to each vendor name a link to its Gartner Peer Insights page for Cloud Web Application and API Protection and TrustRadius, Upcity summarizes reviews of cybersecurity companies (everyone gets 5 stars).etc.
- Cloudbric Corp. (Korea)
- Cyber Security Cloud Inc. (AWS: Penta Security & WafCharm)
- F5 (which I’ve worked with since 1980)
- Fortinet
- GeoGuard
- Imperva G2
- ThreatSTOP
PROTIP: The above vendors are also listed among “AWS Marketplace managed rules” to buy rule groups maintained professionally by cybersecurity firms:
https://console.aws.amazon.com/wafv2/homev2/marketplace
PROTIP: Not on the list are famous vendors
- Akamai
- Cloudflare
- Fastly
Mitigation Testing
PROTIP: Verify each mitigation you add to ensure it actually works. For example, use the “known-bad” app DVWA (Damn Vulnerable Web Application) described in my article on OWASP Testing to VIDEO: verify whether F5’s WAF works.
Analyze Logs
Within “Web ACL” GUI there is a Query editor. For example: VIDEO:
fields action, @timestamp, @message
| filter httpRequest.clientIp="220.255.215.130"
| sort @timestamp desc
| limit 20
-
Scroll down to the “Default web ACL action for requests that don’t match any rule”.
IMPORTANT: The selection of “Allow” or “Block” is fundamental to the maturity level of the organization running AWS.
NOTE that those two replaces “Whitelist” and “Blacklist” for more cultural sensitivity.
Selecting “Allow” by default means relying completely on Rules defined to safeguard traffic. That’s not terrific but also terrifying. Miss one and your whole operation is open to hackers.
Selecting “Block” by default means that each user and app must be specifically specified, and unspecified when each user leaves the team or organization. Those who use VPNs would change the IP address frequently. That also will likely result in some complaints from developers and users. That requires more automation and staffing of a 24/7 operation. But mistakes with this approach doesn’t open your whole environment to hackers.
PROTIP: This is a good discussion prompt in an interview. How did the candidate’s previous employer collect IP addresses dynamically to open up the network to each downline service and user?
PROTIP: Selecting Count is a good move to analyze the impact of rules defined before productive use. Use this for general monitoring and also to test your new web request handling rules. A toggle can be defined in Terraform to easily select this.
Distinguish Friend from Foe
To avoid slamming the door on legitimate (but slow moving) actual users, blanket automatic timeouts need to be set based on observations of real traffic patterns by emulating the full mix of users under load.
That’s the job of Performance Engineers. The cutoff threshold can vary depending on the efficiency of the hardware and the processing mix.
PROTIP: Here is an opportunity for proactive collaboration: when a slow connection is identified to a real customer, have Customer Service reach out to that customer to investigate whether it’s a bad network, slow computer, or not enough training.
This would require storing the IPs of known-slow users can be tracked so that they are exempted when blocking IP addresses which respond slower than a cutoff threshold.
More than HTTP/IP traffic
At the Application layer, WAF can examine all protocols to detect security issues:
-
DNS per-request login by https://www.f5.com/glossary/web-application-firewall-waf
-
FTP (File Transfer Protocol)
-
SMTP time protocol UTP flood
-
-
Select the vulnerabilities to catch.
WAF ACL Rules for OWASP
Fortinet, Cloudbric Corp., Cyber Security Cloud Inc., F5 provide WAF rules to identity some of the attacks identified among the OWASP Top 10 listing the most seen web application vulnerabilities. As of 2022:
-
SQL Injection attacks target databases by inserting malicious code into website input fields. This can allow hackers to delete, change or take control of the database, leading to data loss and system compromise.
-
XML External Entities (XXE)
WARNING: Looking at Customer Reviews of the above reveal a common complaint:
“Why did that particular IP address get blocked? I can’t correlate the rule id that shows up in a log file with a rule name that’s understandable by a human.”
“False positives” take time and expertise to resolve.
Rule criteria
Within each rule, the criteria in such rules include known malicious IP addresses, geographical origins, length of query strings, SQL code, etc.
???
-
-
Switch to a Terminal to check WCU requirements for a set of rules:
aws wafv2 check-capacity
Run the above AFTER running my mac-setup bash script to setup the aws command and support utilities.
Other vidoes about AWS WAF:
- “Hands-on: Deploy AWS WAF on ALB and setup WAF Rules” by StormIT
- ” AWS WAF Tutorial | Understanding AWS WAF, Acl, Rule, WCU and implementation for CloudFront by DumbTutorials
- AWS Web Application Firewall (WAF) config by Loi Liang Yang</a> (loiliangyang.com), demo
- Rahul Wagh
- F5 DevCentral
- Cybr
- https://www.linkedin.com/advice/1/what-top-web-application-firewalls-waf-protecting-dkjle?trk=contr
Manual GUI Console forbidden
More and more enterprises do not allow manual use of GUI on production resources.
This is despite tracking of changes made.
That’s because changes using the web Console GUI are not repeatable. It’s difficult for one person to create the same exact configuration. Accurace and precise documentation are difficult to follow. It’s too easy to miss a step.
IaC Automation
Instead, storage of Infrastructure as Code (IaC) specifications in GitHub enables collaboration and tracking of who made what change, and when. There are two approaches:
They both reference the (at last count) 54 actions defined for AWS WAFV2 API from ovember, 2019 at: https://docs.aws.amazon.com/waf/latest/APIReference/API_Operations_AWS_WAFV2.html and 128 datatypes at https://docs.aws.amazon.com/waf/latest/APIReference/CommonErrors.html See the Developer Guide at https://docs.aws.amazon.com/waf/latest/developerguide/what-is-aws-waf.html
REMEMBER: AWS has defined a Quota for the Maximum number of calls of
- 5 request per second to any individual Get or List action, if no other quota is defined for it
- 1 request per second specifically to GetWebACLForResource and ListResourcesForWebACL (which can return a lot of information)
- 1 request per second to any individual Create, Put, or Update action, if no other quota is defined for it
- 2 request every 2 seconds specifically to AssociateWebACL and DisassociateWebACL
Terraform for AWS WAF
In his article on Medium, Prashant Bhatasana explains his
https://github.com/LazziBear/terraform-aws-WAFv2 which setups up a WAF service using Terraform.
So in this article we present links to documentation about use of each Terraform module associated with each GUI menu item shown above:
| AWS WAF Menu Item | Terraform module | Notes |
| —————– | —————- | —– |
| Web ACLs (Access Control Lists) | aws_wafv2_web_acl | - |
| Bot Control | aws_wafv2_web_acl_association &
aws_wafv2_web_acl_logging_configuration | VIDEO |
| IP sets | aws_wafv2_ip_set | - |
| RegEx pattern sets | aws_wafv2_regex_pattern_set | - |
| Rule groups | aws_wafv2_rule_group | - |
with a set of AWS WAF rules that filters traffic for web-based attacks. blocks requests that don’t match the rules.
This solution uses logs for the ALB resource. The Scanner & Probe Protection rule in this solution inspect these logs.
The specify protective features to include are defined in https://registry.terraform.io/providers/hashicorp/aws/latest/docs/resources/wafv2_web_acl Terraform HCL</a> or
We require AWS IAM API keys (access and secret keys) with full access to create AWS WAF/ AWS WAF rules.
In front of a Load Balancer which allocates traffic among various web services.
Need the
variable "region" {
  description = "AWS Deployment region.."
  default = "us-east-1"
}
variable "aws_lb_arn" {
  description = "ARN of your LoadBalance that you want to attach with WAF.."
}
??? aws_wafv2_web_acl.WafWebAcl
The Terraform module contains:
resource "aws_cloudwatch_log_group" "WafWebAclLoggroup" {
  name = "aws-waf-logs-wafv2-web-acl"
  retention_in_days = 30
}
resource "aws_wafv2_web_acl_logging_configuration" "WafWebAclLogging" {
  log_destination_configs = [aws_cloudwatch_log_group.WafWebAclLoggroup.arn]
  resource_arn = aws_wafv2_web_acl.WafWebAcl.arn
  depends_on = [
    aws_wafv2_web_acl.WafWebAcl,
    aws_cloudwatch_log_group.WafWebAclLoggroup
  ]
}
resource "aws_wafv2_web_acl_association" "WafWebAclAssociation" {
  resource_arn = var.aws_lb_arn
  web_acl_arn  = aws_wafv2_web_acl.WafWebAcl.arn
  depends_on = [
    aws_wafv2_web_acl.WafWebAcl,
    aws_cloudwatch_log_group.WafWebAclLoggroup
  ]
}
Security Automations for AWS WAF
AWS offers a managed service: “Security Automations for AWS WAF” to deploy AWS WAF rules and IP Sets (preconfigured by AWS people) to filter common web-based attacks.
The diagram below shows the solution using Python-driven Lambda functions:

-
At the bottom of the diagram: (B) & (C) - Allow and Denied list of IP addresses defined by AWS influence routing of AWS Lambda processing by Amazon EventBridge.
-
At the top of the diagram: Without having to write your own rule, AWS-Managed (A) AWS Managed Rules provide Rules IP reputation rule groups, baseline rule groups, and use-case specific rule groups to protect against exploitation of common application vulnerabilities or other unwanted traffic, including those described in OWASP publications - (D) SQL Injection and (E) XSS.
-
WAF logs are streamed to an Amazon Kinesis Data Firehose, which partitions Traffic information into various S3 buckets.
-
The WAF Log Parser Lambda function generates Scanner and Probe WAF Rules and IP Sets and mitigate HTTP Flood.
-
App Access logs from the Application Load Balancer are partitioned into S3 for it as well.
-
A IP Lists Parser Lambda function generates IP Reputation Lists based on events captured within Amazon CloudWatch.
-
An Access Handler Lambda function configures a Bad Bot honeypot based on Amazon API Gateway. It’s a security mechanism intended to lure and deflect an attempted attack.
To get the solution working:
-
Make “OS-level configuration” by installing Python.
-
git clone the solution’s GitHub repo (containing AWS CloudFormation templates) to:
https://github.com/aws-solutions/aws-waf-security-automations/tree/main/deployment
-
aws-waf-security-automations.template is the “main” template used as the entry point to launch the solution in your account. The default configuration deploys an AWS WAF web ACL with preconfigured rules that are customized for each organization.
-
aws-waf-security-automations-webacl.template provisions AWS WAF resources including a web ACL, IP, sets and other associated resources.
-
aws-waf-security-automations-firehose-athena.template provisions resources related to AWS Glue, Athena, and Firehose. It’s created when you choose either the Scanner & Probe Athena log parser or the HTTP Flood Lambda or Athena log parser.
-
-
Setup Python and run unit test of Python modules in the source folder:
-
Identify the version-code of the package at:
https://github.com/aws-solutions/aws-waf-security-automations/releases
-
Define variables for build-s3-dist.sh:
# The S3 bucket location where the templates are stored:
template-bucket=""
# Name for location where the Lambda source code is deployed, with '-[region_name]' appended to the bucket name:
source-bucket-base-name=""
# Name of the solution (for consistency):
trademarked-solution-name="Security Automations"
# Version of the package
version-code="4.0.3"
-
Run build-s3-dist.sh
cd deployment
chmod +x build-s3-dist.sh
./build-s3-dist.sh "$source-bucket-base-name" "$trademarked-solution-name" "$version-code"
References:
- https://docs.aws.amazon.com/solutions/latest/security-automations-for-aws-waf/cost.html
- Implementation Guide
- https://docs.aws.amazon.com/prescriptive-guidance/latest/patterns/deploy-the-security-automations-for-aws-waf-solution-by-using-terraform.html
Other Cloud Vendors
https://www.gartner.com/reviews/market/cloud-web-application-and-api-protection/vendor/microsoft/product/azure-front-door
https://www.gartner.com/reviews/market/cloud-web-application-and-api-protection/vendor/google/product/google-cloud-armor
References:
- Advanced WAF
-
Add Intrusion Prevention or Intrusion Detection virtual appliances to secure protocols and to take preventive/corrective action.
- Assign
-
Configure Privileged Identity access management solutions to monitor and audit access by Administrators of your VPC.
-
Add anti-virus for cleansing specific EC2 instances inside a VPC. Trend micro offers a product for this.
- http://harish11g.blogspot.com/2015/06/best-practices-tips-on-amazon-web-services-security-groups-aws-security-managed-services.html
AMS needs to set limits http://docs.aws.amazon.com/AmazonVPC/latest/UserGuide/VPC_Appendix_Limits.html
AWS Networking Certification
AWS Certified Advanced Networking - Specialty exam ANS-C01 https://aws.amazon.com/certification/certified-advanced-networking-specialty/
PDF: Domains and Task Statements:
-
Network Design 30%
-
Network Implementation 26%
-
Network Management and Operation 20%
-
Network Security, Compliance, and Governance 24%
4.1: Implement and maintain network features to meet security and compliance needs and requirements.
- Threat models
- Securing app flows
- Securing inbound traffic flows into AWS (AWS WAF, AWS Shield, Network Firewall)
- Securing outbound traffic flows from AWS (for example, Network Firewall, proxies, Gateway Load Balancers)
- Securing inter-VPC traffic within an account or across multiple accounts (security groups, network ACLs, VPC endpoint policies)
- Implementing an AWS network architecture to meet security and compliance requirements (untrusted network, perimeter VPC, three-tier architecture)
- Developing a threat model and identifying appropriate mitigation strategies for a given network architecture
- Testing compliance with the initial requirements (failover)
4.3: Implement and maintain confidentiality of data and communications of the network:
- Network encryption options that are available on AWS
- VPN connectivity over Direct Connect
- Encryption methods for data in transit (IPsec)
- Network encryption under the AWS shared responsibility model
-
Security methods for DNS communications (DNSSEC)
- network encryption methods to meet application compliance requirements (IPsec, TLS)
- encryption solutions to secure data in transit (for example, CloudFront, Application Load Balancers and Network Load Balancers, VPN over Direct Connect, AWS managed databases, Amazon S3, custom solutions on Amazon EC2, Transit Gateway)
- a certificate management solution by using a certificate authority (ACM, AWS Certificate Manager Private Certificate Authority [ACM PCA])
- secure DNS communications
-
Professional experience using AWS technology, AWS security best practices, AWS storage options and their underlying consistency models, and AWS networking nuances and how they relate to the integration of AWS services.
-
Knowledge of advanced networking architectures and interconnectivity options [e.g., IP VPN, multiprotocol label switching (MPLS), virtual private LAN service (VPLS)].
-
Familiarity with the development of automation scripts and tools. This should include the design, implementation, and optimization of the following: Routing architectures (including static and dynamic); multi-region solutions for a global enterprise; highly available connectivity solutions (e.g., AWS Direct Connect, VPN).
-
Knowledge of CIDR and sub-netting (IPv4 and IPv6); IPv6 transition challenges; and generic solutions for network security features, including AWS WAF, intrusion detection systems (IDS), intrusion prevention systems (IPS), DDoS protection, and economic denial of service/sustainability (EDoS).
More on Amazon
This is one of a series on Amazon:
- AWS Cloud Services Comparisons
- AWS Well-Architected Cloud
- AWS Cloud Services
- AWS IAM
- AWS CLI
- AWS On-boarding (GUI, CLI, API)
- AWS Security
- AWS Data Tools
- AWS DevOps (CodeCommit, CodePipeline, CodeDeploy)
- AWS server deployment options
- AWS CDK
- Build load-balanced servers in AWS EC2
- AWS Networking
- AWS Xray
- IoT on AWS
- AWS Lambda
- AWS Lambda
More on DevOps
This is one of a series on DevOps:
- DevOps_2.0
- ci-cd (Continuous Integration and Continuous Delivery)
- User Stories for DevOps
- Git and GitHub vs File Archival
- Git Commands and Statuses
- Git Commit, Tag, Push
- Git Utilities
- Data Security GitHub
- GitHub API
- Choices for DevOps Technologies
- Pulumi Infrastructure as Code (IaC)
- Java DevOps Workflow
- AWS DevOps (CodeCommit, CodePipeline, CodeDeploy)
- AWS server deployment options
- Cloud services comparisons (across vendors)
- Cloud regions (across vendors)
- Azure Cloud Onramp (Subscriptions, Portal GUI, CLI)
- Azure Certifications
- Azure Cloud Powershell
- Bash Windows using Microsoft’s WSL (Windows Subsystem for Linux)
- Azure Networking
- Azure Storage
- Azure Compute
- Digital Ocean
- Packer automation to build Vagrant images
- Terraform multi-cloud provisioning automation
-
Hashicorp Vault and Consul to generate and hold secrets
- Powershell Ecosystem
- Powershell on MacOS
- Jenkins Server Setup
- Jenkins Plug-ins
- Jenkins Freestyle jobs
- Docker (Glossary, Ecosystem, Certification)
- Make Makefile for Docker
- Docker Setup and run Bash shell script
- Bash coding
- Docker Setup
- Dockerize apps
- Ansible
- Kubernetes Operators
- Threat Modeling
- API Management Microsoft
- Scenarios for load
- Chaos Engineering